ESP FORD RANGER 2000 2.G Owners Manual
[x] Cancel search | Manufacturer: FORD, Model Year: 2000, Model line: RANGER, Model: FORD RANGER 2000 2.GPages: 240, PDF Size: 2.07 MB
Page 8 of 240
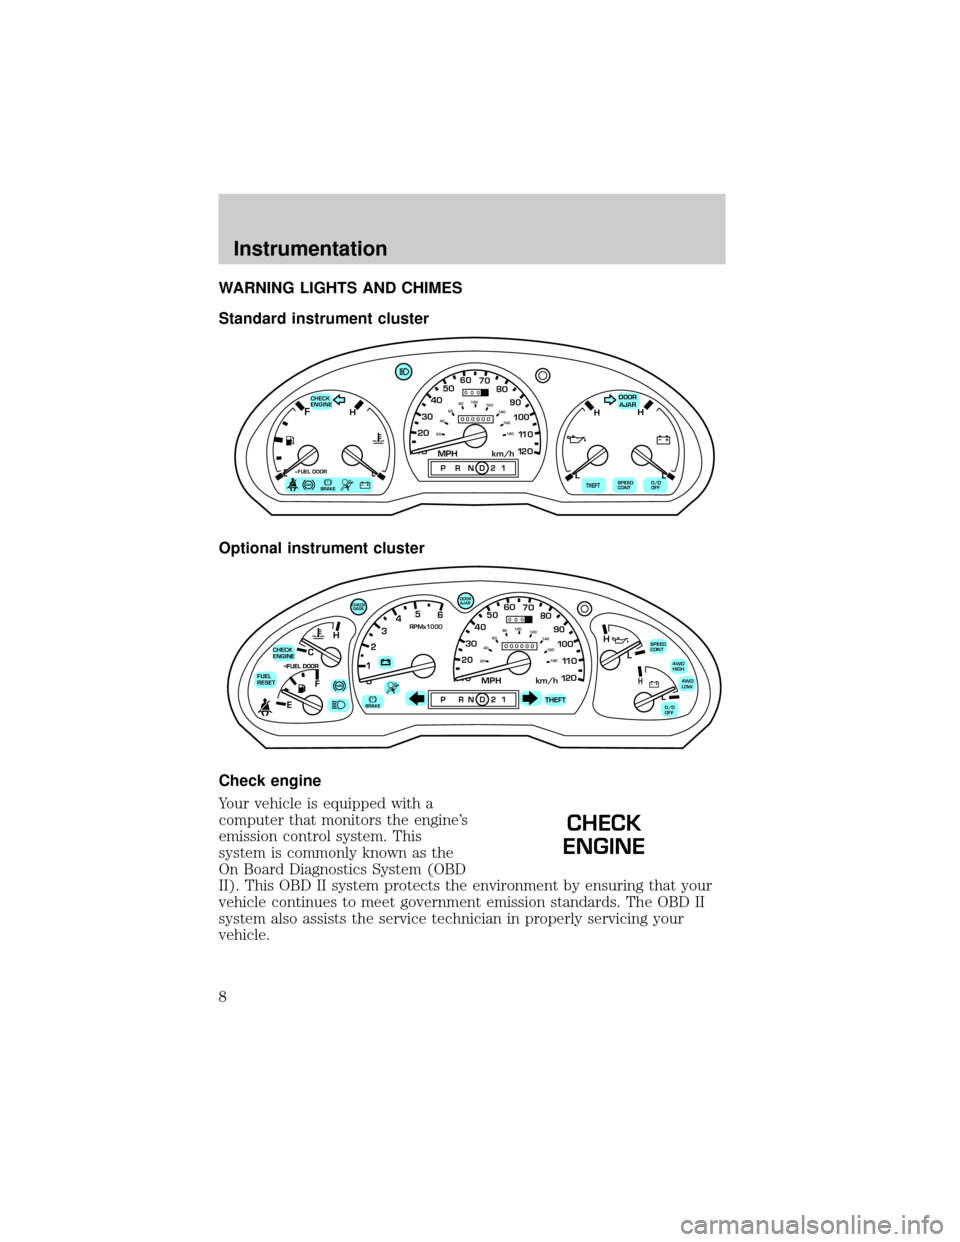
WARNING LIGHTS AND CHIMES
Standard instrument cluster
Optional instrument cluster
Check engine
Your vehicle is equipped with a
computer that monitors the engine's
emission control system. This
system is commonly known as the
On Board Diagnostics System (OBD
II). This OBD II system protects the environment by ensuring that your
vehicle continues to meet government emission standards. The OBD II
system also assists the service technician in properly servicing your
vehicle.
ABS
CHECK
ENGINEFH
H H
PRND21EL
DOOR
AJAR
LL
10MPH 205060
70
304080
90
km/h
0 0 0
10 100
1
20
1
0 0 0 0 0 0406080100
120
140
160
180
20
OFFTHEFT
C
012345
6
RPMx1000
ABS!BRAKE
CHECK
ENGINE
FUEL
RESET
EFH
H
H
PRN D 2 1THEFT
SPEED
CONT
4WD
HIGH
4WD
LOW
O/D
OFFL
L
10MPH 205060
70
304080
90
km/h
0 0 0
10 100
1
20
1
0 0 0 0 0 0406080100
120
140
160
180
20
DOOR
AJAR
CHECK
GAGE
CHECK
ENGINE
Instrumentation
8
Page 65 of 240
Changes or modifications not expressly approved by the party
responsible for compliance could void the user's authority to
operate the equipment.
Replacing the battery
The transmitter is powered by one coin type three-volt lithium battery
CR2032 or equivalent. Typical operating range will allow you to be up to
10 meters (33 feet) away from your vehicle. A decrease in operating
range can be caused by:
²weather conditions
²nearby radio towers
²structures around the vehicle
²other vehicles parked next to the vehicle
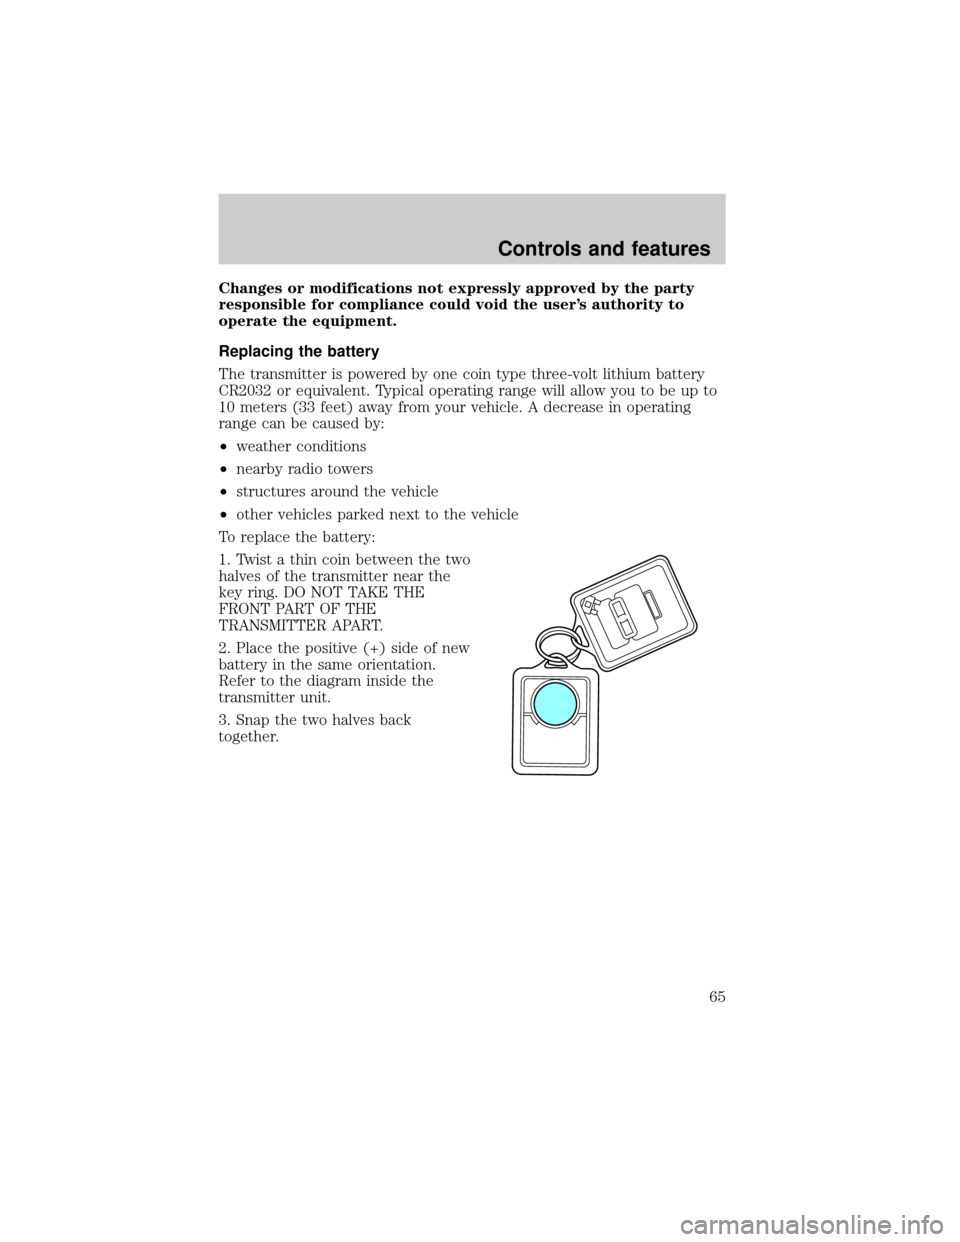
To replace the battery:
1. Twist a thin coin between the two
halves of the transmitter near the
key ring. DO NOT TAKE THE
FRONT PART OF THE
TRANSMITTER APART.
2. Place the positive (+) side of new
battery in the same orientation.
Refer to the diagram inside the
transmitter unit.
3. Snap the two halves back
together.
Controls and features
65
Page 74 of 240
The front outboard safety restraints in the vehicle are combination lap
and shoulder belts. The front passenger outboard safety belt has two
types of locking modes described below:
Energy Management Feature
²This vehicle has a seat belt system with an energy management
feature at the front outboard seating positions to help further reduce
the risk of injury in the event of a head-on collision.
²This seat belt system has a retractor assembly that is designed to pay
out webbing in a controlled manner. This feature is designed to help
reduce the belt force acting on the occupant's chest.
After any vehicle collision, the seat belt system at all outboard
seating positions (except driver, which has no ªautomatic locking
retractorº feature) must be checked by a qualified technician to verify
that the ªautomatic locking retractorº feature for child seats is still
functioning properly. In addition, all seat belts should be checked for
proper function.
BELT AND RETRACTOR ASSEMBLY MUST BE REPLACED if
the seat belt assembly ªautomatic locking retractorº feature or
any other seat belt function is not operating properly when checked
according to the procedures in Workshop Manual.
Failure to replace the Belt and Retractor assembly could
increase the risk of injury in collisions.
Vehicle sensitive mode
The vehicle sensitive mode is the normal retractor mode, allowing free
shoulder belt length adjustment to your movements and locking in
response to vehicle movement. For example, if the driver brakes
suddenly or turns a corner sharply, or the vehicle receives an impact of
approximately 8 km/h (5 mph) or more, the combination safety belts will
lock to help reduce forward movement of the driver and passengers.
Automatic locking mode
In this mode, the shoulder belt is automatically pre-locked. The belt will
still retract to remove any slack in the shoulder belt.
The automatic locking mode is not available on the driver safety belt.
Seating and safety restraints
74
Page 90 of 240
The safety belts for the driver and right front passenger seating
positions have been specifically designed to function together
with the air bags in certain types of crashes. When you turn OFF your
air bag, you not only lose the protection of the air bag, you also may
reduce the effectiveness of your safety belt system, which was
designed to work with the air bag. If you are not a person who meets
the requirements stated in the NHTSA/Transport Canada deactivation
criteria turning OFF the air bag can increase the risk of serious injury
or death in a collision.
Always use safety belts and child restraints properly. If a child in
a rear facing infant seat must be transported in front, the
passenger air bagmustbe turned OFF. This is because the back of the
infant seat is too close to the inflating air bag and the risk of a fatal
injury to the infant when the air bag inflates is substantial.
The vast majority of drivers and passengers are much safer with an air
bag than without. To do their job and reduce the risk of life threatening
injuries, air bags must open with great force, and this force can pose a
potentially deadly risk in some situations, particularly when a front seat
occupant is not properly buckled up. The most effective way to reduce
the risk of unnecessary air bag injuries without reducing the overall
safety of the vehicle is to make sure all occupants are properly
restrained in the vehicle, especially in the front seat. This provides the
protection of safety belts and permits the air bags to provide the
additional protection they were designed to provide. If you choose to
deactivate your air bag, you are losing the very significant risk reducing
benefits of the air bag and you are also reducing the effectiveness of the
safety belts, because safety belts in modern vehicles are designed to
work as a safety system with the air bags.
Read all air bag Warning labels in the vehicle as well as the other
important air bag instructions and Warnings in this Owner's Guide.
NHTSA deactivation criteria (excluding Canada)
1.Infant.An infant (less than 1 year old) must ride in the front seat
because:
²the vehicle has no rear seat;
²the vehicle has a rear seat too small to accommodate a rear-facing
infant seat; or
Seating and safety restraints
90
Page 93 of 240
SAFETY RESTRAINTS FOR CHILDREN
See the following sections for directions on how to properly use safety
restraints for children. Also seeAir Bag Supplemental Restraint System
(SRS)in this chapter for special instructions about using air bags.
Important child restraint precautions
You are required by law to use safety restraints for children in the U.S.
and Canada. If small children ride in your vehicle (generally children who
are four years old or younger and who weigh 18 kg [40 lbs] or less), you
must put them in safety seats made especially for children. Check your
local and state or provincial laws for specific requirements regarding the
safety of children in your vehicle.
Never let a passenger hold a child on his or her lap while the
vehicle is moving. The passenger cannot protect the child from
injury in a collision.
Always follow the instructions and warnings that come with any infant or
child restraint you might use.
When possible, always place children under age 12 in the rear seat of
your vehicle. Accident statistics suggest that children are safer when
properly restrained in the rear seating positions than in the front seating
positions.
Do not install a child seat in a center facing jump seat.
Children and safety belts
If the child is the proper size, restrain the child in a safety seat.
Children who are too large for child safety seats (as specified by your
child safety seat manufacturer) should always wear safety belts.
Follow all the important safety restraint and air bag precautions that
apply to adult passengers in your vehicle.
If the shoulder belt portion of a combination lap and shoulder belt can
be positioned so it does not cross or rest in front of the child's face or
neck, the child should wear the lap and shoulder belt. Moving the child
closer to the center of the vehicle may help provide a good shoulder belt
fit.
Seating and safety restraints
93
Page 102 of 240
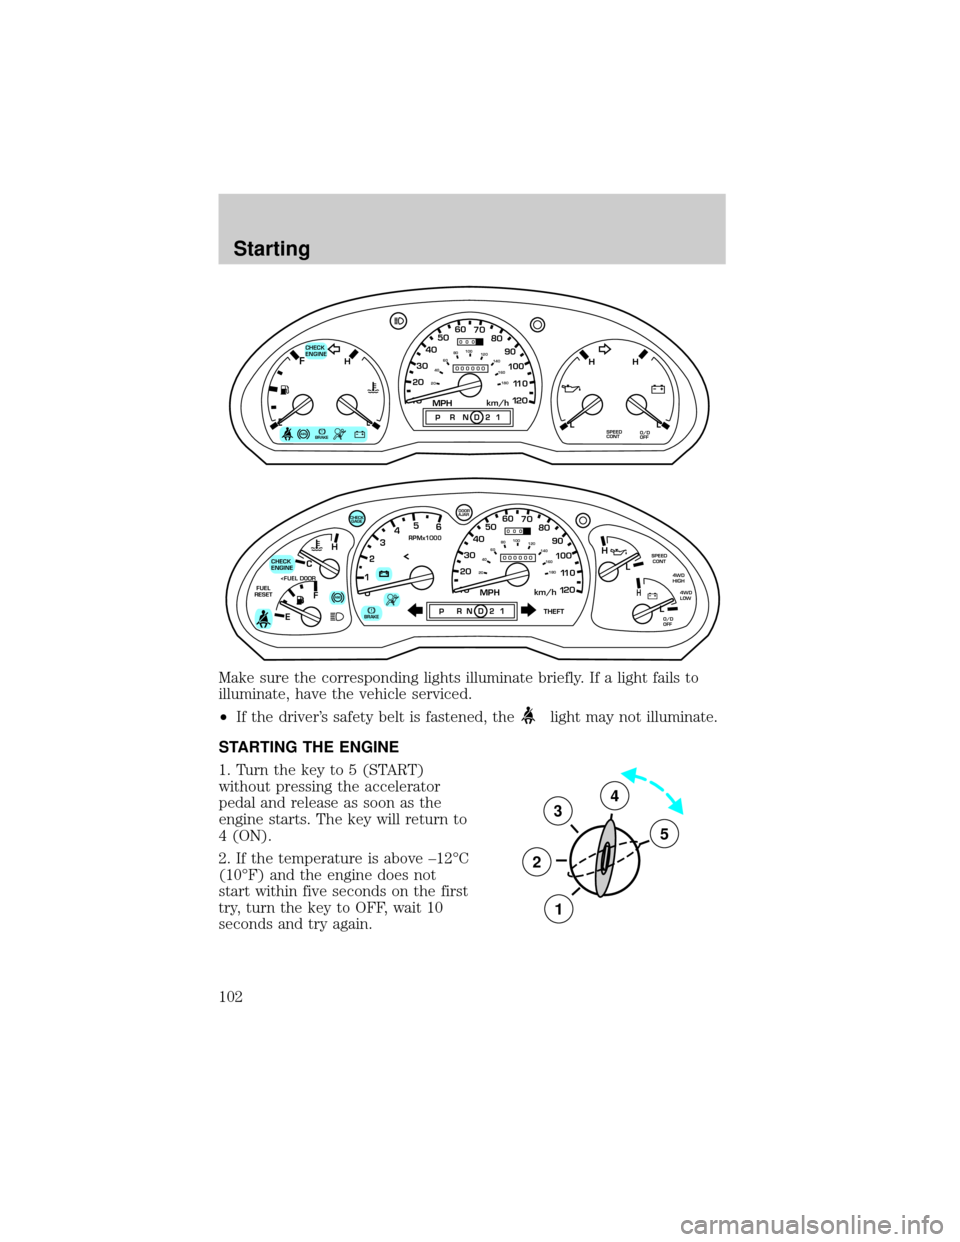
Make sure the corresponding lights illuminate briefly. If a light fails to
illuminate, have the vehicle serviced.
²If the driver's safety belt is fastened, the
light may not illuminate.
STARTING THE ENGINE
1. Turn the key to 5 (START)
without pressing the accelerator
pedal and release as soon as the
engine starts. The key will return to
4 (ON).
2. If the temperature is above ±12ÉC
(10ÉF) and the engine does not
start within five seconds on the first
try, turn the key to OFF, wait 10
seconds and try again.
ABS
CHECK
ENGINEFH
H H
PRND21ELSPEED
CONTO/D
OFFLL
10MPH 205060
70
304080
90
km/h
0 0 0
10 100
1
20
1
0 0 0 0 0 0406080100
120
140
160
180
20
!BRAKE
C
012345
6
RPMx1000
ABS
CHECK
ENGINE
FUEL
RESET
EFH
H
H
PRN D 2 1THEFT
SPEED
CONT
4WD
HIGH
4WD
LOW
O/D
OFFL
L
10MPH 205060
70
304080
90
km/h
0 0 0
10 100
1
20
1
0 0 0 0 0 0406080100
120
140
160
180
20
AJAR
CHECK
GAGE
!BRAKE
3
2
1
5
4
Starting
102
Page 104 of 240
If the engine fails to start using the preceding instructions
1. Press the accelerator pedal 1/3 to 1/2 of the way to floor and hold.
2. Turn the key to START position.
3. When the engine starts, release the key, then release the accelerator
pedal gradually as the engine speeds up.
4. If the engine still fails to start, repeat steps one through three.
5. After the engine starts, hold your foot on the brake pedal, put the
gearshift lever in gear and release the parking brake. Slowly release the
brake pedal and drive away in a normal manner.
Using the engine block heater (if equipped)
An engine block heater warms the engine coolant, which improves
starting, warms up the engine faster and allows the heater-defroster
system to respond quickly. Use of an engine block heater is strongly
recommended if you live in a region where temperatures reach -23ÉC
(-10ÉF) or below. Your engine block heater also comes with a battery
warmer. The battery warmer wraps around the battery and keeps the
battery warm when the engine block heater is plugged in.
For best results, plug the heater in at least three hours before starting
the vehicle. Using the heater for longer than three hours will not harm
the engine, so the heater can be plugged in the night before starting the
vehicle.
To prevent electrical shock, do not use your heater with
ungrounded electrical systems or two-pronged (cheater)
adapters.
Starting
104
Page 122 of 240
Maintain steering wheel control at all times, especially in rough terrain.
Since sudden changes in terrain can result in abrupt steering wheel
motion, make sure you grip the steering wheel from the outside. Do not
grip the spokes.
Drive cautiously to avoid vehicle damage from concealed objects such as
rocks and stumps.
You should either know the terrain or examine maps of the area before
driving. Map out your route before driving in the area. For more
information on driving off-road, read the ªFour Wheelingº supplement in
your owner's portfolio.
If your vehicle gets stuck
If the vehicle is stuck it may be rocked out by shifting from forward and
reverse gears, stopping between shifts, in a steady pattern. Press lightly
on the accelerator in each gear.
Do not rock the vehicle if the engine is not at normal operating
temperature or damage to the transmission may occur.
Do not rock the vehicle for more than a few minutes or damage
to the transmission and tires may occur or the engine may
overheat.
Do not spin the wheels at over 56 km/h (35 mph). The tires may
fail and injure a passenger or bystander.
Sand
When driving over sand, try to keep all four wheels on the most solid
area of the trail. Do not reduce the tire pressures but shift to a lower
gear and drive steadily through the terrain. Apply the accelerator slowly
and avoid spinning the wheels.
Mud and water
If you must drive through high water, drive slowly. Traction or brake
capability may be limited.
When driving through water, determine the depth; avoid water higher
than the bottom of the hubs (if possible) and proceed slowly. If the
ignition system gets wet, the vehicle may stall.
Once through water, always try the brakes. Wet brakes do not stop the
vehicle as effectively as dry brakes. Drying can be improved by moving
your vehicle slowly while applying light pressure on the brake pedal.
Driving
122
Page 123 of 240

After driving through mud, clean off residue stuck to the driveshafts and
tires. Excess mud stuck on tires and rotating driveshafts causes an
imbalance that could damage drive components.
If the transmission, transfer case or front axle are submerged in water,
their fluids should be checked and changed, if necessary.
Water intrusion into the transmission may damage the
transmission.
Replace rear axle lubricant any time the axle has been submerged in
water. The rear axle does not normally require a lubricant change for the
life of the vehicle. Rear axle lubricant quantities are not to be checked or
changed unless a leak is suspected or repair is required.
Driving on hilly or sloping terrain
When driving on a hill, avoid driving crosswise or turning on steep
slopes. You could lose traction and slip sideways. Drive straight up,
straight down or avoid the hill completely. Know the conditions on the
other side of a hill before driving over the crest.
When climbing a steep hill, start in a lower gear rather than downshifting
to a lower gear from a higher gear once the ascent has started. This
reduces strain on the engine and the possibility of stalling.
When descending a steep hill, avoid sudden braking. Shift to a lower gear
when added engine braking is desired.
When speed control is on and you are driving uphill, your vehicle speed
may drop considerably, especially if you are carrying a heavy load.
If vehicle speed drops more than 16 km/h (10 mph), the speed control
will cancel automatically. Resume speed with accelerator pedal.
If speed control cancels after climbing the hill, reset speed by pressing
and holding the SET ACCEL button (to resume speeds over 50 km/h [30
mph]).
Automatic transmissions may shift frequently while driving up steep
grades. Eliminate frequent shifting by shifting out of
(Overdrive) into
a lower gear.
Driving on snow and ice
A 4WD vehicle has advantages over 2WD vehicles in snow and ice but
can skid like any other vehicle.
Driving
123
Page 124 of 240

Avoid sudden applications of power and quick changes of direction on
snow and ice. Apply the accelerator slowly and steadily when starting
from a full stop.
When braking, apply the brakes as you normally would. In order to allow
the anti-lock brake system (ABS) to operate properly, keep steady
pressure on the brake pedal.
Allow more stopping distance and drive slower than usual. Consider
using one of the lower gears.
TRACTION-LOK AXLE (IF EQUIPPED)
This axle provides added traction on slippery surfaces, particularly when
one wheel is on a poor traction surface. Under normal conditions, the
Traction-Lok axle functions like a standard rear axle.
Extended use of other than the manufacturer's specified size tires on a
Traction-Lok rear axle could result in a permanent reduction in
effectiveness. This loss of effectiveness does not affect normal driving
and should not be noticeable to the driver.
To avoid injury, never run the engine with one wheel off the
ground, such as when changing a tire.
DRIVING THROUGH WATER
Do not drive quickly through standing water, especially if the depth is
unknown. Traction or brake capability may be limited and if the ignition
system gets wet, your engine may stall. Water may also enter your
engine's air intake and severely damage your engine.
If driving through deep or standing water is unavoidable, proceed very
slowly. Never drive through water that is higher than the bottom of the
hubs (for trucks) or the bottom of the wheel rims (for cars).
Once through the water, always try the brakes. Wet brakes do not stop
the vehicle as effectively as dry brakes. Drying can be improved by
moving your vehicle slowly while applying light pressure on the brake
pedal.
Driving through deep water where the transmission vent tube is
submerged may allow water into the transmission and cause
internal transmission damage.
Driving
124