spare tire FORD RANGER 2001 2.G Owners Manual
[x] Cancel search | Manufacturer: FORD, Model Year: 2001, Model line: RANGER, Model: FORD RANGER 2001 2.GPages: 272, PDF Size: 1.98 MB
Page 87 of 272
If your keys are lost or stolen you
will need to do the following:
²Use your spare key to start the
vehicle, or
²Have your vehicle towed to a
dealership or locksmith. The key
codes will need to be erased from
your vehicle and new key codes will need to be re-coded.
Replacing coded keys can be very costly and you may want to store an
extra programmed key away from the vehicle in a safe place to prevent
an unforeseen inconvenience.
The correctcoded keymust be used for your vehicle. The use of the
wrong type ofcoded keymay lead to a ªNO-STARTº condition.
If an unprogrammed key is used in the ignition it will cause a
ªNO STARTº condition.
Programming spare keys
A maximum of eight keys can be coded to your vehicle. Only
SecuriLockykeys can be used. To program acoded keyyourself, you
will need two previously programmedcoded keys(keys that already
operate your vehicle's engine) and the new unprogrammed key(s) readily
accessible for timely implementation of each step in the procedure.
If two previously programmed coded keys are not available, you must
bring your vehicle to your dealership to have the spare coded key(s)
programmed.
Please read and understand the entire procedure before you begin.
Controls and features
87
Page 171 of 272
Fuse/Relay
LocationFuse Amp
RatingPower Distribution Box
Description
44 Ð Not Used
45A Ð Wiper High/Low
45B Ð Wiper Park/Run
46A Ð Not Used
46B Ð Front Washer Pump
47A Ð Not Used
47B Ð Not Used
48A Ð Fog Lamps
48B Ð Fog Lamp Relay
49 Ð Full Starter
50A Ð Not Used
50B Ð Fuel Pump
51 Ð Not Used
52 Ð Not Used
53 Ð Powertrain Control Module (PCM)
Diode
54 Ð Powertrain Control Module (PCM)
55 Ð Blower
56A Ð A/C Clutch Solenoid
56B Ð Trailer Tow
* Mini Fuses ** Maxi Fuses
CHANGING THE TIRES
If you get a flat tire while driving, do not apply the brake heavily.
Instead, gradually decrease your speed. Hold the steering wheel firmly
and slowly move to a safe place on the side of the road.
Temporary spare tire information
Your vehicle may have a temporary or conventional spare tire. The
temporary spare tire for your vehicle is labeled as such. It is smaller than
a regular tire and is designed for emergency use only. Replace this tire
with a full-size tire as soon as possible.
Roadside emergencies
171
Page 172 of 272
It is not recommended that the vehicle be operated in 4WD modes with
a temporary spare. If 4WD operation is necessary, do not operate above
speeds of 16 km/h (10 mph) or for distances above 80 km (50 miles).
If you use the temporary spare tire continuously or do not follow
these precautions, the tire could fail, causing you to lose control
of the vehicle, possibly injuring yourself or others.
When driving with the temporary spare tiredo not:
²exceed 80 km/h (50 mph) under any circumstances
²load the vehicle beyond maximum vehicle load rating listed on the
Safety Compliance Label
²tow a trailer
²use tire chains
²drive through an automatic car wash, because of the vehicle's reduced
ground clearance
²try to repair the temporary spare tire or remove it from its wheel rim
²use the wheel for any other type of vehicle
Conventional spare tire information
If you have the conventional spare tire, you can use it as a spare or a
regular tire. The spare is identical to the other tires on your vehicle,
although the wheel may not match.
Roadside emergencies
172
Page 173 of 272
Location of the spare tire and tools
The spare tire and tools for your vehicle are stowed in the following
locations:
Tool Location
Spare tire Under the vehicle, just forward of the rear
bumper
Jack, jack handle,
wheel nut wrenchRegular Cab: behind seats and underneath the
jack and tools cover
SuperCab: stowed in the passenger side rear cab
compartment or behind the jump seat in a
separate tool bag
Four-door models: stowed behind the front seats,
between jump seats and underneath jack and
tools cover.
Key, spare tire lock
(if equipped)In the glove box
Removing the spare tire
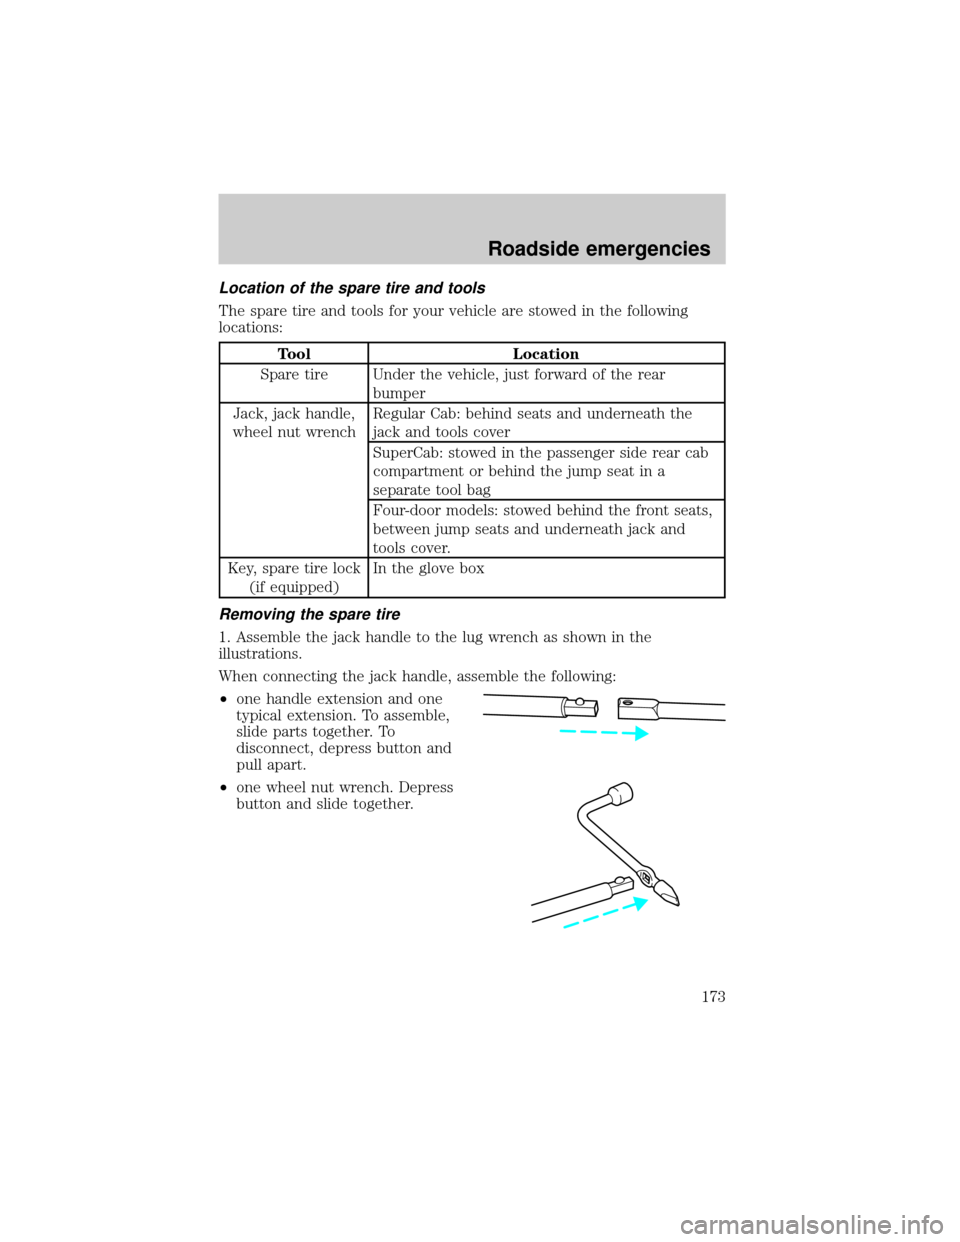
1. Assemble the jack handle to the lug wrench as shown in the
illustrations.
When connecting the jack handle, assemble the following:
²one handle extension and one
typical extension. To assemble,
slide parts together. To
disconnect, depress button and
pull apart.
²one wheel nut wrench. Depress
button and slide together.
Roadside emergencies
173
Page 174 of 272

2. If equipped, unlock and remove
the spare tire carrier lock from the
rear access hole located just above
the rear bumper and below the
tailgate.
3. Insert the straight end of the jack
handle into the rear access hole
located just above the rear bumper
and below the tailgate.
Forward motion will stop and
resistance to turning will be felt
when properly engaged.
4. Turn the handle counterclockwise
until tire is lowered to the ground
and the cable is slightly slack.
5. Remove the retainer from the spare tire.
Roadside emergencies
174
Page 175 of 272
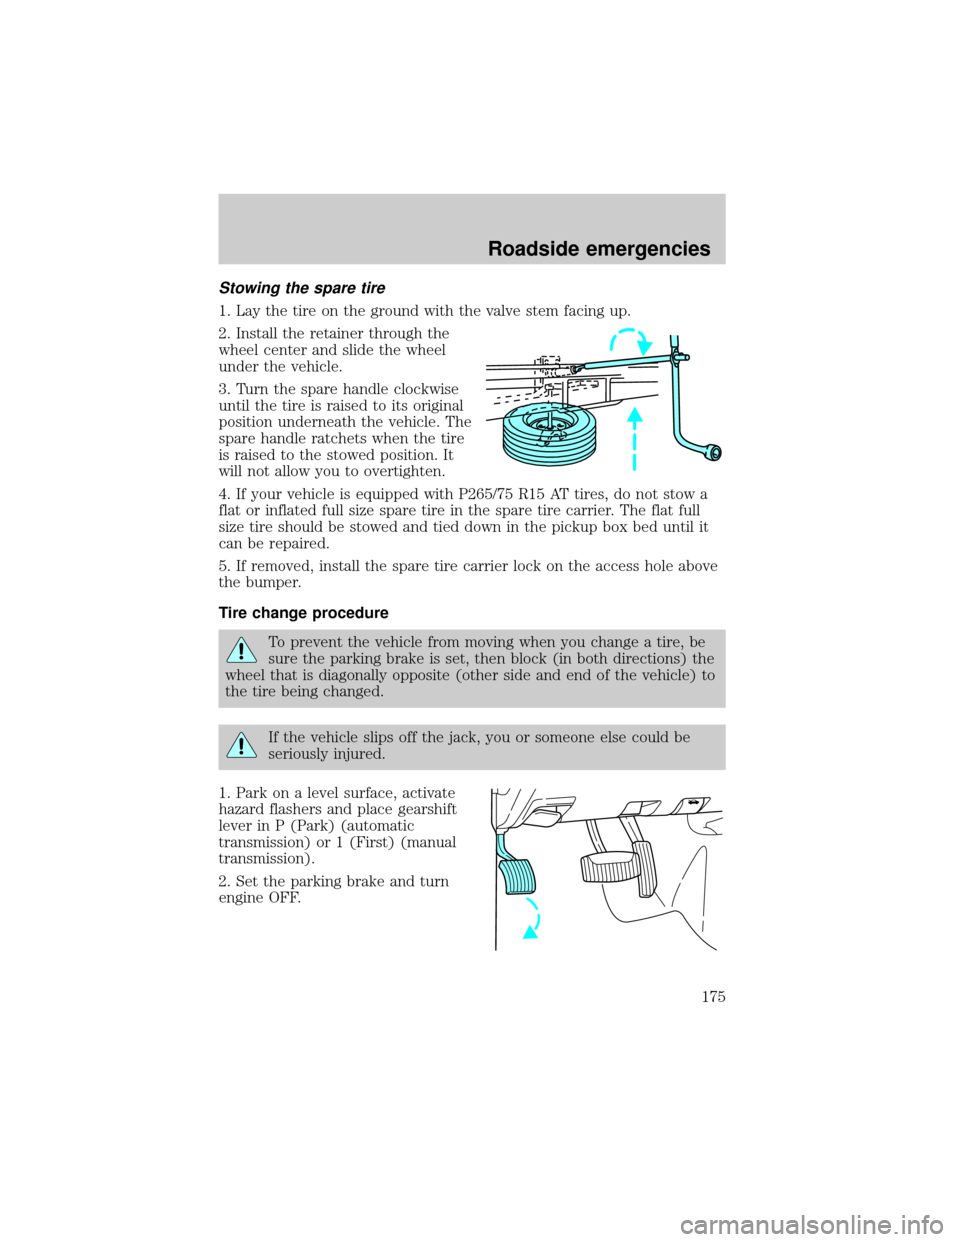
Stowing the spare tire
1. Lay the tire on the ground with the valve stem facing up.
2. Install the retainer through the
wheel center and slide the wheel
under the vehicle.
3. Turn the spare handle clockwise
until the tire is raised to its original
position underneath the vehicle. The
spare handle ratchets when the tire
is raised to the stowed position. It
will not allow you to overtighten.
4. If your vehicle is equipped with P265/75 R15 AT tires, do not stow a
flat or inflated full size spare tire in the spare tire carrier. The flat full
size tire should be stowed and tied down in the pickup box bed until it
can be repaired.
5. If removed, install the spare tire carrier lock on the access hole above
the bumper.
Tire change procedure
To prevent the vehicle from moving when you change a tire, be
sure the parking brake is set, then block (in both directions) the
wheel that is diagonally opposite (other side and end of the vehicle) to
the tire being changed.
If the vehicle slips off the jack, you or someone else could be
seriously injured.
1. Park on a level surface, activate
hazard flashers and place gearshift
lever in P (Park) (automatic
transmission) or 1 (First) (manual
transmission).
2. Set the parking brake and turn
engine OFF.
Roadside emergencies
175
Page 177 of 272
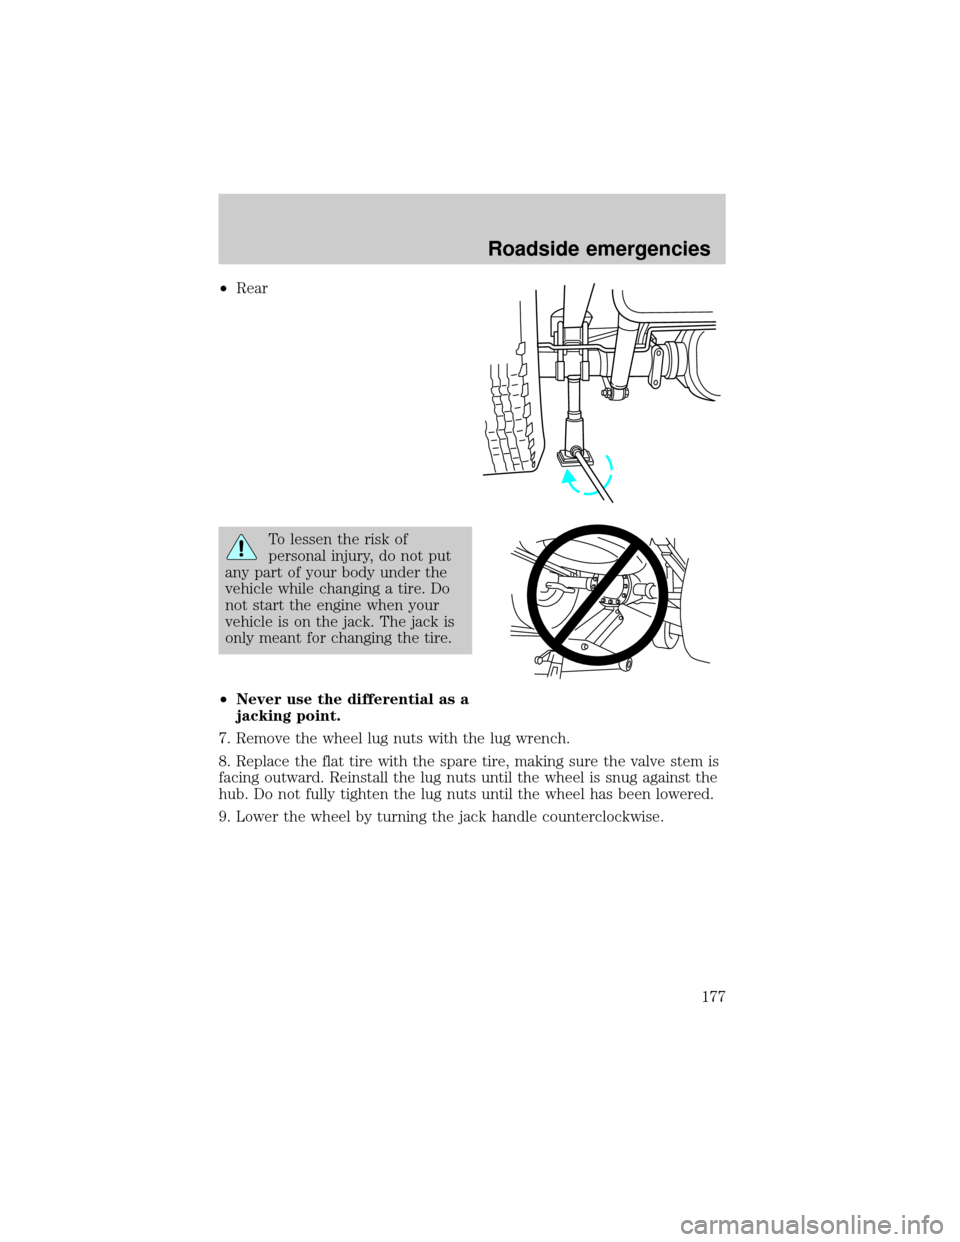
²Rear
To lessen the risk of
personal injury, do not put
any part of your body under the
vehicle while changing a tire. Do
not start the engine when your
vehicle is on the jack. The jack is
only meant for changing the tire.
²Never use the differential as a
jacking point.
7. Remove the wheel lug nuts with the lug wrench.
8. Replace the flat tire with the spare tire, making sure the valve stem is
facing outward. Reinstall the lug nuts until the wheel is snug against the
hub. Do not fully tighten the lug nuts until the wheel has been lowered.
9. Lower the wheel by turning the jack handle counterclockwise.
Roadside emergencies
177
Page 178 of 272
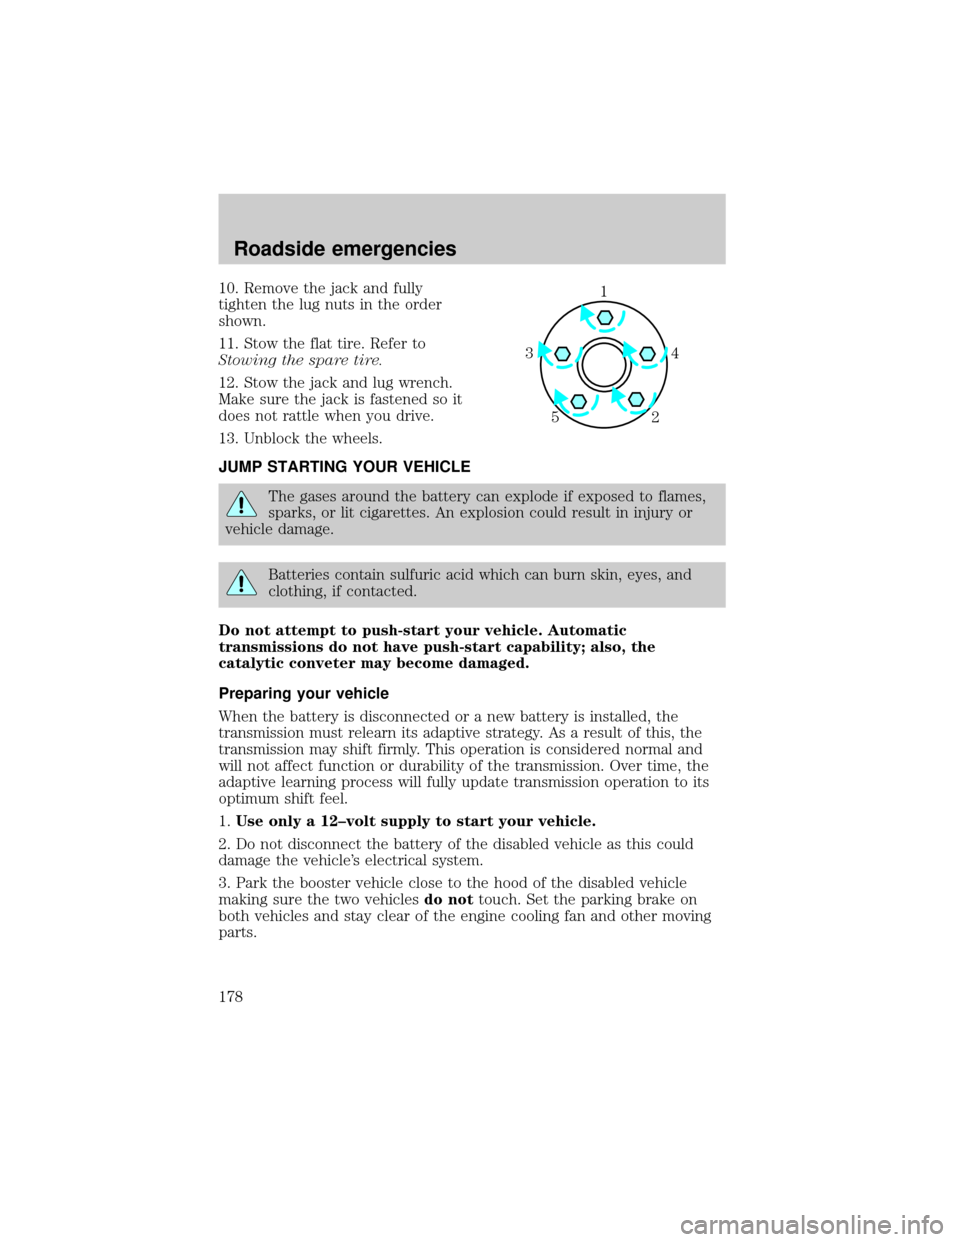
10. Remove the jack and fully
tighten the lug nuts in the order
shown.
11. Stow the flat tire. Refer to
Stowing the spare tire.
12. Stow the jack and lug wrench.
Make sure the jack is fastened so it
does not rattle when you drive.
13. Unblock the wheels.
JUMP STARTING YOUR VEHICLE
The gases around the battery can explode if exposed to flames,
sparks, or lit cigarettes. An explosion could result in injury or
vehicle damage.
Batteries contain sulfuric acid which can burn skin, eyes, and
clothing, if contacted.
Do not attempt to push-start your vehicle. Automatic
transmissions do not have push-start capability; also, the
catalytic conveter may become damaged.
Preparing your vehicle
When the battery is disconnected or a new battery is installed, the
transmission must relearn its adaptive strategy. As a result of this, the
transmission may shift firmly. This operation is considered normal and
will not affect function or durability of the transmission. Over time, the
adaptive learning process will fully update transmission operation to its
optimum shift feel.
1.Use only a 12±volt supply to start your vehicle.
2. Do not disconnect the battery of the disabled vehicle as this could
damage the vehicle's electrical system.
3. Park the booster vehicle close to the hood of the disabled vehicle
making sure the two vehiclesdo nottouch. Set the parking brake on
both vehicles and stay clear of the engine cooling fan and other moving
parts.
1
4 3
2 5
Roadside emergencies
178
Page 210 of 272
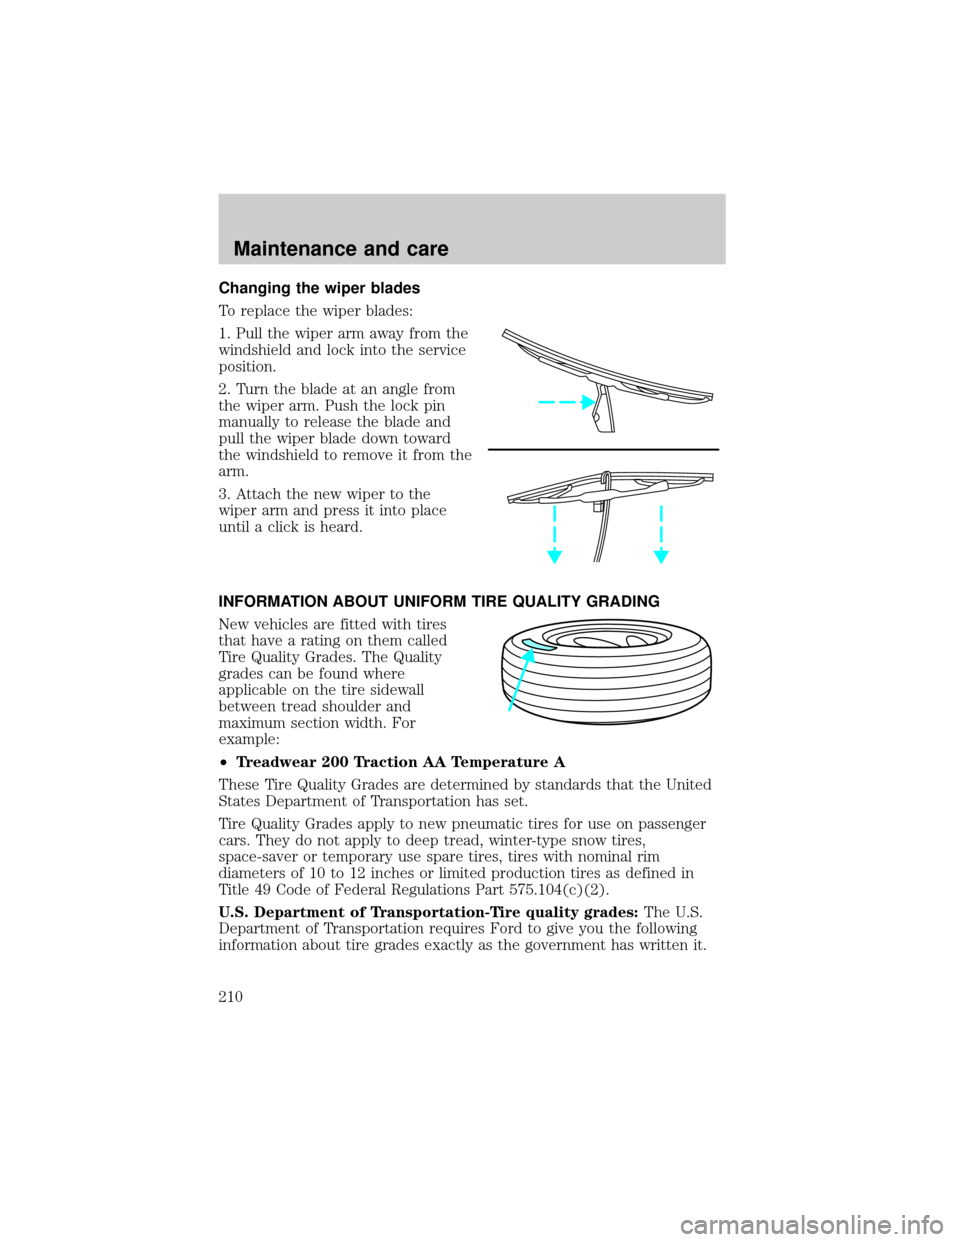
Changing the wiper blades
To replace the wiper blades:
1. Pull the wiper arm away from the
windshield and lock into the service
position.
2. Turn the blade at an angle from
the wiper arm. Push the lock pin
manually to release the blade and
pull the wiper blade down toward
the windshield to remove it from the
arm.
3. Attach the new wiper to the
wiper arm and press it into place
until a click is heard.
INFORMATION ABOUT UNIFORM TIRE QUALITY GRADING
New vehicles are fitted with tires
that have a rating on them called
Tire Quality Grades. The Quality
grades can be found where
applicable on the tire sidewall
between tread shoulder and
maximum section width. For
example:
²Treadwear 200 Traction AA Temperature A
These Tire Quality Grades are determined by standards that the United
States Department of Transportation has set.
Tire Quality Grades apply to new pneumatic tires for use on passenger
cars. They do not apply to deep tread, winter-type snow tires,
space-saver or temporary use spare tires, tires with nominal rim
diameters of 10 to 12 inches or limited production tires as defined in
Title 49 Code of Federal Regulations Part 575.104(c)(2).
U.S. Department of Transportation-Tire quality grades:The U.S.
Department of Transportation requires Ford to give you the following
information about tire grades exactly as the government has written it.
Maintenance and care
210
Page 259 of 272
Protection and appearance equipment
Air bag anti-theft locks
All weather slush mats
Bed mat/tailgate kit
Bed hooks
Bed mats
Bedliners
Carpeted floor mats with logo
Door edge guards
Front end covers (full and sport)
Bug deflectors
Instrument panel trim (brushed aluminum)
Locking gas cap
Lubricants and oils
Rally bar with off road lighting
Rear window deflector
Side window air deflectors
Skid plate
Spare tire lock
Step bumpers
Tailgate lock
Tailgate protector
Tonneau covers Ð soft (snap and snapless) and hard
Universal floor mats
For maximum vehicle performance, keep the following information in
mind when adding accessories or equipment to your vehicle:
²When adding accessories, equipment, passengers and luggage to your
vehicle, do not exceed the total weight capacity of the vehicle or of
the front or rear axle (GVWR or GAWR as indicated on the Safety
compliance certification label). Consult your dealer for specific weight
information.
Customer assistance
259