steering FORD RANGER 2002 2.G User Guide
[x] Cancel search | Manufacturer: FORD, Model Year: 2002, Model line: RANGER, Model: FORD RANGER 2002 2.GPages: 288, PDF Size: 3.03 MB
Page 170 of 288
Descend a hill in the same gear you
would use to climb up the hill to
avoid excessive brake application
and brake overheating. Do not
descend in neutral, disengage
overdrive or manually shift to a
lower gear. When descending a
steep hill, avoid sudden hard
braking as you could lose control.
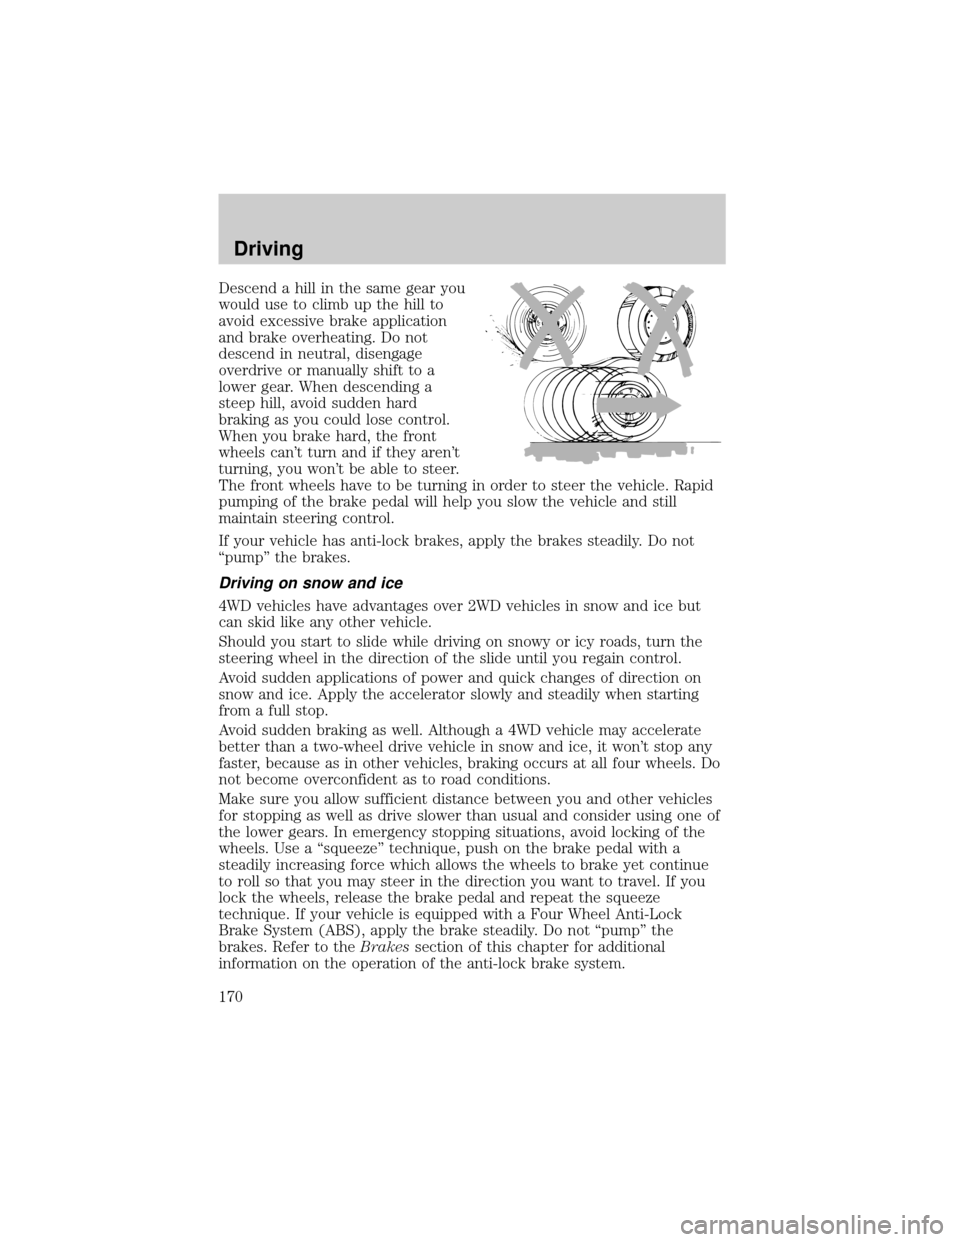
When you brake hard, the front
wheels can't turn and if they aren't
turning, you won't be able to steer.
The front wheels have to be turning in order to steer the vehicle. Rapid
pumping of the brake pedal will help you slow the vehicle and still
maintain steering control.
If your vehicle has anti-lock brakes, apply the brakes steadily. Do not
ªpumpº the brakes.
Driving on snow and ice
4WD vehicles have advantages over 2WD vehicles in snow and ice but
can skid like any other vehicle.
Should you start to slide while driving on snowy or icy roads, turn the
steering wheel in the direction of the slide until you regain control.
Avoid sudden applications of power and quick changes of direction on
snow and ice. Apply the accelerator slowly and steadily when starting
from a full stop.
Avoid sudden braking as well. Although a 4WD vehicle may accelerate
better than a two-wheel drive vehicle in snow and ice, it won't stop any
faster, because as in other vehicles, braking occurs at all four wheels. Do
not become overconfident as to road conditions.
Make sure you allow sufficient distance between you and other vehicles
for stopping as well as drive slower than usual and consider using one of
the lower gears. In emergency stopping situations, avoid locking of the
wheels. Use a ªsqueezeº technique, push on the brake pedal with a
steadily increasing force which allows the wheels to brake yet continue
to roll so that you may steer in the direction you want to travel. If you
lock the wheels, release the brake pedal and repeat the squeeze
technique. If your vehicle is equipped with a Four Wheel Anti-Lock
Brake System (ABS), apply the brake steadily. Do not ªpumpº the
brakes. Refer to theBrakessection of this chapter for additional
information on the operation of the anti-lock brake system.
Driving
170
Page 171 of 288

Never drive with chains on the front tires of 4WD vehicles without also
putting them on the rear tires. This could cause the rear to slide and
swing around during braking.
Tires, Replacement Requirements
4WD vehicles are equipped with tires designed to provide for safe ride
and handling capability.
Do not use a size and type of tire and wheel other than that originally
provided by Ford because it can affect the safety and performance of
your vehicle, which could lead to loss of vehicle control or roll over and
serious injury. Make sure all tires and wheels on the vehicle are of the
same size, type, tread design, brand and load-carrying capacity. If you
have questions regarding tire replacement, see an authorized Ford or
Lincoln/Mercury dealer.
If you nevertheless decide to equip your 4WD for off-road use with tires
larger than what Ford recommends, you should not use these tires for
highway driving.
If you use any tire/wheel combination not recommended by Ford, it may
adversely affect vehicle handling and could cause steering, suspension,
axle or transfer case failure.
Do not useºaftermarket lift kitsº or other suspension modifications,
whether or not they are used with larger tires and wheels.
These ªaftermarket lift kitsº could adversely affect the vehicle's handling
characteristics, which could lead to loss of vehicle control or roll over
and serious injury.
Tires can be damaged during off-road use. For your safety, tires that are
damaged should not be used for highway driving because they are more
likely to blow out or fail.
You should carefully observe the recommended tire inflation pressure
found on the safety compliance certification label attached to the left
front door lock facing or door latch post pillar. Failure to follow tire
pressure recommendations can adversely affect the way your vehicle
handles. Do not exceed the Ford recommended pressure even if it is less
than the maximum pressure allowed for the tire.
Driving
171
Page 172 of 288
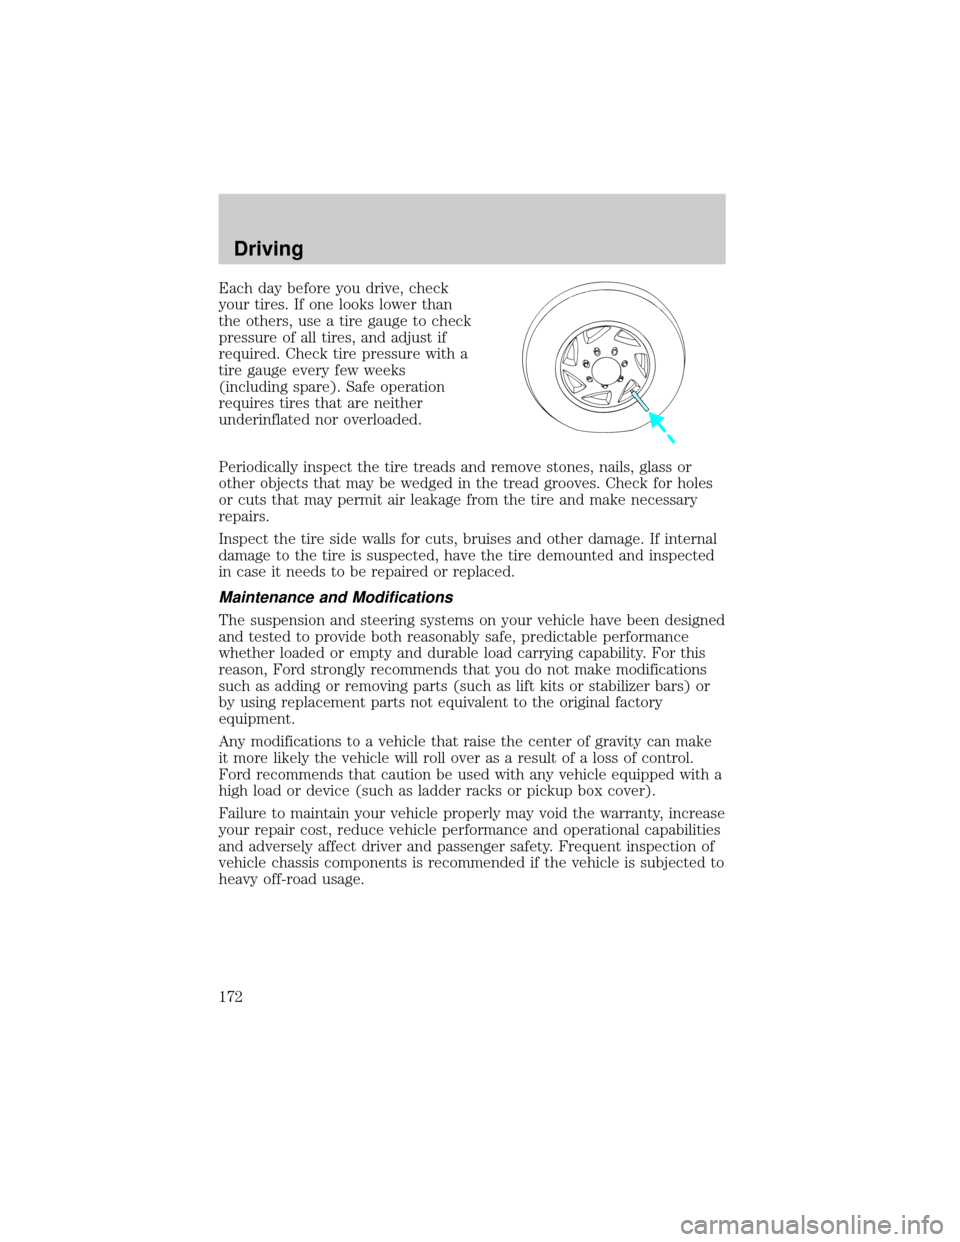
Each day before you drive, check
your tires. If one looks lower than
the others, use a tire gauge to check
pressure of all tires, and adjust if
required. Check tire pressure with a
tire gauge every few weeks
(including spare). Safe operation
requires tires that are neither
underinflated nor overloaded.
Periodically inspect the tire treads and remove stones, nails, glass or
other objects that may be wedged in the tread grooves. Check for holes
or cuts that may permit air leakage from the tire and make necessary
repairs.
Inspect the tire side walls for cuts, bruises and other damage. If internal
damage to the tire is suspected, have the tire demounted and inspected
in case it needs to be repaired or replaced.
Maintenance and Modifications
The suspension and steering systems on your vehicle have been designed
and tested to provide both reasonably safe, predictable performance
whether loaded or empty and durable load carrying capability. For this
reason, Ford strongly recommends that you do not make modifications
such as adding or removing parts (such as lift kits or stabilizer bars) or
by using replacement parts not equivalent to the original factory
equipment.
Any modifications to a vehicle that raise the center of gravity can make
it more likely the vehicle will roll over as a result of a loss of control.
Ford recommends that caution be used with any vehicle equipped with a
high load or device (such as ladder racks or pickup box cover).
Failure to maintain your vehicle properly may void the warranty, increase
your repair cost, reduce vehicle performance and operational capabilities
and adversely affect driver and passenger safety. Frequent inspection of
vehicle chassis components is recommended if the vehicle is subjected to
heavy off-road usage.
Driving
172
Page 188 of 288
ROADSIDE COVERAGE BEYOND BASIC WARRANTY
In the United States, you may purchase additional roadside assistance
coverage beyond this period through the Ford Auto Club by contacting
your Ford or Lincoln Mercury dealer.
Similarly in Canada, for uninterrupted Roadside Assistance coverage, you
may purchase extended coverage prior to your Basic Warranty's Roadside
Assistance expiring. For more information and enrollment, contact
1±877±294±2582 or visit our website at www.ford.ca.
HAZARD FLASHER
Use only in an emergency to warn traffic of vehicle breakdown,
approaching danger, etc. The hazard flashers can be operated when the
ignition is off.
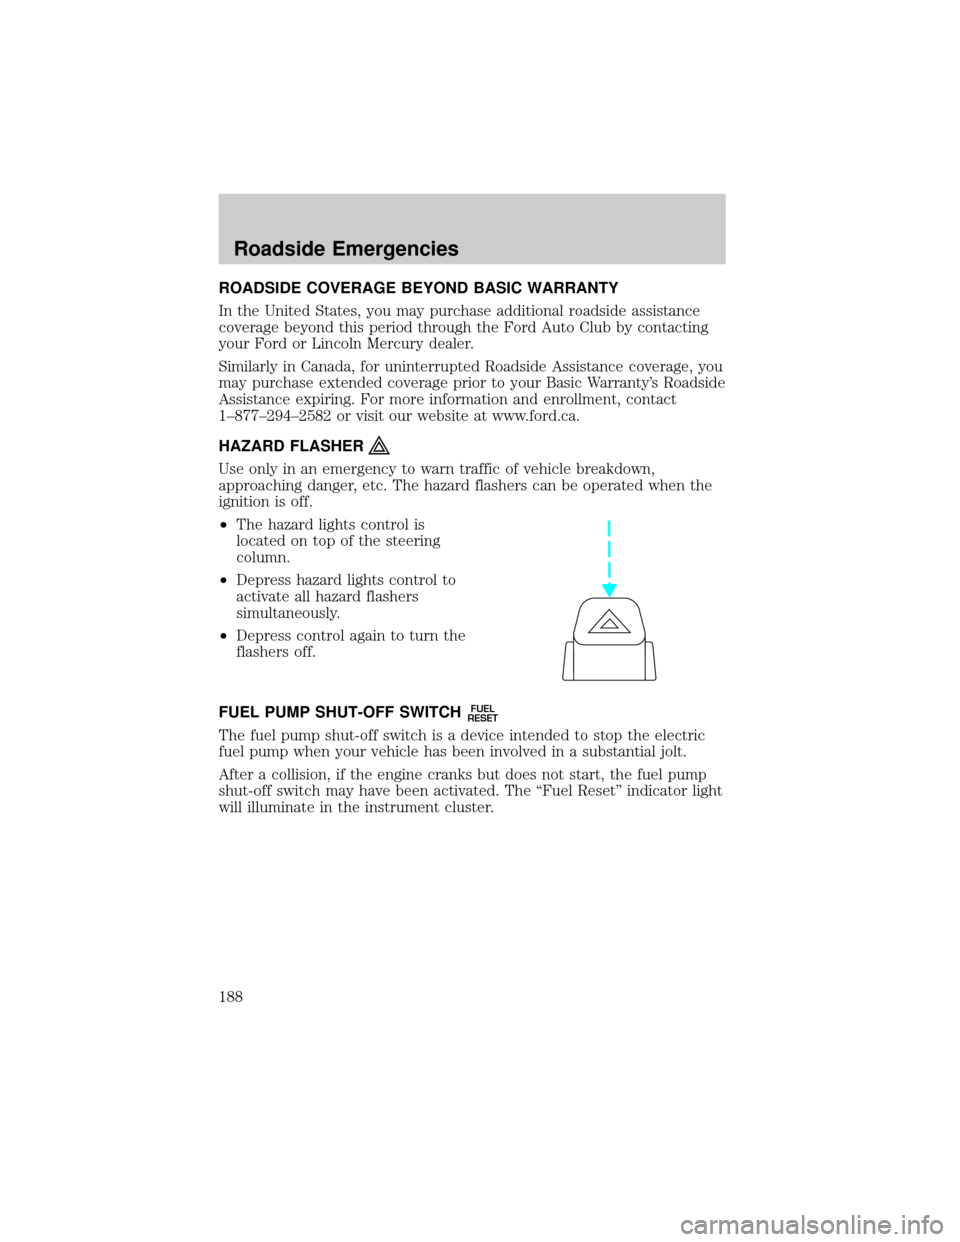
²The hazard lights control is
located on top of the steering
column.
²Depress hazard lights control to
activate all hazard flashers
simultaneously.
²Depress control again to turn the
flashers off.
FUEL PUMP SHUT-OFF SWITCH
FUEL
RESET
The fuel pump shut-off switch is a device intended to stop the electric
fuel pump when your vehicle has been involved in a substantial jolt.
After a collision, if the engine cranks but does not start, the fuel pump
shut-off switch may have been activated. The ªFuel Resetº indicator light
will illuminate in the instrument cluster.
Roadside Emergencies
188
Page 200 of 288
Fuse/Relay
LocationFuse Amp
RatingPower Distribution Box
Description
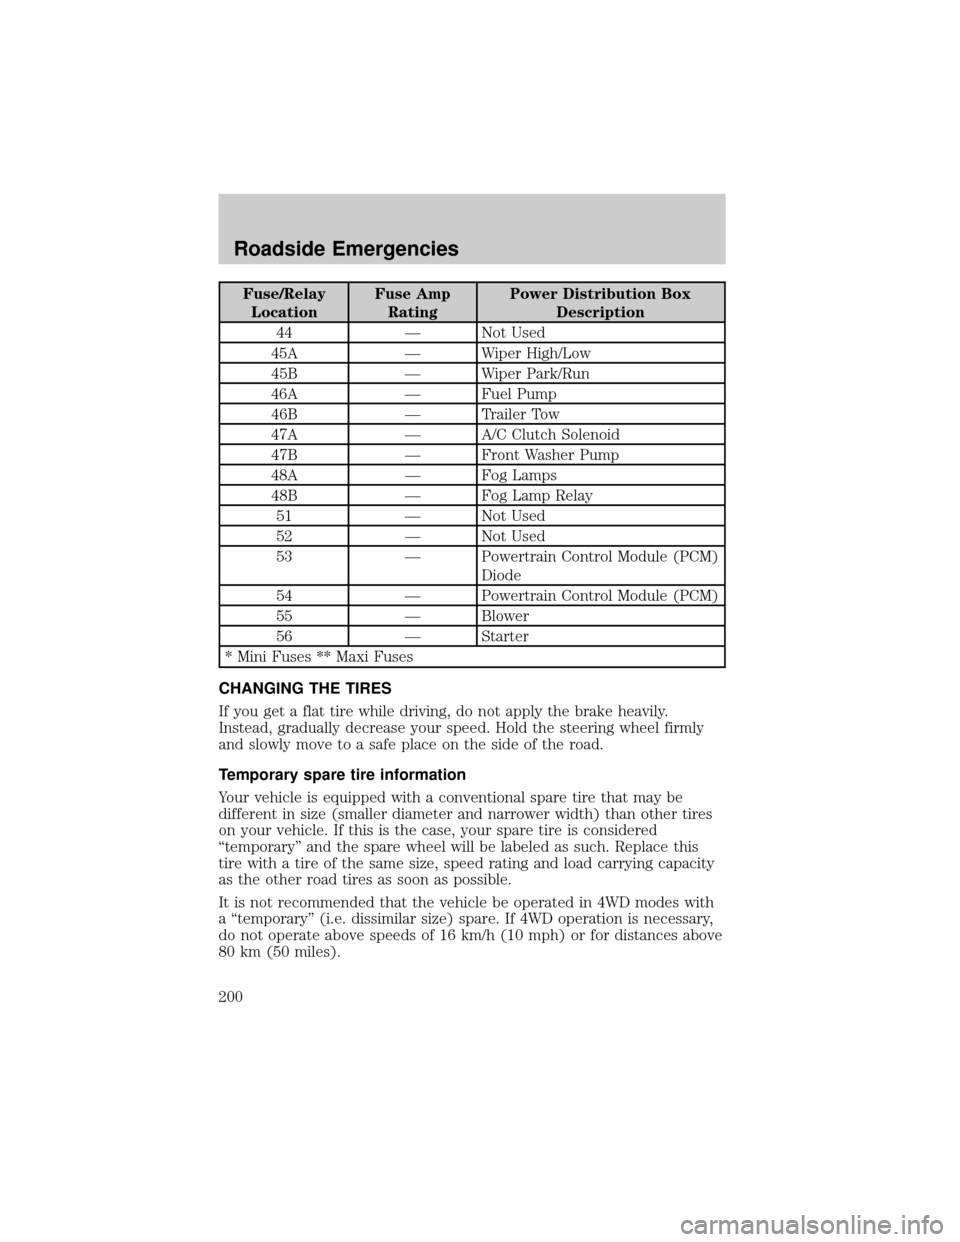
44 Ð Not Used
45A Ð Wiper High/Low
45B Ð Wiper Park/Run
46A Ð Fuel Pump
46B Ð Trailer Tow
47A Ð A/C Clutch Solenoid
47B Ð Front Washer Pump
48A Ð Fog Lamps
48B Ð Fog Lamp Relay
51 Ð Not Used
52 Ð Not Used
53 Ð Powertrain Control Module (PCM)
Diode
54 Ð Powertrain Control Module (PCM)
55 Ð Blower
56 Ð Starter
* Mini Fuses ** Maxi Fuses
CHANGING THE TIRES
If you get a flat tire while driving, do not apply the brake heavily.
Instead, gradually decrease your speed. Hold the steering wheel firmly
and slowly move to a safe place on the side of the road.
Temporary spare tire information
Your vehicle is equipped with a conventional spare tire that may be
different in size (smaller diameter and narrower width) than other tires
on your vehicle. If this is the case, your spare tire is considered
ªtemporaryº and the spare wheel will be labeled as such. Replace this
tire with a tire of the same size, speed rating and load carrying capacity
as the other road tires as soon as possible.
It is not recommended that the vehicle be operated in 4WD modes with
a ªtemporaryº (i.e. dissimilar size) spare. If 4WD operation is necessary,
do not operate above speeds of 16 km/h (10 mph) or for distances above
80 km (50 miles).
Roadside Emergencies
200
Page 227 of 288
Clean the outside of the windshield or rear window with a non-abrasive
cleaner such as Ultra Clear Spray Glass Cleaner (E4AZ-19C507±AA),
available from your authorized Ford, Lincoln or Mercury dealer. If after
cleaning the glass surface, the water sheets from the glass (e.g., does not
bead), then the window is clean.
The windshield, rear window and wiper blades should be cleaned
regularly. Wiper blades can be cleaned with isopropyl (rubbing) alcohol
or windshield washer solution. Be sure to replace wiper blades when
they appear worn or do not function properly.
CLEANING THE INSTRUMENT PANEL
Clean the instrument panel with a damp cloth, then dry with a dry cloth.
Avoid cleaners or polish that increase the gloss of the upper portion of
the instrument panel. The dull finish in this area helps protect the driver
from undesirable windshield reflection.
Do not use chemical solvents or strong detergents when cleaning
the steering wheel or instrument panel to avoid contamination of
the air bag system.
Cleaning the instrument cluster lens
Wipe the cluster area with a soft, damp cotton towel. Dry the area with a
clean, dry towel.
CLEANING THE INSIDE WINDOWS
Use Ultra Clear Spray Glass Cleaner (E4AZ-19C507±AA) for the inside
windows if they become fogged.
To clean, use two lint-free, soft towels, folded into a pad-shape. Mist the
glass completely with cleaner, and use one of the towels to evenly agitate
the surface. Use the other towel to remove the residue.
CLEANING THE INTERIOR FABRIC, CARPETS AND CLOTH SEATS
Remove dust and loose dirt with a vacuum cleaner. Remove light stains
and soil with Extra Strength Upholstery Cleaner (E8AZ-19523±AA).
Never saturate the seat covers with cleaning solution.
Do not use household cleaning products or glass cleaners, which
can stain and discolor the fabric and affect the flame retardent
abilities of the seat materials.
Cleaning
227
Page 231 of 288
3. Turn off the engine and remove the key.
4. Block the wheels to prevent the vehicle from moving unexpectedly.
Working with the engine on
²Automatic transmission:
1. Set the parking brake and ensure the gearshift is securely latched in P
(Park).
2. Block the wheels to prevent the vehicle from moving unexpectedly.
Note:Do not start your engine with the air cleaner removed and do not
remove it while the engine is running.
²Manual transmission:
1. Set the parking brake, depress the clutch and place the gearshift in
neutral.
2. Block the wheels to prevent the vehicle from moving unexpectedly.
Note:Do not start your engine with the air cleaner removed and do not
remove it while the engine is running.
The cooling fan is automatic and may come on at any time.
Always disconnect the negative terminal of the battery before
working near the fan.
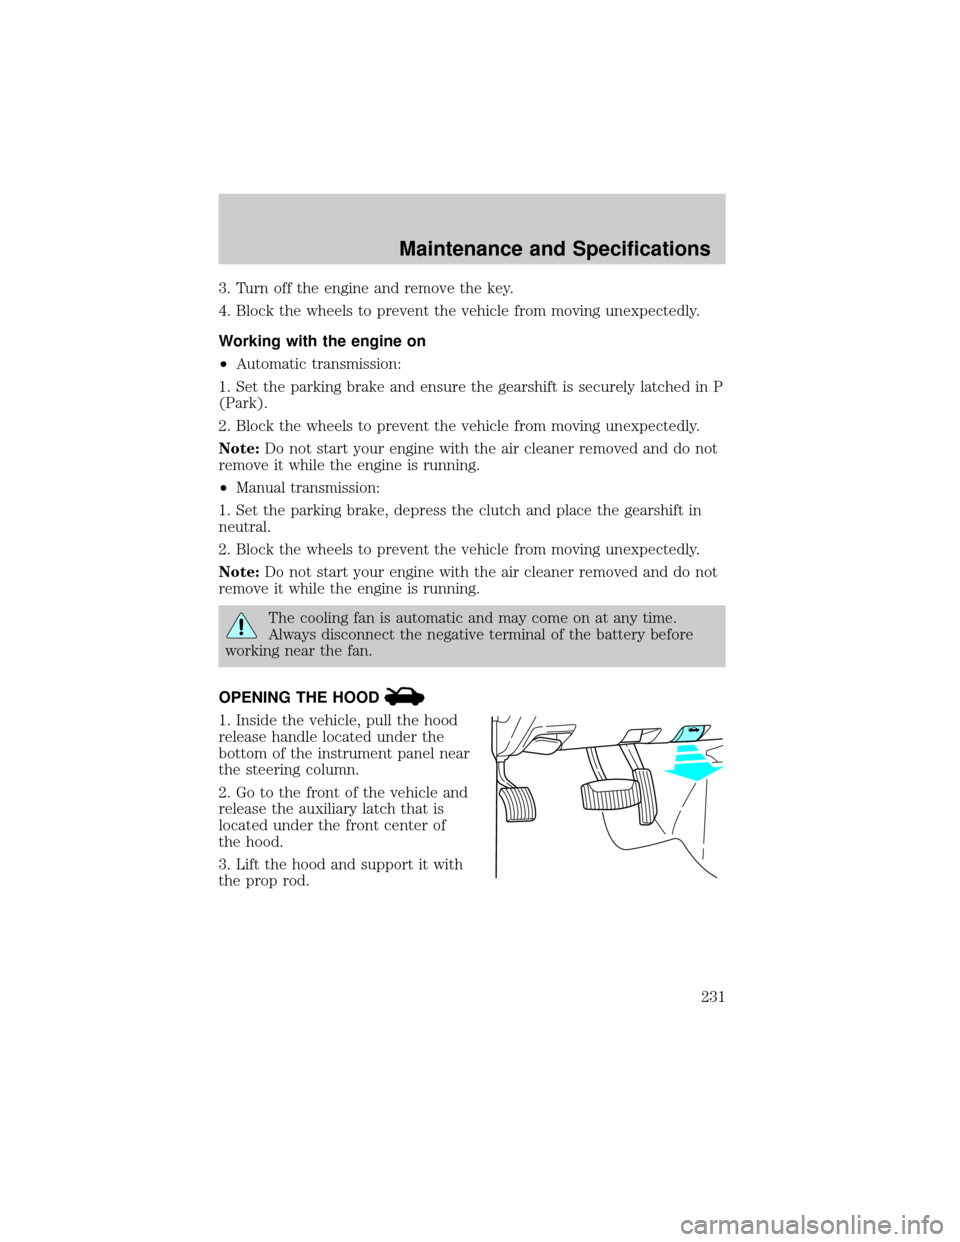
OPENING THE HOOD
1. Inside the vehicle, pull the hood
release handle located under the
bottom of the instrument panel near
the steering column.
2. Go to the front of the vehicle and
release the auxiliary latch that is
located under the front center of
the hood.
3. Lift the hood and support it with
the prop rod.
Maintenance and Specifications
231
Page 232 of 288
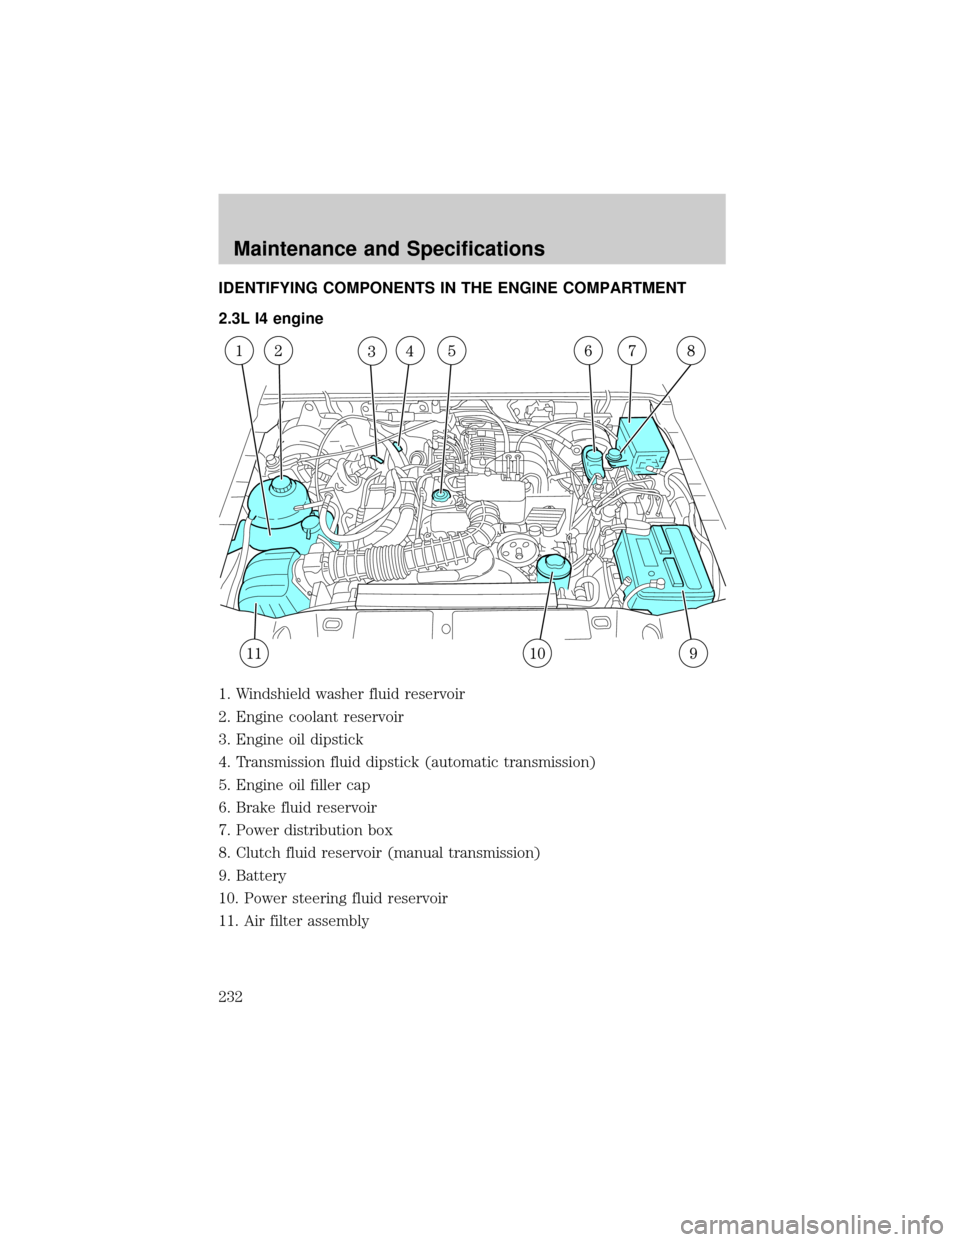
IDENTIFYING COMPONENTS IN THE ENGINE COMPARTMENT
2.3L I4 engine
1. Windshield washer fluid reservoir
2. Engine coolant reservoir
3. Engine oil dipstick
4. Transmission fluid dipstick (automatic transmission)
5. Engine oil filler cap
6. Brake fluid reservoir
7. Power distribution box
8. Clutch fluid reservoir (manual transmission)
9. Battery
10. Power steering fluid reservoir
11. Air filter assembly
Maintenance and Specifications
232
Page 233 of 288
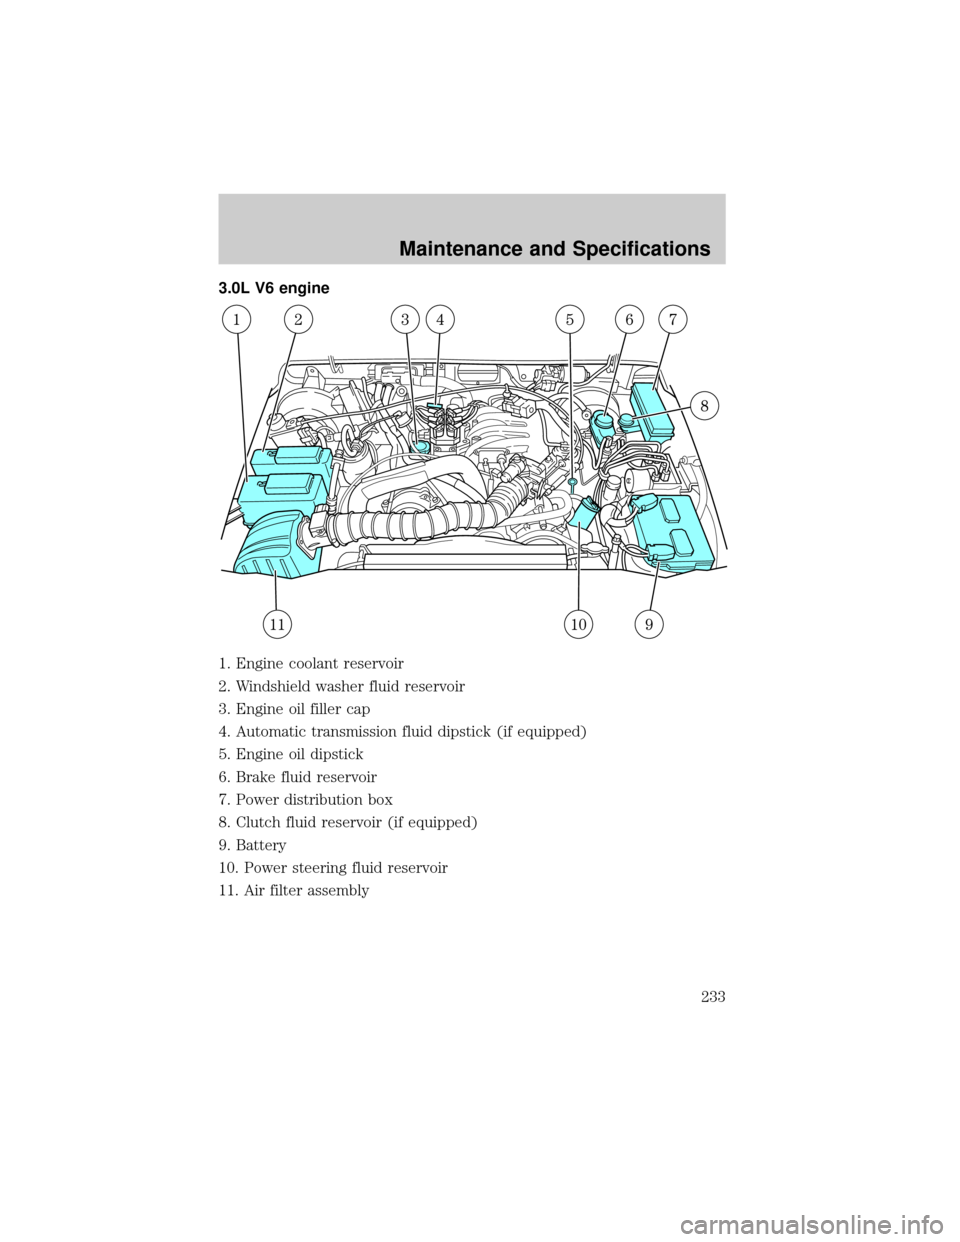
3.0L V6 engine
1. Engine coolant reservoir
2. Windshield washer fluid reservoir
3. Engine oil filler cap
4. Automatic transmission fluid dipstick (if equipped)
5. Engine oil dipstick
6. Brake fluid reservoir
7. Power distribution box
8. Clutch fluid reservoir (if equipped)
9. Battery
10. Power steering fluid reservoir
11. Air filter assembly
Maintenance and Specifications
233
Page 234 of 288
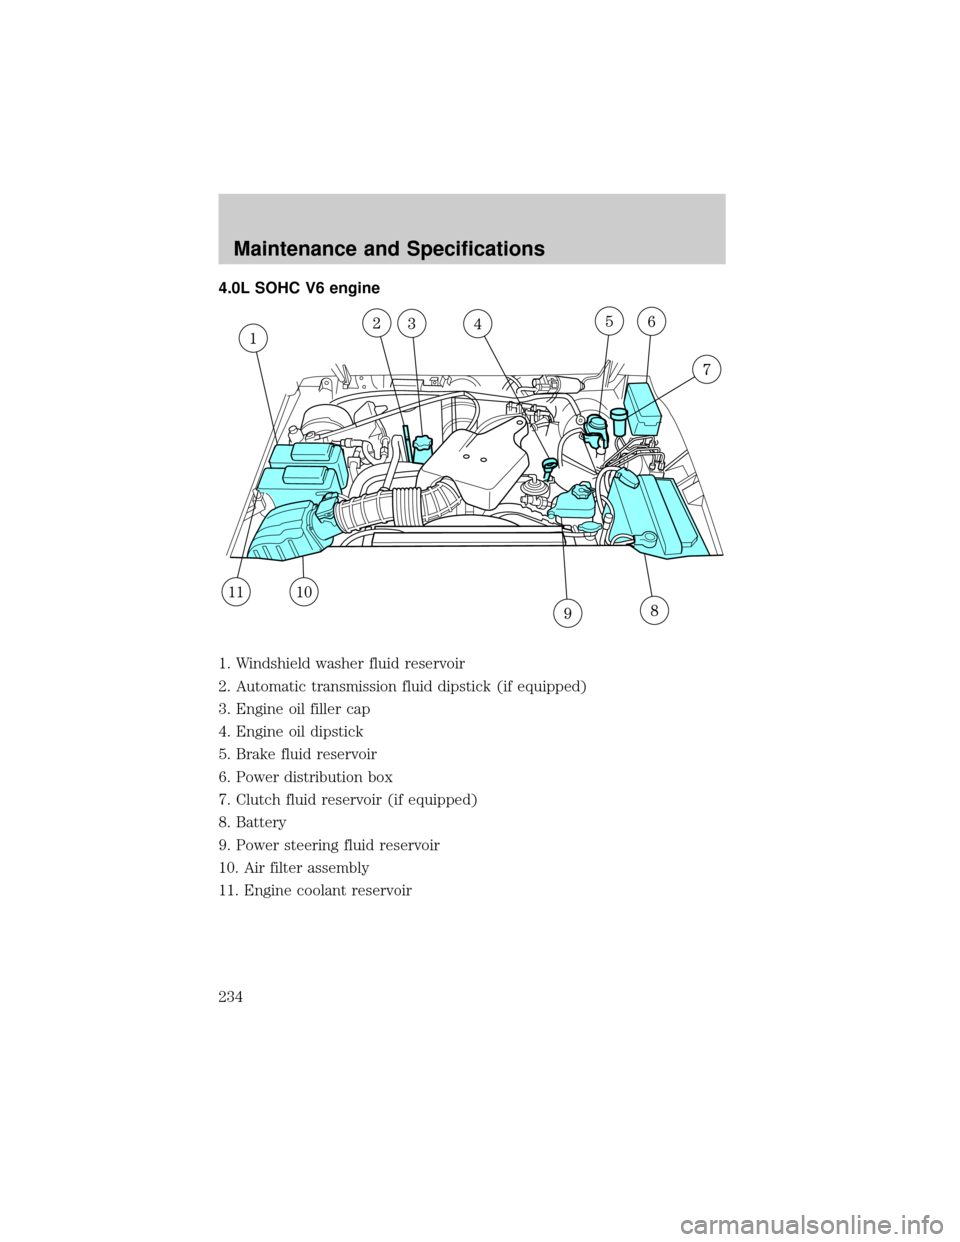
4.0L SOHC V6 engine
1. Windshield washer fluid reservoir
2. Automatic transmission fluid dipstick (if equipped)
3. Engine oil filler cap
4. Engine oil dipstick
5. Brake fluid reservoir
6. Power distribution box
7. Clutch fluid reservoir (if equipped)
8. Battery
9. Power steering fluid reservoir
10. Air filter assembly
11. Engine coolant reservoir
Maintenance and Specifications
234