clock FORD RANGER 2011 2.G Owners Manual
[x] Cancel search | Manufacturer: FORD, Model Year: 2011, Model line: RANGER, Model: FORD RANGER 2011 2.GPages: 302, PDF Size: 2.33 MB
Page 20 of 302
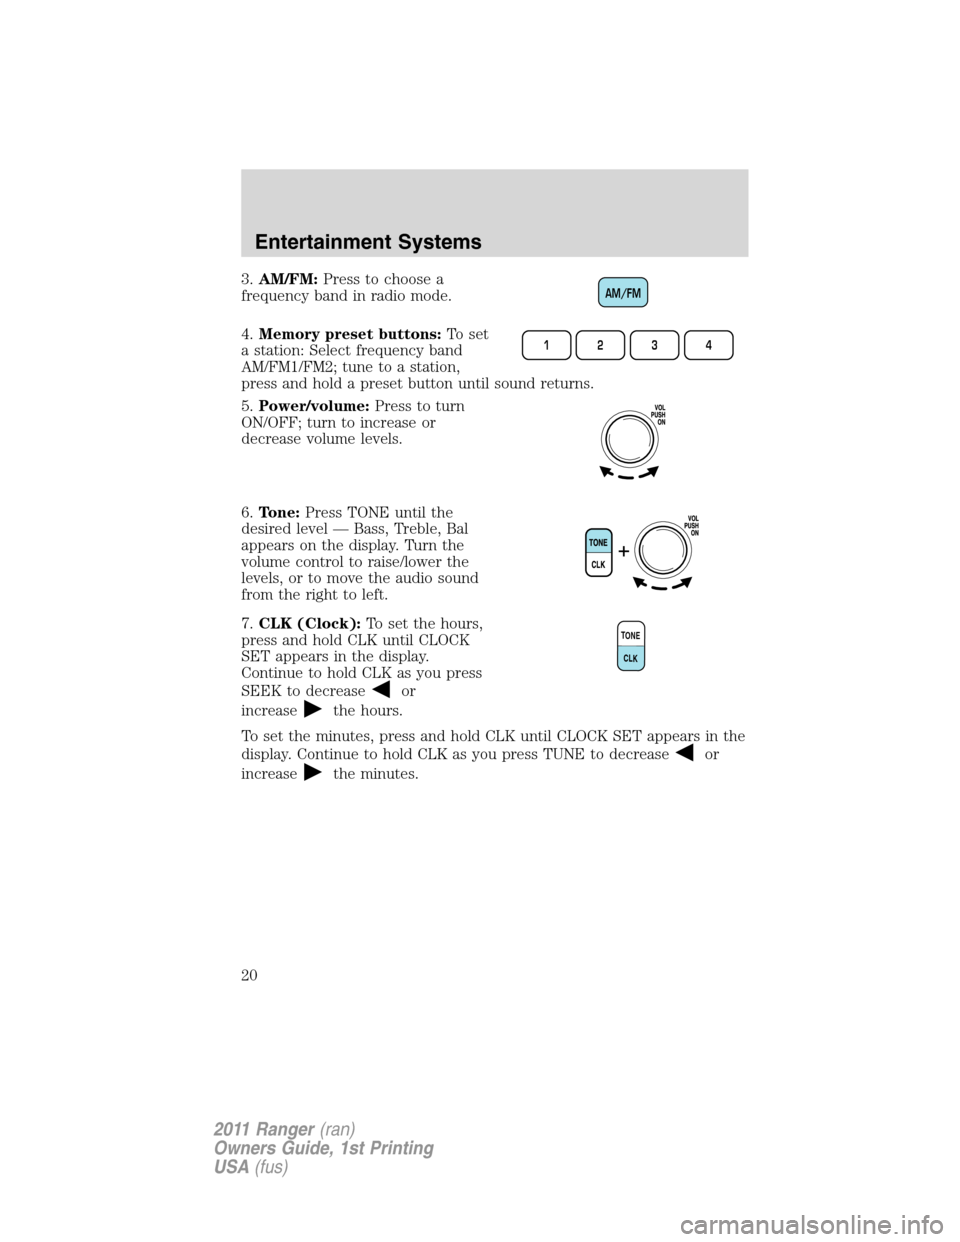
3.AM/FM:Press to choose a
frequency band in radio mode.
4.Memory preset buttons:To set
a station: Select frequency band
AM/FM1/FM2; tune to a station,
press and hold a preset button until sound returns.
5.Power/volume:Press to turn
ON/OFF; turn to increase or
decrease volume levels.
6.Tone:Press TONE until the
desired level — Bass, Treble, Bal
appears on the display. Turn the
volume control to raise/lower the
levels, or to move the audio sound
from the right to left.
7.CLK (Clock):To set the hours,
press and hold CLK until CLOCK
SET appears in the display.
Continue to hold CLK as you press
SEEK to decrease
or
increase
the hours.
To set the minutes, press and hold CLK until CLOCK SET appears in the
display. Continue to hold CLK as you press TUNE to decrease
or
increase
the minutes.
AM/FM
1234
TONE
CLK
Entertainment Systems
20
2011 Ranger(ran)
Owners Guide, 1st Printing
USA(fus)
Page 21 of 302
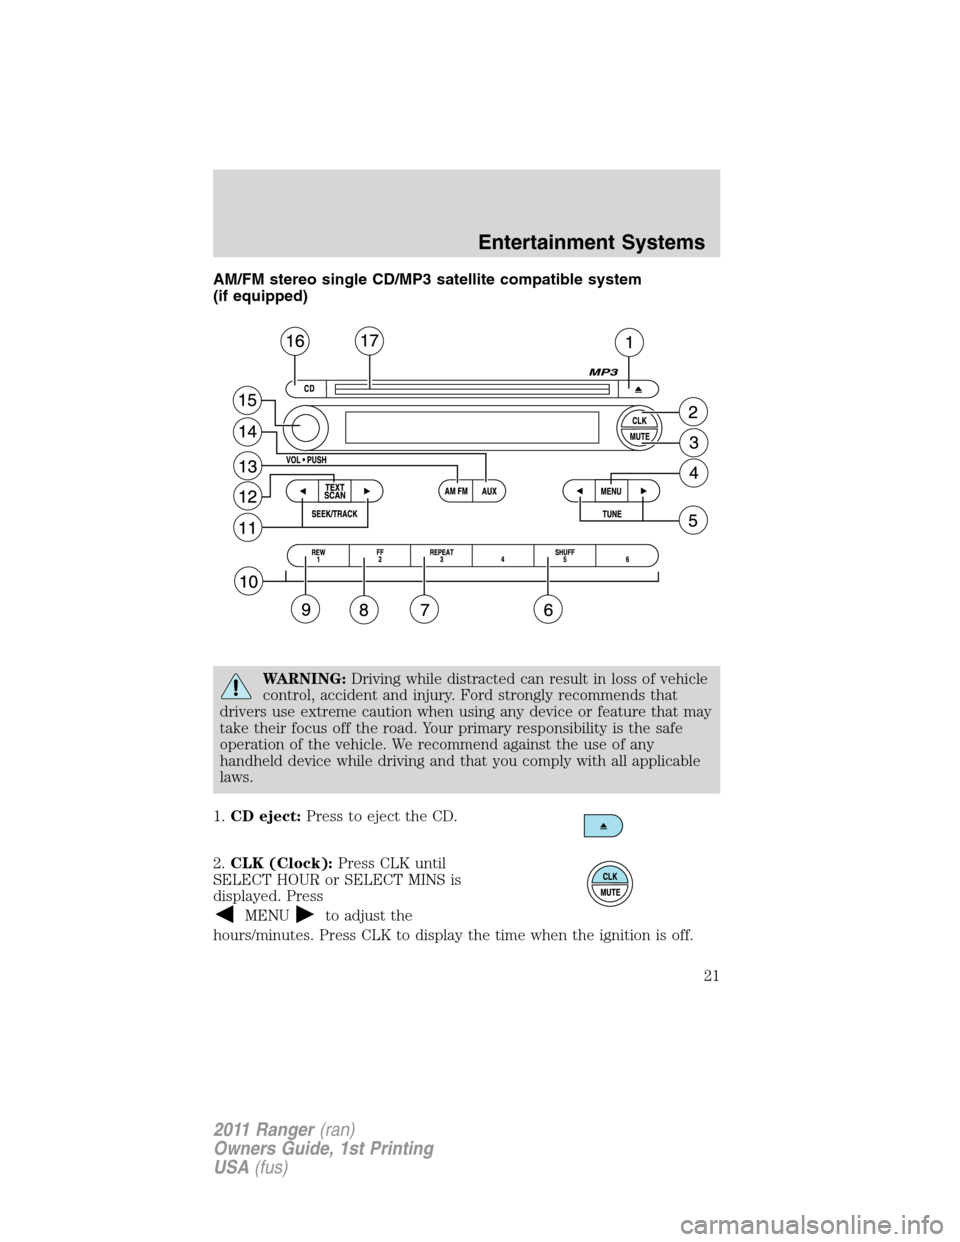
AM/FM stereo single CD/MP3 satellite compatible system
(if equipped)
WARNING:Driving while distracted can result in loss of vehicle
control, accident and injury. Ford strongly recommends that
drivers use extreme caution when using any device or feature that may
take their focus off the road. Your primary responsibility is the safe
operation of the vehicle. We recommend against the use of any
handheld device while driving and that you comply with all applicable
laws.
1.CD eject:Press to eject the CD.
2.CLK (Clock):Press CLK until
SELECT HOUR or SELECT MINS is
displayed. Press
MENUto adjust the
hours/minutes. Press CLK to display the time when the ignition is off.
Entertainment Systems
21
2011 Ranger(ran)
Owners Guide, 1st Printing
USA(fus)
Page 41 of 302
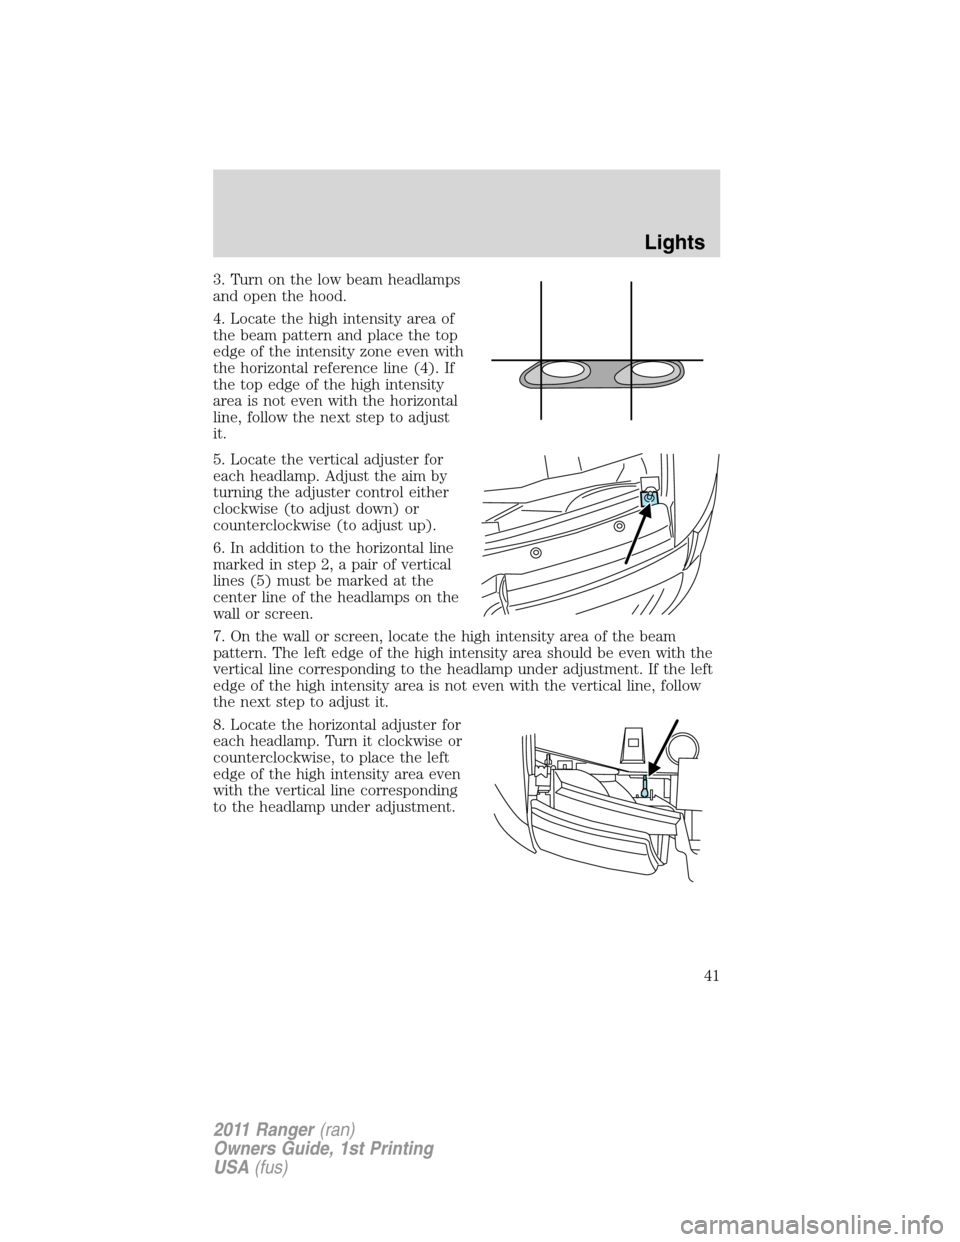
3. Turn on the low beam headlamps
and open the hood.
4. Locate the high intensity area of
the beam pattern and place the top
edge of the intensity zone even with
the horizontal reference line (4). If
the top edge of the high intensity
area is not even with the horizontal
line, follow the next step to adjust
it.
5. Locate the vertical adjuster for
each headlamp. Adjust the aim by
turning the adjuster control either
clockwise (to adjust down) or
counterclockwise (to adjust up).
6. In addition to the horizontal line
marked in step 2, a pair of vertical
lines (5) must be marked at the
center line of the headlamps on the
wall or screen.
7. On the wall or screen, locate the high intensity area of the beam
pattern. The left edge of the high intensity area should be even with the
vertical line corresponding to the headlamp under adjustment. If the left
edge of the high intensity area is not even with the vertical line, follow
the next step to adjust it.
8. Locate the horizontal adjuster for
each headlamp. Turn it clockwise or
counterclockwise, to place the left
edge of the high intensity area even
with the vertical line corresponding
to the headlamp under adjustment.
Lights
41
2011 Ranger(ran)
Owners Guide, 1st Printing
USA(fus)
Page 44 of 302
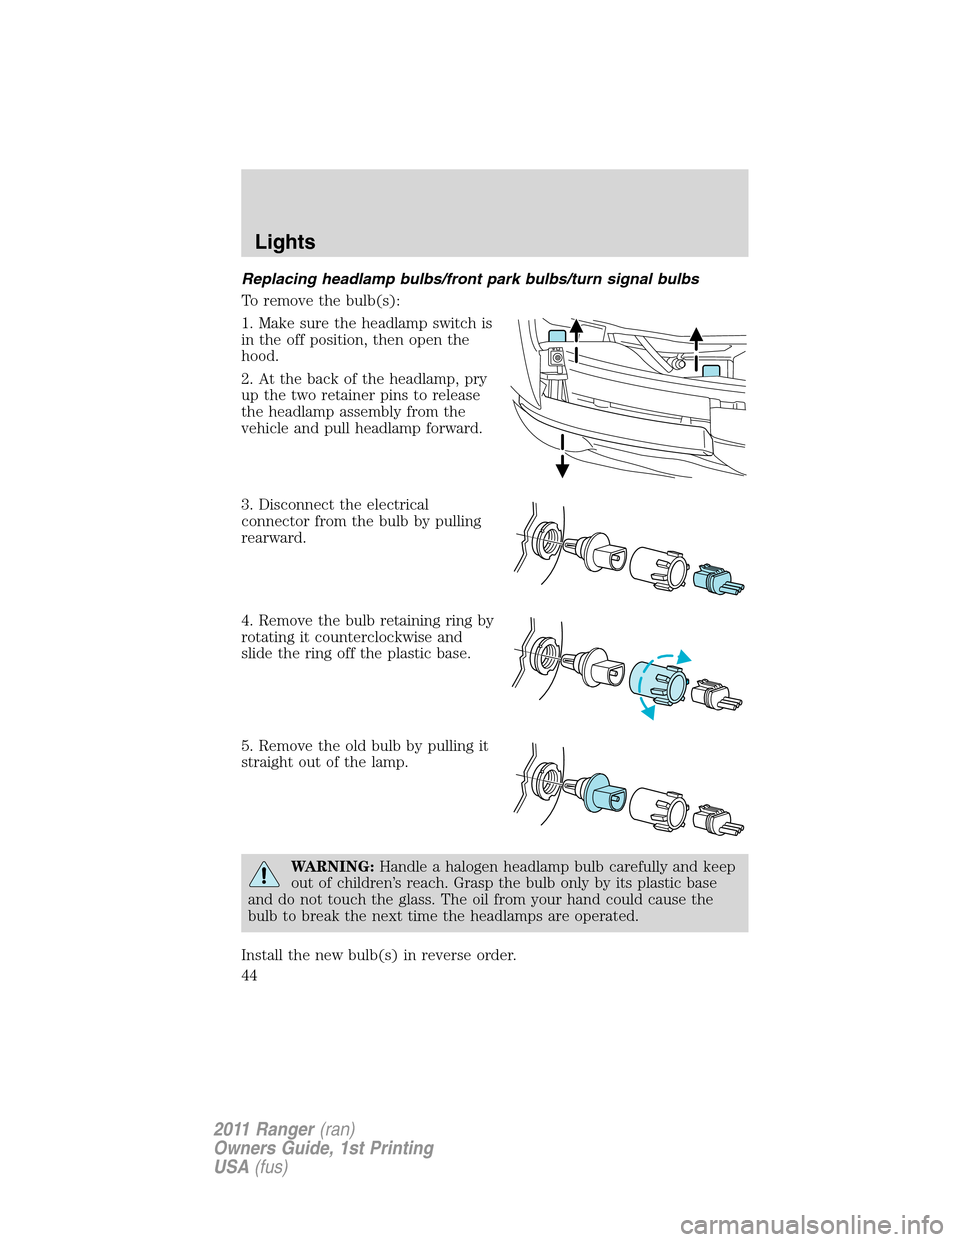
Replacing headlamp bulbs/front park bulbs/turn signal bulbs
To remove the bulb(s):
1. Make sure the headlamp switch is
in the off position, then open the
hood.
2. At the back of the headlamp, pry
up the two retainer pins to release
the headlamp assembly from the
vehicle and pull headlamp forward.
3. Disconnect the electrical
connector from the bulb by pulling
rearward.
4. Remove the bulb retaining ring by
rotating it counterclockwise and
slide the ring off the plastic base.
5. Remove the old bulb by pulling it
straight out of the lamp.
WARNING:Handle a halogen headlamp bulb carefully and keep
out of children’s reach. Grasp the bulb only by its plastic base
and do not touch the glass. The oil from your hand could cause the
bulb to break the next time the headlamps are operated.
Install the new bulb(s) in reverse order.
Lights
44
2011 Ranger(ran)
Owners Guide, 1st Printing
USA(fus)
Page 45 of 302
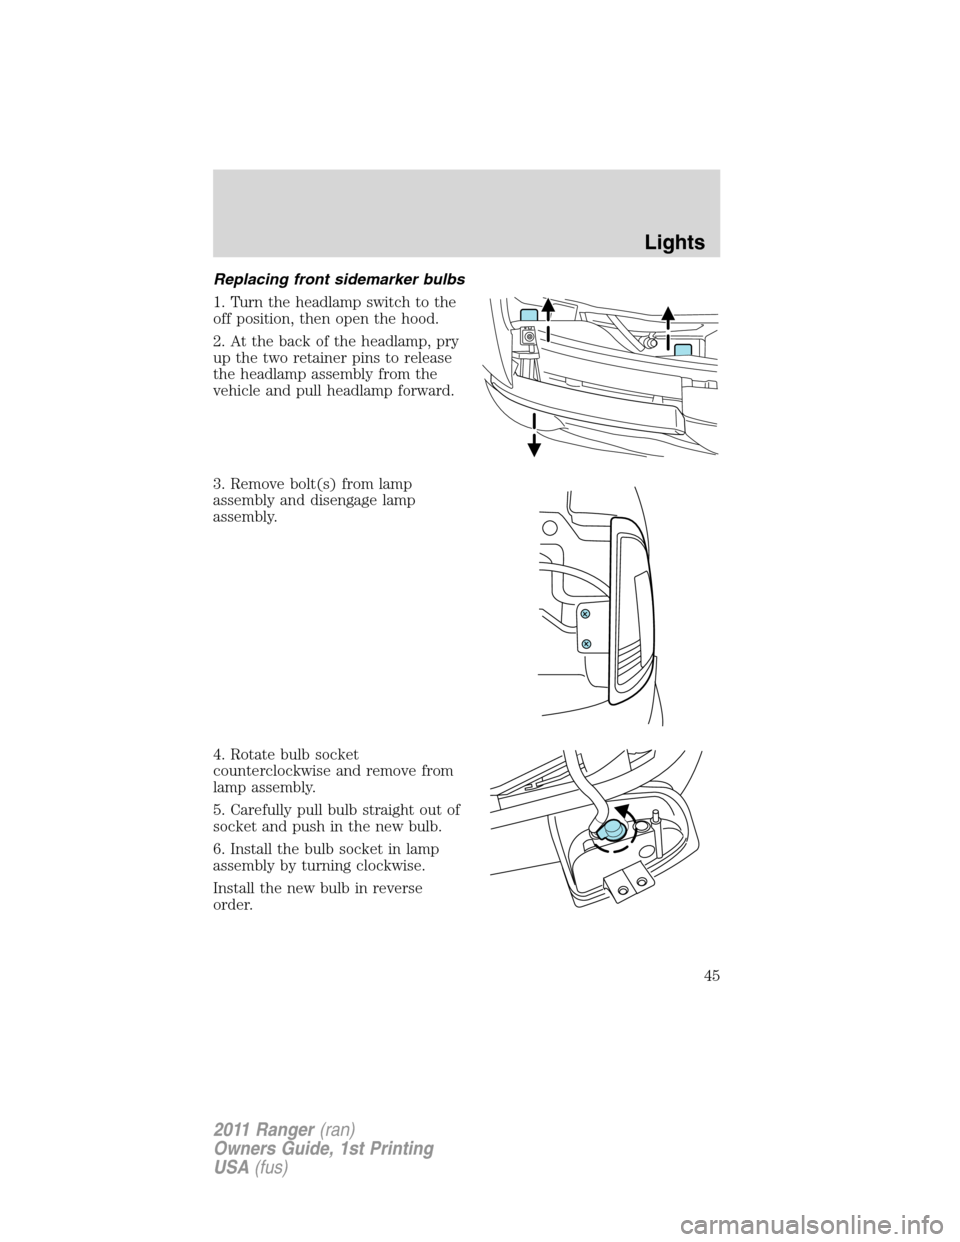
Replacing front sidemarker bulbs
1. Turn the headlamp switch to the
off position, then open the hood.
2. At the back of the headlamp, pry
up the two retainer pins to release
the headlamp assembly from the
vehicle and pull headlamp forward.
3. Remove bolt(s) from lamp
assembly and disengage lamp
assembly.
4. Rotate bulb socket
counterclockwise and remove from
lamp assembly.
5. Carefully pull bulb straight out of
socket and push in the new bulb.
6. Install the bulb socket in lamp
assembly by turning clockwise.
Install the new bulb in reverse
order.
Lights
45
2011 Ranger(ran)
Owners Guide, 1st Printing
USA(fus)
Page 46 of 302
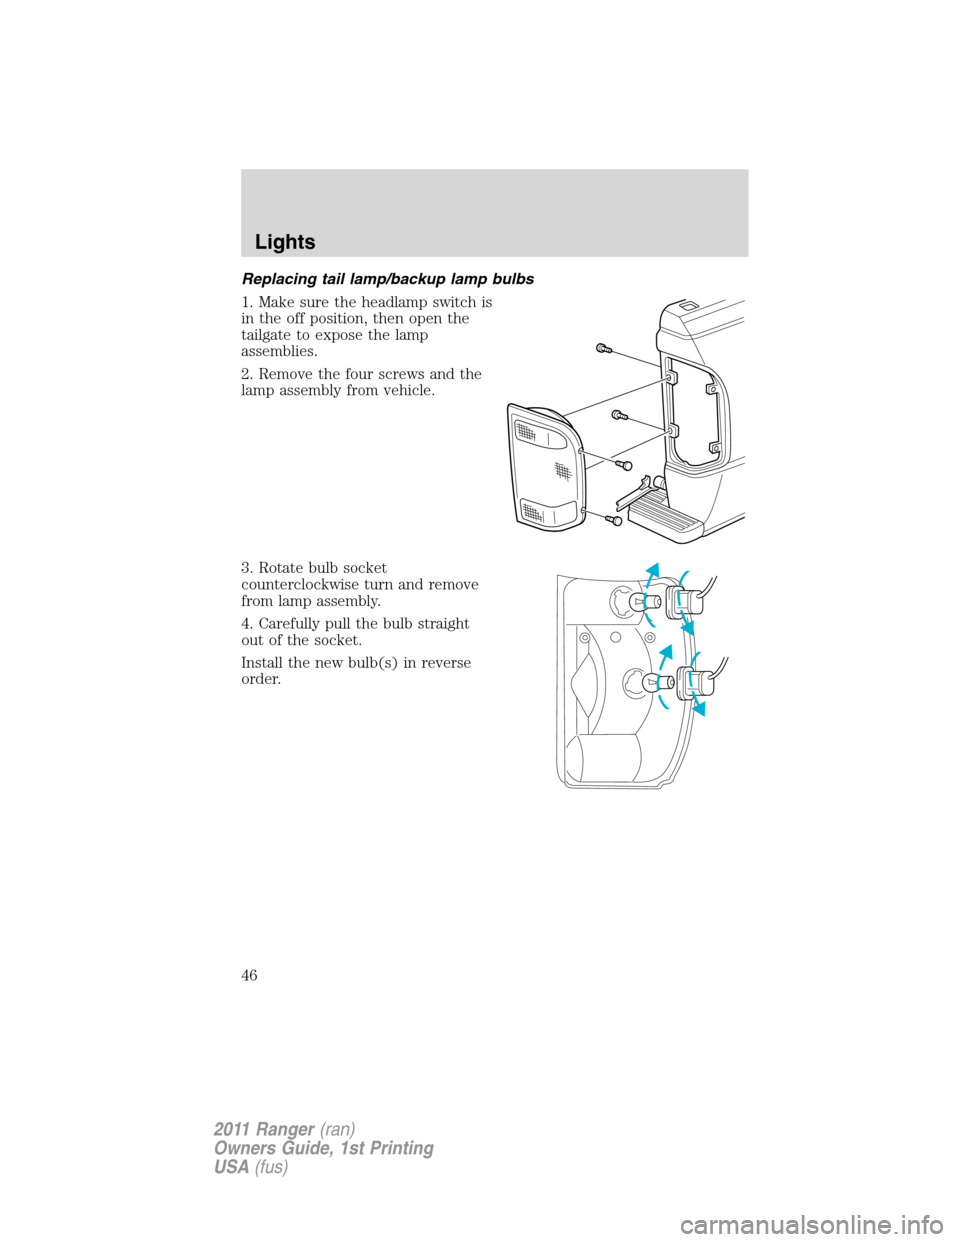
Replacing tail lamp/backup lamp bulbs
1. Make sure the headlamp switch is
in the off position, then open the
tailgate to expose the lamp
assemblies.
2. Remove the four screws and the
lamp assembly from vehicle.
3. Rotate bulb socket
counterclockwise turn and remove
from lamp assembly.
4. Carefully pull the bulb straight
out of the socket.
Install the new bulb(s) in reverse
order.
Lights
46
2011 Ranger(ran)
Owners Guide, 1st Printing
USA(fus)
Page 47 of 302
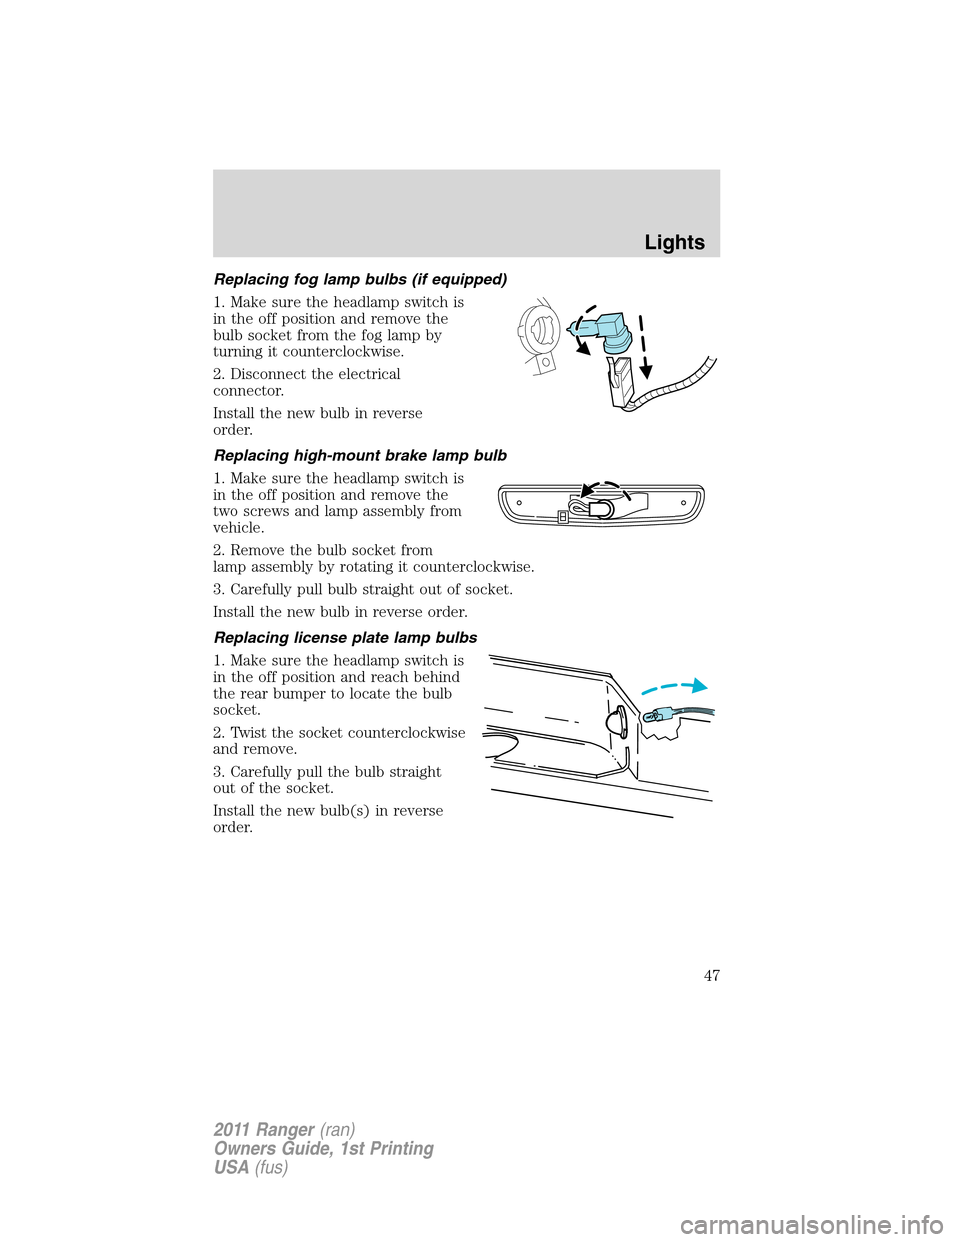
Replacing fog lamp bulbs (if equipped)
1. Make sure the headlamp switch is
in the off position and remove the
bulb socket from the fog lamp by
turning it counterclockwise.
2. Disconnect the electrical
connector.
Install the new bulb in reverse
order.
Replacing high-mount brake lamp bulb
1. Make sure the headlamp switch is
in the off position and remove the
two screws and lamp assembly from
vehicle.
2. Remove the bulb socket from
lamp assembly by rotating it counterclockwise.
3. Carefully pull bulb straight out of socket.
Install the new bulb in reverse order.
Replacing license plate lamp bulbs
1. Make sure the headlamp switch is
in the off position and reach behind
the rear bumper to locate the bulb
socket.
2. Twist the socket counterclockwise
and remove.
3. Carefully pull the bulb straight
out of the socket.
Install the new bulb(s) in reverse
order.
Lights
47
2011 Ranger(ran)
Owners Guide, 1st Printing
USA(fus)
Page 51 of 302
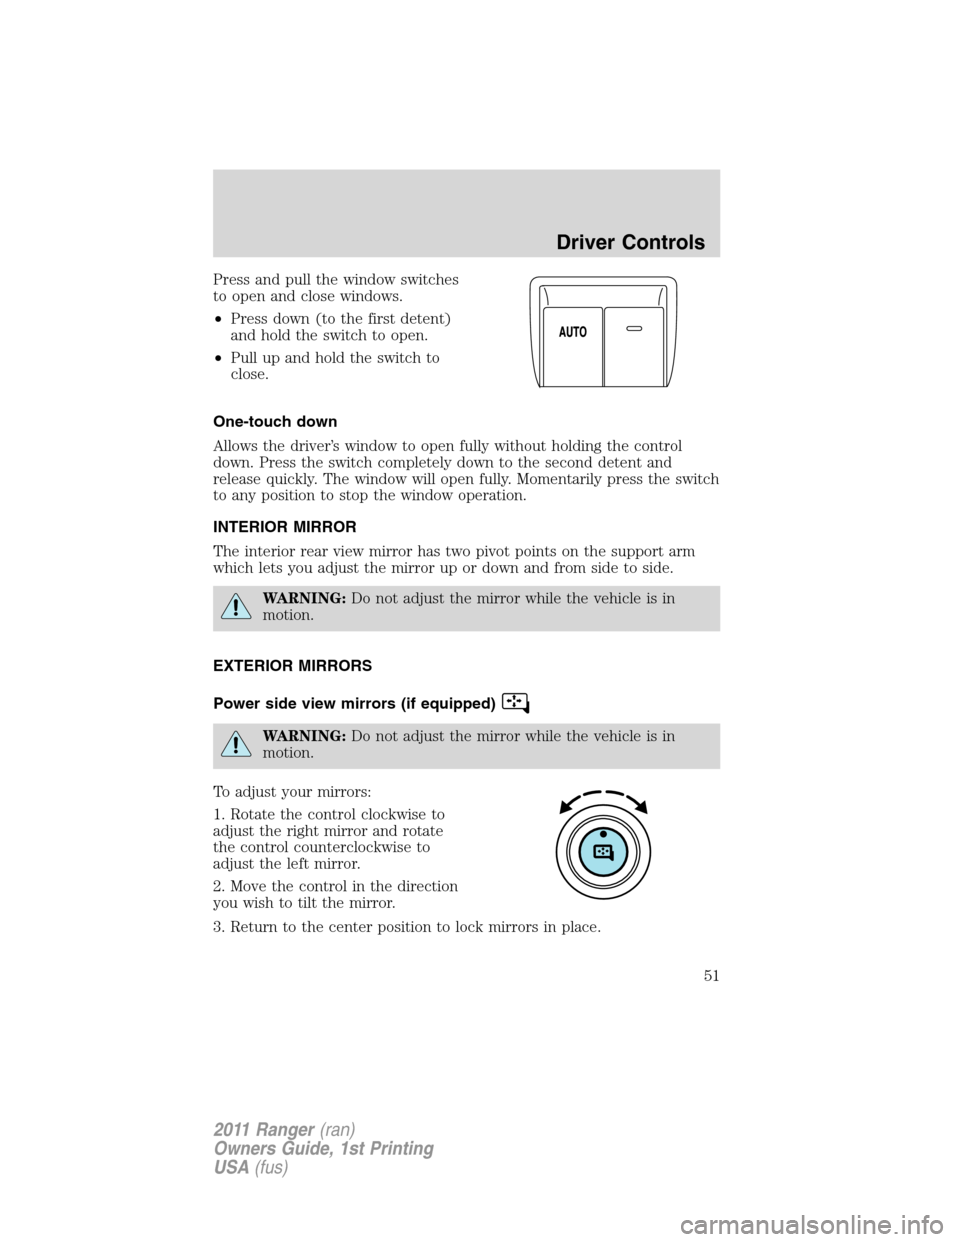
Press and pull the window switches
to open and close windows.
•Press down (to the first detent)
and hold the switch to open.
•Pull up and hold the switch to
close.
One-touch down
Allows the driver’s window to open fully without holding the control
down. Press the switch completely down to the second detent and
release quickly. The window will open fully. Momentarily press the switch
to any position to stop the window operation.
INTERIOR MIRROR
The interior rear view mirror has two pivot points on the support arm
which lets you adjust the mirror up or down and from side to side.
WARNING:Do not adjust the mirror while the vehicle is in
motion.
EXTERIOR MIRRORS
Power side view mirrors (if equipped)
WARNING:Do not adjust the mirror while the vehicle is in
motion.
To adjust your mirrors:
1. Rotate the control clockwise to
adjust the right mirror and rotate
the control counterclockwise to
adjust the left mirror.
2. Move the control in the direction
you wish to tilt the mirror.
3. Return to the center position to lock mirrors in place.
Driver Controls
51
2011 Ranger(ran)
Owners Guide, 1st Printing
USA(fus)
Page 195 of 302
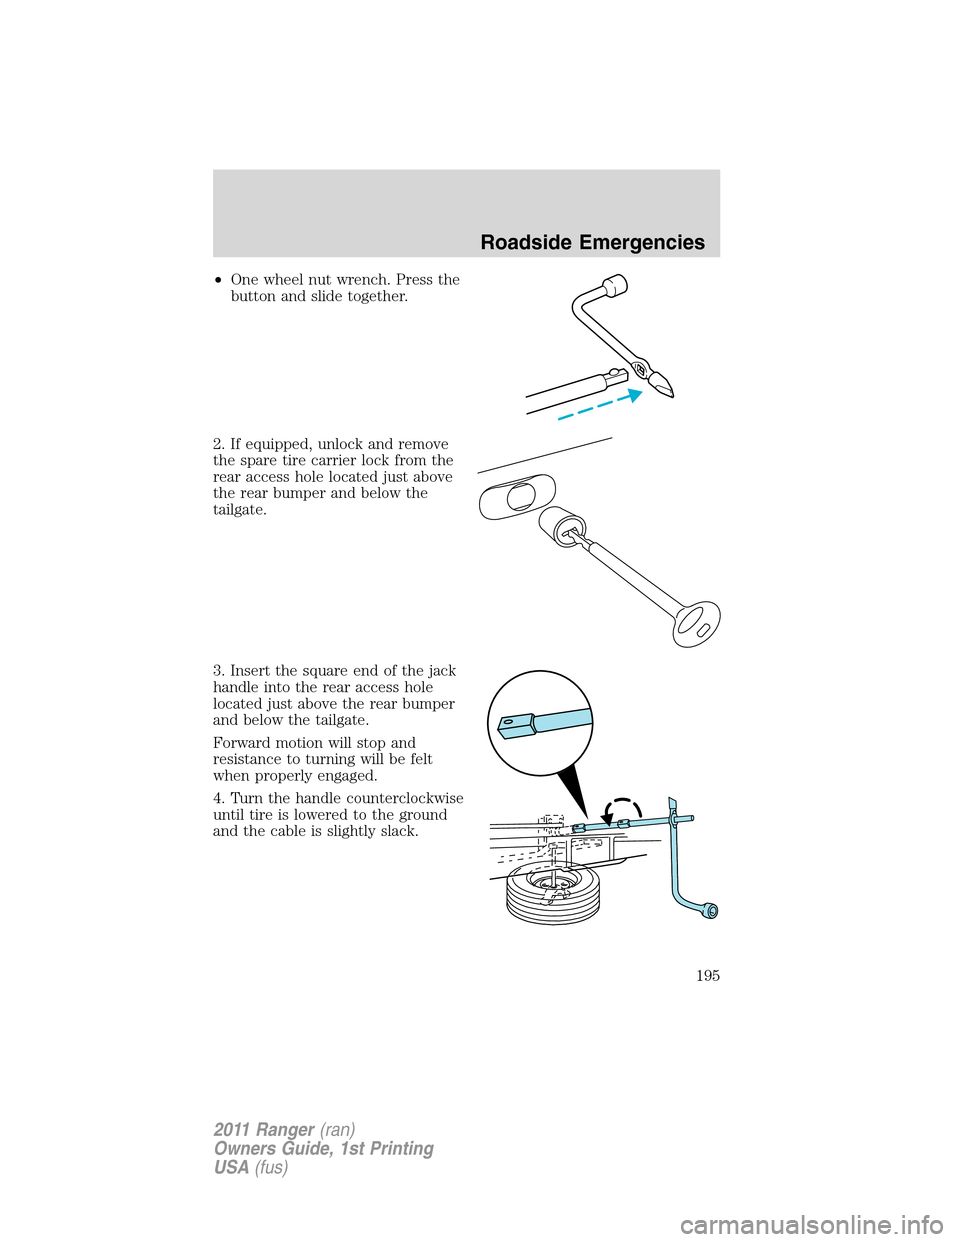
•One wheel nut wrench. Press the
button and slide together.
2. If equipped, unlock and remove
the spare tire carrier lock from the
rear access hole located just above
the rear bumper and below the
tailgate.
3. Insert the square end of the jack
handle into the rear access hole
located just above the rear bumper
and below the tailgate.
Forward motion will stop and
resistance to turning will be felt
when properly engaged.
4. Turn the handle counterclockwise
until tire is lowered to the ground
and the cable is slightly slack.
Roadside Emergencies
195
2011 Ranger(ran)
Owners Guide, 1st Printing
USA(fus)
Page 197 of 302
WARNING:Do not attempt to change a tire on the side of the
vehicle close to moving traffic. Pull far enough off the road to
avoid the danger of being hit when operating the jack or changing the
wheel.
Note:Passengers should not remain in the vehicle when the vehicle is
being jacked.
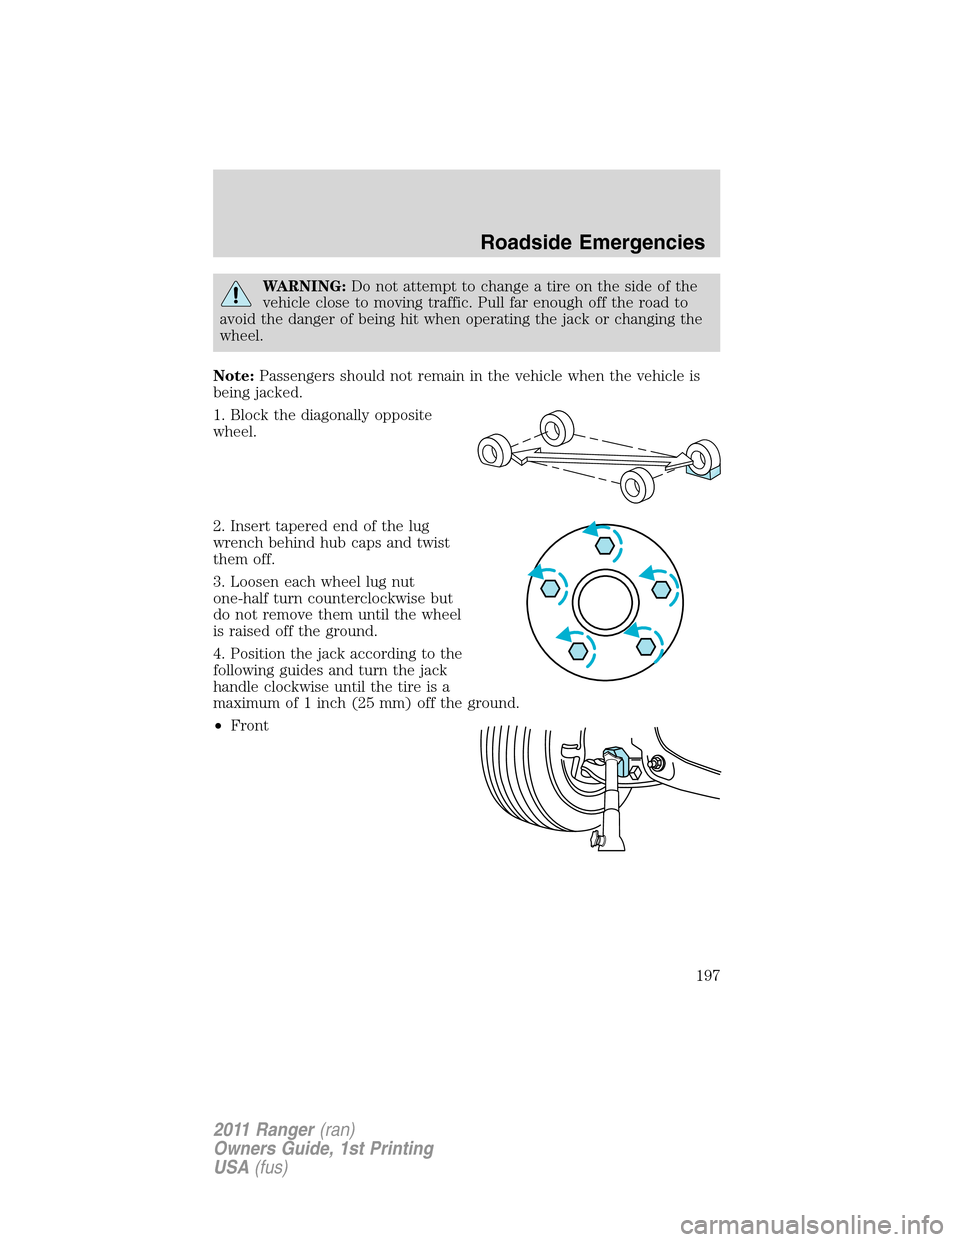
1. Block the diagonally opposite
wheel.
2. Insert tapered end of the lug
wrench behind hub caps and twist
them off.
3. Loosen each wheel lug nut
one-half turn counterclockwise but
do not remove them until the wheel
is raised off the ground.
4. Position the jack according to the
following guides and turn the jack
handle clockwise until the tire is a
maximum of 1 inch (25 mm) off the ground.
•Front
Roadside Emergencies
197
2011 Ranger(ran)
Owners Guide, 1st Printing
USA(fus)