headlamp FORD RANGER 2019 User Guide
[x] Cancel search | Manufacturer: FORD, Model Year: 2019, Model line: RANGER, Model: FORD RANGER 2019Pages: 512, PDF Size: 7.63 MB
Page 92 of 512
Normally, it illuminates until the engine is
cranked and automatically turns off if no
malfunctions are present. However, if after
15 seconds it flashes eight times, this
indicates that your vehicle is not ready for
Inspection and Maintenance (I/M) testing.
See Emission Law (page 148).
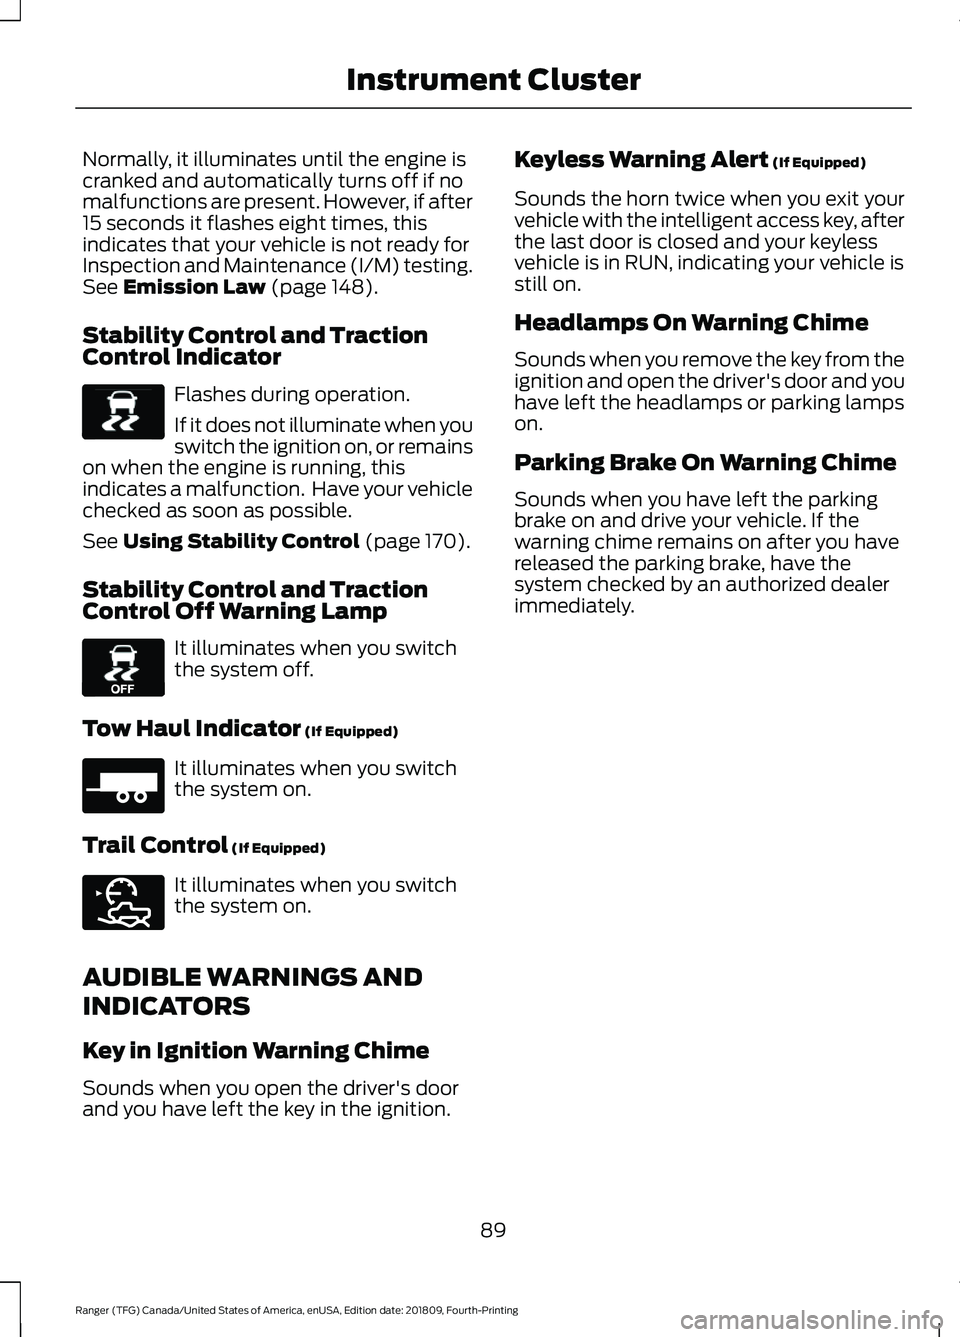
Stability Control and Traction
Control Indicator Flashes during operation.
If it does not illuminate when you
switch the ignition on, or remains
on when the engine is running, this
indicates a malfunction. Have your vehicle
checked as soon as possible.
See
Using Stability Control (page 170).
Stability Control and Traction
Control Off Warning Lamp It illuminates when you switch
the system off.
Tow Haul Indicator
(If Equipped) It illuminates when you switch
the system on.
Trail Control
(If Equipped) It illuminates when you switch
the system on.
AUDIBLE WARNINGS AND
INDICATORS
Key in Ignition Warning Chime
Sounds when you open the driver's door
and you have left the key in the ignition. Keyless Warning Alert
(If Equipped)
Sounds the horn twice when you exit your
vehicle with the intelligent access key, after
the last door is closed and your keyless
vehicle is in RUN, indicating your vehicle is
still on.
Headlamps On Warning Chime
Sounds when you remove the key from the
ignition and open the driver's door and you
have left the headlamps or parking lamps
on.
Parking Brake On Warning Chime
Sounds when you have left the parking
brake on and drive your vehicle. If the
warning chime remains on after you have
released the parking brake, have the
system checked by an authorized dealer
immediately.
89
Ranger (TFG) Canada/United States of America, enUSA, Edition date: 201809, Fourth-Printing Instrument ClusterE138639 E130458 E271981 E272858
Page 197 of 512

•
Low.
• Normal.
• High.
System Display If you switch the system on in alert mode,
an overhead graphic of a vehicle with lane
markings appears in the information
display.
If you switch the system on in aid or alert
and aid mode, a separate white icon also
appears, or in some vehicles arrows display
with the lane markings.
When you switch off the system, the lane
marking graphics do not display.
While the system is on, the color of the
lane markings change to indicate the
system status.
Grey: Indicates that the system is
temporarily unable to provide a warning
or intervention on the indicated side. This
may be because: •
Your vehicle is under the activation
speed.
• Your vehicle is in a dynamic maneuver.
• The road has no or poor lane markings
in the camera field-of-view.
• The camera is obscured or unable to
detect the lane markings due to
environmental, traffic or vehicle
conditions. For example, significant sun
angles, shadows, snow, heavy rain or
fog, following a large vehicle that is
blocking or shadowing the lane or poor
headlamp illumination.
See Troubleshooting for additional
information.
Green: Indicates that the system is
available or ready to provide a warning or
intervention on the indicated side.
Yellow: Indicates that the system is
providing or has just provided a lane
keeping aid intervention.
Red: Indicates that the system is providing
or has just provided a lane keeping alert
warning.
The system can be temporarily suppressed
at any time by the following:
• Quick braking.
• Fast acceleration.
• Using the direction indicator.
• Evasive steering maneuver.
• Driving too close to the lane markings.
Troubleshooting Why is the feature not available when I can see the lane markings on the road?
Your vehicle speed is outside the operational range of the feature.
The sun is shining directly into the camera lens.
A quick intentional lane change has occurred.
194
Ranger (TFG) Canada/United States of America, enUSA, Edition date: 201809, Fourth-Printing Driving AidsE151660
Page 269 of 512
CHECKING THE WIPER
BLADES
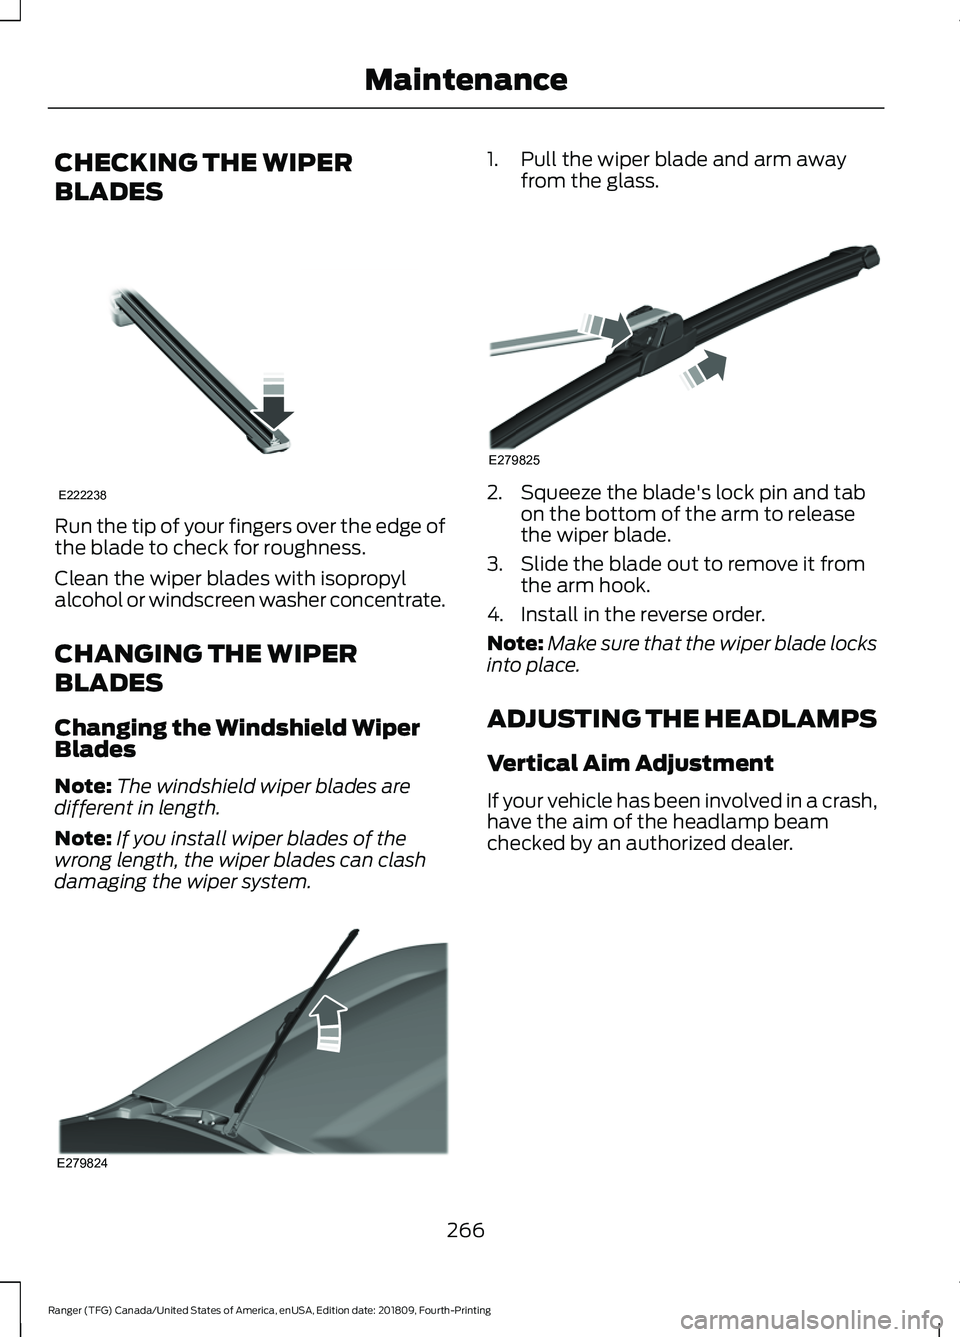
Run the tip of your fingers over the edge of
the blade to check for roughness.
Clean the wiper blades with isopropyl
alcohol or windscreen washer concentrate.
CHANGING THE WIPER
BLADES
Changing the Windshield Wiper
Blades
Note:
The windshield wiper blades are
different in length.
Note: If you install wiper blades of the
wrong length, the wiper blades can clash
damaging the wiper system. 1. Pull the wiper blade and arm away
from the glass. 2. Squeeze the blade's lock pin and tab
on the bottom of the arm to release
the wiper blade.
3. Slide the blade out to remove it from the arm hook.
4. Install in the reverse order.
Note: Make sure that the wiper blade locks
into place.
ADJUSTING THE HEADLAMPS
Vertical Aim Adjustment
If your vehicle has been involved in a crash,
have the aim of the headlamp beam
checked by an authorized dealer.
266
Ranger (TFG) Canada/United States of America, enUSA, Edition date: 201809, Fourth-Printing MaintenanceE222238 E279824 E279825
Page 270 of 512
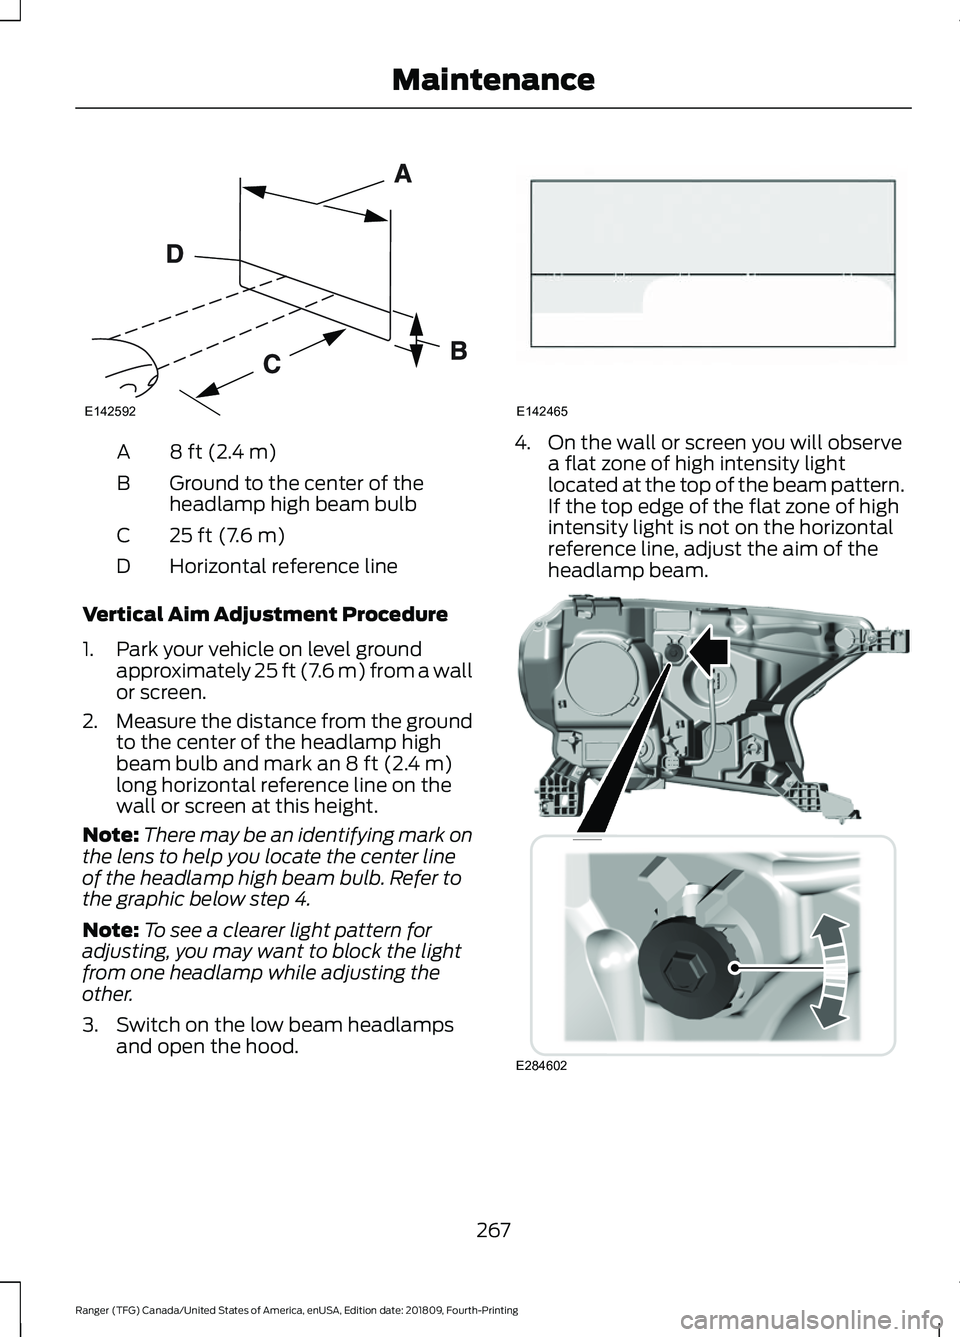
8 ft (2.4 m)
A
Ground to the center of the
headlamp high beam bulb
B
25 ft (7.6 m)
C
Horizontal reference line
D
Vertical Aim Adjustment Procedure
1. Park your vehicle on level ground approximately 25 ft (7.6 m) from a wall
or screen.
2. Measure the distance from the ground
to the center of the headlamp high
beam bulb and mark an
8 ft (2.4 m)
long horizontal reference line on the
wall or screen at this height.
Note: There may be an identifying mark on
the lens to help you locate the center line
of the headlamp high beam bulb. Refer to
the graphic below step 4.
Note: To see a clearer light pattern for
adjusting, you may want to block the light
from one headlamp while adjusting the
other.
3. Switch on the low beam headlamps and open the hood. 4. On the wall or screen you will observe
a flat zone of high intensity light
located at the top of the beam pattern.
If the top edge of the flat zone of high
intensity light is not on the horizontal
reference line, adjust the aim of the
headlamp beam. 267
Ranger (TFG) Canada/United States of America, enUSA, Edition date: 201809, Fourth-Printing MaintenanceE142592 E142465 E284602
Page 271 of 512
5. Use a suitable tool, for example a
screwdriver or socket wrench, to turn
the adjuster clockwise or
counterclockwise to adjust the vertical
aim of the headlamp. The horizontal
edge of the brighter light should touch
the horizontal reference line.
6. Close the hood and switch off the lamps.
REMOVING A HEADLAMP
Contact an authorized dealer.
CHANGING A BULB
Replacing the Headlamp Bulbs
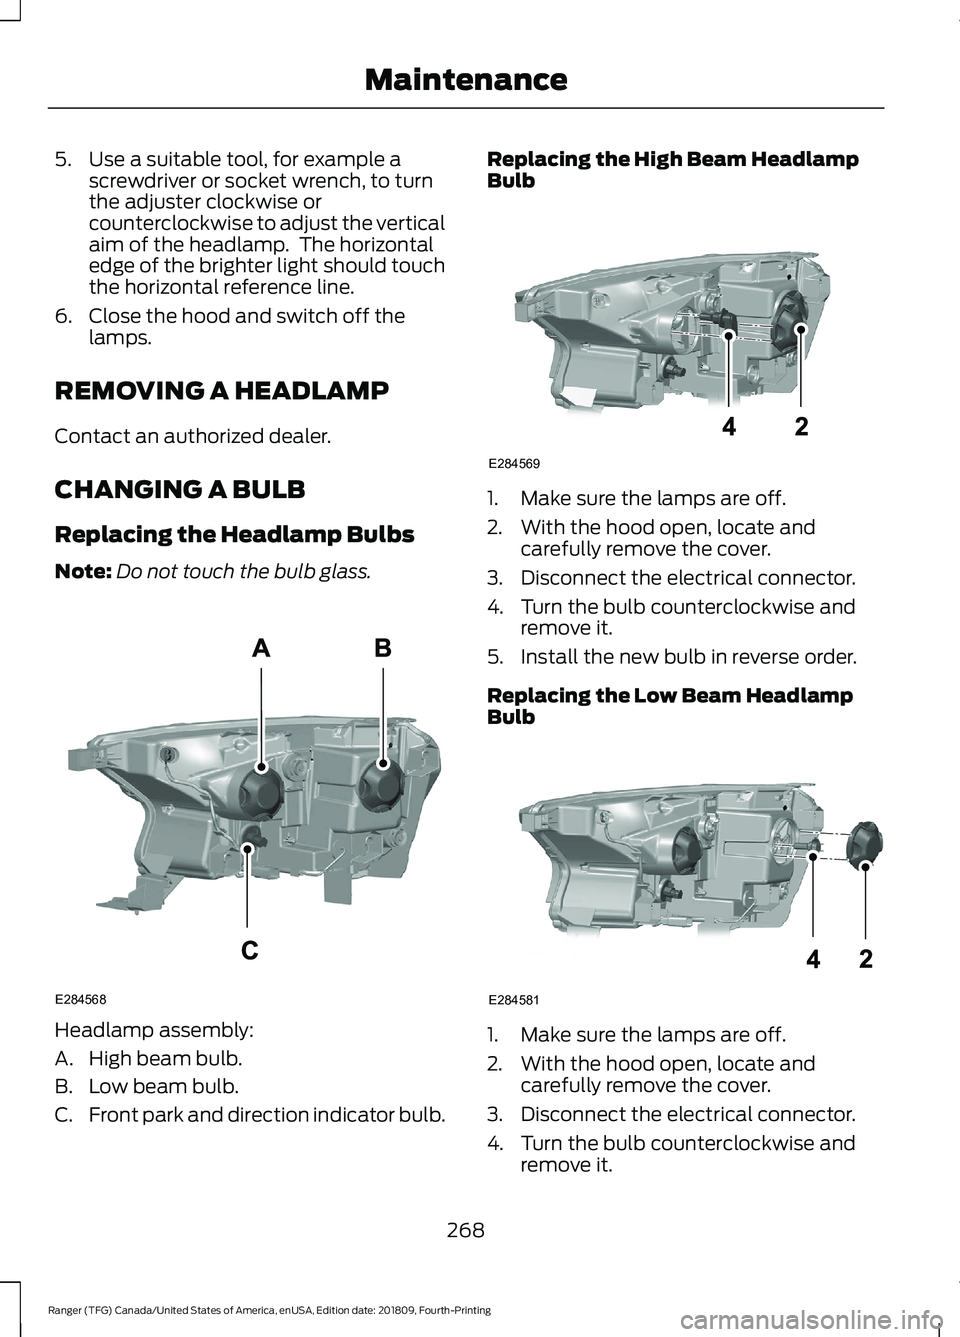
Note: Do not touch the bulb glass.Headlamp assembly:
A. High beam bulb.
B. Low beam bulb.
C.
Front park and direction indicator bulb. Replacing the High Beam Headlamp
Bulb
1. Make sure the lamps are off.
2. With the hood open, locate and
carefully remove the cover.
3. Disconnect the electrical connector.
4. Turn the bulb counterclockwise and remove it.
5. Install the new bulb in reverse order.
Replacing the Low Beam Headlamp
Bulb 1. Make sure the lamps are off.
2. With the hood open, locate and
carefully remove the cover.
3. Disconnect the electrical connector.
4. Turn the bulb counterclockwise and remove it.
268
Ranger (TFG) Canada/United States of America, enUSA, Edition date: 201809, Fourth-Printing MaintenanceE284568 E284569 E284581
Page 272 of 512
5. Install the new bulb in reverse order.
Replacing the Front Park and Direction
Indicator Bulb
1. Make sure the lamps are off.
2.
Turn the bulb holder counterclockwise
and remove it.
3. Remove the bulb by pulling it straight out.
4. Install the new bulb in reverse order.
Replacing LED Headlamp Bulbs
All bulbs in this assembly except for the
direction indicator bulb are LED. If an LED
fails have your vehicle checked as soon as
possible. Contact an authorized dealer.
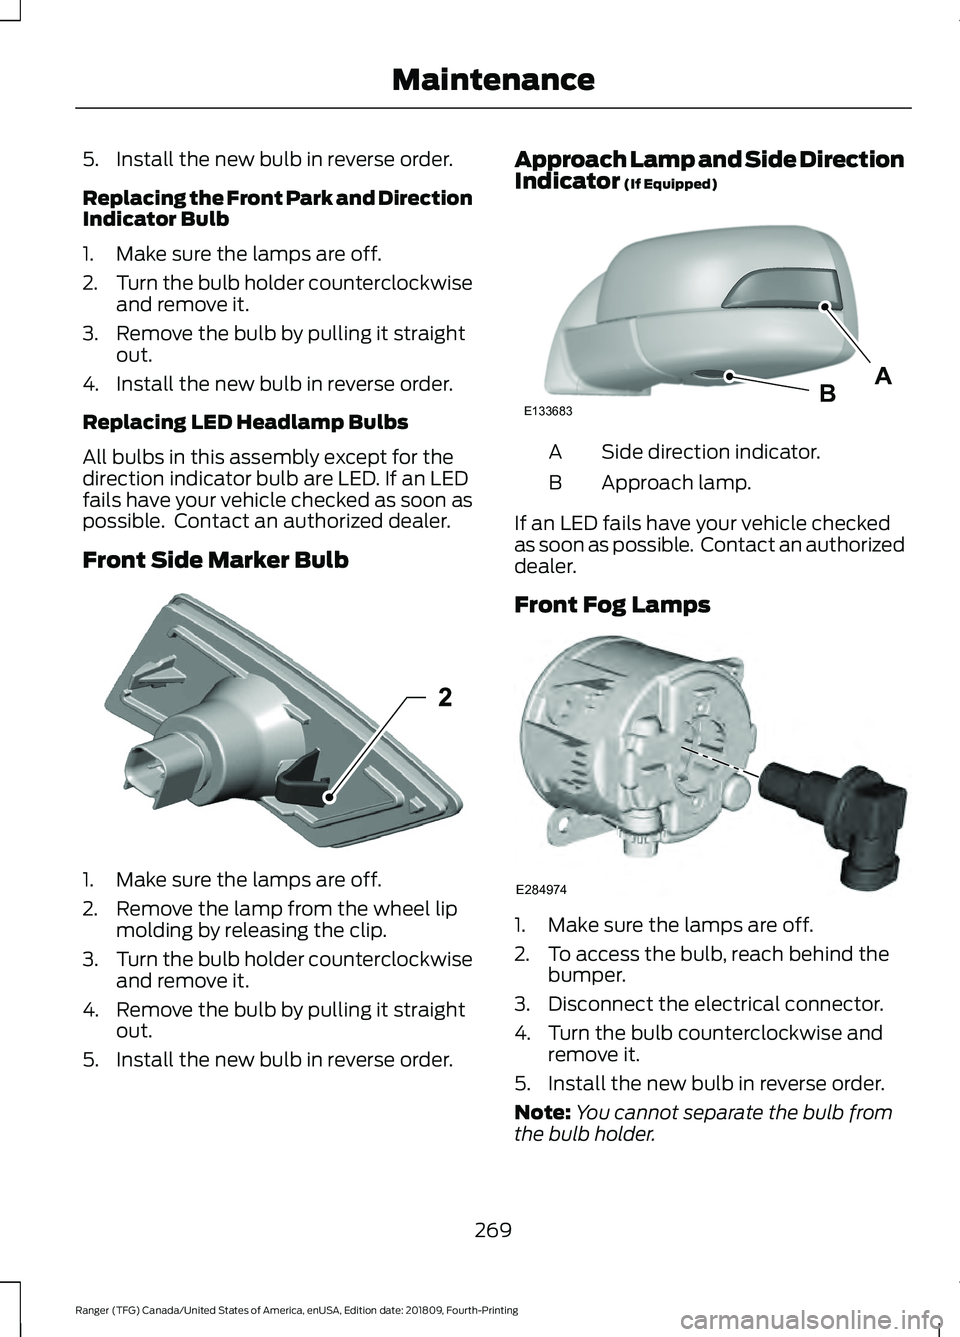
Front Side Marker Bulb 1. Make sure the lamps are off.
2. Remove the lamp from the wheel lip
molding by releasing the clip.
3. Turn the bulb holder counterclockwise
and remove it.
4. Remove the bulb by pulling it straight out.
5. Install the new bulb in reverse order. Approach Lamp and Side Direction
Indicator (If Equipped)
Side direction indicator.
A
Approach lamp.
B
If an LED fails have your vehicle checked
as soon as possible. Contact an authorized
dealer.
Front Fog Lamps 1. Make sure the lamps are off.
2. To access the bulb, reach behind the
bumper.
3. Disconnect the electrical connector.
4. Turn the bulb counterclockwise and remove it.
5. Install the new bulb in reverse order.
Note: You cannot separate the bulb from
the bulb holder.
269
Ranger (TFG) Canada/United States of America, enUSA, Edition date: 201809, Fourth-Printing MaintenanceE301637 ABE133683 E284974
Page 277 of 512
•
Dry your vehicle with a chamois or soft
terry cloth towel to eliminate water
spotting.
• Immediately remove fuel spillages, bird
droppings, insect deposits and road tar.
These may cause damage to your
vehicle ’s paintwork or trim over time.
We recommend Motorcraft Bug and
Tar Remover.
• Remove any exterior accessories, for
example antennas, before entering a
car wash.
• When filling with AdBlue®, remove any
residue on painted surfaces
immediately.
Note: Suntan lotions and insect repellents
can damage painted surfaces. If these
substances come in contact with your
vehicle, wash the affected area as soon as
possible.
Cleaning the Headlamps
Note: Do not scrape the headlamp lenses
or use abrasives, alcoholic solvents or
chemical solvents to clean them.
Note: Do not wipe the headlamps when
they are dry.
Exterior Chrome Parts
• Apply a high quality-cleaning product
to bumpers and other chrome parts.
Follow the manufacturer ’s instructions.
We recommend Motorcraft Custom
Bright Metal Cleaner.
• Do not apply the cleaning product to
hot surfaces. Do not leave the cleaning
product on chrome surfaces longer
than the time recommended.
• Using non-recommended cleaners can
result in severe and permanent
cosmetic damage.
Note: Never use abrasive materials, for
example steel wool or plastic pads as they
can scratch the chrome surface. Note:
Do not use chrome cleaner, metal
cleaner or polish on wheels or wheel covers.
Exterior Plastic Parts
For routine cleaning we recommend
Motorcraft Detail Wash. If tar or grease
spots are present, we recommend
Motorcraft Bug and Tar Remover.
Stripes or Graphics (If Equipped)
Hand washing your vehicle is preferred
however, pressure washing may be used
under the following conditions:
• Do not use water pressure higher than
2,000 psi (14,000 kPa)
.
• Do not use water hotter than
179°F
(82°C).
• Use a spray with a
40° wide spray
angle pattern.
• Keep the nozzle at a
12 in (305 mm)
distance and 90° angle to your
vehicle's surface.
Note: Holding the pressure washer nozzle
at an angle to the vehicle's surface may
damage graphics and cause the edges to
peel away from the vehicle's surface.
Underbody
Regularly clean the underside of your
vehicle using water. Keep body and door
drain holes free of debris or foreign
material.
Under Hood
For removing black rubber marks from
under the hood we recommend Motorcraft
Wheel and Tire Cleaner or Motorcraft Bug
and Tar Remover.
274
Ranger (TFG) Canada/United States of America, enUSA, Edition date: 201809, Fourth-Printing Vehicle Care
Page 327 of 512
BULB SPECIFICATION CHART
Power (Watts)
Specification
Bulb
55
H11LL
Headlamp low beam.
60
HB3LL
Headlamp high beam.
LED
LED
Headlamps. 1
21/5
W21/5W
Front park/direction indicator bulb
(Clear).
28/8
7444NA
Front park/direction indicator bulb
(Amber).
3.78
194
Front side marker bulb.
55
H11
Front fog lamp bulb.
LED
LED
Front fog lamps. 1
21/5
W21/5W
Rear brake/park bulb.
21
WY21W
Rear direction indicator bulb.
LED
LED
Rear direction/park/stop lamp. 1
LED
LED
Reverse lamp. 1
21
W21W
Reverse lamp bulb - type 1.
324
Ranger (TFG) Canada/United States of America, enUSA, Edition date: 201809, Fourth-Printing Capacities and SpecificationsE240523
Page 500 of 512
4
4WD
See: Four-Wheel Drive..................................... 156
A
A/C See: Climate Control........................................... 111
About This Manual...........................................7
About Trail Control.......................................174
ABS See: Brakes........................................................... 165
ABS driving hints See: Hints on Driving With Anti-Lock
Brakes................................................................ 165
Accessories....................................................433 Exterior Style....................................................... 433
Interior Style........................................................ 433
Lifestyle................................................................. 433
Peace of Mind..................................................... 433
Accessories See: Replacement Parts
Recommendation............................................ 13
ACC See: Using Adaptive Cruise Control.............183
Adjusting the Headlamps........................266 Vertical Aim Adjustment................................ 266
Adjusting the Steering Wheel...................66
Airbag Disposal
...............................................49
Air Conditioning See: Climate Control........................................... 111
Air Filter See: Changing the Engine Air Filter.............272
Alarm See: Anti-Theft Alarm........................................ 65
Ambient Lighting............................................76 Adjusting the Brightness.................................... 76
Changing the Color.............................................. 76
Switching Ambient Lighting Off..................... 76
Switching Ambient Lighting On...................... 76
Anti-Theft Alarm
............................................65
Alarm System........................................................ 65
Arming the Alarm................................................. 65
Disarming the Alarm........................................... 65
Triggering the Alarm............................................65
Appendices....................................................455 Apps.................................................................402
........................................................................\
.......... 402
SiriusXM Traffic and Travel Link.................. 404
At a Glance........................................................18
Audible Warnings and Indicators.............89 Headlamps On Warning Chime..................... 89
Key in Ignition Warning Chime........................ 89
Keyless Warning Alert........................................ 89
Parking Brake On Warning Chime.................89
Audio Control
..................................................66
Type One................................................................. 66
Type Two................................................................. 67
You can operate the following functions with the control:............................................... 67
Audio Input Jack...........................................337
Audio System................................................326 General Information......................................... 326
Audio Unit - Vehicles With: SYNC 3
......................................................................330
Adjusting the Volume...................................... 330
Changing Radio Stations................................. 331
Playing or Pausing Media................................. 331
Switching the Audio Unit On and Off..........331
Using Seek, Fast Forward and Reverse.............................................................. 331
Audio Unit - Vehicles With: SYNC.........328 Accessing the Apps Menu.............................. 328
Accessing the Clock Settings........................ 328
Accessing the Information Menu.................328
Accessing the Media Source Menu.............328
Accessing the Phone Features..................... 328
Accessing the Settings Menu........................ 328
Accessing the Sound Settings...................... 329
Adjusting the Volume....................................... 329
Changing Radio Stations................................ 329
Listening to the Radio...................................... 329
Playing or Pausing Media............................... 329
Switching Repeat Mode On and Off..........329
Switching Shuffle Mode On and Off..........329
Switching the Audio Unit On and Off........329
Switching the Display On and Off...............329
Using a Cell Phone............................................ 329
Using Seek, Fast Forward and Reverse............................................................. 330
Using the Display Control............................... 330
Using the Number Block................................. 330
497
Ranger (TFG) Canada/United States of America, enUSA, Edition date: 201809, Fourth-Printing Index
Page 501 of 512
Audio Unit - Vehicles Without:
SYNC.............................................................326
Accessing the Clock Settings........................ 326
Accessing the Media Source Menu.............326
Accessing the Menu.......................................... 326
Accessing the Phone Features...................... 327
Accessing the Sound Settings....................... 327
Adjusting the Volume....................................... 327
Changing Radio Stations................................. 327
Listening to the Radio....................................... 327
Muting the Audio................................................ 327
Switching the Audio Unit On and Off.........327
Using Seek, Fast Forward and Reverse............................................................. 328
Using the Display Control................................ 327
Using the Number Block................................. 328
Autolamps.........................................................72 Windshield Wiper Activated
Headlamps......................................................... 72
Automatic Climate Control
........................112
Setting the Blower Motor Speed................... 112
Setting the Temperature................................... 112
Switching Auto Mode On and Off.................112
Switching Defrost On and Off......................... 113
Switching Maximum Air Conditioning On and Off................................................................ 113
Switching Maximum Defrost On and Off........................................................................\
. 113
Switching Recirculated Air On and Off........................................................................\
. 113
Switching the Air Conditioning On and Off........................................................................\
. 112
Switching the Climate Control On and Off........................................................................\
. 113
Switching the Heated Seats On and Off........................................................................\
. 113
Automatic High Beam Control..................74 Automatic High Beam Indicator..................... 75
Switching the System On and Off.................74
Automatic Transmission
............................152
Automatic Transmission Adaptive
Learning............................................................. 155
Brake-Shift Interlock......................................... 154
If Your Vehicle Gets Stuck In Mud or Snow................................................................... 155
Progressive Range Selection.......................... 154
SelectShift™ Automatic Transmission................................................... 153Transmission Selector Lever
Positions............................................................ 152
Automatic Transmission Fluid Check .............................................................
262
Auto-Start-Stop...........................................139 Disabling Auto-Start-Stop............................. 140
Enabling Auto-Start-Stop............................... 139
Autowipers.......................................................69 Autowipers Settings............................................ 70
Auxiliary Power Points
................................129
110 Volt AC Power Point................................... 129
12 Volt DC Power Point..................................... 129
USB Port and Power Point Locations.........129
B
Battery See: Changing the 12V Battery..................... 264
Battery Charging See: Charging the 12V Battery...................... 263
Blind Spot Information System..............196 Blind Spot Information System with Trailer
Tow...................................................................... 197
Switching the System On and Off...............199
System Errors....................................................... 199
Using the Blind Spot Information System.............................................................. 196
BLIS See: Blind Spot Information System..........196
Body Styling Kits.........................................280
Bonnet Lock See: Opening and Closing the Hood..........256
Booster Seats
..................................................29
Types of Booster Seats...................................... 29
Brake Fluid Check
........................................262
Brakes...............................................................165 General Information.......................................... 165
Breaking-In.....................................................224
Bulb Specification Chart...........................324
C
Cabin Air Filter
................................................116
Canceling the Set Speed...........................174
Capacities and Specifications................320 Alternative Engine Oil for Extremely Cold
Climates........................................................... 323
Specifications....................................................... 321
498
Ranger (TFG) Canada/United States of America, enUSA, Edition date: 201809, Fourth-Printing Index