tow FORD RANGER 2021 User Guide
[x] Cancel search | Manufacturer: FORD, Model Year: 2021, Model line: RANGER, Model: FORD RANGER 2021Pages: 475, PDF Size: 7.9 MB
Page 60 of 475
The power windows do not work during
remote start and the radio does not turn
on automatically.
The parking lamps remain on and your
vehicle will run for 5, 10 or 15 minutes,
depending on the setting.
Extending the Engine Running Time
To extend the engine running time duration
of your vehicle during remote start, repeat
steps 1 and 2 while the engine is running.
If the duration is set to 15 minutes, the
duration extends by another 15 minutes.
For example, if your vehicle had been
running from the first remote start for 10
minutes, your vehicle continues to run now
for a total of 30 minutes. You can extend
the engine running time duration to a
maximum of 30 minutes.
Wait at least five seconds before remote
starting after the engine stops running.
Turning Your Vehicle Off After Remote
Starting
Press the button once. Your
vehicle and the parking lamps
turn off.
You may have to be closer to your vehicle
than when starting due to ground reflection
and the added noise of your running
vehicle.
You can switch this feature on or off in the
information display.
REPLACING A LOST KEY OR
REMOTE CONTROL
Replacement keys or remote controls can
be purchased from an authorized dealer.
Authorized dealers can program remote
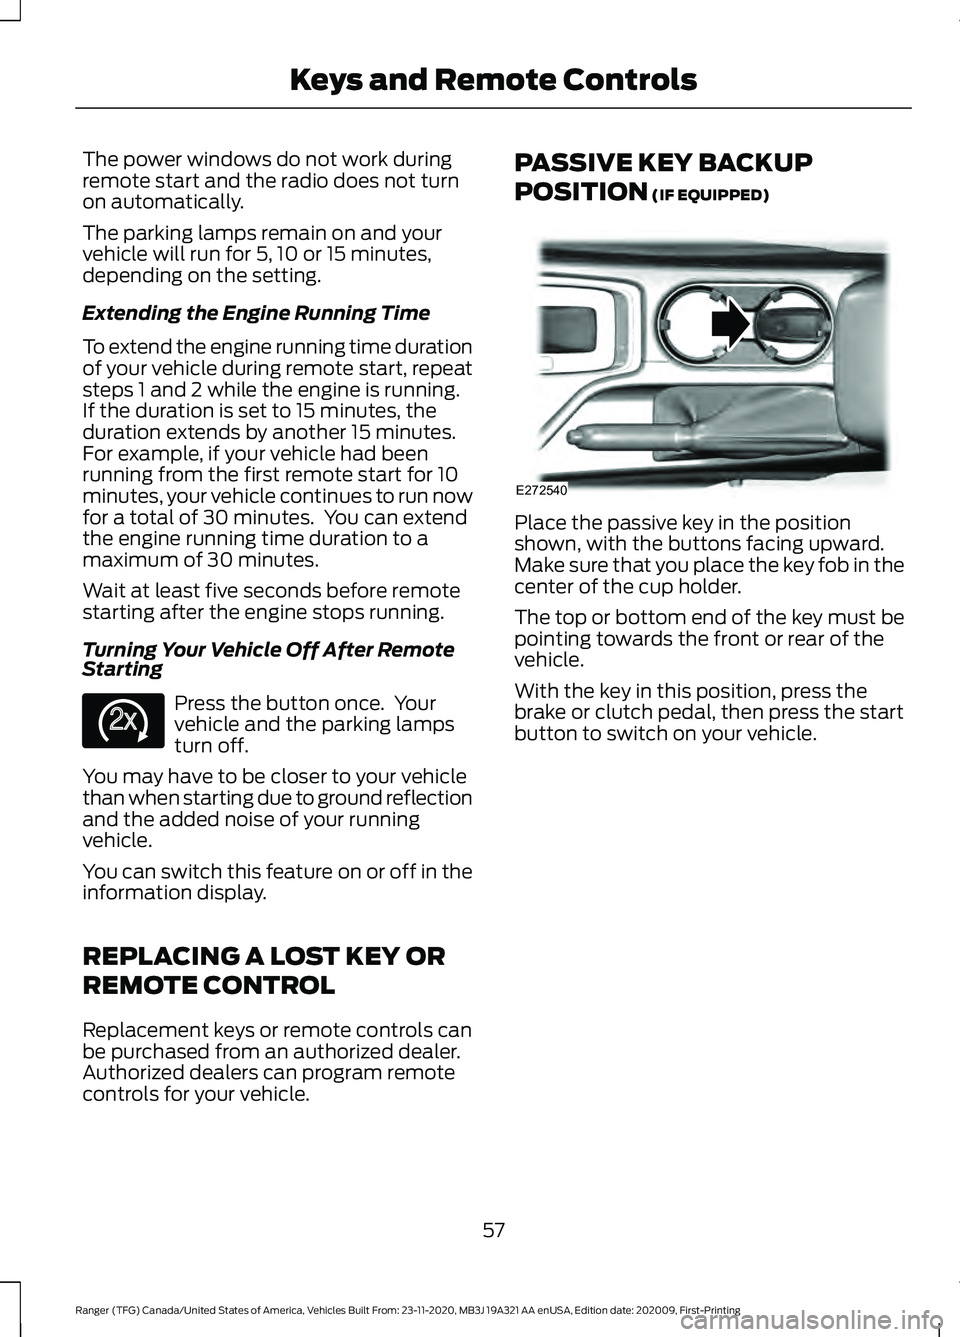
controls for your vehicle. PASSIVE KEY BACKUP
POSITION (IF EQUIPPED)
Place the passive key in the position
shown, with the buttons facing upward.
Make sure that you place the key fob in the
center of the cup holder.
The top or bottom end of the key must be
pointing towards the front or rear of the
vehicle.
With the key in this position, press the
brake or clutch pedal, then press the start
button to switch on your vehicle.
57
Ranger (TFG) Canada/United States of America, Vehicles Built From: 23-11-2020, MB3J 19A321 AA enUSA, Edition date: 202009, First-Printing Keys and Remote ControlsE138625 E272540
Page 66 of 475
LOCKING AND UNLOCKING
You can use the power door lock control
or the remote control to lock and unlock
your doors. This is also true for the tailgate
if your vehicle comes with power tailgate
lock. See Tailgate Lock (page 68).
Note: Always take your keys and lock all
doors when leaving your vehicle.
Note: Do not use the door latch assembly
to attach any accessory, such as handles or
steps, as this can cause damage to your
vehicle.
Power Door Locks
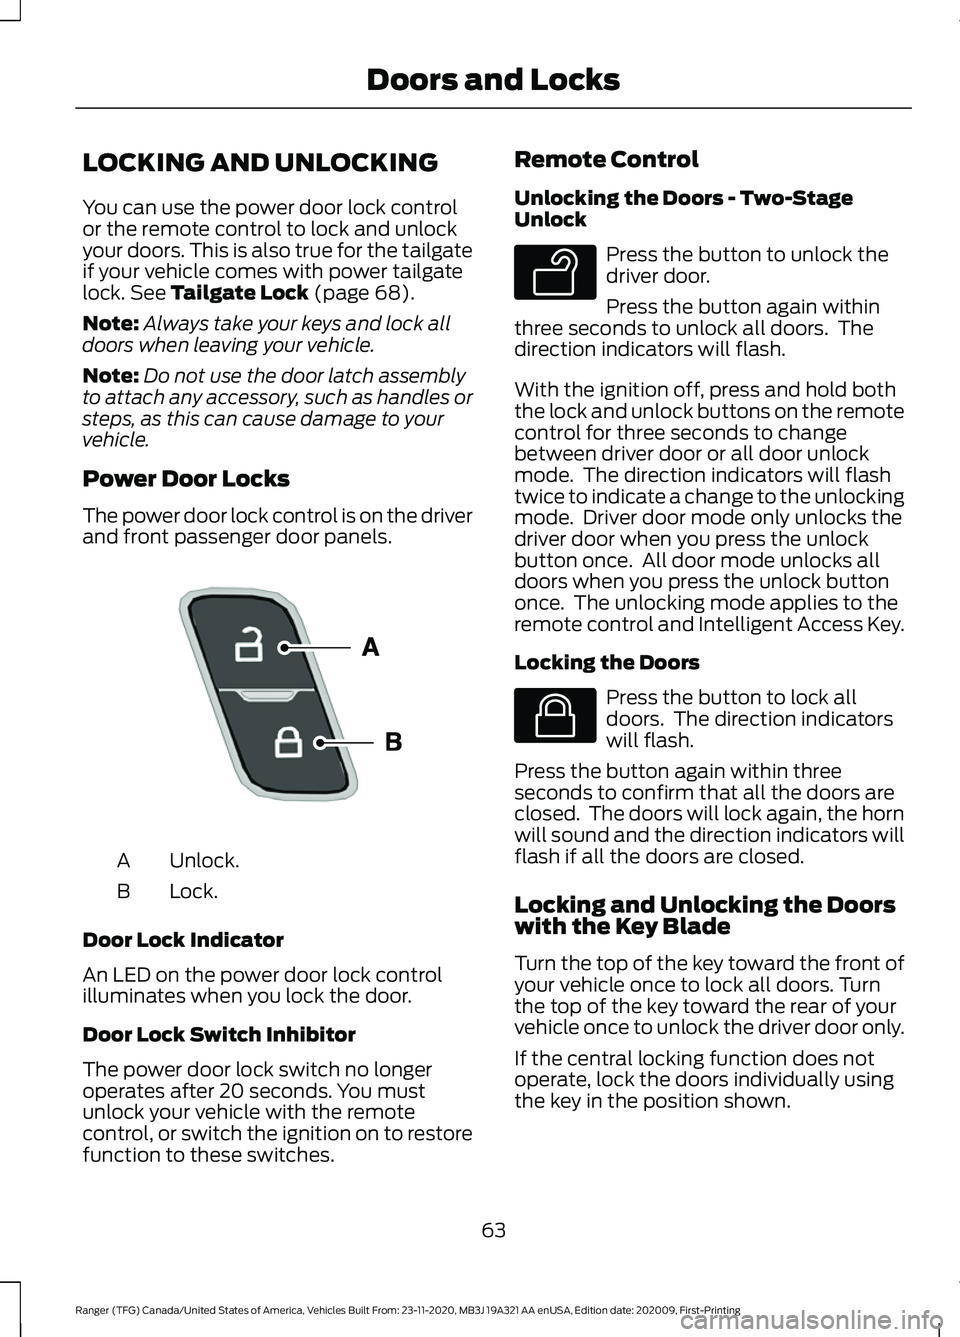
The power door lock control is on the driver
and front passenger door panels. Unlock.
A
Lock.
B
Door Lock Indicator
An LED on the power door lock control
illuminates when you lock the door.
Door Lock Switch Inhibitor
The power door lock switch no longer
operates after 20 seconds. You must
unlock your vehicle with the remote
control, or switch the ignition on to restore
function to these switches. Remote Control
Unlocking the Doors - Two-Stage
Unlock Press the button to unlock the
driver door.
Press the button again within
three seconds to unlock all doors. The
direction indicators will flash.
With the ignition off, press and hold both
the lock and unlock buttons on the remote
control for three seconds to change
between driver door or all door unlock
mode. The direction indicators will flash
twice to indicate a change to the unlocking
mode. Driver door mode only unlocks the
driver door when you press the unlock
button once. All door mode unlocks all
doors when you press the unlock button
once. The unlocking mode applies to the
remote control and Intelligent Access Key.
Locking the Doors Press the button to lock all
doors. The direction indicators
will flash.
Press the button again within three
seconds to confirm that all the doors are
closed. The doors will lock again, the horn
will sound and the direction indicators will
flash if all the doors are closed.
Locking and Unlocking the Doors
with the Key Blade
Turn the top of the key toward the front of
your vehicle once to lock all doors. Turn
the top of the key toward the rear of your
vehicle once to unlock the driver door only.
If the central locking function does not
operate, lock the doors individually using
the key in the position shown.
63
Ranger (TFG) Canada/United States of America, Vehicles Built From: 23-11-2020, MB3J 19A321 AA enUSA, Edition date: 202009, First-Printing Doors and LocksE196954 E138629 E138623
Page 73 of 475
PASSIVE ANTI-THEFT
SYSTEM
Note:
The system is not compatible with
non-Ford aftermarket remote start systems.
Use of these systems could result in vehicle
starting problems and a loss of security
protection.
Note: Metallic objects, electronic devices
or a second coded key on the same key
chain could cause vehicle starting problems
if they are too close to the key when starting
the engine. Prevent these objects from
touching the coded key while starting the
engine. Switch the ignition off, move all
objects on the key chain away from the
coded key and restart the engine if a
problem occurs.
Note: Do not leave a duplicate coded key
in the vehicle. Always take your keys and
lock all doors when leaving the vehicle.
SecuriLock®
The system is an engine immobilization
system. It helps to prevent anyone from
starting the engine without using a coded
key programmed to your vehicle. Using the
wrong key could prevent the engine from
starting. A message may appear in the
information display.
If you are unable to start the engine with a
correctly coded key, there is a problem with
the system and a message could appear
in the information display.
Automatic Arming
The vehicle arms immediately after you
switch the ignition off.
Automatic Disarming
Switching the ignition on with a coded key
disarms the vehicle. Replacement Keys
Note:
Your vehicle comes with two
integrated keyhead transmitters or two
intelligent access keys.
The integrated keyhead transmitter
functions as a programmed ignition key
that operates all the locks and starts the
vehicle, as well as a remote control.
The intelligent access key functions as a
programmed key that operates the driver
door lock and activates the intelligent
access with push button start system, as
well as a remote control.
If your programmed transmitters or
standard SecuriLock coded keys
(integrated keyhead transmitters only) are
lost or stolen and you do not have an extra
coded key, you will need to have your
vehicle towed to an authorized dealer. You
need to erase the key codes from your
vehicle and program new coded keys.
Store an extra programmed key away from
the vehicle in a safe place to help prevent
any inconveniences. See your authorized
dealer to purchase additional spare or
replacement keys.
Programming a Spare Intelligent
Access Key (If Equipped)
See your authorized dealer to have
additional keys programmed to your
vehicle.
ANTI-THEFT ALARM
(IF EQUIPPED)
Alarm System
Perimeter Alarm
The perimeter alarm is a deterrent against
unauthorized access to your vehicle
through the doors, luggage compartment
and the hood.
70
Ranger (TFG) Canada/United States of America, Vehicles Built From: 23-11-2020, MB3J 19A321 AA enUSA, Edition date: 202009, First-Printing Security
Page 78 of 475
WINDSHIELD WIPERS
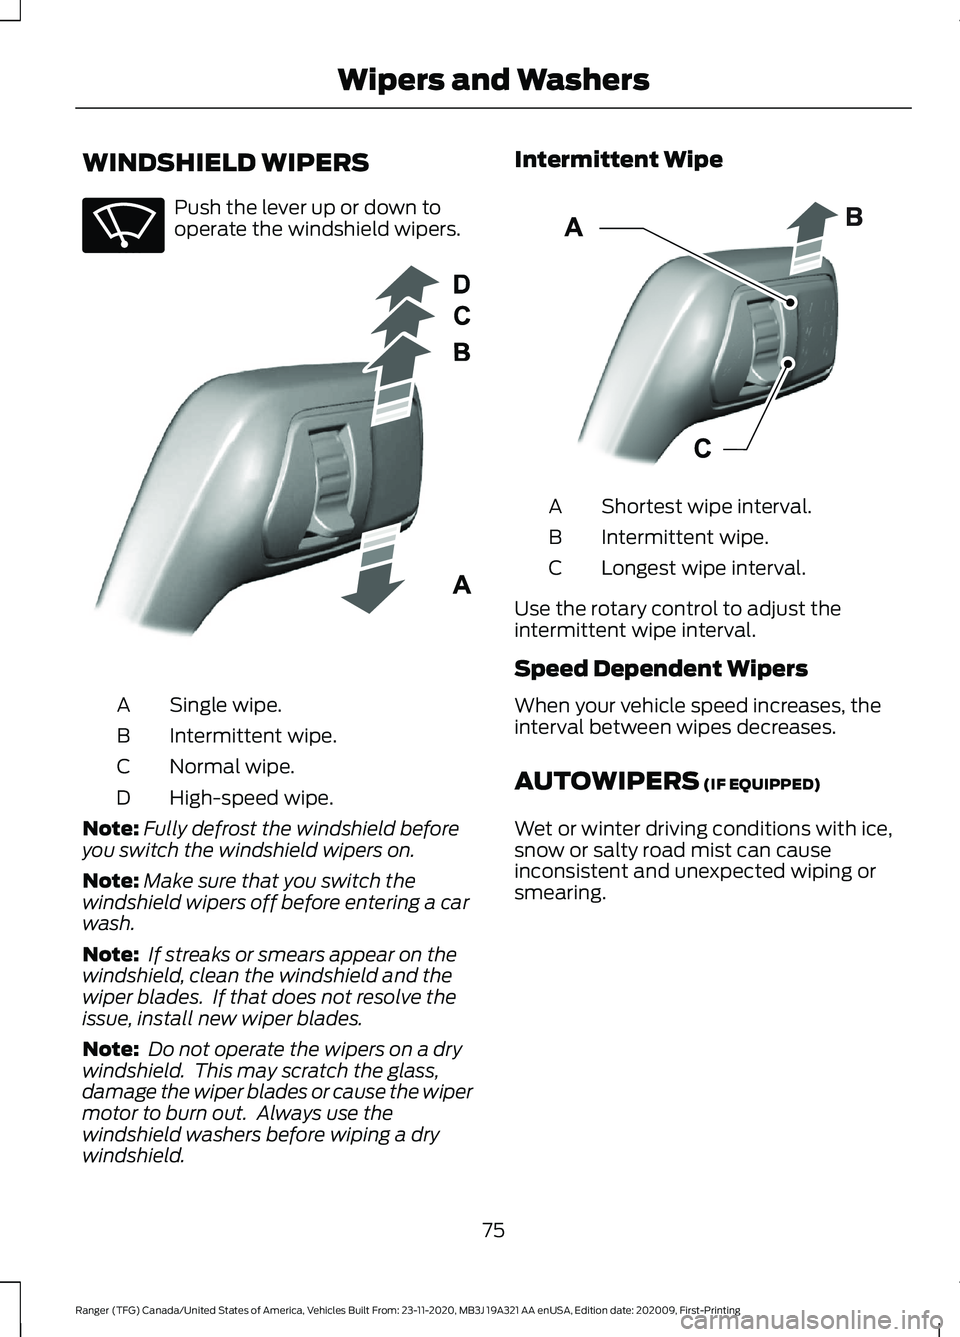
Push the lever up or down to
operate the windshield wipers.
Single wipe.
A
Intermittent wipe.
B
Normal wipe.
C
High-speed wipe.
D
Note: Fully defrost the windshield before
you switch the windshield wipers on.
Note: Make sure that you switch the
windshield wipers off before entering a car
wash.
Note: If streaks or smears appear on the
windshield, clean the windshield and the
wiper blades. If that does not resolve the
issue, install new wiper blades.
Note: Do not operate the wipers on a dry
windshield. This may scratch the glass,
damage the wiper blades or cause the wiper
motor to burn out. Always use the
windshield washers before wiping a dry
windshield. Intermittent Wipe
Shortest wipe interval.
A
Intermittent wipe.
B
Longest wipe interval.
C
Use the rotary control to adjust the
intermittent wipe interval.
Speed Dependent Wipers
When your vehicle speed increases, the
interval between wipes decreases.
AUTOWIPERS (IF EQUIPPED)
Wet or winter driving conditions with ice,
snow or salty road mist can cause
inconsistent and unexpected wiping or
smearing.
75
Ranger (TFG) Canada/United States of America, Vehicles Built From: 23-11-2020, MB3J 19A321 AA enUSA, Edition date: 202009, First-Printing Wipers and WashersE270969 E295996 E295997
Page 79 of 475
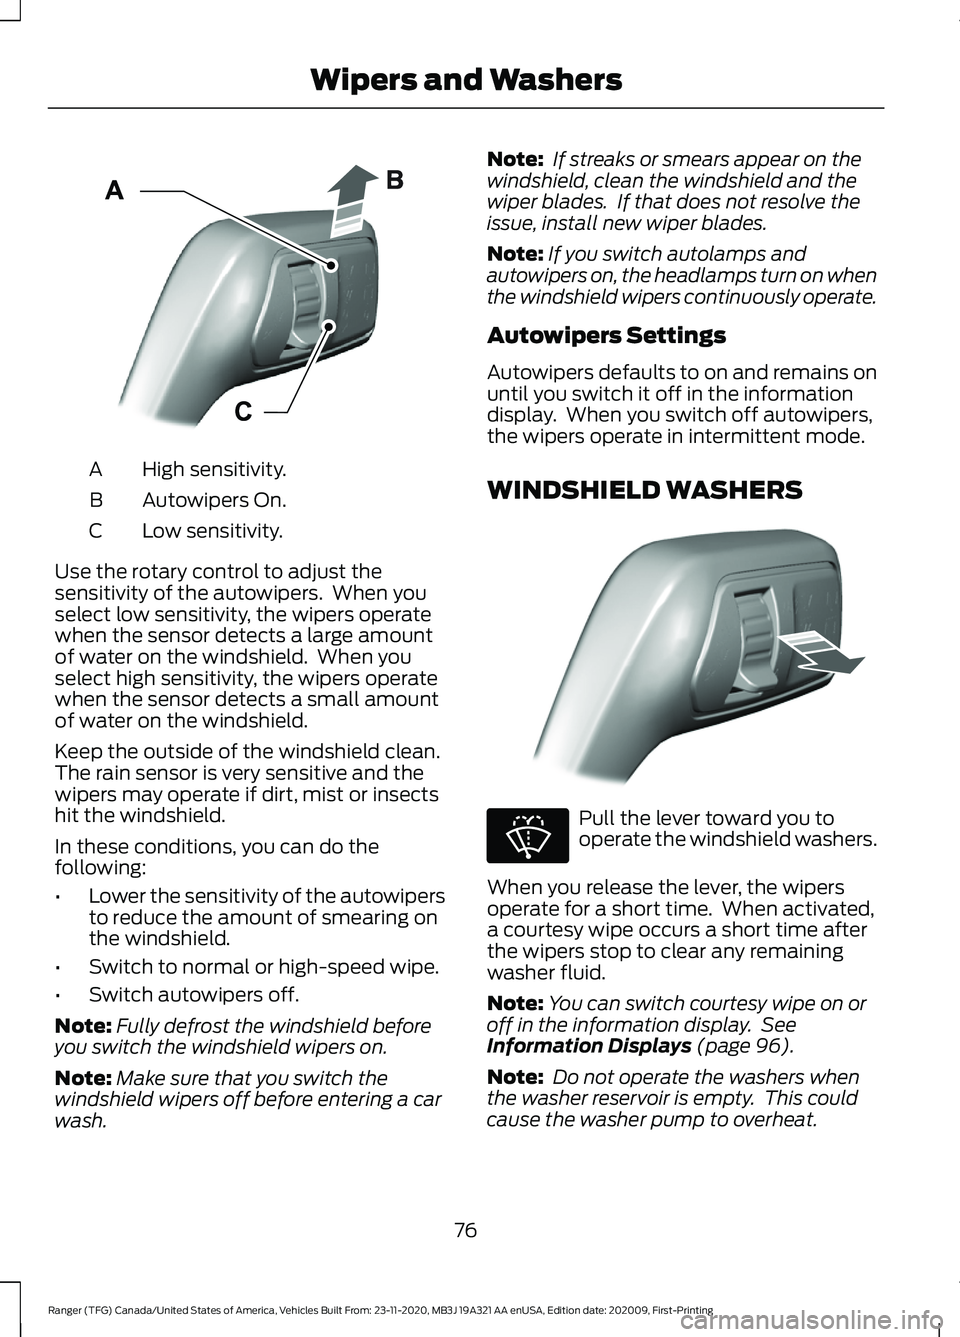
High sensitivity.
A
Autowipers On.
B
Low sensitivity.
C
Use the rotary control to adjust the
sensitivity of the autowipers. When you
select low sensitivity, the wipers operate
when the sensor detects a large amount
of water on the windshield. When you
select high sensitivity, the wipers operate
when the sensor detects a small amount
of water on the windshield.
Keep the outside of the windshield clean.
The rain sensor is very sensitive and the
wipers may operate if dirt, mist or insects
hit the windshield.
In these conditions, you can do the
following:
• Lower the sensitivity of the autowipers
to reduce the amount of smearing on
the windshield.
• Switch to normal or high-speed wipe.
• Switch autowipers off.
Note: Fully defrost the windshield before
you switch the windshield wipers on.
Note: Make sure that you switch the
windshield wipers off before entering a car
wash. Note:
If streaks or smears appear on the
windshield, clean the windshield and the
wiper blades. If that does not resolve the
issue, install new wiper blades.
Note: If you switch autolamps and
autowipers on, the headlamps turn on when
the windshield wipers continuously operate.
Autowipers Settings
Autowipers defaults to on and remains on
until you switch it off in the information
display. When you switch off autowipers,
the wipers operate in intermittent mode.
WINDSHIELD WASHERS Pull the lever toward you to
operate the windshield washers.
When you release the lever, the wipers
operate for a short time. When activated,
a courtesy wipe occurs a short time after
the wipers stop to clear any remaining
washer fluid.
Note: You can switch courtesy wipe on or
off in the information display. See
Information Displays (page 96).
Note: Do not operate the washers when
the washer reservoir is empty. This could
cause the washer pump to overheat.
76
Ranger (TFG) Canada/United States of America, Vehicles Built From: 23-11-2020, MB3J 19A321 AA enUSA, Edition date: 202009, First-Printing Wipers and WashersE295997 E296048 E270967
Page 80 of 475

GENERAL INFORMATION
Condensation in the Exterior Front
Lamps and Rear Lamps
Exterior front lamps and rear lamps have
vents to accommodate normal changes
in air pressure.
Condensation can be a natural by-product
of this design. When moist air enters the
lamp assembly through the vents, there is
a possibility that condensation can occur
when the temperature is cold. When
normal condensation occurs, a fine mist
can form on the interior of the lens. The
fine mist eventually clears and exits
through the vents during normal operation.
Clearing time may take as long as 48 hours
under dry weather conditions.
Examples of acceptable condensation are:
•
The presence of a fine mist (no streaks,
drip marks or large droplets).
• A fine mist covers less than 50% of the
lens.
Examples of unacceptable condensation
are:
• A water puddle inside the lamp.
• Streaks, drip marks or large droplets
present on the interior of the lens.
If you see any unacceptable condensation,
have your vehicle checked by an authorized
dealer. LIGHTING CONTROL Lamps off.
A
Parking lamps, instrument panel
lamps, license plate lamps and
tail lamps.
B
Headlamps.
C
Headlamp High Beam Push the lever away from you to
switch the high beam on.
Push the lever forward again or pull the
lever toward you to switch the high beams
off.
77
Ranger (TFG) Canada/United States of America, Vehicles Built From: 23-11-2020, MB3J 19A321 AA enUSA, Edition date: 202009, First-Printing LightingE142449 E242674
Page 81 of 475
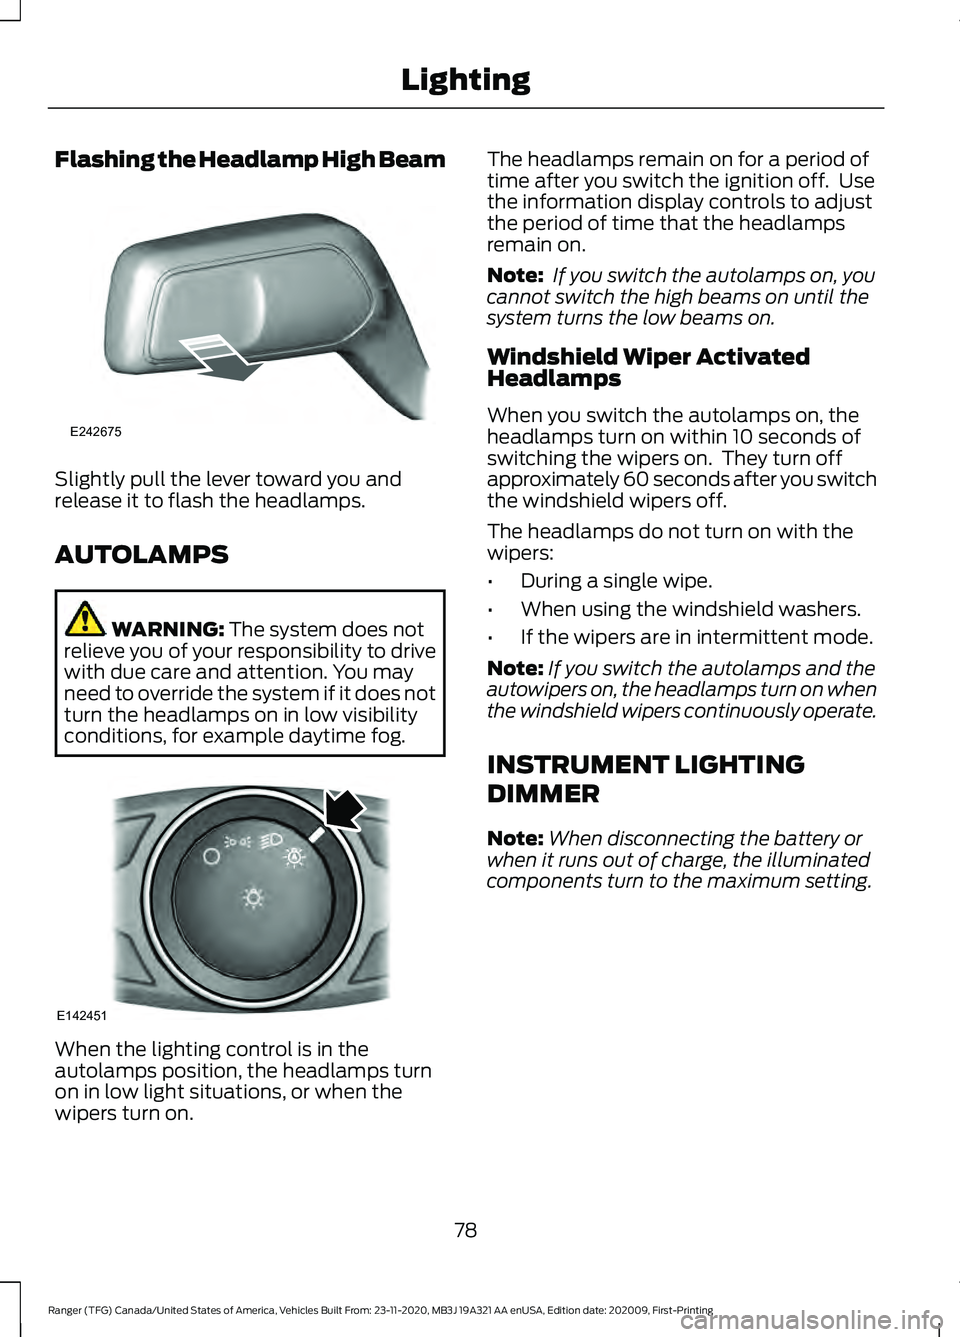
Flashing the Headlamp High Beam
Slightly pull the lever toward you and
release it to flash the headlamps.
AUTOLAMPS
WARNING: The system does not
relieve you of your responsibility to drive
with due care and attention. You may
need to override the system if it does not
turn the headlamps on in low visibility
conditions, for example daytime fog. When the lighting control is in the
autolamps position, the headlamps turn
on in low light situations, or when the
wipers turn on. The headlamps remain on for a period of
time after you switch the ignition off. Use
the information display controls to adjust
the period of time that the headlamps
remain on.
Note:
If you switch the autolamps on, you
cannot switch the high beams on until the
system turns the low beams on.
Windshield Wiper Activated
Headlamps
When you switch the autolamps on, the
headlamps turn on within 10 seconds of
switching the wipers on. They turn off
approximately 60 seconds after you switch
the windshield wipers off.
The headlamps do not turn on with the
wipers:
• During a single wipe.
• When using the windshield washers.
• If the wipers are in intermittent mode.
Note: If you switch the autolamps and the
autowipers on, the headlamps turn on when
the windshield wipers continuously operate.
INSTRUMENT LIGHTING
DIMMER
Note: When disconnecting the battery or
when it runs out of charge, the illuminated
components turn to the maximum setting.
78
Ranger (TFG) Canada/United States of America, Vehicles Built From: 23-11-2020, MB3J 19A321 AA enUSA, Edition date: 202009, First-Printing LightingE242675 E142451
Page 89 of 475
If you disconnect the battery, you must
reset the bounce-back memory separately
for each window.
1. Lift and hold the switch until you fully
close the window.
2. Release the switch.
3. Lift the switch again for one second.
4. Press and hold the switch until you fully
close the window.
5. Release the switch.
6. Lift and hold the switch until you fully close the window.
7. Open the window and then try to close
it automatically.
8. Reset and repeat the procedure if the window does not close automatically.
EXTERIOR MIRRORS
Power Exterior Mirrors (If Equipped) WARNING:
Do not adjust the
mirrors when your vehicle is moving. This
could result in the loss of control of your
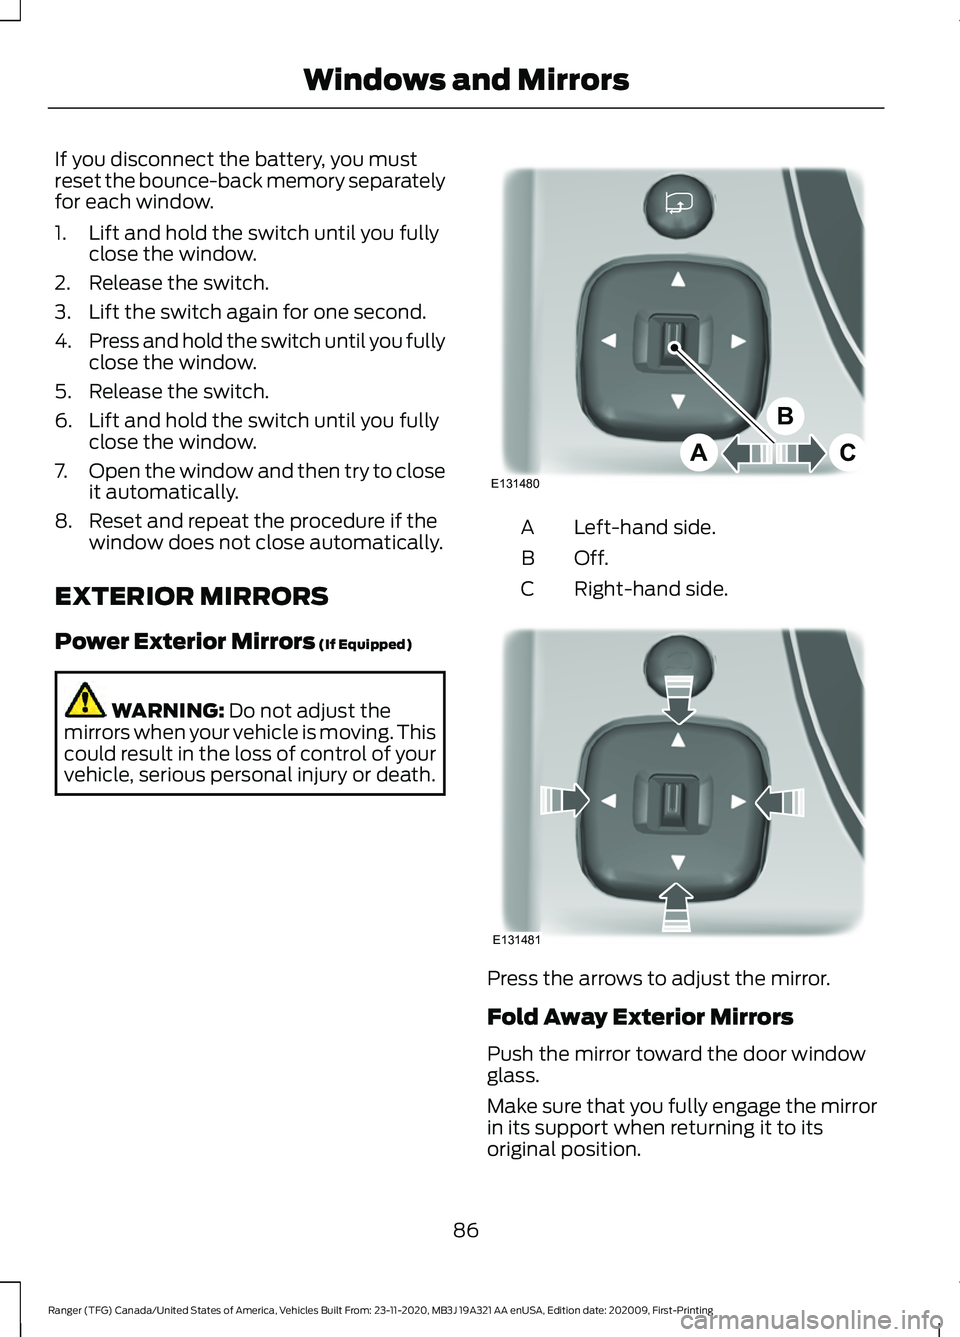
vehicle, serious personal injury or death. Left-hand side.
A
Off.B
Right-hand side.
C Press the arrows to adjust the mirror.
Fold Away Exterior Mirrors
Push the mirror toward the door window
glass.
Make sure that you fully engage the mirror
in its support when returning it to its
original position.
86
Ranger (TFG) Canada/United States of America, Vehicles Built From: 23-11-2020, MB3J 19A321 AA enUSA, Edition date: 202009, First-Printing Windows and MirrorsE131480
A
B
C E131481
Page 90 of 475
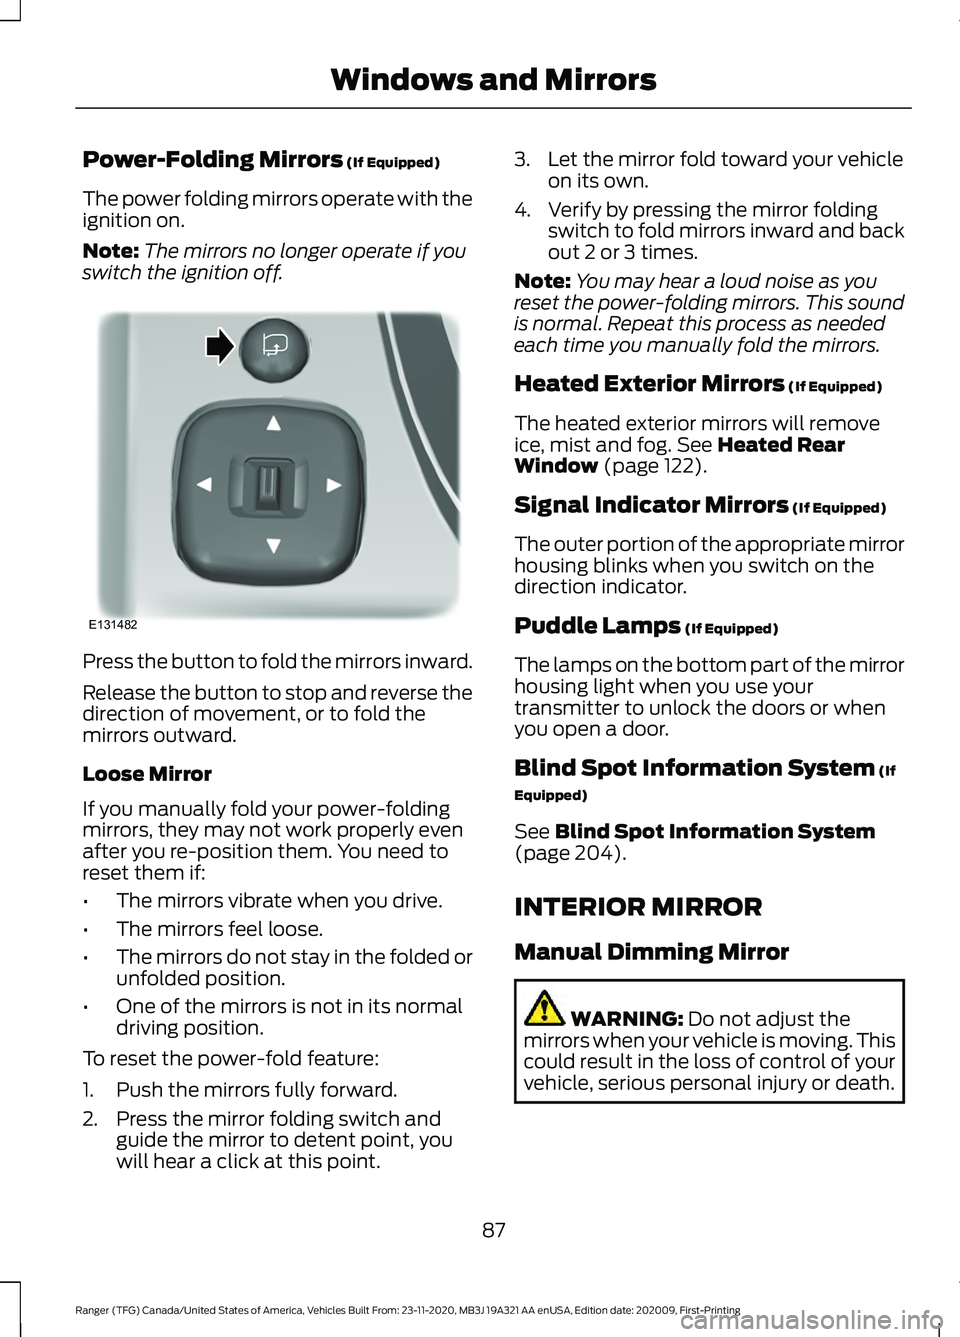
Power-Folding Mirrors (If Equipped)
The power folding mirrors operate with the
ignition on.
Note: The mirrors no longer operate if you
switch the ignition off. Press the button to fold the mirrors inward.
Release the button to stop and reverse the
direction of movement, or to fold the
mirrors outward.
Loose Mirror
If you manually fold your power-folding
mirrors, they may not work properly even
after you re-position them. You need to
reset them if:
•
The mirrors vibrate when you drive.
• The mirrors feel loose.
• The mirrors do not stay in the folded or
unfolded position.
• One of the mirrors is not in its normal
driving position.
To reset the power-fold feature:
1. Push the mirrors fully forward.
2. Press the mirror folding switch and guide the mirror to detent point, you
will hear a click at this point. 3. Let the mirror fold toward your vehicle
on its own.
4. Verify by pressing the mirror folding switch to fold mirrors inward and back
out 2 or 3 times.
Note: You may hear a loud noise as you
reset the power-folding mirrors. This sound
is normal. Repeat this process as needed
each time you manually fold the mirrors.
Heated Exterior Mirrors
(If Equipped)
The heated exterior mirrors will remove
ice, mist and fog.
See Heated Rear
Window (page 122).
Signal Indicator Mirrors
(If Equipped)
The outer portion of the appropriate mirror
housing blinks when you switch on the
direction indicator.
Puddle Lamps
(If Equipped)
The lamps on the bottom part of the mirror
housing light when you use your
transmitter to unlock the doors or when
you open a door.
Blind Spot Information System
(If
Equipped)
See
Blind Spot Information System
(page 204).
INTERIOR MIRROR
Manual Dimming Mirror WARNING:
Do not adjust the
mirrors when your vehicle is moving. This
could result in the loss of control of your
vehicle, serious personal injury or death.
87
Ranger (TFG) Canada/United States of America, Vehicles Built From: 23-11-2020, MB3J 19A321 AA enUSA, Edition date: 202009, First-Printing Windows and MirrorsE131482
Page 91 of 475
Pull the tab below the mirror toward you
to reduce the effect of bright light from
behind.
Automatic Dimming Mirror (If Equipped)
WARNING: Do not adjust the
mirrors when your vehicle is moving. This
could result in the loss of control of your
vehicle, serious personal injury or death.
The mirror dims to reduce the effect of
bright light from behind. It returns to
normal when the bright light from behind
is no longer present or if you shift into
reverse (R).
Do not block the sensors on the front and
back of the mirror.
Note: A rear center passenger or raised rear
center head restraint could prevent light
from reaching the sensor.
SUN VISORS Rotate the sun visor toward the side
window and extend it rearward for extra
shade. Illuminated Vanity Mirror
(If Equipped)
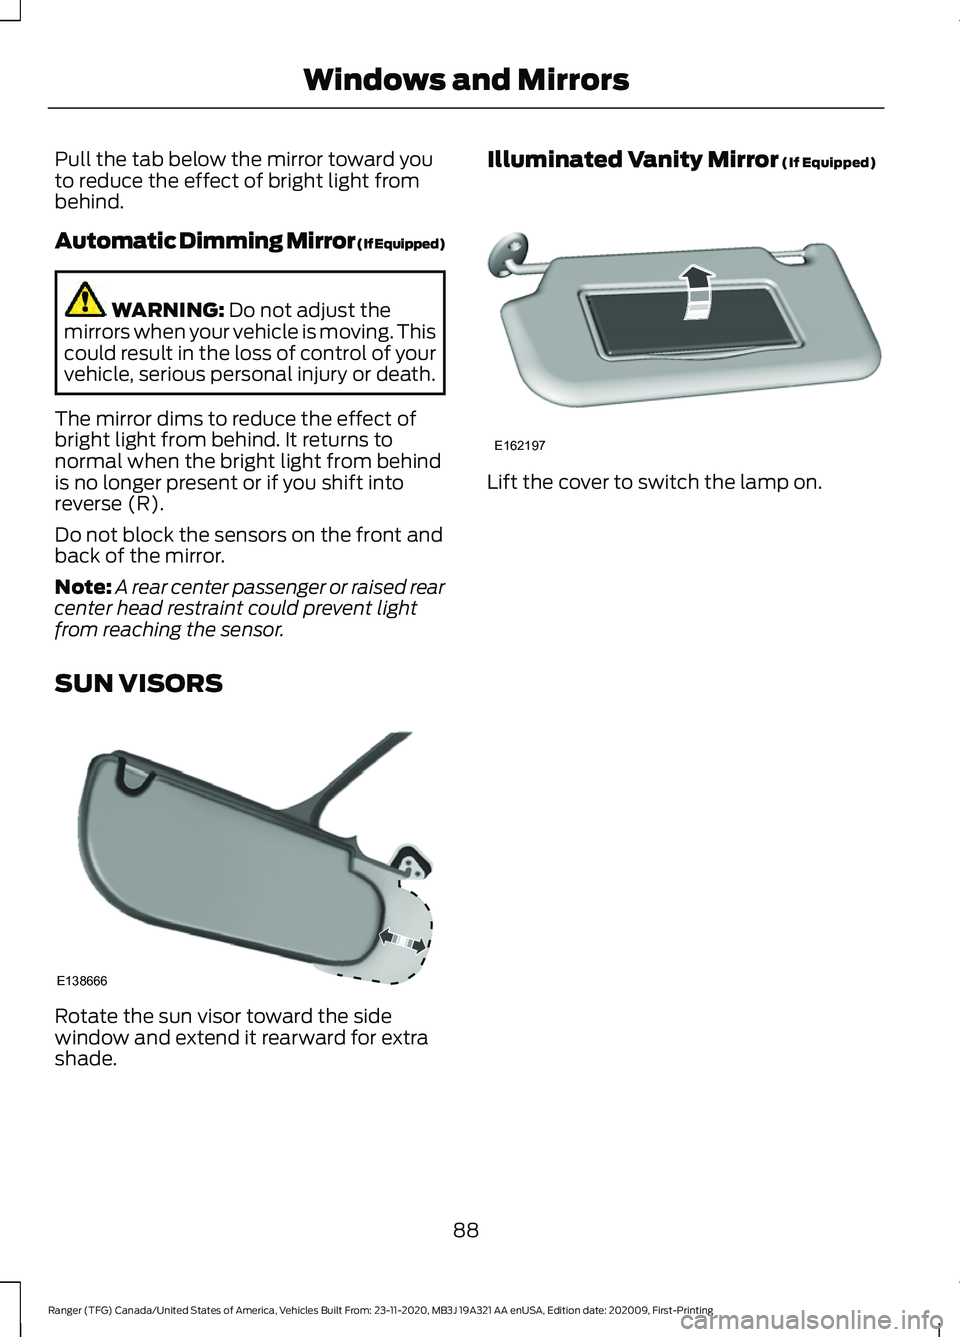
Lift the cover to switch the lamp on.
88
Ranger (TFG) Canada/United States of America, Vehicles Built From: 23-11-2020, MB3J 19A321 AA enUSA, Edition date: 202009, First-Printing Windows and MirrorsE138666 E162197