FORD RANGER 2021 Owners Manual
Manufacturer: FORD, Model Year: 2021, Model line: RANGER, Model: FORD RANGER 2021Pages: 475, PDF Size: 7.9 MB
Page 321 of 475
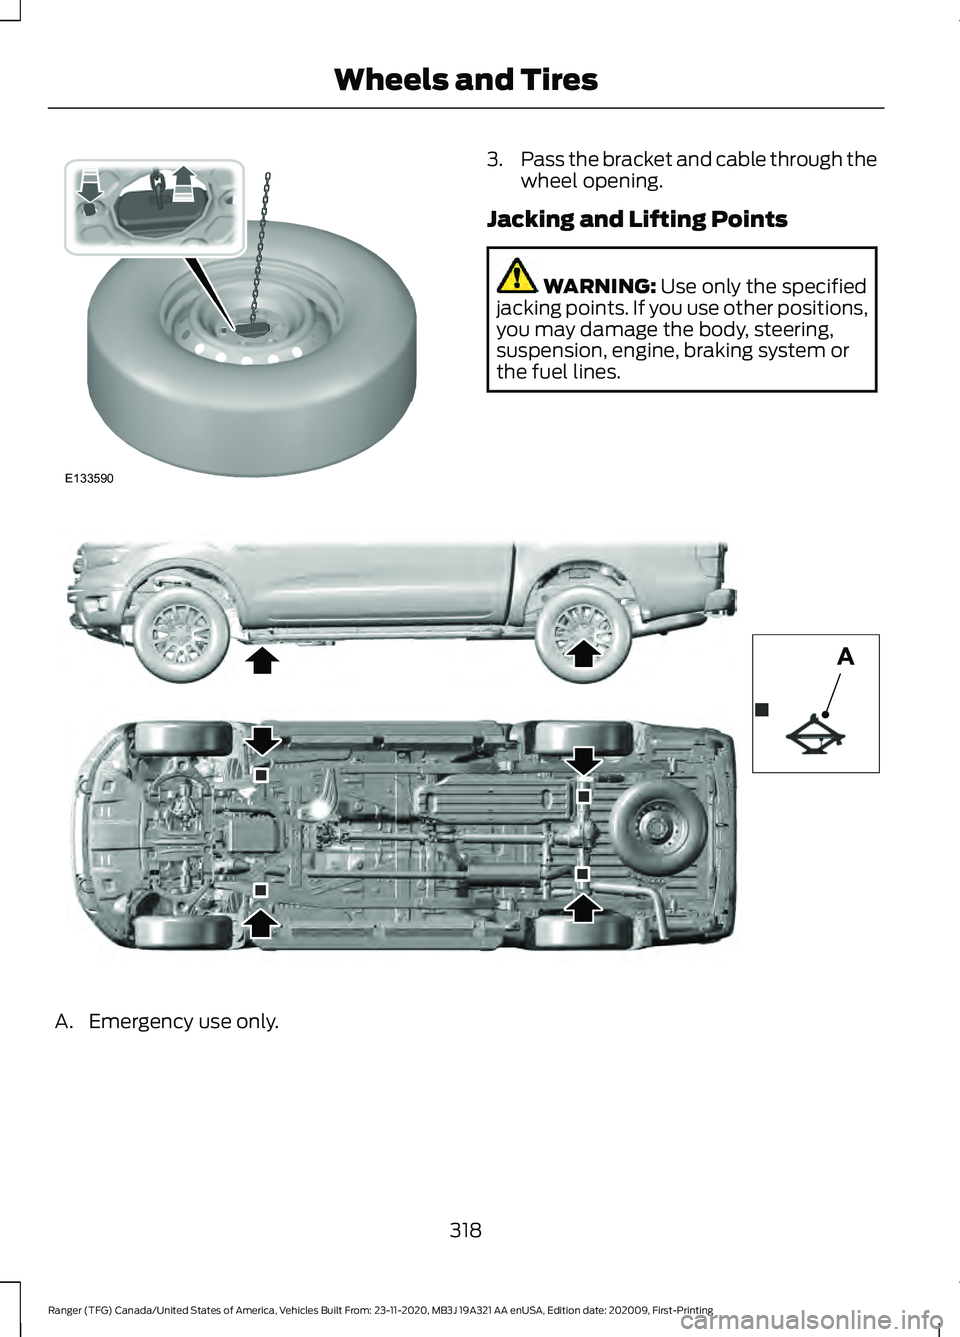
3.
Pass the bracket and cable through the
wheel opening.
Jacking and Lifting Points WARNING: Use only the specified
jacking points. If you use other positions,
you may damage the body, steering,
suspension, engine, braking system or
the fuel lines. A. Emergency use only.
318
Ranger (TFG) Canada/United States of America, Vehicles Built From: 23-11-2020, MB3J 19A321 AA enUSA, Edition date: 202009, First-Printing Wheels and TiresE133590 E301113
Page 322 of 475
Removing a Road Wheel
WARNING: Park your vehicle in
such a position that neither the traffic
nor you are hindered or endangered. WARNING:
Make sure that the
wheels are pointing straight ahead. WARNING:
If your vehicle has a
manual transmission, shift into first or
reverse gear. If your vehicle has an
automatic transmission, shift into park
(P). WARNING:
Secure the diagonally
opposite wheel with an appropriate
block or wheel chock. WARNING:
Make sure that the
vehicle jack is vertical to the jacking point
and the base is flat on the ground. WARNING:
Never place anything
between the vehicle jack and your
vehicle.
Note: Do not lay alloy road wheels face
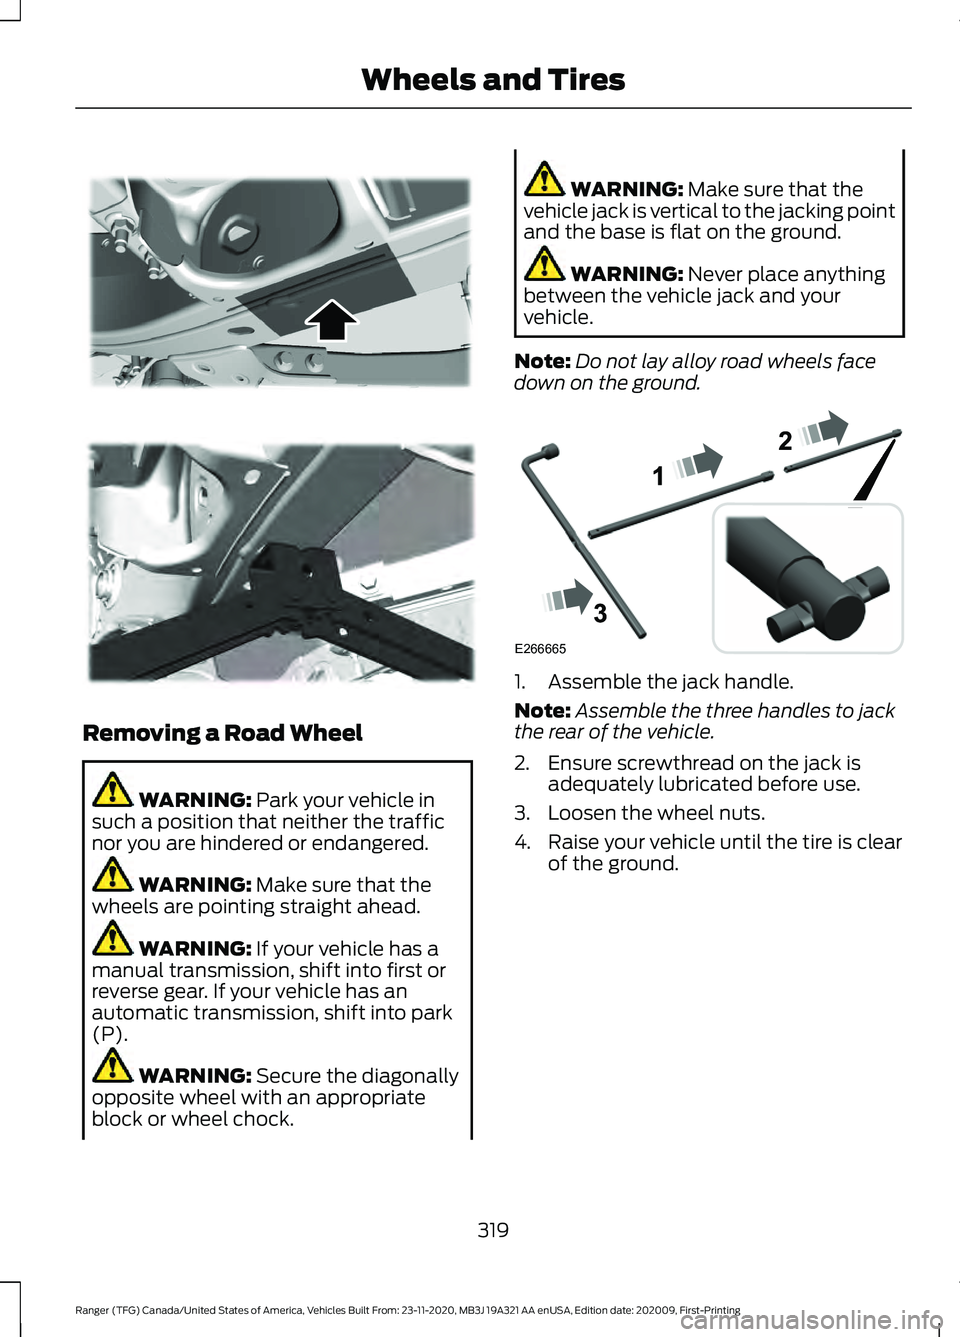
down on the ground. 1. Assemble the jack handle.
Note:
Assemble the three handles to jack
the rear of the vehicle.
2. Ensure screwthread on the jack is adequately lubricated before use.
3. Loosen the wheel nuts.
4. Raise your vehicle until the tire is clear of the ground.
319
Ranger (TFG) Canada/United States of America, Vehicles Built From: 23-11-2020, MB3J 19A321 AA enUSA, Edition date: 202009, First-Printing Wheels and Tires E296117 E296118 E266665
Page 323 of 475
5. Remove the wheel nuts and the road
wheel.
Installing a Road Wheel WARNING: Use only approved
wheel and tire sizes. Using other sizes
could damage your vehicle. WARNING:
Do not fit run flat tires
on vehicles that were not originally fitted
with them. See an authorized dealer for
more details about compatibility. WARNING:
Make sure there is no
grease or oil on the threads or the
surface between the wheel lugs and
nuts. This can cause the lug nuts to
loosen while driving. WARNING:
Have the lug nuts
checked for tightness and the tire
pressure checked as soon as possible. WARNING:
Do not install alloy
wheels using lug nuts designed for use
with steel wheels. Note:
The wheel nuts of alloy wheels and
spoked steel wheels will also be used for
the steel spare wheel for a maximum of two
weeks.
Note: Make sure the wheel and hub contact
surfaces are free from foreign matter.
Note: Make sure that the cones on the
wheel nuts are against the wheel.
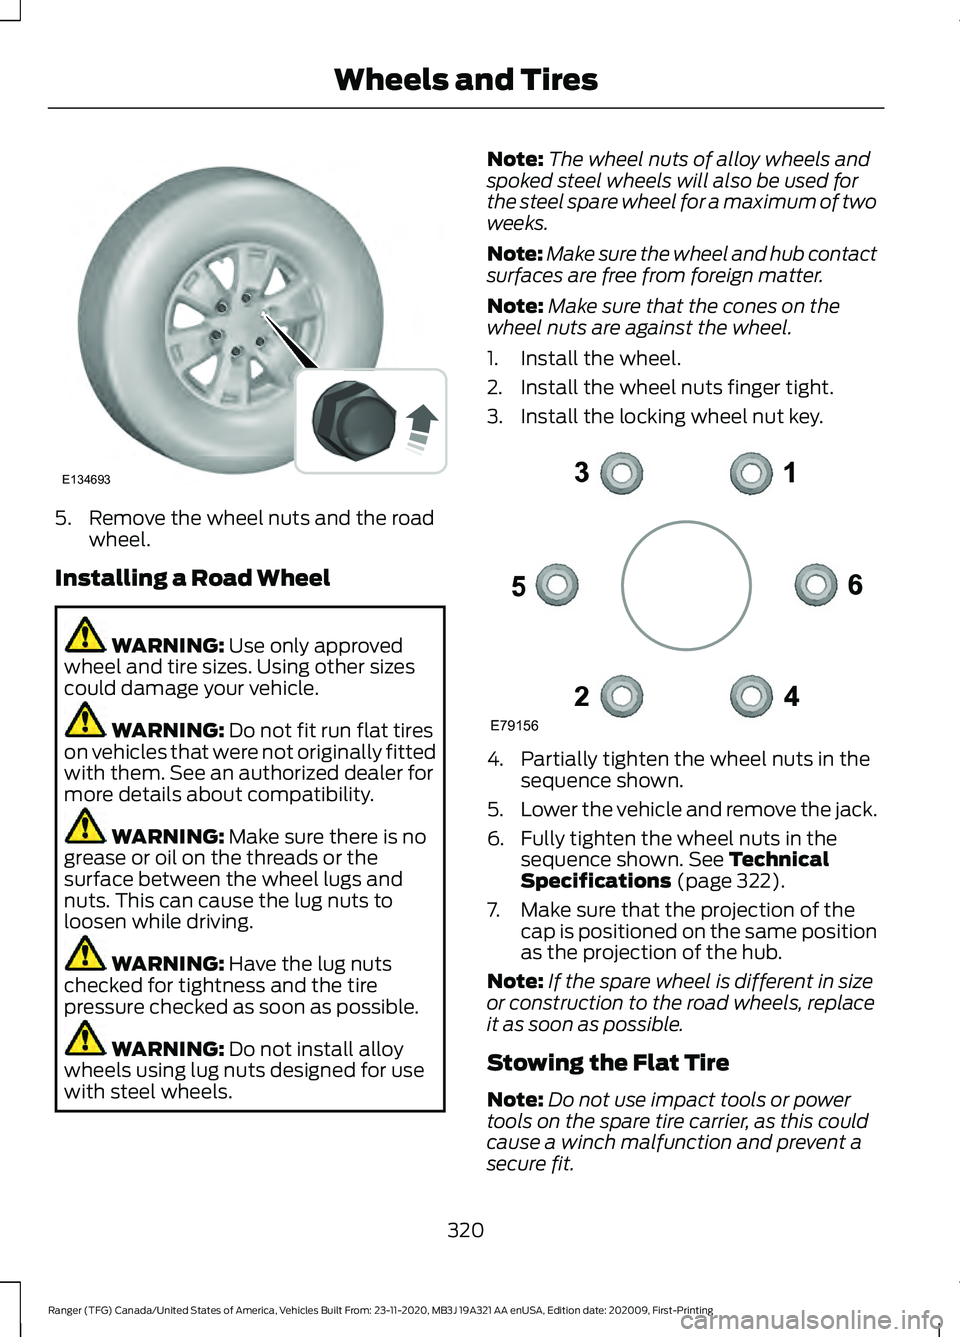
1. Install the wheel.
2. Install the wheel nuts finger tight.
3. Install the locking wheel nut key. 4. Partially tighten the wheel nuts in the
sequence shown.
5. Lower the vehicle and remove the jack.
6. Fully tighten the wheel nuts in the sequence shown.
See Technical
Specifications (page 322).
7. Make sure that the projection of the cap is positioned on the same position
as the projection of the hub.
Note: If the spare wheel is different in size
or construction to the road wheels, replace
it as soon as possible.
Stowing the Flat Tire
Note: Do not use impact tools or power
tools on the spare tire carrier, as this could
cause a winch malfunction and prevent a
secure fit.
320
Ranger (TFG) Canada/United States of America, Vehicles Built From: 23-11-2020, MB3J 19A321 AA enUSA, Edition date: 202009, First-Printing Wheels and TiresE134693 E79156
Page 324 of 475
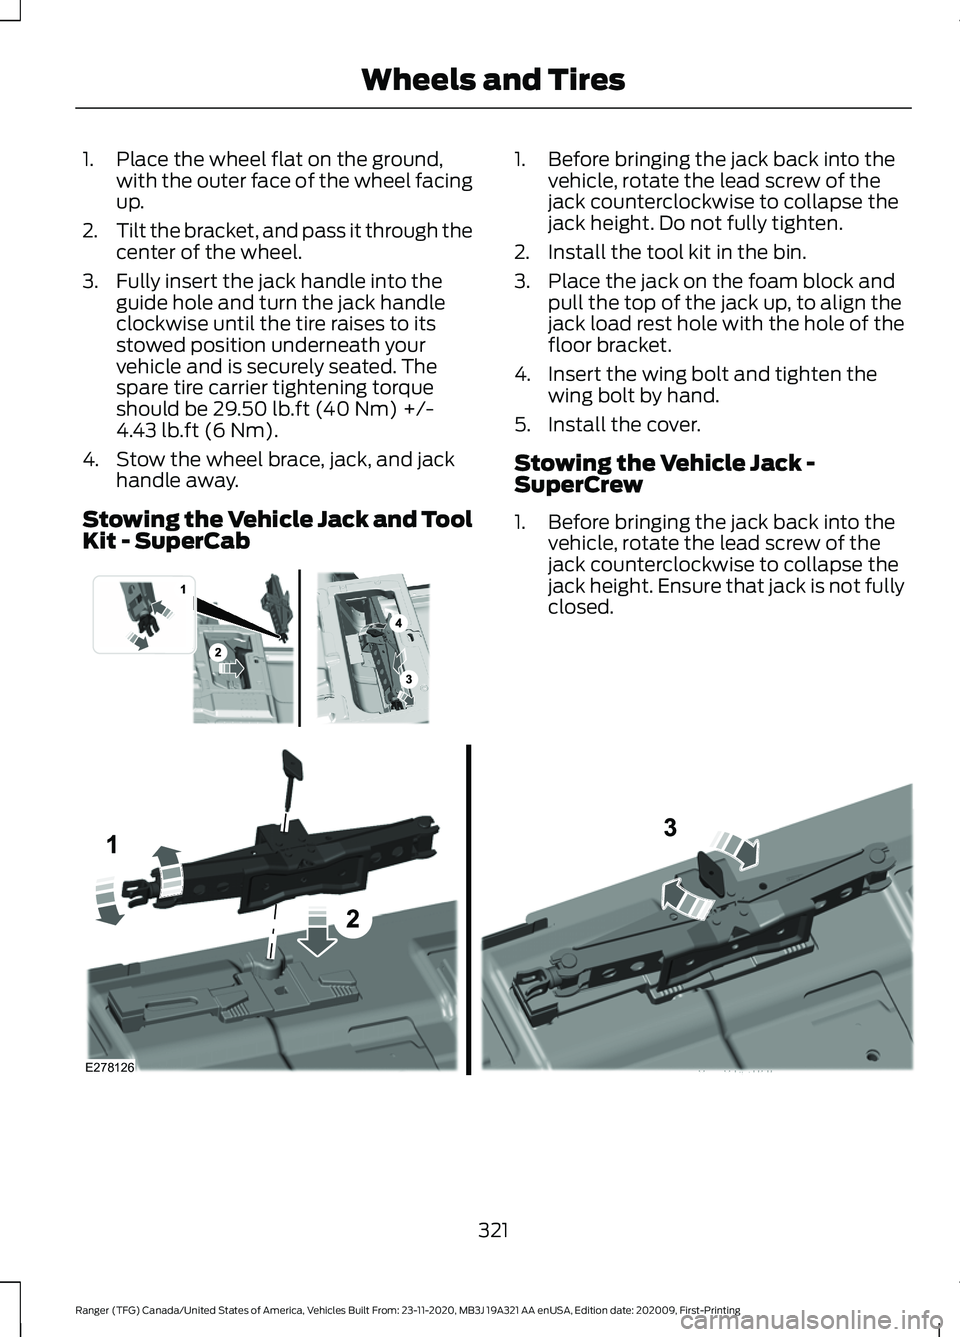
1. Place the wheel flat on the ground,
with the outer face of the wheel facing
up.
2. Tilt the bracket, and pass it through the
center of the wheel.
3. Fully insert the jack handle into the guide hole and turn the jack handle
clockwise until the tire raises to its
stowed position underneath your
vehicle and is securely seated. The
spare tire carrier tightening torque
should be 29.50 lb.ft (40 Nm) +/-
4.43 lb.ft (6 Nm).
4. Stow the wheel brace, jack, and jack handle away.
Stowing the Vehicle Jack and Tool
Kit - SuperCab 1. Before bringing the jack back into the
vehicle, rotate the lead screw of the
jack counterclockwise to collapse the
jack height. Do not fully tighten.
2. Install the tool kit in the bin.
3. Place the jack on the foam block and pull the top of the jack up, to align the
jack load rest hole with the hole of the
floor bracket.
4. Insert the wing bolt and tighten the wing bolt by hand.
5. Install the cover.
Stowing the Vehicle Jack -
SuperCrew
1. Before bringing the jack back into the vehicle, rotate the lead screw of the
jack counterclockwise to collapse the
jack height. Ensure that jack is not fully
closed. 321
Ranger (TFG) Canada/United States of America, Vehicles Built From: 23-11-2020, MB3J 19A321 AA enUSA, Edition date: 202009, First-Printing Wheels and Tires E296013 E278126
Page 325 of 475
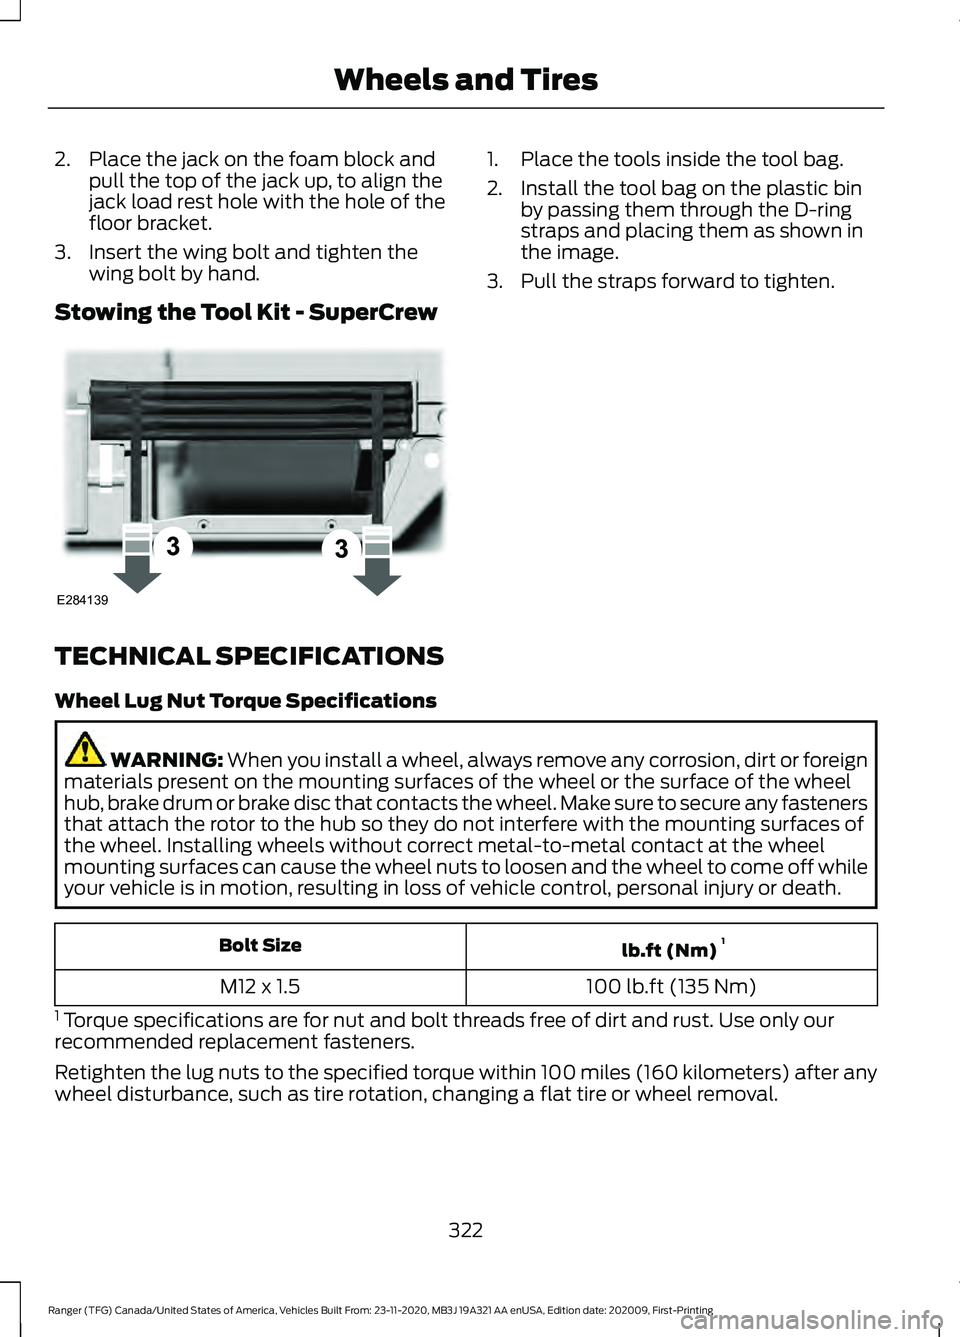
2. Place the jack on the foam block and
pull the top of the jack up, to align the
jack load rest hole with the hole of the
floor bracket.
3. Insert the wing bolt and tighten the wing bolt by hand.
Stowing the Tool Kit - SuperCrew 1. Place the tools inside the tool bag.
2. Install the tool bag on the plastic bin
by passing them through the D-ring
straps and placing them as shown in
the image.
3. Pull the straps forward to tighten.
TECHNICAL SPECIFICATIONS
Wheel Lug Nut Torque Specifications WARNING: When you install a wheel, always remove any corrosion, dirt or foreign
materials present on the mounting surfaces of the wheel or the surface of the wheel
hub, brake drum or brake disc that contacts the wheel. Make sure to secure any fasteners
that attach the rotor to the hub so they do not interfere with the mounting surfaces of
the wheel. Installing wheels without correct metal-to-metal contact at the wheel
mounting surfaces can cause the wheel nuts to loosen and the wheel to come off while
your vehicle is in motion, resulting in loss of vehicle control, personal injury or death. lb.ft (Nm)
1
Bolt Size
100 lb.ft (135 Nm)
M12 x 1.5
1 Torque specifications are for nut and bolt threads free of dirt and rust. Use only our
recommended replacement fasteners.
Retighten the lug nuts to the specified torque within 100 miles (160 kilometers) after any
wheel disturbance, such as tire rotation, changing a flat tire or wheel removal.
322
Ranger (TFG) Canada/United States of America, Vehicles Built From: 23-11-2020, MB3J 19A321 AA enUSA, Edition date: 202009, First-Printing Wheels and TiresE284139
Page 326 of 475
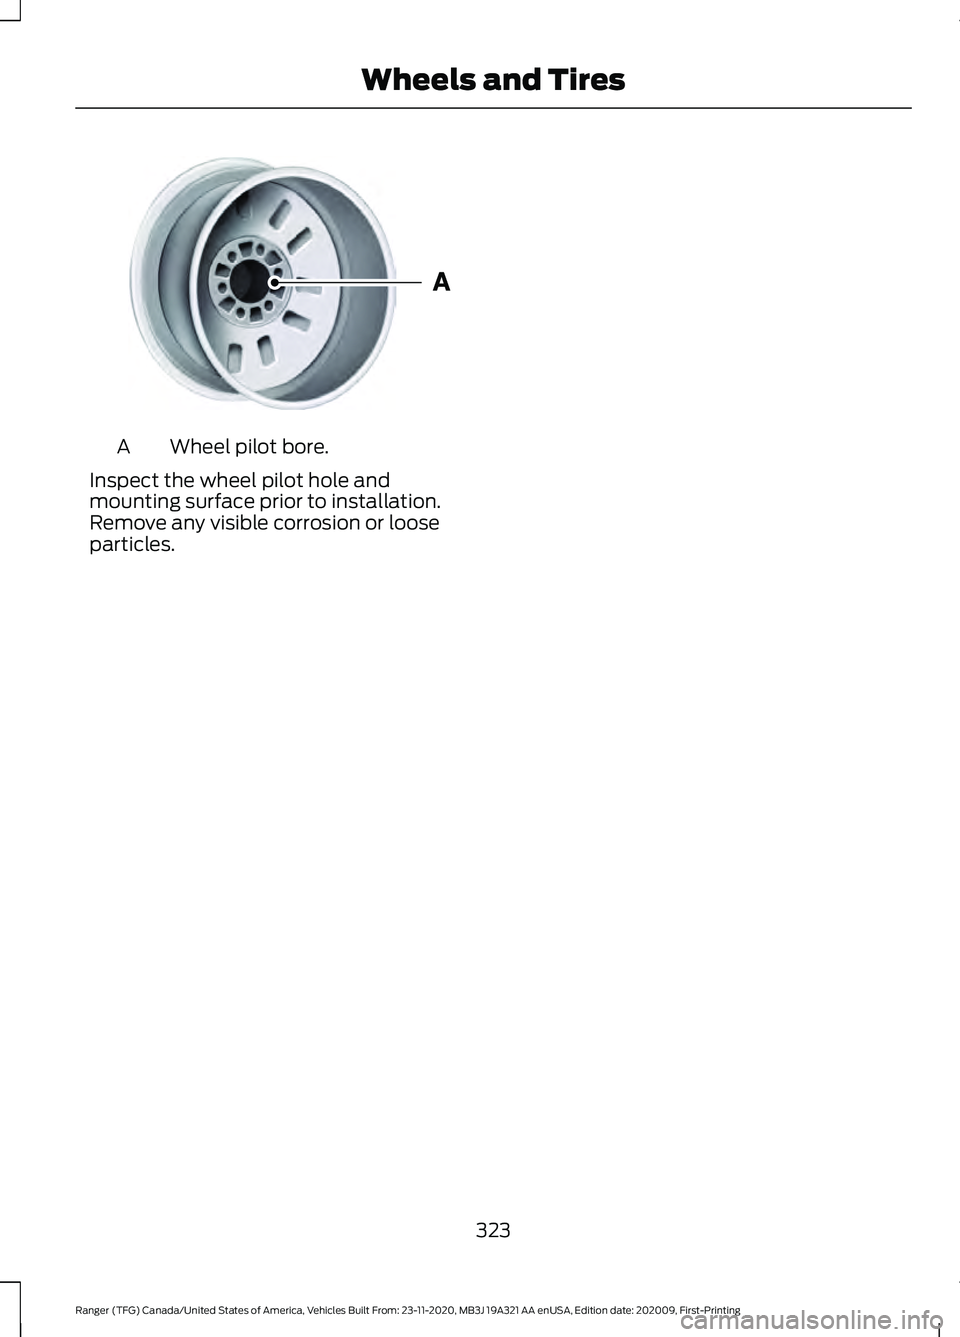
Wheel pilot bore.
A
Inspect the wheel pilot hole and
mounting surface prior to installation.
Remove any visible corrosion or loose
particles.
323
Ranger (TFG) Canada/United States of America, Vehicles Built From: 23-11-2020, MB3J 19A321 AA enUSA, Edition date: 202009, First-Printing Wheels and TiresE145950
Page 327 of 475
ENGINE SPECIFICATIONS
2.3L EcoBoost
Engine
138.00 in³ (2,261.41 cm³)
Displacement.
Minimum 87 octane
Required fuel.
1-3-4-2
Firing order.
Coil on plug
Ignition system.
0.028–0.031 in (0.7–0.8 mm)
Spark plug gap.
10:1
Compression ratio.
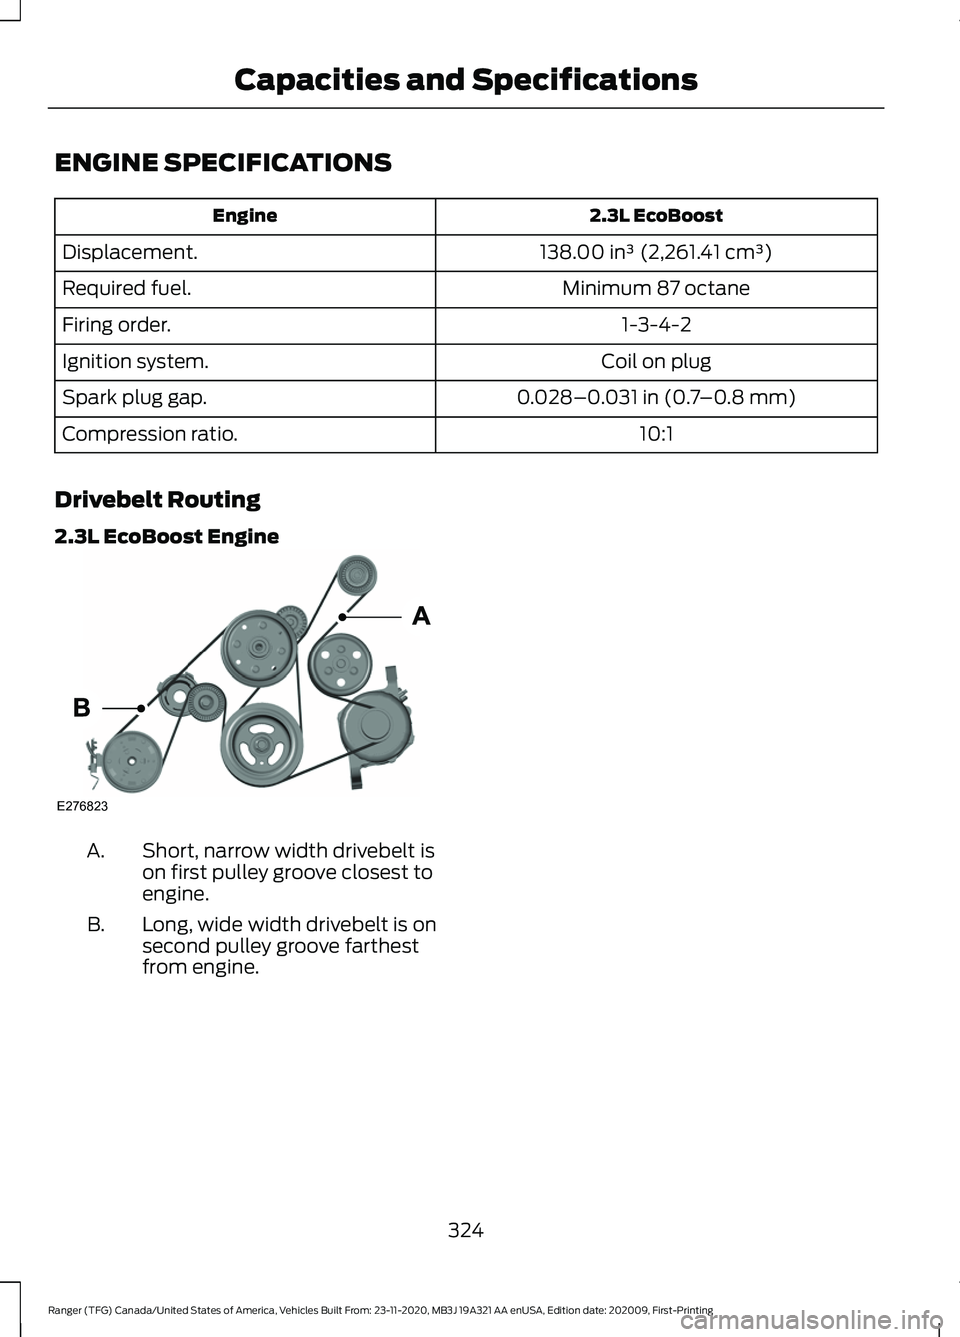
Drivebelt Routing
2.3L EcoBoost Engine Short, narrow width drivebelt is
on first pulley groove closest to
engine.
A.
Long, wide width drivebelt is on
second pulley groove farthest
from engine.
B.
324
Ranger (TFG) Canada/United States of America, Vehicles Built From: 23-11-2020, MB3J 19A321 AA enUSA, Edition date: 202009, First-Printing Capacities and SpecificationsE276823
Page 328 of 475
MOTORCRAFT PARTS
Part Number
Component
FA-1943
Air filter element.
FL-910-S
Oil filter.
BAGM-48H6-760
Battery.
BAGM-94RH7-800
SP-578
Spark plugs.
FT-215
Transmission filter (10R80).
FP-88
Cabin air filter.
WW-2615 (driver side)
Windshield wiper blade.
WW-1615 (passenger side)
We recommend Motorcraft replacement parts available at a dealer or at fordparts.com
for scheduled maintenance. We engineer the parts for your vehicle to meet or exceed our
specifications. Use of other parts could impact vehicle performance, emissions and
durability. Your warranty could be void for any damage related to use of other parts.
If a Motorcraft oil filter is not available, use an oil filter that meets industry performance
specification SAE/USCAR-36.
For spark plug replacement, contact a dealer.
Replace the spark plugs at the appropriate intervals.
See Scheduled Maintenance (page 416).
325
Ranger (TFG) Canada/United States of America, Vehicles Built From: 23-11-2020, MB3J 19A321 AA enUSA, Edition date: 202009, First-Printing Capacities and Specifications
Page 329 of 475
VEHICLE IDENTIFICATION
NUMBER
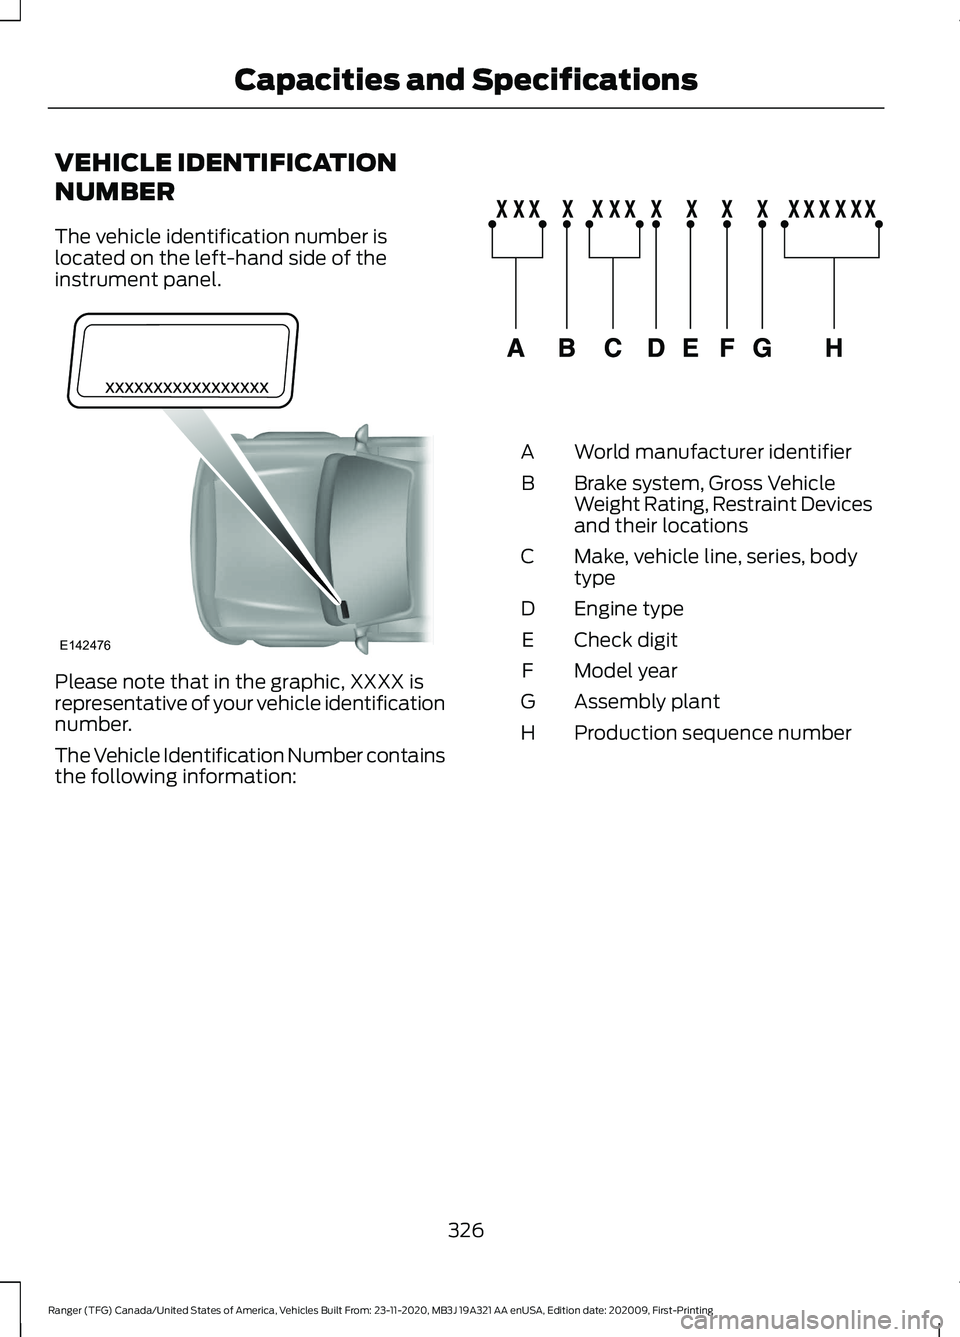
The vehicle identification number is
located on the left-hand side of the
instrument panel.
Please note that in the graphic, XXXX is
representative of your vehicle identification
number.
The Vehicle Identification Number contains
the following information: World manufacturer identifier
A
Brake system, Gross Vehicle
Weight Rating, Restraint Devices
and their locations
B
Make, vehicle line, series, body
type
C
Engine type
D
Check digit
E
Model year
F
Assembly plant
G
Production sequence number
H
326
Ranger (TFG) Canada/United States of America, Vehicles Built From: 23-11-2020, MB3J 19A321 AA enUSA, Edition date: 202009, First-Printing Capacities and SpecificationsE142476 E142477
Page 330 of 475
VEHICLE CERTIFICATION
LABEL
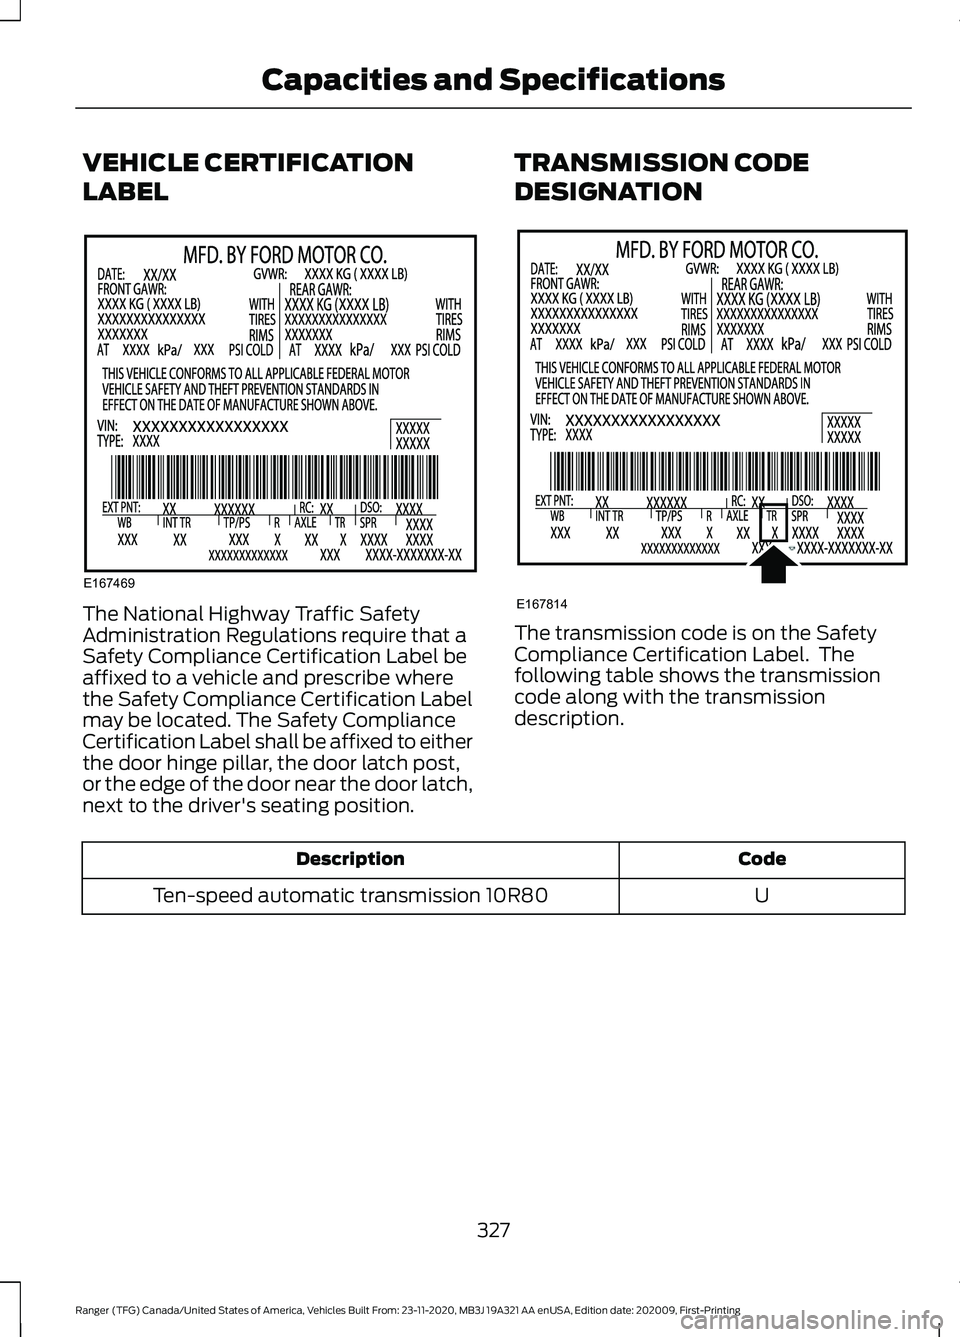
The National Highway Traffic Safety
Administration Regulations require that a
Safety Compliance Certification Label be
affixed to a vehicle and prescribe where
the Safety Compliance Certification Label
may be located. The Safety Compliance
Certification Label shall be affixed to either
the door hinge pillar, the door latch post,
or the edge of the door near the door latch,
next to the driver's seating position.
TRANSMISSION CODE
DESIGNATION The transmission code is on the Safety
Compliance Certification Label. The
following table shows the transmission
code along with the transmission
description.
Code
Description
U
Ten-speed automatic transmission 10R80
327
Ranger (TFG) Canada/United States of America, Vehicles Built From: 23-11-2020, MB3J 19A321 AA enUSA, Edition date: 202009, First-Printing Capacities and SpecificationsE167469 E167814