torque FORD SIERRA 1984 1.G Braking System Workshop Manual
[x] Cancel search | Manufacturer: FORD, Model Year: 1984, Model line: SIERRA, Model: FORD SIERRA 1984 1.GPages: 22, PDF Size: 1.11 MB
Page 2 of 22

Torque wrench settingsNmlbf ft
Caliper carrier bracket-to-hub carrier bolts . . . . . . . . . . . . . . . . . . . . . .51 to 6138 to 45
Front caliper guide bolts . . . . . . . . . . . . . . . . . . . . . . . . . . . . . . . . . . . . .20 to 2515 to 18
Rear caliper guide bolts . . . . . . . . . . . . . . . . . . . . . . . . . . . . . . . . . . . . .31 to 3523 to 26
Rear brake backplate nuts - P100 models . . . . . . . . . . . . . . . . . . . . . . .45 to 5433 to 40
Servo-to-bulkhead nuts (conventional braking system) . . . . . . . . . . . . .35 to 4526 to 33
Master cylinder-to-servo nuts . . . . . . . . . . . . . . . . . . . . . . . . . . . . . . . .20 to 2515 to 18
Hydraulic unit-to-bulkhead nuts (ABS) . . . . . . . . . . . . . . . . . . . . . . . . . .41 to 5130 to 38
Hydraulic unit accumulator (ABS) . . . . . . . . . . . . . . . . . . . . . . . . . . . . . .34 to 4625 to 34
Pump mounting bolt (ABS) . . . . . . . . . . . . . . . . . . . . . . . . . . . . . . . . . . .7 to 95 to 7
High pressure hose-to-pump union (ABS) . . . . . . . . . . . . . . . . . . . . . . .7 to 125 to 9
Wheel sensor mounting bolts (ABS) . . . . . . . . . . . . . . . . . . . . . . . . . . . .8 to 116 to 8
General information
The braking system is of the dual circuit
hydraulic type. The front and rear circuits are
operated independently from a tandem
master cylinder, so that in the event of a
hydraulic failure in one circuit, full braking
force will still be available to two wheels
through the remaining circuit.
A deceleration sensitive valve on Saloon,
Hatchback and Estate models not fitted with
an Anti-lock Braking System (ABS), and a load
apportioning valve on P100 models, is
incorporated in the rear brake hydraulic
circuit. The valve regulates the pressure
applied to the rear brakes and reduces the
possibility of the rear wheels locking under
heavy braking.
All models are fitted with front disc brakes,
with solid or ventilated discs depending on
model. The calipers are of single piston sliding
type, which ensures that equal pressure is
applied to each disc pad.
Non-ABS models are fitted with rear disc
brakes or rear drum brakes, incorporating
leading and trailing shoes operated by
double-acting wheel cylinders. A self-adjuster
mechanism is fitted which consists of a
toothed quadrant which is kept in contact with
a toothed pin attached to the shoe strut by
means of a spring. The quadrant incorporates
an arm which locates in a slot in the leading
shoe. As the shoe linings wear the quadrant is
pulled from the pin when the footbrake is
operated, and automatically repositioned to
effectively lengthen the shoe strut.
ABS is available as an option for all models
except the P100. The system comprises an
electronic control unit, roadwheel sensors,
hydraulic actuator with electrically-driven
hydraulic pump, and the necessary valves and
switches. Disc brakes are fitted to all four
wheels. The front disc brakes are similar to
those fitted to non-ABS models, but the rear
brakes incorporate a self-adjusting
mechanism, and a mechanical handbrake
mechanism. The purpose of the system is to
prevent wheel(s) locking during heavy brake
applications. This is achieved by automatic
release of the brake on the locked wheel,followed by reapplication of the brake. This
procedure is carried out four times per second
by the control valves in the valve block. The
valves are controlled by the electronic control
unit which itself receives signals from the
wheel sensors, which monitor the locked or
unlocked state of the wheels. A pressure
regulating valve is incorporated in the rear
hydraulic circuit to maintain the desired
pressure ratio between the front and rear
circuits.
Precautions
Note: Hydraulic fluid is poisonous; wash off
immediately and thoroughly in the case of skin
contact and seek immediate medical advice if
any fluid is swallowed or gets into the eyes.
Certain types of hydraulic fluid are
inflammable and may ignite when allowed into
contact with hot components; when servicing
any hydraulic system it is safest to assume
that the fluid is inflammable and to take
precautions against the risk of fire as though it
is petrol that is being handled. Hydraulic fluid
is also an effective paint stripper and will
attack plastics; if any is spilt, it should be
washed off immediately using copious
quantities of fresh water. Finally, it is
hygroscopic (it absorbs moisture from the air)
old fluid may be contaminated and unfit for
further use. When topping-up or renewing the
fluid, always use the recommended type and
ensure that it comes from a freshly-opened
sealed container
Note: When working on the brake
components, take care not to disperse brake
dust into the air, or to inhale it, since it may
contain asbestos which is injurious to health.
General
1If any of the hydraulic components in the
braking system have been removed or
disconnected, or if the fluid level in the
reservoir has been allowed to fall appreciably,
it is inevitable that air will have been
introduced into the system. The removal of all
this air from the hydraulic system is essential
if the brakes are to function correctly, and the
process of removing it is known as bleeding.
2Where an operation has only affected one
circuit (front or rear) of the hydraulic system,
then it will only be necessary to bleed the
relevant circuit. If the master cylinder has
been disconnected and reconnected, or the
fluid level has been allowed to fall
appreciably, then the complete system must
be bled.
3One of three methods can be used to bleed
the system.
Bleeding
Two-man method
4Gather together a clean jar and a length of
rubber or plastic bleed tubing which will fit the
bleed screws tightly. The help of an assistant
will be required.
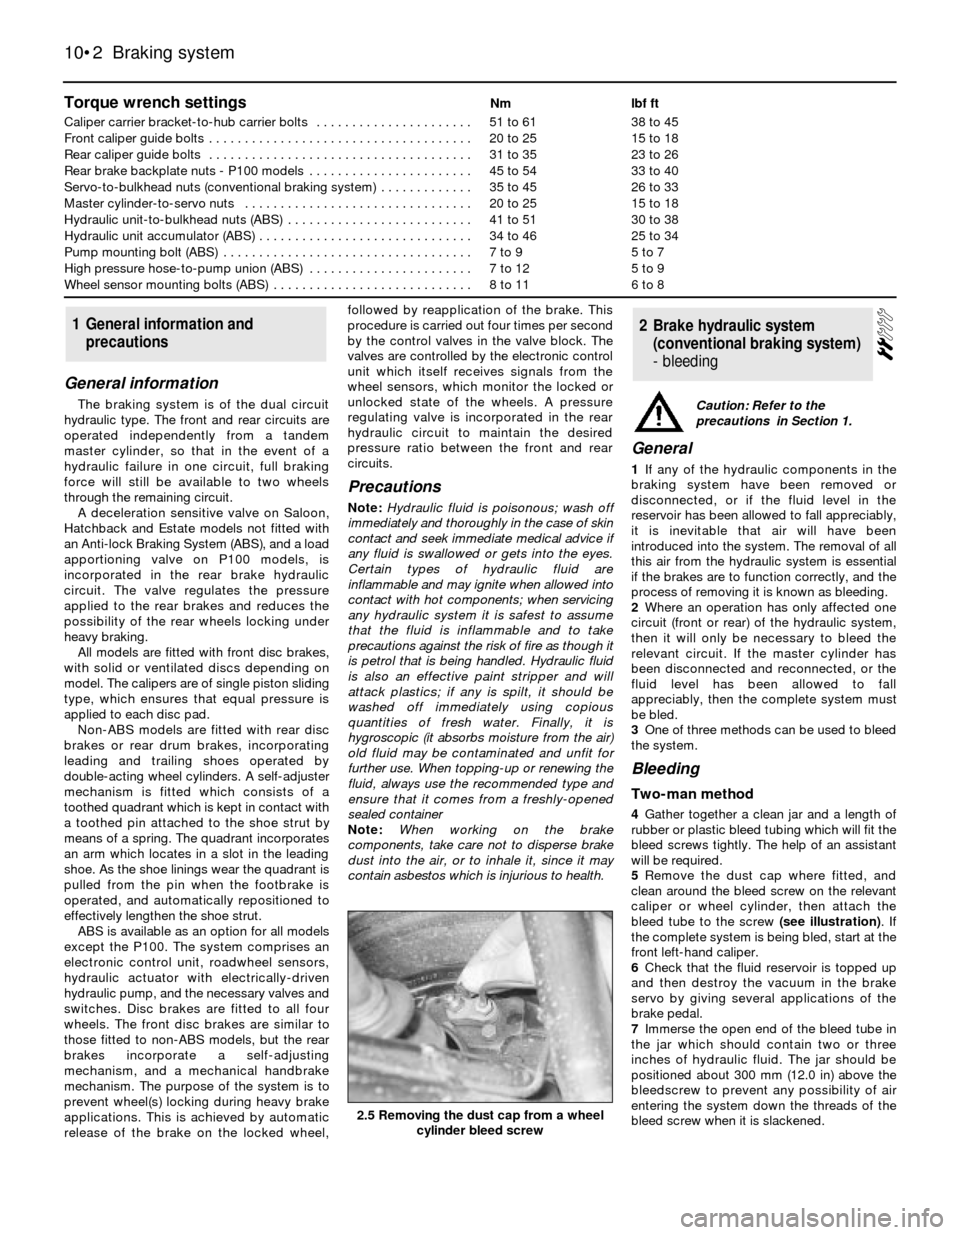
5Remove the dust cap where fitted, and
clean around the bleed screw on the relevant
caliper or wheel cylinder, then attach the
bleed tube to the screw (see illustration). If
the complete system is being bled, start at the
front left-hand caliper.
6Check that the fluid reservoir is topped up
and then destroy the vacuum in the brake
servo by giving several applications of the
brake pedal.
7Immerse the open end of the bleed tube in
the jar which should contain two or three
inches of hydraulic fluid. The jar should be
positioned about 300 mm (12.0 in) above the
bleedscrew to prevent any possibility of air
entering the system down the threads of the
bleed screw when it is slackened.
2Brake hydraulic system
(conventional braking system)
- bleeding1General information and
precautions
10•2Braking system
2.5 Removing the dust cap from a wheel
cylinder bleed screw
Caution: Refer to the
precautions in Section 1.
Page 9 of 22

neck with a rubber band, or by refitting the
cap. This will reduce the loss of fluid during
the following procedure.
3Disconnect the flexible fluid hose from the
rigid brake pipe under the wing of the vehicle,
or alternatively unscrew the flexible hose from
the union on the caliper. Take care not to twist
the hose, and plug the open ends to prevent
fluid loss and dirt ingress.
4Remove the disc pads.
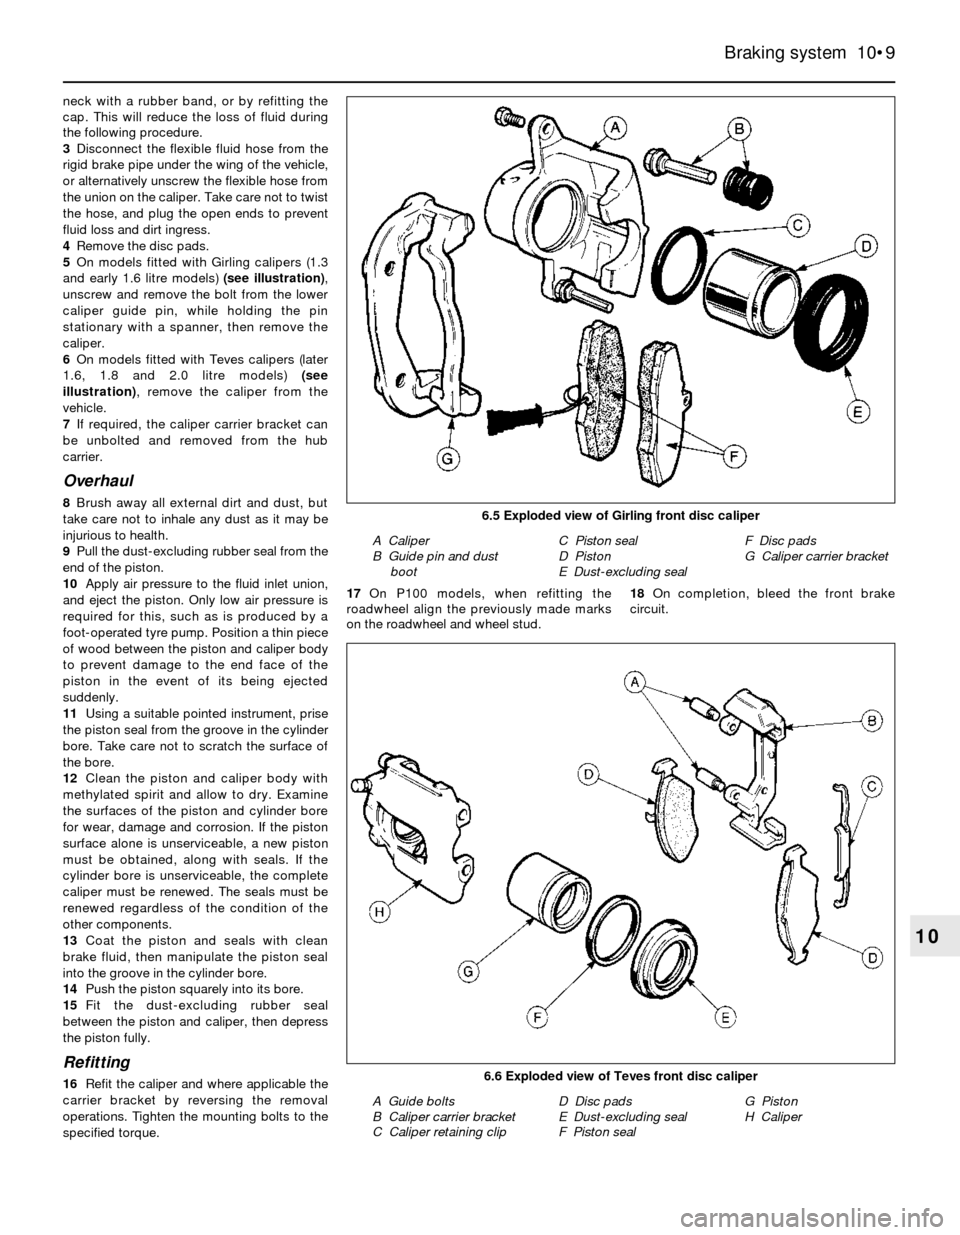
5On models fitted with Girling calipers (1.3
and early 1.6 litre models) (see illustration),
unscrew and remove the bolt from the lower
caliper guide pin, while holding the pin
stationary with a spanner, then remove the
caliper.
6On models fitted with Teves calipers (later
1.6, 1.8 and 2.0 litre models) (see
illustration), remove the caliper from the
vehicle.
7If required, the caliper carrier bracket can
be unbolted and removed from the hub
carrier.
Overhaul
8Brush away all external dirt and dust, but
take care not to inhale any dust as it may be
injurious to health.
9Pull the dust-excluding rubber seal from the
end of the piston.
10Apply air pressure to the fluid inlet union,
and eject the piston. Only low air pressure is
required for this, such as is produced by a
foot-operated tyre pump. Position a thin piece
of wood between the piston and caliper body
to prevent damage to the end face of the
piston in the event of its being ejected
suddenly.
11Using a suitable pointed instrument, prise
the piston seal from the groove in the cylinder
bore. Take care not to scratch the surface of
the bore.
12Clean the piston and caliper body with
methylated spirit and allow to dry. Examine
the surfaces of the piston and cylinder bore
for wear, damage and corrosion. If the piston
surface alone is unserviceable, a new piston
must be obtained, along with seals. If the
cylinder bore is unserviceable, the complete
caliper must be renewed. The seals must be
renewed regardless of the condition of the
other components.
13Coat the piston and seals with clean
brake fluid, then manipulate the piston seal
into the groove in the cylinder bore.
14Push the piston squarely into its bore.
15Fit the dust-excluding rubber seal
between the piston and caliper, then depress
the piston fully.
Refitting
16Refit the caliper and where applicable the
carrier bracket by reversing the removal
operations. Tighten the mounting bolts to the
specified torque.17On P100 models, when refitting the
roadwheel align the previously made marks
on the roadwheel and wheel stud.18On completion, bleed the front brake
circuit.
Braking system 10•9
10
6.6 Exploded view of Teves front disc caliper
A Guide bolts
B Caliper carrier bracket
C Caliper retaining clipD Disc pads
E Dust-excluding seal
F Piston sealG Piston
H Caliper
6.5 Exploded view of Girling front disc caliper
A Caliper
B Guide pin and dust
bootC Piston seal
D Piston
E Dust-excluding sealF Disc pads
G Caliper carrier bracket
Page 13 of 22

3Remove the wheel cylinder.
4Remove the driveshaft but do not refit the
securing bolts to the backplate.
5Remove the backplate.
6If required, prise out the handbrake stop
button.
7Refitting is a reversal of removal.
P 100 models
Note: When refitting the backplate, a new rear
hub nut and driveshaft O-ring must be used.
8Proceed as described in paragraphs 1 to 3
inclusive.
9Remove the driveshaft.
10Relieve the staking on the rear hub nut,
and using a 50 mm socket and a suitable
extension bar, unscrew the nut. Note that the
nut is extremely tight.
11Pull off the hub.
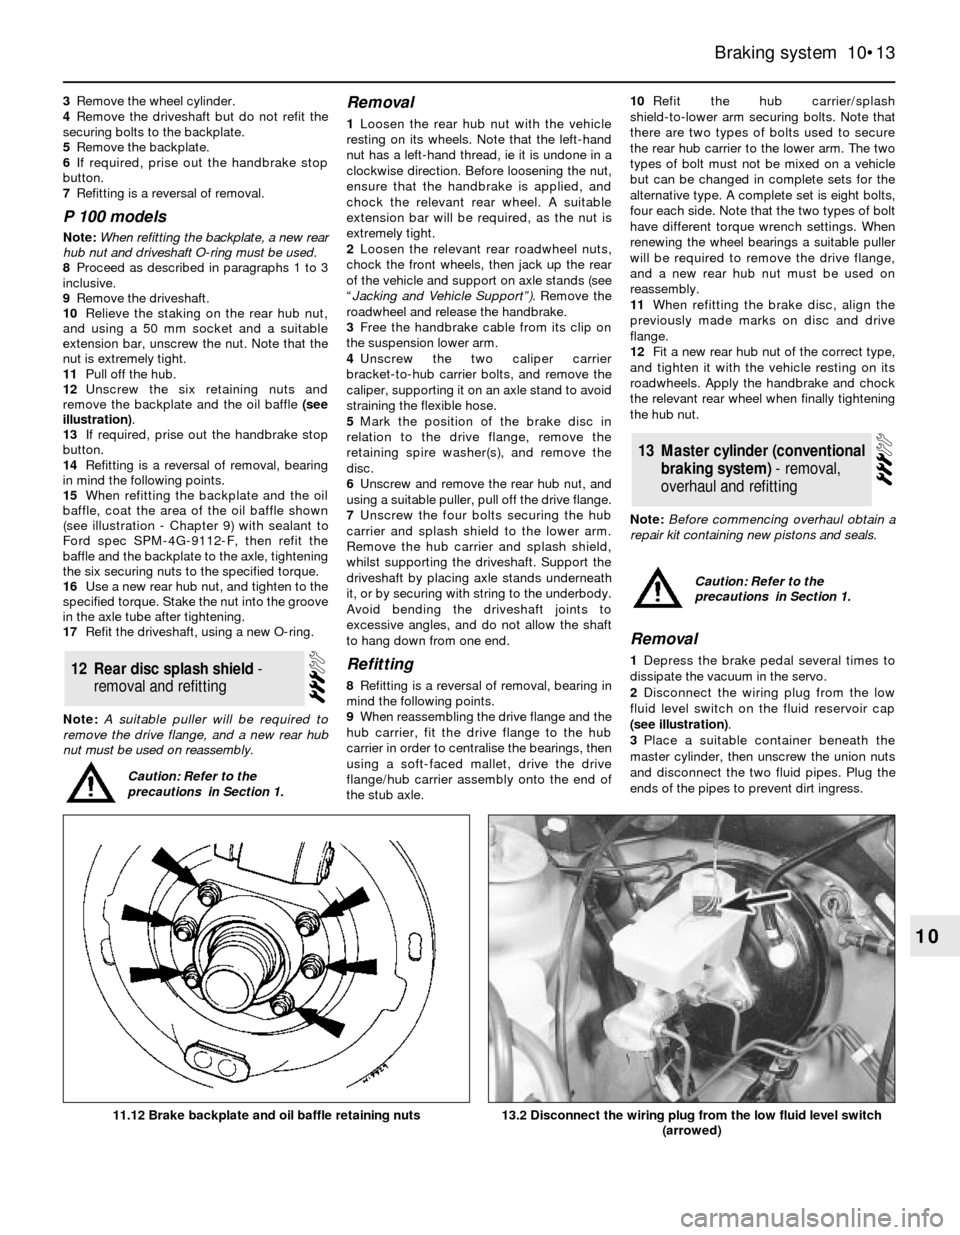
12Unscrew the six retaining nuts and
remove the backplate and the oil baffle (see
illustration).
13If required, prise out the handbrake stop
button.
14Refitting is a reversal of removal, bearing
in mind the following points.
15When refitting the backplate and the oil
baffle, coat the area of the oil baffle shown
(see illustration - Chapter 9) with sealant to
Ford spec SPM-4G-9112-F, then refit the
baffle and the backplate to the axle, tightening
the six securing nuts to the specified torque.
16Use a new rear hub nut, and tighten to the
specified torque. Stake the nut into the groove
in the axle tube after tightening.
17Refit the driveshaft, using a new O-ring.
Note: A suitable puller will be required to
remove the drive flange, and a new rear hub
nut must be used on reassembly.
Removal
1Loosen the rear hub nut with the vehicle
resting on its wheels. Note that the left-hand
nut has a left-hand thread, ie it is undone in a
clockwise direction. Before loosening the nut,
ensure that the handbrake is applied, and
chock the relevant rear wheel. A suitable
extension bar will be required, as the nut is
extremely tight.
2Loosen the relevant rear roadwheel nuts,
chock the front wheels, then jack up the rear
of the vehicle and support on axle stands (see
“Jacking and Vehicle Support”).Remove the
roadwheel and release the handbrake.
3Free the handbrake cable from its clip on
the suspension lower arm.
4Unscrew the two caliper carrier
bracket-to-hub carrier bolts, and remove the
caliper, supporting it on an axle stand to avoid
straining the flexible hose.
5Mark the position of the brake disc in
relation to the drive flange, remove the
retaining spire washer(s), and remove the
disc.
6Unscrew and remove the rear hub nut, and
using a suitable puller, pull off the drive flange.
7Unscrew the four bolts securing the hub
carrier and splash shield to the lower arm.
Remove the hub carrier and splash shield,
whilst supporting the driveshaft. Support the
driveshaft by placing axle stands underneath
it, or by securing with string to the underbody.
Avoid bending the driveshaft joints to
excessive angles, and do not allow the shaft
to hang down from one end.
Refitting
8Refitting is a reversal of removal, bearing in
mind the following points.
9When reassembling the drive flange and the
hub carrier, fit the drive flange to the hub
carrier in order to centralise the bearings, then
using a soft-faced mallet, drive the drive
flange/hub carrier assembly onto the end of
the stub axle.10Refit the hub carrier/splash
shield-to-lower arm securing bolts. Note that
there are two types of bolts used to secure
the rear hub carrier to the lower arm. The two
types of bolt must not be mixed on a vehicle
but can be changed in complete sets for the
alternative type. A complete set is eight bolts,
four each side. Note that the two types of bolt
have different torque wrench settings. When
renewing the wheel bearings a suitable puller
will be required to remove the drive flange,
and a new rear hub nut must be used on
reassembly.
11When refitting the brake disc, align the
previously made marks on disc and drive
flange.
12Fit a new rear hub nut of the correct type,
and tighten it with the vehicle resting on its
roadwheels. Apply the handbrake and chock
the relevant rear wheel when finally tightening
the hub nut.
Note: Before commencing overhaul obtain a
repair kit containing new pistons and seals.
Removal
1Depress the brake pedal several times to
dissipate the vacuum in the servo.
2Disconnect the wiring plug from the low
fluid level switch on the fluid reservoir cap
(see illustration).
3Place a suitable container beneath the
master cylinder, then unscrew the union nuts
and disconnect the two fluid pipes. Plug the
ends of the pipes to prevent dirt ingress.
13Master cylinder (conventional
braking system) - removal,
overhaul and refitting
12Rear disc splash shield -
removal and refitting
Braking system 10•13
10
13.2 Disconnect the wiring plug from the low fluid level switch
(arrowed)11.12 Brake backplate and oil baffle retaining nuts
Caution: Refer to the
precautions in Section 1.
Caution: Refer to the
precautions in Section 1.
Page 14 of 22

4Unscrew the two mounting nuts and spring
washers, and withdraw the master cylinder
from the servo. Cover the master cylinder with
rag or a plastic bag to prevent spillage of
hydraulic fluid on the vehicle paintwork. If fluid
is accidentally spilt on the paintwork, wash off
immediately with cold water.
Overhaul
5Drain the remaining fluid from the master
cylinder, and clean the exterior surfaces with
methylated spirit.
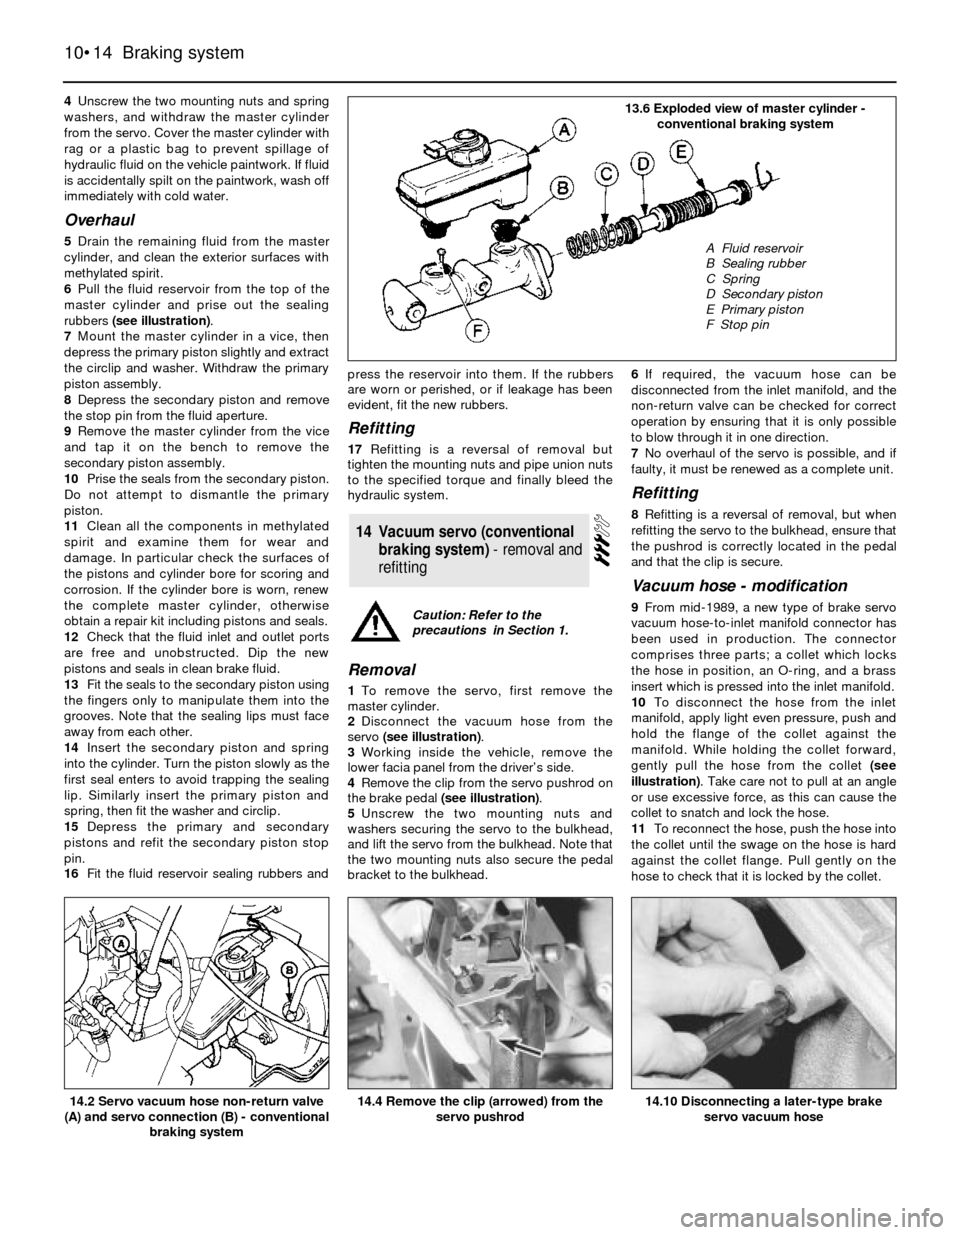
6Pull the fluid reservoir from the top of the
master cylinder and prise out the sealing
rubbers (see illustration).
7Mount the master cylinder in a vice, then
depress the primary piston slightly and extract
the circlip and washer. Withdraw the primary
piston assembly.
8Depress the secondary piston and remove
the stop pin from the fluid aperture.
9Remove the master cylinder from the vice
and tap it on the bench to remove the
secondary piston assembly.
10Prise the seals from the secondary piston.
Do not attempt to dismantle the primary
piston.
11Clean all the components in methylated
spirit and examine them for wear and
damage. In particular check the surfaces of
the pistons and cylinder bore for scoring and
corrosion. If the cylinder bore is worn, renew
the complete master cylinder, otherwise
obtain a repair kit including pistons and seals.
12Check that the fluid inlet and outlet ports
are free and unobstructed. Dip the new
pistons and seals in clean brake fluid.
13Fit the seals to the secondary piston using
the fingers only to manipulate them into the
grooves. Note that the sealing lips must face
away from each other.
14Insert the secondary piston and spring
into the cylinder. Turn the piston slowly as the
first seal enters to avoid trapping the sealing
lip. Similarly insert the primary piston and
spring, then fit the washer and circlip.
15Depress the primary and secondary
pistons and refit the secondary piston stop
pin.
16Fit the fluid reservoir sealing rubbers andpress the reservoir into them. If the rubbers
are worn or perished, or if leakage has been
evident, fit the new rubbers.
Refitting
17Refitting is a reversal of removal but
tighten the mounting nuts and pipe union nuts
to the specified torque and finally bleed the
hydraulic system.
Removal
1To remove the servo, first remove the
master cylinder.
2Disconnect the vacuum hose from the
servo (see illustration).
3Working inside the vehicle, remove the
lower facia panel from the driver’s side.
4Remove the clip from the servo pushrod on
the brake pedal (see illustration).
5Unscrew the two mounting nuts and
washers securing the servo to the bulkhead,
and lift the servo from the bulkhead. Note that
the two mounting nuts also secure the pedal
bracket to the bulkhead.6If required, the vacuum hose can be
disconnected from the inlet manifold, and the
non-return valve can be checked for correct
operation by ensuring that it is only possible
to blow through it in one direction.
7No overhaul of the servo is possible, and if
faulty, it must be renewed as a complete unit.
Refitting
8Refitting is a reversal of removal, but when
refitting the servo to the bulkhead, ensure that
the pushrod is correctly located in the pedal
and that the clip is secure.
Vacuum hose - modification
9From mid-1989, a new type of brake servo
vacuum hose-to-inlet manifold connector has
been used in production. The connector
comprises three parts; a collet which locks
the hose in position, an O-ring, and a brass
insert which is pressed into the inlet manifold.
10To disconnect the hose from the inlet
manifold, apply light even pressure, push and
hold the flange of the collet against the
manifold. While holding the collet forward,
gently pull the hose from the collet (see
illustration). Take care not to pull at an angle
or use excessive force, as this can cause the
collet to snatch and lock the hose.
11To reconnect the hose, push the hose into
the collet until the swage on the hose is hard
against the collet flange. Pull gently on the
hose to check that it is locked by the collet.
14Vacuum servo (conventional
braking system) - removal and
refitting
10•14Braking system
14.10 Disconnecting a later-type brake
servo vacuum hose14.4 Remove the clip (arrowed) from the
servo pushrod14.2 Servo vacuum hose non-return valve
(A) and servo connection (B) - conventional
braking system
13.6 Exploded view of master cylinder -
conventional braking system
A Fluid reservoir
B Sealing rubber
C Spring
D Secondary piston
E Primary piston
F Stop pin
Caution: Refer to the
precautions in Section 1.