cooling FORD SIERRA 1986 1.G Introduction Workshop Manual
[x] Cancel search | Manufacturer: FORD, Model Year: 1986, Model line: SIERRA, Model: FORD SIERRA 1986 1.GPages: 18, PDF Size: 0.5 MB
Page 3 of 18

REPAIRS AND OVERHAUL
Engine and Associated Systems
SOHC enginesPage2A•1
DOHC enginesPage2B•1
CVH enginesPage2C•1
Cooling, heating and air conditioning systemsPage3•1
Fuel/exhaust systems - carburettor modelsPage4A•1
Fuel/exhaust systems - fuel injection modelsPage4B•1
Engine electrical systemsPage5•1
TRANSMISSION
ClutchPage6•1
Manual gearboxPage7A•1
Automatic transmissionPage7B•1
Propellor shaftPage8•1
Final drive and driveshaftsPage9•1
BRAKES AND SUSPENSION
Braking systemPage10•1
Suspension and steeringPage11•1
BODY EQUIPMENT
Bodywork, trim and fittingsPage12•1
Body electrical systemsPage13•1
Wiring DiagramsPage13•22
Reference
General dimensions and weightsPageREF•1
Buying spare parts and vehicle identificationPageREF•3
General repair proceduresPageREF•4
Tools and working facilitiesPageREF•5
MOT test checks PageREF•7
Fault findingPageREF•11
Glossary of technical termsPageREF•18
IndexPageREF•23
Contents
Page 12 of 18

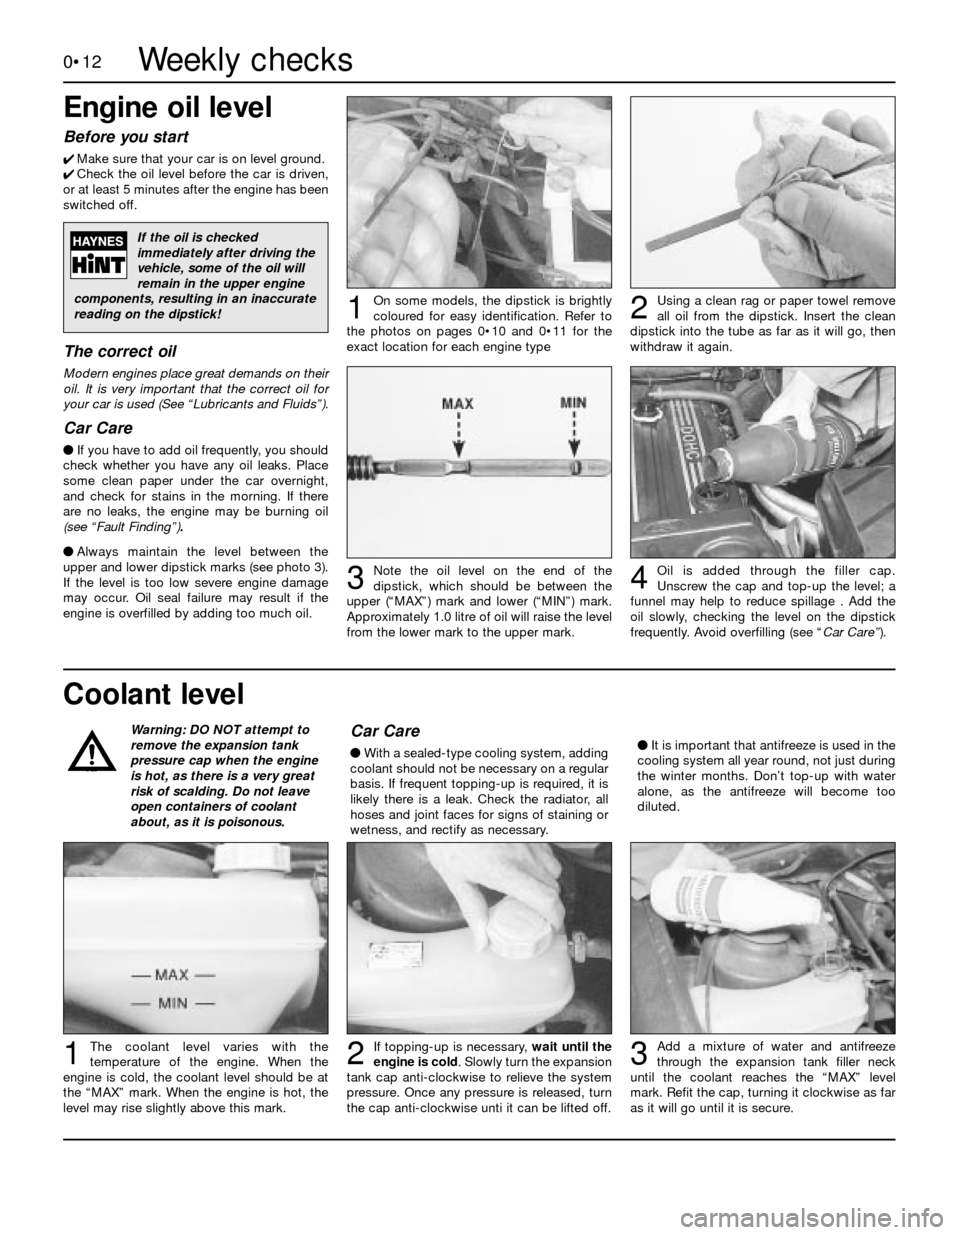
Coolant level Engine oil level
Before you start
4Make sure that your car is on level ground.
4Check the oil level before the car is driven,
or at least 5 minutes after the engine has been
switched off.
The correct oil
Modern engines place great demands on their
oil. It is very important that the correct oil for
your car is used (See “Lubricants and Fluids”).
Car Care
l If you have to add oil frequently, you should
check whether you have any oil leaks. Place
some clean paper under the car overnight,
and check for stains in the morning. If there
are no leaks, the engine may be burning oil
(see “Fault Finding”).
lAlways maintain the level between the
upper and lower dipstick marks (see photo 3).
If the level is too low severe engine damage
may occur. Oil seal failure may result if the
engine is overfilled by adding too much oil.
0•12
Using a clean rag or paper towel remove
all oil from the dipstick. Insert the clean
dipstick into the tube as far as it will go, then
withdraw it again.
Add a mixture of water and antifreeze
through the expansion tank filler neck
until the coolant reaches the “MAX” level
mark. Refit the cap, turning it clockwise as far
as it will go until it is secure.
If topping-up is necessary, wait until the
engine is cold. Slowly turn the expansion
tank cap anti-clockwise to relieve the system
pressure. Once any pressure is released, turn
the cap anti-clockwise unti it can be lifted off.The coolant level varies with the
temperature of the engine. When the
engine is cold, the coolant level should be at
the “MAX” mark. When the engine is hot, the
level may rise slightly above this mark.
Note the oil level on the end of the
dipstick, which should be between the
upper (“MAX”) mark and lower (“MIN”) mark.
Approximately 1.0 litre of oil will raise the level
from the lower mark to the upper mark.Oil is added through the filler cap.
Unscrew the cap and top-up the level; a
funnel may help to reduce spillage . Add the
oil slowly, checking the level on the dipstick
frequently. Avoid overfilling (see “Car Care”).
On some models, the dipstick is brightly
coloured for easy identification. Refer to
the photos on pages 0•10 and 0•11 for the
exact location for each engine type12
3
123
4
Warning: DO NOT attempt to
remove the expansion tank
pressure cap when the engine
is hot, as there is a very great
risk of scalding. Do not leave
open containers of coolant
about, as it is poisonous.Car Care
lWith a sealed-type cooling system, adding
coolant should not be necessary on a regular
basis. If frequent topping-up is required, it is
likely there is a leak. Check the radiator, all
hoses and joint faces for signs of staining or
wetness, and rectify as necessary.lIt is important that antifreeze is used in the
cooling system all year round, not just during
the winter months. Don’t top-up with water
alone, as the antifreeze will become too
diluted.
If the oil is checked
immediately after driving the
vehicle, some of the oil will
remain in the upper engine
components, resulting in an inaccurate
reading on the dipstick!
Weekly checks
Page 17 of 18

0•17Weekly checks
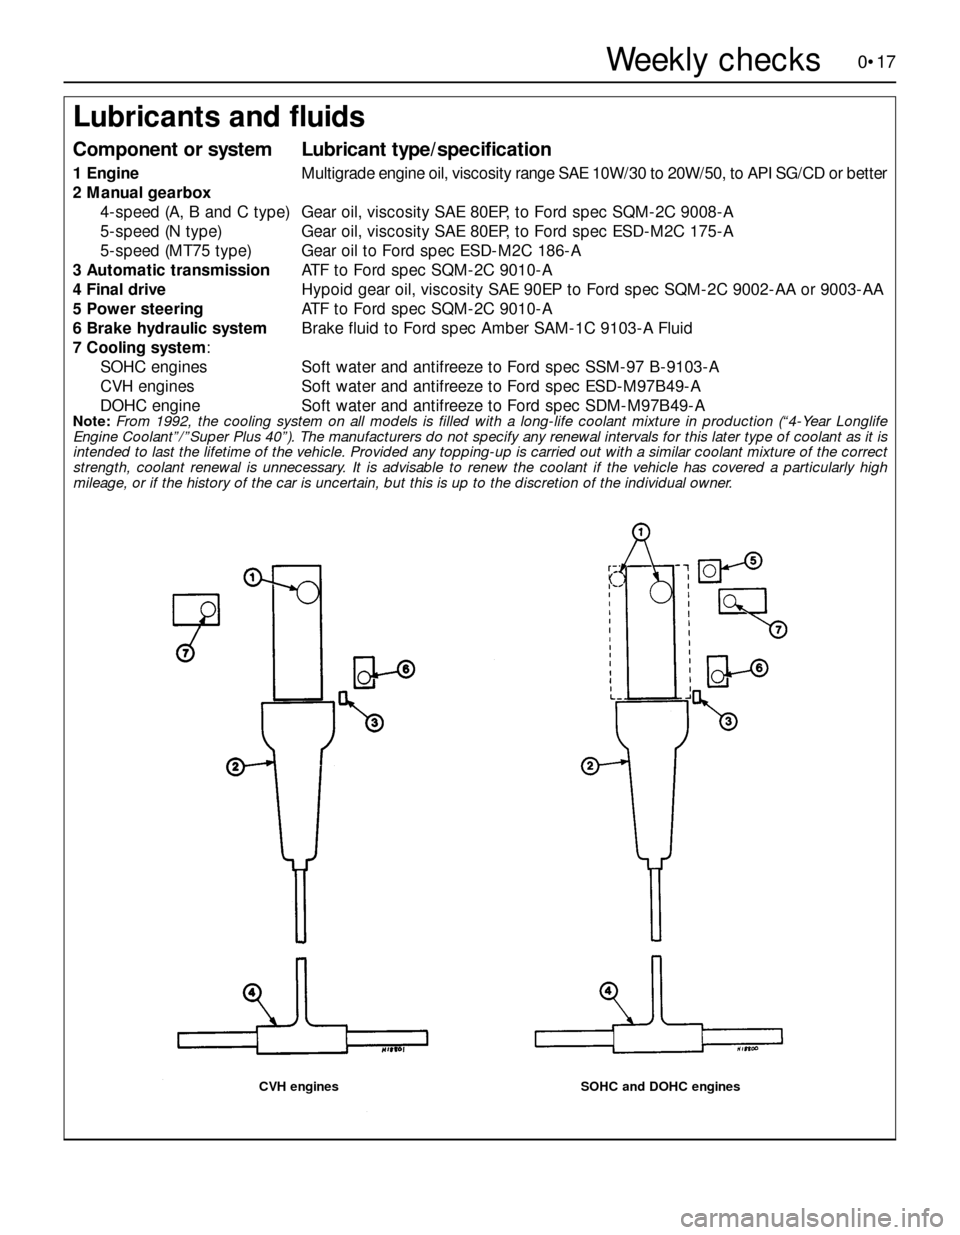
Lubricants and fluids
Component or systemLubricant type/specification
1EngineMultigrade engine oil, viscosity range SAE 10W/30 to 20W/50, to API SG/CD or better
2Manual gearbox
4-speed (A, B and C type)Gear oil, viscosity SAE 80EP, to Ford spec SQM-2C 9008-A
5-speed (N type)Gear oil, viscosity SAE 80EP, to Ford spec ESD-M2C 175-A
5-speed (MT75 type)Gear oil to Ford spec ESD-M2C 186-A
3Automatic transmissionATF to Ford spec SQM-2C 9010-A
4Final driveHypoid gear oil, viscosity SAE 90EP to Ford spec SQM-2C 9002-AA or 9003-AA
5Power steeringATF to Ford spec SQM-2C 9010-A
6Brake hydraulic systemBrake fluid to Ford spec Amber SAM-1C 9103-A Fluid
7Cooling system:
SOHC enginesSoft water and antifreeze to Ford spec SSM-97 B-9103-A
CVH enginesSoft water and antifreeze to Ford spec ESD-M97B49-A
DOHC engineSoft water and antifreeze to Ford spec SDM-M97B49-A
Note:From 1992, the cooling system on all models is filled with a long-life coolant mixture in production (“4-Year Longlife
Engine Coolant”/”Super Plus 40”). The manufacturers do not specify any renewal intervals for this later type of coolant as it is
intended to last the lifetime of the vehicle. Provided any topping-up is carried out with a similar coolant mixture of the correct
strength, coolant renewal is unnecessary. It is advisable to renew the coolant if the vehicle has covered a particularly high
mileage, or if the history of the car is uncertain, but this is up to the discretion of the individual owner.
CVH enginesSOHC and DOHC engines