wheel FORD SIERRA 1986 1.G Introduction Workshop Manual
[x] Cancel search | Manufacturer: FORD, Model Year: 1986, Model line: SIERRA, Model: FORD SIERRA 1986 1.GPages: 18, PDF Size: 0.5 MB
Page 1 of 18
Ford Sierra
Service and Repair Manual
Steve Rendle and Christopher Rogers
Models covered
Saloon (Sapphire and Hatchback), Estate and P100 Pick-up models, including special/limited editions,
with four-cylinder SOHC, DOHC & CVH petrol engines and two-wheel-drive
Does not cover V6 or Diesel engine models, four-wheel-drive models, or RS Cosworth(903 - 368 - 11Y8)
© Haynes Publishing 1996
A book in the Haynes Service and Repair Manual Series
All rights reserved. No part of this book may be reproduced or
transmitted in any form or by any means, electronic or mechanical,
including photocopying, recording or by any information storage
or retrieval system, without permission in writing from the
copyright holder.
ISBN 1 85960 090 5
British Library Cataloguing in Publication Data
A catalogue record for this book is available from from the British library.Printed by J H Haynes & Co. Ltd, Sparkford, Nr Yeovil,
Somerset BA22 7JJ
Haynes Publishing
Sparkford, Nr Yeovil, Somerset BA22 7JJ England
Haynes North America, Inc
861 Lawrence Drive, Newbury Park, California 91320 USA
Editions Haynes S.A.
147/149, rue Saint Honore, 75001 PARIS, France
Page 2 of 18

LIVING WITH YOUR FORD SIERRAIntroduction to the Ford SierraPage0•4
AcknowledgementsPage0•4
Safety first!Page0•5
ROADSIDE REPAIRSJacking, vehicle support and wheel changingPage0•6
TowingPage0•7
Identifying leaksPage0•8
Jump startingPage0•9
Weekly Checks
IntroductionPage0•10
Underbonnet check pointsPage0•10
Engine Oil levelPage0•12
Coolant levelPage0•12
Screen washer fluid levelPage0•13
Brake fluid levelPage0•13
Power steering fluid levelPage0•14
Electrical systemsPage0•14
BatteryPage0•15
Wiper bladesPage0•15
Tyre condition and pressurePage0•16
Lubricants and fluidsPage0•17
Tyre pressuresPage0•18
MAINTENANCE
Routine Maintenance and ServicingPage1•1
Maintenance schedulePage1•4
Maintenance proceduresPage1•9
Contents
Page 5 of 18
0•5Safety First!
Working on your car can be dangerous.
This page shows just some of the potential
risks and hazards, with the aim of creating a
safety-conscious attitude.
General hazards
Scalding
• Don’t remove the radiator or expansion
tank cap while the engine is hot.
• Engine oil, automatic transmission fluid or
power steering fluid may also be dangerously
hot if the engine has recently been running.
Burning
• Beware of burns from the exhaust system
and from any part of the engine. Brake discs
and drums can also be extremely hot
immediately after use.
Crushing
• When working under or near
a raised vehicle,
always
supplement the
jack with axle
stands, or use
drive-on
ramps.
Never
venture
under a car which
is only supported by a jack.
• Take care if loosening or tightening high-
torque nuts when the vehicle is on stands.
Initial loosening and final tightening should
be done with the wheels on the ground.
Fire
• Fuel is highly flammable; fuel vapour is
explosive.
• Don’t let fuel spill onto a hot engine.
• Do not smoke or allow naked lights
(including pilot lights) anywhere near a
vehicle being worked on. Also beware of
creating sparks
(electrically or by use of tools).
• Fuel vapour is heavier than air, so don’t
work on the fuel system with the vehicle over
an inspection pit.
• Another cause of fire is an electrical
overload or short-circuit. Take care when
repairing or modifying the vehicle wiring.
• Keep a fire extinguisher handy, of a type
suitable for use on fuel and electrical fires.
Electric shock
• Ignition HT
voltage can be
dangerous,
especially to
people with heart
problems or a
pacemaker. Don’t
work on or near the
ignition system with
the engine running or
the ignition switched on.• Mains voltage is also dangerous. Make
sure that any mains-operated equipment is
correctly earthed. Mains power points should
be protected by a residual current device
(RCD) circuit breaker.
Fume or gas intoxication
• Exhaust fumes are
poisonous; they often
contain carbon
monoxide, which is
rapidly fatal if inhaled.
Never run the
engine in a
confined space
such as a garage
with the doors shut.
• Fuel vapour is also
poisonous, as are the vapours from some
cleaning solvents and paint thinners.
Poisonous or irritant substances
• Avoid skin contact with battery acid and
with any fuel, fluid or lubricant, especially
antifreeze, brake hydraulic fluid and Diesel
fuel. Don’t syphon them by mouth. If such a
substance is swallowed or gets into the eyes,
seek medical advice.
• Prolonged contact with used engine oil can
cause skin cancer. Wear gloves or use a
barrier cream if necessary. Change out of oil-
soaked clothes and do not keep oily rags in
your pocket.
• Air conditioning refrigerant forms a
poisonous gas if exposed to a naked flame
(including a cigarette). It can also cause skin
burns on contact.
Asbestos
• Asbestos dust can cause cancer if inhaled
or swallowed. Asbestos may be found in
gaskets and in brake and clutch linings.
When dealing with such components it is
safest to assume that they contain asbestos.
Specia hazards
Hydrofluoric acid
• This extremely corrosive acid is formed
when certain types of synthetic rubber, found
in some O-rings, oil seals, fuel hoses etc, are
exposed to temperatures above 400
0C. The
rubber changes into a charred or sticky
substance containing the acid. Once formed,
the acid remains dangerous for years. If it
gets onto the skin, it may be necessary to
amputate the limb concerned.
• When dealing with a vehicle which has
suffered a fire, or with components salvaged
from such a vehicle, wear protective gloves
and discard them after use.
The battery
• Batteries contain sulphuric acid, which
attacks clothing, eyes and skin. Take care
when topping-up or carrying the battery.
• The hydrogen gas given off by the battery
is highly explosive. Never cause a spark or
allow a naked light nearby. Be careful when
connecting and disconnecting battery
chargers or jump leads.
Air bags
• Air bags can cause injury if they go off
accidentally. Take care when removing the
steering wheel and/or facia. Special storage
instructions may apply.
Diesel injection equipment
• Diesel injection pumps supply fuel at very
high pressure. Take care when working on
the fuel injectors and fuel pipes.
Warning: Never expose the hands,
face or any other part of the body
to injector spray; the fuel can
penetrate the skin with potentially fatal
results.
Remember...
DO
• Do use eye protection when using power
tools, and when working under the vehicle.
• Do wear gloves or use barrier cream to
protect your hands when necessary.
• Do get someone to check periodically
that all is well when working alone on the
vehicle.
• Do keep loose clothing and long hair well
out of the way of moving mechanical parts.
• Do remove rings, wristwatch etc, before
working on the vehicle – especially the
electrical system.
• Do ensure that any lifting or jacking
equipment has a safe working load rating
adequate for the job.
A few tips
DON’T
• Don’t attempt to lift a heavy component
which may be beyond your capability – get
assistance.
• Don’t rush to finish a job, or take
unverified short cuts.
• Don’t use ill-fitting tools which may slip
and cause injury.
• Don’t leave tools or parts lying around
where someone can trip over them. Mop
up oil and fuel spills at once.
• Don’t allow children or pets to play in or
near a vehicle being worked on.
Page 6 of 18
0•6
The jack supplied with the vehicle tool kit
should only be used for changing roadwheels.
When carrying out any other kind of work,
raise the vehicle using a trolley jack, and
always supplement the jack with axle stands
positioned under the vehicle jacking points.
To change a roadwheel, first remove the
spare wheel and jack from their stowage
positions. On Saloon, Hatchback and Estate
models, the jack and spare wheel are located
in the luggage compartment. On P100
models, the jack is located behind the
passenger seat, and the spare wheel is
located under the rear of the cargo area.
Firmly apply the handbrake and engage first
gear on manual gearbox models or “P” onautomatic transmission models. Place chocks
at the front and rear of the wheel diagonally
opposite the one to be changed.
Where applicable, remove the wheel trim
and slacken the wheel nuts using the wheel
brace provided in the vehicle tool kit. Position
the jack head under the jacking point nearest
to the wheel to be changed. Raise the jack
until the wheel is clear of the ground, then
remove the wheel nuts and the wheel. Fit the
spare wheel and secure it with the wheel nuts.
Lower the jack until the wheel is just touching
the ground, and tighten the wheel nuts
moderately tight. Now lower the jack fully and
tighten the wheel nuts securely in a diagonal
sequence. Where applicable, refit the wheeltrim , then withdraw the jack and stow the
wheel and jack in thier respective locations.
When jacking up the vehicle with a trolley
jack, position the jack under one of the
relevant jacking point (note that on P100
models, the jackng points for use with a trolley
jack are different to those for use with the
vehicle jack). Do not jack the vehicle under the
sump or or any of the steering or suspension
components. Supplement the jack using axle
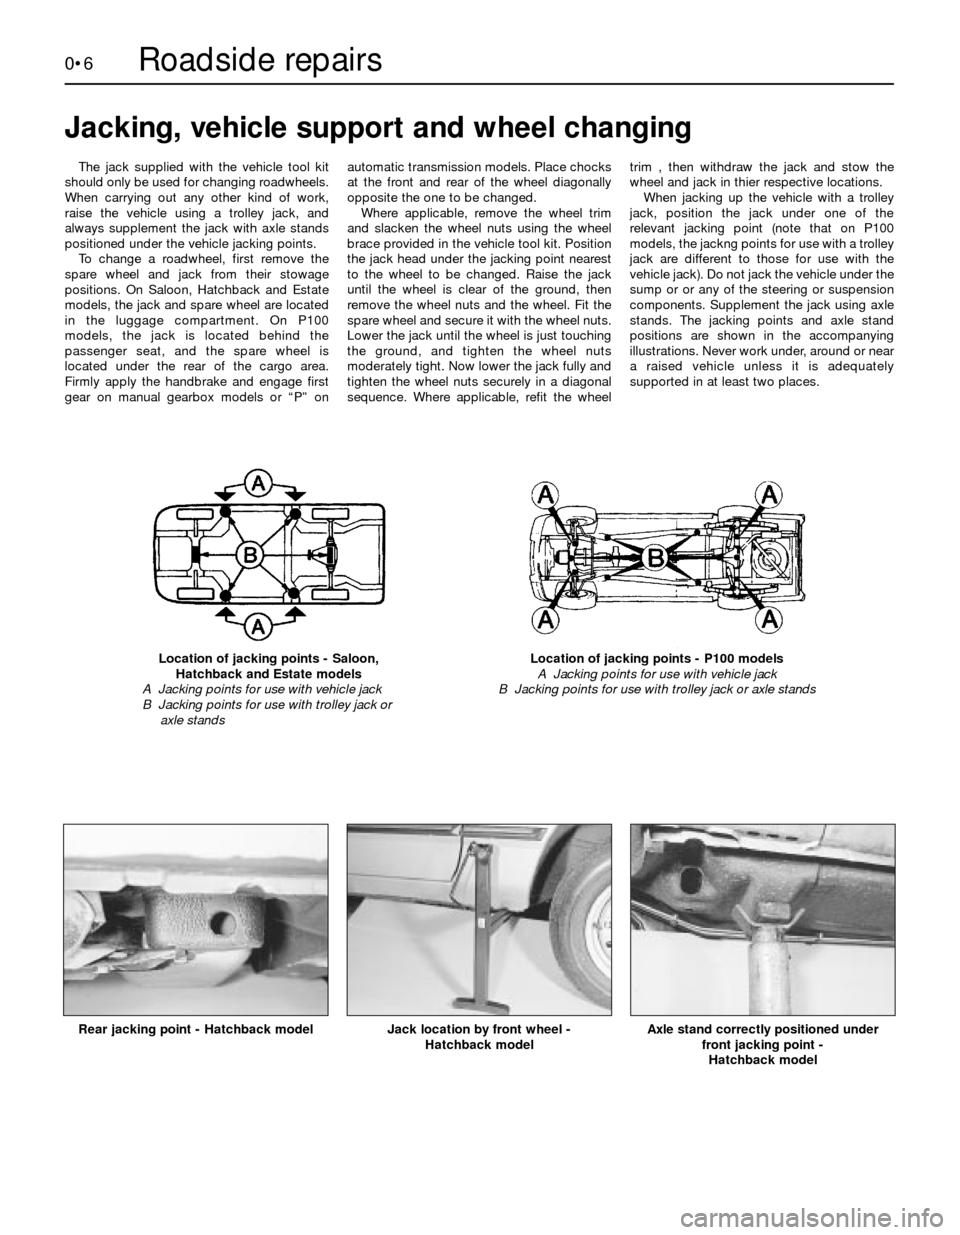
stands. The jacking points and axle stand
positions are shown in the accompanying
illustrations. Never work under, around or near
a raised vehicle unless it is adequately
supported in at least two places.
Jacking, vehicle support and wheel changing
Location of jacking points - Saloon,
Hatchback and Estate models
A Jacking points for use with vehicle jack
B Jacking points for use with trolley jack or
axle standsLocation of jacking points - P100 models
A Jacking points for use with vehicle jack
B Jacking points for use with trolley jack or axle stands
Rear jacking point - Hatchback model
Jack location by front wheel -
Hatchback modelAxle stand correctly positioned under
front jacking point -
Hatchback model
Roadside repairs
Page 8 of 18
0•8Roadside repairs
Puddles on the garage floor or drive, or
obvious wetness under the bonnet or
underneath the car, suggest a leak that needs
investigating. It can sometimes be difficult to
decide where the leak is coming from,
especially if the engine bay is very dirty
already. Leaking oil or fluid can also be blown
rearwards by the passage of air under the car,
giving a false impression of where the
problem lies.Warning: Most automotive oils
and fluids are poisonous. Wash
them off skin, and change out of
contaminated clothing, without
delay.
Identifying leaks
The smell of a fluid leaking
from the car may provide a
clue to what’s leaking. Some
fluids are distinctively
coloured. It may help to clean the car
carefully and to park it over some clean
paper overnight as an aid to locating the
source of the leak.
Remember that some leaks may only
occur while the engine is running.
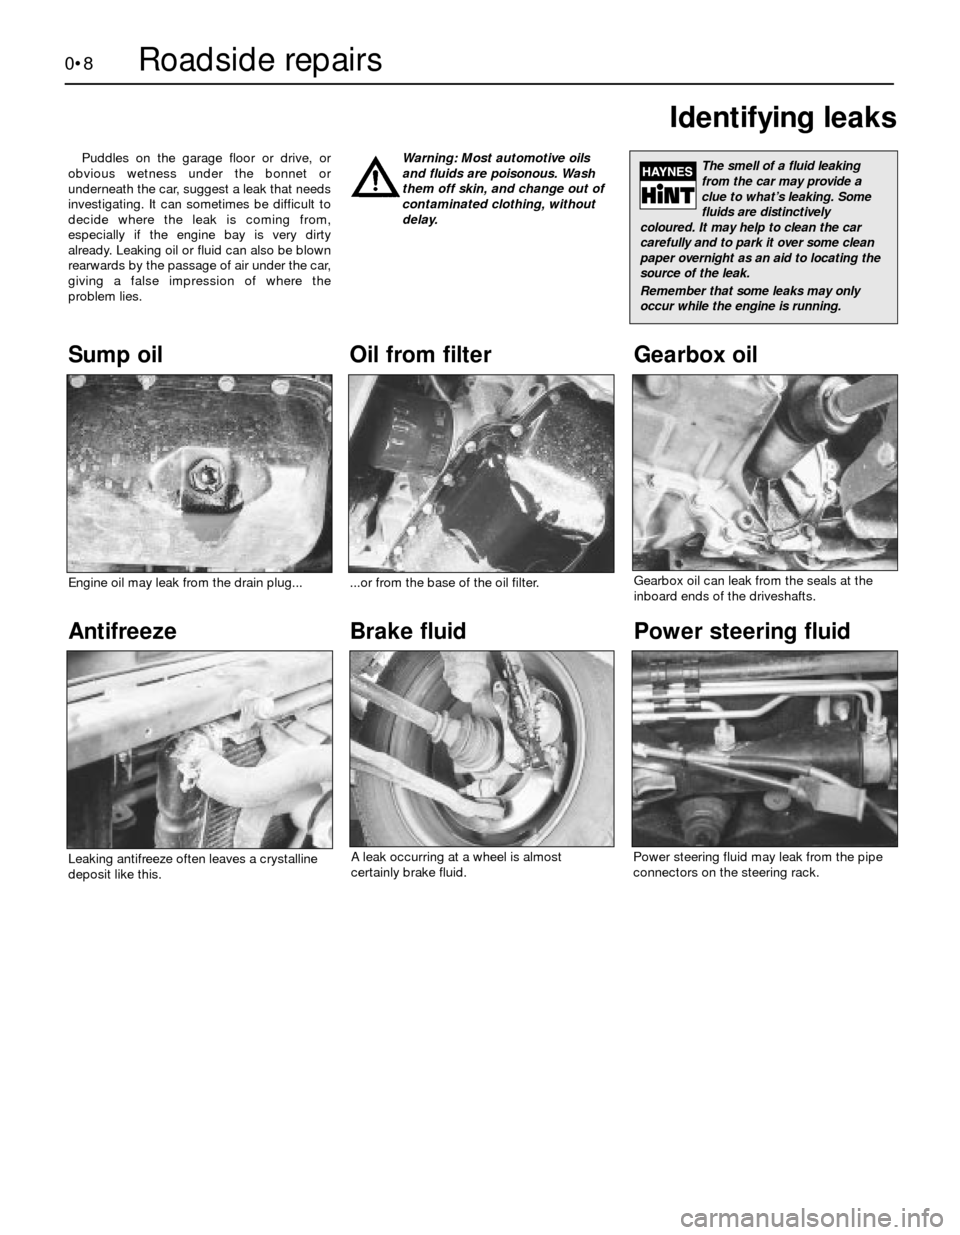
Sump oilGearbox oil
Brake fluidPower steering fluidOil from filter
Antifreeze
Engine oil may leak from the drain plug......or from the base of the oil filter.
Leaking antifreeze often leaves a crystalline
deposit like this.Gearbox oil can leak from the seals at the
inboard ends of the driveshafts.
A leak occurring at a wheel is almost
certainly brake fluid.Power steering fluid may leak from the pipe
connectors on the steering rack.
Page 14 of 18
0•14
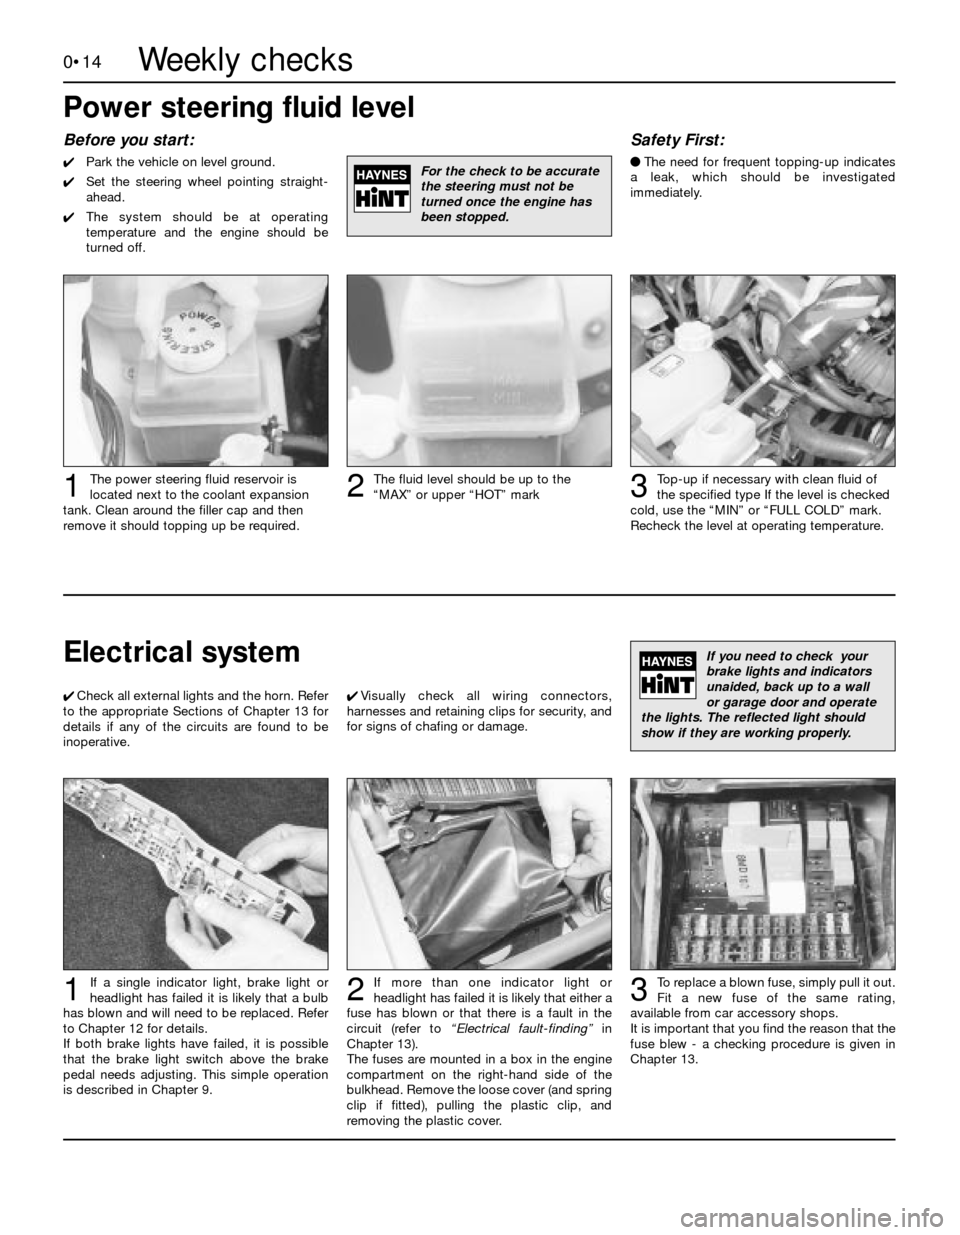
Before you start:
4Park the vehicle on level ground.
4Set the steering wheel pointing straight-
ahead.
4The system should be at operating
temperature and the engine should be
turned off.
Safety First:
lThe need for frequent topping-up indicates
a leak, which should be investigated
immediately.
Top-up if necessary with clean fluid of
the specified typeIf the level is checked
cold, use the “MIN” or “FULL COLD” mark.
Recheck the level at operating temperature.
The fluid level should be up to the
“MAX” or upper “HOT” markThe power steering fluid reservoir is
located next to the coolant expansion
tank. Clean around the filler cap and then
remove it should topping up be required.123
For the check to be accurate
the steering must not be
turned once the engine has
been stopped.
Power steering fluid level
Weekly checks
Electrical system
To replace a blown fuse, simply pull it out.
Fit a new fuse of the same rating,
available from car accessory shops.
It is important that you find the reason that the
fuse blew - a checking procedure is given in
Chapter 13.If more than one indicator light or
headlight has failed it is likely that either a
fuse has blown or that there is a fault in the
circuit (refer to“Electrical fault-finding”in
Chapter 13).
The fuses are mounted in a box in the engine
compartment on the right-hand side of the
bulkhead. Remove the loose cover (and spring
clip if fitted), pulling the plastic clip, and
removing the plastic cover.If a single indicator light, brake light or
headlight has failed it is likely that a bulb
has blown and will need to be replaced. Refer
to Chapter 12 for details.
If both brake lights have failed, it is possible
that the brake light switch above the brake
pedal needs adjusting. This simple operation
is described in Chapter 9.1
If you need to check your
brake lights and indicators
unaided, back up to a wall
or garage door and operate
the lights. The reflected light should
show if they are working properly.
4Check all external lights and the horn. Refer
to the appropriate Sections of Chapter 13 for
details if any of the circuits are found to be
inoperative.4Visually check all wiring connectors,
harnesses and retaining clips for security, and
for signs of chafing or damage.
23
Page 16 of 18
0•16Weekly checks
It is very important that tyres are in good
condition, and at the correct pressure - having
a tyre failure at any speed is highly dangerous.
Tyre wear is influenced by driving style - harsh
braking and acceleration, or fast cornering,
will all produce more rapid tyre wear. As a
general rule, the front tyres wear out faster
than the rears. Interchanging the tyres from
front to rear (“rotating” the tyres) may result in
more even wear. However, if this is completely
effective, you may have the expense of
replacing all four tyres at once!
Remove any nails or stones embedded in the
tread before they penetrate the tyre to cause
deflation. If removal of a nail does reveal thatthe tyre has been punctured, refit the nail so
that its point of penetration is marked. Then
immediately change the wheel, and have the
tyre repaired by a tyre dealer.
Regularly check the tyres for damage in the
form of cuts or bulges, especially in the
sidewalls. Periodically remove the wheels, and
clean any dirt or mud from the inside and
outside surfaces. Examine the wheel rims for
signs of rusting, corrosion or other damage.
Light alloy wheels are easily damaged by
“kerbing” whilst parking; steel wheels may
also become dented or buckled. A new wheel
is very often the only way to overcome severe
damage.New tyres should be balanced when they are
fitted, but it may become necessary to re-
balance them as they wear, or if the balance
weights fitted to the wheel rim should fall off.
Unbalanced tyres will wear more quickly, as
will the steering and suspension components.
Wheel imbalance is normally signified by
vibration, particularly at a certain speed
(typically around 50 mph). If this vibration is
felt only through the steering, then it is likely
that just the front wheels need balancing. If,
however, the vibration is felt through the whole
car, the rear wheels could be out of balance.
Wheel balancing should be carried out by a
tyre dealer or garage.
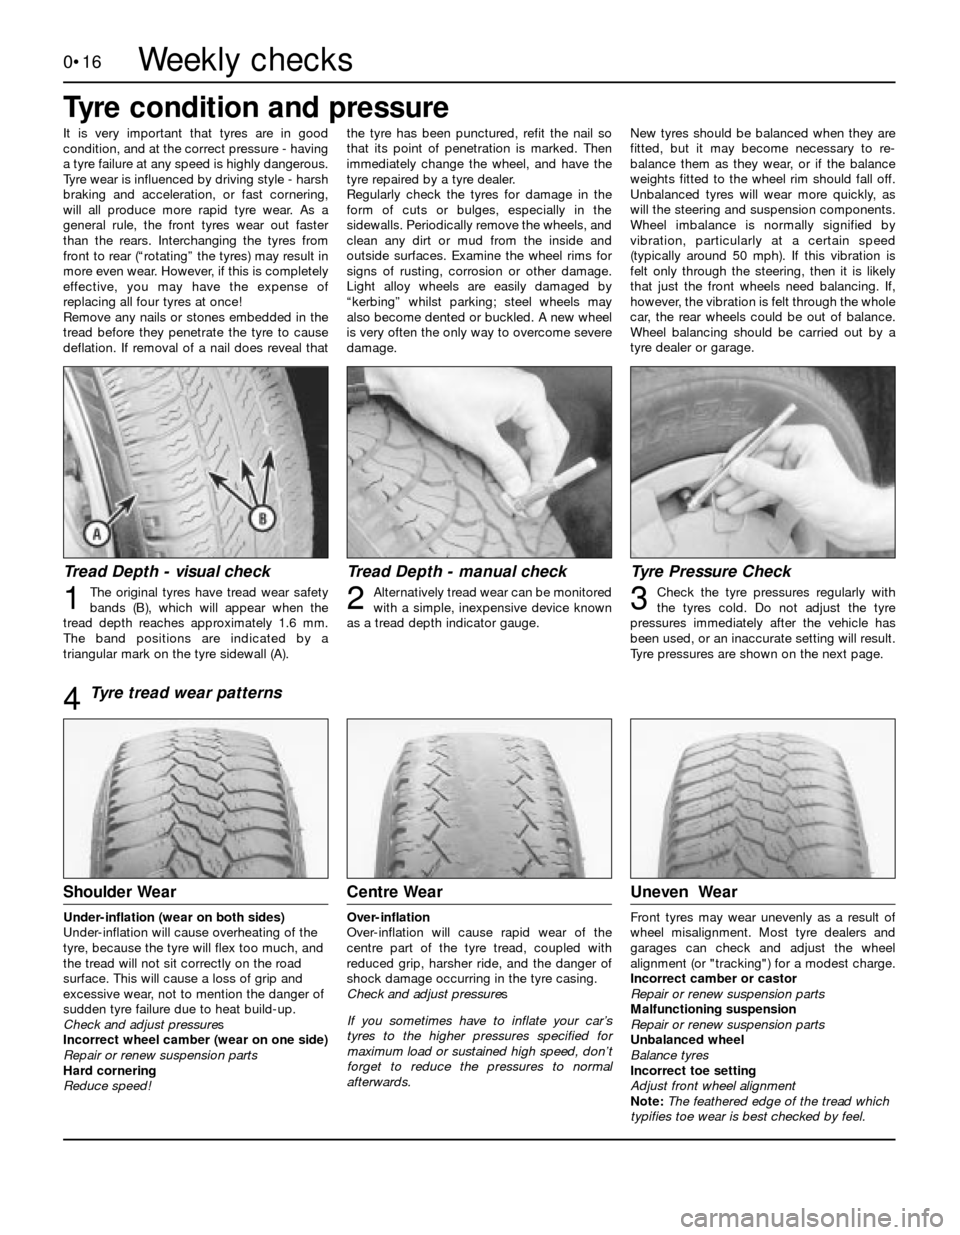
Tyre Pressure Check
Check the tyre pressures regularly with
the tyres cold. Do not adjust the tyre
pressures immediately after the vehicle has
been used, or an inaccurate setting will result.
Tyre pressures are shown on the next page.
Tread Depth - manual check
Alternatively tread wear can be monitored
with a simple, inexpensive device known
as a tread depth indicator gauge.
Tread Depth - visual check
The original tyres have tread wear safety
bands (B), which will appear when the
tread depth reaches approximately 1.6 mm.
The band positions are indicated by a
triangular mark on the tyre sidewall (A).123
Tyre condition and pressure
Tyre tread wear patterns
Shoulder Wear
Under-inflation (wear on both sides)
Under-inflation will cause overheating of the
tyre, because the tyre will flex too much, and
the tread will not sit correctly on the road
surface. This will cause a loss of grip and
excessive wear, not to mention the danger of
sudden tyre failure due to heat build-up.
Check and adjust pressures
Incorrect wheel camber (wear on one side)
Repair or renew suspension parts
Hard cornering
Reduce speed!
Centre Wear
Over-inflation
Over-inflation will cause rapid wear of the
centre part of the tyre tread, coupled with
reduced grip, harsher ride, and the danger of
shock damage occurring in the tyre casing.
Check and adjust pressures
If you sometimes have to inflate your car’s
tyres to the higher pressures specified for
maximum load or sustained high speed, don’t
forget to reduce the pressures to normal
afterwards.
Uneven Wear
Front tyres may wear unevenly as a result of
wheel misalignment. Most tyre dealers and
garages can check and adjust the wheel
alignment (or "tracking") for a modest charge.
Incorrect camber or castor
Repair or renew suspension parts
Malfunctioning suspension
Repair or renew suspension parts
Unbalanced wheel
Balance tyres
Incorrect toe setting
Adjust front wheel alignment
Note: The feathered edge of the tread which
typifies toe wear is best checked by feel.
4