engine oil FORD SIERRA 1988 2.G Routine Manintenance And Servicing User Guide
[x] Cancel search | Manufacturer: FORD, Model Year: 1988, Model line: SIERRA, Model: FORD SIERRA 1988 2.GPages: 22, PDF Size: 1.26 MB
Page 13 of 22
25Start the engine and run it at 3000 rpm for
15 seconds, ensuring that all electrical loads
(headlamps, heater blower etc) are switched
off, then allow the engine to idle and check
the CO content. Note that the CO reading will
initially rise, then fall and finally stabilise.
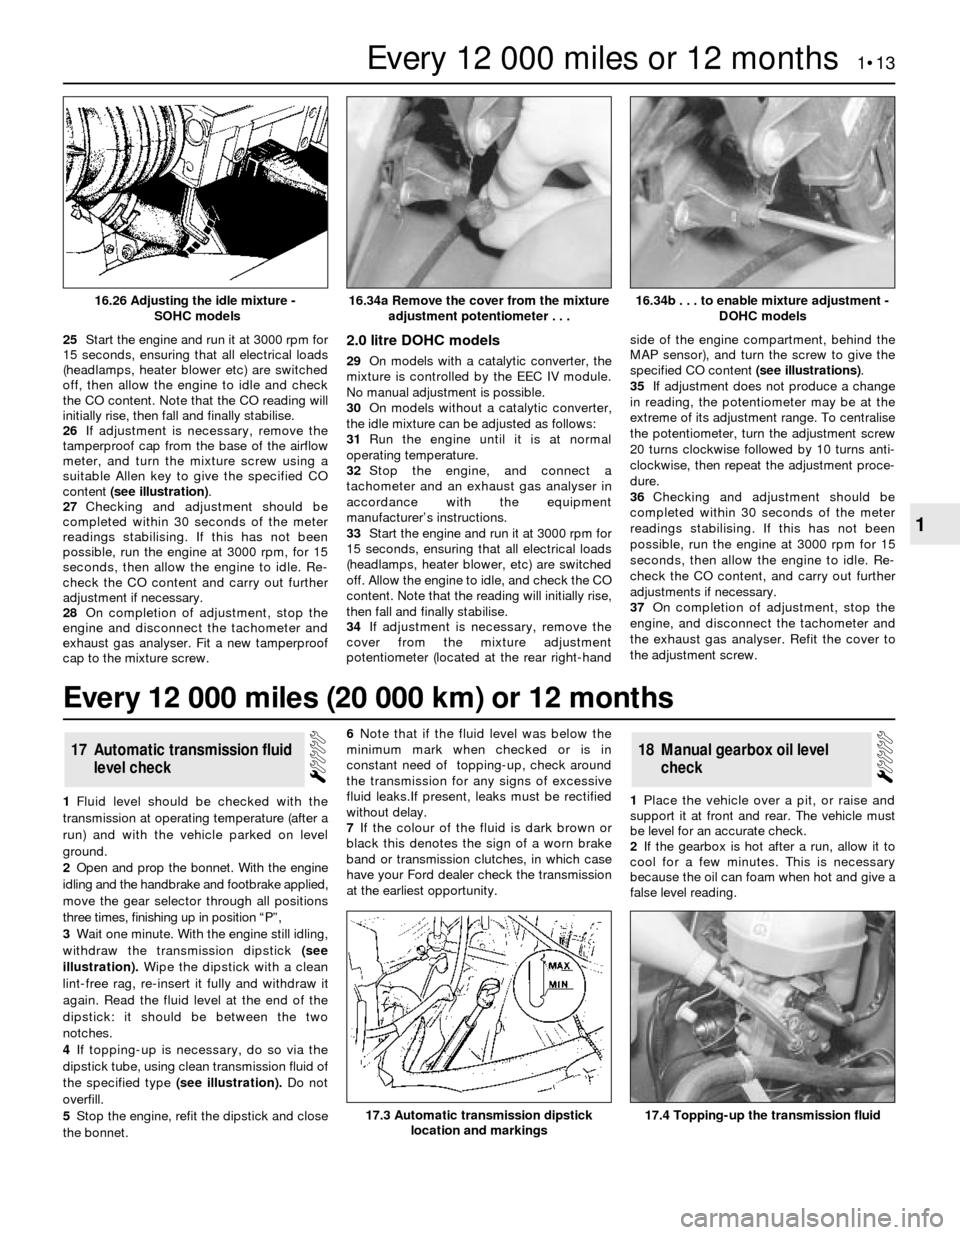
26If adjustment is necessary, remove the
tamperproof cap from the base of the airflow
meter, and turn the mixture screw using a
suitable Allen key to give the specified CO
content (see illustration).
27Checking and adjustment should be
completed within 30 seconds of the meter
readings stabilising. If this has not been
possible, run the engine at 3000 rpm, for 15
seconds, then allow the engine to idle. Re-
check the CO content and carry out further
adjustment if necessary.
28On completion of adjustment, stop the
engine and disconnect the tachometer and
exhaust gas analyser. Fit a new tamperproof
cap to the mixture screw.2.0 litre DOHC models
29On models with a catalytic converter, the
mixture is controlled by the EEC IV module.
No manual adjustment is possible.
30On models without a catalytic converter,
the idle mixture can be adjusted as follows:
31Run the engine until it is at normal
operating temperature.
32Stop the engine, and connect a
tachometer and an exhaust gas analyser in
accordance with the equipment
manufacturer’s instructions.
33Start the engine and run it at 3000 rpm for
15 seconds, ensuring that all electrical loads
(headlamps, heater blower, etc) are switched
off. Allow the engine to idle, and check the CO
content. Note that the reading will initially rise,
then fall and finally stabilise.
34If adjustment is necessary, remove the
cover from the mixture adjustment
potentiometer (located at the rear right-handside of the engine compartment, behind the
MAP sensor), and turn the screw to give the
specified CO content (see illustrations).
35If adjustment does not produce a change
in reading, the potentiometer may be at the
extreme of its adjustment range. To centralise
the potentiometer, turn the adjustment screw
20 turns clockwise followed by 10 turns anti-
clockwise, then repeat the adjustment proce-
dure.
36Checking and adjustment should be
completed within 30 seconds of the meter
readings stabilising. If this has not been
possible, run the engine at 3000 rpm for 15
seconds, then allow the engine to idle. Re-
check the CO content, and carry out further
adjustments if necessary.
37On completion of adjustment, stop the
engine, and disconnect the tachometer and
the exhaust gas analyser. Refit the cover to
the adjustment screw.
1Fluid level should be checked with the
transmission at operating temperature (after a
run) and with the vehicle parked on level
ground.
2Open and prop the bonnet. With the engine
idling and the handbrake and footbrake applied,
move the gear selector through all positions
three times, finishing up in position “P”,
3Wait one minute. With the engine still idling,
withdraw the transmission dipstick (see
illustration).Wipe the dipstick with a clean
lint-free rag, re-insert it fully and withdraw it
again. Read the fluid level at the end of the
dipstick: it should be between the two
notches.
4If topping-up is necessary, do so via the
dipstick tube, using clean transmission fluid of
the specified type (see illustration).Do not
overfill.
5Stop the engine, refit the dipstick and close
the bonnet.6Note that if the fluid level was below the
minimum mark when checked or is in
constant need of topping-up, check around
the transmission for any signs of excessive
fluid leaks.If present, leaks must be rectified
without delay.
7If the colour of the fluid is dark brown or
black this denotes the sign of a worn brake
band or transmission clutches, in which case
have your Ford dealer check the transmission
at the earliest opportunity.1Place the vehicle over a pit, or raise and
support it at front and rear. The vehicle must
be level for an accurate check.
2If the gearbox is hot after a run, allow it to
cool for a few minutes. This is necessary
because the oil can foam when hot and give a
false level reading.
18Manual gearbox oil level
check17Automatic transmission fluid
level check
Every 12 000 miles or 12 months 1•13
1
16.34b . . . to enable mixture adjustment -
DOHC models
17.4 Topping-up the transmission fluid17.3 Automatic transmission dipstick
location and markings
16.34a Remove the cover from the mixture
adjustment potentiometer . . .16.26 Adjusting the idle mixture -
SOHC models
Every 12 000 miles (20 000 km) or 12 months
Page 14 of 22
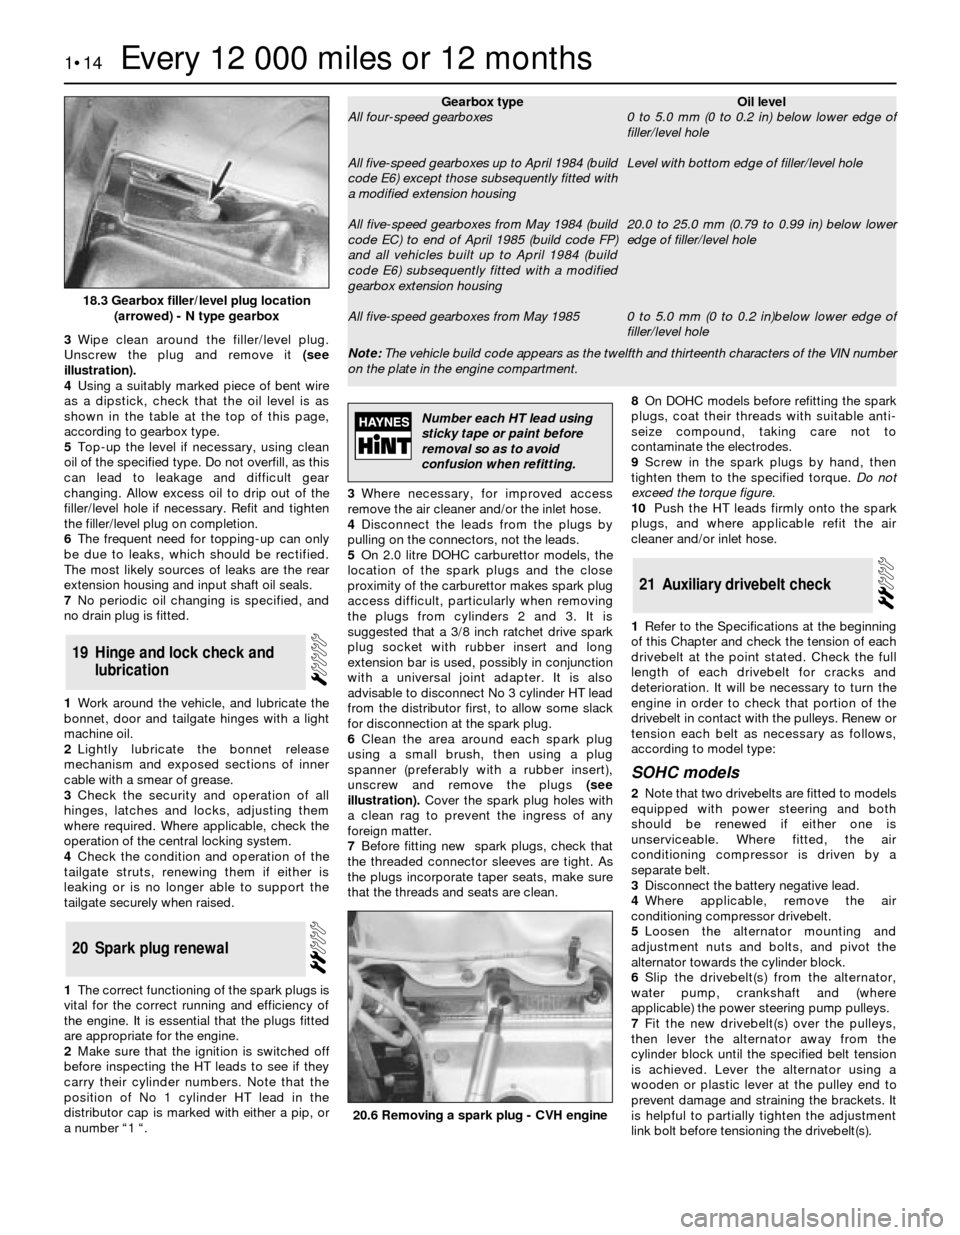
3Wipe clean around the filler/level plug.
Unscrew the plug and remove it(see
illustration).
4Using a suitably marked piece of bent wire
as a dipstick, check that the oil level is as
shown in the table at the top of this page,
according to gearbox type.
5Top-up the level if necessary, using clean
oil of the specified type. Do not overfill, as this
can lead to leakage and difficult gear
changing. Allow excess oil to drip out of the
filler/level hole if necessary. Refit and tighten
the filler/level plug on completion.
6The frequent need for topping-up can only
be due to leaks, which should be rectified.
The most likely sources of leaks are the rear
extension housing and input shaft oil seals.
7No periodic oil changing is specified, and
no drain plug is fitted.
1Work around the vehicle, and lubricate the
bonnet, door and tailgate hinges with a light
machine oil.
2Lightly lubricate the bonnet release
mechanism and exposed sections of inner
cable with a smear of grease.
3Check the security and operation of all
hinges, latches and locks, adjusting them
where required. Where applicable, check the
operation of the central locking system.
4Check the condition and operation of the
tailgate struts, renewing them if either is
leaking or is no longer able to support the
tailgate securely when raised.
1The correct functioning of the spark plugs is
vital for the correct running and efficiency of
the engine. It is essential that the plugs fitted
are appropriate for the engine.
2Make sure that the ignition is switched off
before inspecting the HT leads to see if they
carry their cylinder numbers. Note that the
position of No 1 cylinder HT lead in the
distributor cap is marked with either a pip, or
a number “1 “.3Where necessary, for improved access
remove the air cleaner and/or the inlet hose.
4Disconnect the leads from the plugs by
pulling on the connectors, not the leads.
5On 2.0 litre DOHC carburettor models, the
location of the spark plugs and the close
proximity of the carburettor makes spark plug
access difficult, particularly when removing
the plugs from cylinders 2 and 3. It is
suggested that a 3/8 inch ratchet drive spark
plug socket with rubber insert and long
extension bar is used, possibly in conjunction
with a universal joint adapter. It is also
advisable to disconnect No 3 cylinder HT lead
from the distributor first, to allow some slack
for disconnection at the spark plug.
6Clean the area around each spark plug
using a small brush, then using a plug
spanner (preferably with a rubber insert),
unscrew and remove the plugs(see
illustration).Cover the spark plug holes with
a clean rag to prevent the ingress of any
foreign matter.
7Before fitting new spark plugs, check that
the threaded connector sleeves are tight. As
the plugs incorporate taper seats, make sure
that the threads and seats are clean.8On DOHC models before refitting the spark
plugs, coat their threads with suitable anti-
seize compound, taking care not to
contaminate the electrodes.
9Screw in the spark plugs by hand, then
tighten them to the specified torque. Do not
exceed the torque figure.
10Push the HT leads firmly onto the spark
plugs, and where applicable refit the air
cleaner and/or inlet hose.
1Refer to the Specifications at the beginning
of this Chapter and check the tension of each
drivebelt at the point stated. Check the full
length of each drivebelt for cracks and
deterioration. It will be necessary to turn the
engine in order to check that portion of the
drivebelt in contact with the pulleys. Renew or
tension each belt as necessary as follows,
according to model type:
SOHC models
2Note that two drivebelts are fitted to models
equipped with power steering and both
should be renewed if either one is
unserviceable. Where fitted, the air
conditioning compressor is driven by a
separate belt.
3Disconnect the battery negative lead.
4Where applicable, remove the air
conditioning compressor drivebelt.
5Loosen the alternator mounting and
adjustment nuts and bolts, and pivot the
alternator towards the cylinder block.
6Slip the drivebelt(s) from the alternator,
water pump, crankshaft and (where
applicable) the power steering pump pulleys.
7Fit the new drivebelt(s) over the pulleys,
then lever the alternator away from the
cylinder block until the specified belt tension
is achieved. Lever the alternator using a
wooden or plastic lever at the pulley end to
prevent damage and straining the brackets. It
is helpful to partially tighten the adjustment
link bolt before tensioning the drivebelt(s).
21Auxiliary drivebelt check
20Spark plug renewal
19Hinge and lock check and
lubrication
1•14Every 12 000 miles or 12 months
18.3 Gearbox filler/level plug location
(arrowed) - N type gearbox
20.6 Removing a spark plug - CVH engine
Note: The vehicle build code appears as the twelfth and thirteenth characters of the VIN number
on the plate in the engine compartment.
Gearbox type
All four-speed gearboxes
All five-speed gearboxes up to April 1984 (build
code E6) except those subsequently fitted with
a modified extension housing
All five-speed gearboxes from May 1984 (build
code EC) to end of April 1985 (build code FP)
and all vehicles built up to April 1984 (build
code E6) subsequently fitted with a modified
gearbox extension housing
All five-speed gearboxes from May 1985Oil level
0 to 5.0 mm (0 to 0.2 in) below lower edge of
filler/level hole
Level with bottom edge of filler/level hole
20.0 to 25.0 mm (0.79 to 0.99 in) below lower
edge of filler/level hole
0 to 5.0 mm (0 to 0.2 in)below lower edge of
filler/level hole
Number each HT lead using
sticky tape or paint before
removal so as to avoid
confusion when refitting.
Page 16 of 22
5Numbering from the front (camshaft
sprocket) end of the engine, the exhaust
valves are 1, 3, 5 and 7, and the inlet valves
are 2, 4, 6 and 8.
6Turn the engine clockwise using a suitable
socket on the crankshaft pulley bolt, until the
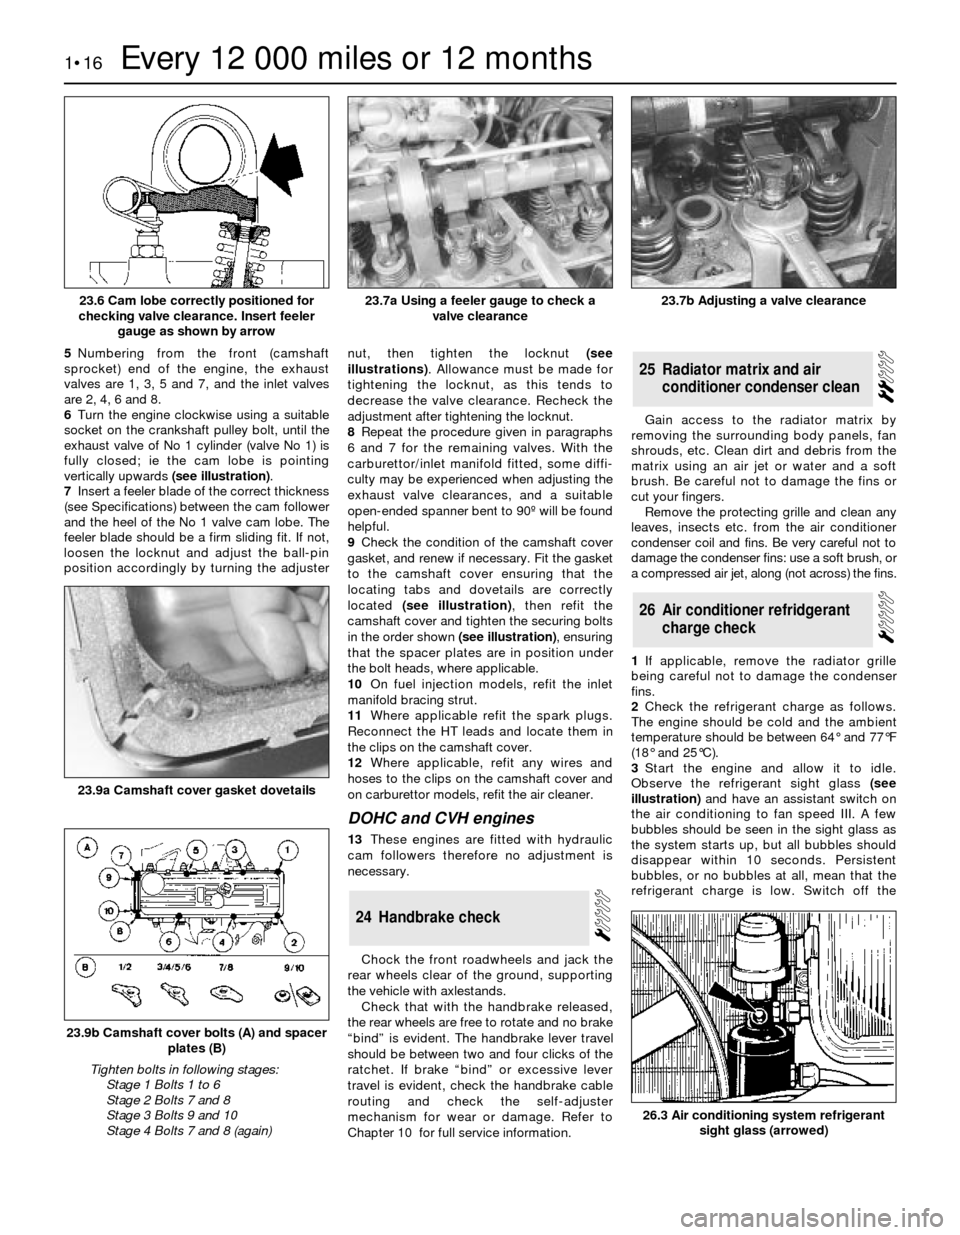
exhaust valve of No 1 cylinder (valve No 1) is
fully closed; ie the cam lobe is pointing
vertically upwards (see illustration).
7Insert a feeler blade of the correct thickness
(see Specifications) between the cam follower
and the heel of the No 1 valve cam lobe. The
feeler blade should be a firm sliding fit. If not,
loosen the locknut and adjust the ball-pin
position accordingly by turning the adjusternut, then tighten the locknut (see
illustrations). Allowance must be made for
tightening the locknut, as this tends to
decrease the valve clearance. Recheck the
adjustment after tightening the locknut.
8Repeat the procedure given in paragraphs
6 and 7 for the remaining valves. With the
carburettor/inlet manifold fitted, some diffi-
culty may be experienced when adjusting the
exhaust valve clearances, and a suitable
open-ended spanner bent to 90º will be found
helpful.
9Check the condition of the camshaft cover
gasket, and renew if necessary. Fit the gasket
to the camshaft cover ensuring that the
locating tabs and dovetails are correctly
located (see illustration), then refit the
camshaft cover and tighten the securing bolts
in the order shown (see illustration), ensuring
that the spacer plates are in position under
the bolt heads, where applicable.
10On fuel injection models, refit the inlet
manifold bracing strut.
11Where applicable refit the spark plugs.
Reconnect the HT leads and locate them in
the clips on the camshaft cover.
12Where applicable, refit any wires and
hoses to the clips on the camshaft cover and
on carburettor models, refit the air cleaner.
DOHCand CVH engines
13These engines are fitted with hydraulic
cam followers therefore no adjustment is
necessary.
Chock the front roadwheels and jack the
rear wheels clear of the ground, supporting
the vehicle with axlestands.
Check that with the handbrake released,
the rear wheels are free to rotate and no brake
“bind” is evident. The handbrake lever travel
should be between two and four clicks of the
ratchet. If brake “bind” or excessive lever
travel is evident, check the handbrake cable
routing and check the self-adjuster
mechanism for wear or damage. Refer to
Chapter 10 for full service information. Gain access to the radiator matrix by
removing the surrounding body panels, fan
shrouds, etc. Clean dirt and debris from the
matrix using an air jet or water and a soft
brush. Be careful not to damage the fins or
cut your fingers.
Remove the protecting grille and clean any
leaves, insects etc. from the air conditioner
condenser coil and fins. Be very careful not to
damage the condenser fins: use a soft brush, or
a compressed air jet, along (not across) the fins.
1If applicable, remove the radiator grille
being careful not to damage the condenser
fins.
2Check the refrigerant charge as follows.
The engine should be cold and the ambient
temperature should be between 64°and 77°F
(18°and 25°C).
3Start the engine and allow it to idle.
Observe the refrigerant sight glass(see
illustration)and have an assistant switch on
the air conditioning to fan speed III. A few
bubbles should be seen in the sight glass as
the system starts up, but all bubbles should
disappear within 10 seconds. Persistent
bubbles, or no bubbles at all, mean that the
refrigerant charge is low. Switch off the
26Air conditioner refridgerant
charge check
25Radiator matrix and air
conditioner condenser clean
24Handbrake check
1•16Every 12 000 miles or 12 months
23.6 Cam lobe correctly positioned for
checking valve clearance. Insert feeler
gauge as shown by arrow23.7b Adjusting a valve clearance
26.3 Air conditioning system refrigerant
sight glass (arrowed)
23.9b Camshaft cover bolts (A) and spacer
plates (B)
Tighten bolts in following stages:
Stage 1 Bolts 1 to 6
Stage 2 Bolts 7 and 8
Stage 3 Bolts 9 and 10
Stage 4 Bolts 7 and 8 (again)
23.9a Camshaft cover gasket dovetails
23.7a Using a feeler gauge to check a
valve clearance
Page 17 of 22
system immediately if the charge is low and
do not use it again until it has been recharged.
4Inspect the refrigerant pipes, hoses and
unions for security and good condition. Refit
the radiator grille.
5The air conditioning system will lose a
proportion of its charge through normal
seepage typically up to 100 g (4 oz) per year -
so it is as well to regard periodic recharging
as a maintenance operation.
1Check the final drive oil level as follows.
2Position the vehicle over a pit, or raise it at
front and rear on ramps or axle stands. The
vehicle must be level.
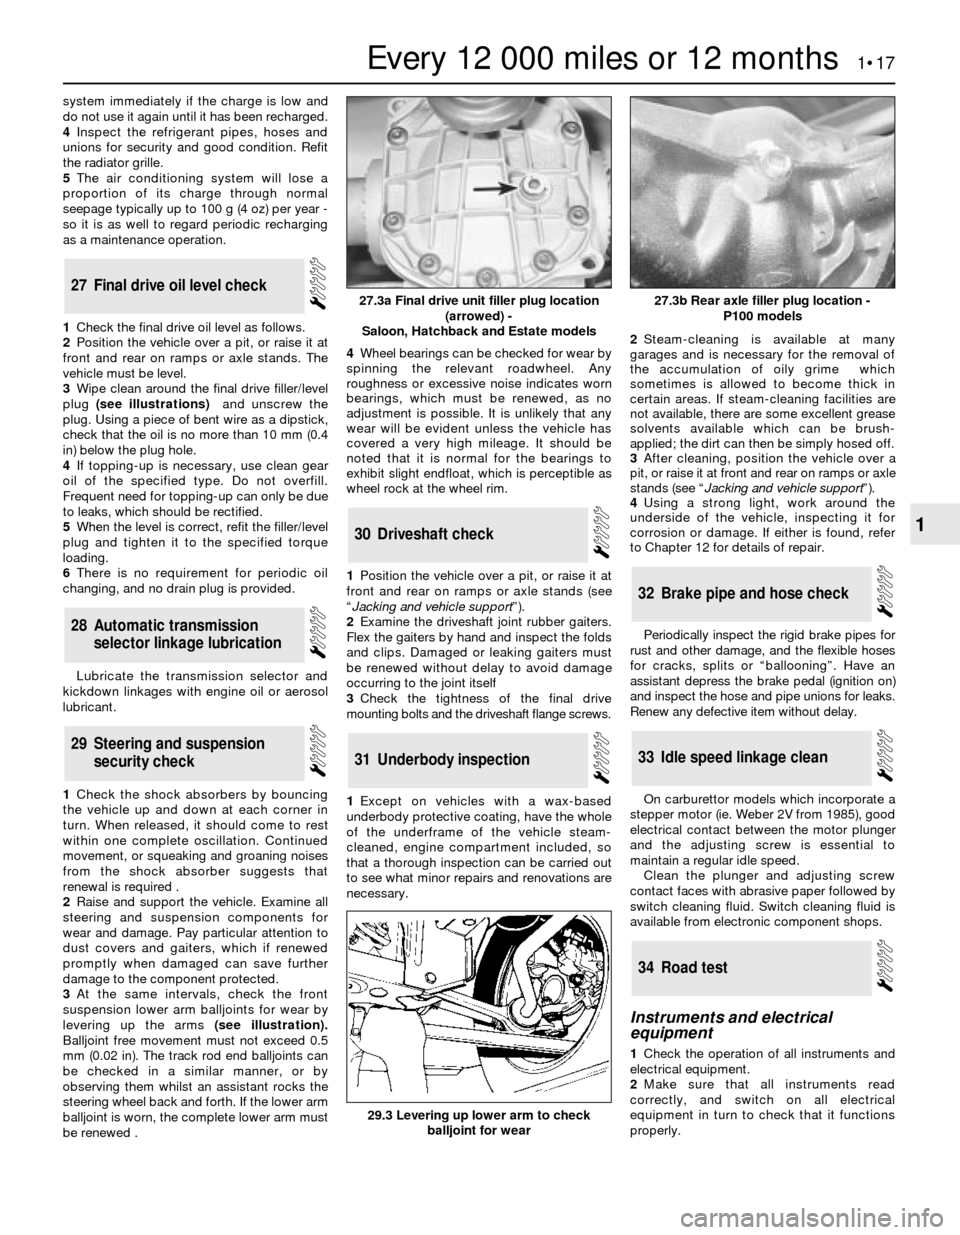
3Wipe clean around the final drive filler/level
plug (see illustrations) and unscrew the
plug. Using a piece of bent wire as a dipstick,
check that the oil is no more than 10 mm (0.4
in) below the plug hole.
4If topping-up is necessary, use clean gear
oil of the specified type. Do not overfill.
Frequent need for topping-up can only be due
to leaks, which should be rectified.
5When the level is correct, refit the filler/level
plug and tighten it to the specified torque
loading.
6There is no requirement for periodic oil
changing, and no drain plug is provided.
Lubricate the transmission selector and
kickdown linkages with engine oil or aerosol
lubricant.
1Check the shock absorbers by bouncing
the vehicle up and down at each corner in
turn. When released, it should come to rest
within one complete oscillation. Continued
movement, or squeaking and groaning noises
from the shock absorber suggests that
renewal is required .
2Raise and support the vehicle. Examine all
steering and suspension components for
wear and damage. Pay particular attention to
dust covers and gaiters, which if renewed
promptly when damaged can save further
damage to the component protected.
3At the same intervals, check the front
suspension lower arm balljoints for wear by
levering up the arms(see illustration).
Balljoint free movement must not exceed 0.5
mm (0.02 in). The track rod end balljoints can
be checked in a similar manner, or by
observing them whilst an assistant rocks the
steering wheel back and forth. If the lower arm
balljoint is worn, the complete lower arm must
be renewed .4Wheel bearings can be checked for wear by
spinning the relevant roadwheel. Any
roughness or excessive noise indicates worn
bearings, which must be renewed, as no
adjustment is possible. It is unlikely that any
wear will be evident unless the vehicle has
covered a very high mileage. It should be
noted that it is normal for the bearings to
exhibit slight endfloat, which is perceptible as
wheel rock at the wheel rim.
1Position the vehicle over a pit, or raise it at
front and rear on ramps or axle stands (see
“Jacking and vehicle support”).
2Examine the driveshaft joint rubber gaiters.
Flex the gaiters by hand and inspect the folds
and clips. Damaged or leaking gaiters must
be renewed without delay to avoid damage
occurring to the joint itself
3Check the tightness of the final drive
mounting bolts and the driveshaft flange screws.
1Except on vehicles with a wax-based
underbody protective coating, have the whole
of the underframe of the vehicle steam-
cleaned, engine compartment included, so
that a thorough inspection can be carried out
to see what minor repairs and renovations are
necessary. 2Steam-cleaning is available at many
garages and is necessary for the removal of
the accumulation of oily grime which
sometimes is allowed to become thick in
certain areas. If steam-cleaning facilities are
not available, there are some excellent grease
solvents available which can be brush-
applied; the dirt can then be simply hosed off.
3After cleaning, position the vehicle over a
pit, or raise it at front and rear on ramps or axle
stands (see “Jacking and vehicle support”).
4Using a strong light, work around the
underside of the vehicle, inspecting it for
corrosion or damage. If either is found, refer
to Chapter 12 for details of repair.
Periodically inspect the rigid brake pipes for
rust and other damage, and the flexible hoses
for cracks, splits or “ballooning”. Have an
assistant depress the brake pedal (ignition on)
and inspect the hose and pipe unions for leaks.
Renew any defective item without delay.
On carburettor models which incorporate a
stepper motor (ie. Weber 2V from 1985), good
electrical contact between the motor plunger
and the adjusting screw is essential to
maintain a regular idle speed.
Clean the plunger and adjusting screw
contact faces with abrasive paper followed by
switch cleaning fluid. Switch cleaning fluid is
available from electronic component shops.
Instruments and electrical
equipment
1Check the operation of all instruments and
electrical equipment.
2Make sure that all instruments read
correctly, and switch on all electrical
equipment in turn to check that it functions
properly.
34Road test
33Idle speed linkage clean
32Brake pipe and hose check
31Underbody inspection
30Driveshaft check
29Steering and suspension
security check
28Automatic transmission
selector linkage lubrication
27Final drive oil level check
Every 12 000 miles or 12 months 1•17
1
29.3 Levering up lower arm to check
balljoint for wear
27.3b Rear axle filler plug location -
P100 models27.3a Final drive unit filler plug location
(arrowed) -
Saloon, Hatchback and Estate models
Page 18 of 22
Steering and suspension
3Check for any abnormalities in the steering,
suspension, handling or road “feel”.
4Drive the vehicle, and check that there are
no unusual vibrations or noises.
5Check that the steering feels positive, with
no excessive “sloppiness”, or roughness, and
check for any suspension noises when
cornering, or when driving over bumps.
Drivetrain
6Check the performance of the engine,
clutch, transmission and driveshafts.
7Listen for any unusual noises from the
engine, clutch and transmission.
8Make sure that the engine runs smoothly
when idling, and that there is no hesitation
when accelerating.9Where applicable, check that the clutch
action is smooth and progressive, that the
drive is taken up smoothly, and that the pedal
travel is not excessive. Also listen for any
noises when the clutch pedal is depressed.
10Check that all gears can be engaged
smoothly, without noise, and that the gear lever
action is not abnormally vague or “notchy”.
Check the operation and
performance of the braking
system
11Make sure that the vehicle does not pull to
one side when braking, and that the wheels
do not lock prematurely when braking hard.
12Check that there is no vibration through
the steering when braking.
13Check that the handbrake operates
correctly, without excessive movement of thelever, and that it holds the vehicle stationary
on a slope.
14Test the operation of the brake servo unit
as follows. With the engine off, depress the
footbrake four or five times to exhaust the
vacuum. Start the engine, holding the brake
pedal depressed. As the engine starts, there
should be a noticeable “give” in the brake
pedal as vacuum builds up. Allow the engine
to run for at least two minutes, and then
switch it off. If the brake pedal is depressed
now, it should be possible to detect a hiss
from the servo as the pedal is depressed.
After about four or five applications, no further
hissing should be heard, and the pedal should
feel considerably firmer.
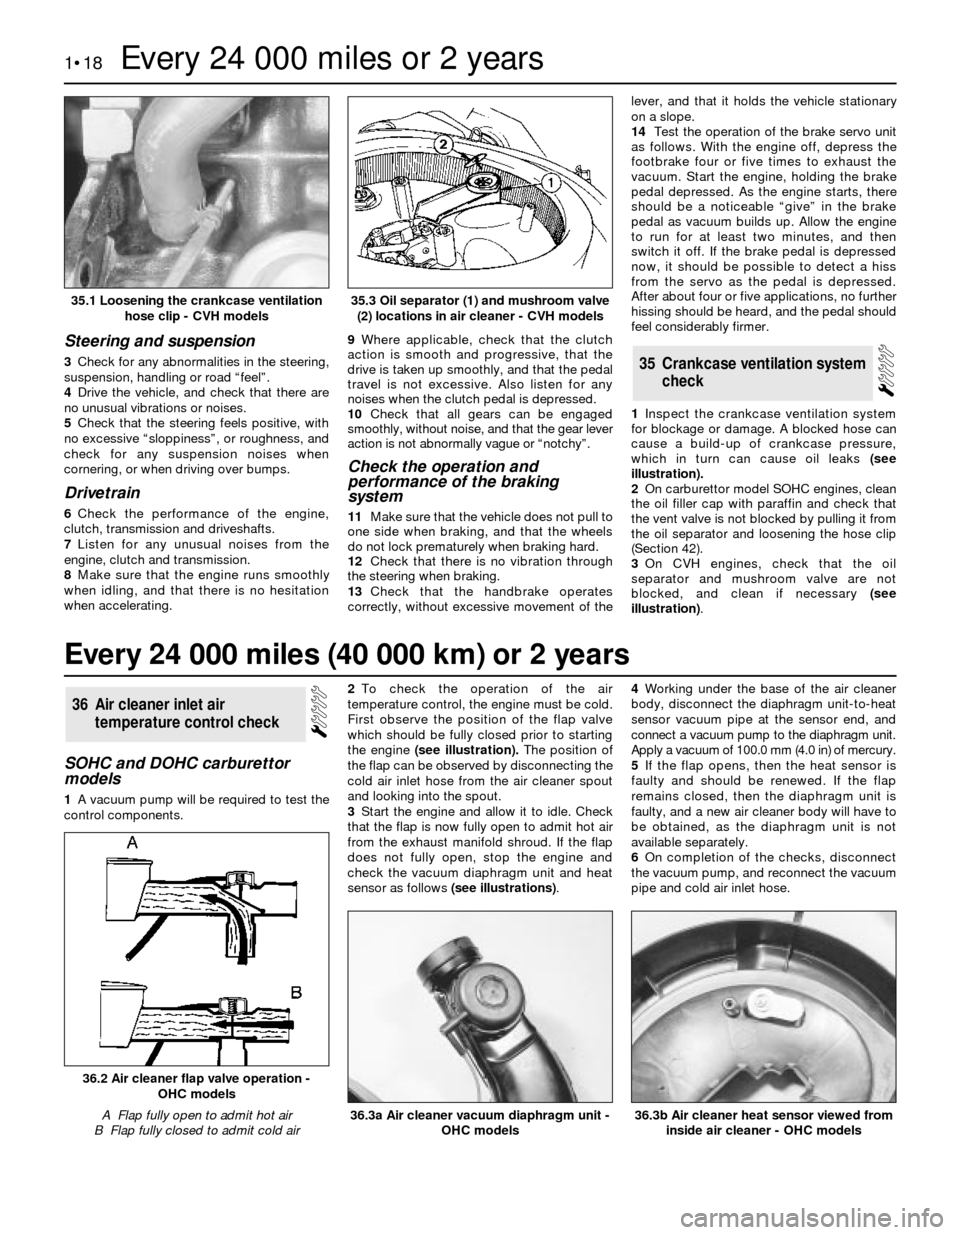
1Inspect the crankcase ventilation system
for blockage or damage. A blocked hose can
cause a build-up of crankcase pressure,
which in turn can cause oil leaks (see
illustration).
2On carburettor model SOHC engines, clean
the oil filler cap with paraffin and check that
the vent valve is not blocked by pulling it from
the oil separator and loosening the hose clip
(Section 42).
3On CVH engines, check that the oil
separator and mushroom valve are not
blocked, and clean if necessary (see
illustration).
35Crankcase ventilation system
check
SOHC and DOHC carburettor
models
1A vacuum pump will be required to test the
control components.2To check the operation of the air
temperature control, the engine must be cold.
First observe the position of the flap valve
which should be fully closed prior to starting
the engine(see illustration).The position of
the flap can be observed by disconnecting the
cold air inlet hose from the air cleaner spout
and looking into the spout.
3Start the engine and allow it to idle. Check
that the flap is now fully open to admit hot air
from the exhaust manifold shroud. If the flap
does not fully open, stop the engine and
check the vacuum diaphragm unit and heat
sensor as follows (see illustrations).4Working under the base of the air cleaner
body, disconnect the diaphragm unit-to-heat
sensor vacuum pipe at the sensor end, and
connect a vacuum pump to the diaphragm unit.
Apply a vacuum of 100.0 mm (4.0 in) of mercury.
5If the flap opens, then the heat sensor is
faulty and should be renewed. If the flap
remains closed, then the diaphragm unit is
faulty, and a new air cleaner body will have to
be obtained, as the diaphragm unit is not
available separately.
6On completion of the checks, disconnect
the vacuum pump, and reconnect the vacuum
pipe and cold air inlet hose.
36Air cleaner inlet air
temperature control check
1•18Every 24 000 miles or 2 years
35.1 Loosening the crankcase ventilation
hose clip - CVH models
36.3b Air cleaner heat sensor viewed from
inside air cleaner - OHC models36.3a Air cleaner vacuum diaphragm unit -
OHC models
36.2 Air cleaner flap valve operation -
OHC models
A Flap fully open to admit hot air
B Flap fully closed to admit cold air
35.3 Oil separator (1) and mushroom valve
(2) locations in air cleaner - CVH models
Every 24 000 miles (40 000 km) or 2 years
Page 20 of 22
13Reconnect the battery negative lead.
2.0 litre DOHC models
14Disconnect the battery negative lead.
15Disconnect the wiring plug from the idle
speed control valve at the front of the plenum
chamber.
16Loosen the clamp, and detach the air inlet
hose from the air inlet tubing.
17Unscrew the securing nut, and release the
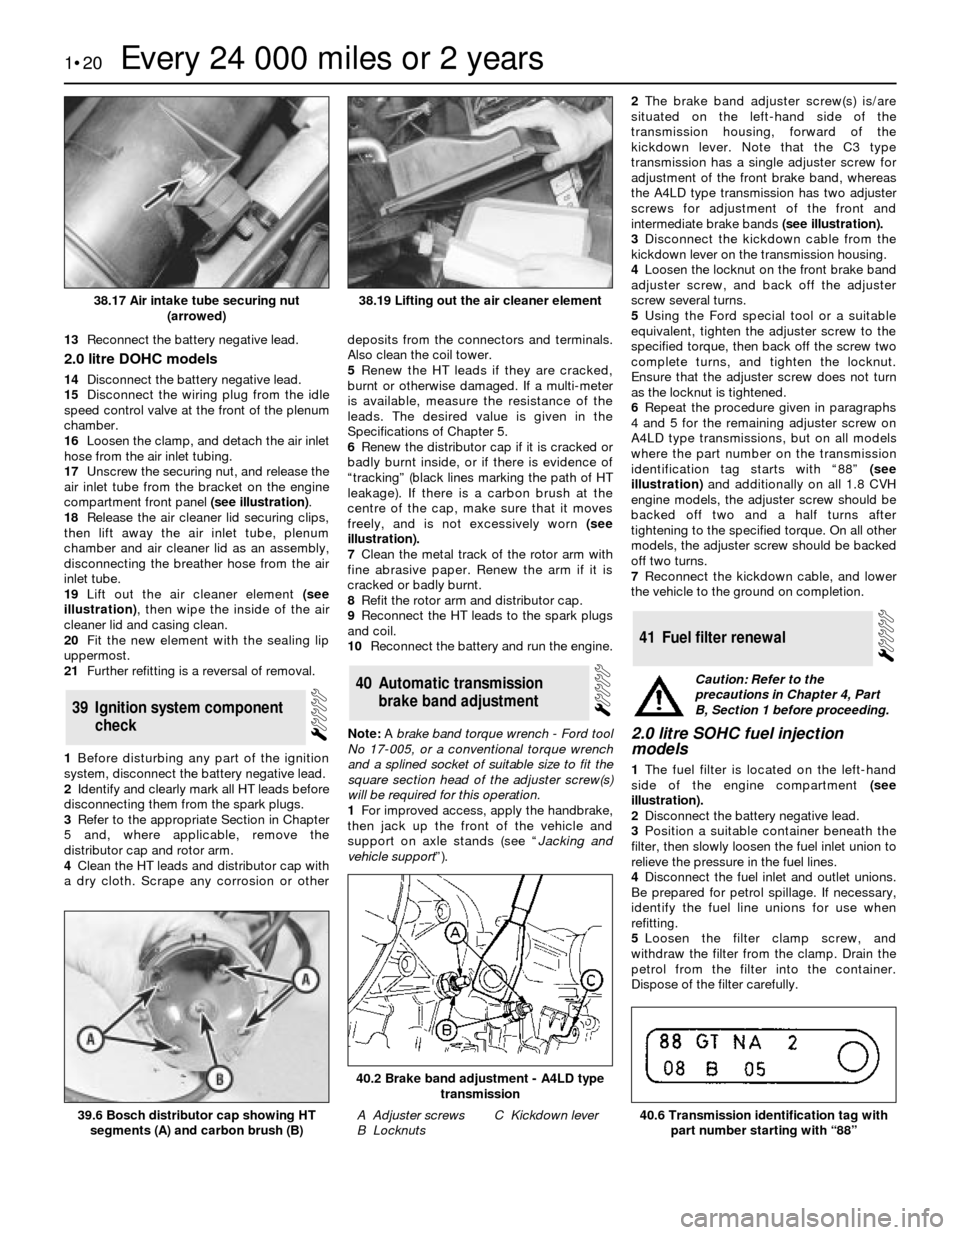
air inlet tube from the bracket on the engine
compartment front panel (see illustration).
18Release the air cleaner lid securing clips,
then lift away the air inlet tube, plenum
chamber and air cleaner lid as an assembly,
disconnecting the breather hose from the air
inlet tube.
19Lift out the air cleaner element (see
illustration), then wipe the inside of the air
cleaner lid and casing clean.
20Fit the new element with the sealing lip
uppermost.
21Further refitting is a reversal of removal.
1Before disturbing any part of the ignition
system, disconnect the battery negative lead.
2Identify and clearly mark all HT leads before
disconnecting them from the spark plugs.
3Refer to the appropriate Section in Chapter
5 and, where applicable, remove the
distributor cap and rotor arm.
4Clean the HT leads and distributor cap with
a dry cloth. Scrape any corrosion or otherdeposits from the connectors and terminals.
Also clean the coil tower.
5Renew the HT leads if they are cracked,
burnt or otherwise damaged. If a multi-meter
is available, measure the resistance of the
leads. The desired value is given in the
Specifications of Chapter 5.
6Renew the distributor cap if it is cracked or
badly burnt inside, or if there is evidence of
“tracking” (black lines marking the path of HT
leakage). If there is a carbon brush at the
centre of the cap, make sure that it moves
freely, and is not excessively worn (see
illustration).
7Clean the metal track of the rotor arm with
fine abrasive paper. Renew the arm if it is
cracked or badly burnt.
8Refit the rotor arm and distributor cap.
9Reconnect the HT leads to the spark plugs
and coil.
10Reconnect the battery and run the engine.
Note: A brake band torque wrench - Ford tool
No 17-005, or a conventional torque wrench
and a splined socket of suitable size to fit the
square section head of the adjuster screw(s)
will be required for this operation.
1For improved access, apply the handbrake,
then jack up the front of the vehicle and
support on axle stands (see “Jacking and
vehicle support”).2The brake band adjuster screw(s) is/are
situated on the left-hand side of the
transmission housing, forward of the
kickdown lever. Note that the C3 type
transmission has a single adjuster screw for
adjustment of the front brake band, whereas
the A4LD type transmission has two adjuster
screws for adjustment of the front and
intermediate brake bands(see illustration).
3Disconnect the kickdown cable from the
kickdown lever on the transmission housing.
4Loosen the locknut on the front brake band
adjuster screw, and back off the adjuster
screw several turns.
5Using the Ford special tool or a suitable
equivalent, tighten the adjuster screw to the
specified torque, then back off the screw two
complete turns, and tighten the locknut.
Ensure that the adjuster screw does not turn
as the locknut is tightened.
6Repeat the procedure given in paragraphs
4 and 5 for the remaining adjuster screw on
A4LD type transmissions, but on all models
where the part number on the transmission
identification tag starts with “88”(see
illustration)and additionally on all 1.8 CVH
engine models, the adjuster screw should be
backed off two and a half turns after
tightening to the specified torque. On all other
models, the adjuster screw should be backed
off two turns.
7Reconnect the kickdown cable, and lower
the vehicle to the ground on completion.
2.0 litre SOHC fuel injection
models
1The fuel filter is located on the left-hand
side of the engine compartment(see
illustration).
2Disconnect the battery negative lead.
3Position a suitable container beneath the
filter, then slowly loosen the fuel inlet union to
relieve the pressure in the fuel lines.
4Disconnect the fuel inlet and outlet unions.
Be prepared for petrol spillage. If necessary,
identify the fuel line unions for use when
refitting.
5Loosen the filter clamp screw, and
withdraw the filter from the clamp. Drain the
petrol from the filter into the container.
Dispose of the filter carefully.
41Fuel filter renewal
40Automatic transmission
brake band adjustment
39Ignition system component
check
1•20Every 24 000 miles or 2 years
38.17 Air intake tube securing nut
(arrowed)
39.6 Bosch distributor cap showing HT
segments (A) and carbon brush (B)40.6 Transmission identification tag with
part number starting with “88”
40.2 Brake band adjustment - A4LD type
transmission
A Adjuster screws
B LocknutsC Kickdown lever
38.19 Lifting out the air cleaner element
Caution: Refer to the
precautions in Chapter 4, Part
B, Section 1 before proceeding.
Page 21 of 22
6Fit the new filter, ensuring that the arrows on
the filter body point in the direction of fuel flow.
7Tighten the clamp screw, and reconnect
the fuel inlet and outlet unions. Ensure that the
unions are correctly connected.
8Reconnect the battery negative lead, and
check the fuel line unions for leaks,
pressurising the system by switching the
ignition on and off several times.
All models except 2.0 litre SOHC
9Proceed as described for the 2.0 litre SOHCmodels, noting the following points.
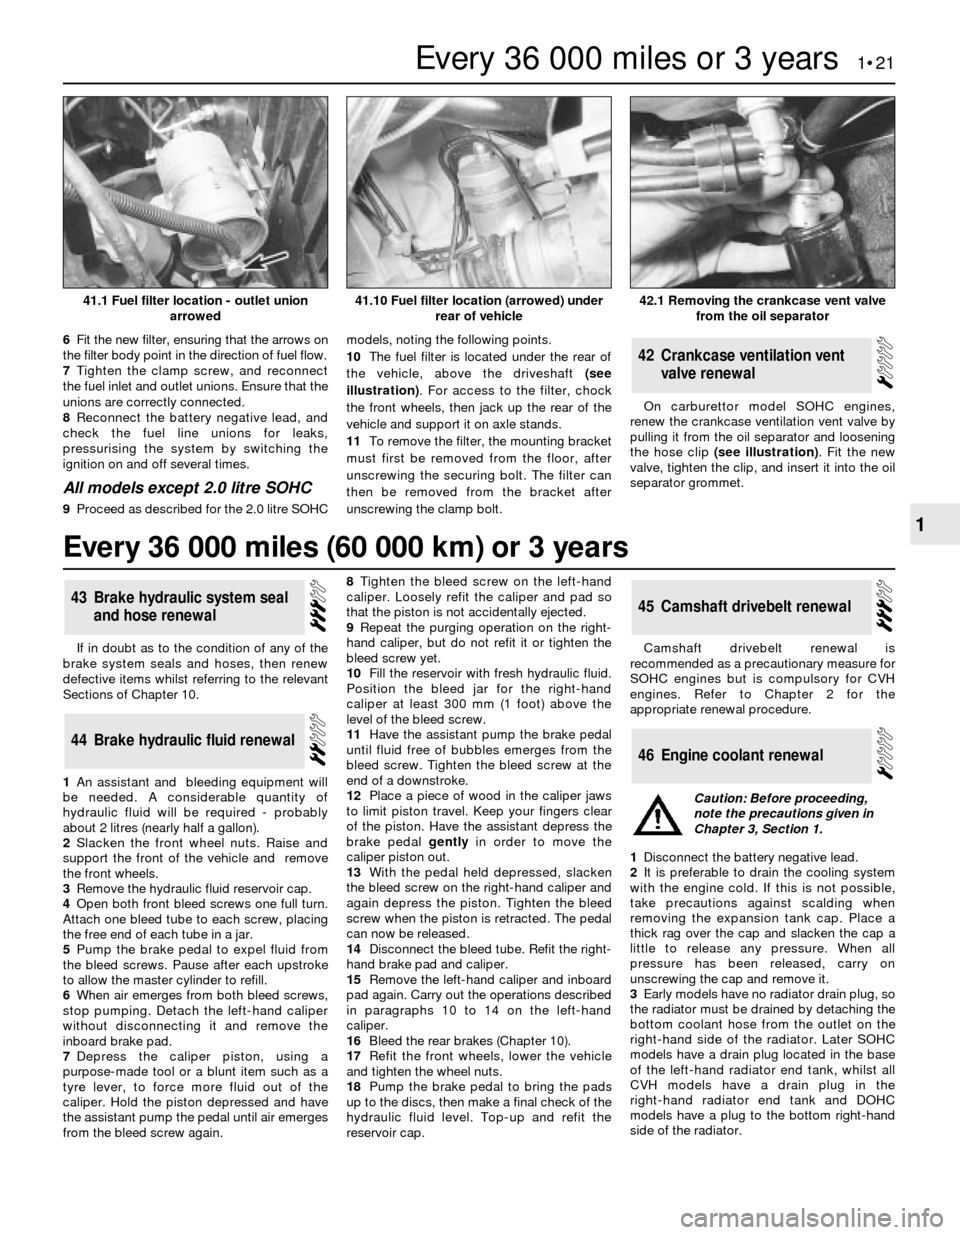
10The fuel filter is located under the rear of
the vehicle, above the driveshaft (see
illustration). For access to the filter, chock
the front wheels, then jack up the rear of the
vehicle and support it on axle stands.
11To remove the filter, the mounting bracket
must first be removed from the floor, after
unscrewing the securing bolt. The filter can
then be removed from the bracket after
unscrewing the clamp bolt.On carburettor model SOHC engines,
renew the crankcase ventilation vent valve by
pulling it from the oil separator and loosening
the hose clip (see illustration). Fit the new
valve, tighten the clip, and insert it into the oil
separator grommet.
42Crankcase ventilation vent
valve renewal
If in doubt as to the condition of any of the
brake system seals and hoses, then renew
defective items whilst referring to the relevant
Sections of Chapter 10.
1An assistant and bleeding equipment will
be needed. A considerable quantity of
hydraulic fluid will be required - probably
about 2 litres (nearly half a gallon).
2Slacken the front wheel nuts. Raise and
support the front of the vehicle and remove
the front wheels.
3Remove the hydraulic fluid reservoir cap.
4Open both front bleed screws one full turn.
Attach one bleed tube to each screw, placing
the free end of each tube in a jar.
5Pump the brake pedal to expel fluid from
the bleed screws. Pause after each upstroke
to allow the master cylinder to refill.
6When air emerges from both bleed screws,
stop pumping. Detach the left-hand caliper
without disconnecting it and remove the
inboard brake pad.
7Depress the caliper piston, using a
purpose-made tool or a blunt item such as a
tyre lever, to force more fluid out of the
caliper. Hold the piston depressed and have
the assistant pump the pedal until air emerges
from the bleed screw again.8Tighten the bleed screw on the left-hand
caliper. Loosely refit the caliper and pad so
that the piston is not accidentally ejected.
9Repeat the purging operation on the right-
hand caliper, but do not refit it or tighten the
bleed screw yet.
10Fill the reservoir with fresh hydraulic fluid.
Position the bleed jar for the right-hand
caliper at least 300 mm (1 foot) above the
level of the bleed screw.
11Have the assistant pump the brake pedal
until fluid free of bubbles emerges from the
bleed screw. Tighten the bleed screw at the
end of a downstroke.
12Place a piece of wood in the caliper jaws
to limit piston travel. Keep your fingers clear
of the piston. Have the assistant depress the
brake pedal gentlyin order to move the
caliper piston out.
13With the pedal held depressed, slacken
the bleed screw on the right-hand caliper and
again depress the piston. Tighten the bleed
screw when the piston is retracted. The pedal
can now be released.
14Disconnect the bleed tube. Refit the right-
hand brake pad and caliper.
15Remove the left-hand caliper and inboard
pad again. Carry out the operations described
in paragraphs 10 to 14 on the left-hand
caliper.
16Bleed the rear brakes (Chapter 10).
17Refit the front wheels, lower the vehicle
and tighten the wheel nuts.
18Pump the brake pedal to bring the pads
up to the discs, then make a final check of the
hydraulic fluid level. Top-up and refit the
reservoir cap.Camshaft drivebelt renewal is
recommended as a precautionary measure for
SOHC engines but is compulsory for CVH
engines. Refer to Chapter 2 for the
appropriate renewal procedure.
1Disconnect the battery negative lead.
2It is preferable to drain the cooling system
with the engine cold. If this is not possible,
take precautions against scalding when
removing the expansion tank cap. Place a
thick rag over the cap and slacken the cap a
little to release any pressure. When all
pressure has been released, carry on
unscrewing the cap and remove it.
3Early models have no radiator drain plug, so
the radiator must be drained by detaching the
bottom coolant hose from the outlet on the
right-hand side of the radiator. Later SOHC
models have a drain plug located in the base
of the left-hand radiator end tank, whilst all
CVH models have a drain plug in the
right-hand radiator end tank and DOHC
models have a plug to the bottom right-hand
side of the radiator.
46Engine coolant renewal
45Camshaft drivebelt renewal
44Brake hydraulic fluid renewal
43Brake hydraulic system seal
and hose renewal
Every 36 000 miles or 3 years 1•21
1
42.1 Removing the crankcase vent valve
from the oil separator41.10 Fuel filter location (arrowed) under
rear of vehicle41.1 Fuel filter location - outlet union
arrowed
Caution: Before proceeding,
note the precautions given in
Chapter 3, Section 1.
Every 36 000 miles (60 000 km) or 3 years