air suspension FORD SIERRA 1989 2.G Introduction Workshop Manual
[x] Cancel search | Manufacturer: FORD, Model Year: 1989, Model line: SIERRA, Model: FORD SIERRA 1989 2.GPages: 18, PDF Size: 0.5 MB
Page 3 of 18

REPAIRS AND OVERHAUL
Engine and Associated Systems
SOHC enginesPage2A•1
DOHC enginesPage2B•1
CVH enginesPage2C•1
Cooling, heating and air conditioning systemsPage3•1
Fuel/exhaust systems - carburettor modelsPage4A•1
Fuel/exhaust systems - fuel injection modelsPage4B•1
Engine electrical systemsPage5•1
TRANSMISSION
ClutchPage6•1
Manual gearboxPage7A•1
Automatic transmissionPage7B•1
Propellor shaftPage8•1
Final drive and driveshaftsPage9•1
BRAKES AND SUSPENSION
Braking systemPage10•1
Suspension and steeringPage11•1
BODY EQUIPMENT
Bodywork, trim and fittingsPage12•1
Body electrical systemsPage13•1
Wiring DiagramsPage13•22
Reference
General dimensions and weightsPageREF•1
Buying spare parts and vehicle identificationPageREF•3
General repair proceduresPageREF•4
Tools and working facilitiesPageREF•5
MOT test checks PageREF•7
Fault findingPageREF•11
Glossary of technical termsPageREF•18
IndexPageREF•23
Contents
Page 4 of 18

0•4
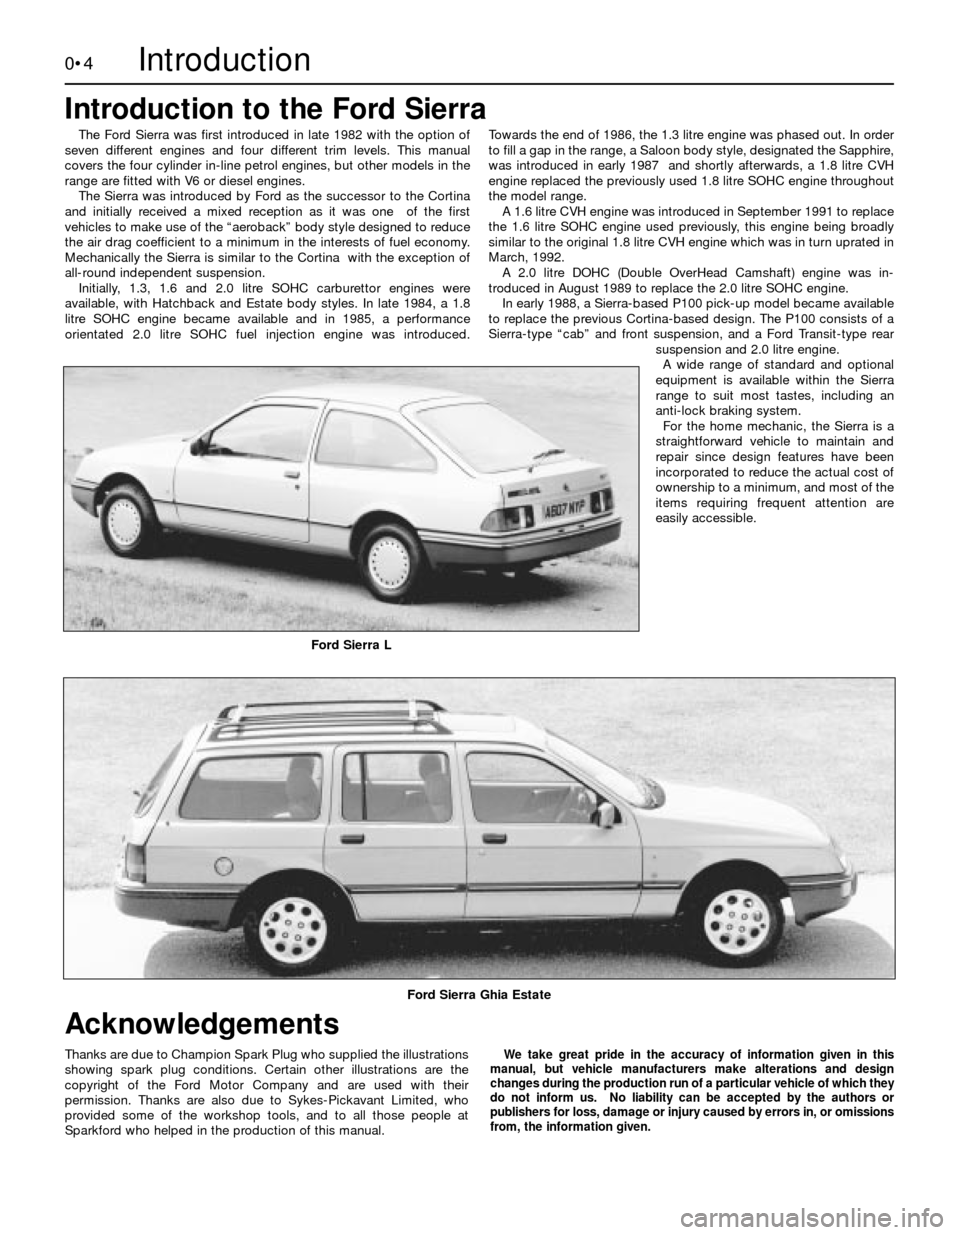
The Ford Sierra was first introduced in late 1982 with the option of
seven different engines and four different trim levels. This manual
covers the four cylinder in-line petrol engines, but other models in the
range are fitted with V6 or diesel engines.
The Sierra was introduced by Ford as the successor to the Cortina
and initially received a mixed reception as it was one of the first
vehicles to make use of the “aeroback” body style designed to reduce
the air drag coefficient to a minimum in the interests of fuel economy.
Mechanically the Sierra is similar to the Cortina with the exception of
all-round independent suspension.
Initially, 1.3, 1.6 and 2.0 litre SOHC carburettor engines were
available, with Hatchback and Estate body styles. In late 1984, a 1.8
litre SOHC engine became available and in 1985, a performance
orientated 2.0 litre SOHC fuel injection engine was introduced.Towards the end of 1986, the 1.3 litre engine was phased out. In order
to fill a gap in the range, a Saloon body style, designated the Sapphire,
was introduced in early 1987 and shortly afterwards, a 1.8 litre CVH
engine replaced the previously used 1.8 litre SOHC engine throughout
the model range.
A 1.6 litre CVH engine was introduced in September 1991 to replace
the 1.6 litre SOHC engine used previously, this engine being broadly
similar to the original 1.8 litre CVH engine which was in turn uprated in
March, 1992.
A 2.0 litre DOHC (Double OverHead Camshaft) engine was in-
troduced in August 1989 to replace the 2.0 litre SOHC engine.
In early 1988, a Sierra-based P100 pick-up model became available
to replace the previous Cortina-based design. The P100 consists of a
Sierra-type “cab” and front suspension, and a Ford Transit-type rear
suspension and 2.0 litre engine.
A wide range of standard and optional
equipment is available within the Sierra
range to suit most tastes, including an
anti-lock braking system.
For the home mechanic, the Sierra is a
straightforward vehicle to maintain and
repair since design features have been
incorporated to reduce the actual cost of
ownership to a minimum, and most of the
items requiring frequent attention are
easily accessible.
Ford Sierra L
Ford Sierra Ghia Estate
Introduction
We take great pride in the accuracy of information given in this
manual, but vehicle manufacturers make alterations and design
changes during the production run of a particular vehicle of which they
do not inform us. No liability can be accepted by the authors or
publishers for loss, damage or injury caused by errors in, or omissions
from, the information given.Thanks are due to Champion Spark Plug who supplied the illustrations
showing spark plug conditions. Certain other illustrations are the
copyright of the Ford Motor Company and are used with their
permission. Thanks are also due to Sykes-Pickavant Limited, who
provided some of the workshop tools, and to all those people at
Sparkford who helped in the production of this manual.
Introduction to the Ford Sierra
Acknowledgements
Page 6 of 18

0•6
The jack supplied with the vehicle tool kit
should only be used for changing roadwheels.
When carrying out any other kind of work,
raise the vehicle using a trolley jack, and
always supplement the jack with axle stands
positioned under the vehicle jacking points.
To change a roadwheel, first remove the
spare wheel and jack from their stowage
positions. On Saloon, Hatchback and Estate
models, the jack and spare wheel are located
in the luggage compartment. On P100
models, the jack is located behind the
passenger seat, and the spare wheel is
located under the rear of the cargo area.
Firmly apply the handbrake and engage first
gear on manual gearbox models or “P” onautomatic transmission models. Place chocks
at the front and rear of the wheel diagonally
opposite the one to be changed.
Where applicable, remove the wheel trim
and slacken the wheel nuts using the wheel
brace provided in the vehicle tool kit. Position
the jack head under the jacking point nearest
to the wheel to be changed. Raise the jack
until the wheel is clear of the ground, then
remove the wheel nuts and the wheel. Fit the
spare wheel and secure it with the wheel nuts.
Lower the jack until the wheel is just touching
the ground, and tighten the wheel nuts
moderately tight. Now lower the jack fully and
tighten the wheel nuts securely in a diagonal
sequence. Where applicable, refit the wheeltrim , then withdraw the jack and stow the
wheel and jack in thier respective locations.
When jacking up the vehicle with a trolley
jack, position the jack under one of the
relevant jacking point (note that on P100
models, the jackng points for use with a trolley
jack are different to those for use with the
vehicle jack). Do not jack the vehicle under the
sump or or any of the steering or suspension
components. Supplement the jack using axle
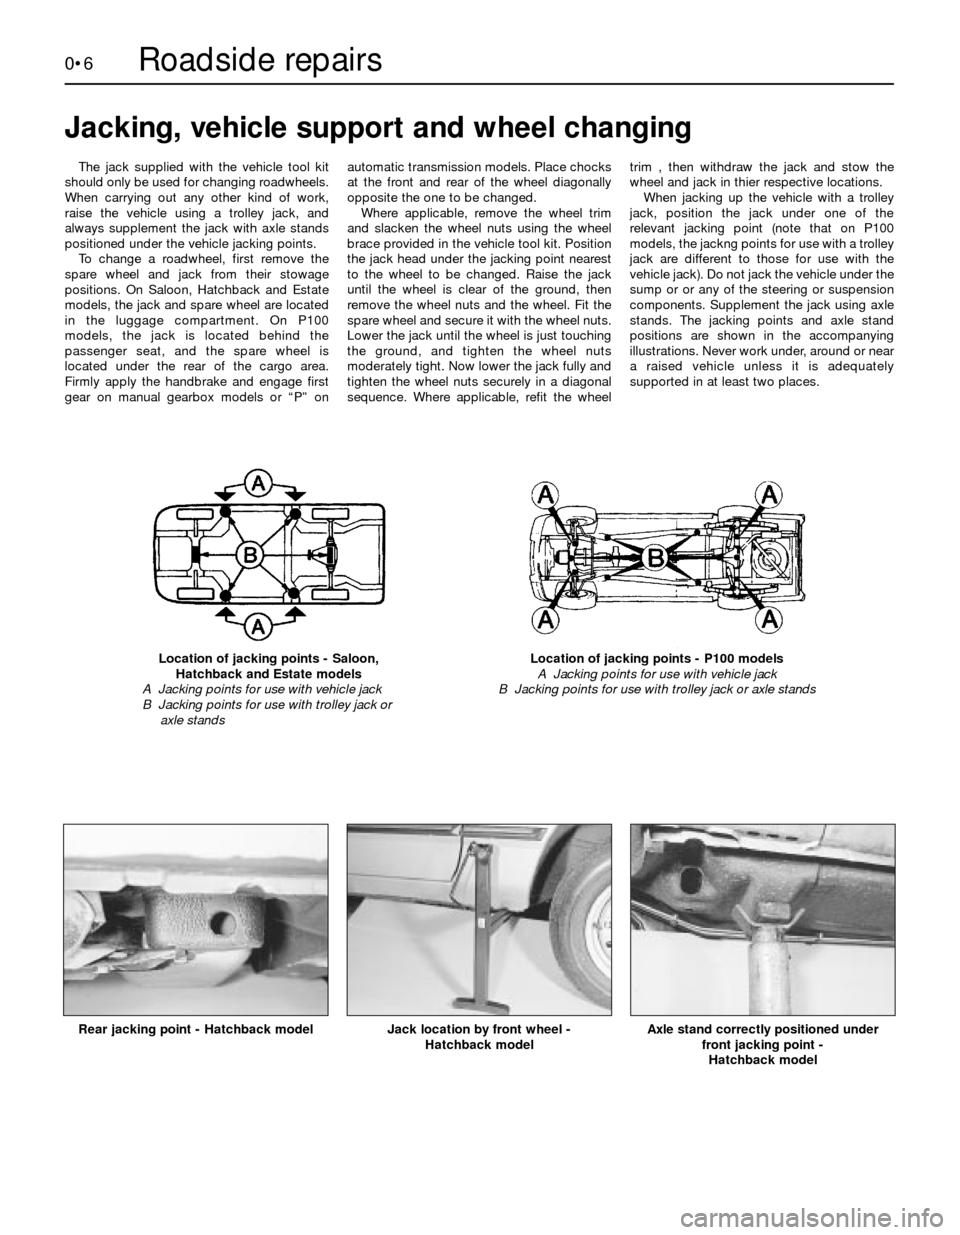
stands. The jacking points and axle stand
positions are shown in the accompanying
illustrations. Never work under, around or near
a raised vehicle unless it is adequately
supported in at least two places.
Jacking, vehicle support and wheel changing
Location of jacking points - Saloon,
Hatchback and Estate models
A Jacking points for use with vehicle jack
B Jacking points for use with trolley jack or
axle standsLocation of jacking points - P100 models
A Jacking points for use with vehicle jack
B Jacking points for use with trolley jack or axle stands
Rear jacking point - Hatchback model
Jack location by front wheel -
Hatchback modelAxle stand correctly positioned under
front jacking point -
Hatchback model
Roadside repairs
Page 16 of 18

0•16Weekly checks
It is very important that tyres are in good
condition, and at the correct pressure - having
a tyre failure at any speed is highly dangerous.
Tyre wear is influenced by driving style - harsh
braking and acceleration, or fast cornering,
will all produce more rapid tyre wear. As a
general rule, the front tyres wear out faster
than the rears. Interchanging the tyres from
front to rear (“rotating” the tyres) may result in
more even wear. However, if this is completely
effective, you may have the expense of
replacing all four tyres at once!
Remove any nails or stones embedded in the
tread before they penetrate the tyre to cause
deflation. If removal of a nail does reveal thatthe tyre has been punctured, refit the nail so
that its point of penetration is marked. Then
immediately change the wheel, and have the
tyre repaired by a tyre dealer.
Regularly check the tyres for damage in the
form of cuts or bulges, especially in the
sidewalls. Periodically remove the wheels, and
clean any dirt or mud from the inside and
outside surfaces. Examine the wheel rims for
signs of rusting, corrosion or other damage.
Light alloy wheels are easily damaged by
“kerbing” whilst parking; steel wheels may
also become dented or buckled. A new wheel
is very often the only way to overcome severe
damage.New tyres should be balanced when they are
fitted, but it may become necessary to re-
balance them as they wear, or if the balance
weights fitted to the wheel rim should fall off.
Unbalanced tyres will wear more quickly, as
will the steering and suspension components.
Wheel imbalance is normally signified by
vibration, particularly at a certain speed
(typically around 50 mph). If this vibration is
felt only through the steering, then it is likely
that just the front wheels need balancing. If,
however, the vibration is felt through the whole
car, the rear wheels could be out of balance.
Wheel balancing should be carried out by a
tyre dealer or garage.
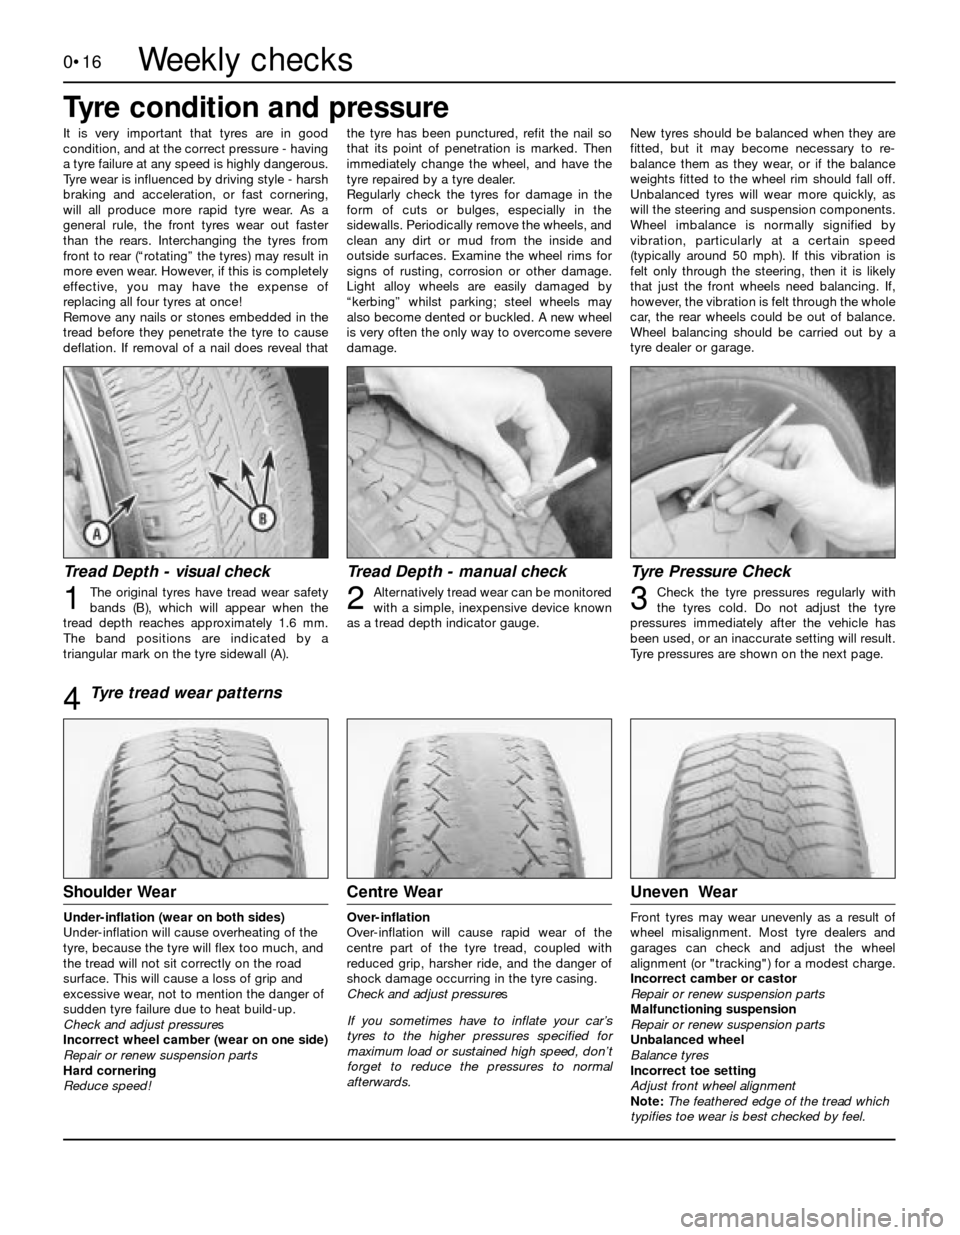
Tyre Pressure Check
Check the tyre pressures regularly with
the tyres cold. Do not adjust the tyre
pressures immediately after the vehicle has
been used, or an inaccurate setting will result.
Tyre pressures are shown on the next page.
Tread Depth - manual check
Alternatively tread wear can be monitored
with a simple, inexpensive device known
as a tread depth indicator gauge.
Tread Depth - visual check
The original tyres have tread wear safety
bands (B), which will appear when the
tread depth reaches approximately 1.6 mm.
The band positions are indicated by a
triangular mark on the tyre sidewall (A).123
Tyre condition and pressure
Tyre tread wear patterns
Shoulder Wear
Under-inflation (wear on both sides)
Under-inflation will cause overheating of the
tyre, because the tyre will flex too much, and
the tread will not sit correctly on the road
surface. This will cause a loss of grip and
excessive wear, not to mention the danger of
sudden tyre failure due to heat build-up.
Check and adjust pressures
Incorrect wheel camber (wear on one side)
Repair or renew suspension parts
Hard cornering
Reduce speed!
Centre Wear
Over-inflation
Over-inflation will cause rapid wear of the
centre part of the tyre tread, coupled with
reduced grip, harsher ride, and the danger of
shock damage occurring in the tyre casing.
Check and adjust pressures
If you sometimes have to inflate your car’s
tyres to the higher pressures specified for
maximum load or sustained high speed, don’t
forget to reduce the pressures to normal
afterwards.
Uneven Wear
Front tyres may wear unevenly as a result of
wheel misalignment. Most tyre dealers and
garages can check and adjust the wheel
alignment (or "tracking") for a modest charge.
Incorrect camber or castor
Repair or renew suspension parts
Malfunctioning suspension
Repair or renew suspension parts
Unbalanced wheel
Balance tyres
Incorrect toe setting
Adjust front wheel alignment
Note: The feathered edge of the tread which
typifies toe wear is best checked by feel.
4