fuse FORD SIERRA 1991 2.G Engine Electrical Systems Workshop Manual
[x] Cancel search | Manufacturer: FORD, Model Year: 1991, Model line: SIERRA, Model: FORD SIERRA 1991 2.GPages: 24, PDF Size: 0.93 MB
Page 18 of 24

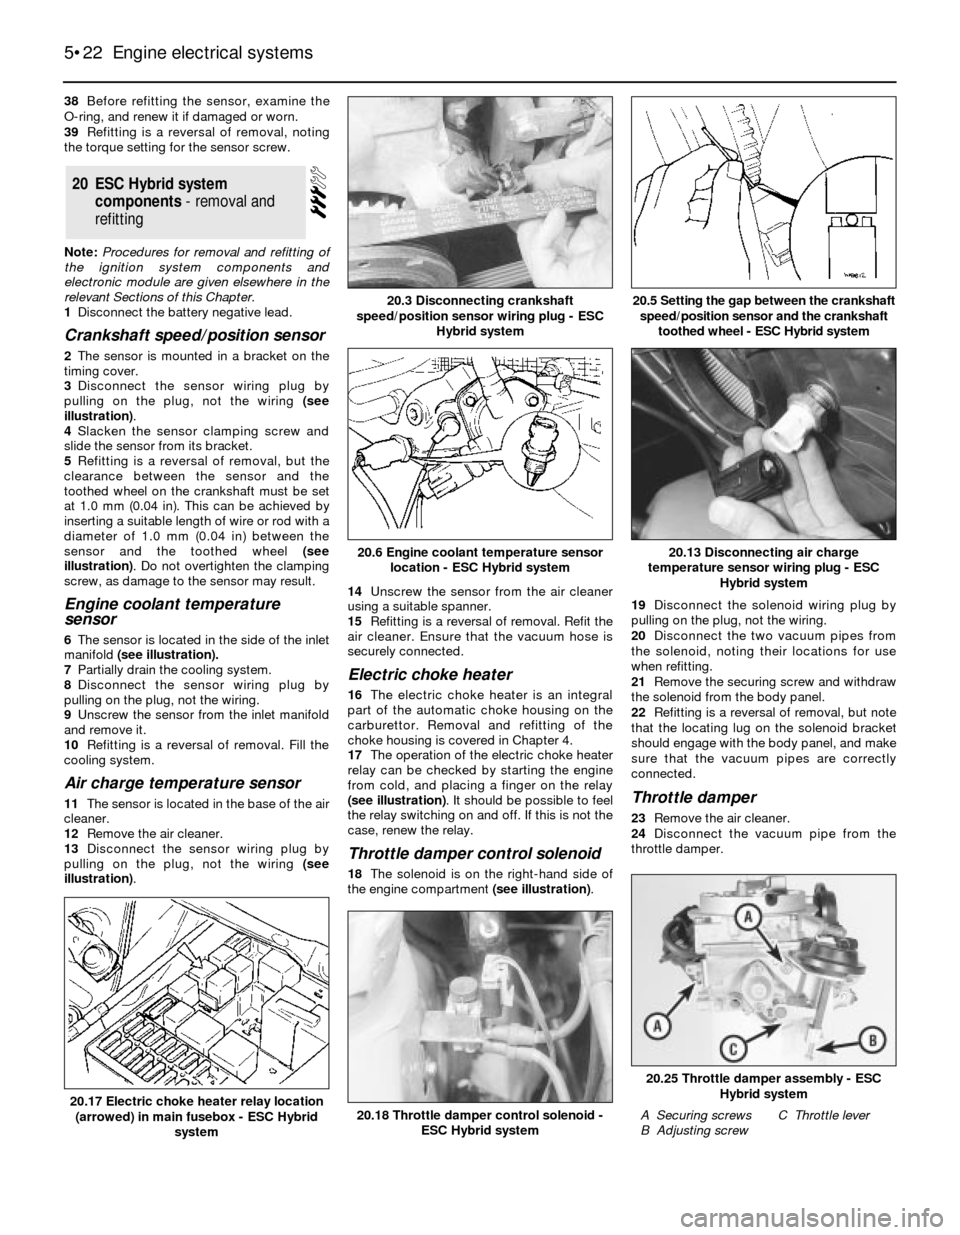
Note that the required distributor body
movement will be half of the required
crankshaft movement (ie an adjustment of 5º
in ignition timing will require the distributor
body to be turned 2º. Tighten the clamp bolt
and re-check the timing.
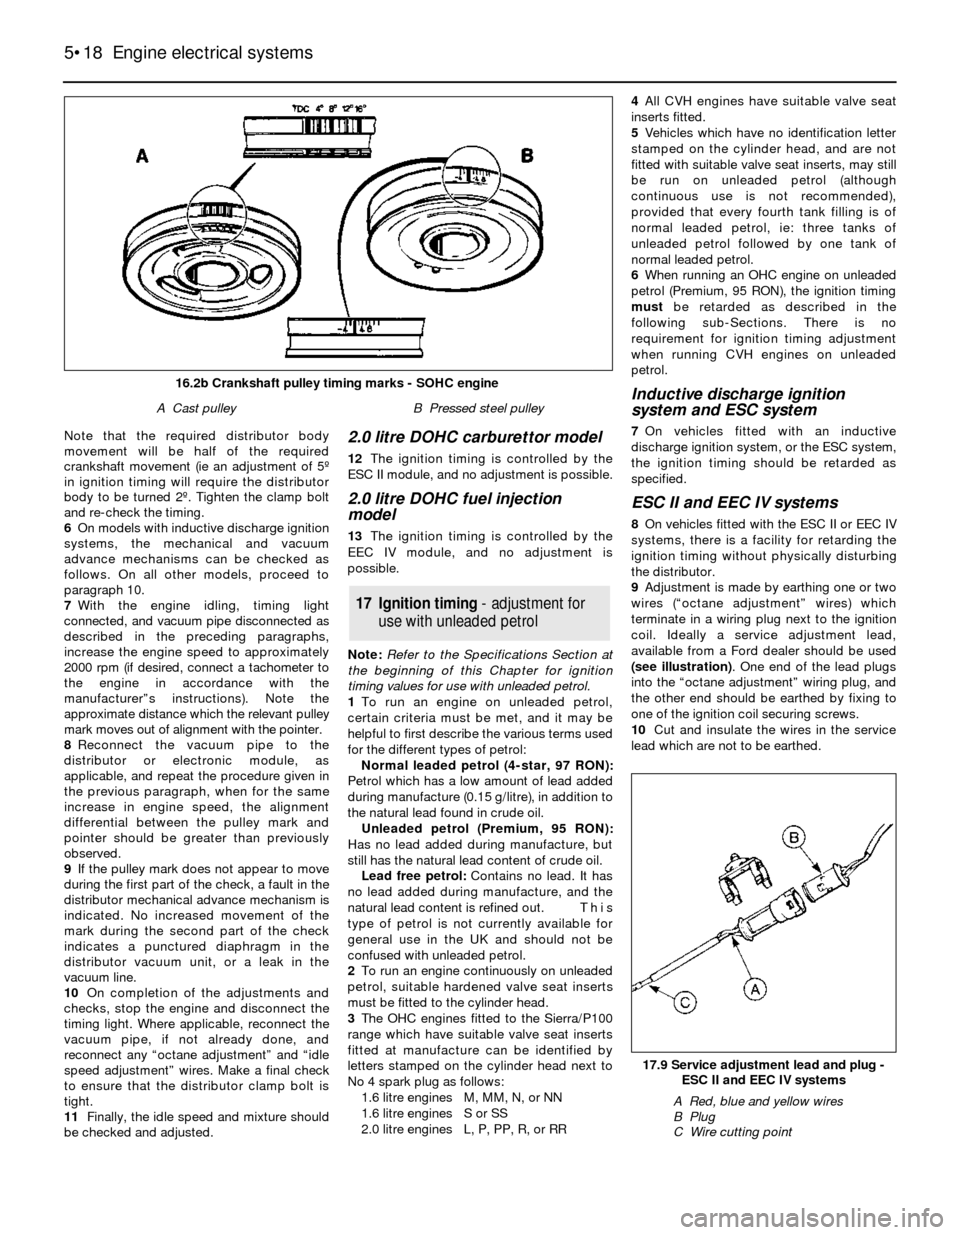
6On models with inductive discharge ignition
systems, the mechanical and vacuum
advance mechanisms can be checked as
follows. On all other models, proceed to
paragraph 10.
7With the engine idling, timing light
connected, and vacuum pipe disconnected as
described in the preceding paragraphs,
increase the engine speed to approximately
2000 rpm (if desired, connect a tachometer to
the engine in accordance with the
manufacturer”s instructions). Note the
approximate distance which the relevant pulley
mark moves out of alignment with the pointer.
8Reconnect the vacuum pipe to the
distributor or electronic module, as
applicable, and repeat the procedure given in
the previous paragraph, when for the same
increase in engine speed, the alignment
differential between the pulley mark and
pointer should be greater than previously
observed.
9If the pulley mark does not appear to move
during the first part of the check, a fault in the
distributor mechanical advance mechanism is
indicated. No increased movement of the
mark during the second part of the check
indicates a punctured diaphragm in the
distributor vacuum unit, or a leak in the
vacuum line.
10On completion of the adjustments and
checks, stop the engine and disconnect the
timing light. Where applicable, reconnect the
vacuum pipe, if not already done, and
reconnect any “octane adjustment” and “idle
speed adjustment” wires. Make a final check
to ensure that the distributor clamp bolt is
tight.
11Finally, the idle speed and mixture should
be checked and adjusted.2.0 litre DOHC carburettor model
12The ignition timing is controlled by the
ESC II module, and no adjustment is possible.
2.0 litre DOHC fuel injection
model
13The ignition timing is controlled by the
EEC IV module, and no adjustment is
possible.
Note: Refer to the Specifications Section at
the beginning of this Chapter for ignition
timing values for use with unleaded petrol.
1To run an engine on unleaded petrol,
certain criteria must be met, and it may be
helpful to first describe the various terms used
for the different types of petrol:
Normal leaded petrol (4-star, 97 RON):
Petrol which has a low amount of lead added
during manufacture (0.15 g/litre), in addition to
the natural lead found in crude oil.
Unleaded petrol (Premium, 95 RON):
Has no lead added during manufacture, but
still has the natural lead content of crude oil.
Lead free petrol: Contains no lead. It has
no lead added during manufacture, and the
natural lead content is refined out. This
type of petrol is not currently available for
general use in the UK and should not be
confused with unleaded petrol.
2To run an engine continuously on unleaded
petrol, suitable hardened valve seat inserts
must be fitted to the cylinder head.
3The OHC engines fitted to the Sierra/P100
range which have suitable valve seat inserts
fitted at manufacture can be identified by
letters stamped on the cylinder head next to
No 4 spark plug as follows:
1.6 litre enginesM, MM, N, or NN
1.6 litre enginesS or SS
2.0 litre enginesL, P, PP, R, or RR4All CVH engines have suitable valve seat
inserts fitted.
5Vehicles which have no identification letter
stamped on the cylinder head, and are not
fitted with suitable valve seat inserts, may still
be run on unleaded petrol (although
continuous use is not recommended),
provided that every fourth tank filling is of
normal leaded petrol, ie: three tanks of
unleaded petrol followed by one tank of
normal leaded petrol.
6When running an OHC engine on unleaded
petrol (Premium, 95 RON), the ignition timing
must be retarded as described in the
following sub-Sections. There is no
requirement for ignition timing adjustment
when running CVH engines on unleaded
petrol.
Inductive discharge ignition
system and ESC system
7On vehicles fitted with an inductive
discharge ignition system, or the ESC system,
the ignition timing should be retarded as
specified.
ESC II and EEC IV systems
8On vehicles fitted with the ESC II or EEC IV
systems, there is a facility for retarding the
ignition timing without physically disturbing
the distributor.
9Adjustment is made by earthing one or two
wires (“octane adjustment” wires) which
terminate in a wiring plug next to the ignition
coil. Ideally a service adjustment lead,
available from a Ford dealer should be used
(see illustration). One end of the lead plugs
into the “octane adjustment” wiring plug, and
the other end should be earthed by fixing to
one of the ignition coil securing screws.
10Cut and insulate the wires in the service
lead which are not to be earthed.
17Ignition timing -adjustmentfor
usewithunleadedpetrol
5•18Engine electrical systems
17.9 Service adjustment lead and plug -
ESC II and EEC IV systems
A Red, blue and yellow wires
B Plug
C Wire cutting point
16.2b Crankshaft pulley timing marks - SOHC engine
A Cast pulleyB Pressed steel pulley
Page 22 of 24

38Before refitting the sensor, examine the
O-ring, and renew it if damaged or worn.
39Refitting is a reversal of removal, noting
the torque setting for the sensor screw.
Note: Procedures for removal and refitting of
the ignition system components and
electronic module are given elsewhere in the
relevant Sections of this Chapter.
1Disconnect the battery negative lead.
Crankshaft speed/position sensor
2The sensor is mounted in a bracket on the
timing cover.
3Disconnect the sensor wiring plug by
pulling on the plug, not the wiring (see
illustration).
4Slacken the sensor clamping screw and
slide the sensor from its bracket.
5Refitting is a reversal of removal, but the
clearance between the sensor and the
toothed wheel on the crankshaft must be set
at 1.0 mm (0.04 in). This can be achieved by
inserting a suitable length of wire or rod with a
diameter of 1.0 mm (0.04 in) between the
sensor and the toothed wheel (see
illustration). Do not overtighten the clamping
screw, as damage to the sensor may result.
Engine coolant temperature
sensor
6The sensor is located in the side of the inlet
manifold(see illustration).
7Partially drain the cooling system.
8Disconnect the sensor wiring plug by
pulling on the plug, not the wiring.
9Unscrew the sensor from the inlet manifold
and remove it.
10Refitting is a reversal of removal. Fill the
cooling system.
Air charge temperature sensor
11The sensor is located in the base of the air
cleaner.
12Remove the air cleaner.
13Disconnect the sensor wiring plug by
pulling on the plug, not the wiring (see
illustration).14Unscrew the sensor from the air cleaner
using a suitable spanner.
15Refitting is a reversal of removal. Refit the
air cleaner. Ensure that the vacuum hose is
securely connected.
Electric choke heater
16The electric choke heater is an integral
part of the automatic choke housing on the
carburettor. Removal and refitting of the
choke housing is covered in Chapter 4.
17The operation of the electric choke heater
relay can be checked by starting the engine
from cold, and placing a finger on the relay
(see illustration). It should be possible to feel
the relay switching on and off. If this is not the
case, renew the relay.
Throttle damper control solenoid
18The solenoid is on the right-hand side of
the engine compartment (see illustration). 19Disconnect the solenoid wiring plug by
pulling on the plug, not the wiring.
20Disconnect the two vacuum pipes from
the solenoid, noting their locations for use
when refitting.
21Remove the securing screw and withdraw
the solenoid from the body panel.
22Refitting is a reversal of removal, but note
that the locating lug on the solenoid bracket
should engage with the body panel, and make
sure that the vacuum pipes are correctly
connected.
Throttle damper
23Remove the air cleaner.
24Disconnect the vacuum pipe from the
throttle damper.
20ESC Hybrid system
components - removal and
refitting
5•22Engine electrical systems
20.3 Disconnecting crankshaft
speed/position sensor wiring plug - ESC
Hybrid system
20.6 Engine coolant temperature sensor
location - ESC Hybrid system
20.25 Throttle damper assembly - ESC
Hybrid system
A Securing screws
B Adjusting screwC Throttle lever20.18 Throttle damper control solenoid -
ESC Hybrid system20.17 Electric choke heater relay location
(arrowed) in main fusebox - ESC Hybrid
system
20.13 Disconnecting air charge
temperature sensor wiring plug - ESC
Hybrid system
20.5 Setting the gap between the crankshaft
speed/position sensor and the crankshaft
toothed wheel - ESC Hybrid system