clock FORD SIERRA 1992 2.G Braking System Workshop Manual
[x] Cancel search | Manufacturer: FORD, Model Year: 1992, Model line: SIERRA, Model: FORD SIERRA 1992 2.GPages: 22, PDF Size: 1.11 MB
Page 5 of 22

the caliper, and the caliper body is modified
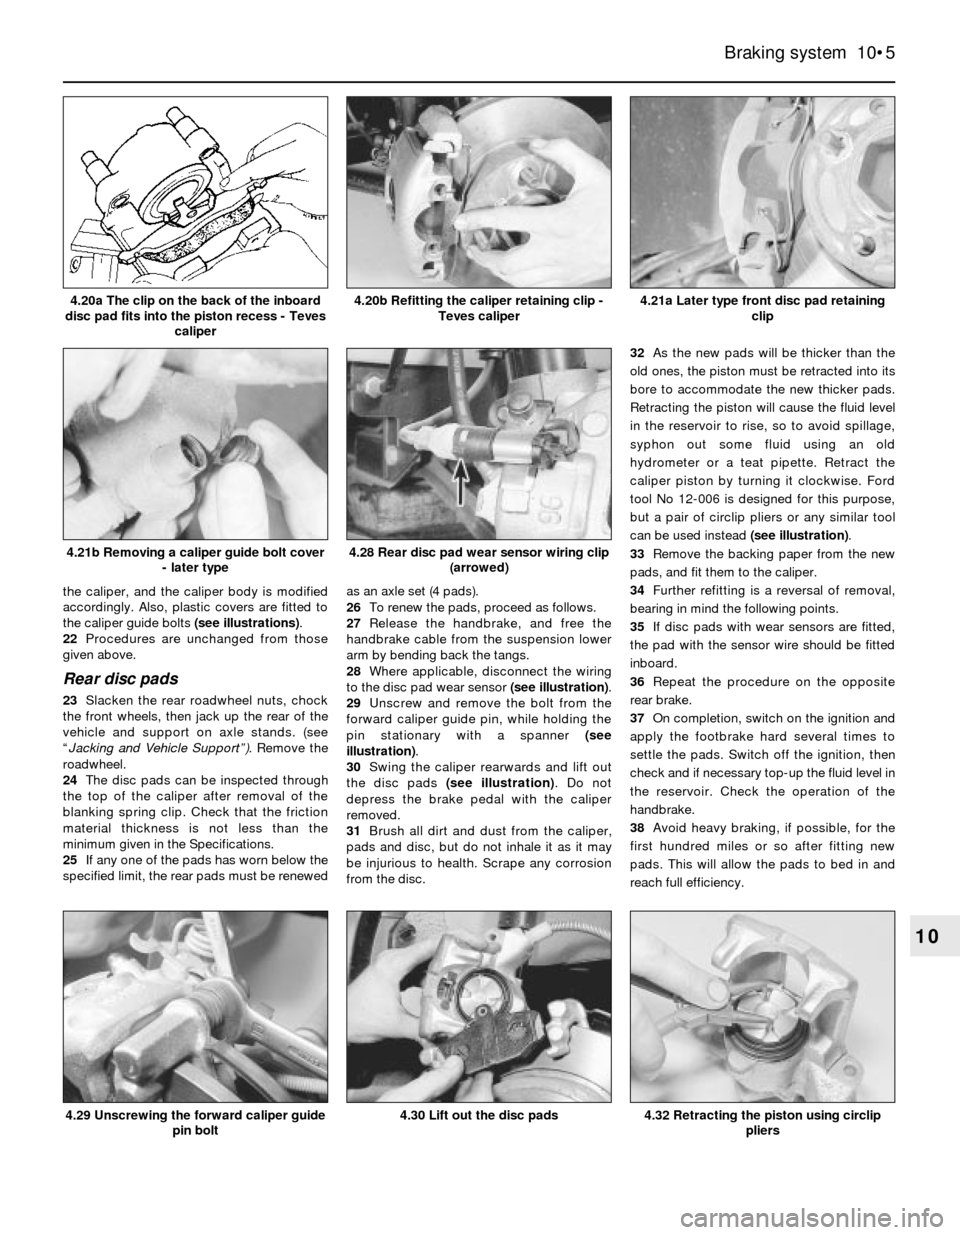
accordingly. Also, plastic covers are fitted to
the caliper guide bolts (see illustrations).
22Procedures are unchanged from those
given above.
Rear disc pads
23Slacken the rear roadwheel nuts, chock
the front wheels, then jack up the rear of the
vehicle and support on axle stands. (see
“Jacking and Vehicle Support”). Remove the
roadwheel.
24The disc pads can be inspected through
the top of the caliper after removal of the
blanking spring clip. Check that the friction
material thickness is not less than the
minimum given in the Specifications.
25If any one of the pads has worn below the
specified limit, the rear pads must be renewedas an axle set (4 pads).
26To renew the pads, proceed as follows.
27Release the handbrake, and free the
handbrake cable from the suspension lower
arm by bending back the tangs.
28Where applicable, disconnect the wiring
to the disc pad wear sensor (see illustration).
29Unscrew and remove the bolt from the
forward caliper guide pin, while holding the
pin stationary with a spanner (see
illustration).
30Swing the caliper rearwards and lift out
the disc pads (see illustration). Do not
depress the brake pedal with the caliper
removed.
31Brush all dirt and dust from the caliper,
pads and disc, but do not inhale it as it may
be injurious to health. Scrape any corrosion
from the disc.32As the new pads will be thicker than the
old ones, the piston must be retracted into its
bore to accommodate the new thicker pads.
Retracting the piston will cause the fluid level
in the reservoir to rise, so to avoid spillage,
syphon out some fluid using an old
hydrometer or a teat pipette. Retract the
caliper piston by turning it clockwise. Ford
tool No 12-006 is designed for this purpose,
but a pair of circlip pliers or any similar tool
can be used instead (see illustration).
33Remove the backing paper from the new
pads, and fit them to the caliper.
34Further refitting is a reversal of removal,
bearing in mind the following points.
35If disc pads with wear sensors are fitted,
the pad with the sensor wire should be fitted
inboard.
36Repeat the procedure on the opposite
rear brake.
37On completion, switch on the ignition and
apply the footbrake hard several times to
settle the pads. Switch off the ignition, then
check and if necessary top-up the fluid level in
the reservoir. Check the operation of the
handbrake.
38Avoid heavy braking, if possible, for the
first hundred miles or so after fitting new
pads. This will allow the pads to bed in and
reach full efficiency.
Braking system 10•5
10
4.21a Later type front disc pad retaining
clip
4.32 Retracting the piston using circlip
pliers4.30 Lift out the disc pads
4.28 Rear disc pad wear sensor wiring clip
(arrowed)
4.29 Unscrewing the forward caliper guide
pin bolt
4.21b Removing a caliper guide bolt cover
- later type
4.20b Refitting the caliper retaining clip -
Teves caliper4.20a The clip on the back of the inboard
disc pad fits into the piston recess - Teves
caliper
Page 10 of 22

Note: Complete dismantling of the rear caliper
should not be attempted unless Ford spring
compressor (tool No 12-007) is available, or
unless the problems likely to arise in the
absence of the tool are understood. Renewal
of the piston seal dust-excluding seal and
piston adjuster nut seal requires no special
tools.
Removal
1With the ignition switched off, pump the
brake pedal at least 20 times, or until it
becomes hard, to depressurise the system.
2Chock the front wheels, slacken the
relevant roadwheel nuts, then jack up the rear
of the vehicle and support on axle stands (see
“Jacking and Vehicle Support”). Remove the
roadwheel and release the handbrake.
3Where applicable, disconnect the wiring to
the disc pad wear sensor.
4Proceed as described in Section 6,
paragraphs 2 and 3, but note that the rigid
brake pipe is clipped to the suspension lower
arm.
5Unscrew and remove the two guide bolts
securing the caliper to the carrier bracket,
while holding the pins with a spanner. Unhookthe handbrake cable from the lever, and
withdraw the caliper. Alternatively, the two
carrier bracket-to-hub carrier bolts can be
unscrewed, and the caliper and carrier can be
separated on the bench, but in this case the
handbrake cable must be disconnected from
the carrier bracket by removing the retaining
circlip.
Overhaul
6Clean the caliper, taking care not to inhale
any dust which may be injurious to health, and
mount it in a soft-jawed vice.
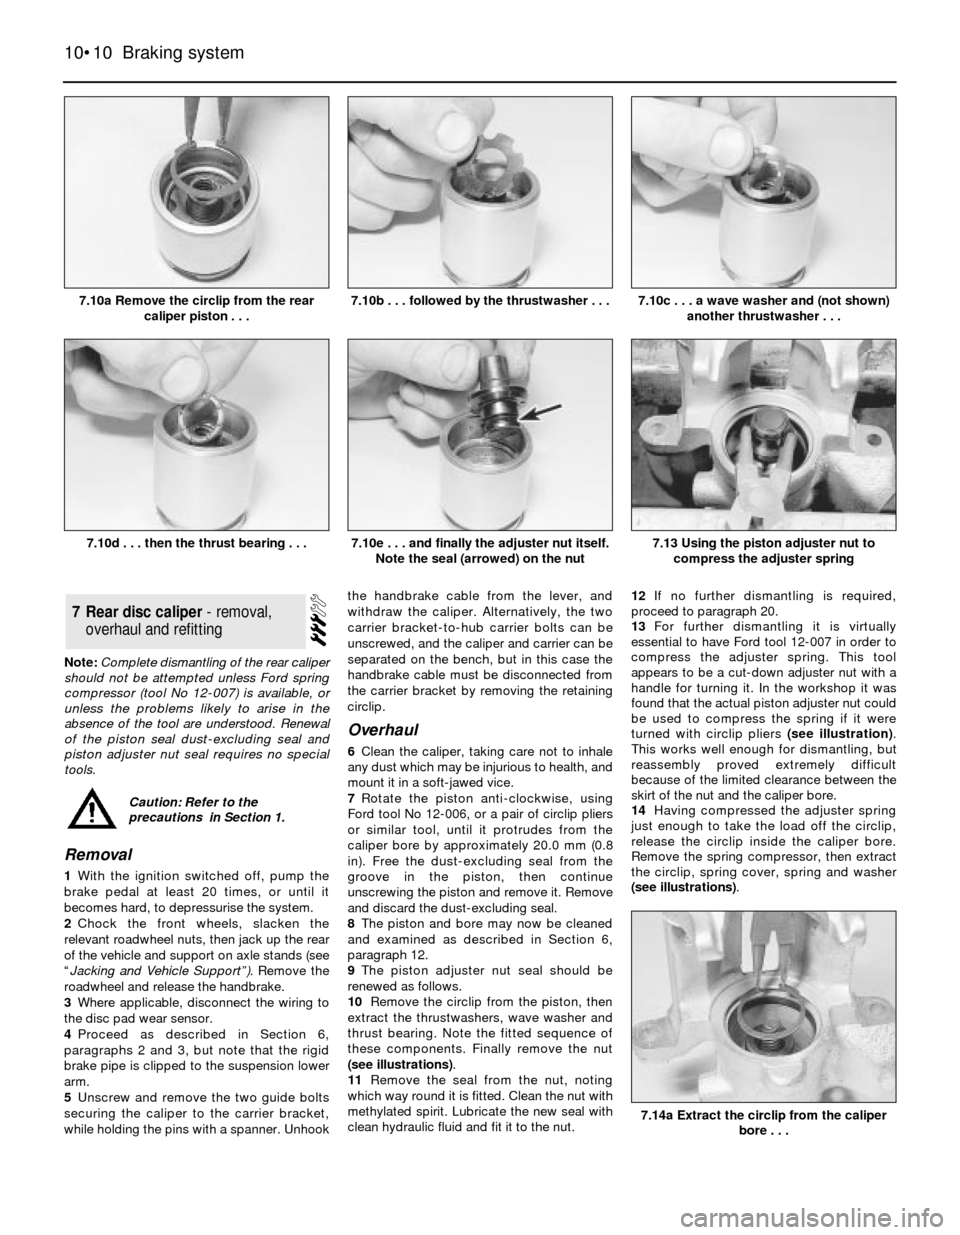
7Rotate the piston anti-clockwise, using
Ford tool No 12-006, or a pair of circlip pliers
or similar tool, until it protrudes from the
caliper bore by approximately 20.0 mm (0.8
in). Free the dust-excluding seal from the
groove in the piston, then continue
unscrewing the piston and remove it. Remove
and discard the dust-excluding seal.
8The piston and bore may now be cleaned
and examined as described in Section 6,
paragraph 12.
9The piston adjuster nut seal should be
renewed as follows.
10Remove the circlip from the piston, then
extract the thrustwashers, wave washer and
thrust bearing. Note the fitted sequence of
these components. Finally remove the nut
(see illustrations).
11Remove the seal from the nut, noting
which way round it is fitted. Clean the nut with
methylated spirit. Lubricate the new seal with
clean hydraulic fluid and fit it to the nut.12If no further dismantling is required,
proceed to paragraph 20.
13For further dismantling it is virtually
essential to have Ford tool 12-007 in order to
compress the adjuster spring. This tool
appears to be a cut-down adjuster nut with a
handle for turning it. In the workshop it was
found that the actual piston adjuster nut could
be used to compress the spring if it were
turned with circlip pliers (see illustration).
This works well enough for dismantling, but
reassembly proved extremely difficult
because of the limited clearance between the
skirt of the nut and the caliper bore.
14Having compressed the adjuster spring
just enough to take the load off the circlip,
release the circlip inside the caliper bore.
Remove the spring compressor, then extract
the circlip, spring cover, spring and washer
(see illustrations).
7Rear disc caliper - removal,
overhaul and refitting
10•10Braking system
7.10a Remove the circlip from the rear
caliper piston . . .7.10c . . . a wave washer and (not shown)
another thrustwasher . . .
7.14a Extract the circlip from the caliper
bore . . .
7.13 Using the piston adjuster nut to
compress the adjuster spring7.10e . . . and finally the adjuster nut itself.
Note the seal (arrowed) on the nut7.10d . . . then the thrust bearing . . .
7.10b . . . followed by the thrustwasher . . .
Caution: Refer to the
precautions in Section 1.
Page 13 of 22

3Remove the wheel cylinder.
4Remove the driveshaft but do not refit the
securing bolts to the backplate.
5Remove the backplate.
6If required, prise out the handbrake stop
button.
7Refitting is a reversal of removal.
P 100 models
Note: When refitting the backplate, a new rear
hub nut and driveshaft O-ring must be used.
8Proceed as described in paragraphs 1 to 3
inclusive.
9Remove the driveshaft.
10Relieve the staking on the rear hub nut,
and using a 50 mm socket and a suitable
extension bar, unscrew the nut. Note that the
nut is extremely tight.
11Pull off the hub.
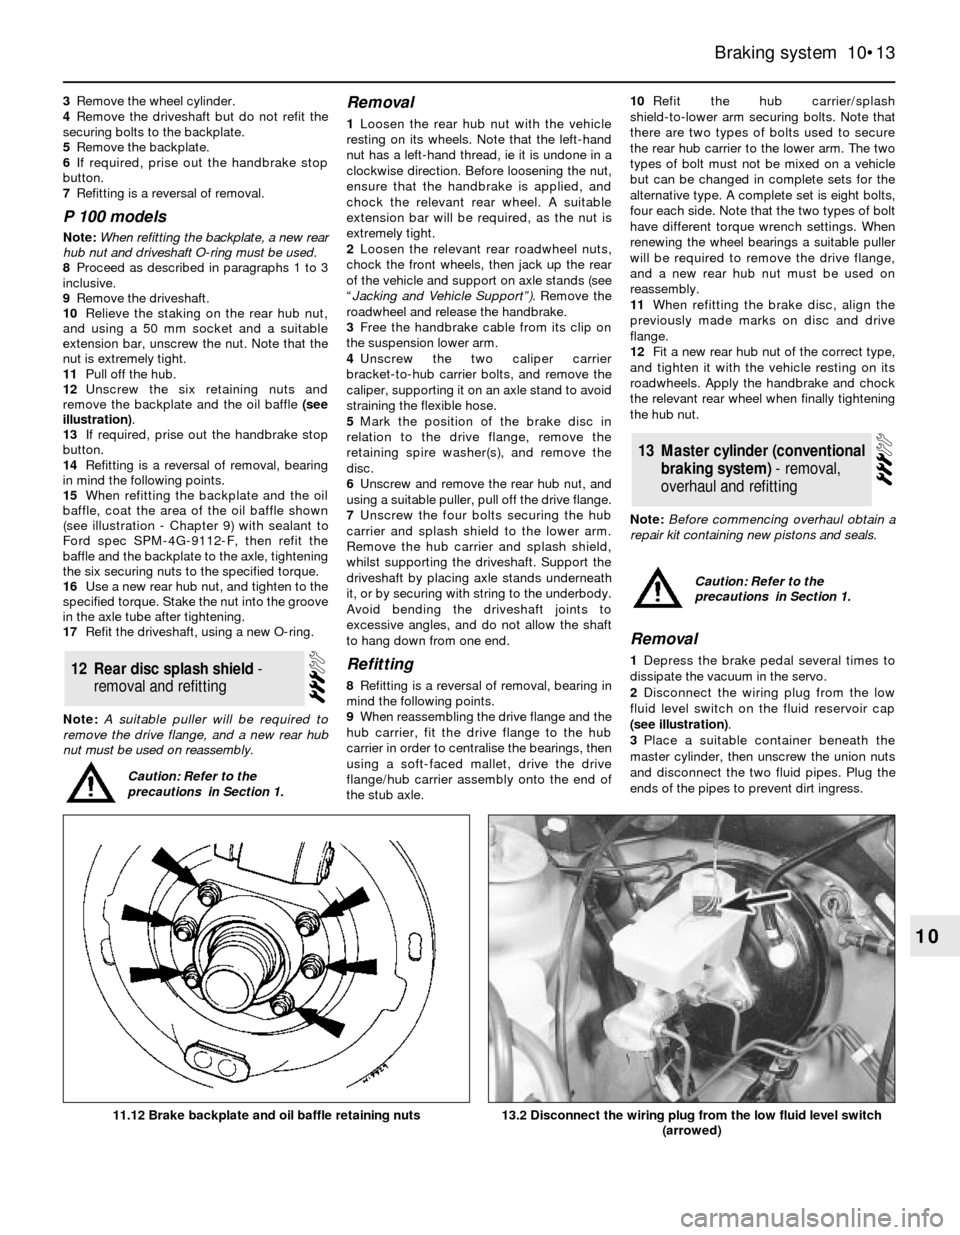
12Unscrew the six retaining nuts and
remove the backplate and the oil baffle (see
illustration).
13If required, prise out the handbrake stop
button.
14Refitting is a reversal of removal, bearing
in mind the following points.
15When refitting the backplate and the oil
baffle, coat the area of the oil baffle shown
(see illustration - Chapter 9) with sealant to
Ford spec SPM-4G-9112-F, then refit the
baffle and the backplate to the axle, tightening
the six securing nuts to the specified torque.
16Use a new rear hub nut, and tighten to the
specified torque. Stake the nut into the groove
in the axle tube after tightening.
17Refit the driveshaft, using a new O-ring.
Note: A suitable puller will be required to
remove the drive flange, and a new rear hub
nut must be used on reassembly.
Removal
1Loosen the rear hub nut with the vehicle
resting on its wheels. Note that the left-hand
nut has a left-hand thread, ie it is undone in a
clockwise direction. Before loosening the nut,
ensure that the handbrake is applied, and
chock the relevant rear wheel. A suitable
extension bar will be required, as the nut is
extremely tight.
2Loosen the relevant rear roadwheel nuts,
chock the front wheels, then jack up the rear
of the vehicle and support on axle stands (see
“Jacking and Vehicle Support”).Remove the
roadwheel and release the handbrake.
3Free the handbrake cable from its clip on
the suspension lower arm.
4Unscrew the two caliper carrier
bracket-to-hub carrier bolts, and remove the
caliper, supporting it on an axle stand to avoid
straining the flexible hose.
5Mark the position of the brake disc in
relation to the drive flange, remove the
retaining spire washer(s), and remove the
disc.
6Unscrew and remove the rear hub nut, and
using a suitable puller, pull off the drive flange.
7Unscrew the four bolts securing the hub
carrier and splash shield to the lower arm.
Remove the hub carrier and splash shield,
whilst supporting the driveshaft. Support the
driveshaft by placing axle stands underneath
it, or by securing with string to the underbody.
Avoid bending the driveshaft joints to
excessive angles, and do not allow the shaft
to hang down from one end.
Refitting
8Refitting is a reversal of removal, bearing in
mind the following points.
9When reassembling the drive flange and the
hub carrier, fit the drive flange to the hub
carrier in order to centralise the bearings, then
using a soft-faced mallet, drive the drive
flange/hub carrier assembly onto the end of
the stub axle.10Refit the hub carrier/splash
shield-to-lower arm securing bolts. Note that
there are two types of bolts used to secure
the rear hub carrier to the lower arm. The two
types of bolt must not be mixed on a vehicle
but can be changed in complete sets for the
alternative type. A complete set is eight bolts,
four each side. Note that the two types of bolt
have different torque wrench settings. When
renewing the wheel bearings a suitable puller
will be required to remove the drive flange,
and a new rear hub nut must be used on
reassembly.
11When refitting the brake disc, align the
previously made marks on disc and drive
flange.
12Fit a new rear hub nut of the correct type,
and tighten it with the vehicle resting on its
roadwheels. Apply the handbrake and chock
the relevant rear wheel when finally tightening
the hub nut.
Note: Before commencing overhaul obtain a
repair kit containing new pistons and seals.
Removal
1Depress the brake pedal several times to
dissipate the vacuum in the servo.
2Disconnect the wiring plug from the low
fluid level switch on the fluid reservoir cap
(see illustration).
3Place a suitable container beneath the
master cylinder, then unscrew the union nuts
and disconnect the two fluid pipes. Plug the
ends of the pipes to prevent dirt ingress.
13Master cylinder (conventional
braking system) - removal,
overhaul and refitting
12Rear disc splash shield -
removal and refitting
Braking system 10•13
10
13.2 Disconnect the wiring plug from the low fluid level switch
(arrowed)11.12 Brake backplate and oil baffle retaining nuts
Caution: Refer to the
precautions in Section 1.
Caution: Refer to the
precautions in Section 1.