engine FORD SIERRA 1993 2.G Introduction User Guide
[x] Cancel search | Manufacturer: FORD, Model Year: 1993, Model line: SIERRA, Model: FORD SIERRA 1993 2.GPages: 18, PDF Size: 0.5 MB
Page 13 of 18

Warning:Brake hydraulic fluid
can harm your eyes and
damage painted surfaces, so
use extreme caution when
handling and pouring it.
l Do not use fluid that has been
standing open for some time, as it
absorbs moisture from the air
which can cause a dangerous loss
of braking effectiveness.
Safety first
lIf the reservoir requires repeated topping-
up this is an indication of a fluid leak
somewhere in the system, which should be
investigated immediately.
lIf a leak is suspected, the car should not be
driven until the braking system has been
checked. Never take any risks where brakes
are concerned.
lOn ABS models, switch the ignition off and
pump the brake pedal at least 20 times or until
the pedal feels hard. Open the bonnet. Switch
on the ignition: the hydraulic unit pump will be
heard running. Wait until the pump stops, then
switch off the ignition.
Brake fluid level
0•13
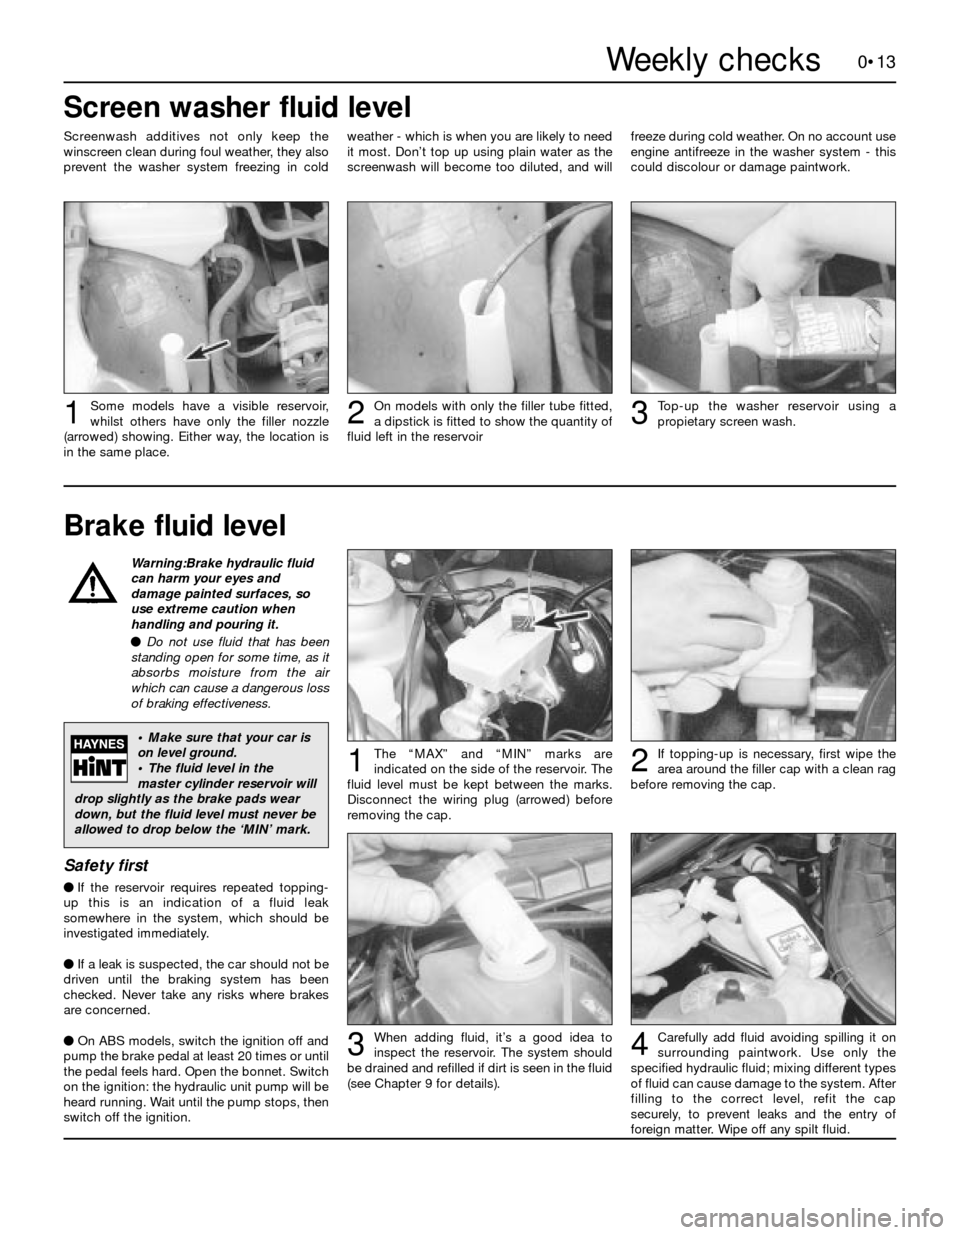
Carefully add fluid avoiding spilling it on
surrounding paintwork. Use only the
specified hydraulic fluid; mixing different types
of fluid can cause damage to the system. After
filling to the correct level, refit the cap
securely, to prevent leaks and the entry of
foreign matter. Wipe off any spilt fluid.When adding fluid, it’s a good idea to
inspect the reservoir. The system should
be drained and refilled if dirt is seen in the fluid
(see Chapter 9 for details).
The “MAX” and “MIN” marks are
indicated on the side of the reservoir. The
fluid level must be kept between the marks.
Disconnect the wiring plug (arrowed) before
removing the cap.1If topping-up is necessary, first wipe the
area around the filler cap with a clean rag
before removing the cap.2
34
Screen washer fluid level
Some models have a visible reservoir,
whilst others have only the filler nozzle
(arrowed) showing. Either way, the location is
in the same place.Top-up the washer reservoir using a
propietary screen wash.On models with only the filler tube fitted,
a dipstick is fitted to show the quantity of
fluid left in the reservoir
Screenwash additives not only keep the
winscreen clean during foul weather, they also
prevent the washer system freezing in coldweather - which is when you are likely to need
it most. Don’t top up using plain water as the
screenwash will become too diluted, and willfreeze during cold weather. On no account use
engine antifreeze in the washer system - this
could discolour or damage paintwork.
123
• Make sure that your car is
on level ground.
• The fluid level in the
master cylinder reservoir will
drop slightly as the brake pads wear
down, but the fluid level must never be
allowed to drop below the ‘MIN’ mark.
Weekly checks
Page 14 of 18

0•14
Before you start:
4Park the vehicle on level ground.
4Set the steering wheel pointing straight-
ahead.
4The system should be at operating
temperature and the engine should be
turned off.
Safety First:
lThe need for frequent topping-up indicates
a leak, which should be investigated
immediately.
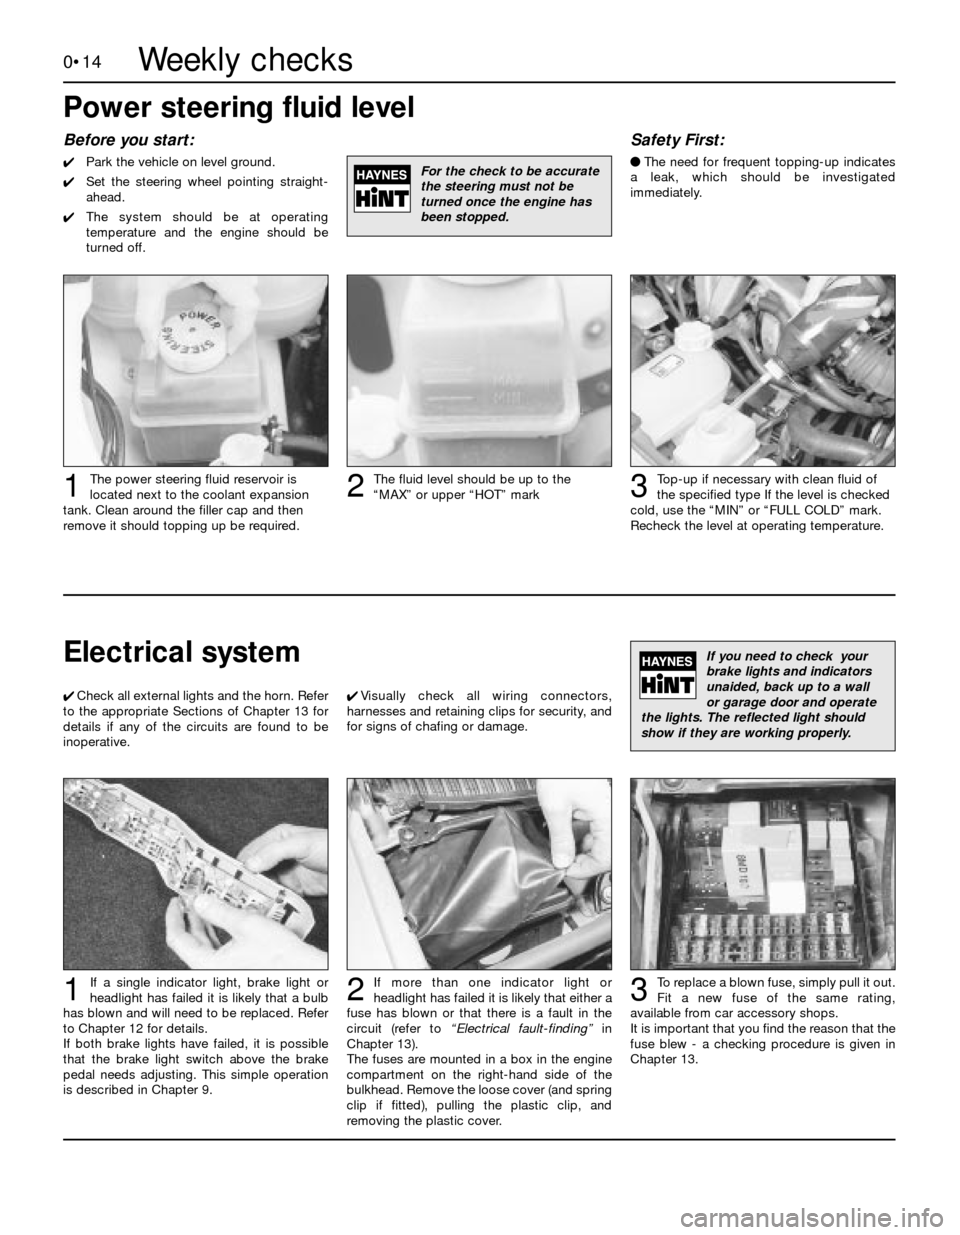
Top-up if necessary with clean fluid of
the specified typeIf the level is checked
cold, use the “MIN” or “FULL COLD” mark.
Recheck the level at operating temperature.
The fluid level should be up to the
“MAX” or upper “HOT” markThe power steering fluid reservoir is
located next to the coolant expansion
tank. Clean around the filler cap and then
remove it should topping up be required.123
For the check to be accurate
the steering must not be
turned once the engine has
been stopped.
Power steering fluid level
Weekly checks
Electrical system
To replace a blown fuse, simply pull it out.
Fit a new fuse of the same rating,
available from car accessory shops.
It is important that you find the reason that the
fuse blew - a checking procedure is given in
Chapter 13.If more than one indicator light or
headlight has failed it is likely that either a
fuse has blown or that there is a fault in the
circuit (refer to“Electrical fault-finding”in
Chapter 13).
The fuses are mounted in a box in the engine
compartment on the right-hand side of the
bulkhead. Remove the loose cover (and spring
clip if fitted), pulling the plastic clip, and
removing the plastic cover.If a single indicator light, brake light or
headlight has failed it is likely that a bulb
has blown and will need to be replaced. Refer
to Chapter 12 for details.
If both brake lights have failed, it is possible
that the brake light switch above the brake
pedal needs adjusting. This simple operation
is described in Chapter 9.1
If you need to check your
brake lights and indicators
unaided, back up to a wall
or garage door and operate
the lights. The reflected light should
show if they are working properly.
4Check all external lights and the horn. Refer
to the appropriate Sections of Chapter 13 for
details if any of the circuits are found to be
inoperative.4Visually check all wiring connectors,
harnesses and retaining clips for security, and
for signs of chafing or damage.
23
Page 15 of 18

0•15
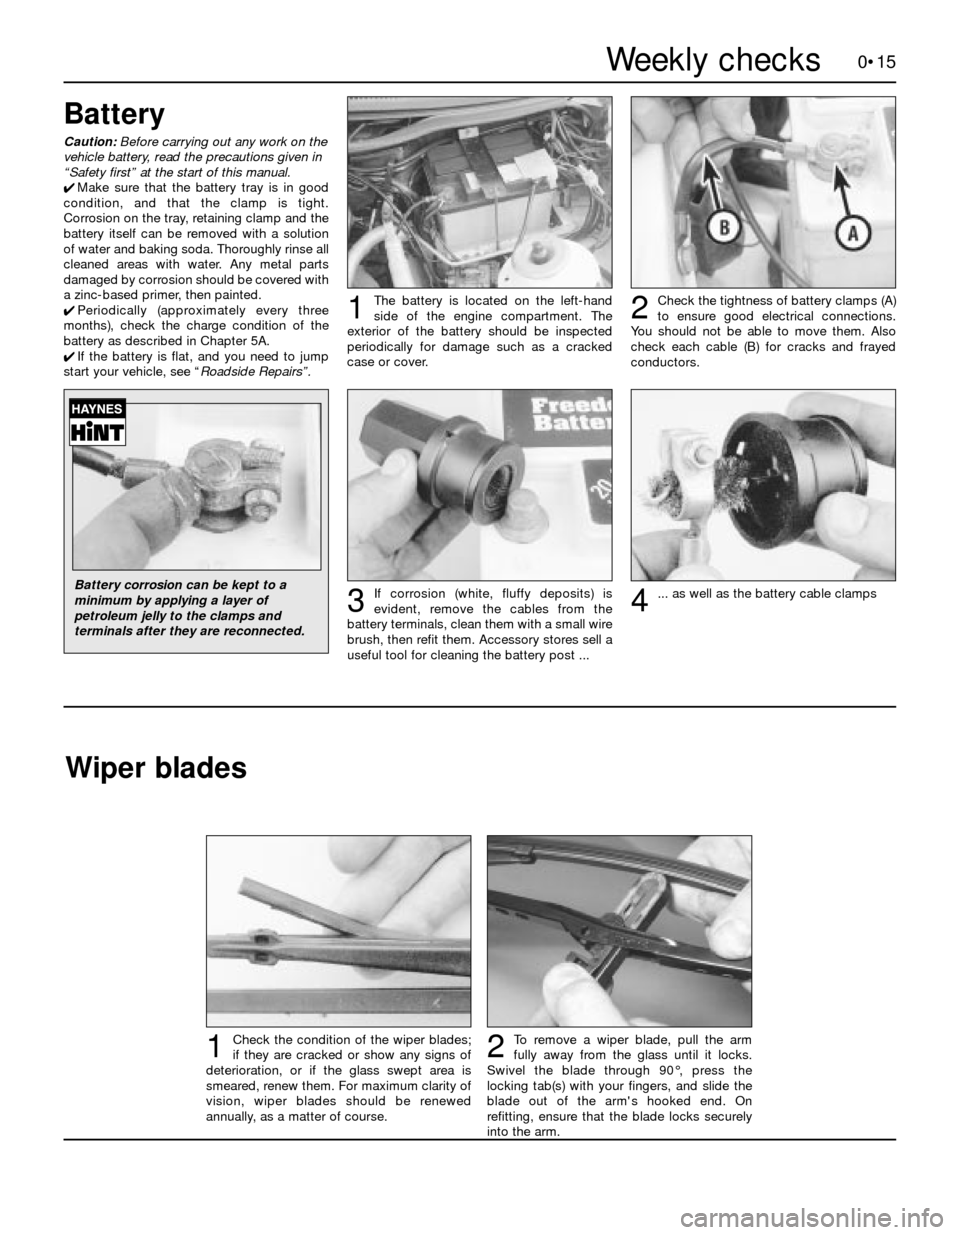
To remove a wiper blade, pull the arm
fully away from the glass until it locks.
Swivel the blade through 90°, press the
locking tab(s) with your fingers, and slide the
blade out of the arm's hooked end. On
refitting, ensure that the blade locks securely
into the arm.Check the condition of the wiper blades;
if they are cracked or show any signs of
deterioration, or if the glass swept area is
smeared, renew them. For maximum clarity of
vision, wiper blades should be renewed
annually, as a matter of course.21Weekly checks
Battery
Caution:Before carrying out any work on the
vehicle battery, read the precautions given in
“Safety first” at the start of this manual.
4Make sure that the battery tray is in good
condition, and that the clamp is tight.
Corrosion on the tray, retaining clamp and the
battery itself can be removed with a solution
of water and baking soda. Thoroughly rinse all
cleaned areas with water. Any metal parts
damaged by corrosion should be covered with
a zinc-based primer, then painted.
4Periodically (approximately every three
months), check the charge condition of the
battery as described in Chapter 5A.
4If the battery is flat, and you need to jump
start your vehicle, see “Roadside Repairs”.The battery is located on the left-hand
side of the engine compartment. The
exterior of the battery should be inspected
periodically for damage such as a cracked
case or cover.
Check the tightness of battery clamps (A)
to ensure good electrical connections.
You should not be able to move them. Also
check each cable (B) for cracks and frayed
conductors.
If corrosion (white, fluffy deposits) is
evident, remove the cables from the
battery terminals, clean them with a small wire
brush, then refit them. Accessory stores sell a
useful tool for cleaning the battery post ...
12
3... as well as the battery cable clamps4
Battery corrosion can be kept to a
minimum by applying a layer of
petroleum jelly to the clamps and
terminals after they are reconnected.
Wiper blades
Page 17 of 18

0•17Weekly checks
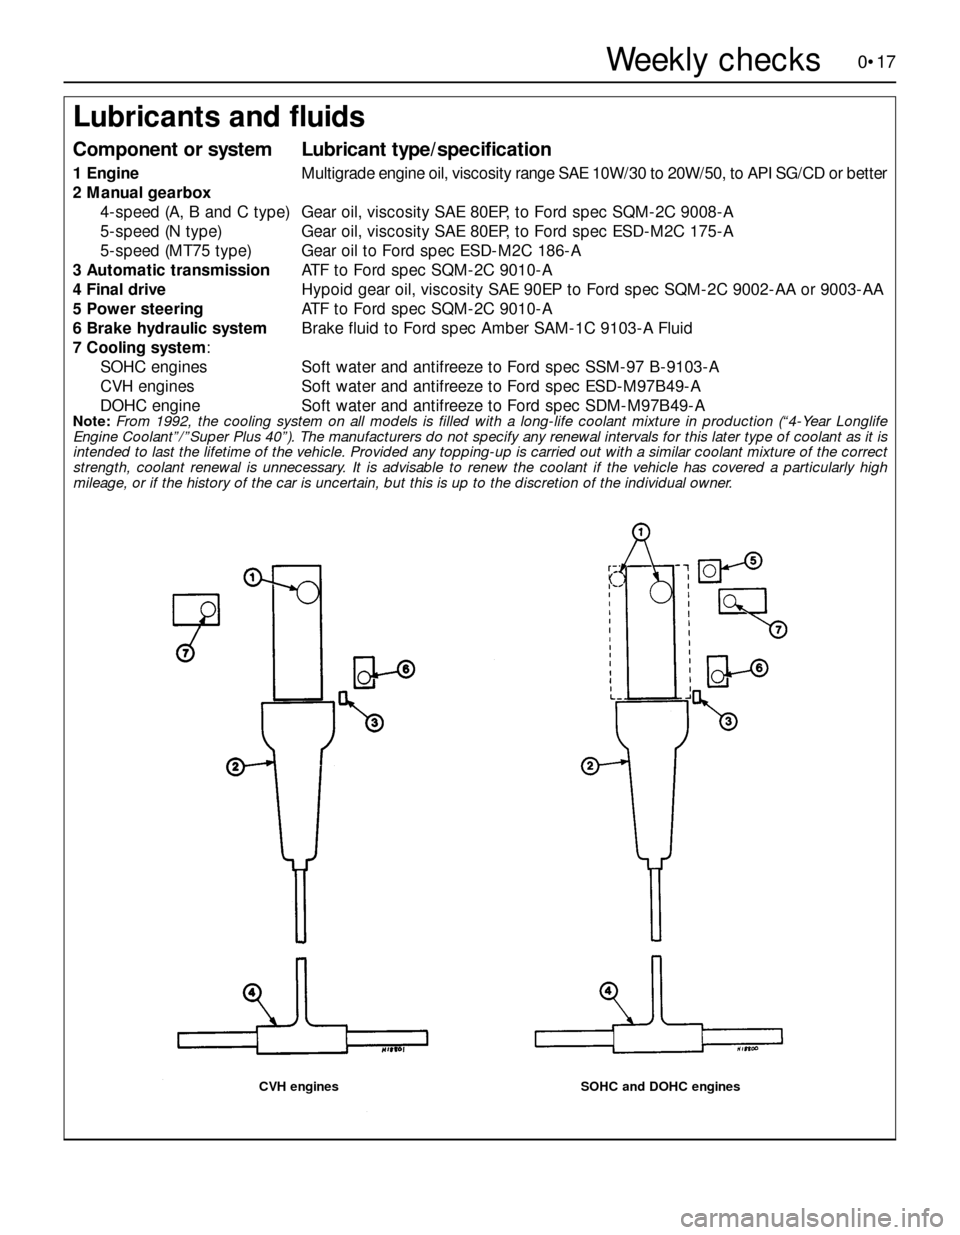
Lubricants and fluids
Component or systemLubricant type/specification
1EngineMultigrade engine oil, viscosity range SAE 10W/30 to 20W/50, to API SG/CD or better
2Manual gearbox
4-speed (A, B and C type)Gear oil, viscosity SAE 80EP, to Ford spec SQM-2C 9008-A
5-speed (N type)Gear oil, viscosity SAE 80EP, to Ford spec ESD-M2C 175-A
5-speed (MT75 type)Gear oil to Ford spec ESD-M2C 186-A
3Automatic transmissionATF to Ford spec SQM-2C 9010-A
4Final driveHypoid gear oil, viscosity SAE 90EP to Ford spec SQM-2C 9002-AA or 9003-AA
5Power steeringATF to Ford spec SQM-2C 9010-A
6Brake hydraulic systemBrake fluid to Ford spec Amber SAM-1C 9103-A Fluid
7Cooling system:
SOHC enginesSoft water and antifreeze to Ford spec SSM-97 B-9103-A
CVH enginesSoft water and antifreeze to Ford spec ESD-M97B49-A
DOHC engineSoft water and antifreeze to Ford spec SDM-M97B49-A
Note:From 1992, the cooling system on all models is filled with a long-life coolant mixture in production (“4-Year Longlife
Engine Coolant”/”Super Plus 40”). The manufacturers do not specify any renewal intervals for this later type of coolant as it is
intended to last the lifetime of the vehicle. Provided any topping-up is carried out with a similar coolant mixture of the correct
strength, coolant renewal is unnecessary. It is advisable to renew the coolant if the vehicle has covered a particularly high
mileage, or if the history of the car is uncertain, but this is up to the discretion of the individual owner.
CVH enginesSOHC and DOHC engines