warning light FORD SUPER DUTY 2004 1.G User Guide
[x] Cancel search | Manufacturer: FORD, Model Year: 2004, Model line: SUPER DUTY, Model: FORD SUPER DUTY 2004 1.GPages: 304, PDF Size: 3.96 MB
Page 102 of 304
Deactivating/activating the BeltMinder feature
Read steps1-9thoroughly before proceeding with the
deactivation/activation programming procedure.
The BeltMinder feature can be deactivated/activated by performing the
following procedure:
Before following the procedure, ensure that the following conditions are
met:
•The parking brake is set.
•The gearshift is in P (Park) (automatic transmission) or the neutral
position (manual transmission).
•The ignition switch is in the OFF position.
•All vehicle doors are closed.
•The driver’s safety belt is unbuckled.
•The parklamps/headlamps are in OFF position (If vehicle is equipped
with Autolamps, this will not affect the procedure).
To reduce the risk of injury, do not deactivate/activate the Belt
Minder feature while driving the vehicle.
BeltMinder activation and deactivation procedure
1. Turn the ignition switch to the RUN (or ON) position. (DO NOT
START THE ENGINE.)
2. Wait until the safety belt warning light turns off. (Approximately 1–2
minutes.)
•Steps 3–5 must be completed within 60 seconds or the procedure will
have to be repeated.
3. Buckle then unbuckle the safety belt three times, ending with the
safety belt unbuckled. This can be done before or during BeltMinder
warning activation.
4. Turn on the parklamps/headlamps, turn off the parklamps/headlamps.
5. Buckle then unbuckle the safety belt three times, ending with the
safety belt unbuckled.
•After step 5 the safety belt warning light will be turned on for three
seconds.
6. Within seven seconds of the safety belt warning light turning off,
buckle then unbuckle the safety belt.
2004 F250/350/450/550(f23)
Owners Guide (post-2002-fmt)
USA English(fus)
Seating and Safety Restraints
102
Page 103 of 304
•This will disable BeltMinder if it is currently enabled, or enable
BeltMinder if it is currently disabled.
7. Confirmation of disabling BeltMinder is provided by the safety belt
warning light flashing four times per second for three seconds.
8. Confirmation of enabling BeltMinder is provided by:
•The safety belt warning light flashing four times per second for three
seconds.
•Followed by three seconds with the safety belt warning light off.
•Once again, the safety belt warning light will flash four times per
second for three seconds.
9. After receiving confirmation, the deactivation/activation procedure is
complete.
Safety belt extension assembly
If the safety belt is too short when fully extended, there is a 20 cm (8
inch) safety belt extension assembly that can be added (part number
611C22). This assembly can be obtained from your dealer at no cost.
Use only extensions manufactured by the same supplier as the safety
belt. Manufacturer identification is located at the end of the webbing on
the label. Also, use the safety belt extension only if the safety belt is too
short for you when fully extended.
Do not use extensions to change the fit of the shoulder belt
across the torso.
Safety belt maintenance
Inspect the safety belt systems periodically to make sure they work
properly and are not damaged. Inspect the safety belts to make sure
there are no nicks, tears or cuts. Replace if necessary. All safety belt
assemblies, including retractors, buckles, front seat belt buckle
assemblies, buckle support assemblies (slide bar-if equipped), shoulder
belt height adjusters (if equipped), shoulder belt guide on seatback (if
equipped), child safety seat LATCH and tether anchors, and attaching
hardware, should be inspected after a collision. Ford Motor Company
recommends that all safety belt assemblies used in vehicles involved in a
collision be replaced. However, if the collision was minor and a qualified
technician finds that the belts do not show damage and continue to
operate properly, they do not need to be replaced. Safety belt assemblies
not in use during a collision should also be inspected and replaced if
either damage or improper operation is noted.
2004 F250/350/450/550(f23)
Owners Guide (post-2002-fmt)
USA English(fus)
Seating and Safety Restraints
103
Page 108 of 304
The diagnostic module monitors its own internal circuits and the
supplemental air bag electrical system wiring (including the impact
sensors), the system wiring, the air bag system readiness light, the air
bag back up power and the air bag ignitors.
Determining if the system is operational
The SRS uses a readiness light in the instrument cluster or a tone to
indicate the condition of the system. Refer toAir bag readinesssection
in theInstrument clusterchapter. Routine maintenance of the air bag is
not required.
A difficulty with the system is indicated by one or more of the following:
•The readiness light will either
flash or stay lit.
•The readiness light will not
illuminate immediately after
ignition is turned on.
•A series of five beeps will be heard. The tone pattern will repeat
periodically until the problem and/or light are repaired.
If any of these things happen, even intermittently, have the SRS serviced
at your dealership or by a qualified technician immediately. Unless
serviced, the system may not function properly in the event of a
collision.
Disposal of air bags and air bag equipped vehicles (including
pretensioners)
See your local dealership or qualified technician. Air bags MUST BE
disposed of by qualified personnel.
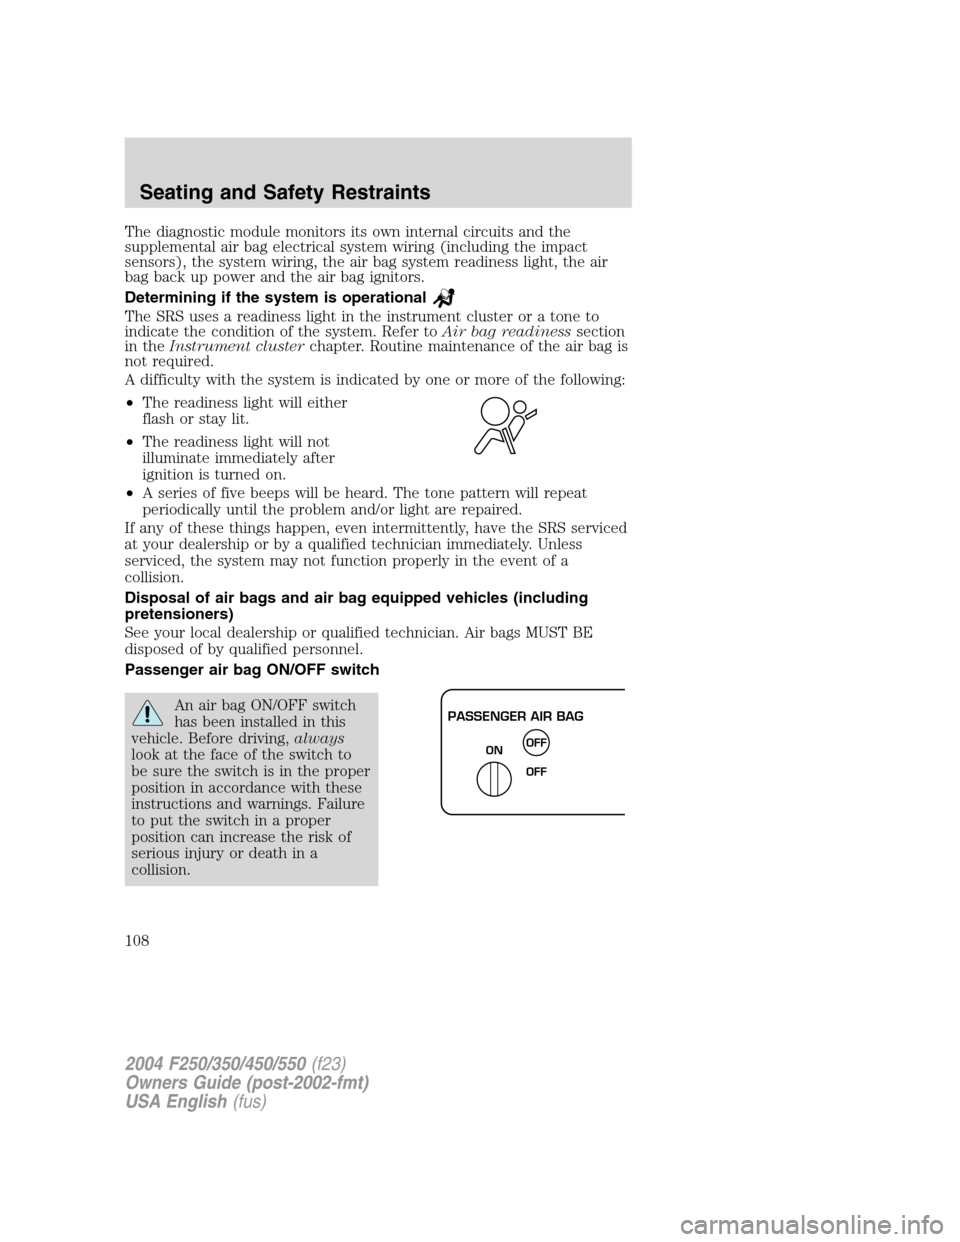
Passenger air bag ON/OFF switch
An air bag ON/OFF switch
has been installed in this
vehicle. Before driving,always
look at the face of the switch to
be sure the switch is in the proper
position in accordance with these
instructions and warnings. Failure
to put the switch in a proper
position can increase the risk of
serious injury or death in a
collision.PASSENGER AIR BAG
OFF
OFF ON
2004 F250/350/450/550(f23)
Owners Guide (post-2002-fmt)
USA English(fus)
Seating and Safety Restraints
108
Page 124 of 304
STARTING
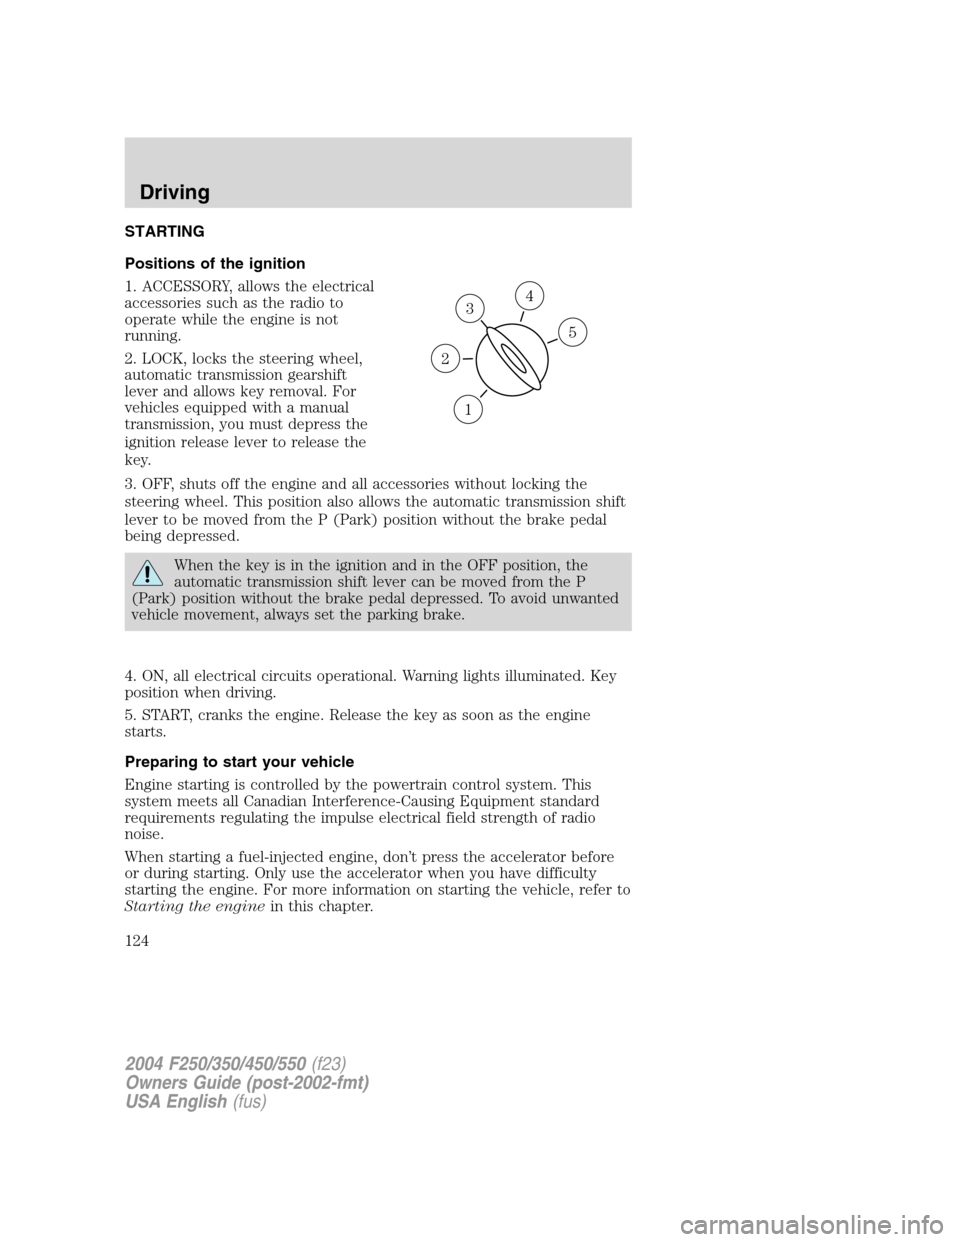
Positions of the ignition
1. ACCESSORY, allows the electrical
accessories such as the radio to
operate while the engine is not
running.
2. LOCK, locks the steering wheel,
automatic transmission gearshift
lever and allows key removal. For
vehicles equipped with a manual
transmission, you must depress the
ignition release lever to release the
key.
3. OFF, shuts off the engine and all accessories without locking the
steering wheel. This position also allows the automatic transmission shift
lever to be moved from the P (Park) position without the brake pedal
being depressed.
When the key is in the ignition and in the OFF position, the
automatic transmission shift lever can be moved from the P
(Park) position without the brake pedal depressed. To avoid unwanted
vehicle movement, always set the parking brake.
4. ON, all electrical circuits operational. Warning lights illuminated. Key
position when driving.
5. START, cranks the engine. Release the key as soon as the engine
starts.
Preparing to start your vehicle
Engine starting is controlled by the powertrain control system. This
system meets all Canadian Interference-Causing Equipment standard
requirements regulating the impulse electrical field strength of radio
noise.
When starting a fuel-injected engine, don’t press the accelerator before
or during starting. Only use the accelerator when you have difficulty
starting the engine. For more information on starting the vehicle, refer to
Starting the enginein this chapter.
3
1
2
5
4
2004 F250/350/450/550(f23)
Owners Guide (post-2002-fmt)
USA English(fus)
Driving
Driving
124
Page 129 of 304
Four-wheel anti-lock brake system (ABS)
Your vehicle is equipped with an Anti-lock Braking System (ABS). This
system helps you maintain steering control during emergency stops by
keeping the brakes from locking. Noise from the ABS pump motor and
brake pedal pulsation may be observed during ABS braking; this is
normal and should be no reason for concern.
ABS warning lamp
ABS
TheABSlamp in the instrument cluster momentarily illuminates when
the ignition is turned to ON. If the light does not illuminate during start
up, remains on or flashes, the ABS may be disabled and may need to be
serviced.
Even when the ABS is disabled,
normal braking is still effective. (If
your BRAKE warning lamp
illuminates with the parking brake
released, have your brake system serviced immediately.)
Using ABS
When hard braking is required, apply continuous force on the brake
pedal; do not pump the brake pedal since this will reduce the
effectiveness of the ABS and will increase your vehicle’s stopping
distance. The ABS will be activated immediately, allowing you to retain
full steering control during hard braking and on slippery surfaces.
However, the ABS does not decrease stopping distance.
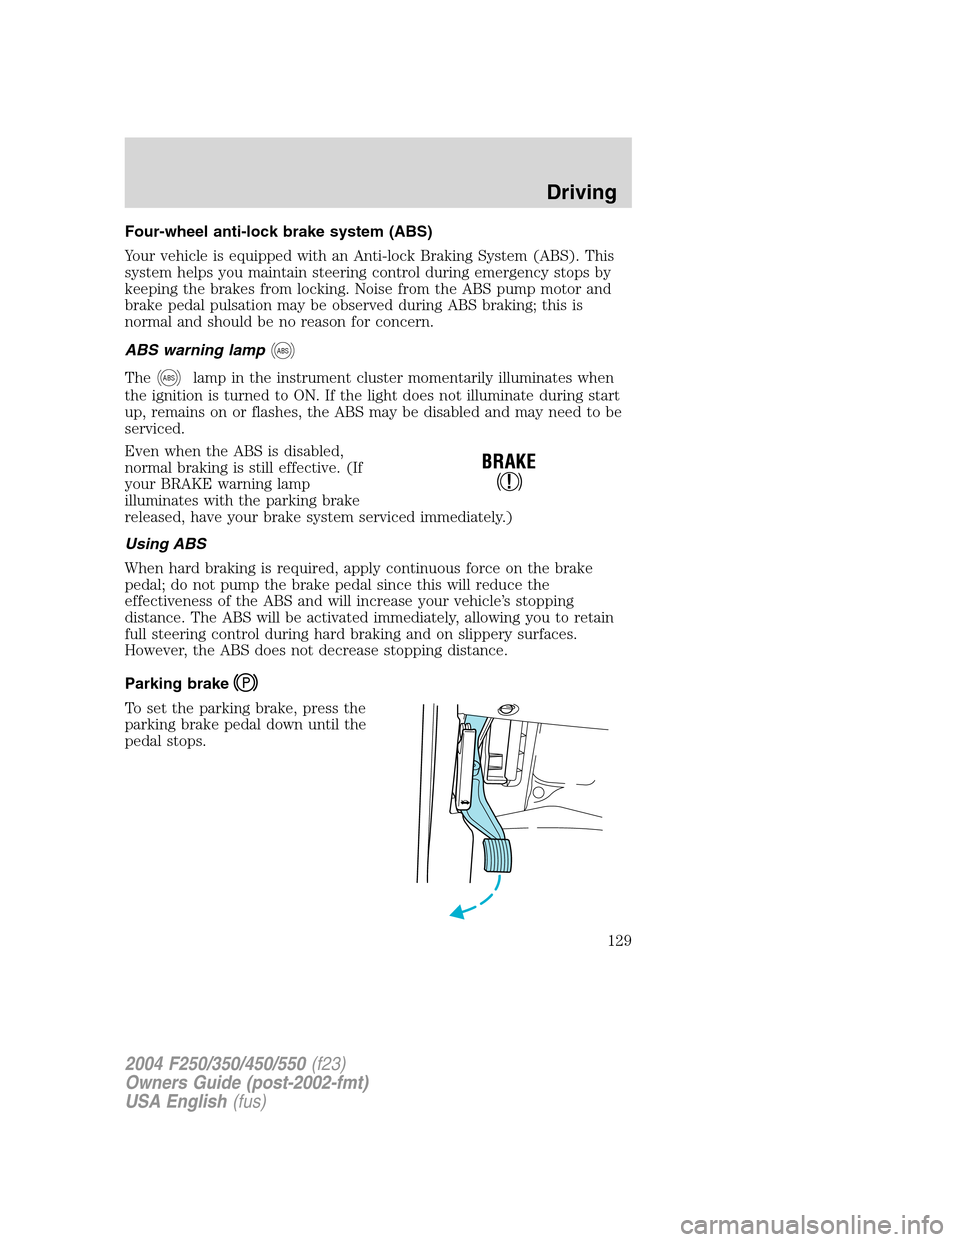
Parking brake
To set the parking brake, press the
parking brake pedal down until the
pedal stops.
2004 F250/350/450/550(f23)
Owners Guide (post-2002-fmt)
USA English(fus)
Driving
129
Page 254 of 304
If other than Ford, Motorcraft or Ford-authorized parts are used for
maintenance replacements or for service of components affecting
emission control, such non-Ford parts should be equivalent to genuine
Ford Motor Company parts in performance and durability.
Do not park, idle, or drive your vehicle in dry grass or other dry
ground cover. The emission system heats up the engine
compartment and exhaust system, which can start a fire.
Illumination of the“Service Engine Soon”light, charging system warning
light or the temperature warning light, fluid leaks, strange odors, smoke
or loss of engine power, could indicate that the emission control system
is not working properly.
Exhaust leaks may result in entry of harmful and potentially
lethal fumes into the passenger compartment.
Do not make any unauthorized changes to your vehicle or engine. By
law, vehicle owners and anyone who manufactures, repairs, services,
sells, leases, trades vehicles, or supervises a fleet of vehicles are not
permitted to intentionally remove an emission control device or prevent
it from working. Information about your vehicle’s emission system is on
the Vehicle Emission Control Information Decal located on or near the
engine. This decal identifies engine displacement and gives some tune up
specifications.
Please consult yourWarranty Guidefor complete emission warranty
information.
On board diagnostics (OBD-II)
Your vehicle is equipped with a computer that monitors the engine’s
emission control system. This system is commonly known as the On
Board Diagnostics System (OBD-II). This OBD-II system protects the
environment by ensuring that your vehicle continues to meet
government emission standards. The OBD-II system also assists the
service technician in properly servicing your vehicle. When theCheck
Engine/Service Engine Soonlight illuminates, the OBD-II system has
detected a malfunction. Temporary malfunctions may cause yourCheck
Engine/Service Engine Soonlight to illuminate. Examples are:
1. The vehicle has run out of fuel. (The engine may misfire or run
poorly.)
2. Poor fuel quality or water in the fuel.
2004 F250/350/450/550(f23)
Owners Guide (post-2002-fmt)
USA English(fus)
Maintenance and Specifications
254
Page 255 of 304
3. The fuel cap may not have been securely tightened.
These temporary malfunctions can be corrected by filling the fuel tank
with good quality fuel and/or properly tightening the fuel cap. After three
driving cycles without these or any other temporary malfunctions
present, theCheck Engine/Service Engine Soonlight should turn off.
(A driving cycle consists of a cold engine startup followed by mixed
city/highway driving.) No additional vehicle service is required.
If theCheck Engine/Service Engine Soonlight remains on, have your
vehicle serviced at the first available opportunity.
Readiness for Inspection/Maintenance (I/M) testing
In some localities, it may be a legal requirement to pass an I/M test of
the on-board diagnostics system. If your“Check Engine/Service Engine
Soon”light is on, refer to the description in theWarning lights and
chimessection of theInstrument clusterchapter. Your vehicle may not
pass the I/M test with the“Check Engine/Service Engine Soon”light on.
If the vehicle’s powertrain system or its battery has just been serviced,
the on-board diagnostics system is reset to a“not ready for I/M test”
condition. To ready the on-board diagnostics system for I/M testing, a
minimum of 30 minutes of city and highway driving is necessary as
described below:
•First, at least 10 minutes of driving on an expressway or highway.
•Next, at least 20 minutes driving in stop-and-go, city-type traffic with
at least four idle periods.
Allow the vehicle to sit for at least eight hours without starting the
engine. Then, start the engine and complete the above driving cycle. The
engine must warm up to its normal operating temperature. Once started,
do not turn off the engine until the above driving cycle is complete.
2004 F250/350/450/550(f23)
Owners Guide (post-2002-fmt)
USA English(fus)
Maintenance and Specifications
255
Page 269 of 304
13.Maximum Permissible Inflation Pressure:Tire manufactures
maximum permissible pressure and/or the pressure at which the
maximum load can be carried by the tire. This pressure is normally
higher than the manufacturer’s recommended cold inflation pressure
which can be found on either the tire label or certification label which is
located on the structure by the trailing edge of the driver’s door or the
edge of the driver’s door. The cold inflation pressure should never be set
lower than the recommended pressure on the label.
Note:You may not find this information on all tires because it is not
required by federal law.
The tire suppliers may have additional markings, notes or warnings such
as standard load, radial tubeless, etc.
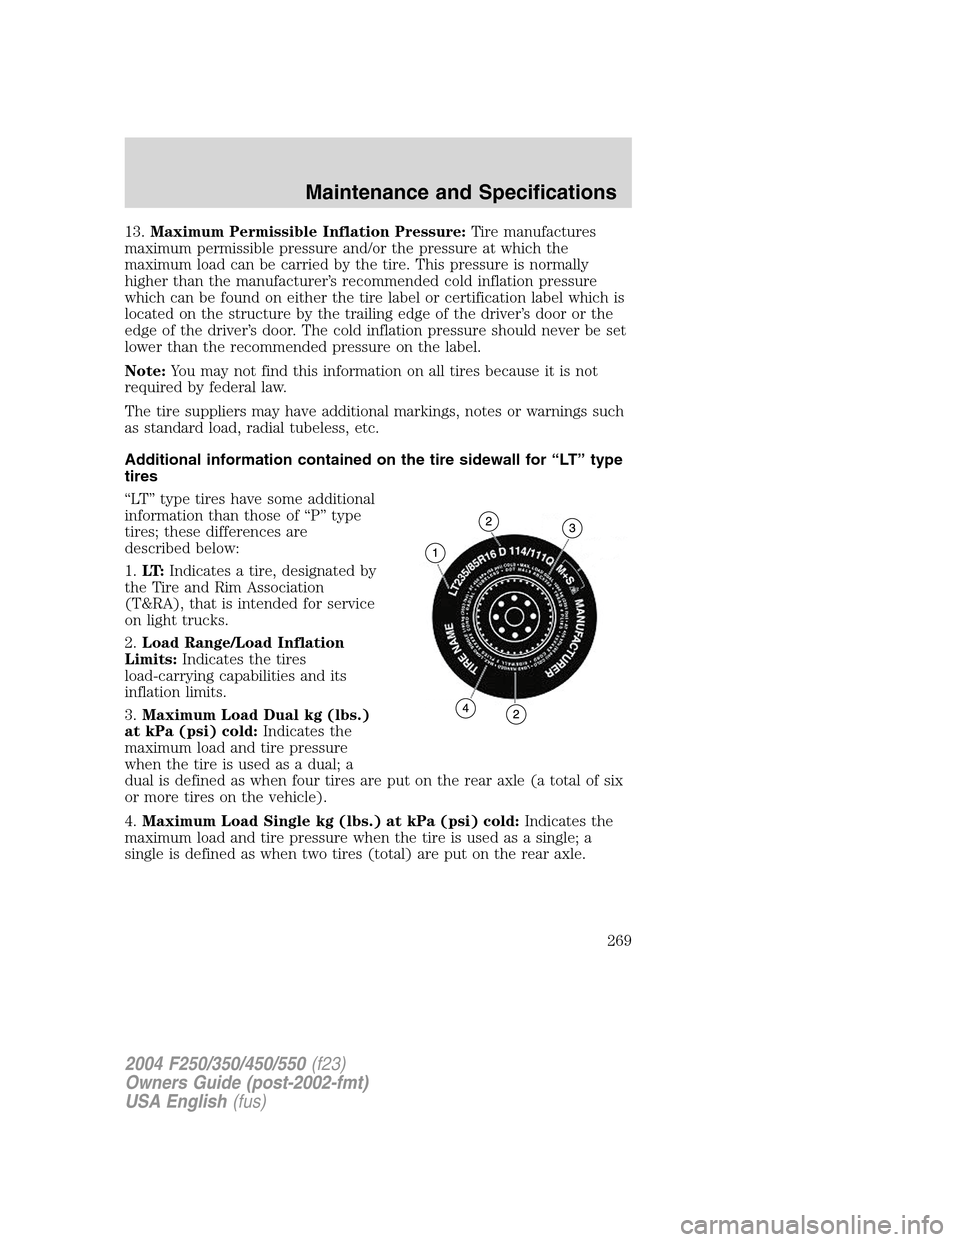
Additional information contained on the tire sidewall for“LT”type
tires
“LT”type tires have some additional
information than those of“P”type
tires; these differences are
described below:
1.LT:Indicates a tire, designated by
the Tire and Rim Association
(T&RA), that is intended for service
on light trucks.
2.Load Range/Load Inflation
Limits:Indicates the tires
load-carrying capabilities and its
inflation limits.
3.Maximum Load Dual kg (lbs.)
at kPa (psi) cold:Indicates the
maximum load and tire pressure
when the tire is used as a dual; a
dual is defined as when four tires are put on the rear axle (a total of six
or more tires on the vehicle).
4.Maximum Load Single kg (lbs.) at kPa (psi) cold:Indicates the
maximum load and tire pressure when the tire is used as a single; a
single is defined as when two tires (total) are put on the rear axle.
2004 F250/350/450/550(f23)
Owners Guide (post-2002-fmt)
USA English(fus)
Maintenance and Specifications
269
Page 272 of 304
6. Visually inspect the tires to make sure there are no nails or other
objects embedded that could poke a hole in the tire and cause an air
leak.
7. Check the sidewalls to make sure there are no gouges, cuts, bulges or
other irregularities.
Tire inflation information
All tires with Steel Carcass Plies (if equipped):
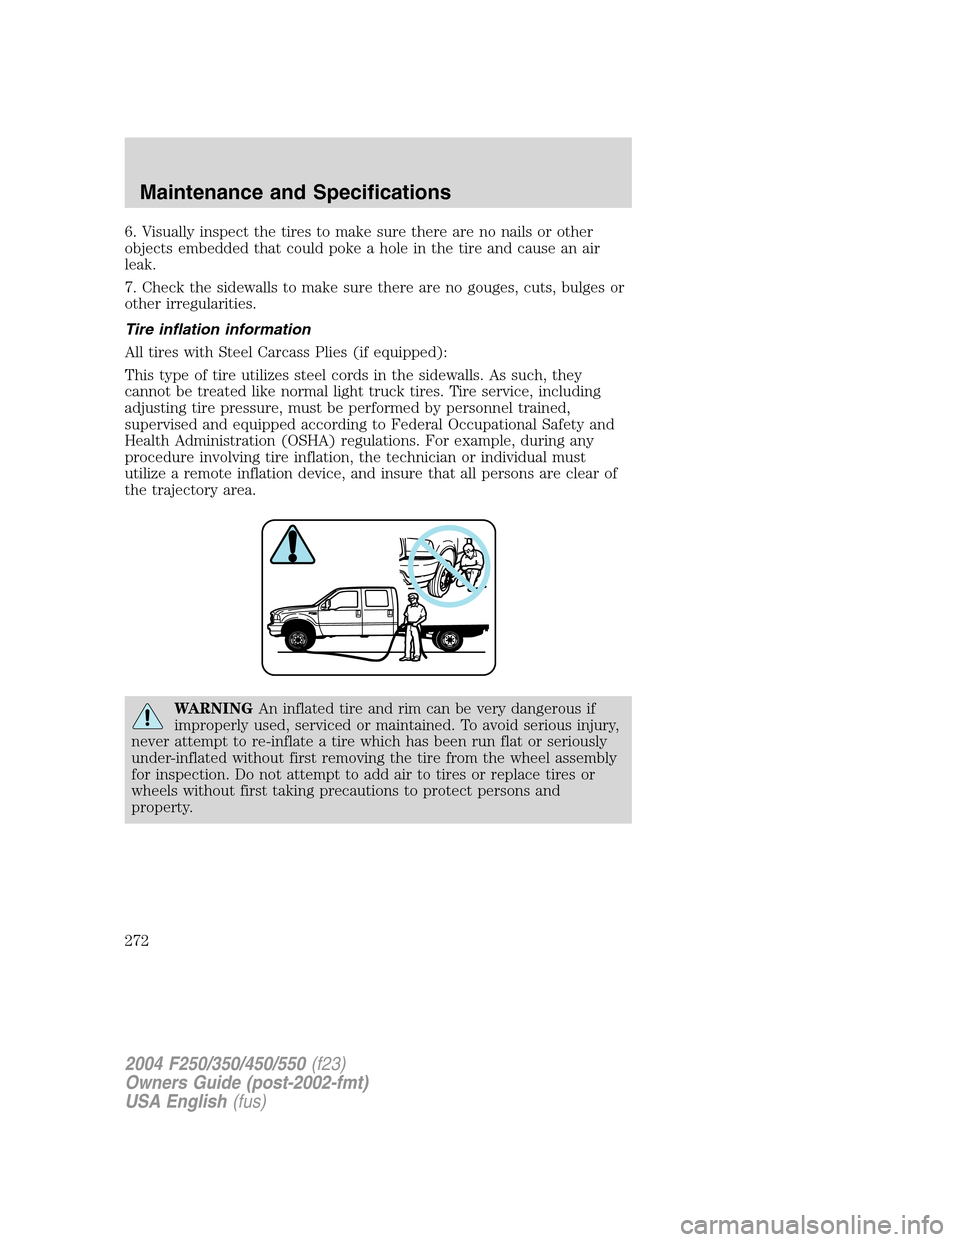
This type of tire utilizes steel cords in the sidewalls. As such, they
cannot be treated like normal light truck tires. Tire service, including
adjusting tire pressure, must be performed by personnel trained,
supervised and equipped according to Federal Occupational Safety and
Health Administration (OSHA) regulations. For example, during any
procedure involving tire inflation, the technician or individual must
utilize a remote inflation device, and insure that all persons are clear of
the trajectory area.
WARNINGAn inflated tire and rim can be very dangerous if
improperly used, serviced or maintained. To avoid serious injury,
never attempt to re-inflate a tire which has been run flat or seriously
under-inflated without first removing the tire from the wheel assembly
for inspection. Do not attempt to add air to tires or replace tires or
wheels without first taking precautions to protect persons and
property.
2004 F250/350/450/550(f23)
Owners Guide (post-2002-fmt)
USA English(fus)
Maintenance and Specifications
272
Page 299 of 304
A
Accessory delay ..........................56
Air bag supplemental restraint
system ........................................104
and child safety seats ............106
description ..............................104
disposal ....................................108
driver air bag ..........................106
indicator light .........................108
operation .................................106
passenger air bag ...................106
passenger deactivation
switch ......................................109
Air cleaner filter ...............263, 277
Ambulance packages ....................8
Antifreeze
(see Engine coolant) ................240
Anti-lock brake system
(see Brakes) ..............................129
Audio system
(see Radio) ..........19, 21, 23, 26, 30
Automatic transmission ............132
driving an automatic
overdrive .........................133, 135
fluid, adding ............................258
fluid, checking ........................258
fluid, refill capacities ..............278
fluid, specification ..................284
Auxiliary power point .................55
Axle
lubricant specifications ..281, 284
refill capacities ........................278
traction lok ..............................131
B
Battery .......................................238
acid, treating emergencies .....238jumping a disabled battery ....209
maintenance-free ....................238
replacement, specifications ...277
servicing ..................................238
BeltMinder ...................................99
Brakes ........................................128
anti-lock ...................................129
anti-lock brake system (ABS)
warning light ...........................129
fluid, checking and adding ....256
fluid, refill capacities ..............278
fluid, specifications .........281, 284
lubricant specifications ..281, 284
parking ....................................129
shift interlock ..........................132
Bulbs ............................................44
C
Calculating load ........................162
Capacities for refilling fluids ....278
Cassette tape player ...................30
CD changer .................................33
Cell phone use ............................67
Certification Label ....................292
Child safety restraints ..............113
child safety belts ....................113
Child safety seats ......................116
attaching with tether straps ..120
in front seat ............................118
in rear seat ..............................118
Cleaning your vehicle
engine compartment ..............226
instrument panel ....................228
interior .....................................228
interior trim ............................228
plastic parts ............................227
safety belts ..............................228
washing ....................................225
2004 F250/350/450/550(f23)
Owners Guide (post-2002-fmt)
USA English(fus)
Index
Index
299