manual transmission FORD SUPER DUTY 2005 1.G Owners Manual
[x] Cancel search | Manufacturer: FORD, Model Year: 2005, Model line: SUPER DUTY, Model: FORD SUPER DUTY 2005 1.GPages: 304, PDF Size: 6.38 MB
Page 12 of 304
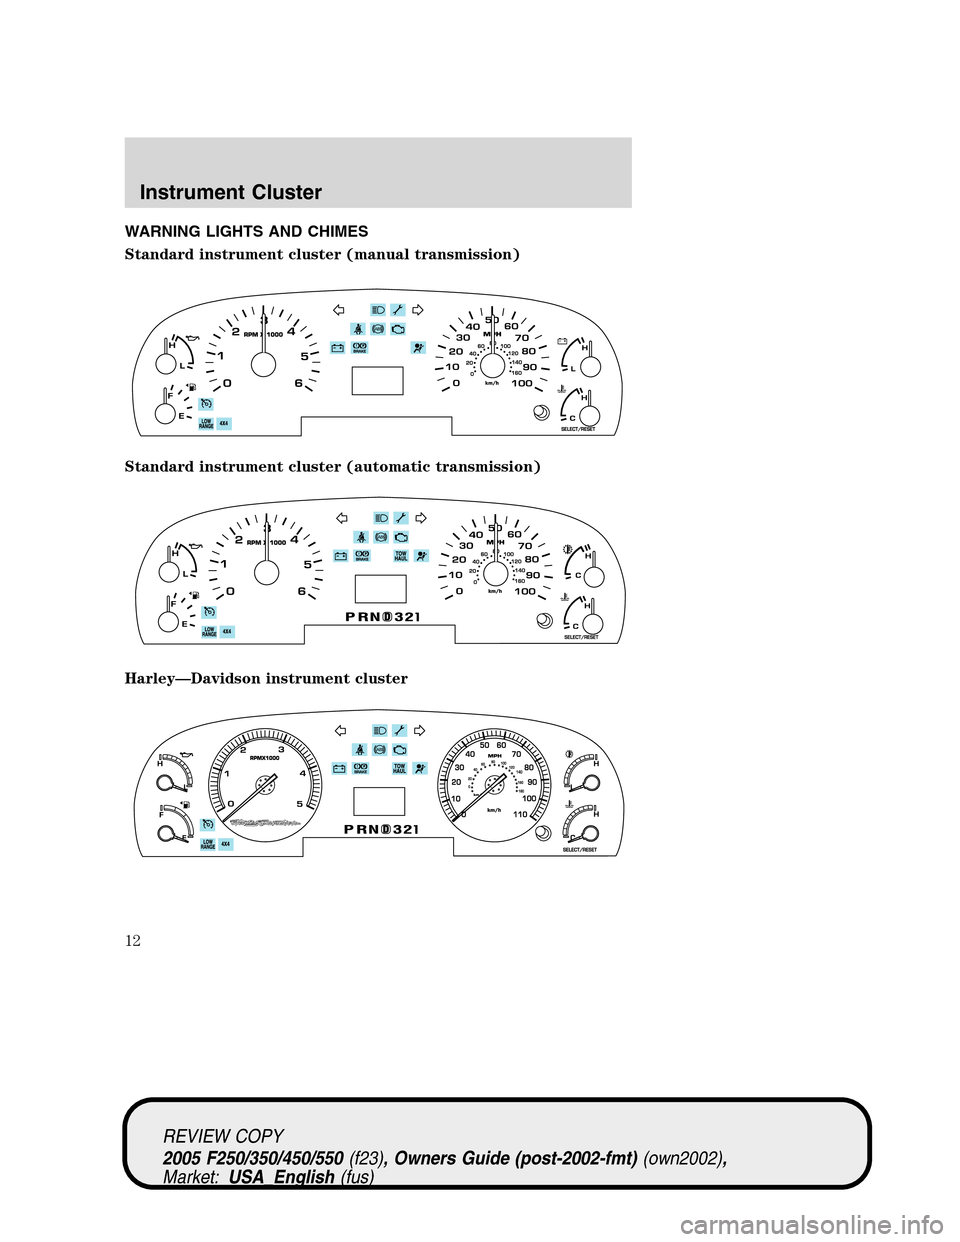
WARNING LIGHTS AND CHIMES
Standard instrument cluster (manual transmission)
Standard instrument cluster (automatic transmission)
Harley—Davidson instrument cluster
REVIEW COPY
2005 F250/350/450/550(f23), Owners Guide (post-2002-fmt)(own2002),
Market:USA_English(fus)
Instrument Cluster
Instrument Cluster
12
Page 18 of 304
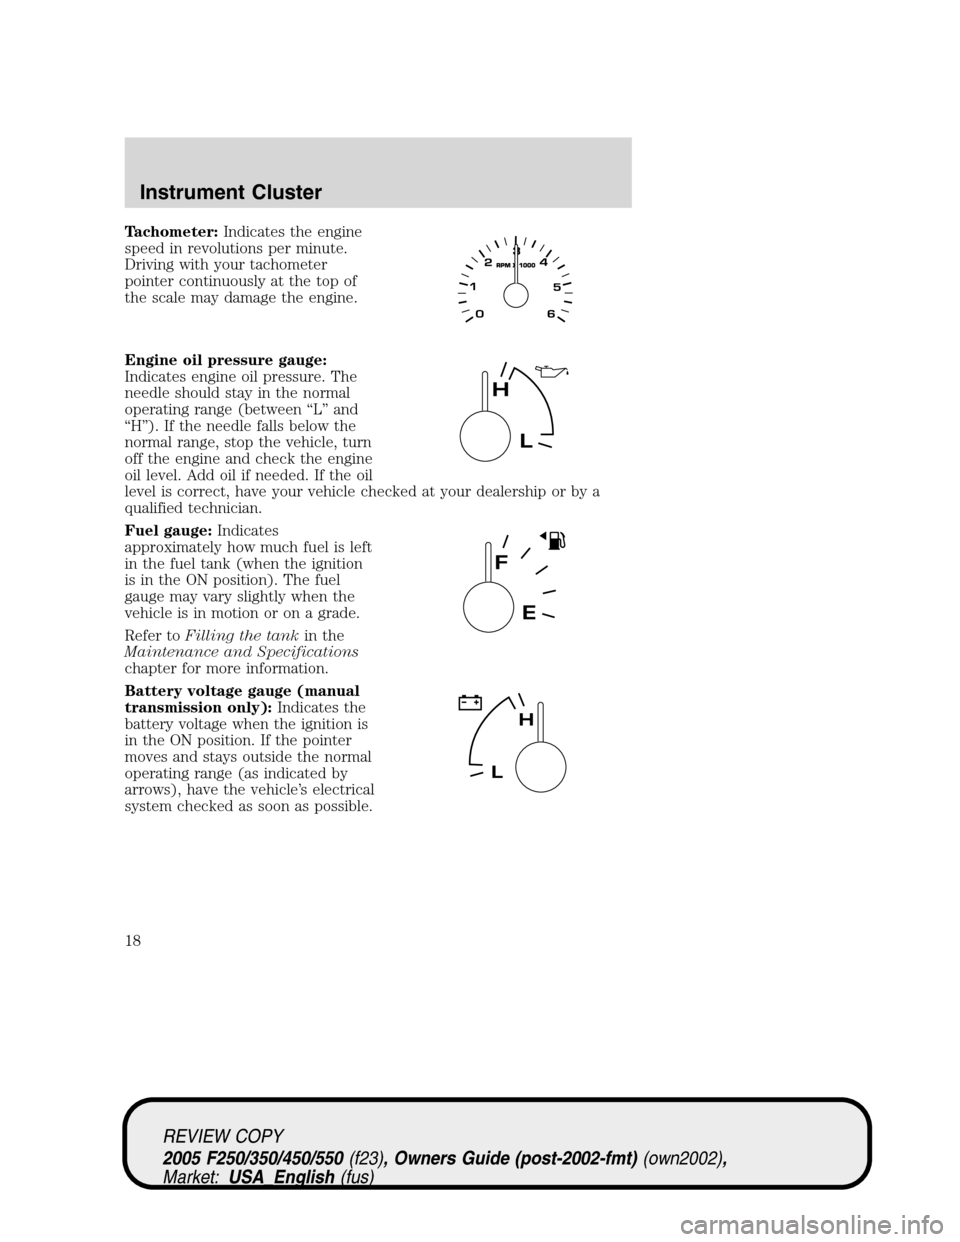
Tachometer:Indicates the engine
speed in revolutions per minute.
Driving with your tachometer
pointer continuously at the top of
the scale may damage the engine.
Engine oil pressure gauge:
Indicates engine oil pressure. The
needle should stay in the normal
operating range (between “L” and
“H”). If the needle falls below the
normal range, stop the vehicle, turn
off the engine and check the engine
oil level. Add oil if needed. If the oil
level is correct, have your vehicle checked at your dealership or by a
qualified technician.
Fuel gauge:Indicates
approximately how much fuel is left
in the fuel tank (when the ignition
is in the ON position). The fuel
gauge may vary slightly when the
vehicle is in motion or on a grade.
Refer toFilling the tankin the
Maintenance and Specifications
chapter for more information.
Battery voltage gauge (manual
transmission only):Indicates the
battery voltage when the ignition is
in the ON position. If the pointer
moves and stays outside the normal
operating range (as indicated by
arrows), have the vehicle’s electrical
system checked as soon as possible.
REVIEW COPY
2005 F250/350/450/550(f23), Owners Guide (post-2002-fmt)(own2002),
Market:USA_English(fus)
Instrument Cluster
18
Page 141 of 304
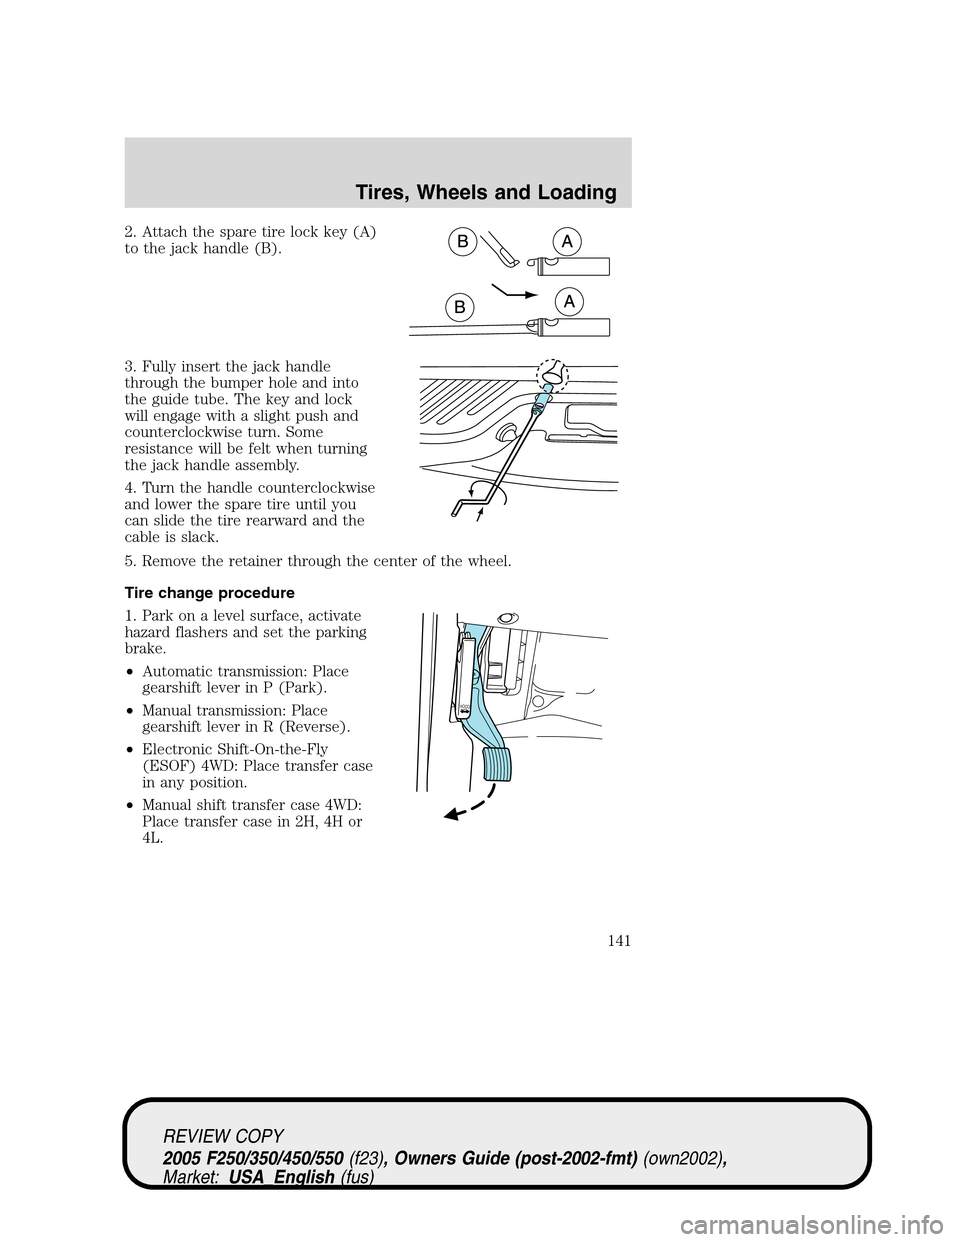
2. Attach the spare tire lock key (A)
to the jack handle (B).
3. Fully insert the jack handle
through the bumper hole and into
the guide tube. The key and lock
will engage with a slight push and
counterclockwise turn. Some
resistance will be felt when turning
the jack handle assembly.
4. Turn the handle counterclockwise
and lower the spare tire until you
can slide the tire rearward and the
cable is slack.
5. Remove the retainer through the center of the wheel.
Tire change procedure
1. Park on a level surface, activate
hazard flashers and set the parking
brake.
•Automatic transmission: Place
gearshift lever in P (Park).
•Manual transmission: Place
gearshift lever in R (Reverse).
•Electronic Shift-On-the-Fly
(ESOF) 4WD: Place transfer case
in any position.
•Manual shift transfer case 4WD:
Place transfer case in 2H, 4H or
4L.
HO
O
D
REVIEW COPY
2005 F250/350/450/550(f23), Owners Guide (post-2002-fmt)(own2002),
Market:USA_English(fus)
Tires, Wheels and Loading
141
Page 142 of 304
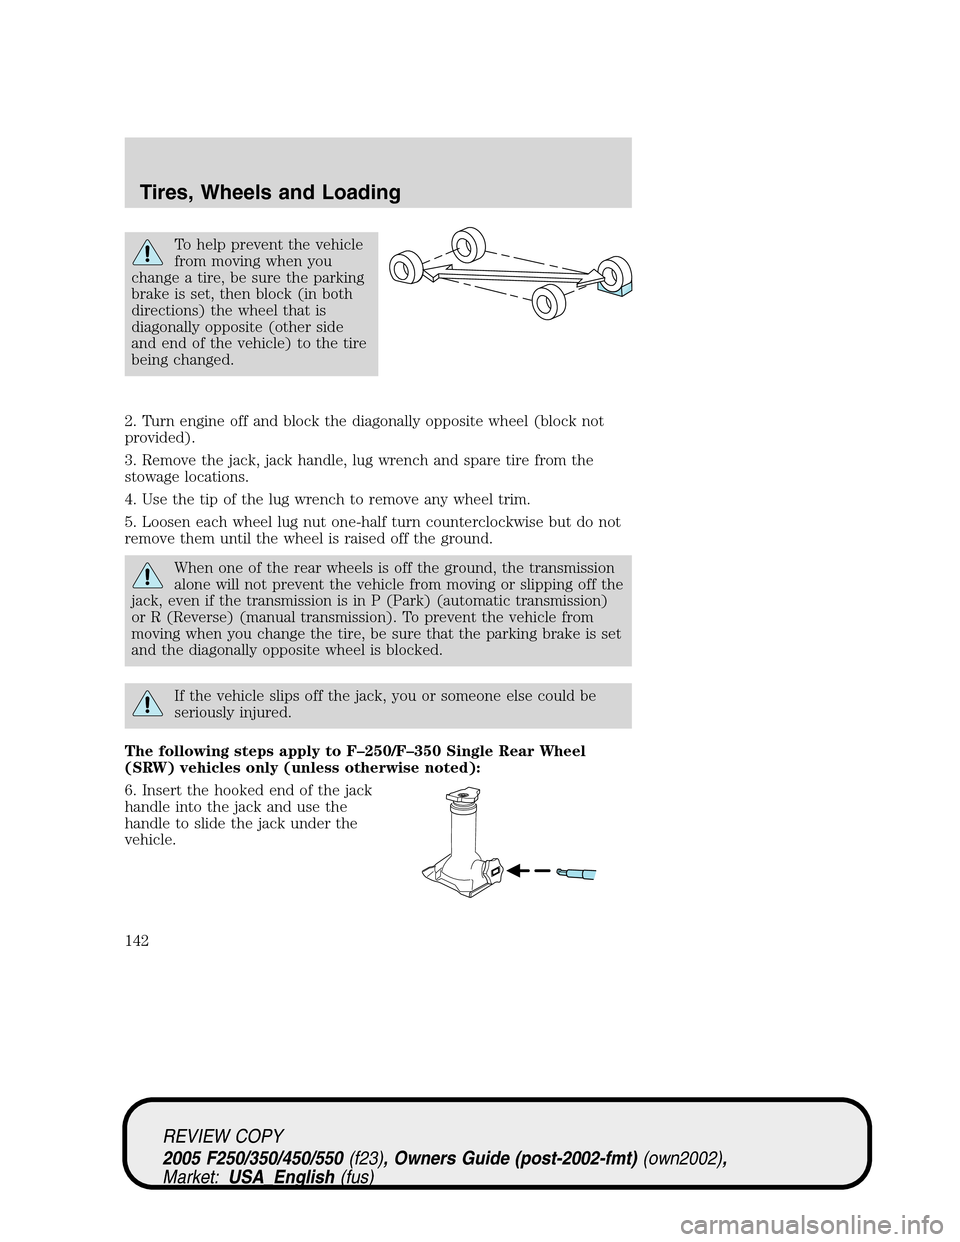
To help prevent the vehicle
from moving when you
change a tire, be sure the parking
brake is set, then block (in both
directions) the wheel that is
diagonally opposite (other side
and end of the vehicle) to the tire
being changed.
2. Turn engine off and block the diagonally opposite wheel (block not
provided).
3. Remove the jack, jack handle, lug wrench and spare tire from the
stowage locations.
4. Use the tip of the lug wrench to remove any wheel trim.
5. Loosen each wheel lug nut one-half turn counterclockwise but do not
remove them until the wheel is raised off the ground.
When one of the rear wheels is off the ground, the transmission
alone will not prevent the vehicle from moving or slipping off the
jack, even if the transmission is in P (Park) (automatic transmission)
or R (Reverse) (manual transmission). To prevent the vehicle from
moving when you change the tire, be sure that the parking brake is set
and the diagonally opposite wheel is blocked.
If the vehicle slips off the jack, you or someone else could be
seriously injured.
The following steps apply to F–250/F–350 Single Rear Wheel
(SRW) vehicles only (unless otherwise noted):
6. Insert the hooked end of the jack
handle into the jack and use the
handle to slide the jack under the
vehicle.
REVIEW COPY
2005 F250/350/450/550(f23), Owners Guide (post-2002-fmt)(own2002),
Market:USA_English(fus)
Tires, Wheels and Loading
142
Page 166 of 304
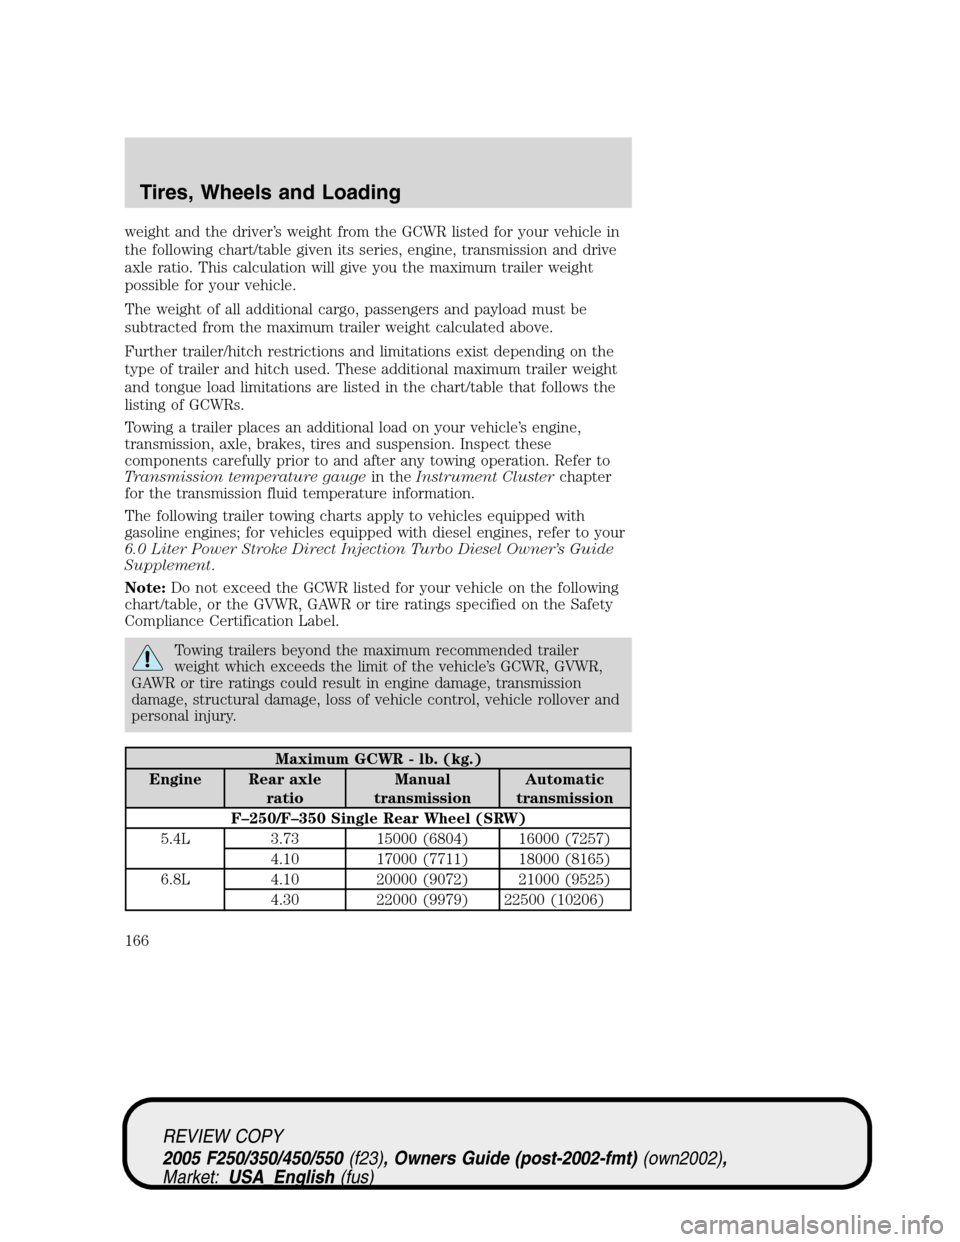
weight and the driver’s weight from the GCWR listed for your vehicle in
the following chart/table given its series, engine, transmission and drive
axle ratio. This calculation will give you the maximum trailer weight
possible for your vehicle.
The weight of all additional cargo, passengers and payload must be
subtracted from the maximum trailer weight calculated above.
Further trailer/hitch restrictions and limitations exist depending on the
type of trailer and hitch used. These additional maximum trailer weight
and tongue load limitations are listed in the chart/table that follows the
listing of GCWRs.
Towing a trailer places an additional load on your vehicle’s engine,
transmission, axle, brakes, tires and suspension. Inspect these
components carefully prior to and after any towing operation. Refer to
Transmission temperature gaugein theInstrument Clusterchapter
for the transmission fluid temperature information.
The following trailer towing charts apply to vehicles equipped with
gasoline engines; for vehicles equipped with diesel engines, refer to your
6.0 Liter Power Stroke Direct Injection Turbo Diesel Owner’s Guide
Supplement.
Note:Do not exceed the GCWR listed for your vehicle on the following
chart/table, or the GVWR, GAWR or tire ratings specified on the Safety
Compliance Certification Label.
Towing trailers beyond the maximum recommended trailer
weight which exceeds the limit of the vehicle’s GCWR, GVWR,
GAWR or tire ratings could result in engine damage, transmission
damage, structural damage, loss of vehicle control, vehicle rollover and
personal injury.
Maximum GCWR - lb. (kg.)
Engine Rear axle
ratioManual
transmissionAutomatic
transmission
F–250/F–350 Single Rear Wheel (SRW)
5.4L 3.73 15000 (6804) 16000 (7257)
4.10 17000 (7711) 18000 (8165)
6.8L 4.10 20000 (9072) 21000 (9525)
4.30 22000 (9979) 22500 (10206)
REVIEW COPY
2005 F250/350/450/550(f23), Owners Guide (post-2002-fmt)(own2002),
Market:USA_English(fus)
Tires, Wheels and Loading
166
Page 167 of 304
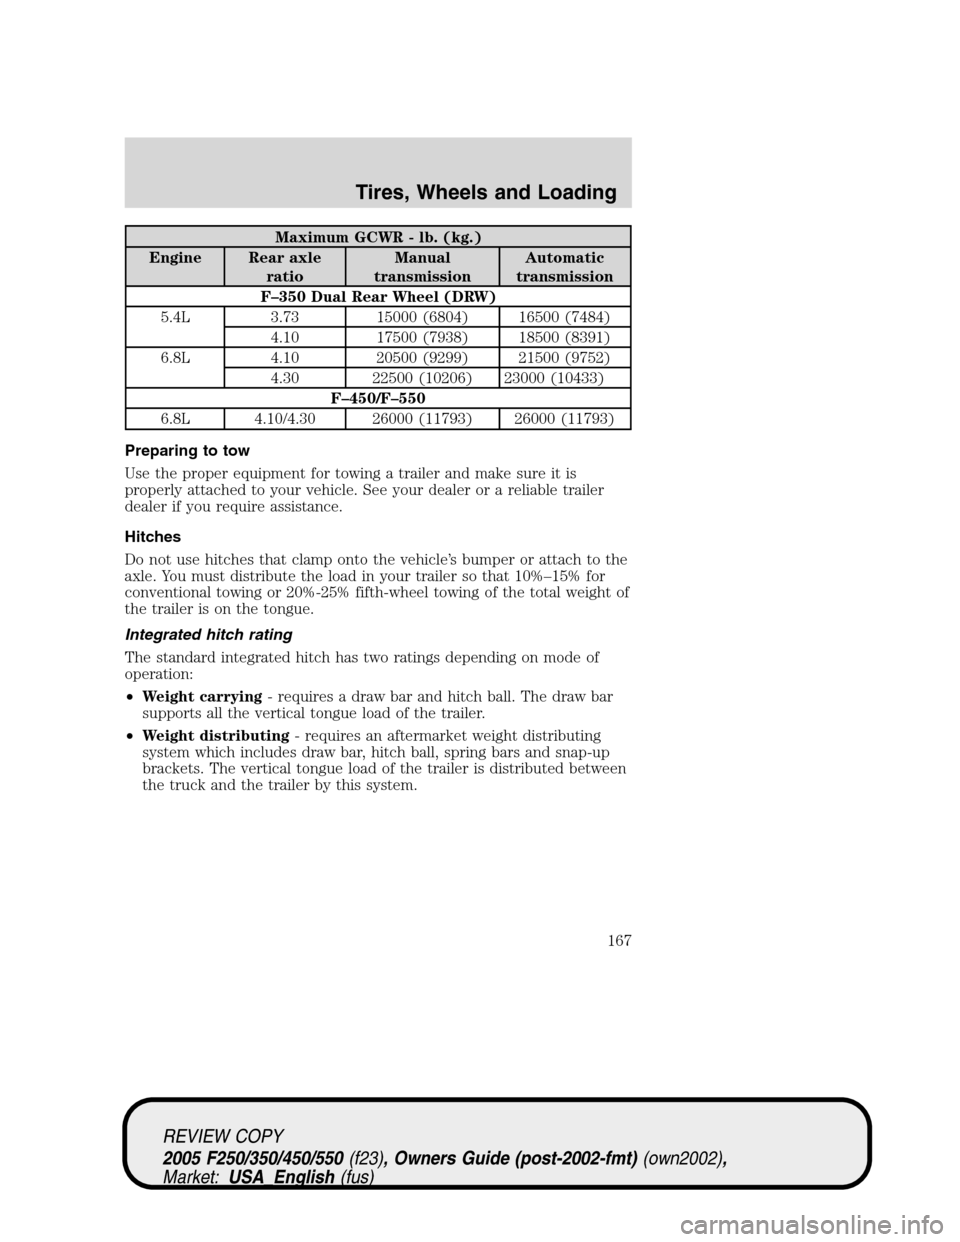
Maximum GCWR - lb. (kg.)
Engine Rear axle
ratioManual
transmissionAutomatic
transmission
F–350 Dual Rear Wheel (DRW)
5.4L 3.73 15000 (6804) 16500 (7484)
4.10 17500 (7938) 18500 (8391)
6.8L 4.10 20500 (9299) 21500 (9752)
4.30 22500 (10206) 23000 (10433)
F–450/F–550
6.8L 4.10/4.30 26000 (11793) 26000 (11793)
Preparing to tow
Use the proper equipment for towing a trailer and make sure it is
properly attached to your vehicle. See your dealer or a reliable trailer
dealer if you require assistance.
Hitches
Do not use hitches that clamp onto the vehicle’s bumper or attach to the
axle. You must distribute the load in your trailer so that 10%–15% for
conventional towing or 20%-25% fifth-wheel towing of the total weight of
the trailer is on the tongue.
Integrated hitch rating
The standard integrated hitch has two ratings depending on mode of
operation:
•Weight carrying- requires a draw bar and hitch ball. The draw bar
supports all the vertical tongue load of the trailer.
•Weight distributing- requires an aftermarket weight distributing
system which includes draw bar, hitch ball, spring bars and snap-up
brackets. The vertical tongue load of the trailer is distributed between
the truck and the trailer by this system.
REVIEW COPY
2005 F250/350/450/550(f23), Owners Guide (post-2002-fmt)(own2002),
Market:USA_English(fus)
Tires, Wheels and Loading
167
Page 173 of 304
type (All-Season or All-Terrain) or is from a different manufacturer
other than the road tires on your vehicle, your spare tire is considered
“temporary”. Consult information on the spare tire label for limitations
when using.
Servicing after towing
If you tow a trailer for long distances, your vehicle will require more
frequent service intervals. Refer to yourScheduled Maintenance Guide
for more information.
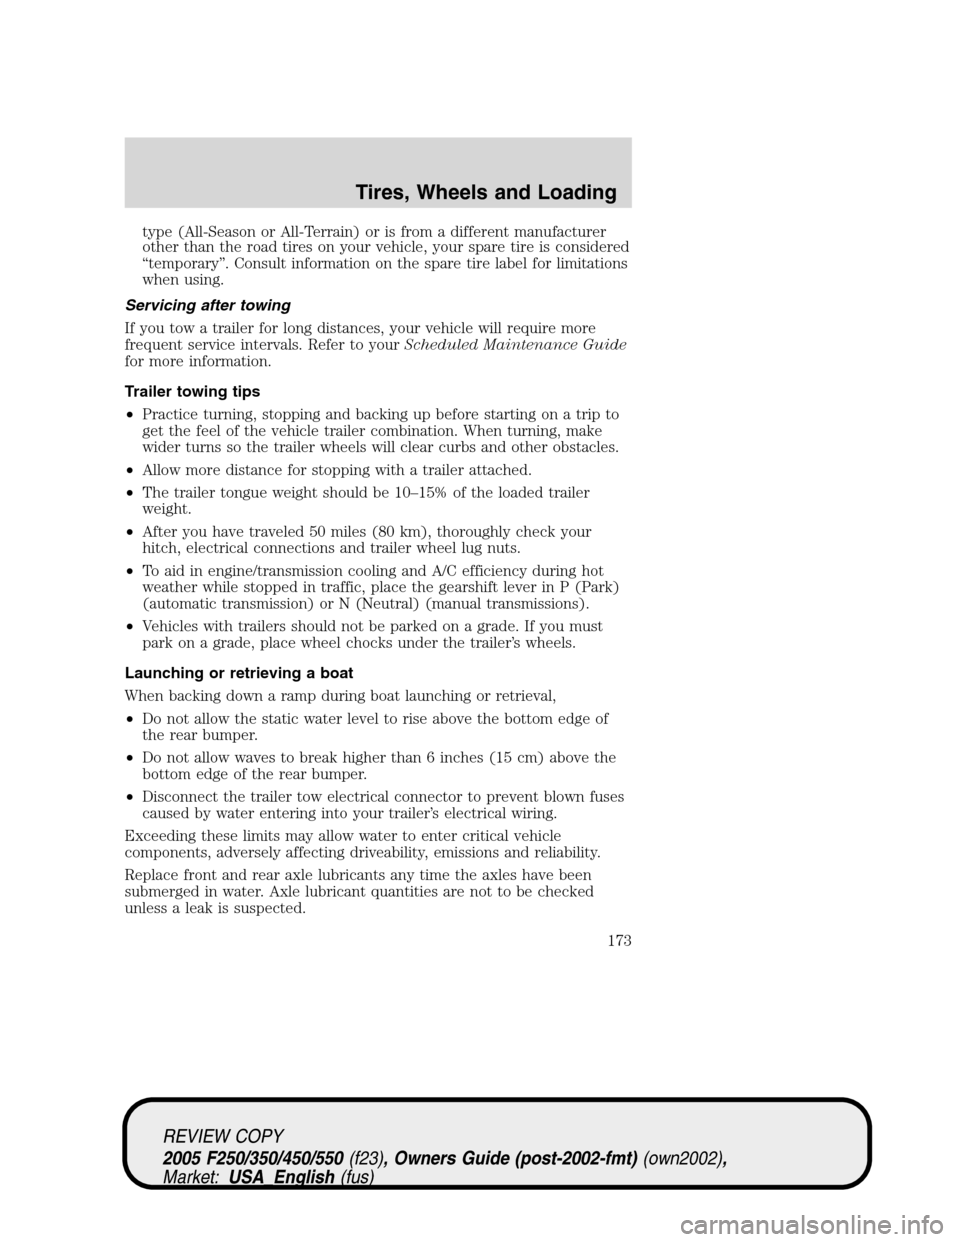
Trailer towing tips
•Practice turning, stopping and backing up before starting on a trip to
get the feel of the vehicle trailer combination. When turning, make
wider turns so the trailer wheels will clear curbs and other obstacles.
•Allow more distance for stopping with a trailer attached.
•The trailer tongue weight should be 10–15% of the loaded trailer
weight.
•After you have traveled 50 miles (80 km), thoroughly check your
hitch, electrical connections and trailer wheel lug nuts.
•To aid in engine/transmission cooling and A/C efficiency during hot
weather while stopped in traffic, place the gearshift lever in P (Park)
(automatic transmission) or N (Neutral) (manual transmissions).
•Vehicles with trailers should not be parked on a grade. If you must
park on a grade, place wheel chocks under the trailer’s wheels.
Launching or retrieving a boat
When backing down a ramp during boat launching or retrieval,
•Do not allow the static water level to rise above the bottom edge of
the rear bumper.
•Do not allow waves to break higher than 6 inches (15 cm) above the
bottom edge of the rear bumper.
•Disconnect the trailer tow electrical connector to prevent blown fuses
caused by water entering into your trailer’s electrical wiring.
Exceeding these limits may allow water to enter critical vehicle
components, adversely affecting driveability, emissions and reliability.
Replace front and rear axle lubricants any time the axles have been
submerged in water. Axle lubricant quantities are not to be checked
unless a leak is suspected.
REVIEW COPY
2005 F250/350/450/550(f23), Owners Guide (post-2002-fmt)(own2002),
Market:USA_English(fus)
Tires, Wheels and Loading
173
Page 174 of 304
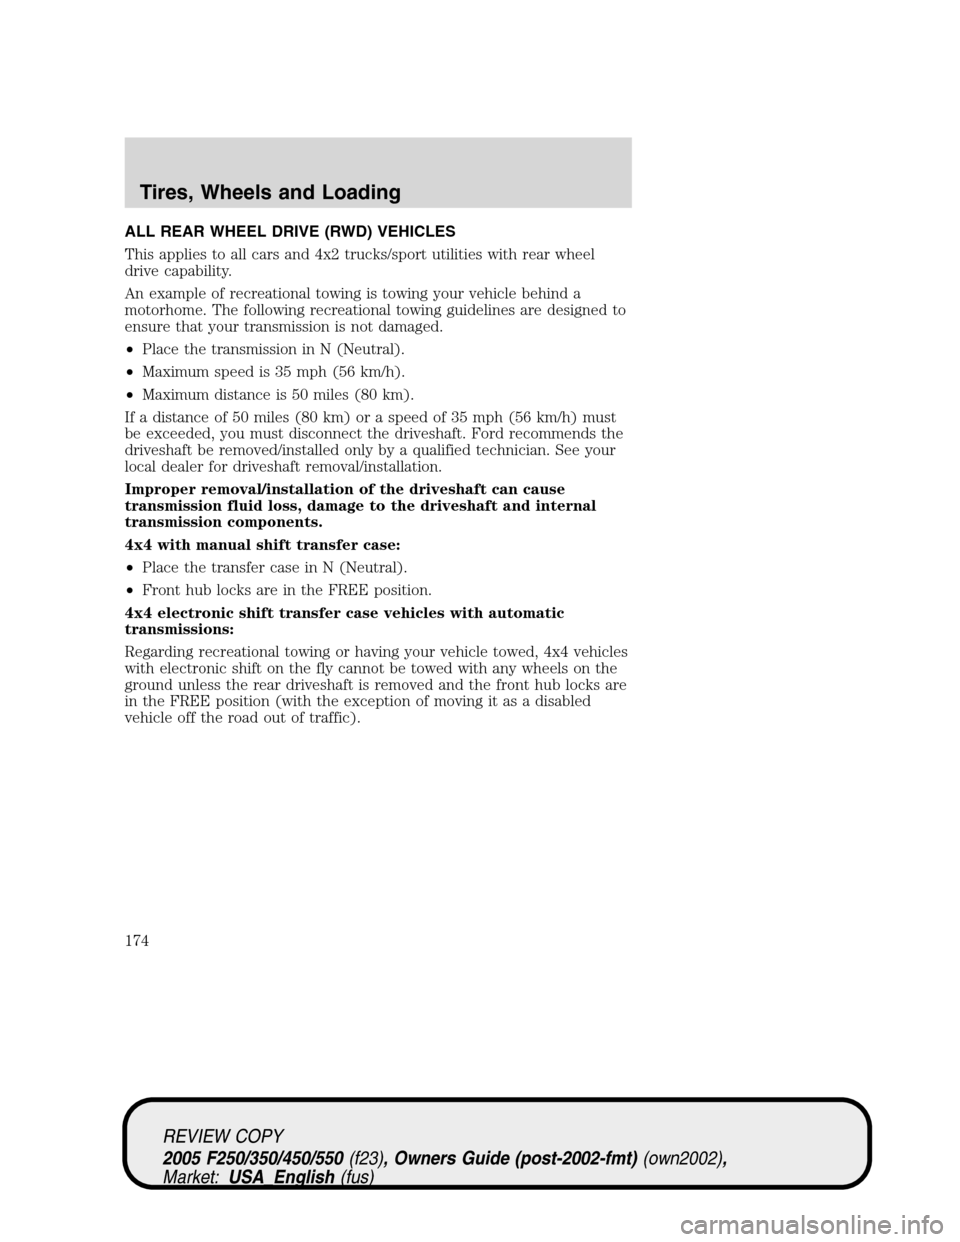
ALL REAR WHEEL DRIVE (RWD) VEHICLES
This applies to all cars and 4x2 trucks/sport utilities with rear wheel
drive capability.
An example of recreational towing is towing your vehicle behind a
motorhome. The following recreational towing guidelines are designed to
ensure that your transmission is not damaged.
•Place the transmission in N (Neutral).
•Maximum speed is 35 mph (56 km/h).
•Maximum distance is 50 miles (80 km).
If a distance of 50 miles (80 km) or a speed of 35 mph (56 km/h) must
be exceeded, you must disconnect the driveshaft. Ford recommends the
driveshaft be removed/installed only by a qualified technician. See your
local dealer for driveshaft removal/installation.
Improper removal/installation of the driveshaft can cause
transmission fluid loss, damage to the driveshaft and internal
transmission components.
4x4 with manual shift transfer case:
•Place the transfer case in N (Neutral).
•Front hub locks are in the FREE position.
4x4 electronic shift transfer case vehicles with automatic
transmissions:
Regarding recreational towing or having your vehicle towed, 4x4 vehicles
with electronic shift on the fly cannot be towed with any wheels on the
ground unless the rear driveshaft is removed and the front hub locks are
in the FREE position (with the exception of moving it as a disabled
vehicle off the road out of traffic).
REVIEW COPY
2005 F250/350/450/550(f23), Owners Guide (post-2002-fmt)(own2002),
Market:USA_English(fus)
Tires, Wheels and Loading
174
Page 175 of 304
STARTING
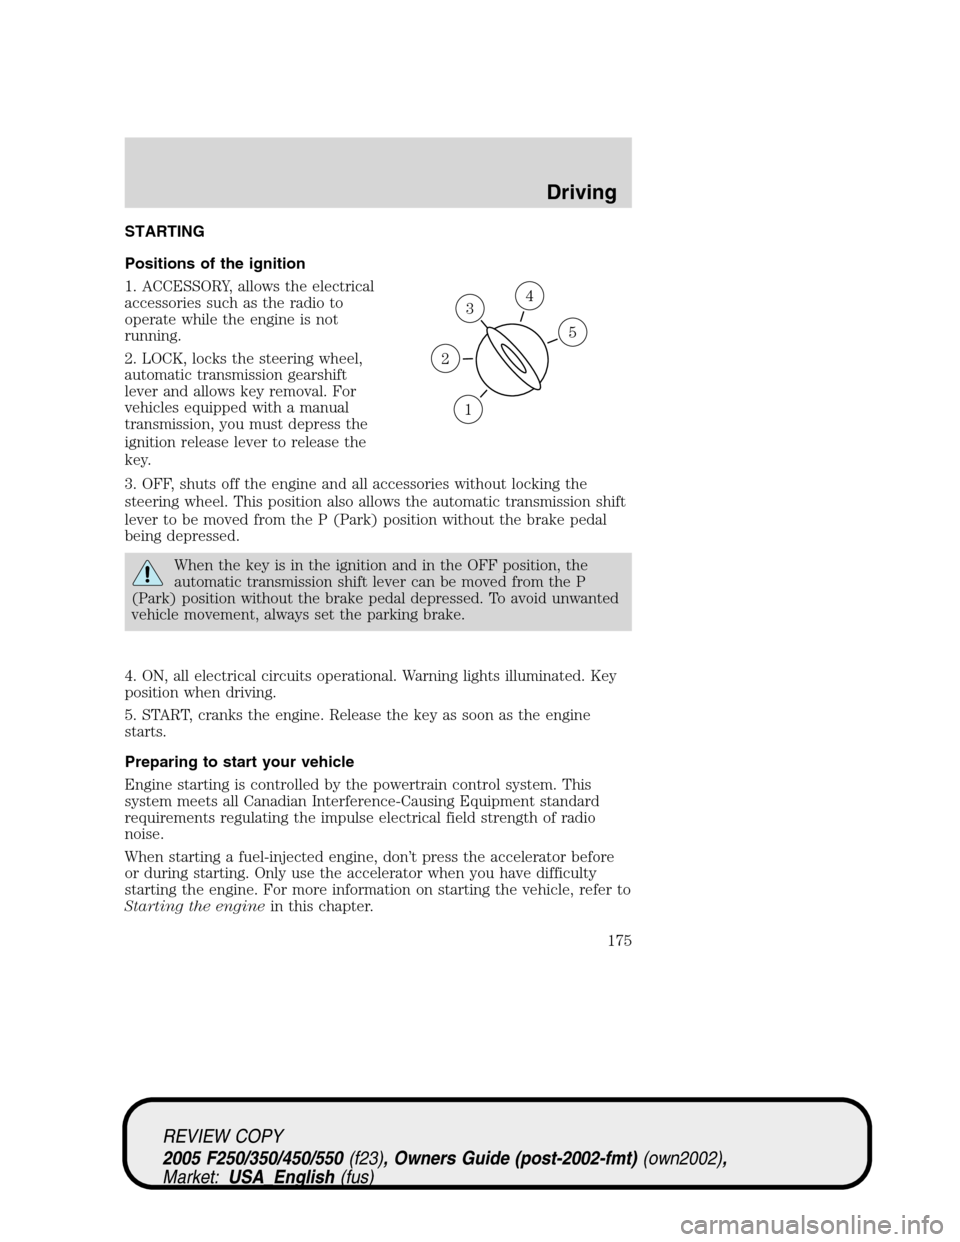
Positions of the ignition
1. ACCESSORY, allows the electrical
accessories such as the radio to
operate while the engine is not
running.
2. LOCK, locks the steering wheel,
automatic transmission gearshift
lever and allows key removal. For
vehicles equipped with a manual
transmission, you must depress the
ignition release lever to release the
key.
3. OFF, shuts off the engine and all accessories without locking the
steering wheel. This position also allows the automatic transmission shift
lever to be moved from the P (Park) position without the brake pedal
being depressed.
When the key is in the ignition and in the OFF position, the
automatic transmission shift lever can be moved from the P
(Park) position without the brake pedal depressed. To avoid unwanted
vehicle movement, always set the parking brake.
4. ON, all electrical circuits operational. Warning lights illuminated. Key
position when driving.
5. START, cranks the engine. Release the key as soon as the engine
starts.
Preparing to start your vehicle
Engine starting is controlled by the powertrain control system. This
system meets all Canadian Interference-Causing Equipment standard
requirements regulating the impulse electrical field strength of radio
noise.
When starting a fuel-injected engine, don’t press the accelerator before
or during starting. Only use the accelerator when you have difficulty
starting the engine. For more information on starting the vehicle, refer to
Starting the enginein this chapter.
3
1
2
5
4
REVIEW COPY
2005 F250/350/450/550(f23), Owners Guide (post-2002-fmt)(own2002),
Market:USA_English(fus)
Driving
Driving
175
Page 177 of 304
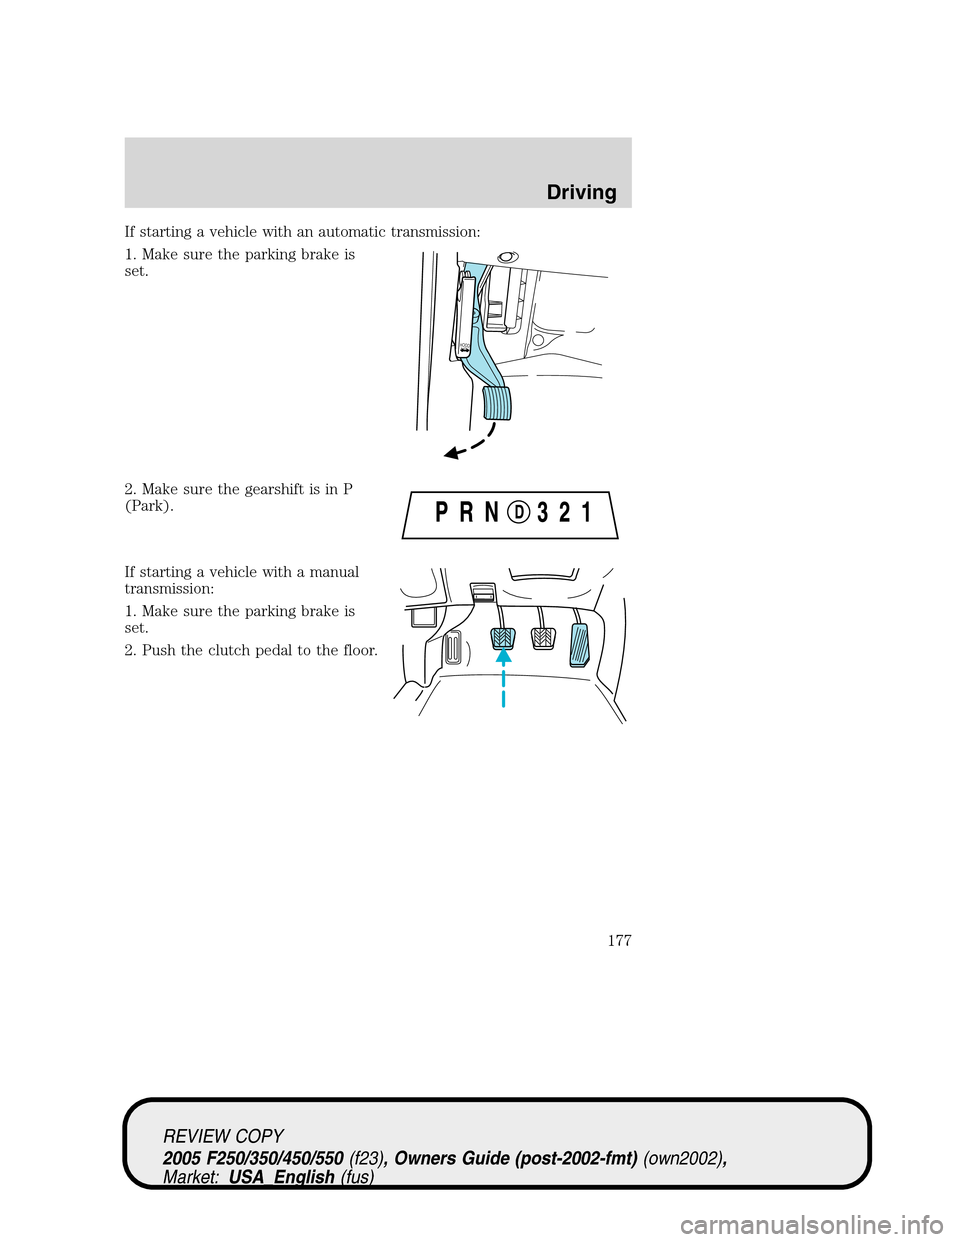
If starting a vehicle with an automatic transmission:
1. Make sure the parking brake is
set.
2. Make sure the gearshift is in P
(Park).
If starting a vehicle with a manual
transmission:
1. Make sure the parking brake is
set.
2. Push the clutch pedal to the floor.
HO
O
D
REVIEW COPY
2005 F250/350/450/550(f23), Owners Guide (post-2002-fmt)(own2002),
Market:USA_English(fus)
Driving
177