parking brake FORD SUPER DUTY 2005 1.G Owners Manual
[x] Cancel search | Manufacturer: FORD, Model Year: 2005, Model line: SUPER DUTY, Model: FORD SUPER DUTY 2005 1.GPages: 304, PDF Size: 6.38 MB
Page 13 of 304
Warning lights and gauges can alert you to a vehicle condition that may
become serious enough to cause expensive repairs. A warning light may
illuminate when a problem exists with one of your vehicle’s functions.
Many lights will illuminate when you start your vehicle to make sure the
bulbs work. If any light remains on after starting the vehicle, have the
respective system inspected immediately.
If your vehicle is equipped with a Diesel engine, it has a unique cluster,
refer toStarting the engine in your 6.0 Liter Power Stroke Direct
Injection Turbo Diesel Owner’s Guide Supplement.
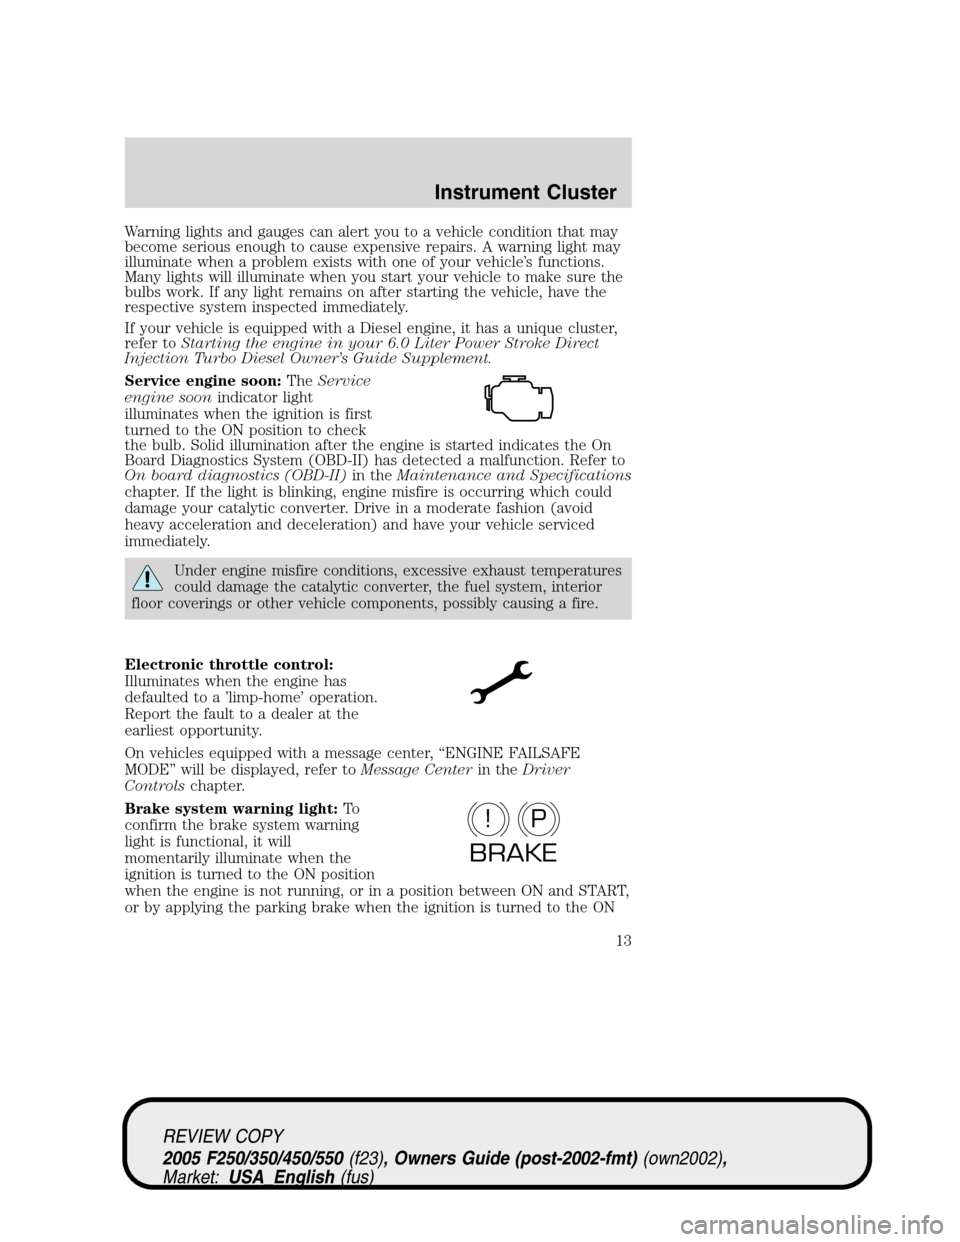
Service engine soon:TheService
engine soonindicator light
illuminates when the ignition is first
turned to the ON position to check
the bulb. Solid illumination after the engine is started indicates the On
Board Diagnostics System (OBD-II) has detected a malfunction. Refer to
On board diagnostics (OBD-II)in theMaintenance and Specifications
chapter. If the light is blinking, engine misfire is occurring which could
damage your catalytic converter. Drive in a moderate fashion (avoid
heavy acceleration and deceleration) and have your vehicle serviced
immediately.
Under engine misfire conditions, excessive exhaust temperatures
could damage the catalytic converter, the fuel system, interior
floor coverings or other vehicle components, possibly causing a fire.
Electronic throttle control:
Illuminates when the engine has
defaulted to a ’limp-home’ operation.
Report the fault to a dealer at the
earliest opportunity.
On vehicles equipped with a message center, “ENGINE FAILSAFE
MODE” will be displayed, refer toMessage Centerin theDriver
Controlschapter.
Brake system warning light:To
confirm the brake system warning
light is functional, it will
momentarily illuminate when the
ignition is turned to the ON position
when the engine is not running, or in a position between ON and START,
or by applying the parking brake when the ignition is turned to the ON
P!
BRAKE
REVIEW COPY
2005 F250/350/450/550(f23), Owners Guide (post-2002-fmt)(own2002),
Market:USA_English(fus)
Instrument Cluster
13
Page 14 of 304
position. If the brake system warning light does not illuminate at this
time, seek service immediately from your dealership. Illumination after
releasing the parking brake indicates low brake fluid level and the brake
system should be inspected immediately by your servicing dealership.
Driving a vehicle with the brake system warning light on is
dangerous. A significant decrease in braking performance may
occur. It will take you longer to stop the vehicle. Have the vehicle
checked by your dealer immediately.
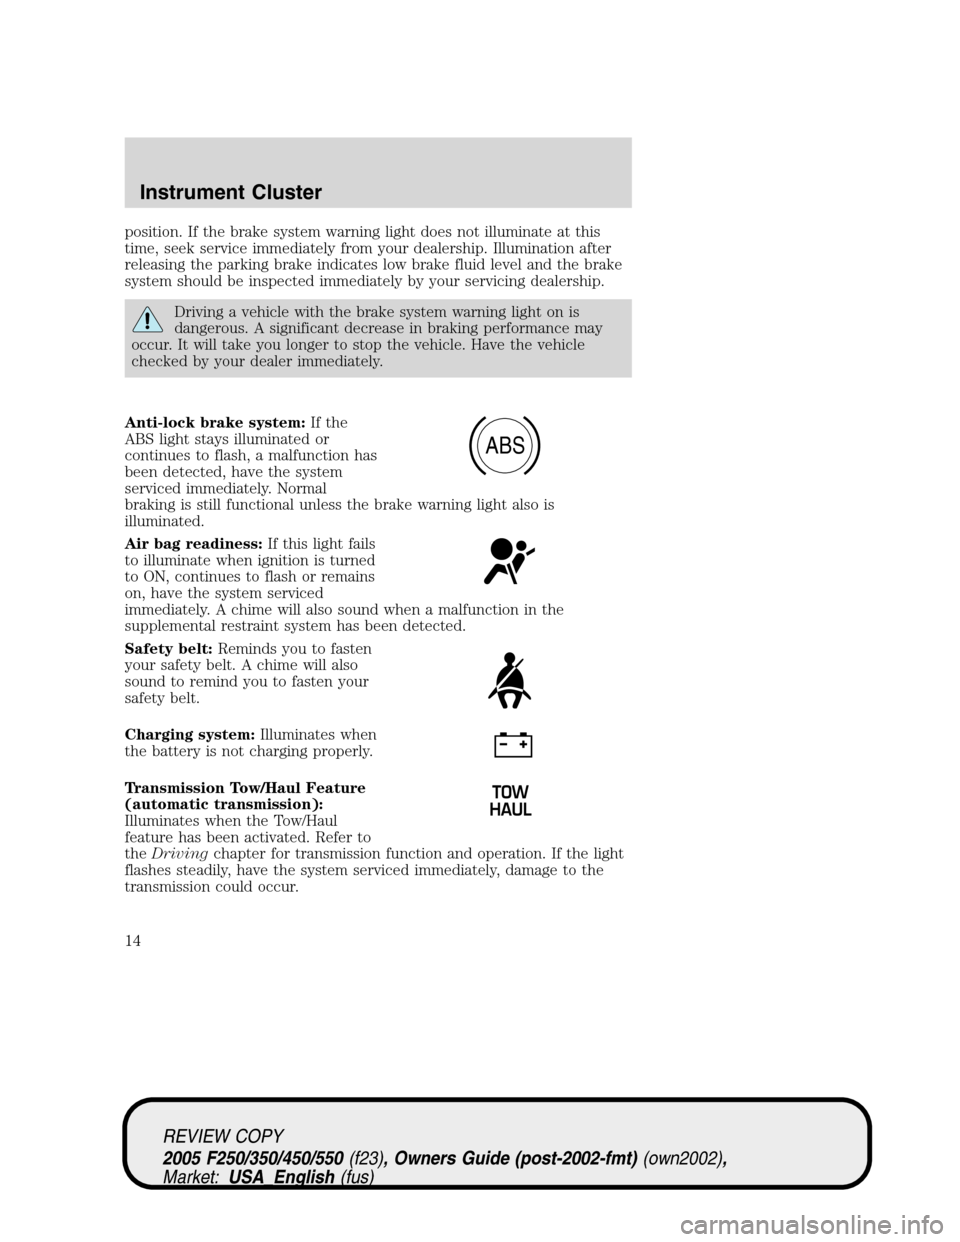
Anti-lock brake system:If the
ABS light stays illuminated or
continues to flash, a malfunction has
been detected, have the system
serviced immediately. Normal
braking is still functional unless the brake warning light also is
illuminated.
Air bag readiness:If this light fails
to illuminate when ignition is turned
to ON, continues to flash or remains
on, have the system serviced
immediately. A chime will also sound when a malfunction in the
supplemental restraint system has been detected.
Safety belt:Reminds you to fasten
your safety belt. A chime will also
sound to remind you to fasten your
safety belt.
Charging system:Illuminates when
the battery is not charging properly.
Transmission Tow/Haul Feature
(automatic transmission):
Illuminates when the Tow/Haul
feature has been activated. Refer to
theDrivingchapter for transmission function and operation. If the light
flashes steadily, have the system serviced immediately, damage to the
transmission could occur.
ABS
REVIEW COPY
2005 F250/350/450/550(f23), Owners Guide (post-2002-fmt)(own2002),
Market:USA_English(fus)
Instrument Cluster
14
Page 15 of 304
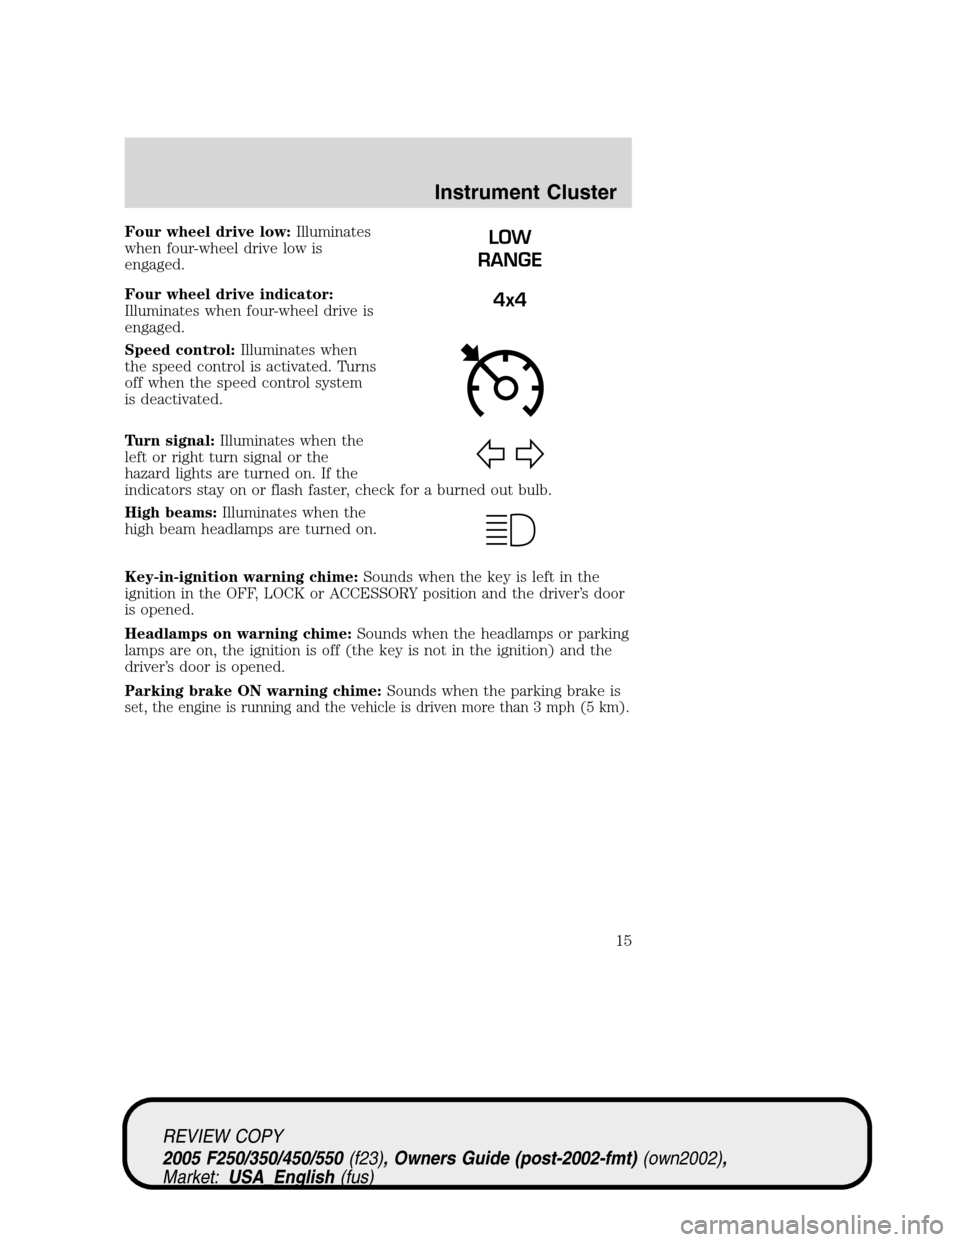
Four wheel drive low:Illuminates
when four-wheel drive low is
engaged.
Four wheel drive indicator:
Illuminates when four-wheel drive is
engaged.
Speed control:Illuminates when
the speed control is activated. Turns
off when the speed control system
is deactivated.
Turn signal:Illuminates when the
left or right turn signal or the
hazard lights are turned on. If the
indicators stay on or flash faster, check for a burned out bulb.
High beams:Illuminates when the
high beam headlamps are turned on.
Key-in-ignition warning chime:Sounds when the key is left in the
ignition in the OFF, LOCK or ACCESSORY position and the driver’s door
is opened.
Headlamps on warning chime:Sounds when the headlamps or parking
lamps are on, the ignition is off (the key is not in the ignition) and the
driver’s door is opened.
Parking brake ON warning chime:Sounds when the parking brake is
set, the engine is running and the vehicle is driven more than 3 mph (5 km).
LOW
RANGE
4x4
REVIEW COPY
2005 F250/350/450/550(f23), Owners Guide (post-2002-fmt)(own2002),
Market:USA_English(fus)
Instrument Cluster
15
Page 41 of 304
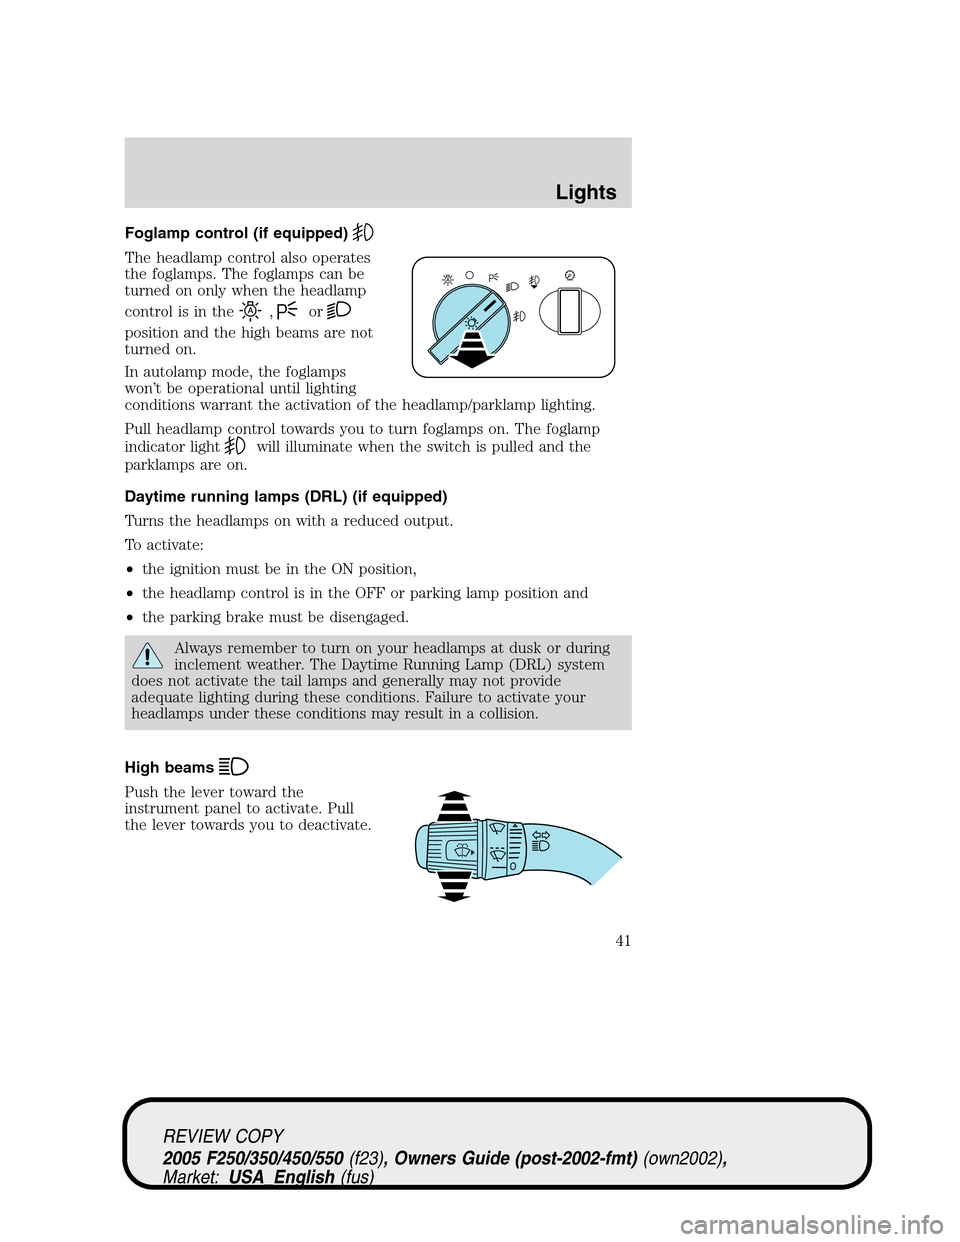
Foglamp control (if equipped)
The headlamp control also operates
the foglamps. The foglamps can be
turned on only when the headlamp
control is in the
,or
position and the high beams are not
turned on.
In autolamp mode, the foglamps
won’t be operational until lighting
conditions warrant the activation of the headlamp/parklamp lighting.
Pull headlamp control towards you to turn foglamps on. The foglamp
indicator light
will illuminate when the switch is pulled and the
parklamps are on.
Daytime running lamps (DRL) (if equipped)
Turns the headlamps on with a reduced output.
To activate:
•the ignition must be in the ON position,
•the headlamp control is in the OFF or parking lamp position and
•the parking brake must be disengaged.
Always remember to turn on your headlamps at dusk or during
inclement weather. The Daytime Running Lamp (DRL) system
does not activate the tail lamps and generally may not provide
adequate lighting during these conditions. Failure to activate your
headlamps under these conditions may result in a collision.
High beams
Push the lever toward the
instrument panel to activate. Pull
the lever towards you to deactivate.
REVIEW COPY
2005 F250/350/450/550(f23), Owners Guide (post-2002-fmt)(own2002),
Market:USA_English(fus)
Lights
41
Page 106 of 304
Reasons given... Consider...
“The people I’m with don’t
wear belts”Set the example, teen deaths occur 4
times more often in vehicles with
TWO or MORE people. Children and
younger brothers/sisters imitate
behavior they see.
“I have an air bag” Air bags offer greater protection when
used with safety belts. Frontal airbags
are not designed to inflate in rear and
side crashes or rollovers.
“I’d rather be thrown clear” Not a good idea.Peoplewho are
ejected are 40 times more likely
to DIE.Safety belts help prevent
ejection, WE CAN’T “PICK OUR
CRASH”.
Do not sit on top of a buckled safety belt to avoid the Belt
Minder chime. Sitting on the safety belt will increase the risk of
injury in an accident. To disable (one-time) or deactivate the Belt
Minder feature please follow the directions stated below.
One time disable
Any time the safety belt is buckled and then unbuckled during an
ignition ON cycle, the BeltMinder will be disabled for that ignition cycle
only.
Deactivating/activating the BeltMinder feature
Read steps1-5thoroughly before proceeding with the
deactivation/activation programming procedure.
The BeltMinder feature can be deactivated/activated by performing the
following procedure:
Before following the procedure, make sure that:
•the parking brake is set
•the gearshift is in P (Park) (automatic transmission)
•the ignition switch is in the OFF position
•all vehicle doors are closed
•the driver’s safety belt is unbuckled
REVIEW COPY
2005 F250/350/450/550(f23), Owners Guide (post-2002-fmt)(own2002),
Market:USA_English(fus)
Seating and Safety Restraints
106
Page 141 of 304
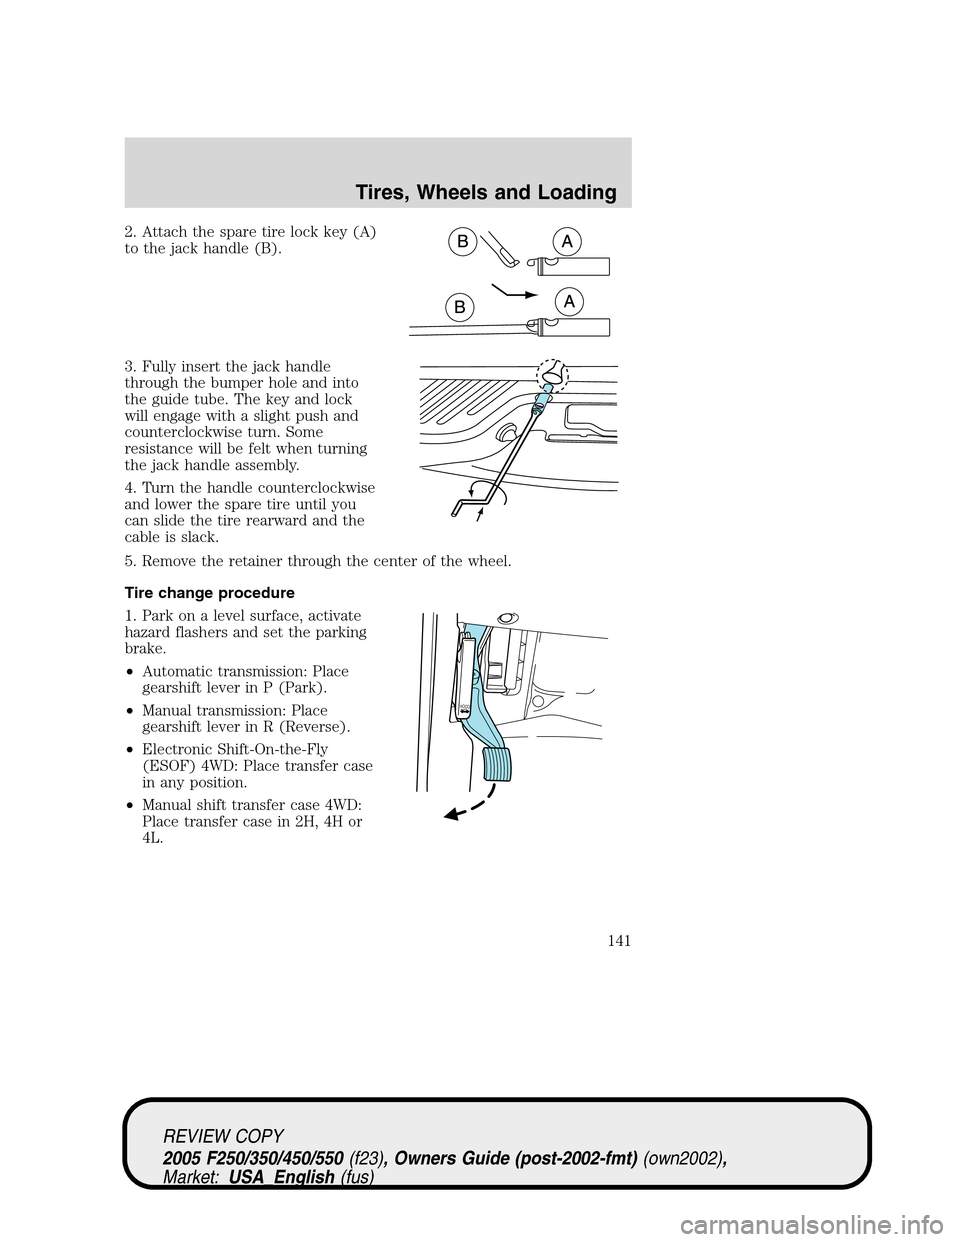
2. Attach the spare tire lock key (A)
to the jack handle (B).
3. Fully insert the jack handle
through the bumper hole and into
the guide tube. The key and lock
will engage with a slight push and
counterclockwise turn. Some
resistance will be felt when turning
the jack handle assembly.
4. Turn the handle counterclockwise
and lower the spare tire until you
can slide the tire rearward and the
cable is slack.
5. Remove the retainer through the center of the wheel.
Tire change procedure
1. Park on a level surface, activate
hazard flashers and set the parking
brake.
•Automatic transmission: Place
gearshift lever in P (Park).
•Manual transmission: Place
gearshift lever in R (Reverse).
•Electronic Shift-On-the-Fly
(ESOF) 4WD: Place transfer case
in any position.
•Manual shift transfer case 4WD:
Place transfer case in 2H, 4H or
4L.
HO
O
D
REVIEW COPY
2005 F250/350/450/550(f23), Owners Guide (post-2002-fmt)(own2002),
Market:USA_English(fus)
Tires, Wheels and Loading
141
Page 142 of 304
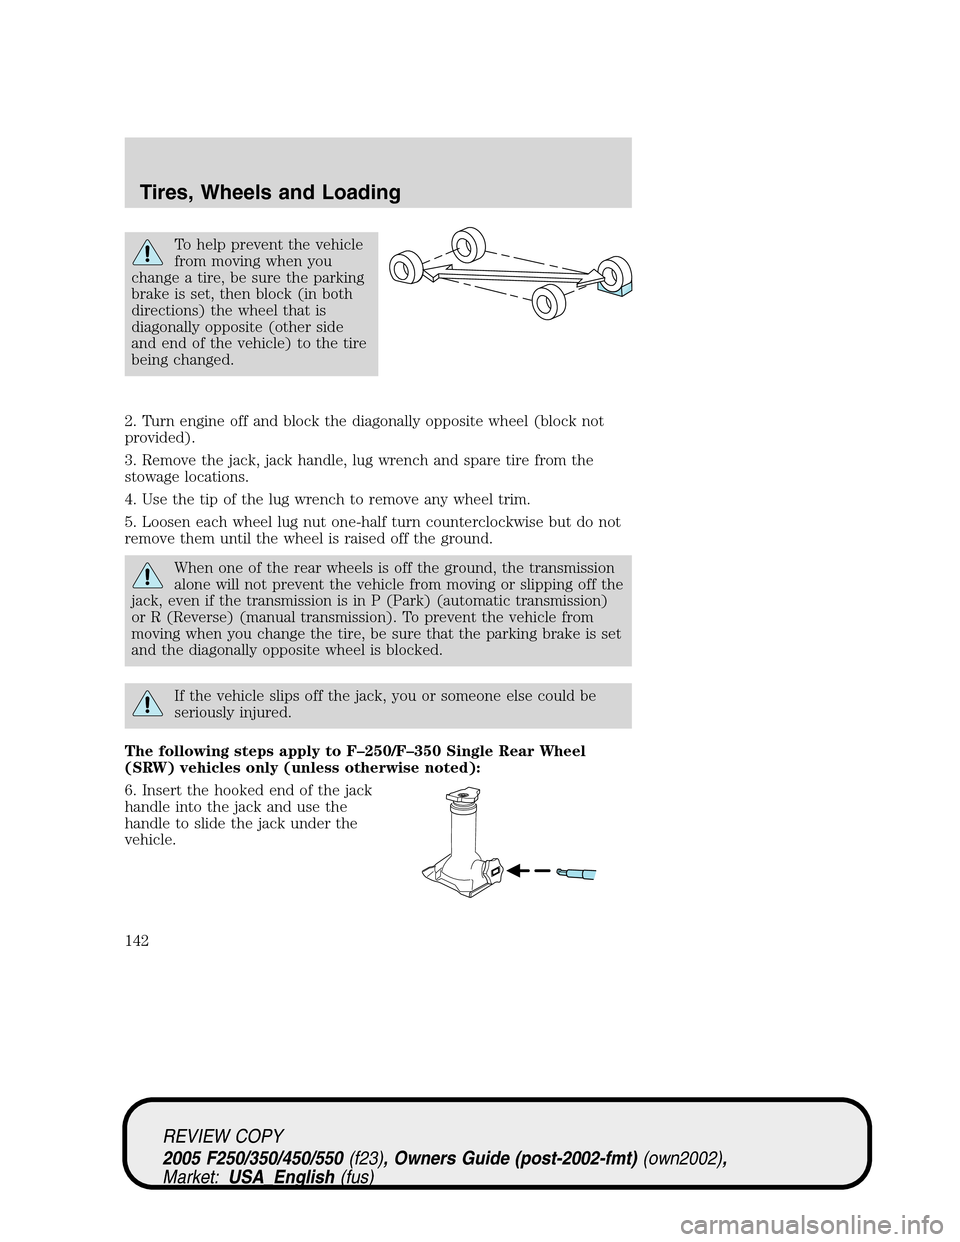
To help prevent the vehicle
from moving when you
change a tire, be sure the parking
brake is set, then block (in both
directions) the wheel that is
diagonally opposite (other side
and end of the vehicle) to the tire
being changed.
2. Turn engine off and block the diagonally opposite wheel (block not
provided).
3. Remove the jack, jack handle, lug wrench and spare tire from the
stowage locations.
4. Use the tip of the lug wrench to remove any wheel trim.
5. Loosen each wheel lug nut one-half turn counterclockwise but do not
remove them until the wheel is raised off the ground.
When one of the rear wheels is off the ground, the transmission
alone will not prevent the vehicle from moving or slipping off the
jack, even if the transmission is in P (Park) (automatic transmission)
or R (Reverse) (manual transmission). To prevent the vehicle from
moving when you change the tire, be sure that the parking brake is set
and the diagonally opposite wheel is blocked.
If the vehicle slips off the jack, you or someone else could be
seriously injured.
The following steps apply to F–250/F–350 Single Rear Wheel
(SRW) vehicles only (unless otherwise noted):
6. Insert the hooked end of the jack
handle into the jack and use the
handle to slide the jack under the
vehicle.
REVIEW COPY
2005 F250/350/450/550(f23), Owners Guide (post-2002-fmt)(own2002),
Market:USA_English(fus)
Tires, Wheels and Loading
142
Page 175 of 304
STARTING
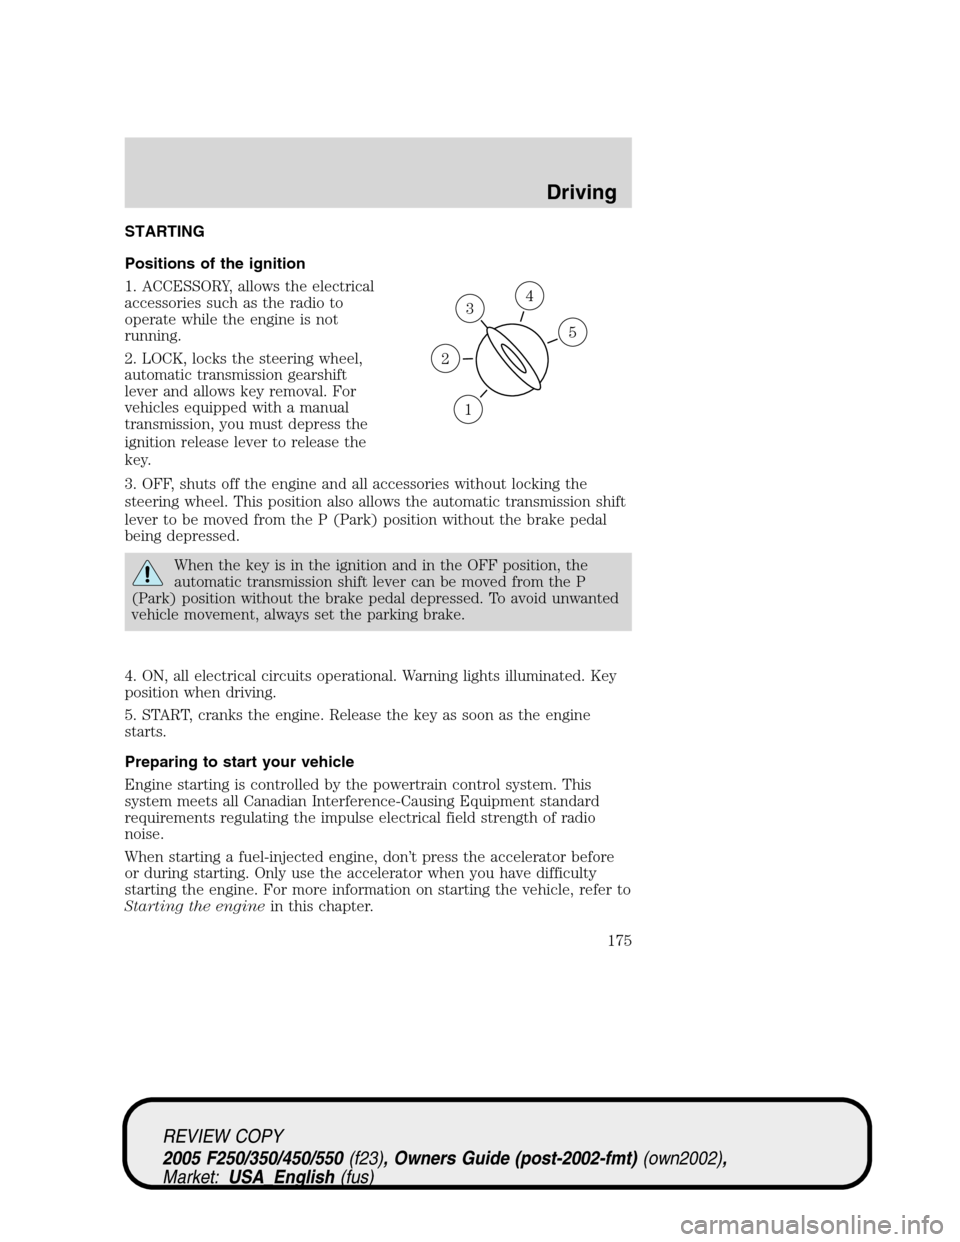
Positions of the ignition
1. ACCESSORY, allows the electrical
accessories such as the radio to
operate while the engine is not
running.
2. LOCK, locks the steering wheel,
automatic transmission gearshift
lever and allows key removal. For
vehicles equipped with a manual
transmission, you must depress the
ignition release lever to release the
key.
3. OFF, shuts off the engine and all accessories without locking the
steering wheel. This position also allows the automatic transmission shift
lever to be moved from the P (Park) position without the brake pedal
being depressed.
When the key is in the ignition and in the OFF position, the
automatic transmission shift lever can be moved from the P
(Park) position without the brake pedal depressed. To avoid unwanted
vehicle movement, always set the parking brake.
4. ON, all electrical circuits operational. Warning lights illuminated. Key
position when driving.
5. START, cranks the engine. Release the key as soon as the engine
starts.
Preparing to start your vehicle
Engine starting is controlled by the powertrain control system. This
system meets all Canadian Interference-Causing Equipment standard
requirements regulating the impulse electrical field strength of radio
noise.
When starting a fuel-injected engine, don’t press the accelerator before
or during starting. Only use the accelerator when you have difficulty
starting the engine. For more information on starting the vehicle, refer to
Starting the enginein this chapter.
3
1
2
5
4
REVIEW COPY
2005 F250/350/450/550(f23), Owners Guide (post-2002-fmt)(own2002),
Market:USA_English(fus)
Driving
Driving
175
Page 177 of 304
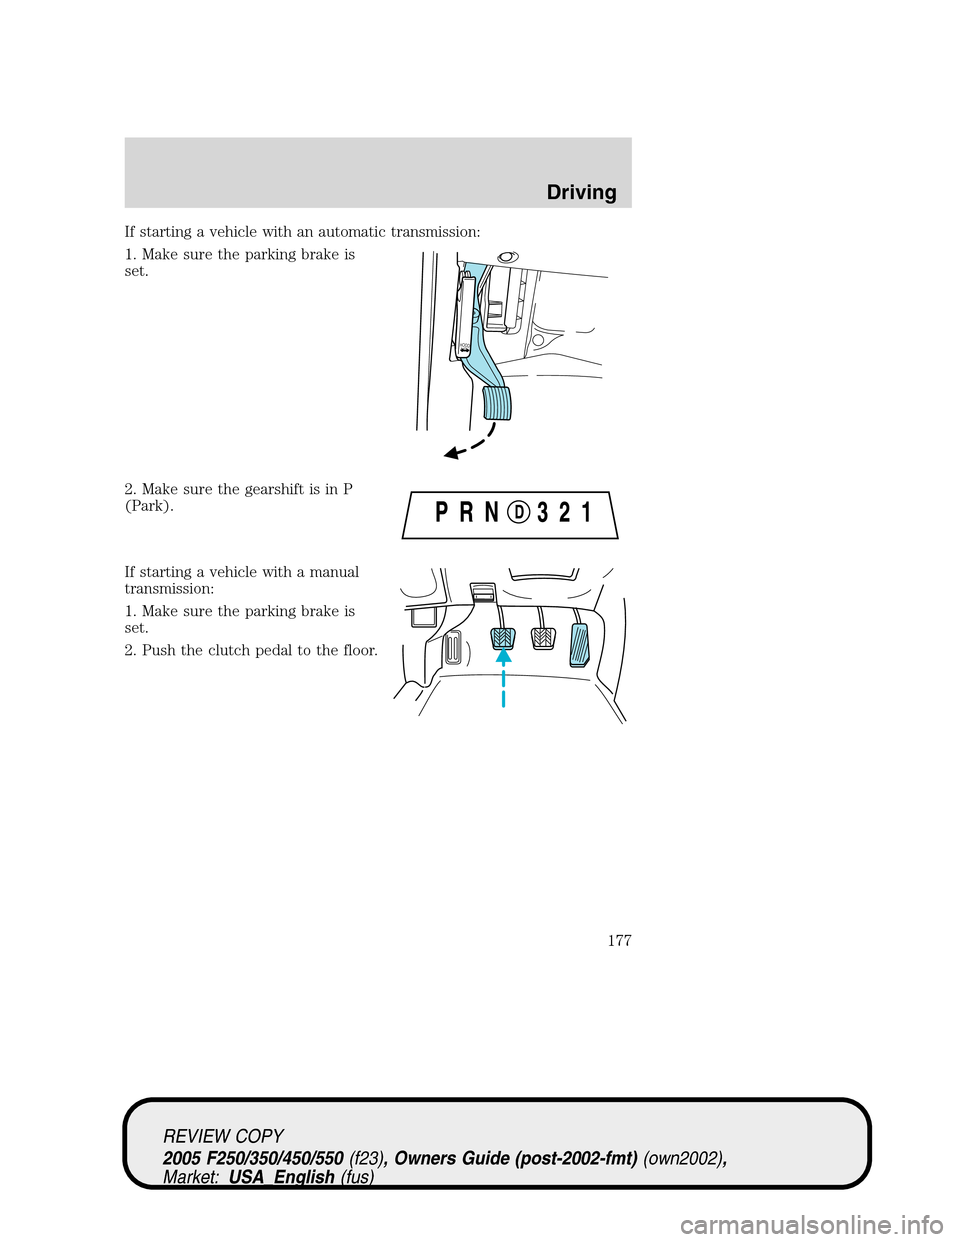
If starting a vehicle with an automatic transmission:
1. Make sure the parking brake is
set.
2. Make sure the gearshift is in P
(Park).
If starting a vehicle with a manual
transmission:
1. Make sure the parking brake is
set.
2. Push the clutch pedal to the floor.
HO
O
D
REVIEW COPY
2005 F250/350/450/550(f23), Owners Guide (post-2002-fmt)(own2002),
Market:USA_English(fus)
Driving
177
Page 181 of 304
BRAKES
Occasional brake noise is normal. If a metal-to-metal, continuous grinding
or continuous squeal sound is present, the brake linings may be worn-out
and should be inspected by a qualified service technician. If the vehicle
has continuous vibration or shudder in the steering wheel while braking,
the vehicle should be inspected by a qualified service technician.
Refer toBrake system warning
lightin theInstrument Cluster
chapter for information on the brake
system warning light.
Four-wheel anti-lock brake system (ABS)
Your vehicle is equipped with an Anti-lock Braking System (ABS). This
system helps you maintain steering control during emergency stops by
keeping the brakes from locking. Noise from the ABS pump motor and
brake pedal pulsation may be observed during ABS braking and the
brake pedal may suddenly travel a little further as soon as ABS braking
is done and normal brake operation resumes. These are normal
characteristics of the ABS and should be no reason for concern.
ABS warning lamp
The ABS lamp in the instrument
cluster momentarily illuminates
when the ignition is turned on. If
the light does not illuminate during
start up, remains on or flashes, the
ABS may be disabled and may need to be serviced.
Even when the ABS is disabled,
normal braking is still effective. (If
your BRAKE warning lamp
illuminates with the parking brake
released, have your brake system
serviced immediately.)
Using ABS
When hard braking is required, apply continuous force on the brake
pedal; do not pump the brake pedal since this will reduce the
effectiveness of the ABS and will increase your vehicle’s stopping
distance. The ABS will be activated immediately, allowing you to retain
full steering control during hard braking and on slippery surfaces.
However, the ABS does not decrease stopping distance.
P!
BRAKE
ABS
P!
BRAKE
REVIEW COPY
2005 F250/350/450/550(f23), Owners Guide (post-2002-fmt)(own2002),
Market:USA_English(fus)
Driving
181