FORD SUPER DUTY 2006 1.G Owners Manual
Manufacturer: FORD, Model Year: 2006, Model line: SUPER DUTY, Model: FORD SUPER DUTY 2006 1.GPages: 312, PDF Size: 3.25 MB
Page 211 of 312
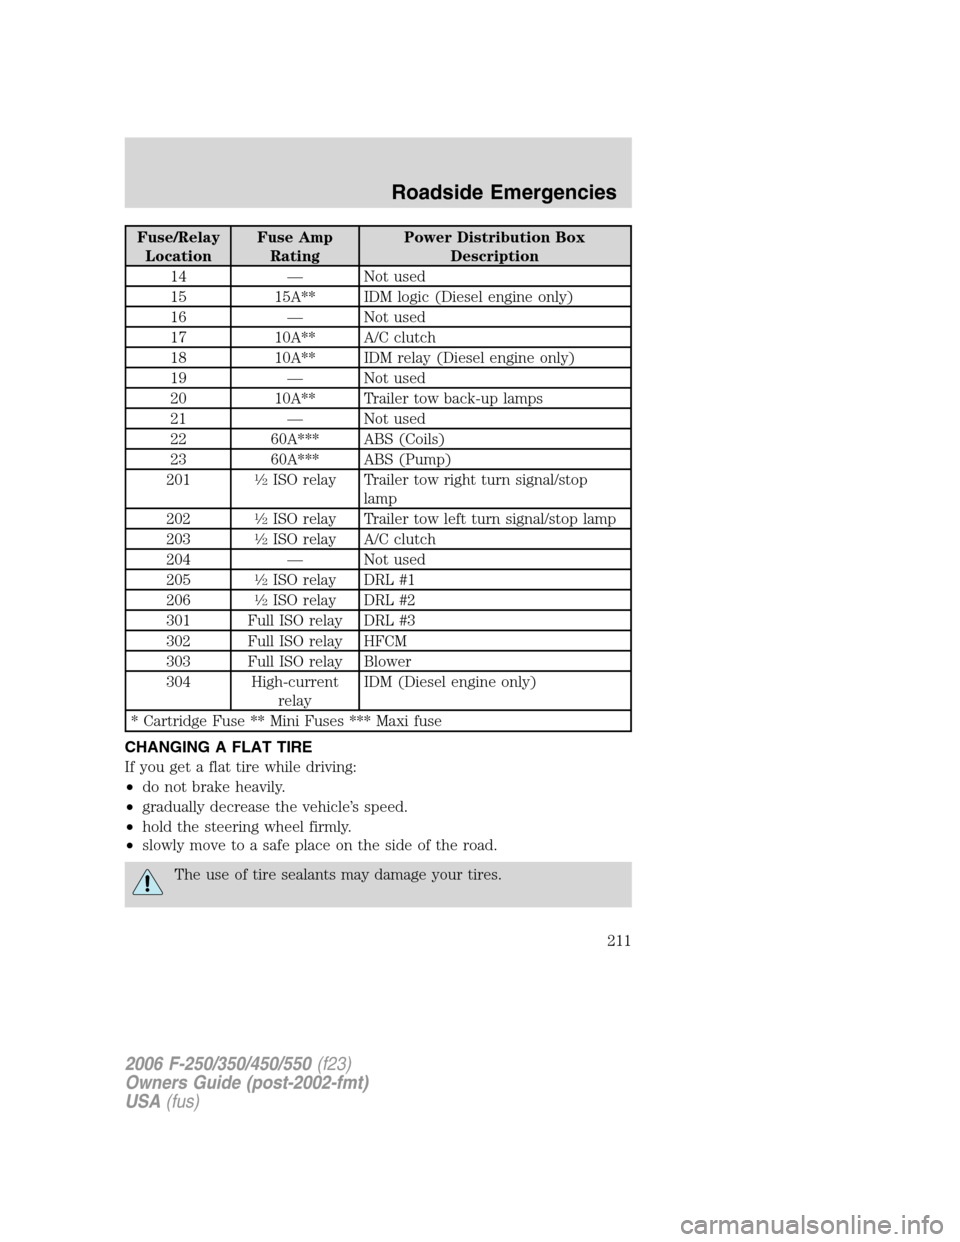
Fuse/Relay
LocationFuse Amp
RatingPower Distribution Box
Description
14 — Not used
15 15A** IDM logic (Diesel engine only)
16 — Not used
17 10A** A/C clutch
18 10A** IDM relay (Diesel engine only)
19 — Not used
20 10A** Trailer tow back-up lamps
21 — Not used
22 60A*** ABS (Coils)
23 60A*** ABS (Pump)
201
1�2ISO relay Trailer tow right turn signal/stop
lamp
202
1�2ISO relay Trailer tow left turn signal/stop lamp
203
1�2ISO relay A/C clutch
204 — Not used
205
1�2ISO relay DRL #1
206
1�2ISO relay DRL #2
301 Full ISO relay DRL #3
302 Full ISO relay HFCM
303 Full ISO relay Blower
304 High-current
relayIDM (Diesel engine only)
* Cartridge Fuse ** Mini Fuses *** Maxi fuse
CHANGING A FLAT TIRE
If you get a flat tire while driving:
•do not brake heavily.
•gradually decrease the vehicle’s speed.
•hold the steering wheel firmly.
•slowly move to a safe place on the side of the road.
The use of tire sealants may damage your tires.
2006 F-250/350/450/550(f23)
Owners Guide (post-2002-fmt)
USA(fus)
Roadside Emergencies
211
Page 212 of 312
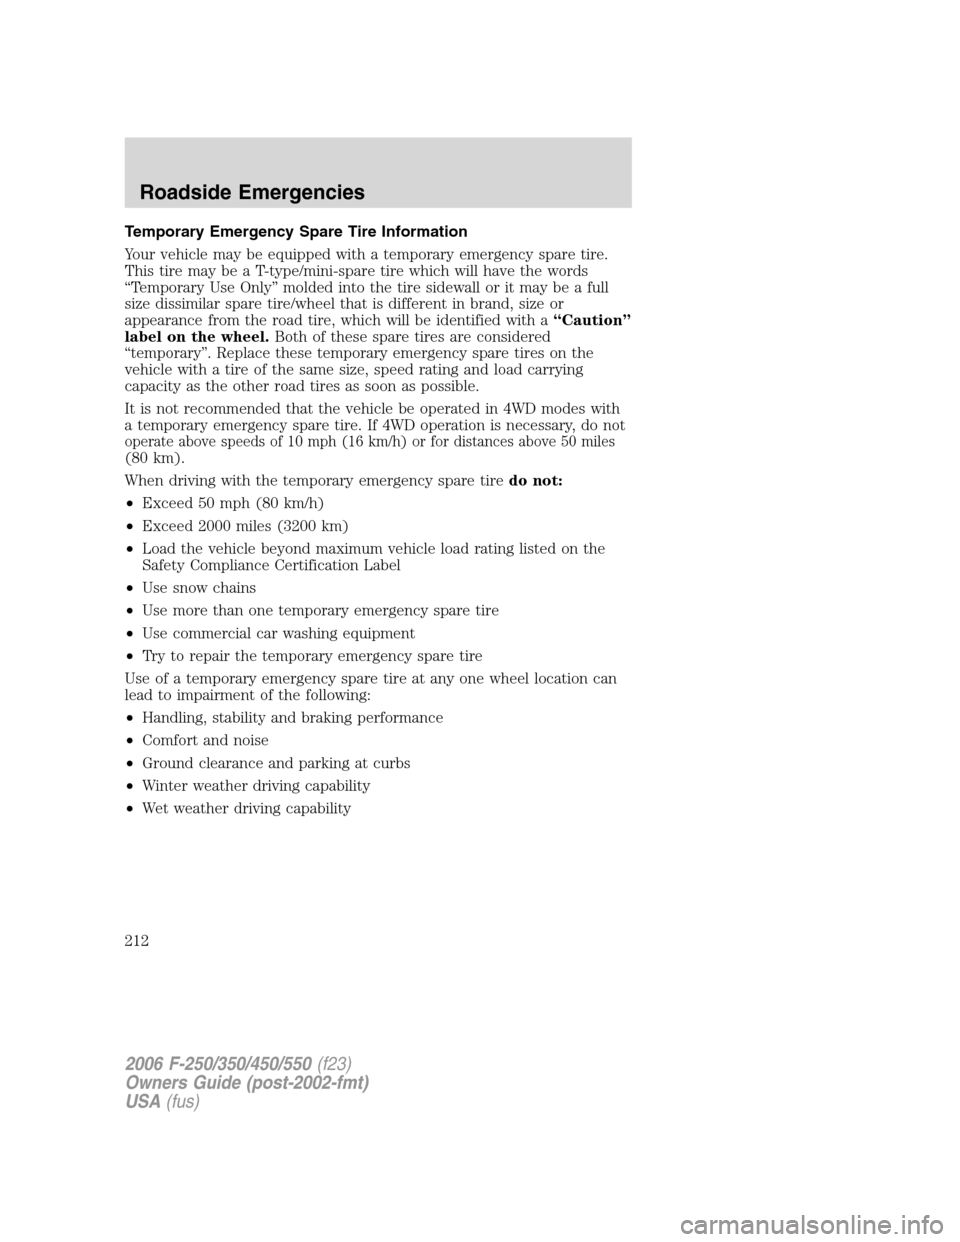
Temporary Emergency Spare Tire Information
Your vehicle may be equipped with a temporary emergency spare tire.
This tire may be a T-type/mini-spare tire which will have the words
“Temporary Use Only” molded into the tire sidewall or it may be a full
size dissimilar spare tire/wheel that is different in brand, size or
appearance from the road tire, which will be identified with a“Caution”
label on the wheel. Both of these spare tires are considered
“temporary”. Replace these temporary emergency spare tires on the
vehicle with a tire of the same size, speed rating and load carrying
capacity as the other road tires as soon as possible.
It is not recommended that the vehicle be operated in 4WD modes with
a temporary emergency spare tire. If 4WD operation is necessary, do not
operate above speeds of 10 mph (16 km/h) or for distances above 50 miles
(80 km).
When driving with the temporary emergency spare tire do not:
• Exceed 50 mph (80 km/h)
• Exceed 2000 miles (3200 km)
• Load the vehicle beyond maximum vehicle load rating listed on the
Safety Compliance Certification Label
• Use snow chains
• Use more than one temporary emergency spare tire
• Use commercial car washing equipment
• Try to repair the temporary emergency spare tire
Use of a temporary emergency spare tire at any one wheel location can
lead to impairment of the following:
• Handling, stability and braking performance
• Comfort and noise
• Ground clearance and parking at curbs
• Winter weather driving capability
• Wet weather driving capability
2006 F-250/350/450/550 (f23)
Owners Guide (post-2002-fmt)
USA (fus)
Roadside Emergencies
212
Page 213 of 312
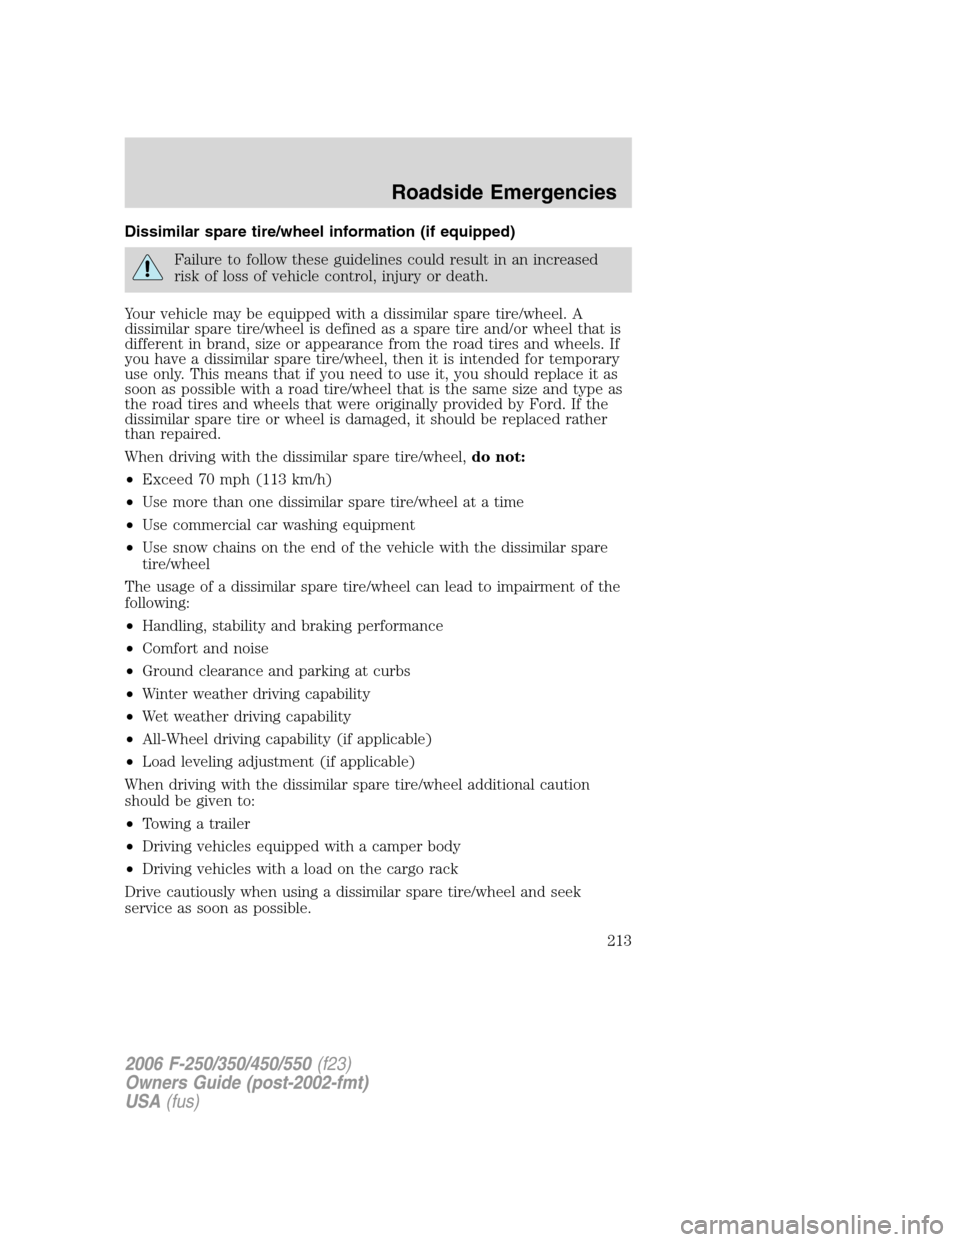
Dissimilar spare tire/wheel information (if equipped)
Failure to follow these guidelines could result in an increased
risk of loss of vehicle control, injury or death.
Your vehicle may be equipped with a dissimilar spare tire/wheel. A
dissimilar spare tire/wheel is defined as a spare tire and/or wheel that is
different in brand, size or appearance from the road tires and wheels. If
you have a dissimilar spare tire/wheel, then it is intended for temporary
use only. This means that if you need to use it, you should replace it as
soon as possible with a road tire/wheel that is the same size and type as
the road tires and wheels that were originally provided by Ford. If the
dissimilar spare tire or wheel is damaged, it should be replaced rather
than repaired.
When driving with the dissimilar spare tire/wheel,do not:
•Exceed 70 mph (113 km/h)
•Use more than one dissimilar spare tire/wheel at a time
•Use commercial car washing equipment
•Use snow chains on the end of the vehicle with the dissimilar spare
tire/wheel
The usage of a dissimilar spare tire/wheel can lead to impairment of the
following:
•Handling, stability and braking performance
•Comfort and noise
•Ground clearance and parking at curbs
•Winter weather driving capability
•Wet weather driving capability
•All-Wheel driving capability (if applicable)
•Load leveling adjustment (if applicable)
When driving with the dissimilar spare tire/wheel additional caution
should be given to:
•Towing a trailer
•Driving vehicles equipped with a camper body
•Driving vehicles with a load on the cargo rack
Drive cautiously when using a dissimilar spare tire/wheel and seek
service as soon as possible.
2006 F-250/350/450/550(f23)
Owners Guide (post-2002-fmt)
USA(fus)
Roadside Emergencies
213
Page 214 of 312
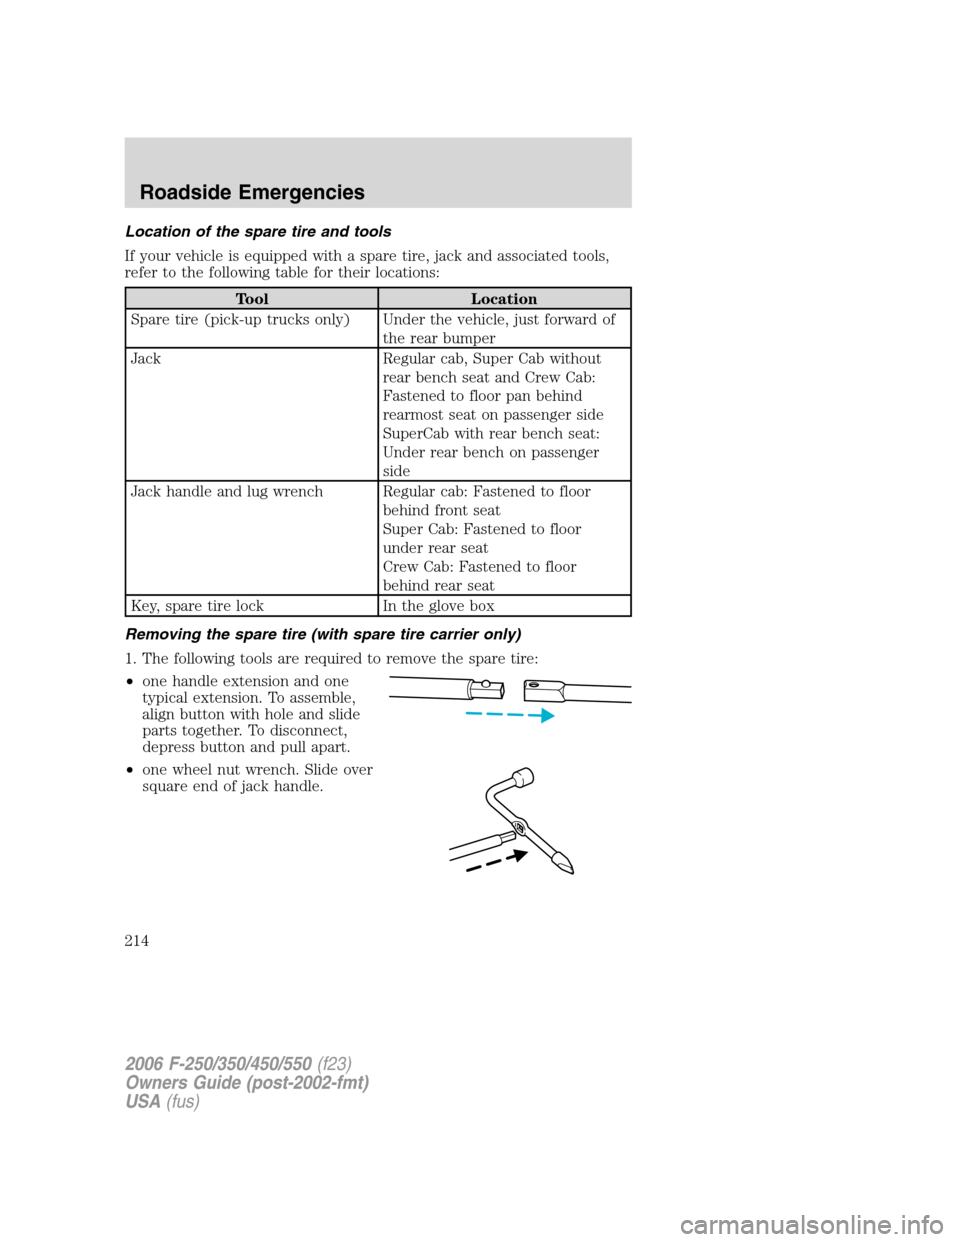
Location of the spare tire and tools
If your vehicle is equipped with a spare tire, jack and associated tools,
refer to the following table for their locations:
Tool Location
Spare tire (pick-up trucks only) Under the vehicle, just forward of
the rear bumper
Jack Regular cab, Super Cab without
rear bench seat and Crew Cab:
Fastened to floor pan behind
rearmost seat on passenger side
SuperCab with rear bench seat:
Under rear bench on passenger
side
Jack handle and lug wrench Regular cab: Fastened to floor
behind front seat
Super Cab: Fastened to floor
under rear seat
Crew Cab: Fastened to floor
behind rear seat
Key, spare tire lock In the glove box
Removing the spare tire (with spare tire carrier only)
1. The following tools are required to remove the spare tire:
•one handle extension and one
typical extension. To assemble,
align button with hole and slide
parts together. To disconnect,
depress button and pull apart.
•one wheel nut wrench. Slide over
square end of jack handle.
2006 F-250/350/450/550(f23)
Owners Guide (post-2002-fmt)
USA(fus)
Roadside Emergencies
214
Page 215 of 312
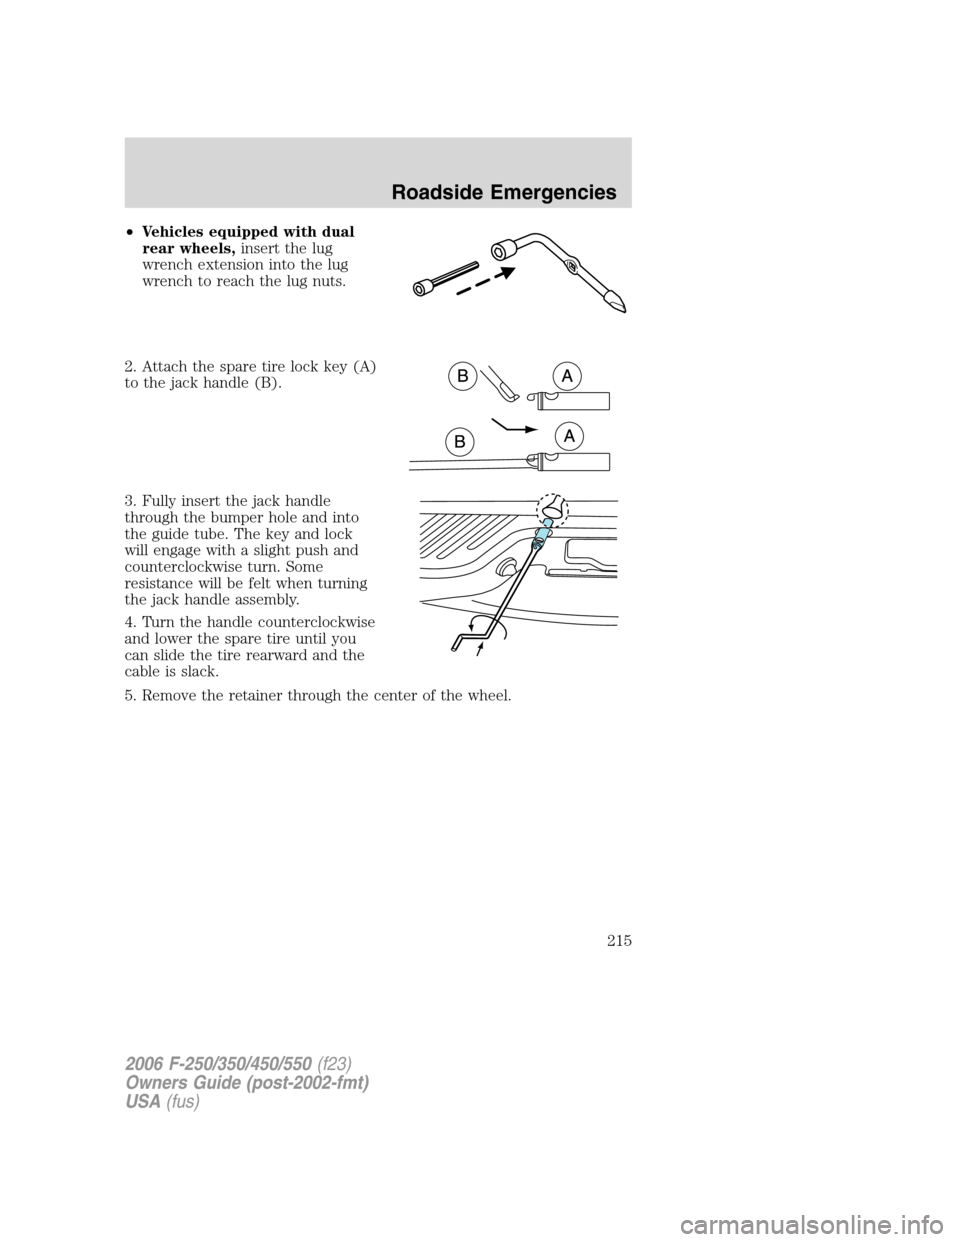
•Vehicles equipped with dual
rear wheels,insert the lug
wrench extension into the lug
wrench to reach the lug nuts.
2. Attach the spare tire lock key (A)
to the jack handle (B).
3. Fully insert the jack handle
through the bumper hole and into
the guide tube. The key and lock
will engage with a slight push and
counterclockwise turn. Some
resistance will be felt when turning
the jack handle assembly.
4. Turn the handle counterclockwise
and lower the spare tire until you
can slide the tire rearward and the
cable is slack.
5. Remove the retainer through the center of the wheel.
2006 F-250/350/450/550(f23)
Owners Guide (post-2002-fmt)
USA(fus)
Roadside Emergencies
215
Page 216 of 312
Tire change procedure
1. Park on a level surface, activate
hazard flashers and set the parking
brake.
•Automatic transmission: Place
gearshift lever in P (Park).
•Manual transmission: Place
gearshift lever in R (Reverse).
•Electronic Shift-On-the-Fly
(ESOF) 4WD: Place transfer case
in any position.
•Manual shift transfer case 4WD:
Place transfer case in 2H, 4H or
4L.
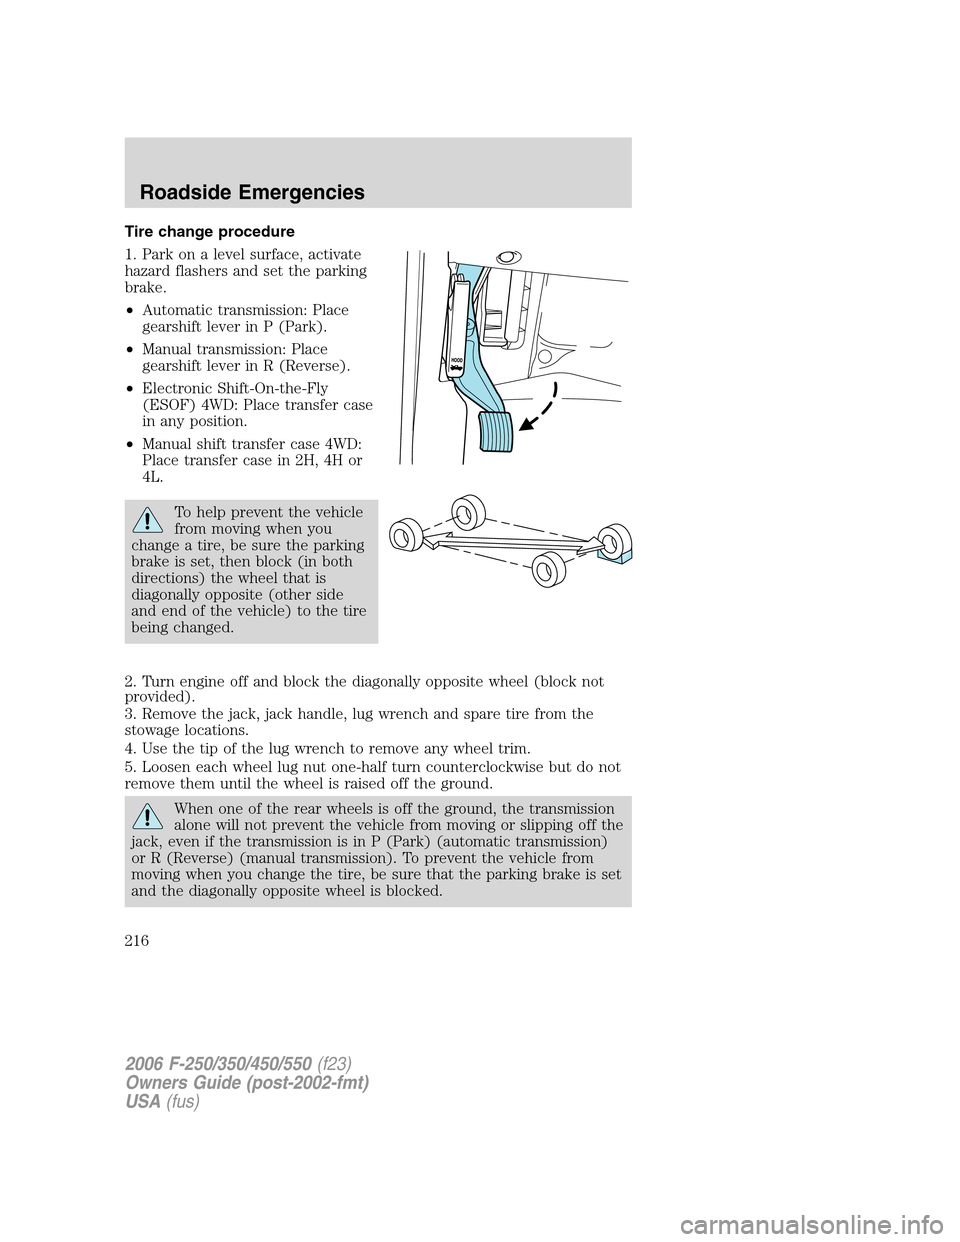
To help prevent the vehicle
from moving when you
change a tire, be sure the parking
brake is set, then block (in both
directions) the wheel that is
diagonally opposite (other side
and end of the vehicle) to the tire
being changed.
2. Turn engine off and block the diagonally opposite wheel (block not
provided).
3. Remove the jack, jack handle, lug wrench and spare tire from the
stowage locations.
4. Use the tip of the lug wrench to remove any wheel trim.
5. Loosen each wheel lug nut one-half turn counterclockwise but do not
remove them until the wheel is raised off the ground.
When one of the rear wheels is off the ground, the transmission
alone will not prevent the vehicle from moving or slipping off the
jack, even if the transmission is in P (Park) (automatic transmission)
or R (Reverse) (manual transmission). To prevent the vehicle from
moving when you change the tire, be sure that the parking brake is set
and the diagonally opposite wheel is blocked.
2006 F-250/350/450/550(f23)
Owners Guide (post-2002-fmt)
USA(fus)
Roadside Emergencies
216
Page 217 of 312
If the vehicle slips off the jack, you or someone else could be
seriously injured.
The following steps apply to F–250/F–350 Single Rear Wheel
(SRW) vehicles only (unless otherwise noted):
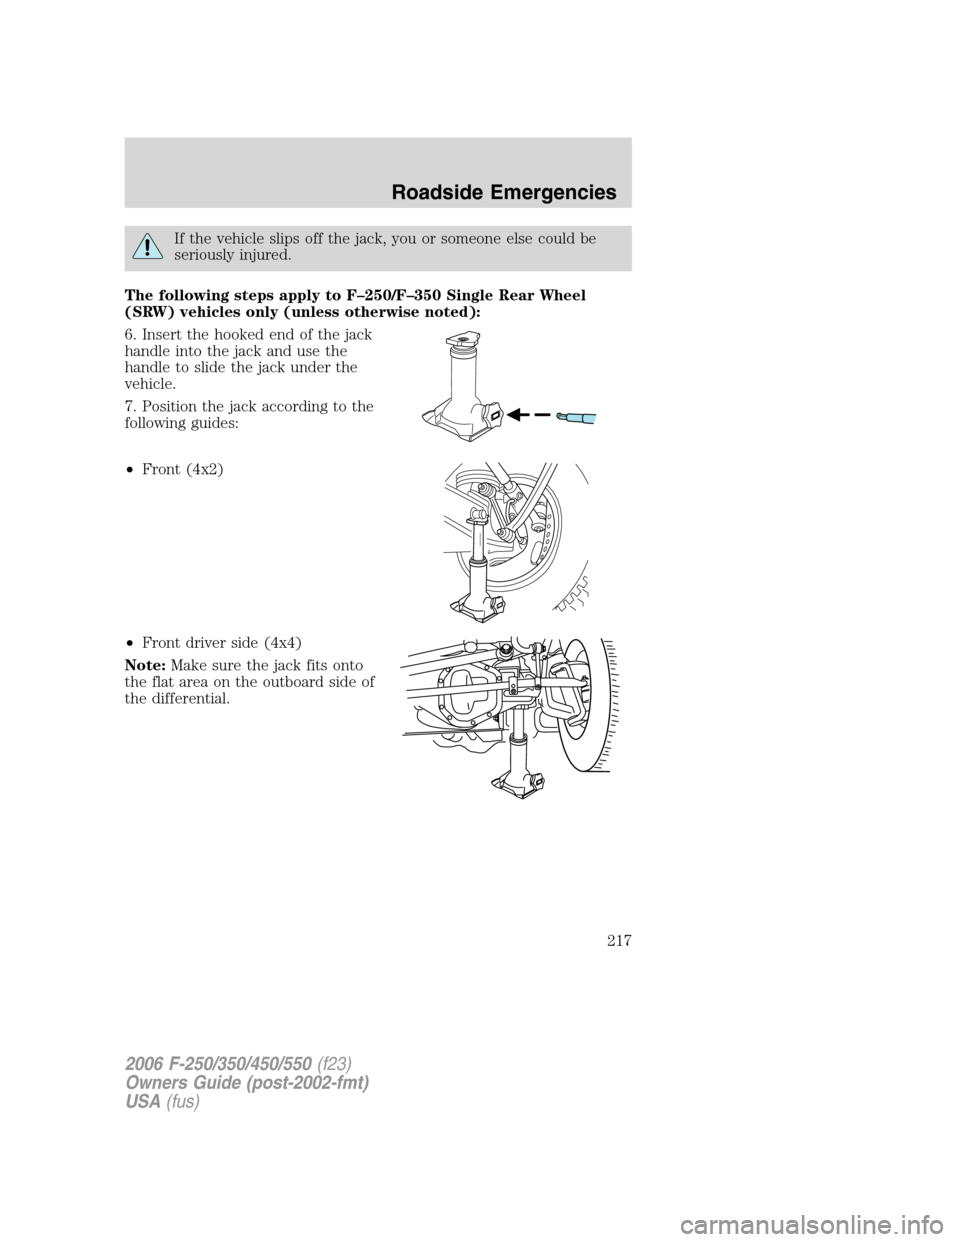
6. Insert the hooked end of the jack
handle into the jack and use the
handle to slide the jack under the
vehicle.
7. Position the jack according to the
following guides:
•Front (4x2)
•Front driver side (4x4)
Note:Make sure the jack fits onto
the flat area on the outboard side of
the differential.
2006 F-250/350/450/550(f23)
Owners Guide (post-2002-fmt)
USA(fus)
Roadside Emergencies
217
Page 218 of 312
![FORD SUPER DUTY 2006 1.G Owners Manual •Front passenger side (4x4)
Note:View shown from the rear of
the vehicle to clearly identify the
jack point. Place the jack directly
under the axle.
•Rear (including F-350 Dual Rear
wheel [DRW] ve FORD SUPER DUTY 2006 1.G Owners Manual •Front passenger side (4x4)
Note:View shown from the rear of
the vehicle to clearly identify the
jack point. Place the jack directly
under the axle.
•Rear (including F-350 Dual Rear
wheel [DRW] ve](/img/11/5267/w960_5267-217.png)
•Front passenger side (4x4)
Note:View shown from the rear of
the vehicle to clearly identify the
jack point. Place the jack directly
under the axle.
•Rear (including F-350 Dual Rear
wheel [DRW] vehicles)
Never use the front or rear
differential as a jacking point.
To lessen the risk of
personal injury, do not put
any part of your body under the
vehicle while changing a tire. Do
not start the engine when your
vehicle is on the jack. The jack is
only meant for changing the tire.
8. Turn the jack handle clockwise
until the wheel is completely off the
ground and high enough to install
the spare tire.
9. Remove the lug nuts with the lug
wrench.
2006 F-250/350/450/550(f23)
Owners Guide (post-2002-fmt)
USA(fus)
Roadside Emergencies
218
Page 219 of 312
10. Replace the flat tire with the spare tire, making sure the valve stem
is facing outward for all front wheels and single rear wheel vehicles. If
replacing an inboard rear tire on dual rear wheel vehicles, the valve stem
must be facing outward. If replacing the outboard wheel, the valve stem
must be facing inward. Reinstall the lug nuts until the wheel is snug
against the hub. Do not fully tighten the lug nuts until the wheel has
been lowered.
11. Lower the wheel by turning the jack handle counterclockwise.
Go to step 19.
The following steps apply to F–350 DRW and F–450/F–550
vehicles only:
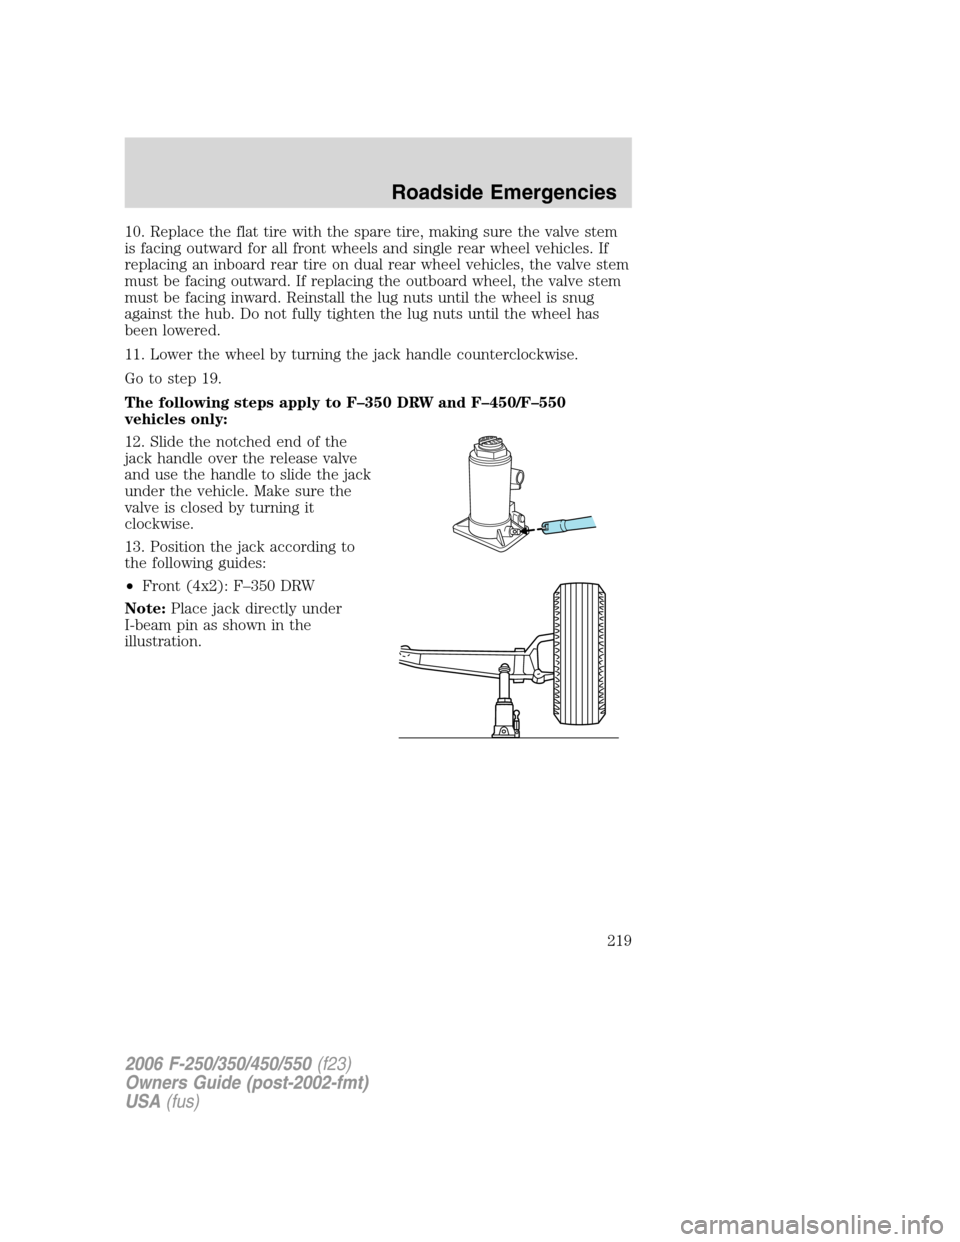
12. Slide the notched end of the
jack handle over the release valve
and use the handle to slide the jack
under the vehicle. Make sure the
valve is closed by turning it
clockwise.
13. Position the jack according to
the following guides:
•Front (4x2): F–350 DRW
Note:Place jack directly under
I-beam pin as shown in the
illustration.
2006 F-250/350/450/550(f23)
Owners Guide (post-2002-fmt)
USA(fus)
Roadside Emergencies
219
Page 220 of 312
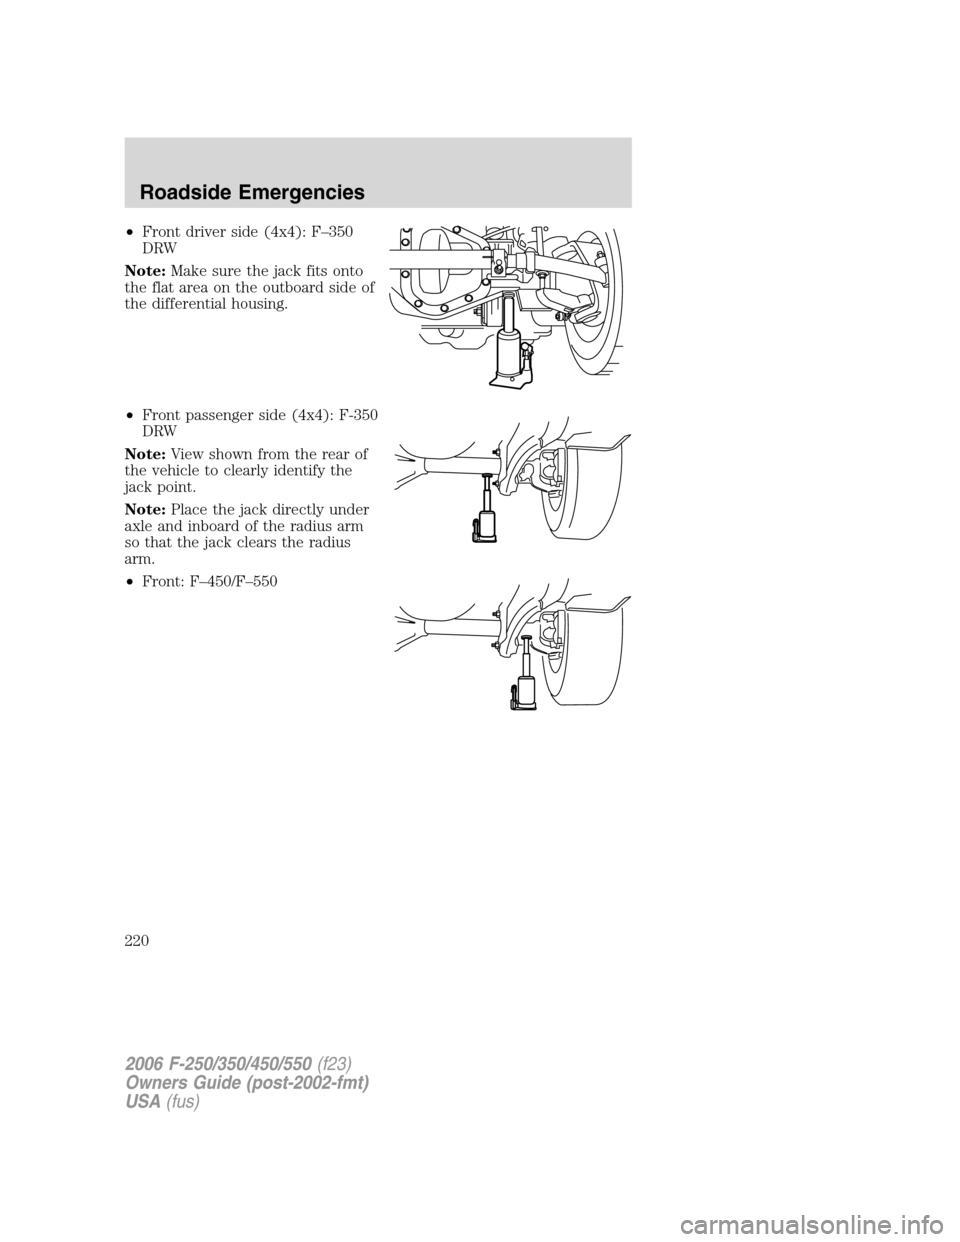
•Front driver side (4x4): F–350
DRW
Note:Make sure the jack fits onto
the flat area on the outboard side of
the differential housing.
•Front passenger side (4x4): F-350
DRW
Note:View shown from the rear of
the vehicle to clearly identify the
jack point.
Note:Place the jack directly under
axle and inboard of the radius arm
so that the jack clears the radius
arm.
•Front: F–450/F–550
2006 F-250/350/450/550(f23)
Owners Guide (post-2002-fmt)
USA(fus)
Roadside Emergencies
220