high beam FORD SUPER DUTY 2009 2.G Owners Manual
[x] Cancel search | Manufacturer: FORD, Model Year: 2009, Model line: SUPER DUTY, Model: FORD SUPER DUTY 2009 2.GPages: 418, PDF Size: 3.55 MB
Page 19 of 418
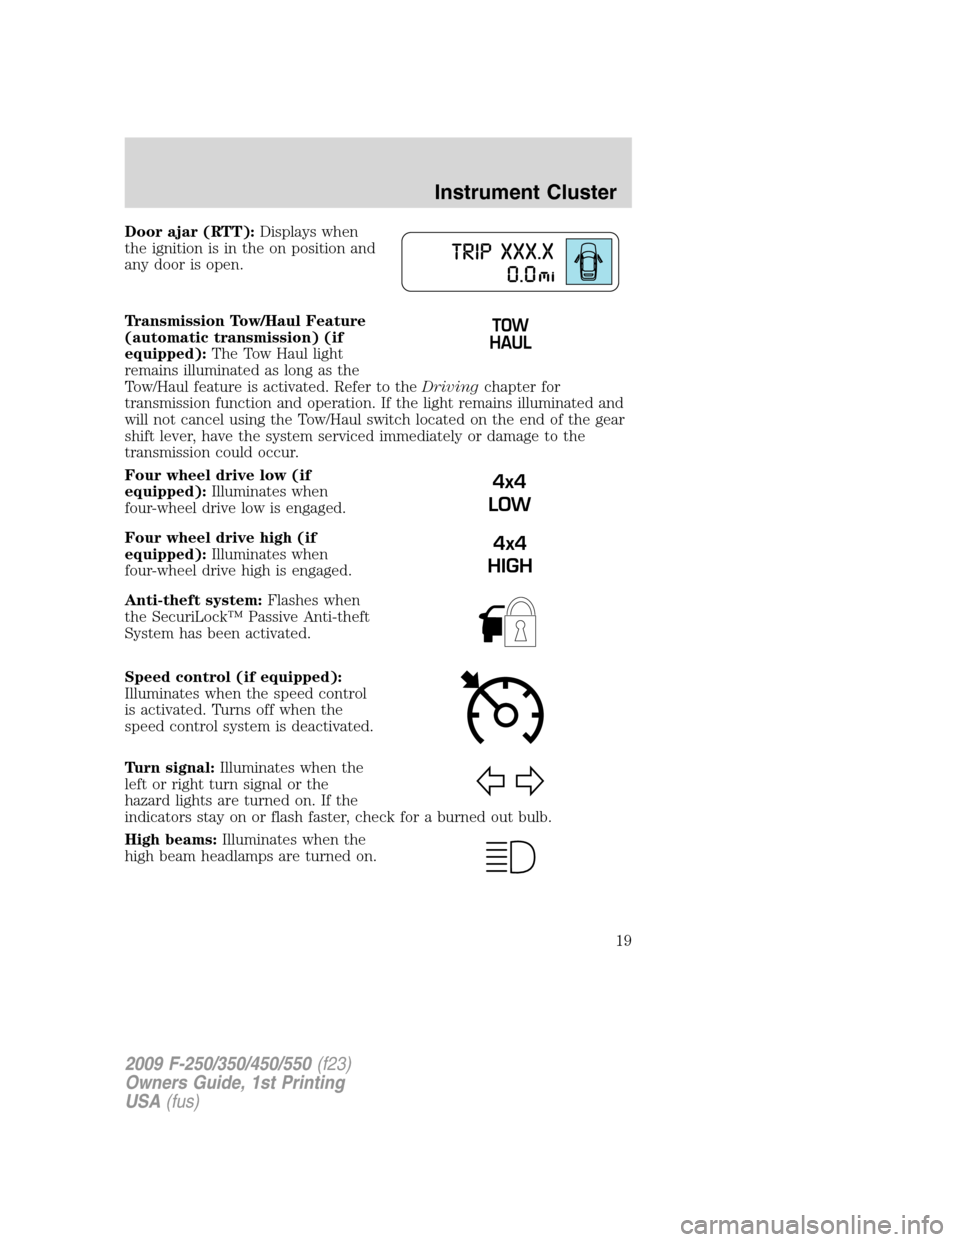
Door ajar (RTT):Displays when
the ignition is in the on position and
any door is open.
Transmission Tow/Haul Feature
(automatic transmission) (if
equipped):The Tow Haul light
remains illuminated as long as the
Tow/Haul feature is activated. Refer to theDrivingchapter for
transmission function and operation. If the light remains illuminated and
will not cancel using the Tow/Haul switch located on the end of the gear
shift lever, have the system serviced immediately or damage to the
transmission could occur.
Four wheel drive low (if
equipped):Illuminates when
four-wheel drive low is engaged.
Four wheel drive high (if
equipped):Illuminates when
four-wheel drive high is engaged.
Anti-theft system:Flashes when
the SecuriLock™ Passive Anti-theft
System has been activated.
Speed control (if equipped):
Illuminates when the speed control
is activated. Turns off when the
speed control system is deactivated.
Turn signal:Illuminates when the
left or right turn signal or the
hazard lights are turned on. If the
indicators stay on or flash faster, check for a burned out bulb.
High beams:Illuminates when the
high beam headlamps are turned on.
4x4
LOW
4x4
HIGH
2009 F-250/350/450/550(f23)
Owners Guide, 1st Printing
USA(fus)
Instrument Cluster
19
Page 89 of 418
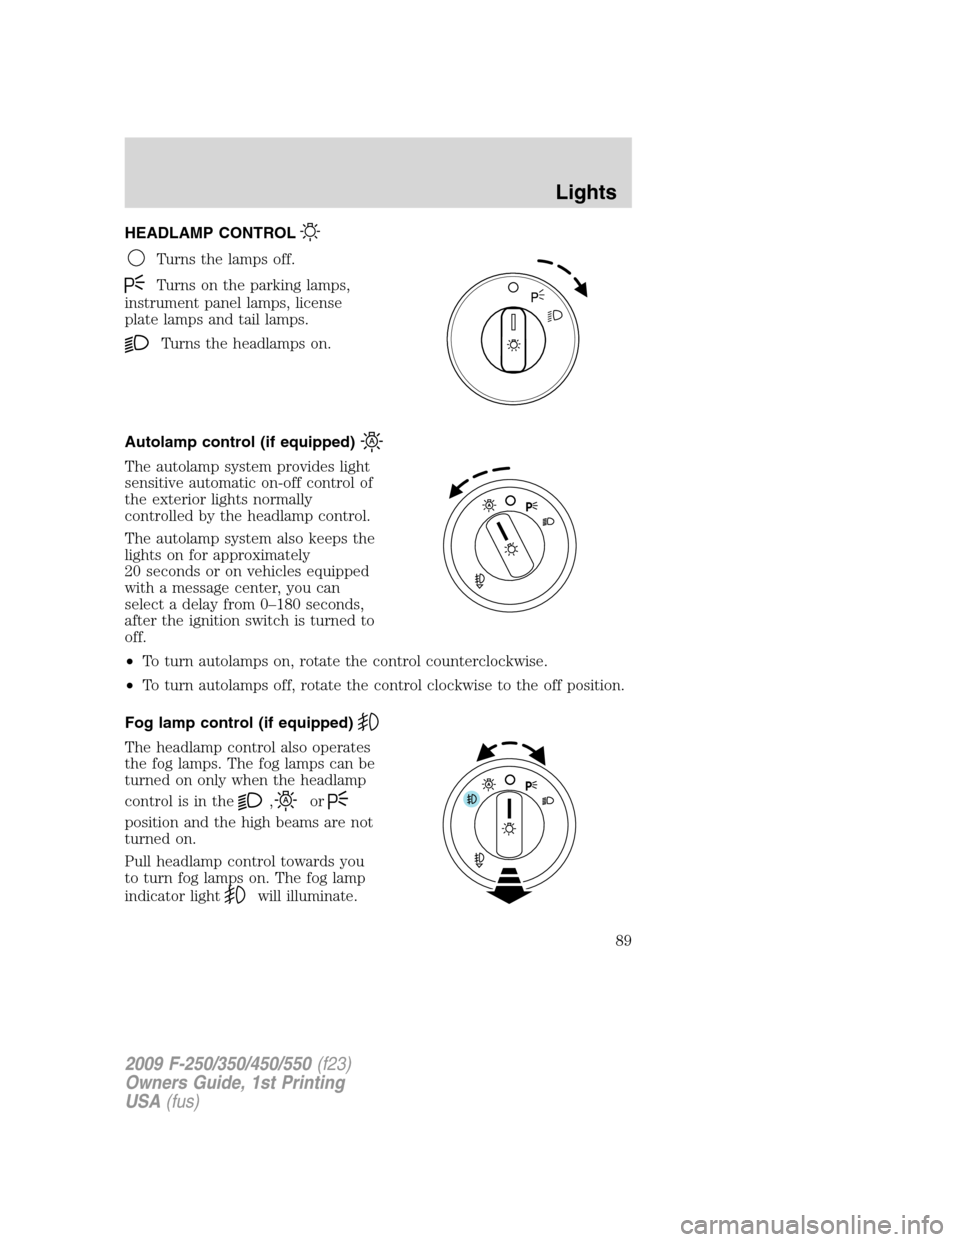
HEADLAMP CONTROL
Turns the lamps off.
Turns on the parking lamps,
instrument panel lamps, license
plate lamps and tail lamps.
Turns the headlamps on.
Autolamp control (if equipped)
The autolamp system provides light
sensitive automatic on-off control of
the exterior lights normally
controlled by the headlamp control.
The autolamp system also keeps the
lights on for approximately
20 seconds or on vehicles equipped
with a message center, you can
select a delay from 0–180 seconds,
after the ignition switch is turned to
off.
•To turn autolamps on, rotate the control counterclockwise.
•To turn autolamps off, rotate the control clockwise to the off position.
Fog lamp control (if equipped)
The headlamp control also operates
the fog lamps. The fog lamps can be
turned on only when the headlamp
control is in the
,or
position and the high beams are not
turned on.
Pull headlamp control towards you
to turn fog lamps on. The fog lamp
indicator light
will illuminate.
2009 F-250/350/450/550(f23)
Owners Guide, 1st Printing
USA(fus)
Lights
89
Page 90 of 418
Daytime running lamps (DRL) (if equipped)
Turns the headlamps on with a reduced output.
To activate:
•the ignition must be in the on position,
•the headlamp control is in the off or parking lamp position and
•the parking brake must be disengaged.
WARNING:Always remember to turn on your headlamps at
dusk or during inclement weather. The Daytime Running Lamp
(DRL) system does not activate the tail lamps and generally may not
provide adequate lighting during these conditions. Failure to activate
your headlamps under these conditions may result in a collision.
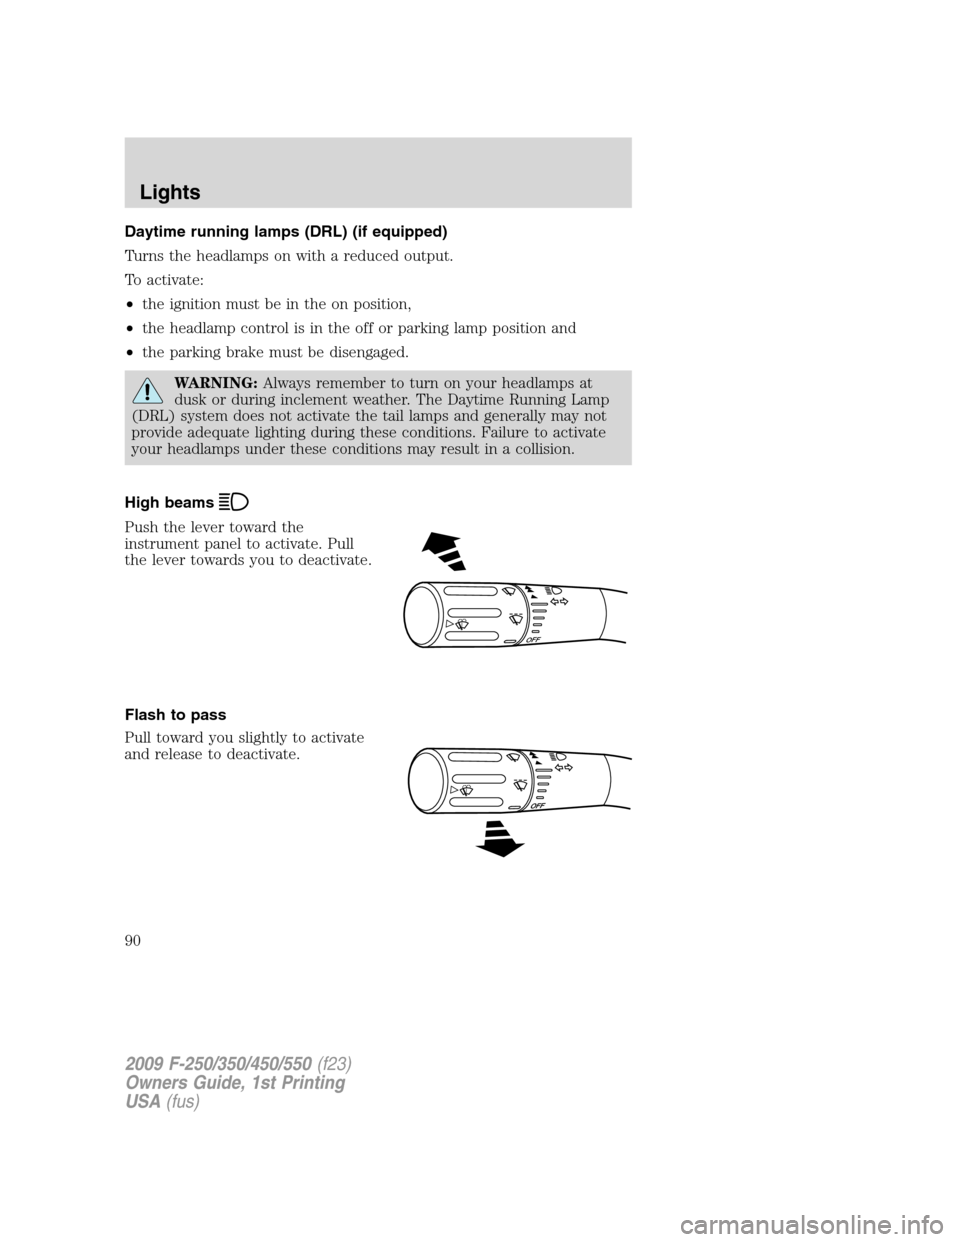
High beams
Push the lever toward the
instrument panel to activate. Pull
the lever towards you to deactivate.
Flash to pass
Pull toward you slightly to activate
and release to deactivate.
O
F
F
2009 F-250/350/450/550(f23)
Owners Guide, 1st Printing
USA(fus)
Lights
90
Page 92 of 418
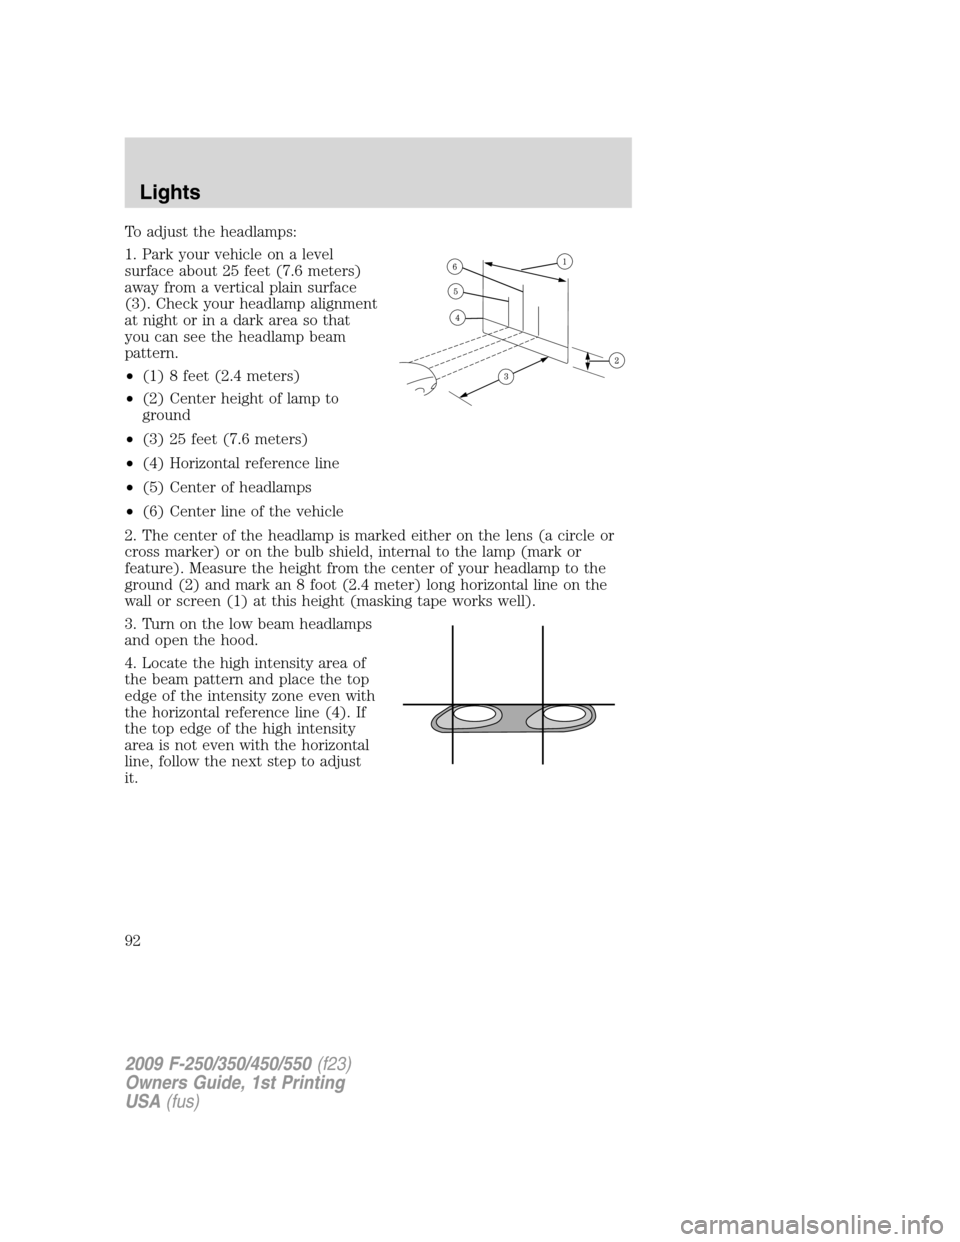
To adjust the headlamps:
1. Park your vehicle on a level
surface about 25 feet (7.6 meters)
away from a vertical plain surface
(3). Check your headlamp alignment
at night or in a dark area so that
you can see the headlamp beam
pattern.
•(1) 8 feet (2.4 meters)
•(2) Center height of lamp to
ground
•(3) 25 feet (7.6 meters)
•(4) Horizontal reference line
•(5) Center of headlamps
•(6) Center line of the vehicle
2. The center of the headlamp is marked either on the lens (a circle or
cross marker) or on the bulb shield, internal to the lamp (mark or
feature). Measure the height from the center of your headlamp to the
ground (2) and mark an 8 foot (2.4 meter) long horizontal line on the
wall or screen (1) at this height (masking tape works well).
3. Turn on the low beam headlamps
and open the hood.
4. Locate the high intensity area of
the beam pattern and place the top
edge of the intensity zone even with
the horizontal reference line (4). If
the top edge of the high intensity
area is not even with the horizontal
line, follow the next step to adjust
it.
2009 F-250/350/450/550(f23)
Owners Guide, 1st Printing
USA(fus)
Lights
92
Page 93 of 418
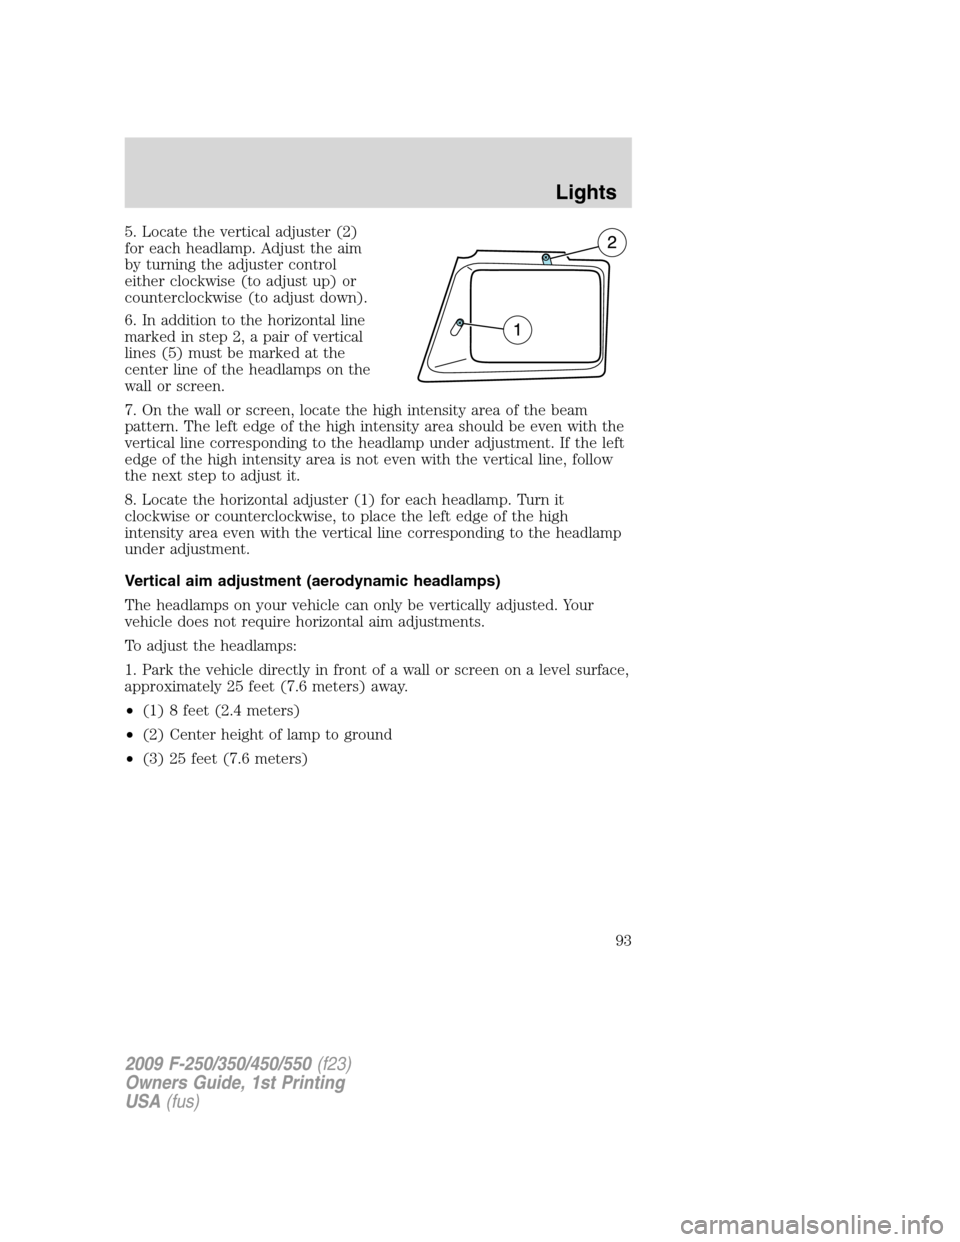
5. Locate the vertical adjuster (2)
for each headlamp. Adjust the aim
by turning the adjuster control
either clockwise (to adjust up) or
counterclockwise (to adjust down).
6. In addition to the horizontal line
marked in step 2, a pair of vertical
lines (5) must be marked at the
center line of the headlamps on the
wall or screen.
7. On the wall or screen, locate the high intensity area of the beam
pattern. The left edge of the high intensity area should be even with the
vertical line corresponding to the headlamp under adjustment. If the left
edge of the high intensity area is not even with the vertical line, follow
the next step to adjust it.
8. Locate the horizontal adjuster (1) for each headlamp. Turn it
clockwise or counterclockwise, to place the left edge of the high
intensity area even with the vertical line corresponding to the headlamp
under adjustment.
Vertical aim adjustment (aerodynamic headlamps)
The headlamps on your vehicle can only be vertically adjusted. Your
vehicle does not require horizontal aim adjustments.
To adjust the headlamps:
1. Park the vehicle directly in front of a wall or screen on a level surface,
approximately 25 feet (7.6 meters) away.
•(1) 8 feet (2.4 meters)
•(2) Center height of lamp to ground
•(3) 25 feet (7.6 meters)
2009 F-250/350/450/550(f23)
Owners Guide, 1st Printing
USA(fus)
Lights
93
Page 96 of 418
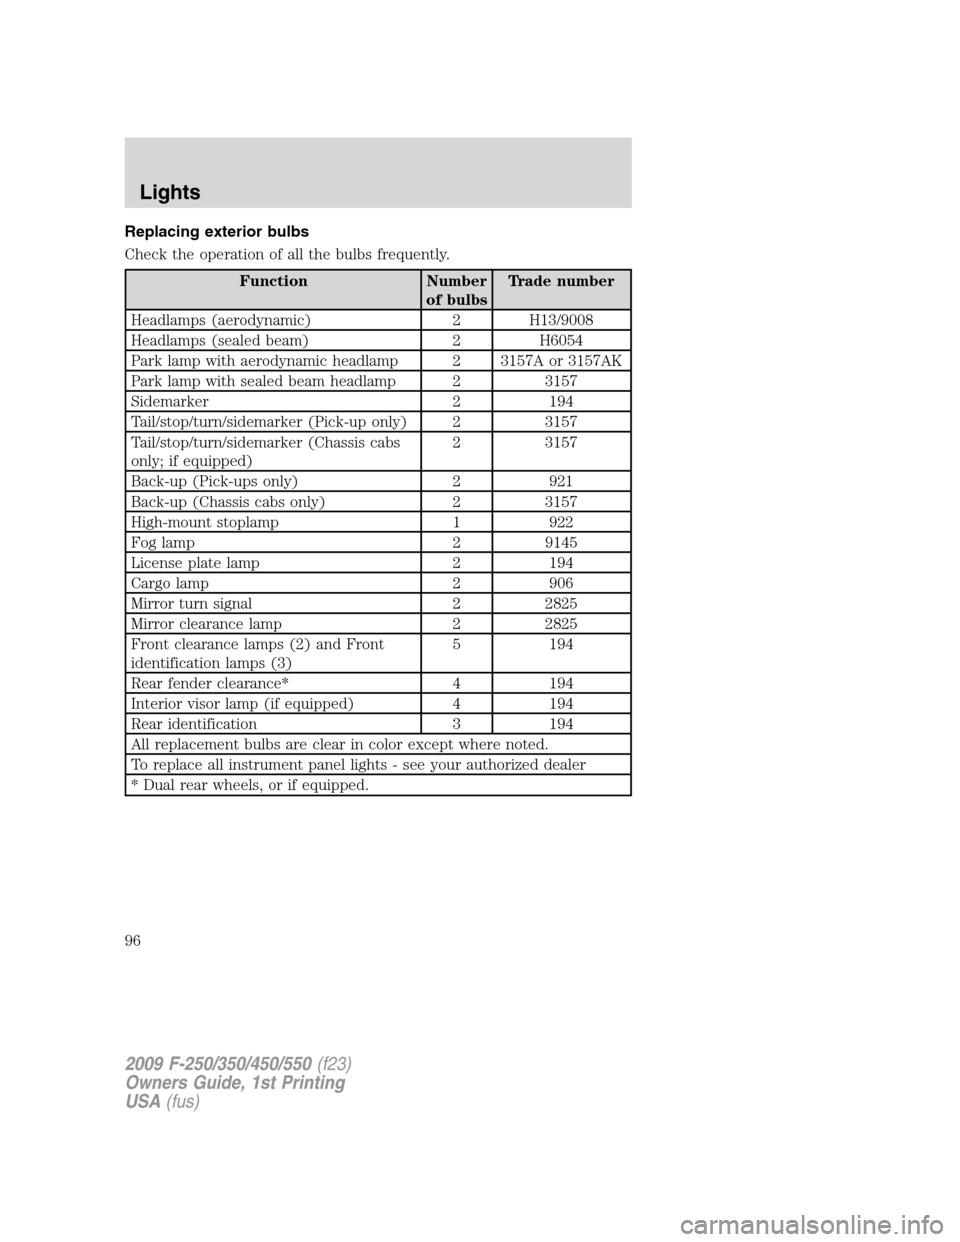
Replacing exterior bulbs
Check the operation of all the bulbs frequently.
Function Number
of bulbsTrade number
Headlamps (aerodynamic) 2 H13/9008
Headlamps (sealed beam) 2 H6054
Park lamp with aerodynamic headlamp 2 3157A or 3157AK
Park lamp with sealed beam headlamp 2 3157
Sidemarker 2 194
Tail/stop/turn/sidemarker (Pick-up only) 2 3157
Tail/stop/turn/sidemarker (Chassis cabs
only; if equipped)2 3157
Back-up (Pick-ups only) 2 921
Back-up (Chassis cabs only) 2 3157
High-mount stoplamp 1 922
Fog lamp 2 9145
License plate lamp 2 194
Cargo lamp 2 906
Mirror turn signal 2 2825
Mirror clearance lamp 2 2825
Front clearance lamps (2) and Front
identification lamps (3)5 194
Rear fender clearance* 4 194
Interior visor lamp (if equipped) 4 194
Rear identification 3 194
All replacement bulbs are clear in color except where noted.
To replace all instrument panel lights - see your authorized dealer
* Dual rear wheels, or if equipped.
2009 F-250/350/450/550(f23)
Owners Guide, 1st Printing
USA(fus)
Lights
96
Page 192 of 418
WARNING:Removing the blocker beam without installing snow
plow attachment hardware may effect airbag deployment in a
crash. Do not operate the truck unless either the blocker beam or
snow plow attachment hardware is installed on the vehicle.
Children and airbags
For additional important safety information, read all information on
safety restraints in this guide.
Children must always be properly restrained. Failure to follow these
instructions may increase the risk of injury in a collision.
WARNING:An infant in a rear-facing seat faces a high risk of
serious or fatal injuries from a deploying passenger airbag. Rear
facing infant seats should NEVER be placed in the front seats, unless
the passenger airbag is turned off. SeePassenger airbag ON/OFF
switch.
WARNING:Front seating positions only: If seating two adults
and a child, Ford recommends properly restraining the child in
the center front seating position, but only if doing so will not interfere
with driving the vehicle. This arrangement provides lap and shoulder
belt and airbag protection for adult occupants and an attachment
method for a child restraint. If the child seat interferes with driving the
vehicle and the child restraint is forward-facing, the child may be
restrained in the passenger seat. Move the seat as far rearward as
possible to minimize the likelihood of interaction with the front
passenger airbag. Never place a rear-facing child seat in front of an
active airbag. Always properly restrain all occupants, including the
child in an appropriate child seat or booster.
2009 F-250/350/450/550(f23)
Owners Guide, 1st Printing
USA(fus)
Seating and Safety Restraints
192
Page 319 of 418
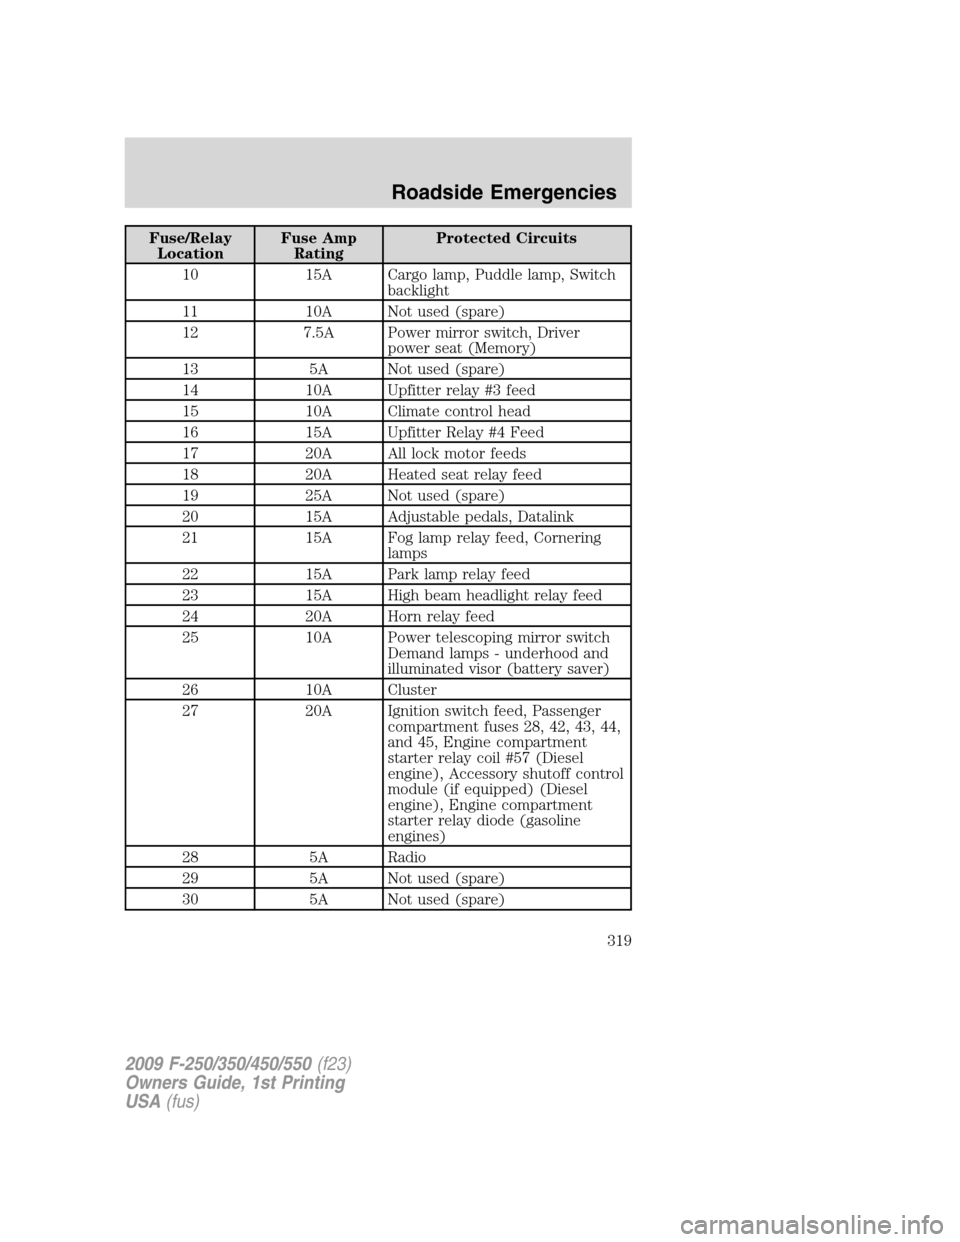
Fuse/Relay
LocationFuse Amp
RatingProtected Circuits
10 15A Cargo lamp, Puddle lamp, Switch
backlight
11 10A Not used (spare)
12 7.5A Power mirror switch, Driver
power seat (Memory)
13 5A Not used (spare)
14 10A Upfitter relay #3 feed
15 10A Climate control head
16 15A Upfitter Relay #4 Feed
17 20A All lock motor feeds
18 20A Heated seat relay feed
19 25A Not used (spare)
20 15A Adjustable pedals, Datalink
21 15A Fog lamp relay feed, Cornering
lamps
22 15A Park lamp relay feed
23 15A High beam headlight relay feed
24 20A Horn relay feed
25 10A Power telescoping mirror switch
Demand lamps - underhood and
illuminated visor (battery saver)
26 10A Cluster
27 20A Ignition switch feed, Passenger
compartment fuses 28, 42, 43, 44,
and 45, Engine compartment
starter relay coil #57 (Diesel
engine), Accessory shutoff control
module (if equipped) (Diesel
engine), Engine compartment
starter relay diode (gasoline
engines)
28 5A Radio
29 5A Not used (spare)
30 5A Not used (spare)
2009 F-250/350/450/550(f23)
Owners Guide, 1st Printing
USA(fus)
Roadside Emergencies
319
Page 415 of 418
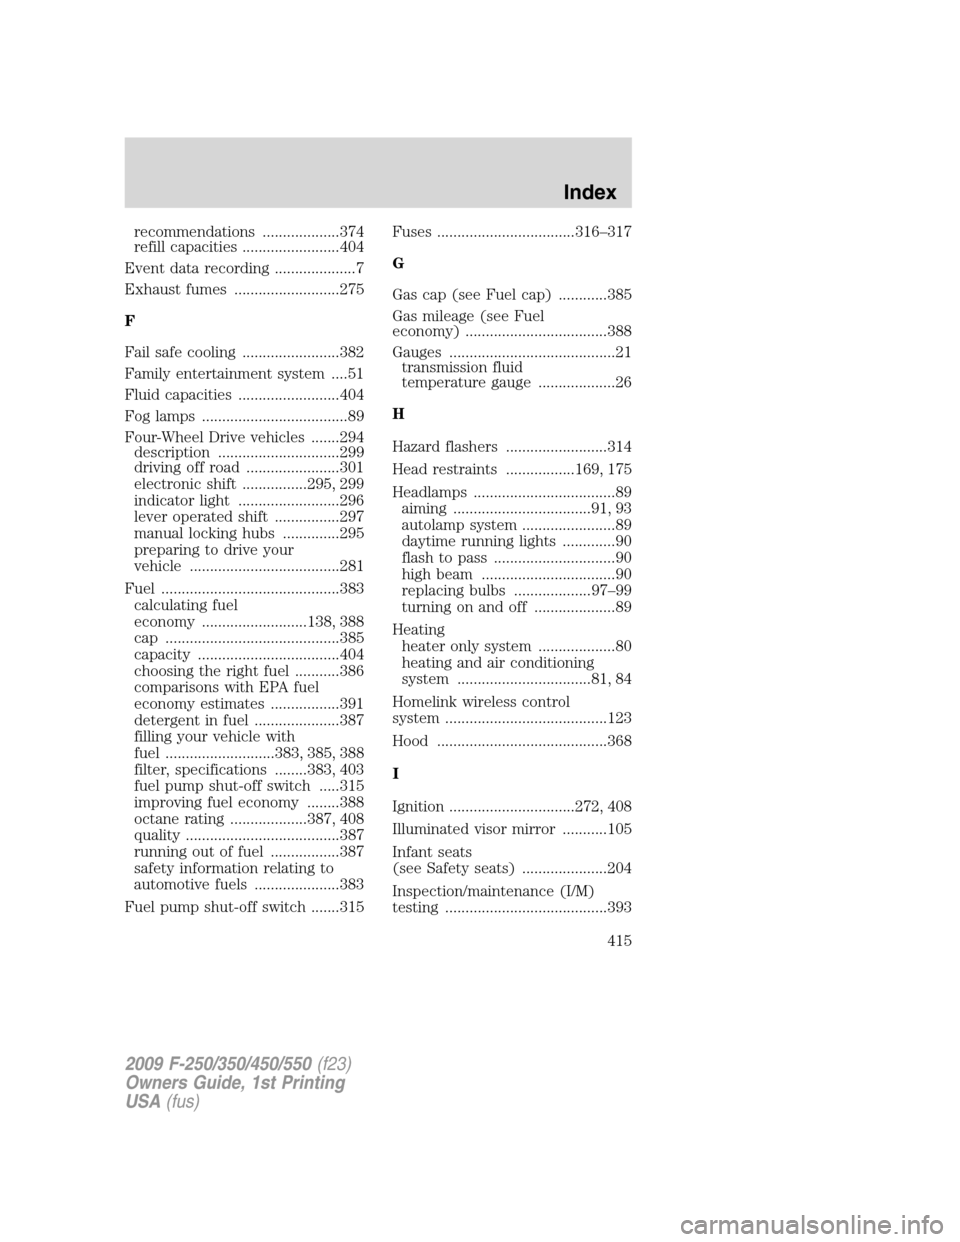
recommendations ...................374
refill capacities ........................404
Event data recording ....................7
Exhaust fumes ..........................275
F
Fail safe cooling ........................382
Family entertainment system ....51
Fluid capacities .........................404
Fog lamps ....................................89
Four-Wheel Drive vehicles .......294
description ..............................299
driving off road .......................301
electronic shift ................295, 299
indicator light .........................296
lever operated shift ................297
manual locking hubs ..............295
preparing to drive your
vehicle .....................................281
Fuel ............................................383
calculating fuel
economy ..........................138, 388
cap ...........................................385
capacity ...................................404
choosing the right fuel ...........386
comparisons with EPA fuel
economy estimates .................391
detergent in fuel .....................387
filling your vehicle with
fuel ...........................383, 385, 388
filter, specifications ........383, 403
fuel pump shut-off switch .....315
improving fuel economy ........388
octane rating ...................387, 408
quality ......................................387
running out of fuel .................387
safety information relating to
automotive fuels .....................383
Fuel pump shut-off switch .......315Fuses ..................................316–317
G
Gas cap (see Fuel cap) ............385
Gas mileage (see Fuel
economy) ...................................388
Gauges .........................................21
transmission fluid
temperature gauge ...................26
H
Hazard flashers .........................314
Head restraints .................169, 175
Headlamps ...................................89
aiming ..................................91, 93
autolamp system .......................89
daytime running lights .............90
flash to pass ..............................90
high beam .................................90
replacing bulbs ...................97–99
turning on and off ....................89
Heating
heater only system ...................80
heating and air conditioning
system .................................81, 84
Homelink wireless control
system ........................................123
Hood ..........................................368
I
Ignition ...............................272, 408
Illuminated visor mirror ...........105
Infant seats
(see Safety seats) .....................204
Inspection/maintenance (I/M)
testing ........................................393
2009 F-250/350/450/550(f23)
Owners Guide, 1st Printing
USA(fus)
Index
415