seat FORD SUPER DUTY 2011 3.G Owner's Manual
[x] Cancel search | Manufacturer: FORD, Model Year: 2011, Model line: SUPER DUTY, Model: FORD SUPER DUTY 2011 3.GPages: 441, PDF Size: 3.3 MB
Page 150 of 441

FRONT SEATING
WARNING:Reclining the seatback can cause an occupant to
slide under the seat’s safety belt, resulting in severe personal
injuries in the event of a collision.
WARNING:Do not pile cargo higher than the seatbacks to
reduce the risk of injury in a collision or sudden stop.
WARNING:Before returning the seatback to its original
position, make sure that cargo or any objects are not trapped
behind the seatback. After returning the seatback to its original
position, pull on the seatback to ensure that it has fully latched. An
unlatched seat may become dangerous in the event of a sudden stop or
collision.
Adjustable head restraints
Your vehicle is equipped with front row outboard head restraints that are
vertically adjustable.
WARNING:To minimize the risk of neck injury in the event of a
crash, the driver and passenger occupants should not sit in
and/or operate the vehicle, until the head restraint is placed in its
proper position. The driver should never adjust the head restraint
while the vehicle is in motion.
The adjustable head restraints
consist of :
•a trimmed energy absorbing foam
and structure (1),
•two steel stems (2),
•a guide sleeve adjust/release
button (3),
•and a guide sleeve unlock/remove
button (4).
3
1
2
4
Seating and Safety Restraints
150
2011 F-250/350/450/550(f23)
Owners Guide, 1st Printing
USA(fus)
Page 151 of 441

To adjust the head restraint, do the following:
1. Adjust the seatback to an upright driving/riding position.
2. Raise the head restraint by
pulling up on the head restraint.
3. Lower the head restraint by
pressing and holding the guide
sleeve adjust/release button and
pushing down on the head restraint.
Properly adjust the head restraint so that the top of the head restraint is
even with the top of your head and positioned as close as possible to the
back of your head. For occupants of extremely tall stature, adjust the
head restraint to its full up position.
WARNING:The adjustable head restraint is a safety device.
Whenever possible it should be installed and properly adjusted
when the seat is occupied.
Seating and Safety Restraints
151
2011 F-250/350/450/550(f23)
Owners Guide, 1st Printing
USA(fus)
Page 152 of 441

To remove the adjustable head restraint, do the following:
1. Pull up the head restraint until it
reaches the highest adjustment
position.
2. Simultaneously press and hold
both the adjust/release button and
the unlock/remove button, then pull
up on the head restraint.
To reinstall the adjustable head restraint, do the following:
1. Insert the two stems into the
guide sleeve collars.
2. Push the head restraint down
until it locks.
Seating and Safety Restraints
152
2011 F-250/350/450/550(f23)
Owners Guide, 1st Printing
USA(fus)
Page 153 of 441
Properly adjust the head restraint so that the top of the head restraint is
even with the top of your head and positioned as close as possible to the
back of your head. For occupants of extremely tall stature, adjust the
head restraint to its full up position.
WARNING:To minimize the risk of neck injury in the event of a
crash, head restraints must be installed properly.
Front row center non-adjustable head restraint (if equipped)
Vehicle’s equipped with a front center seat will have head restraints that
are non-adjustable.
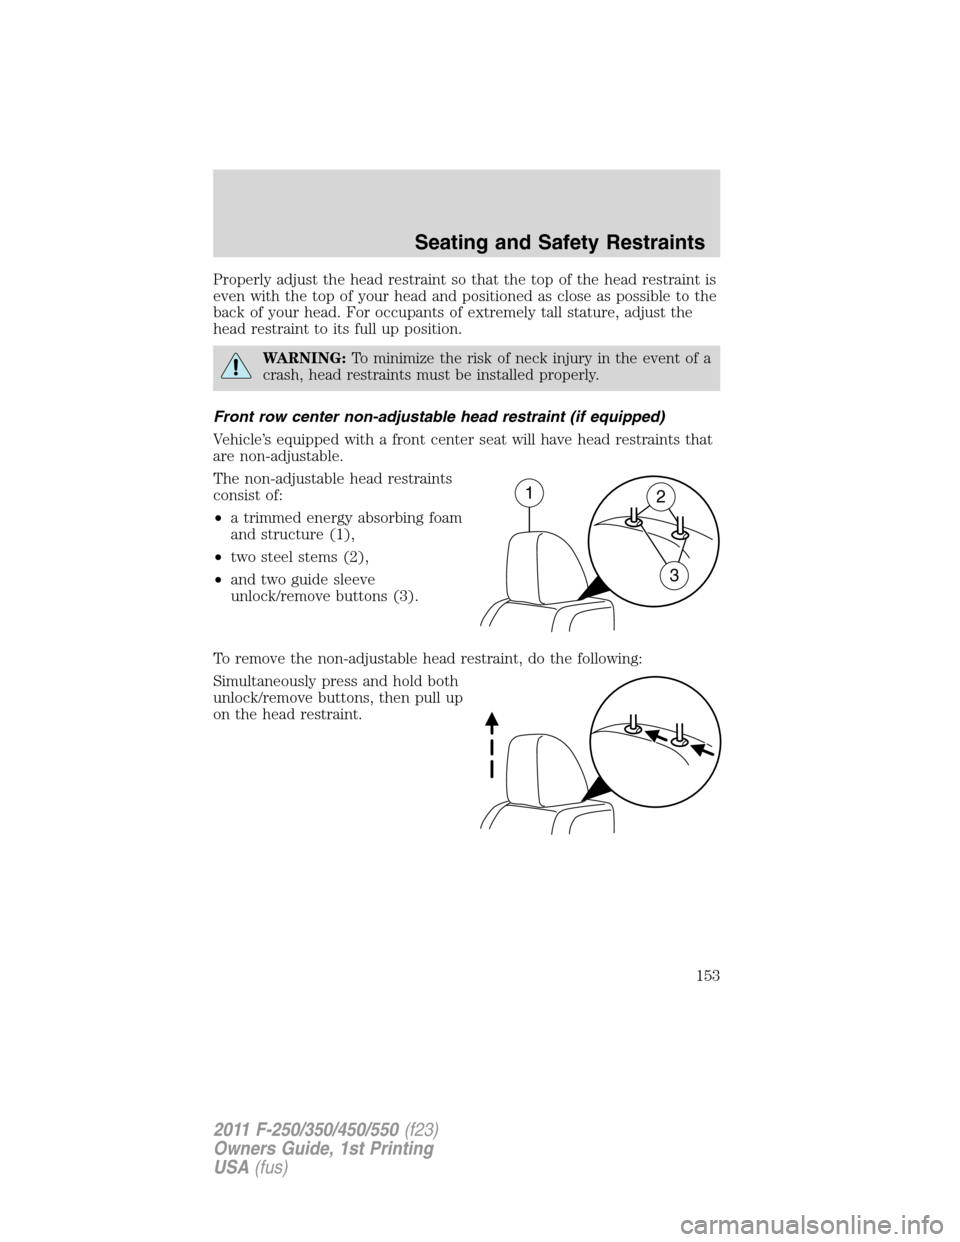
The non-adjustable head restraints
consist of:
•a trimmed energy absorbing foam
and structure (1),
•two steel stems (2),
•and two guide sleeve
unlock/remove buttons (3).
To remove the non-adjustable head restraint, do the following:
Simultaneously press and hold both
unlock/remove buttons, then pull up
on the head restraint.
12
3
Seating and Safety Restraints
153
2011 F-250/350/450/550(f23)
Owners Guide, 1st Printing
USA(fus)
Page 154 of 441

To reinstall the non-adjustable head restraint, do the following:
1. Insert the two stems into the
guide sleeve collars.
2. Push the head restraint down
until it locks.
WARNING:The non-adjustable head restraint is a safety device.
It should be installed whenever the seat is occupied.
WARNING:To minimize the risk of neck injury in the event of a
crash, head restraints must be installed properly.
Front seat
•Lift the track release bar to move
the seat forward or rearward.
Make sure that the seat is
relatched into place.
Seating and Safety Restraints
154
2011 F-250/350/450/550(f23)
Owners Guide, 1st Printing
USA(fus)
Page 155 of 441

•Pull the release lever handle
located on the side of the seat up
to move the seatback forward or
backward.
20 percent front seat armrest and console (if equipped)
To release the armrest and gain
access to the cupholders and
seatback storage bin, press the
button on the right-hand side of the
seat and pull the seatback down.
Pull up on the tab to open the
storage bin.
Lift up on the seatback to return it to the upright position.
Seating and Safety Restraints
155
2011 F-250/350/450/550(f23)
Owners Guide, 1st Printing
USA(fus)
Page 156 of 441

To gain access to the under-seat
storage compartment (if equipped)
in your seat cushion, lift the latch to
open the lid. The lid cannot be
opened when the armrest is down.
The under-seat storage
compartment (if equipped) has a
programmable lock. Use the ignition
key to program the lock to the
compartment. Electronics may be
powered or charged using the
under-seat storage compartment
auxiliary power point. Refer to
Auxiliary power point (12VDC)in
theDrive Controlschapter.
Adjusting the front power seat (if equipped)
Move the front of the control up or
down to tilt the seat cushion.
Move the rear of the control up or
down to raise or lower the seat
cushion.
Seating and Safety Restraints
156
2011 F-250/350/450/550(f23)
Owners Guide, 1st Printing
USA(fus)
Page 157 of 441

Move the control in the directions
shown to move the seat forward or
backward.
Power recline (if equipped)
Press the control to recline the
seatback forward or rearward.
Using the power lumbar support (if equipped)
The power lumbar control is located on the outboard side of the seat.
Press one side of the control to
adjust firmness.
Press the other side of the control
to adjust softness.
Using the manual lumbar support
The lumbar support control is
located on the outboard side of the
seat
Turn the lumbar support forward
toward the front of the vehicle for
more support.
Turn the lumbar support backward
toward the rear of the vehicle for
less support.
Seating and Safety Restraints
157
2011 F-250/350/450/550(f23)
Owners Guide, 1st Printing
USA(fus)
Page 158 of 441
Heated and cooled seats (if equipped)
The controls for the climate controlled seats are located on the dual
electronic automatic temperature control (DEATC) system.
Heated seats
WARNING:Persons who are unable to feel pain to the skin
because of advanced age, chronic illness, diabetes, spinal cord
injury, medication, alcohol use, exhaustion, or other physical
conditions, must exercise care when using the seat heater. The seat
heater may cause burns even at low temperatures, especially if used
for long periods of time. Do not place anything on the seat that
insulates against heat, such as a blanket or cushion, because this may
cause the seat heater to overheat. Do not puncture the seat with pins,
needles, or other pointed objects because this may damage the heating
element which may cause the seat heater to overheat. An overheated
seat may cause serious personal injury.
Note:Do not do the following:
•Place heavy objects on the seat
•Operate the seat heater if water or any other liquid is spilled on the
seat. Allow the seat to dry thoroughly.
The heated seats will only function when the engine is running.
To operate the heated seats:
Press once to activate the high heat
setting (three indicator lights).
Continue pressing to scroll through
the other settings; medium heat
(two indicator lights), low heat (one
indicator light) or off.
Cooled seats
The cooled seats will only function when the engine is running.
To operate the cooled seats:
Press once to activate the high cool
setting (three indicator lights).
Continue pressing to scroll through
the other settings; medium cool
(two indicator lights), low cool (one
indicator light) or off.
A/C
Seating and Safety Restraints
158
2011 F-250/350/450/550(f23)
Owners Guide, 1st Printing
USA(fus)
Page 159 of 441

If the engine falls below 350 rpm while the cooled seats are on, the
feature will turn itself off and will need to be reactivated.
Climate controlled seats air filter replacement (if equipped)
The climate controlled seat system includes air filters that must be
replaced periodically. Refer to thescheduled maintenance information
for more information.
•There is a filter located under the
rear of each front seat.
•The filter can be accessed from the second row seat. Move the front
seats all the way forward and up to ease access.
To remove an air filter:
1. Remove key from ignition.
2. Push up on the outside rigid edge
of the filter and rotate toward the
front of the vehicle once tabs are
released.
3. Remove filter.
Seating and Safety Restraints
159
2011 F-250/350/450/550(f23)
Owners Guide, 1st Printing
USA(fus)