engine FORD SUPER DUTY 2013 3.G Quick Reference Guide
[x] Cancel search | Manufacturer: FORD, Model Year: 2013, Model line: SUPER DUTY, Model: FORD SUPER DUTY 2013 3.GPages: 10, PDF Size: 1.94 MB
Page 3 of 10

1
3
4
2
5
6
89
1
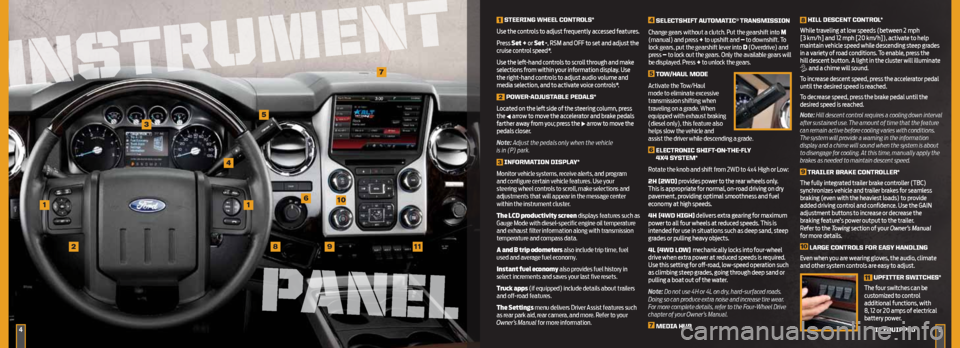
S teeRinG WHeeL COntROLS*
use the controls to adjust frequently accessed features.
p ress Set + or Set -, rsm and oFF to set and adjust the
cruise control speed*.
use the left-hand controls to scroll through and make
selections from within your information display. use
the right-hand controls to adjust audio volume and
media selection, and to activate voice controls*.
2
POWeR-ADJuS tABLe PeDALS*
l ocated on the left side of the steering column, press
the
arrow to move the accelerator and brake pedals
farther away from you; press the arrow to move the
pedals closer.
Note: Adjust the pedals only when the vehicle
is in (P) park.
3 inFORMA
tiOn DiSPLA y*
Monitor vehicle systems, receive alerts, and program
and configure certain vehicle features. Use your
steering wheel controls to scroll, make selections and
adjustments that will appear in the message center
within the instrument cluster.
The LCD productivity screen displays features such as
Gauge Mode with diesel-specific engine oil temperature
and exhaust filter information along with transmission
temperature and compass data.
A and B trip odometers also include trip time, fuel
used and average fuel economy.
Instant fuel economy also provides fuel history in
select increments and saves your last five resets.
Truck apps (if equipped) include details about trailers
and off-road features.
The Settings menu delivers Driver Assist features such
as rear park aid, rear camera, and more. Refer to your
Owner’s Manual for more information.
4
SeLe CtSHiFt Aut OMA tiC® tRAnSMiSSiOn
Change gears without a clutch. Put the gearshift into M
(manual) and press + to upshift and – to downshift. To
lock gears, put the gearshift lever into D (Overdrive) and
press – to lock out the gears. Only the available gears will
be displayed. Press + to unlock the gears.
5
t OW/HA uL MODe
Activate the Tow/Haul
mode to eliminate excessive
transmission shifting when
traveling on a grade. When
equipped with exhaust braking
(diesel only), this feature also
helps slow the vehicle and
assist the driver while descending a grade.
6 eLe CtROniC SHiFt -On-tHe-FLy
4X4 S yS teM*
Rotate the knob and shift from 2WD to 4x4 High or Low:
2H (2WD) provides power to the rear wheels only.
t his is appropriate for normal, on-road driving on dry
pavement, providing optimal smoothness and fuel
economy at high speeds.
4H (4WD HiGH) delivers extra gearing for maximum
power to all four wheels at reduced speeds. t his is
intended for use in situations such as deep sand, steep
grades or pulling heavy objects.
4L (4WD LOW) mechanically locks into four-wheel
drive when extra power at reduced speeds is required.
use this setting for off-road, low-speed operation such
as climbing steep grades, going through deep sand or
pulling a boat out of the water.
Note: Do not use 4H or 4L on dry, hard-surfaced roads.
Doing so can produce extra noise and increase tire wear.
For more complete details, refer to the Four-Wheel Drive
chapter of your Owner’s Manual.
7 MeDiA HuB
8
HiLL DeSCent COntROL*
while traveling at low speeds (between 2 mph
[3 km/h] and 12 mph [20 km/h]), activate to help
maintain vehicle speed while descending steep grades
in a variety of road conditions. t o enable, press the
hill descent button. a light in the cluster will illuminate
and a chime will sound.
t o increase descent speed, press the accelerator pedal
until the desired speed is reached.
t o decrease speed, press the brake pedal until the
desired speed is reached.
Note: Hill descent control requires a cooling down interval
after sustained use. The amount of time that the feature
can remain active before cooling varies with conditions.
The system will provide a warning in the information
display and a chime will sound when the system is about
to disengage for cooling. At this time, manually apply the
brakes as needed to maintain descent speed.
9 tRAiLeR BRAke COntROLLeR*
t he fully integrated trailer brake controller (tBC)
synchronizes vehicle and trailer brakes for seamless
braking (even with the heaviest loads) to provide
added driving control and confidence. use the G aIn
adjustment buttons to increase or decrease the
braking feature’s power output to the trailer.
r efer to the Towing section of your Owner’s Manual
for more details.
10 LARGe COntROLS FOR eAS y HAnDLinG
e ven when you are wearing gloves, the audio, climate
and other system controls are easy to adjust.
11 uPFitteR SWit
CHeS*
t he four switches can be
customized to control
additional functions, with
8, 12 or 20 amps of electrical
battery power.
101
11
*iF e QuiPPeD45
7
INSTRUMENT
INSTRUMENT
PANEL
Page 9 of 10

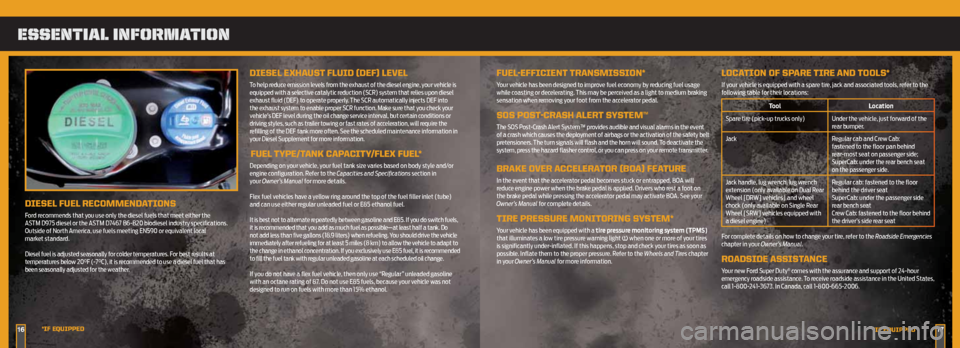
DieSeL FueL ReCOMMenDA tiOnS
Ford recommends that you use only the diesel fuels that meet either the
ASTM D975 diesel or the ASTM D7467 B6-B20 biodiesel industry specifications.
Outside of North America, use fuels meeting EN590 or equivalent local
market standard.
Diesel fuel is adjusted seasonally for colder temperatures. For best results at
temperatures below 20°F (-7°C), it is recommended to use a diesel fuel that has
been seasonally adjusted for the weather.
eSSential information
1716*iF e QuiPPeD
*iF eQuiPPeD
DieSeL eXHAuSt FL uiD (DeF) LeVeL
To help reduce emission levels from the exhaust of the diesel engine, your vehicle is
equipped with a selective catalytic reduction (SCR) system that relies upon diesel
exhaust fluid (DEF) to operate properly. The SCR automatically injects DEF into
the exhaust system to enable proper SCR function. Make sure that you check your
vehicle’s DEF level during the oil change service interval, but certain conditions or
driving styles, such as trailer towing or fast rates of acceleration, will require the
refilling of the DEF tank more often. See the scheduled maintenance information in
your Diesel Supplement for more information.
FueL t yPe/ tAnk C APACity/FLeX FueL *
Depending on your vehicle, your fuel tank size varies based on body style and/or
engine configuration. Refer to the Capacities and Specifications section in
your Owner’s Manual for more details.
Flex fuel vehicles have a yellow ring around the top of the fuel filler inlet (tube)
and can use either regular unleaded fuel or E85 ethanol fuel.
It is best not to alternate repeatedly between gasoline and E85. If you do switch fuels,
it is recommended that you add as much fuel as possible—at least half a tank. Do
not add less than five gallons (18.9 liters) when refueling. You should drive the vehicle
immediately after refueling for at least 5 miles (8 km) to allow the vehicle to adapt to
the change in ethanol concentration. If you exclusively use E85 fuel, it is recommended
to fill the fuel tank with regular unleaded gasoline at each scheduled oil change.
If you do not have a flex fuel vehicle, then only use “Regular” unleaded gasoline
with an octane rating of 87. Do not use E85 fuels, because your vehicle was not
designed to run on fuels with more than 15% ethanol.
FueL-eFFiCient tRAnSMiSSiOn*
Your vehicle has been designed to improve fuel economy by reducing fuel usage
while coasting or decelerating. This may be perceived as a light to medium braking
sensation when removing your foot from the accelerator pedal.
SOS POSt-CRASH ALeR t SySteM™
The SOS Post-Crash Alert System™ provides audible and visual alarms in the event
of a crash which causes the deployment of airbags or the activation of the safety belt
pretensioners. The turn signals will flash and the horn will sound. To deactivate the
system, press the hazard flasher control, or you can press on your remote transmitter.
BRAke OVeR ACCeLeRAtOR (BOA) FeA tuRe
In the event that the accelerator pedal becomes stuck or entrapped, BOA will
reduce engine power when the brake pedal is applied. Drivers who rest a foot on
the brake pedal while pressing the accelerator pedal may activate BOA. See your
Owner’s Manual for complete details.
tiRe PReSSuRe MOnitORinG SySteM*
Your vehicle has been equipped with a tire pressure monitoring system (tPMS)
that illuminates a low tire pressure warning light when one or more of your tires
is significantly under-inflated. If this happens, stop and check your tires as soon as
possible. Inflate them to the proper pressure. Refer to the Wheels and Tires chapter
in your Owner’s Manual for more information.
L OCA tiOn OF SPARe tiRe AnD tOOLS*
If your vehicle is equipped with a spare tire, jack and associated tools, refer to the
following table for their locations:
t ool Location
Spare tire (pick-up trucks only) Under the vehicle, just forward of the
rear bumper.
Jack Regular cab and Crew Cab:
fastened to the floor pan behind
rear-most seat on passenger side;
SuperCab: under the rear bench seat
on the passenger side.
Jack handle, lug wrench, lug wrench
extension (only available on Dual Rear
Wheel [DRW] vehicles) and wheel
chock (only available on Single Rear
Wheel [SRW] vehicles equipped with
a diesel engine) Regular cab: fastened to the floor
behind the driver seat
SuperCab: under the passenger side
rear bench seat
Crew Cab: fastened to the floor behind
the driver’s side rear seat
For complete details on how to change your tire, refer to the Roadside Emergencies
chapter in your Owner’s Manual.
ROADSiDe A SSiStAnCe
Your new Ford Super Duty® comes with the assurance and support of 24-hour
emergency roadside assistance. To receive roadside assistance in the United States,
call 1-800-241-3673. In Canada, call 1-800-665-2006.