door lock FORD SUPER DUTY 2016 3.G Owner's Manual
[x] Cancel search | Manufacturer: FORD, Model Year: 2016, Model line: SUPER DUTY, Model: FORD SUPER DUTY 2016 3.GPages: 510, PDF Size: 5.42 MB
Page 134 of 510
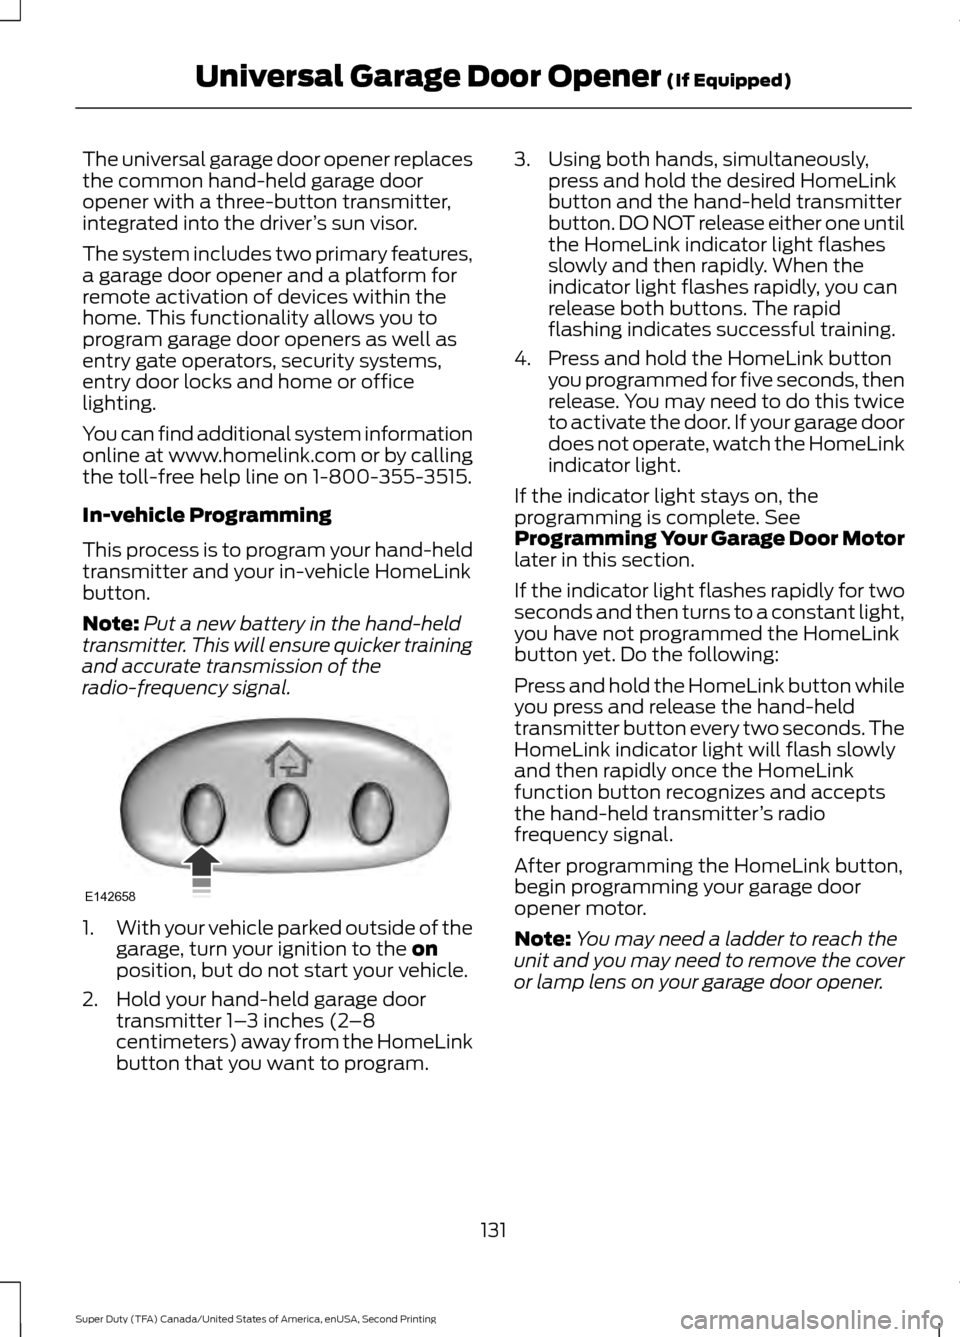
The universal garage door opener replaces
the common hand-held garage door
opener with a three-button transmitter,
integrated into the driver
’s sun visor.
The system includes two primary features,
a garage door opener and a platform for
remote activation of devices within the
home. This functionality allows you to
program garage door openers as well as
entry gate operators, security systems,
entry door locks and home or office
lighting.
You can find additional system information
online at www.homelink.com or by calling
the toll-free help line on 1-800-355-3515.
In-vehicle Programming
This process is to program your hand-held
transmitter and your in-vehicle HomeLink
button.
Note: Put a new battery in the hand-held
transmitter. This will ensure quicker training
and accurate transmission of the
radio-frequency signal. 1.
With your vehicle parked outside of the
garage, turn your ignition to the on
position, but do not start your vehicle.
2. Hold your hand-held garage door transmitter 1– 3 inches (2–8
centimeters) away from the HomeLink
button that you want to program. 3. Using both hands, simultaneously,
press and hold the desired HomeLink
button and the hand-held transmitter
button. DO NOT release either one until
the HomeLink indicator light flashes
slowly and then rapidly. When the
indicator light flashes rapidly, you can
release both buttons. The rapid
flashing indicates successful training.
4. Press and hold the HomeLink button you programmed for five seconds, then
release. You may need to do this twice
to activate the door. If your garage door
does not operate, watch the HomeLink
indicator light.
If the indicator light stays on, the
programming is complete. See
Programming Your Garage Door Motor
later in this section.
If the indicator light flashes rapidly for two
seconds and then turns to a constant light,
you have not programmed the HomeLink
button yet. Do the following:
Press and hold the HomeLink button while
you press and release the hand-held
transmitter button every two seconds. The
HomeLink indicator light will flash slowly
and then rapidly once the HomeLink
function button recognizes and accepts
the hand-held transmitter ’s radio
frequency signal.
After programming the HomeLink button,
begin programming your garage door
opener motor.
Note: You may need a ladder to reach the
unit and you may need to remove the cover
or lamp lens on your garage door opener.
131
Super Duty (TFA) Canada/United States of America, enUSA, Second Printing Universal Garage Door Opener
(If Equipped)E142658
Page 140 of 510
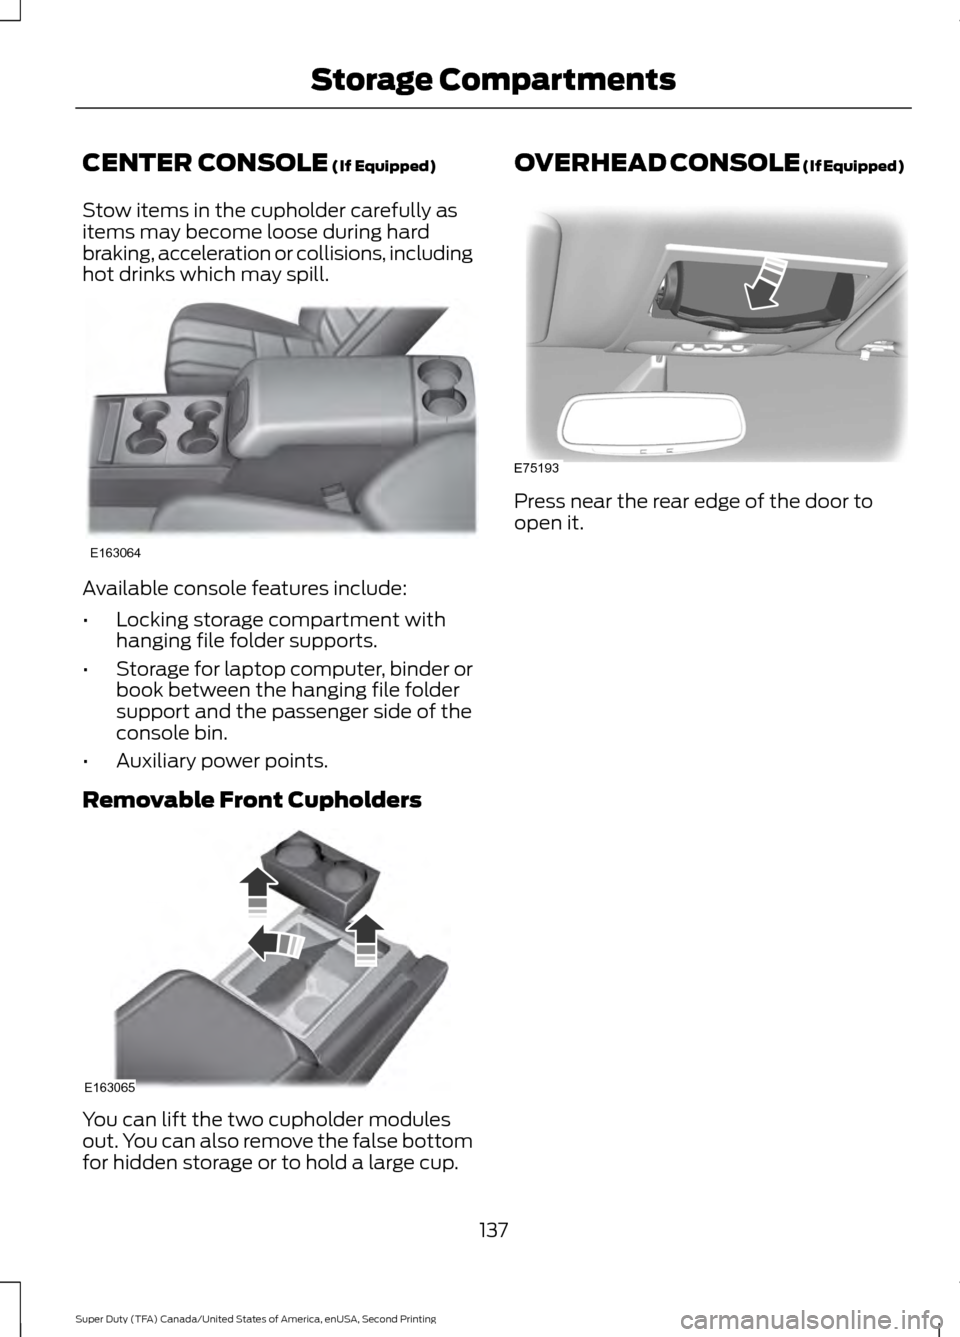
CENTER CONSOLE (If Equipped)
Stow items in the cupholder carefully as
items may become loose during hard
braking, acceleration or collisions, including
hot drinks which may spill. Available console features include:
•
Locking storage compartment with
hanging file folder supports.
• Storage for laptop computer, binder or
book between the hanging file folder
support and the passenger side of the
console bin.
• Auxiliary power points.
Removable Front Cupholders You can lift the two cupholder modules
out. You can also remove the false bottom
for hidden storage or to hold a large cup. OVERHEAD CONSOLE (If Equipped)
Press near the rear edge of the door to
open it.
137
Super Duty (TFA) Canada/United States of America, enUSA, Second Printing Storage CompartmentsE163064 E163065 E75193
Page 143 of 510
You may experience a decrease in peak
performance when the engine is cold when
operating on E85 ethanol.
Do not crank the engine for more than 10
seconds at a time as starter damage may
occur. If the engine fails to start, turn the
key to off and wait 30 seconds before
trying again.
Do not use starting fluid such as ether in
the air intake system. Such fluid could
cause immediate explosive damage to the
engine and possible personal injury.
If you should experience cold weather
starting problems on E85 ethanol, and
neither an alternative brand of E85 ethanol
nor an engine block heater is available, the
addition of unleaded gasoline to your tank
improves cold starting performance. Your
vehicle is designed to operate on E85
ethanol alone, unleaded gasoline alone, or
any mixture of the two.
If the Engine Fails to Start Using the
Preceding Instructions (Flexible Fuel
Vehicles Only)
1. Press and hold down the accelerator
one-third to one-half the way to the
floor, then crank the engine.
2. When the engine starts, release the key, then gradually release the
accelerator pedal as the engine speeds
up. If the engine still fails to start,
repeat Step 1.
Guarding Against Exhaust Fumes WARNING
If you smell exhaust fumes inside
your vehicle, have your vehicle
checked by your authorized dealer
immediately. Do not drive your vehicle if
you smell exhaust fumes. Carbon
monoxide is present in exhaust fumes.
Take precautions to avoid its dangerous
effects. Important Ventilating Information
If you stop your vehicle and then leave the
engine idling for long periods of time, we
recommend that you do one of the
following:
•
Open the windows at least 1 inch (2.5
centimeters).
• Set your climate control to outside air.
ENGINE BLOCK HEATER (If
Equipped) WARNINGS
Failure to follow engine block heater
instructions could result in property
damage or serious personal injury.
Do not use your heater with
ungrounded electrical systems or
two-pronged adapters. There is a risk
of electrical shock. Do not fully close the hood, or allow
it to drop under its own weight when
using the engine block heater. This
could damage the power cable and may
cause an electrical short resulting in fire,
injury and property damage. Note:
The heater is most effective when
outdoor temperatures are below 0°F
(-18°C).
The heater acts as a starting aid by
warming the engine coolant. This allows
the climate control system to respond
quickly. The equipment includes a heater
element (installed in the engine block) and
a wire harness. You can connect the
system to a grounded 120-volt AC
electrical source.
140
Super Duty (TFA) Canada/United States of America, enUSA, Second Printing Starting and Stopping the Engine
Page 144 of 510
We recommend that you do the following
for a safe and correct operation:
•
Use a 16-gauge outdoor extension cord
that is product certified by
Underwriter ’s Laboratory (UL) or
Canadian Standards Association
(CSA). This extension cord must be
suitable for use outdoors, in cold
temperatures, and be clearly marked
Suitable for Use with Outdoor
Appliances. Do not use an indoor
extension cord outdoors. This could
result in an electric shock or become a
fire hazard.
• Use as short an extension cord as
possible.
• Do not use multiple extension cords.
• Make sure that when in operation, the
extension cord plug and heater cord
plug connections are free and clear of
water. This could cause an electric
shock or fire.
• Make sure your vehicle is parked in a
clean area, clear of combustibles.
• Make sure the heater, heater cord and
extension cord are firmly connected.
• Check for heat anywhere in the
electrical hookup once the system has
been operating for approximately 30
minutes.
• Make sure the system is unplugged and
properly stowed before starting and
driving your vehicle. Make sure the
protective cover seals the prongs of the
block heater cord plug when not in use.
• Make sure the heater system is
checked for proper operation before
winter.
Using the Engine Block Heater
Make sure the receptacle terminals are
clean and dry prior to use. Clean them with
a dry cloth if necessary. The heater uses 0.4 to 1.0 kilowatt-hours
of energy per hour of use. The system does
not have a thermostat. It achieves
maximum temperature after
approximately three hours of operation.
Using the heater longer than three hours
does not improve system performance and
unnecessarily uses electricity.
141
Super Duty (TFA) Canada/United States of America, enUSA, Second Printing Starting and Stopping the Engine
Page 148 of 510
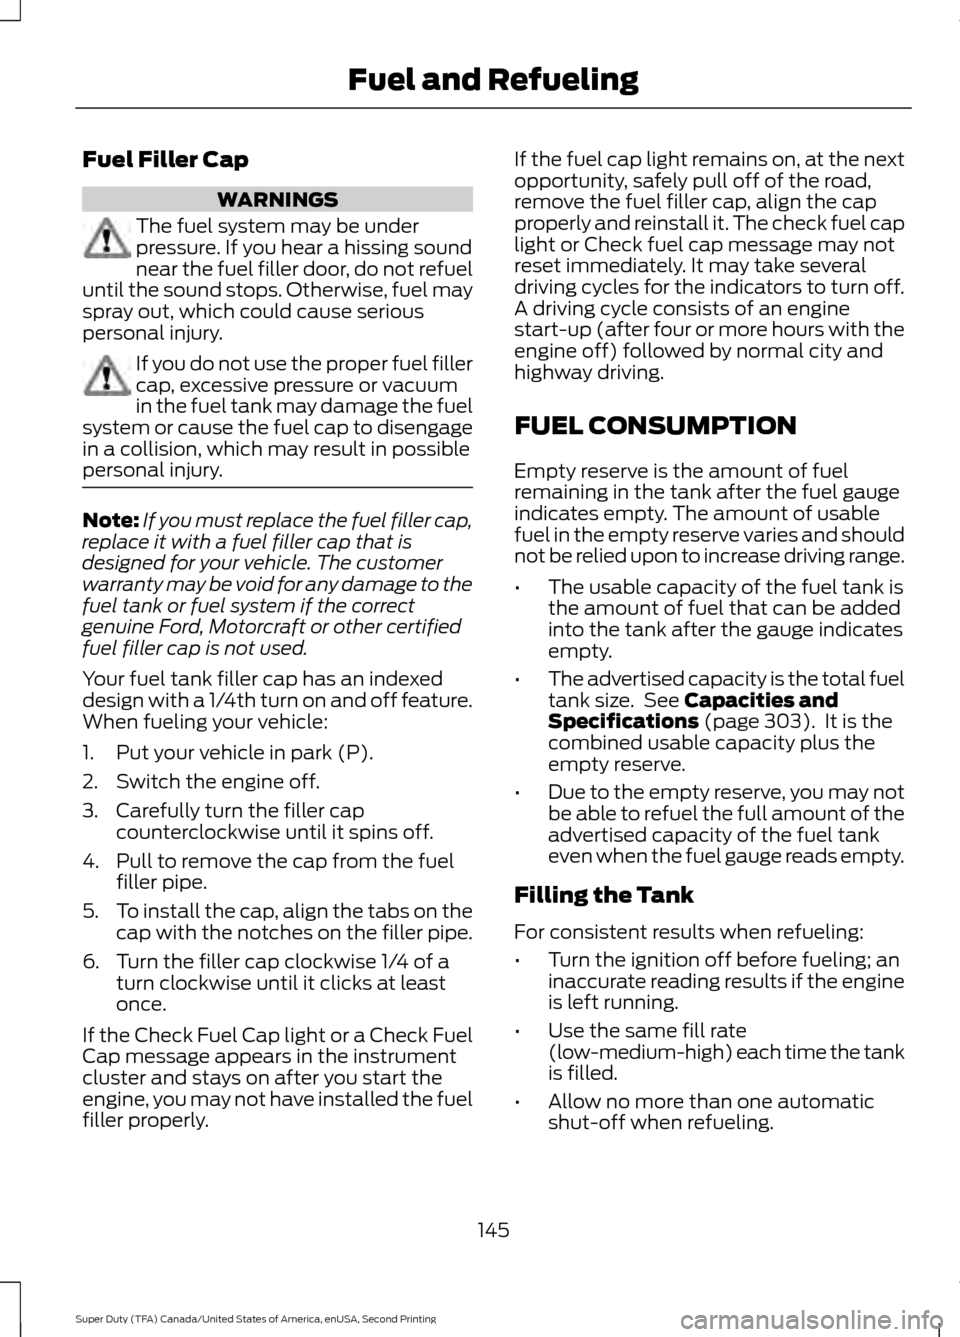
Fuel Filler Cap
WARNINGS
The fuel system may be under
pressure. If you hear a hissing sound
near the fuel filler door, do not refuel
until the sound stops. Otherwise, fuel may
spray out, which could cause serious
personal injury. If you do not use the proper fuel filler
cap, excessive pressure or vacuum
in the fuel tank may damage the fuel
system or cause the fuel cap to disengage
in a collision, which may result in possible
personal injury. Note:
If you must replace the fuel filler cap,
replace it with a fuel filler cap that is
designed for your vehicle. The customer
warranty may be void for any damage to the
fuel tank or fuel system if the correct
genuine Ford, Motorcraft or other certified
fuel filler cap is not used.
Your fuel tank filler cap has an indexed
design with a 1/4th turn on and off feature.
When fueling your vehicle:
1. Put your vehicle in park (P).
2. Switch the engine off.
3. Carefully turn the filler cap counterclockwise until it spins off.
4. Pull to remove the cap from the fuel filler pipe.
5. To install the cap, align the tabs on the
cap with the notches on the filler pipe.
6. Turn the filler cap clockwise 1/4 of a turn clockwise until it clicks at least
once.
If the Check Fuel Cap light or a Check Fuel
Cap message appears in the instrument
cluster and stays on after you start the
engine, you may not have installed the fuel
filler properly. If the fuel cap light remains on, at the next
opportunity, safely pull off of the road,
remove the fuel filler cap, align the cap
properly and reinstall it. The check fuel cap
light or Check fuel cap message may not
reset immediately. It may take several
driving cycles for the indicators to turn off.
A driving cycle consists of an engine
start-up (after four or more hours with the
engine off) followed by normal city and
highway driving.
FUEL CONSUMPTION
Empty reserve is the amount of fuel
remaining in the tank after the fuel gauge
indicates empty. The amount of usable
fuel in the empty reserve varies and should
not be relied upon to increase driving range.
•
The usable capacity of the fuel tank is
the amount of fuel that can be added
into the tank after the gauge indicates
empty.
• The advertised capacity is the total fuel
tank size. See Capacities and
Specifications (page 303). It is the
combined usable capacity plus the
empty reserve.
• Due to the empty reserve, you may not
be able to refuel the full amount of the
advertised capacity of the fuel tank
even when the fuel gauge reads empty.
Filling the Tank
For consistent results when refueling:
• Turn the ignition off before fueling; an
inaccurate reading results if the engine
is left running.
• Use the same fill rate
(low-medium-high) each time the tank
is filled.
• Allow no more than one automatic
shut-off when refueling.
145
Super Duty (TFA) Canada/United States of America, enUSA, Second Printing Fuel and Refueling
Page 232 of 510
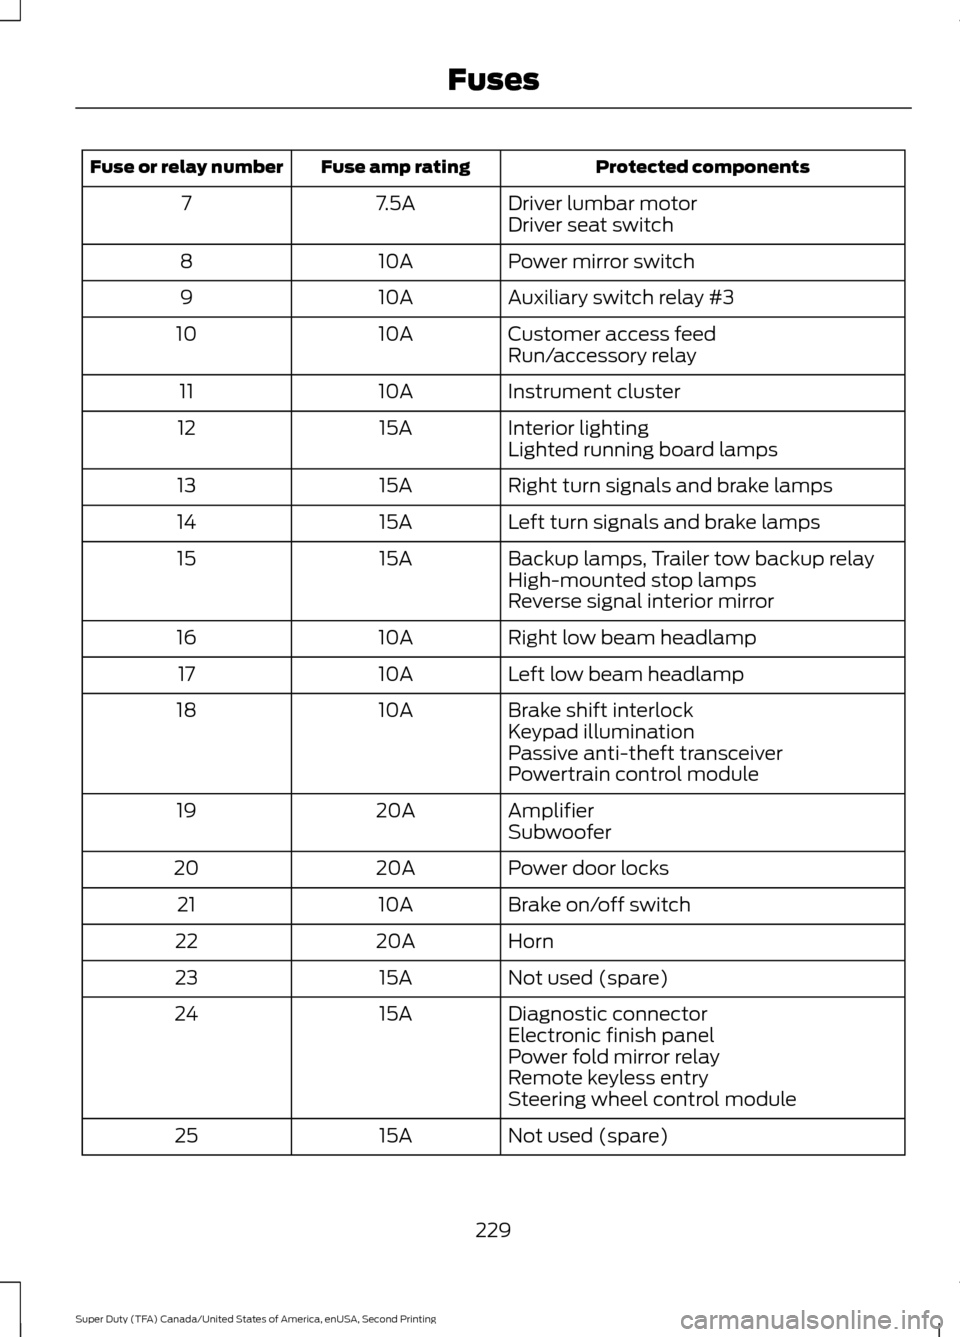
Protected components
Fuse amp rating
Fuse or relay number
Driver lumbar motor
7.5A
7
Driver seat switch
Power mirror switch
10A
8
Auxiliary switch relay #3
10A
9
Customer access feed
10A
10
Run/accessory relay
Instrument cluster
10A
11
Interior lighting
15A
12
Lighted running board lamps
Right turn signals and brake lamps
15A
13
Left turn signals and brake lamps
15A
14
Backup lamps, Trailer tow backup relay
15A
15
High-mounted stop lamps
Reverse signal interior mirror
Right low beam headlamp
10A
16
Left low beam headlamp
10A
17
Brake shift interlock
10A
18
Keypad illumination
Passive anti-theft transceiver
Powertrain control module
Amplifier
20A
19
Subwoofer
Power door locks
20A
20
Brake on/off switch
10A
21
Horn
20A
22
Not used (spare)
15A
23
Diagnostic connector
15A
24
Electronic finish panel
Power fold mirror relay
Remote keyless entry
Steering wheel control module
Not used (spare)
15A
25
229
Super Duty (TFA) Canada/United States of America, enUSA, Second Printing Fuses
Page 233 of 510
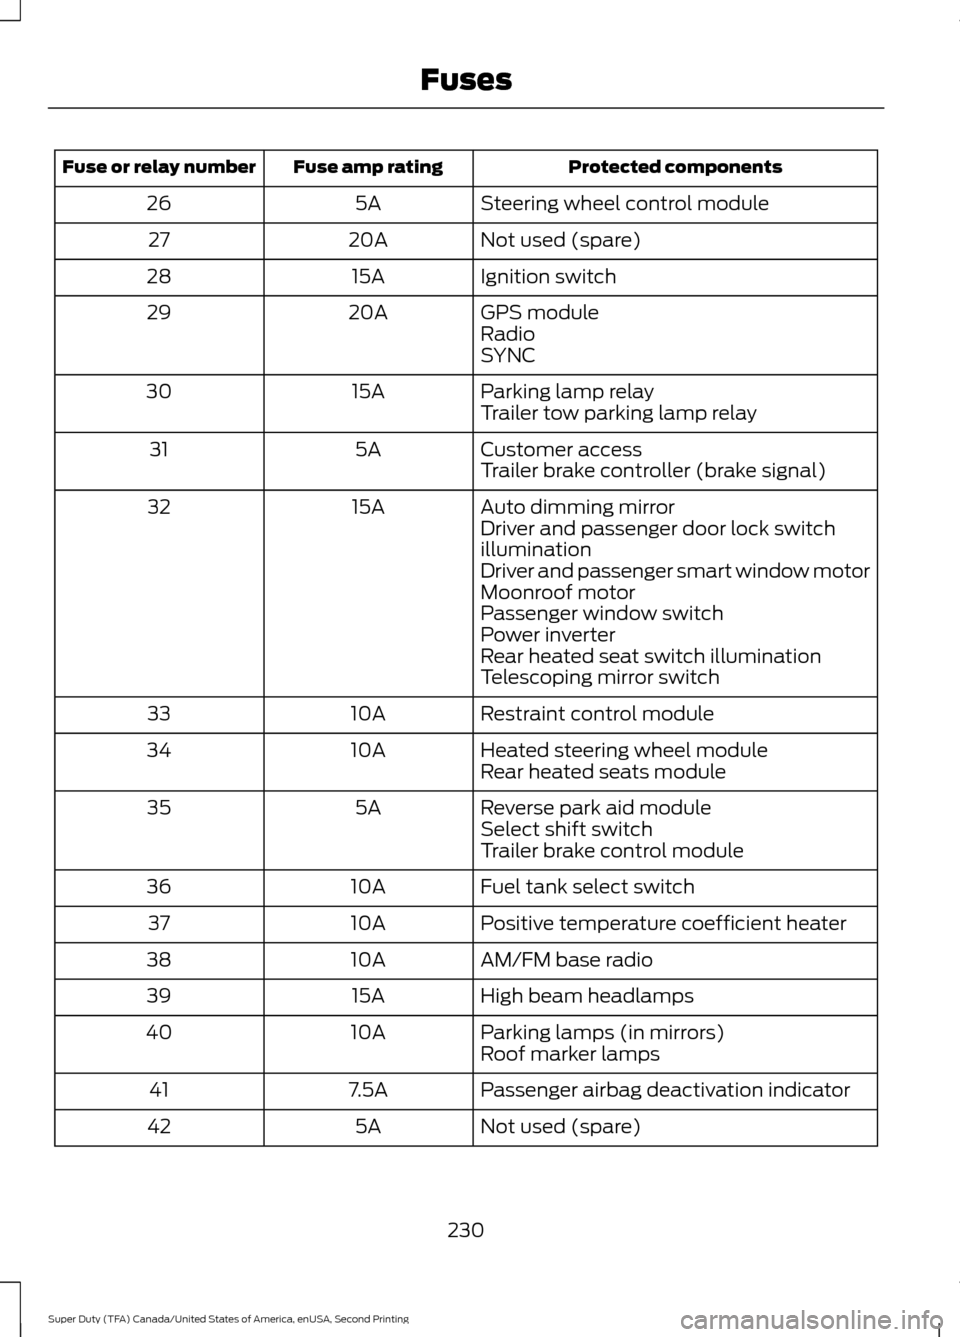
Protected components
Fuse amp rating
Fuse or relay number
Steering wheel control module
5A
26
Not used (spare)
20A
27
Ignition switch
15A
28
GPS module
20A
29
Radio
SYNC
Parking lamp relay
15A
30
Trailer tow parking lamp relay
Customer access
5A
31
Trailer brake controller (brake signal)
Auto dimming mirror
15A
32
Driver and passenger door lock switch
illumination
Driver and passenger smart window motor
Moonroof motor
Passenger window switch
Power inverter
Rear heated seat switch illumination
Telescoping mirror switch
Restraint control module
10A
33
Heated steering wheel module
10A
34
Rear heated seats module
Reverse park aid module
5A
35
Select shift switch
Trailer brake control module
Fuel tank select switch
10A
36
Positive temperature coefficient heater
10A
37
AM/FM base radio
10A
38
High beam headlamps
15A
39
Parking lamps (in mirrors)
10A
40
Roof marker lamps
Passenger airbag deactivation indicator
7.5A
41
Not used (spare)
5A
42
230
Super Duty (TFA) Canada/United States of America, enUSA, Second Printing Fuses
Page 249 of 510
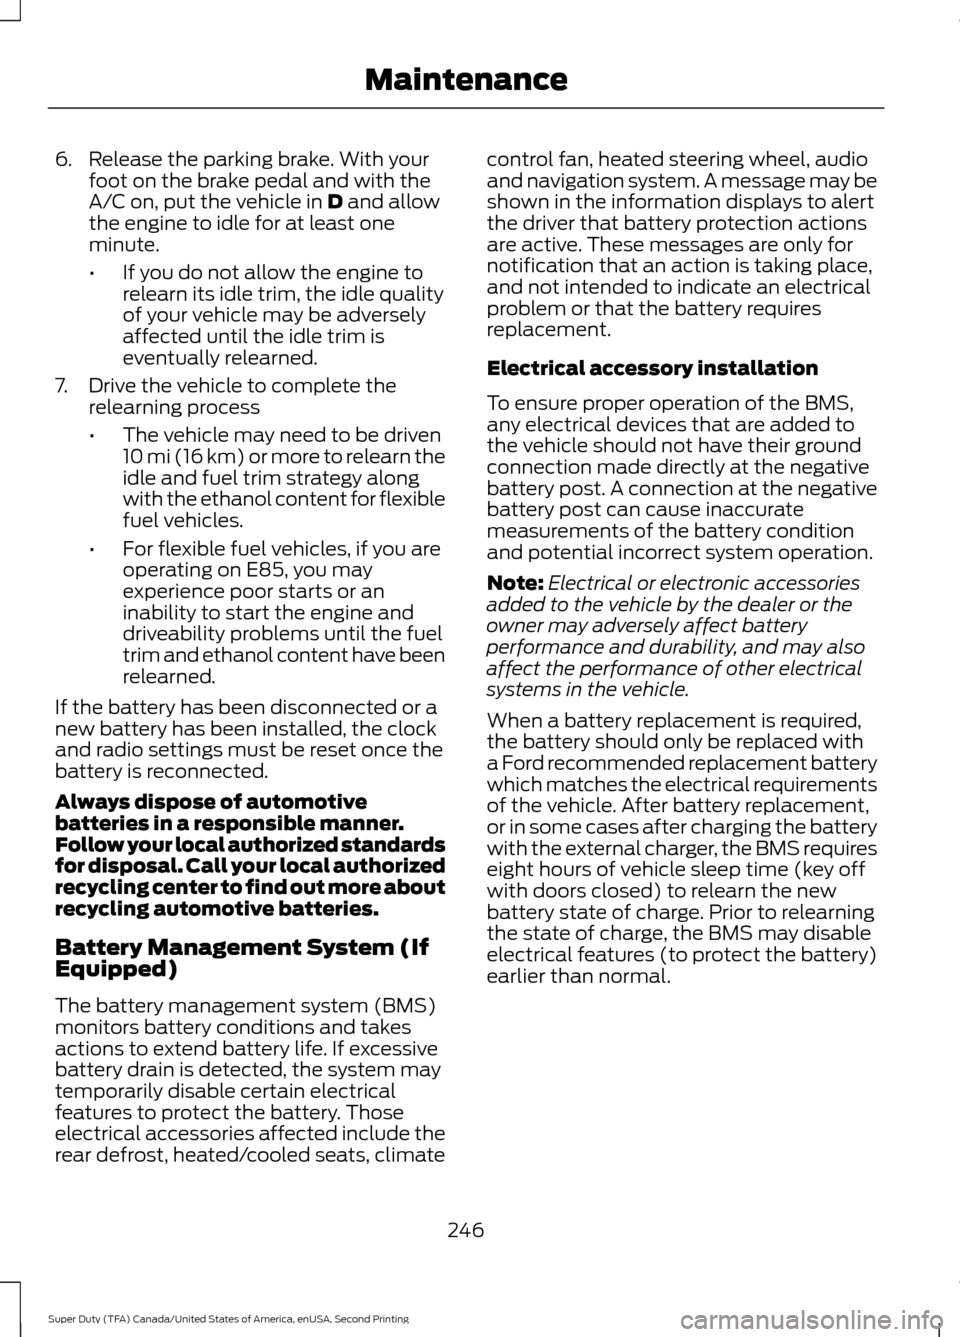
6. Release the parking brake. With your
foot on the brake pedal and with the
A/C on, put the vehicle in D and allow
the engine to idle for at least one
minute.
• If you do not allow the engine to
relearn its idle trim, the idle quality
of your vehicle may be adversely
affected until the idle trim is
eventually relearned.
7. Drive the vehicle to complete the relearning process
•The vehicle may need to be driven
10 mi (16 km) or more to relearn the
idle and fuel trim strategy along
with the ethanol content for flexible
fuel vehicles.
• For flexible fuel vehicles, if you are
operating on E85, you may
experience poor starts or an
inability to start the engine and
driveability problems until the fuel
trim and ethanol content have been
relearned.
If the battery has been disconnected or a
new battery has been installed, the clock
and radio settings must be reset once the
battery is reconnected.
Always dispose of automotive
batteries in a responsible manner.
Follow your local authorized standards
for disposal. Call your local authorized
recycling center to find out more about
recycling automotive batteries.
Battery Management System (If
Equipped)
The battery management system (BMS)
monitors battery conditions and takes
actions to extend battery life. If excessive
battery drain is detected, the system may
temporarily disable certain electrical
features to protect the battery. Those
electrical accessories affected include the
rear defrost, heated/cooled seats, climate control fan, heated steering wheel, audio
and navigation system. A message may be
shown in the information displays to alert
the driver that battery protection actions
are active. These messages are only for
notification that an action is taking place,
and not intended to indicate an electrical
problem or that the battery requires
replacement.
Electrical accessory installation
To ensure proper operation of the BMS,
any electrical devices that are added to
the vehicle should not have their ground
connection made directly at the negative
battery post. A connection at the negative
battery post can cause inaccurate
measurements of the battery condition
and potential incorrect system operation.
Note:
Electrical or electronic accessories
added to the vehicle by the dealer or the
owner may adversely affect battery
performance and durability, and may also
affect the performance of other electrical
systems in the vehicle.
When a battery replacement is required,
the battery should only be replaced with
a Ford recommended replacement battery
which matches the electrical requirements
of the vehicle. After battery replacement,
or in some cases after charging the battery
with the external charger, the BMS requires
eight hours of vehicle sleep time (key off
with doors closed) to relearn the new
battery state of charge. Prior to relearning
the state of charge, the BMS may disable
electrical features (to protect the battery)
earlier than normal.
246
Super Duty (TFA) Canada/United States of America, enUSA, Second Printing Maintenance
Page 261 of 510
•
Do not allow wax to come in contact
with any non-body (low-gloss black)
colored trim. The wax will discolor or
stain the parts over time.
•Roof racks.
• Bumpers.
• Grained door handles.
• Side moldings.
• Mirror housings.
• Windshield cowl area.
• Do not apply wax to glass areas.
• After waxing, your car's paint should
feel smooth, and be free of streaks and
smudges.
CLEANING THE ENGINE
Engines are more efficient when they are
clean because grease and dirt buildup keep
the engine warmer than normal.
When washing:
• Take care when using a power washer
to clean the engine. The high-pressure
fluid could penetrate the sealed parts
and cause damage.
• Do not spray a hot engine with cold
water to avoid cracking the engine
block or other engine components.
• Spray Motorcraft Engine Shampoo and
Degreaser on all parts that require
cleaning and pressure rinse clean. In
Canada, use Motorcraft Engine
Shampoo.
• Never wash or rinse the engine while it
is hot or running; water in the running
engine may cause internal damage. •
Never wash or rinse any ignition coil,
spark plug wire or spark plug well, or
the area in and around these locations.
• Cover the battery, power distribution
box, and air filter assembly to prevent
water damage when cleaning the
engine.
CLEANING THE WINDOWS AND
WIPER BLADES
Car wash chemicals and environmental
fallout can result in windshield and wiper
blade contamination. Dirty windshield and
wipers will result in poor windshield wiper
operation. Keep the windshield and wiper
blades clean to maintain windshield wiper
performance.
To clean the windshield and wiper blades:
• Clean the windshield with a
non-abrasive glass cleaner. When
cleaning the interior of the windshield,
avoid getting any glass cleaner on the
instrument panel or door panels. Wipe
any glass cleaner off these surfaces
immediately.
• For windshields contaminated with
tree sap, chemicals, wax or bugs, clean
the entire windshield using steel wool
(no greater than 0000 grade) in a
circular motion and rinse with water.
• Clean the wiper blades with isopropyl
rubbing alcohol or windshield washer
concentrate.
Note: Do not use razor blades or other
sharp objects to clean or remove decals
from the inside of the heated rear window.
The vehicle warranty does not cover
damage caused to the heated rear window
grid lines.
258
Super Duty (TFA) Canada/United States of America, enUSA, Second Printing Vehicle Care
Page 380 of 510
This system uses a four-corner strategy to
provide quick access to several vehicle
features and settings. The touchscreen
provides easy interaction with your cell
phone, entertainment, information and
system settings. The corners display active
modes within the menus, for example; your
cell phone's status.
Note:
Some features are not available while
your vehicle is moving.
Note: You can access the entertainment
features for 30 minutes after you switch the
ignition off, and no doors are opened.
PHONE
Press to select any of the following: Message
Phone
Quick Dial
Phonebook
History
Messaging
Settings
NAVIGATION
Press to select any of the following: Message
My Home
Favorites
Previous Destinations
Point of Interest
Emergency
Street Address
Intersection Message
City Center
Map
Edit Route
Cancel Route
CLIMATE
Press the corresponding icons to control
the following options:
• Driver Settings
• Recirculated Air
• Auto
• Dual
• Passenger Settings
• A/C
• Defrost
SETTINGS Press to select any of the following:
Message
Clock
Display
Sound
Vehicle
Settings
Help
HOME Press to access the home
screen.
377
Super Duty (TFA) Canada/United States of America, enUSA, Second Printing MyFord Touch
™ (If Equipped)E142607 E142613