fuel pump FORD TAURUS 1999 3.G Owners Manual
[x] Cancel search | Manufacturer: FORD, Model Year: 1999, Model line: TAURUS, Model: FORD TAURUS 1999 3.GPages: 224, PDF Size: 1.42 MB
Page 110 of 224

Pull the release lever
to release the brake.
Driving with the
parking brake on will
cause the brakes to
wear out quickly and
reduce fuel economy.
STEERING
Your vehicle is equipped with power steering. Power
steering uses energy from the engine to help steer
the vehicle.
To prevent damage to the power steering pump:
²Never hold the steering wheel to the extreme
right or the extreme left for more than a few
seconds when the engine is running.
²Do not operate the vehicle with a low power
steering pump fluid level.
If the power steering system breaks down (or if the
engine is turned off), you can steer the vehicle
manually, but it takes more effort.
If the steering wanders or pulls, the condition could
be caused by any of the following:
²underinflated tire(s) on any wheel(s)
²high crown in center of road
²high crosswinds
²wheels out of alignment
²loose or worn components in steering linkage
Driving
110
Page 124 of 224

HAZARD FLASHER
Use only in an emergency to warn traffic of vehicle
breakdown, approaching danger, etc. The hazard
flashers can be operated when the ignition is off.
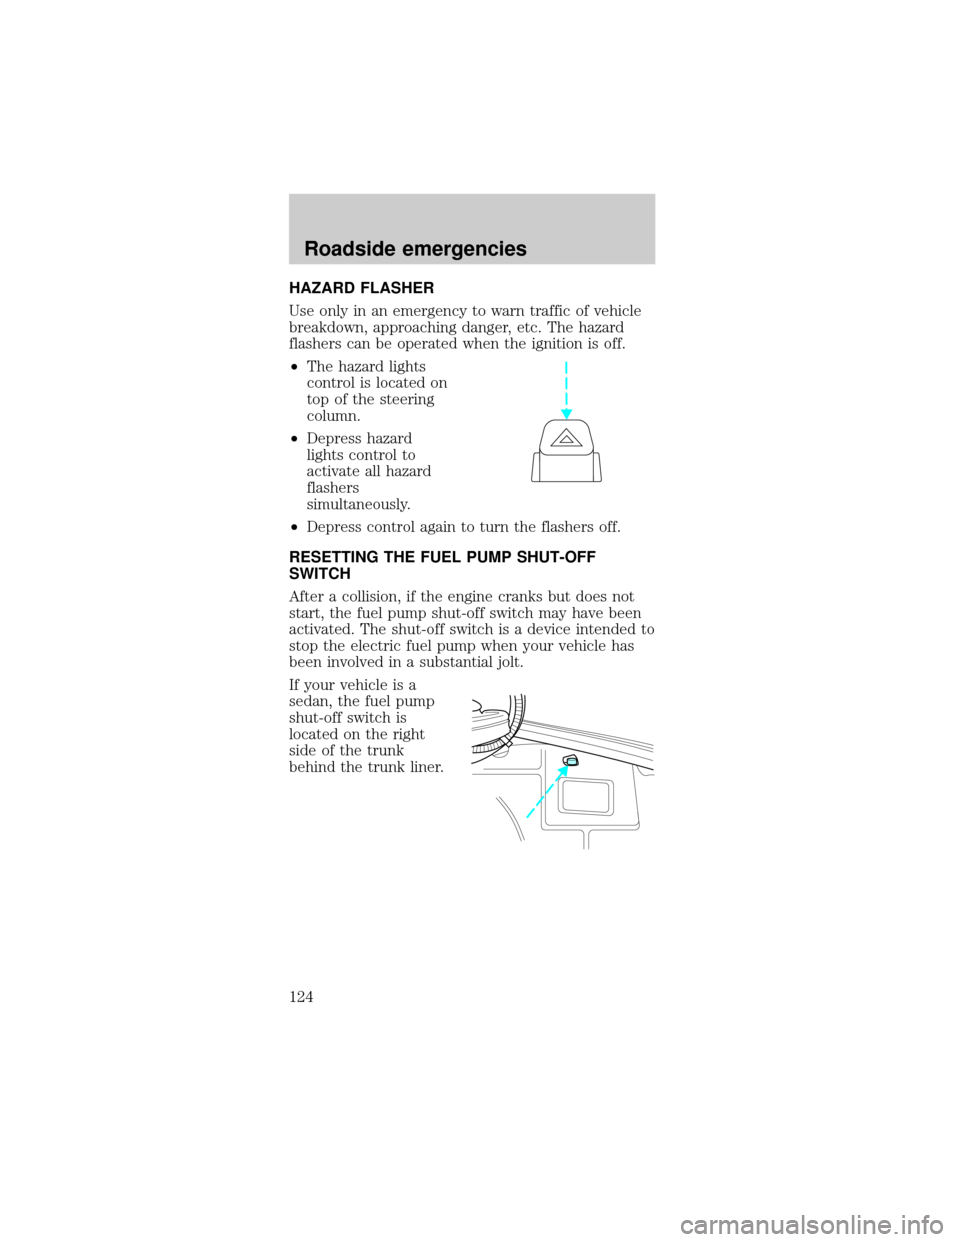
²The hazard lights
control is located on
top of the steering
column.
²Depress hazard
lights control to
activate all hazard
flashers
simultaneously.
²Depress control again to turn the flashers off.
RESETTING THE FUEL PUMP SHUT-OFF
SWITCH
After a collision, if the engine cranks but does not
start, the fuel pump shut-off switch may have been
activated. The shut-off switch is a device intended to
stop the electric fuel pump when your vehicle has
been involved in a substantial jolt.
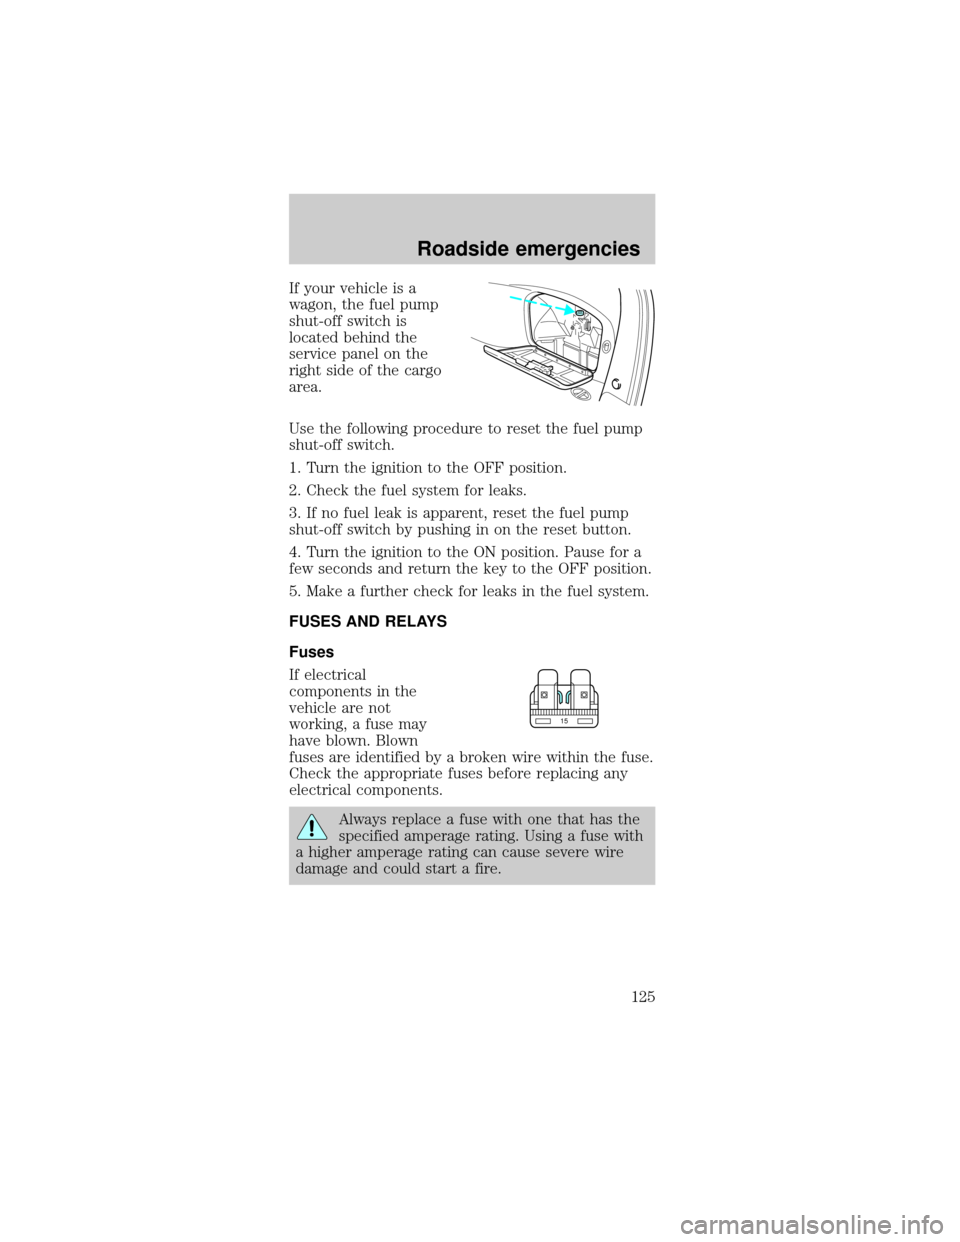
If your vehicle is a
sedan, the fuel pump
shut-off switch is
located on the right
side of the trunk
behind the trunk liner.
Roadside emergencies
124
Page 125 of 224

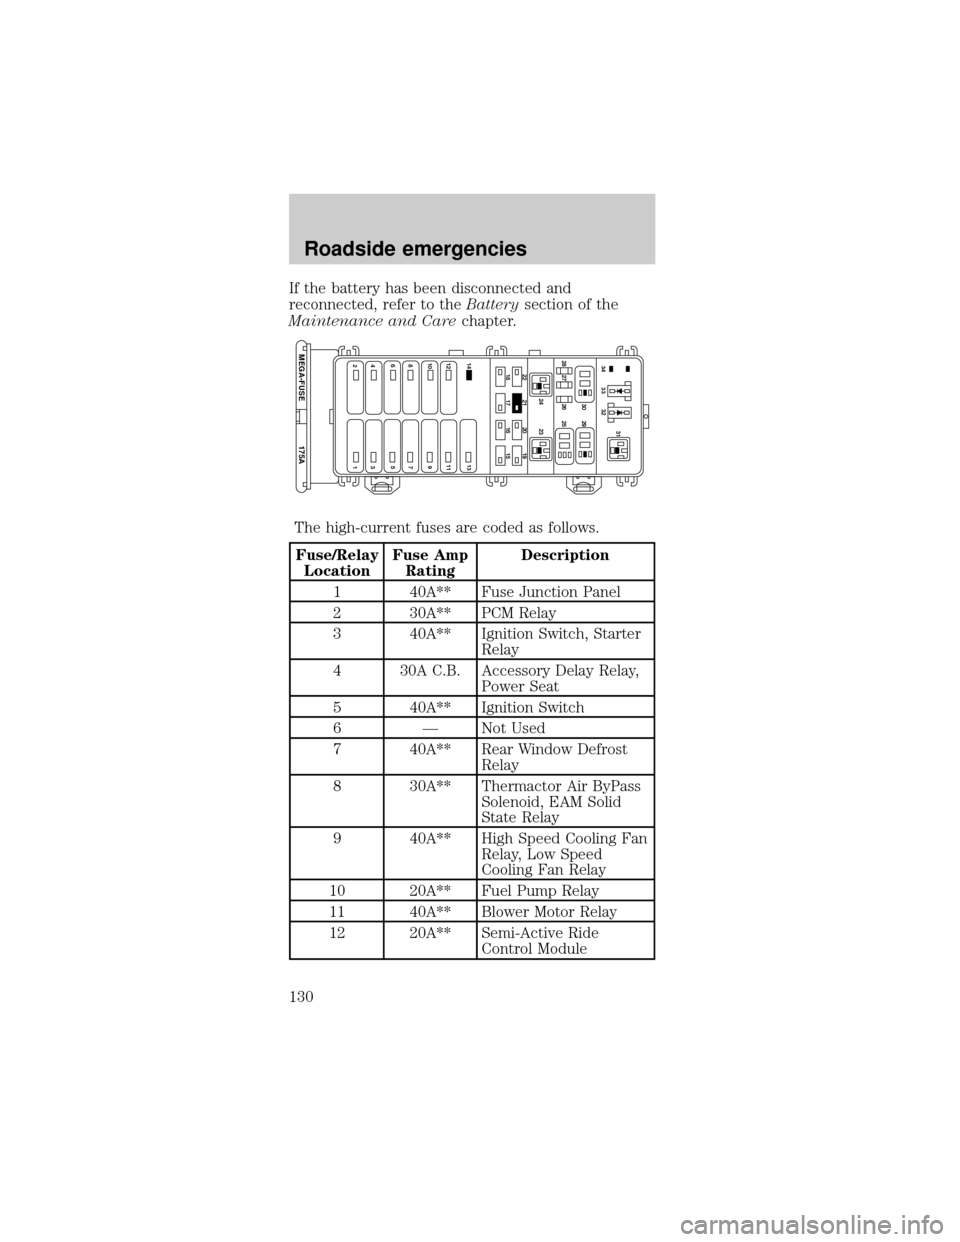
If your vehicle is a
wagon, the fuel pump
shut-off switch is
located behind the
service panel on the
right side of the cargo
area.
Use the following procedure to reset the fuel pump
shut-off switch.
1. Turn the ignition to the OFF position.
2. Check the fuel system for leaks.
3. If no fuel leak is apparent, reset the fuel pump
shut-off switch by pushing in on the reset button.
4. Turn the ignition to the ON position. Pause for a
few seconds and return the key to the OFF position.
5. Make a further check for leaks in the fuel system.
FUSES AND RELAYS
Fuses
If electrical
components in the
vehicle are not
working, a fuse may
have blown. Blown
fuses are identified by a broken wire within the fuse.
Check the appropriate fuses before replacing any
electrical components.
Always replace a fuse with one that has the
specified amperage rating. Using a fuse with
a higher amperage rating can cause severe wire
damage and could start a fire.
15
Roadside emergencies
125
Page 130 of 224

If the battery has been disconnected and
reconnected, refer to theBatterysection of the
Maintenance and Carechapter.
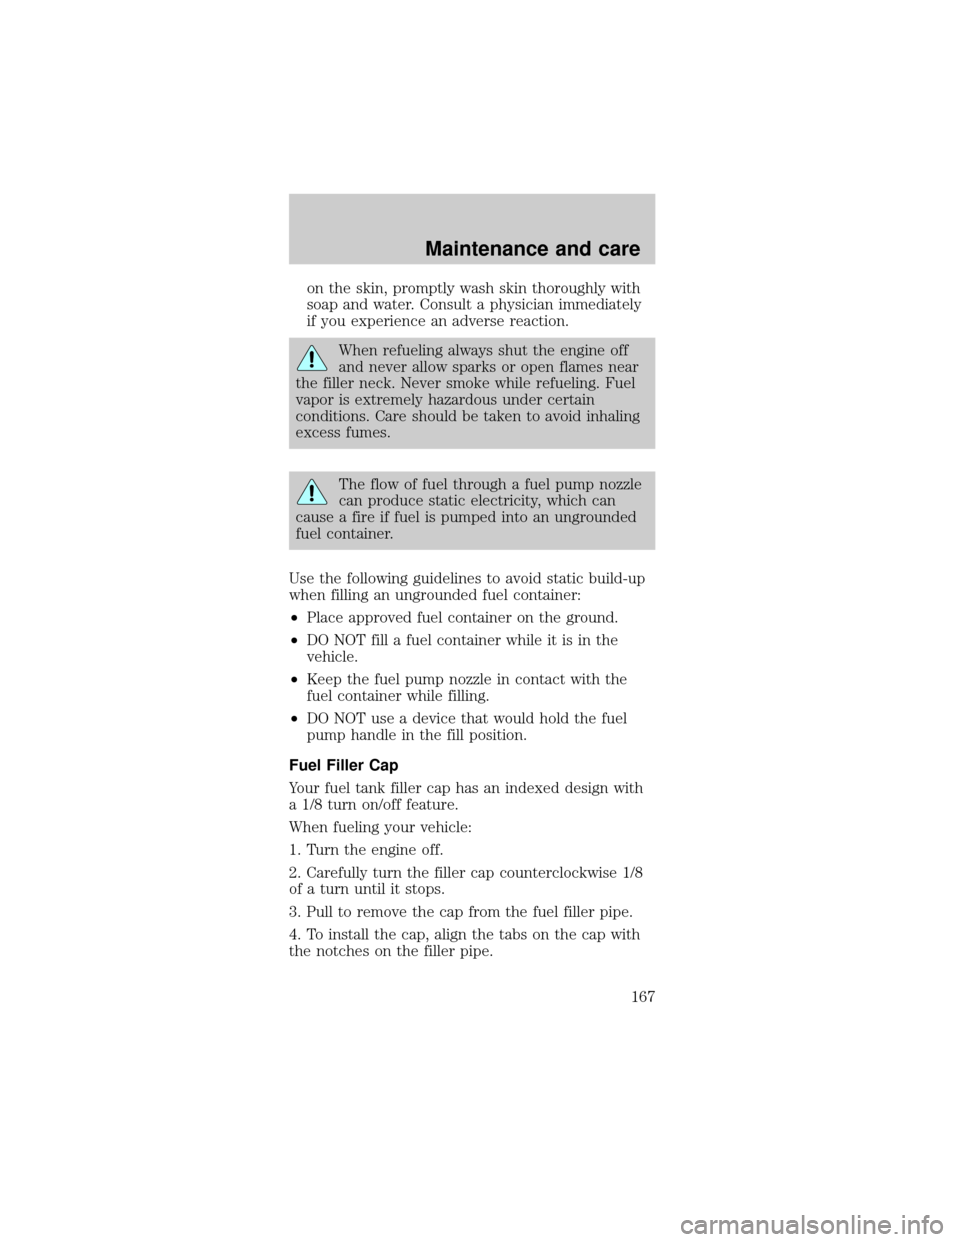
The high-current fuses are coded as follows.
Fuse/Relay
LocationFuse Amp
RatingDescription
1 40A** Fuse Junction Panel
2 30A** PCM Relay
3 40A** Ignition Switch, Starter
Relay
4 30A C.B. Accessory Delay Relay,
Power Seat
5 40A** Ignition Switch
6 Ð Not Used
7 40A** Rear Window Defrost
Relay
8 30A** Thermactor Air ByPass
Solenoid, EAM Solid
State Relay
9 40A** High Speed Cooling Fan
Relay, Low Speed
Cooling Fan Relay
10 20A** Fuel Pump Relay
11 40A** Blower Motor Relay
12 20A** Semi-Active Ride
Control Module
22
14 13
12 11
10 9
87
175A MEGA-FUSE
65
43
2121 24 23 28 27 26 2530 2931
33 3432
20 19
18 17 16 15
Roadside emergencies
130
Page 131 of 224

Fuse/Relay
LocationFuse Amp
RatingDescription
13 40A** Anti-Lock Brake Module
14 Ð Not Used
15 15A* Daytime Running
Lamps (DRL) Module
16 10A* Electronic Control Unit
(ECU)
17 20A* Rear Control Unit, CD
Changer
18 30A* Anti-Lock Brake Module
19 15A* Horn Relay, Powertrain
Control Module (PCM)
20 15A* Headlamp Switch,
Autolamp Park Relay
21 Ð Not Used
22 30A* Autolamps Relay,
Multifunction Switch,
Headlamp Switch
23 Ð Blower Motor Relay
24 Ð Starter Relay
25 Ð A/C Clutch Relay
26 30A* Generator
27 10A* A/C Clutch Relay
28 15A* Heated Oxygen Sensors,
Canister Vent
29 Ð Fuel Pump Relay
30 Ð PCM Relay
31 Ð Low Speed Cooling Fan
Relay
32 Ð PCM Diode
33 Ð A/C Clutch Diode
34 Ð Not Used
* Mini Fuses ** Maxi Fuses
Roadside emergencies
131
Page 167 of 224

on the skin, promptly wash skin thoroughly with
soap and water. Consult a physician immediately
if you experience an adverse reaction.
When refueling always shut the engine off
and never allow sparks or open flames near
the filler neck. Never smoke while refueling. Fuel
vapor is extremely hazardous under certain
conditions. Care should be taken to avoid inhaling
excess fumes.
The flow of fuel through a fuel pump nozzle
can produce static electricity, which can
cause a fire if fuel is pumped into an ungrounded
fuel container.
Use the following guidelines to avoid static build-up
when filling an ungrounded fuel container:
²Place approved fuel container on the ground.
²DO NOT fill a fuel container while it is in the
vehicle.
²Keep the fuel pump nozzle in contact with the
fuel container while filling.
²DO NOT use a device that would hold the fuel
pump handle in the fill position.
Fuel Filler Cap
Your fuel tank filler cap has an indexed design with
a 1/8 turn on/off feature.
When fueling your vehicle:
1. Turn the engine off.
2. Carefully turn the filler cap counterclockwise 1/8
of a turn until it stops.
3. Pull to remove the cap from the fuel filler pipe.
4. To install the cap, align the tabs on the cap with
the notches on the filler pipe.
Maintenance and care
167
Page 170 of 224

Fuel quality
If you are experiencing starting, rough idle or
hesitation driveability problems during a cold start, try
a different brand of gasoline. ªPremiumº unleaded
gasoline should not be used (particularly in the United
States) if ªRegularº unleaded gasoline is recommended
because it may cause these problems to become more
pronounced. If the problems persist, see your dealer or
a qualified service technician.
It should not be necessary to add any aftermarket
products to your fuel tank if you continue to use a
high quality fuel.
Cleaner air
Ford approves the use of gasolines to improve air
quality, including reformulated gasolines that contain
oxygenates up to 10% ethanol or 15% MTBE.
Running out of fuel
Avoid running out fuel because this situation may
have an adverse affect on powertrain components.
If you have run out of fuel:
²You may need to crank the engine several times
after refueling before the system starts to pump
the fuel from the tank to the engine.
²Your ªService Engine Soonº indicator may come
on. For more information on the ªService Engine
Soonº indicator, refer to theInstrumentation
chapter.
Fuel Filter
For fuel filter replacement, see your dealer or a
qualified service technician. Refer to the Scheduled
Maintenance Guide for the appropriate intervals for
changing the fuel filter.
Replace the fuel filter with an authorized
Motorcraft part. The customer warranty may
be void for any damage to the fuel system if an
authorized Motorcraft fuel filter is not used.
Maintenance and care
170
Page 172 of 224

²Use a known quality gasoline, preferably a
national brand.
²Use the same side of the same pump and have
the vehicle facing the same direction each time
you fill up.
²Have the vehicle loading and distribution the
same every time.
Your results will be most accurate if your filling
method is consistent.
Calculating fuel economy
1. Fill the fuel tank completely and record the initial
odometer reading (in kilometers or miles).
2. Each time you fill the tank, record the amount of
fuel added (in liters or gallons).
3. After at least three to five tank fill-ups, fill the
fuel tank and record the current odometer reading.
4. Subtract your initial odometer reading from the
current odometer reading.
5. Follow one of the simple calculations in order to
determine fuel economy:
Multiply liters used by 100, then divide by total
kilometers traveled.
Divide total miles traveled by total gallons
used.
Keep a record for at least one month and record the
type of driving (city or highway). This will provide
an accurate estimate of the vehicle's fuel economy
under current driving conditions. Additionally,
keeping records during summer and winter will show
how temperature impacts fuel economy. In general,
lower temperatures give lower fuel economy.
Maintenance and care
172
Page 218 of 224

capacity ................. 191
choosing
the right fuel ......... 168
comparisons with
EPA fuel economy
estimates ............... 175
detergent in fuel ... 170
filling your vehicle
with fuel .. 165,167,171
filter,
specifications.. 170,190
fuel pump shut-off
switch .................... 124
gauge ....................... 15
improving fuel
economy ................ 171
low fuel
warning light ............. 8
octane
rating ....... 169,194,195
quality .................... 170
running
out of fuel ............. 170
safety information
relating to
automotive fuels ... 165
Fuses ................. 125,126
Gas cap
(see Fuel cap) ......... 167
Gas mileage (see
Fuel economy) ........ 171
Gauges ....................... 12
engine coolant
temperature gauge... 13
fuel gauge ................ 15
odometer ................. 14
speedometer ........... 12
tachometer .............. 13
trip odometer .......... 14
GAWR (Gross Axle
Weight Rating) ........ 116
definition ............... 116driving with a heavy
load ........................ 116
location .................. 116
GVWR (Gross Vehicle
Weight Rating) ........ 116
calculating ............. 116
definition ............... 116
driving with
a heavy load .......... 116
location .................. 116
Hazard flashers ....... 124
Head restraints ......... 74
Headlamps ................. 16
aiming ............. 182,183
autolamp system ..... 17
bulb
specifications ........ 181
daytime
running lights .......... 16
flash to pass ............ 17
high beam ............ 6,16
turning on and off .. 16
warning chime ........ 11
Heating ...................... 18
heating and air
conditioning
system ..................... 18
Hood ........................ 142
Ignition .............. 194,195
positions of the
ignition .................... 45
Infant seats (see
Safety seats) ........ 95,96
Inspection/maintenance
(I/M) testing ............ 176
Instrument panel ........ 6
cleaning ................. 188
lighting up panel
and interior ............. 17
location of
components ............... 6
Index
218