headlamp FORD TAURUS 2002 4.G User Guide
[x] Cancel search | Manufacturer: FORD, Model Year: 2002, Model line: TAURUS, Model: FORD TAURUS 2002 4.GPages: 248, PDF Size: 2.12 MB
Page 59 of 248
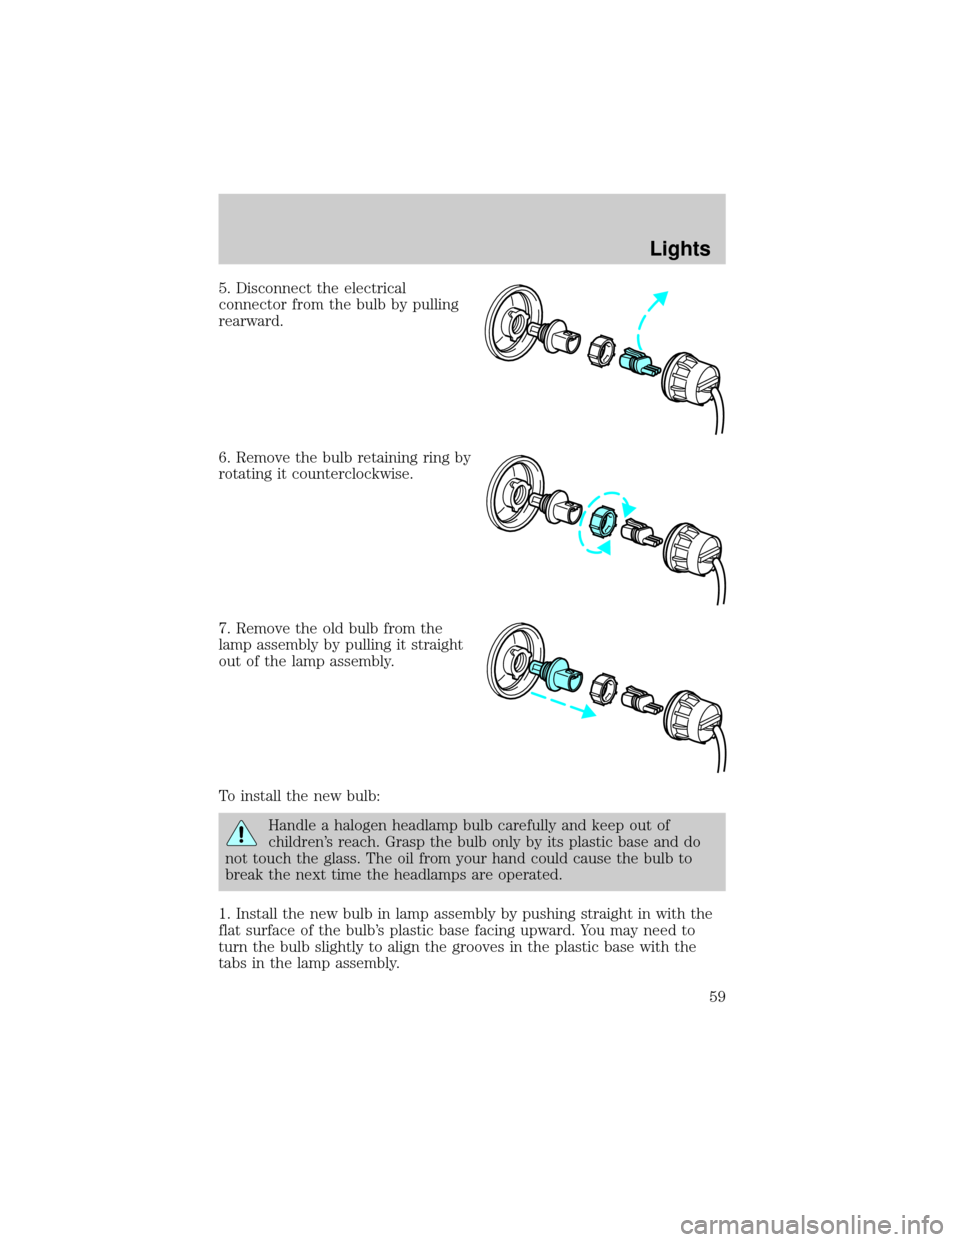
5. Disconnect the electrical
connector from the bulb by pulling
rearward.
6. Remove the bulb retaining ring by
rotating it counterclockwise.
7. Remove the old bulb from the
lamp assembly by pulling it straight
out of the lamp assembly.
To install the new bulb:
Handle a halogen headlamp bulb carefully and keep out of
children's reach. Grasp the bulb only by its plastic base and do
not touch the glass. The oil from your hand could cause the bulb to
break the next time the headlamps are operated.
1. Install the new bulb in lamp assembly by pushing straight in with the
flat surface of the bulb's plastic base facing upward. You may need to
turn the bulb slightly to align the grooves in the plastic base with the
tabs in the lamp assembly.
Lights
59
Page 60 of 248
2. Install the bulb retaining ring over the plastic base and lock the ring
by rotating clockwise until it snaps into place.
3. Connect the electrical connector to the bulb.
4. Install the protective dust shield and lock the shield by rotating it
clockwise until it locks into position.
5. Carefully position the headlamp assembly onto the vehicle.
6. Hold the headlamp assembly snugly against the vehicle and install the
retainer pins straight down to lock the lamp into place.
7. Before reinstalling the bolt, make sure the retainer pins are fully
seated, and install bolt on headlamp housing.
8. Turn the headlamps on and make sure they work properly. If the
headlamp was correctly aligned before you changed the bulb, you should
not need to align it again.
Replacing front parking lamp/turn signal/cornering lamp bulbs
1. Make sure the headlamp control
is in the OFF position.
2. Remove the bolt from the
headlamp housing.
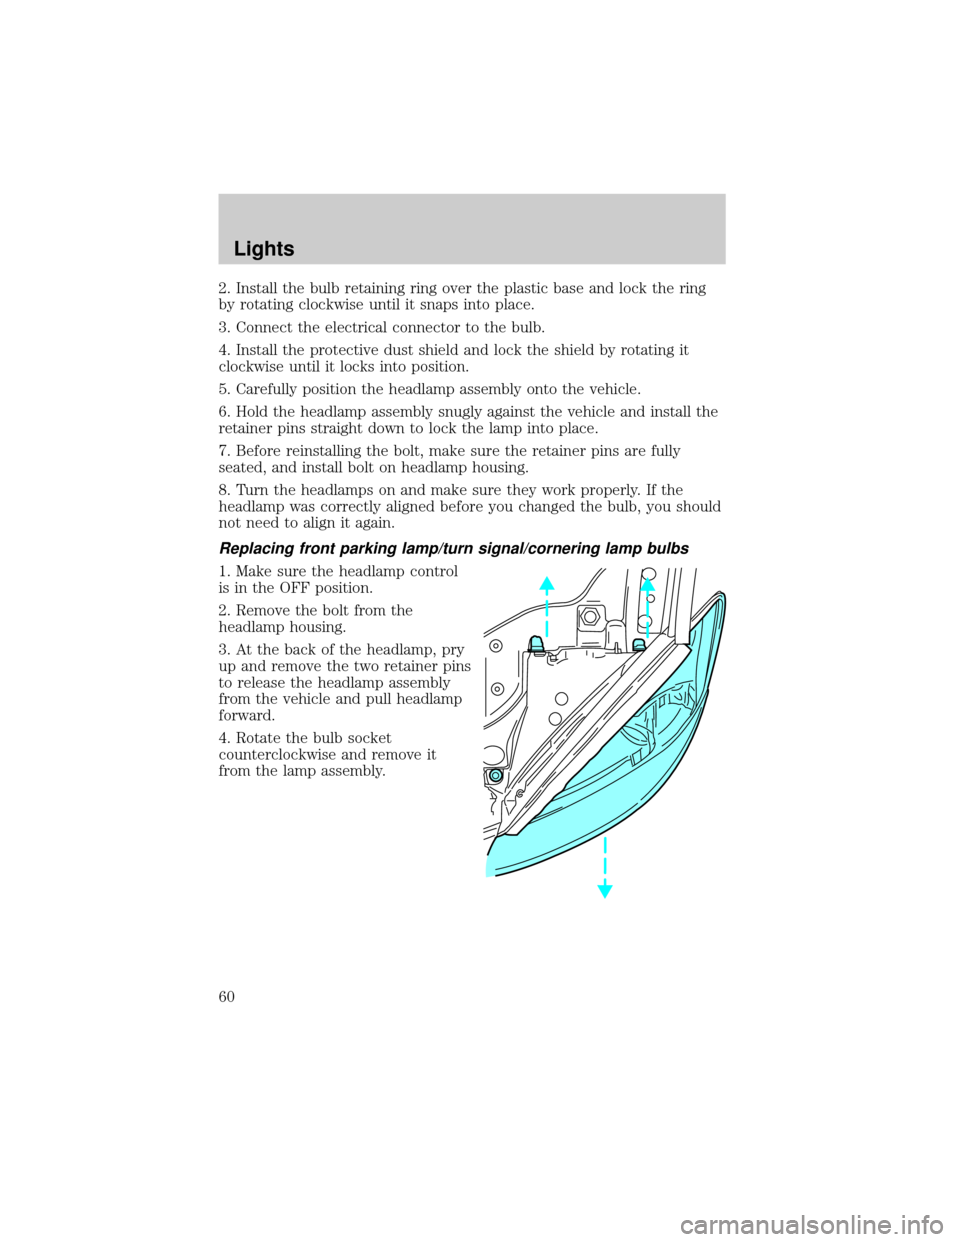
3. At the back of the headlamp, pry
up and remove the two retainer pins
to release the headlamp assembly
from the vehicle and pull headlamp
forward.
4. Rotate the bulb socket
counterclockwise and remove it
from the lamp assembly.
Lights
60
Page 61 of 248
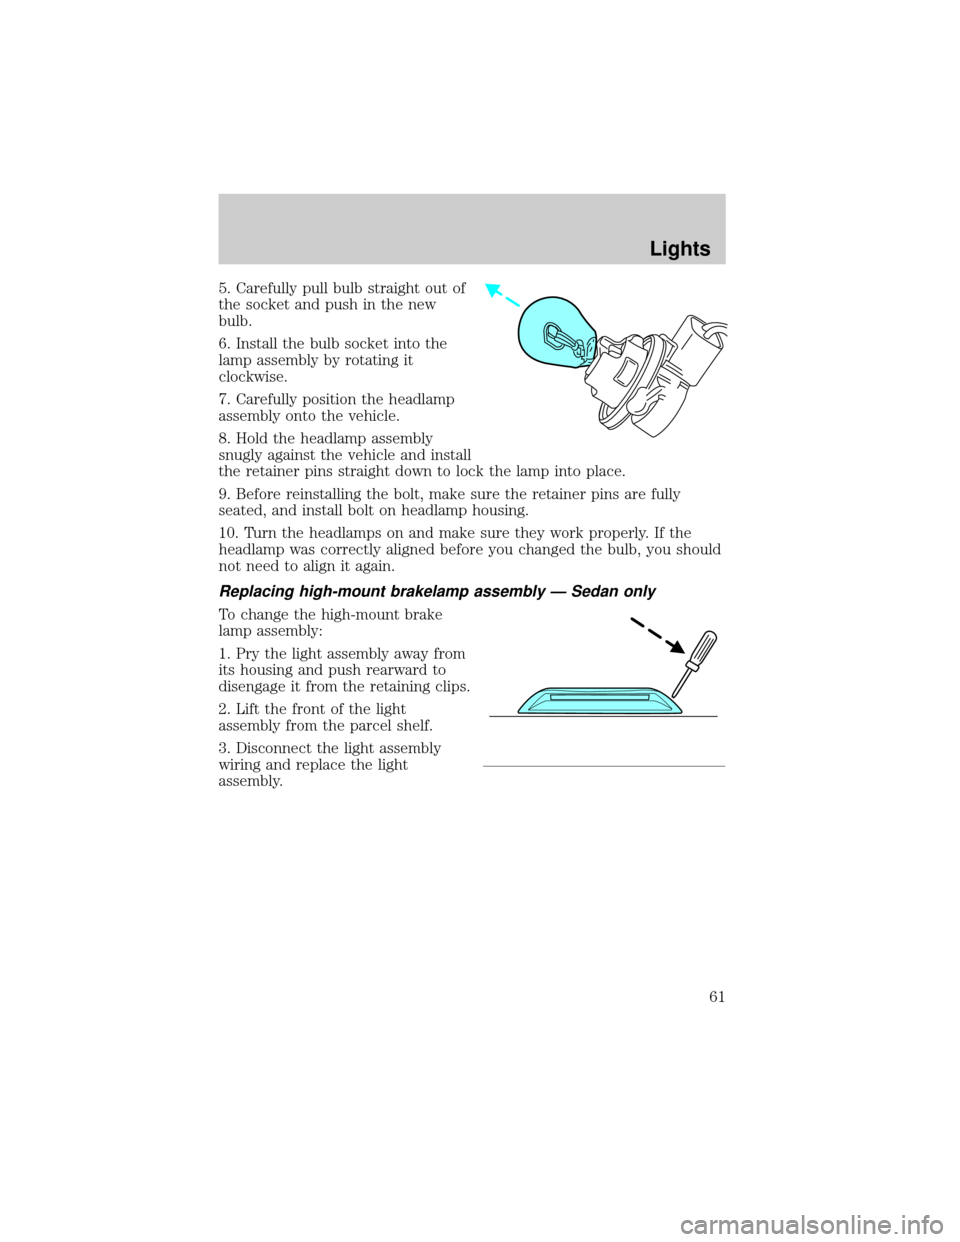
5. Carefully pull bulb straight out of
the socket and push in the new
bulb.
6. Install the bulb socket into the
lamp assembly by rotating it
clockwise.
7. Carefully position the headlamp
assembly onto the vehicle.
8. Hold the headlamp assembly
snugly against the vehicle and install
the retainer pins straight down to lock the lamp into place.
9. Before reinstalling the bolt, make sure the retainer pins are fully
seated, and install bolt on headlamp housing.
10. Turn the headlamps on and make sure they work properly. If the
headlamp was correctly aligned before you changed the bulb, you should
not need to align it again.
Replacing high-mount brakelamp assembly Ð Sedan only
To change the high-mount brake
lamp assembly:
1. Pry the light assembly away from
its housing and push rearward to
disengage it from the retaining clips.
2. Lift the front of the light
assembly from the parcel shelf.
3. Disconnect the light assembly
wiring and replace the light
assembly.
Lights
61
Page 66 of 248
WINDSHIELD WIPER/WASHER CONTROLS
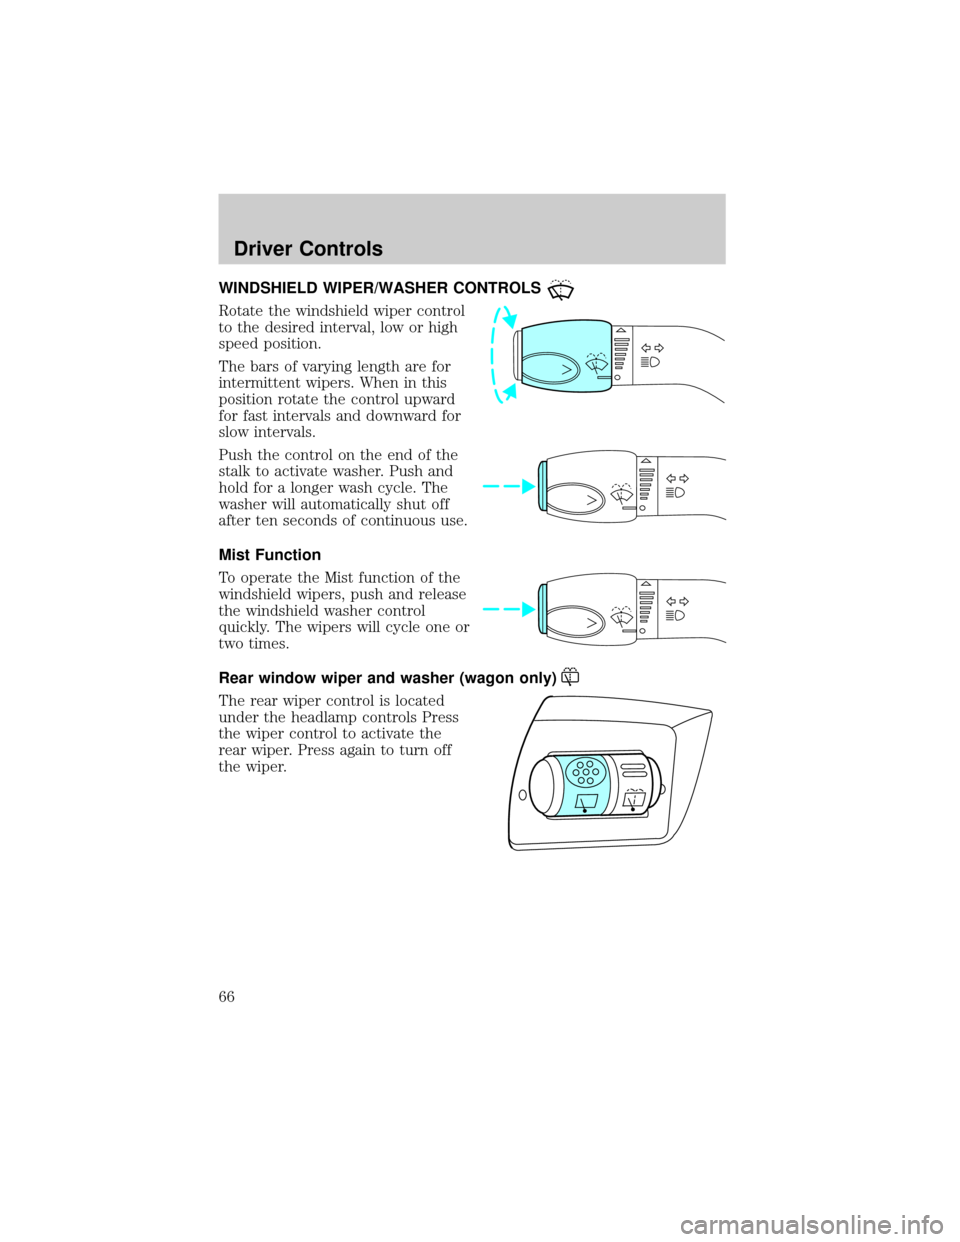
Rotate the windshield wiper control
to the desired interval, low or high
speed position.
The bars of varying length are for
intermittent wipers. When in this
position rotate the control upward
for fast intervals and downward for
slow intervals.
Push the control on the end of the
stalk to activate washer. Push and
hold for a longer wash cycle. The
washer will automatically shut off
after ten seconds of continuous use.
Mist Function
To operate the Mist function of the
windshield wipers, push and release
the windshield washer control
quickly. The wipers will cycle one or
two times.
Rear window wiper and washer (wagon only)
The rear wiper control is located
under the headlamp controls Press
the wiper control to activate the
rear wiper. Press again to turn off
the wiper.
Driver Controls
66
Page 98 of 248
PERIMETER ALARM SYSTEM (IF EQUIPPED)
The perimeter anti-theft system will help prevent your vehicle from
unauthorized entry.
If there is any potential perimeter anti-theft problem with your vehicle,
ensureALL key fobs(remote entry transmitters) are brought to the
dealership, to aid in troubleshooting.
Arming the system
When armed, this system will help protect your vehicle from
unauthorized entry. When unauthorized entry occurs, the system will
flash the headlamps and/or parking lamps, and will chirp the horn.
The system is ready to arm whenever the key is removed from the
ignition. Any of the following actions will prearm the alarm system:
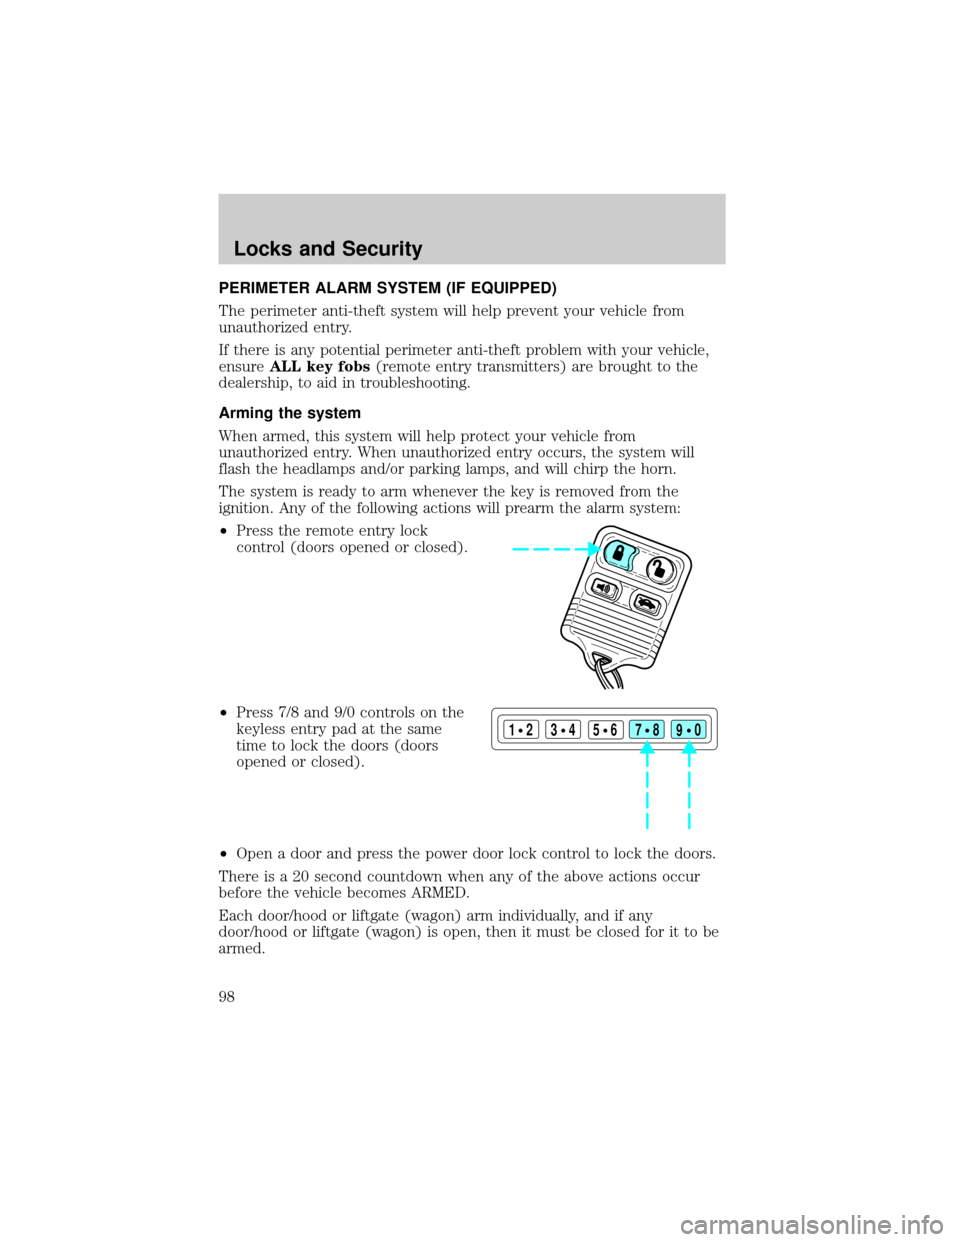
²Press the remote entry lock
control (doors opened or closed).
²Press 7/8 and 9/0 controls on the
keyless entry pad at the same
time to lock the doors (doors
opened or closed).
²Open a door and press the power door lock control to lock the doors.
There is a 20 second countdown when any of the above actions occur
before the vehicle becomes ARMED.
Each door/hood or liftgate (wagon) arm individually, and if any
door/hood or liftgate (wagon) is open, then it must be closed for it to be
armed.
123
45678
90
Locks and Security
98
Page 119 of 248
²the ignition switch is in the OFF position
²all vehicle doors are closed
²the driver's safety belt is unbuckled
²the parklamps/headlamps are in OFF position (If vehicle is equipped
with Autolamps, this will not affect the procedure.)
To reduce the risk of injury, do not deactivate/activate the Belt
Minder feature while driving the vehicle.
1. Turn the ignition switch to the RUN (or ON) position. (DO NOT
START THE ENGINE)
2. Wait until the safety belt warning light turns off. (Approximately 1±2
minutes)
²Steps 3±5 must be completed within 60 seconds or the procedure will
have to be repeated.
3. Buckle then unbuckle the safety belt three times, ending with the
safety belt unbuckled. This can be done before or during BeltMinder
warning activation.
4. Turn on the parklamps/headlamps, turn off the parklamps/headlamps.
5. Buckle then unbuckle the safety belt three times, ending with the
safety belt unbuckled.
²After step 5 the safety belt warning light will be turned on for three
seconds.
6. Within seven seconds of the safety belt warning light turning off,
buckle then unbuckle the safety belt.
²This will disable BeltMinder if it is currently enabled, or enable
BeltMinder if it is currently disabled.
7. Confirmation of disabling BeltMinder is provided by flashing the safety
belt warning light four times per second for three seconds.
8. Confirmation of enabling BeltMinder is provided by flashing the safety
belt warning light four times per second for three seconds, followed by
three seconds with the safety belt warning light off, then followed by
flashing the safety belt warning light four times per second for three
seconds again.
9. After receiving confirmation, the deactivation/activation procedure is
complete.
Seating and Safety Restraints
119
Page 139 of 248
Do not start your vehicle in a closed garage or in other enclosed
areas. Exhaust fumes can be toxic. Always open the garage door
before you start the engine. SeeGuarding against exhaust fumesin
this chapter for more instructions.
If you smell exhaust fumes inside your vehicle, have your dealer
inspect your vehicle immediately. Do not drive if you smell
exhaust fumes.
Important safety precautions
A computer system controls the engine's idle revolutions per minute
(RPM). When the engine starts, the idle RPM runs faster to warm the
engine. If the engine idle speed does not slow down automatically, have
the vehicle checked. Do not allow the vehicle to idle for more than 10
minutes at the higher engine RPM.
Before starting the vehicle:
1. Make sure all vehicle occupants have buckled their safety belts. For
more information on safety belts and their proper usage, refer to the
Seating and safety restraintschapter.
2. Make sure the headlamps and vehicle accessories are off.
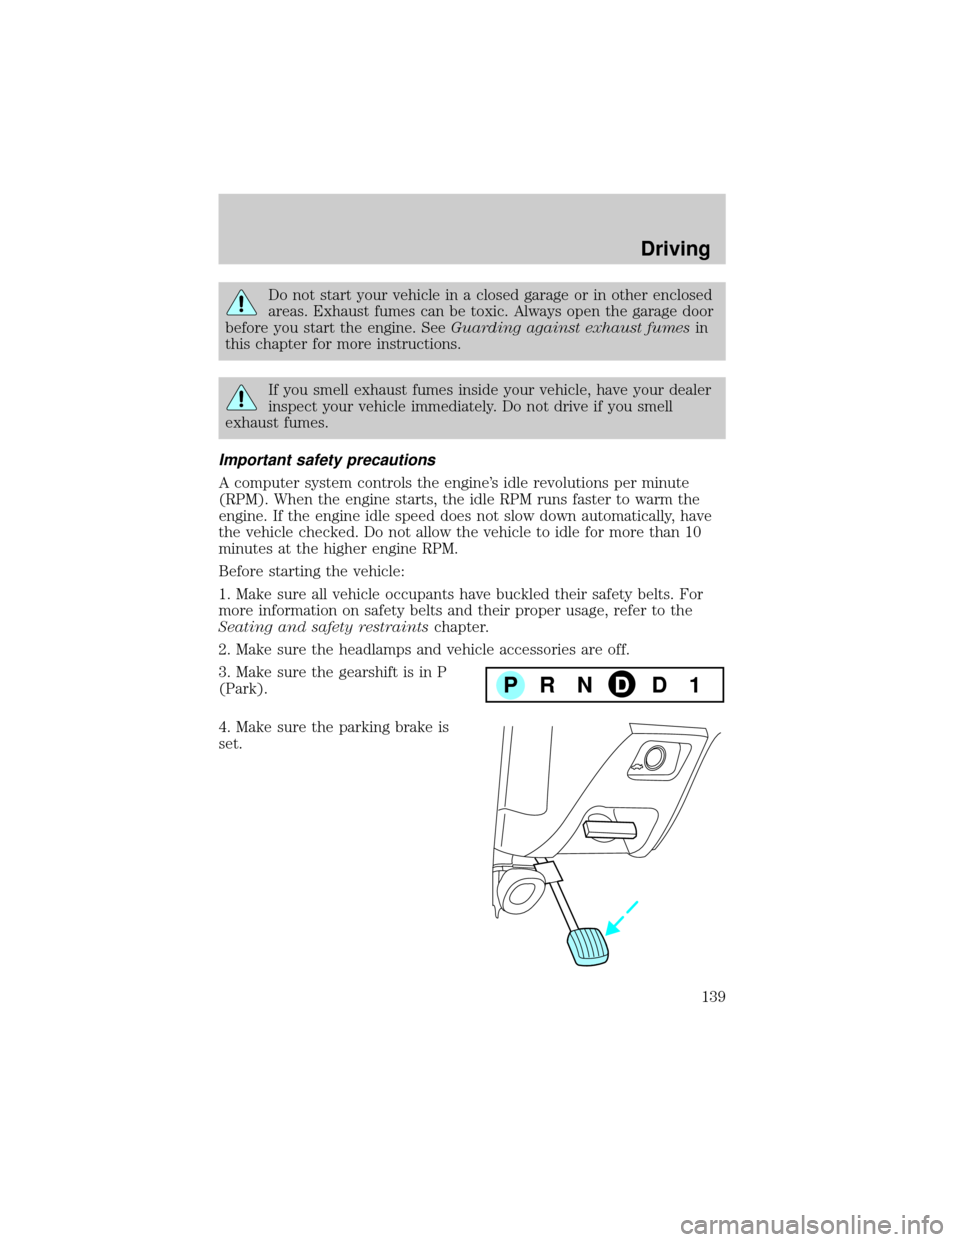
3. Make sure the gearshift is in P
(Park).
4. Make sure the parking brake is
set.
PRNDD1
Driving
139
Page 165 of 248
Fuse/relay
locationFuse amp
ratingPassenger compartment fuse
panel description
29 15A Autolamps, Park lamps, PWM,
Headlamp switch
30 15A Horns and horn switch, OBD II
connector
31 Ð Not used
32 10A ABS, DRL relay coil, Speed
control actuator, Traction control
switch, AC heater selector switch,
Blend door actuator, Brake shift
interlock, Rear defroster relay coil
33 Ð Not used
34 Ð Not used
35 Ð Not used
36 15A Turn signals, Back-up lamps
37 15A Transmission position switch
38 5A GEM park neutral switch
39 Ð Not used
40 Ð Not used
41 Ð Not used
42 Ð Not used
Roadside Emergencies
165
Page 167 of 248
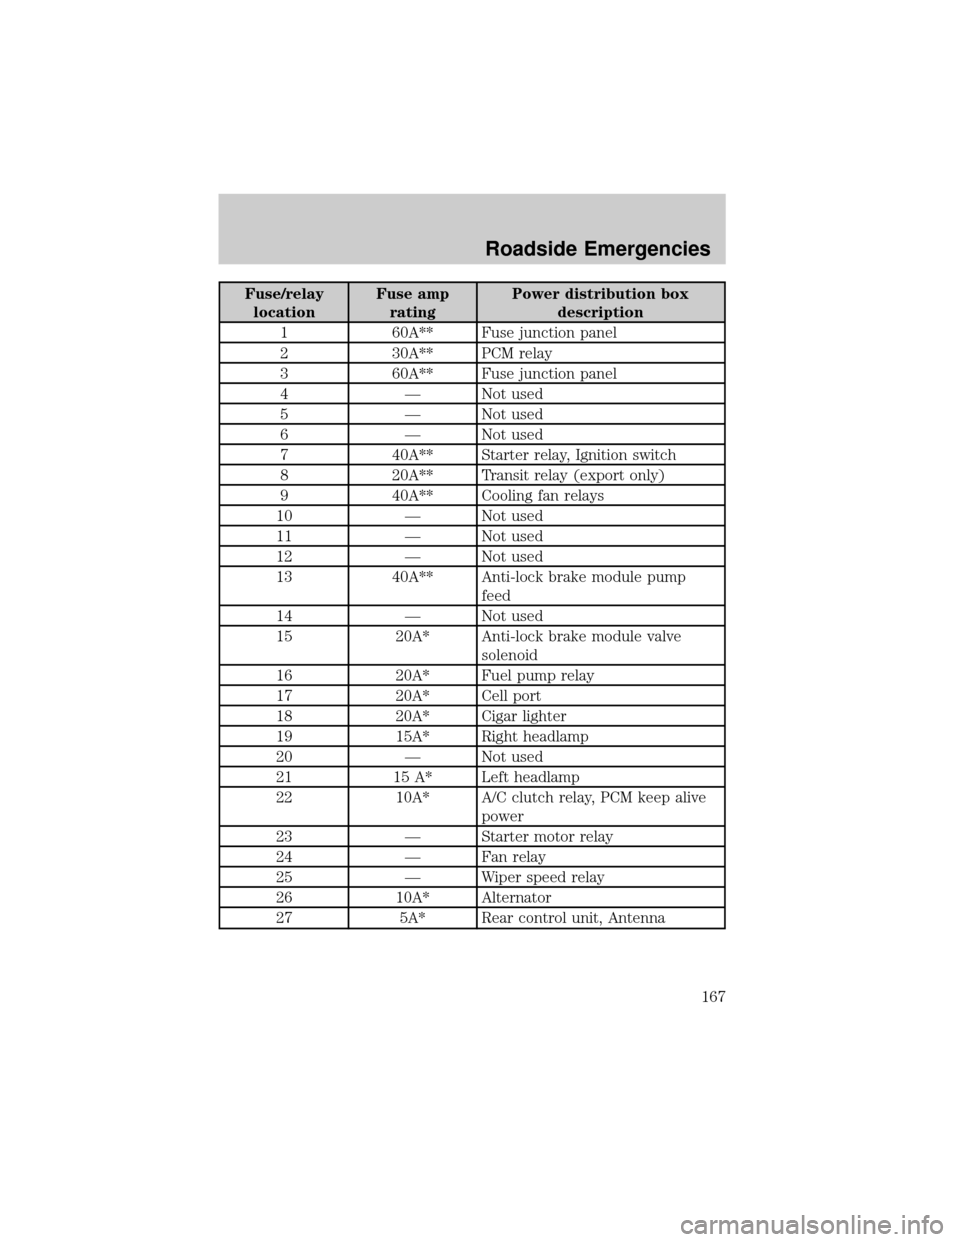
Fuse/relay
locationFuse amp
ratingPower distribution box
description
1 60A** Fuse junction panel
2 30A** PCM relay
3 60A** Fuse junction panel
4 Ð Not used
5 Ð Not used
6 Ð Not used
7 40A** Starter relay, Ignition switch
8 20A** Transit relay (export only)
9 40A** Cooling fan relays
10 Ð Not used
11 Ð Not used
12 Ð Not used
13 40A** Anti-lock brake module pump
feed
14 Ð Not used
15 20A* Anti-lock brake module valve
solenoid
16 20A* Fuel pump relay
17 20A* Cell port
18 20A* Cigar lighter
19 15A* Right headlamp
20 Ð Not used
21 15 A* Left headlamp
22 10A* A/C clutch relay, PCM keep alive
power
23 Ð Starter motor relay
24 Ð Fan relay
25 Ð Wiper speed relay
26 10A* Alternator
27 5A* Rear control unit, Antenna
Roadside Emergencies
167
Page 245 of 248

idle speed control ...................205
lubrication
specifications ..................234, 236
refill capacities ........................233
service points ..................199±200
starting after a collision .........160
Engine block heater .................142
Engine oil ..................................202
checking and adding ..............202
dipstick ....................................202
filter, specifications ........204, 232
recommendations ...................204
refill capacities ........................233
specifications ..................234, 236
Exhaust fumes ..........................142
F
Flexible Fuel Vehicle (FFV) ....212
Floor mats ...................................80
Fluid capacities .........................233
Fuel ............................................212
calculating fuel economy .......219
cap .....................................11, 215
capacity ...................................233
choosing the right fuel ...........216
comparisons with EPA fuel
economy estimates .................222
detergent in fuel .....................218
filling your vehicle
with fuel ..................212, 215, 219
filter, specifications ........218, 232
fuel pump shut-off switch .....160
gauge .........................................17
improving fuel economy ........219
low fuel warning light ..............13
octane rating ...................216, 236
quality ......................................217
running out of fuel .................218safety information relating
to automotive fuels ................212
Fuses ..................................162±163
G
Gas cap (see Fuel cap) ......11, 215
Gas mileage
(see Fuel economy) .................219
Gauges .........................................16
engine coolant
temperature gauge ...................16
fuel gauge ..................................17
odometer ...................................17
speedometer .............................17
tachometer ................................18
trip odometer ............................18
GAWR (Gross Axle
Weight Rating) ..........................153
definition .................................153
driving with a heavy load ......153
location ....................................153
GVWR (Gross Vehicle
Weight Rating) ..........................153
calculating ...............................153
definition .................................153
driving with a heavy load ......153
location ....................................153
H
Hazard flashers .........................160
Head restraints .........................101
Headlamps ...................................51
aiming ..................................52±53
autolamp system .......................51
bulb specifications ....................56
daytime running lights .............51
flash to pass ..............................52
Index
245