lock FORD TAURUS 2002 4.G Owners Manual
[x] Cancel search | Manufacturer: FORD, Model Year: 2002, Model line: TAURUS, Model: FORD TAURUS 2002 4.GPages: 248, PDF Size: 2.12 MB
Page 1 of 248
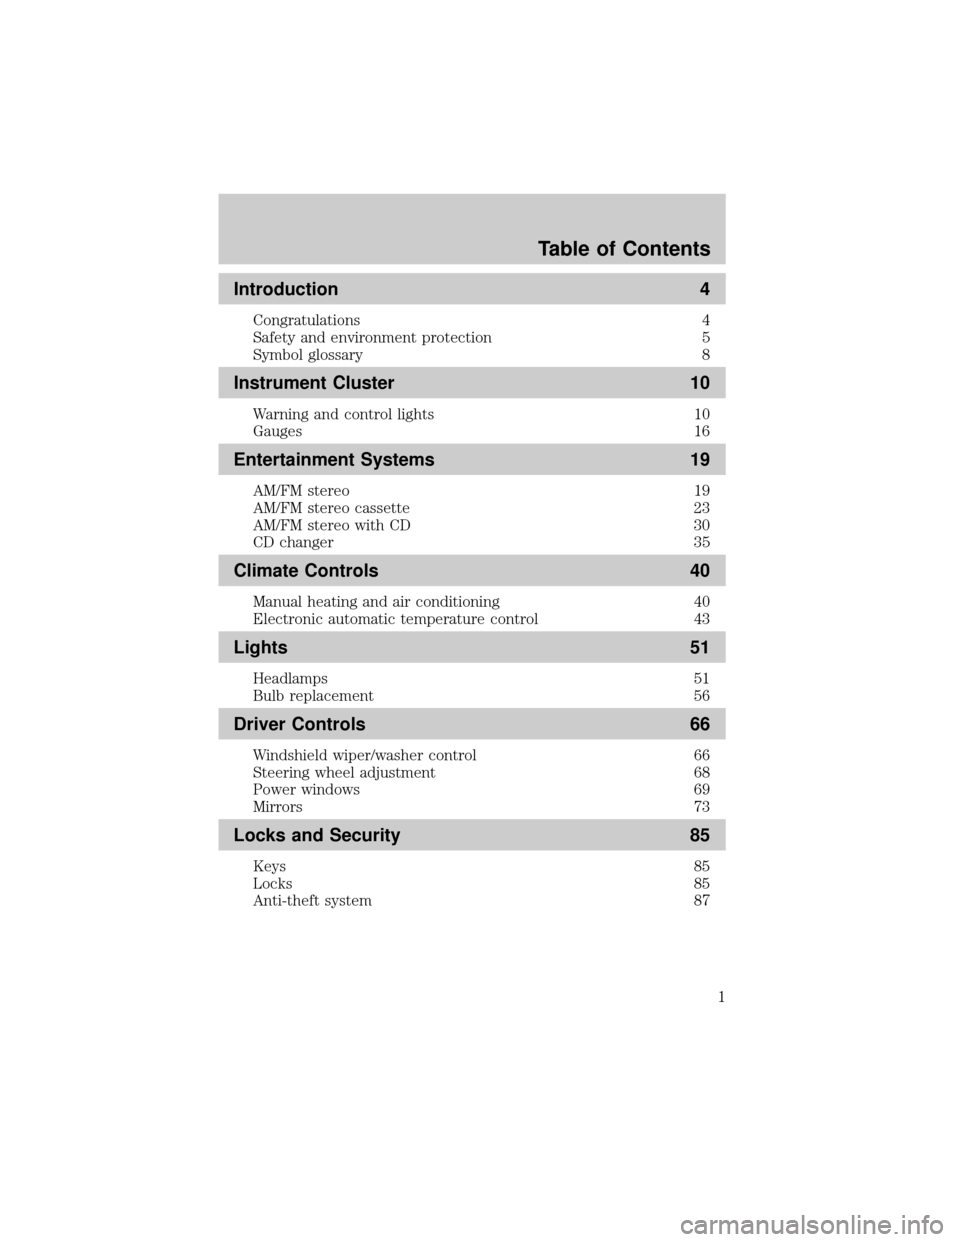
Introduction 4
Congratulations 4
Safety and environment protection 5
Symbol glossary 8
Instrument Cluster 10
Warning and control lights 10
Gauges 16
Entertainment Systems 19
AM/FM stereo 19
AM/FM stereo cassette 23
AM/FM stereo with CD 30
CD changer 35
Climate Controls 40
Manual heating and air conditioning 40
Electronic automatic temperature control 43
Lights 51
Headlamps 51
Bulb replacement 56
Driver Controls 66
Windshield wiper/washer control 66
Steering wheel adjustment 68
Power windows 69
Mirrors 73
Locks and Security 85
Keys 85
Locks 85
Anti-theft system 87
Table of Contents
1
Page 8 of 248
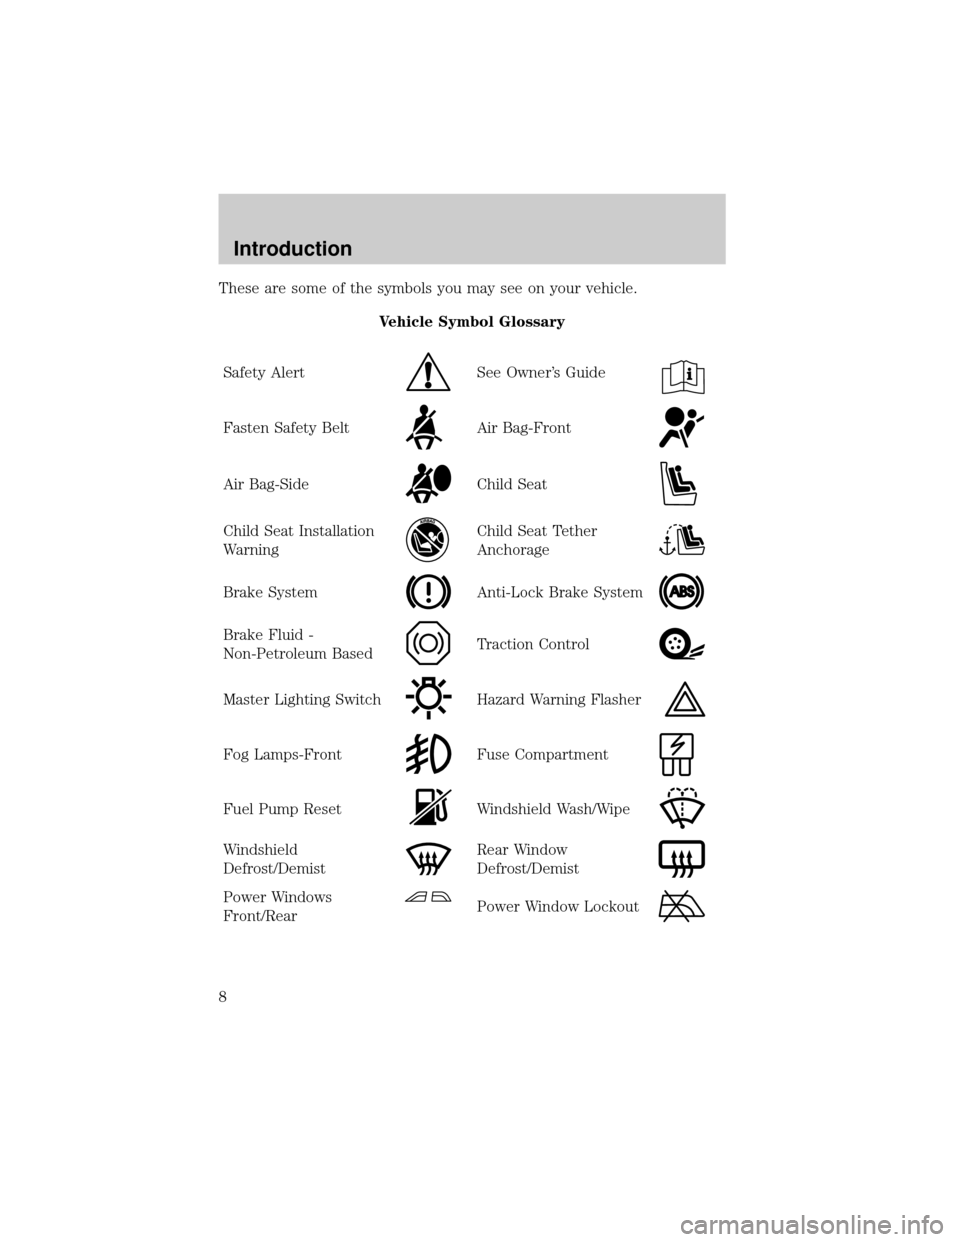
These are some of the symbols you may see on your vehicle.
Vehicle Symbol Glossary
Safety Alert
See Owner's Guide
Fasten Safety BeltAir Bag-Front
Air Bag-SideChild Seat
Child Seat Installation
WarningChild Seat Tether
Anchorage
Brake SystemAnti-Lock Brake System
Brake Fluid -
Non-Petroleum BasedTraction Control
Master Lighting SwitchHazard Warning Flasher
Fog Lamps-FrontFuse Compartment
Fuel Pump ResetWindshield Wash/Wipe
Windshield
Defrost/DemistRear Window
Defrost/Demist
Power Windows
Front/RearPower Window Lockout
Introduction
8
Page 9 of 248
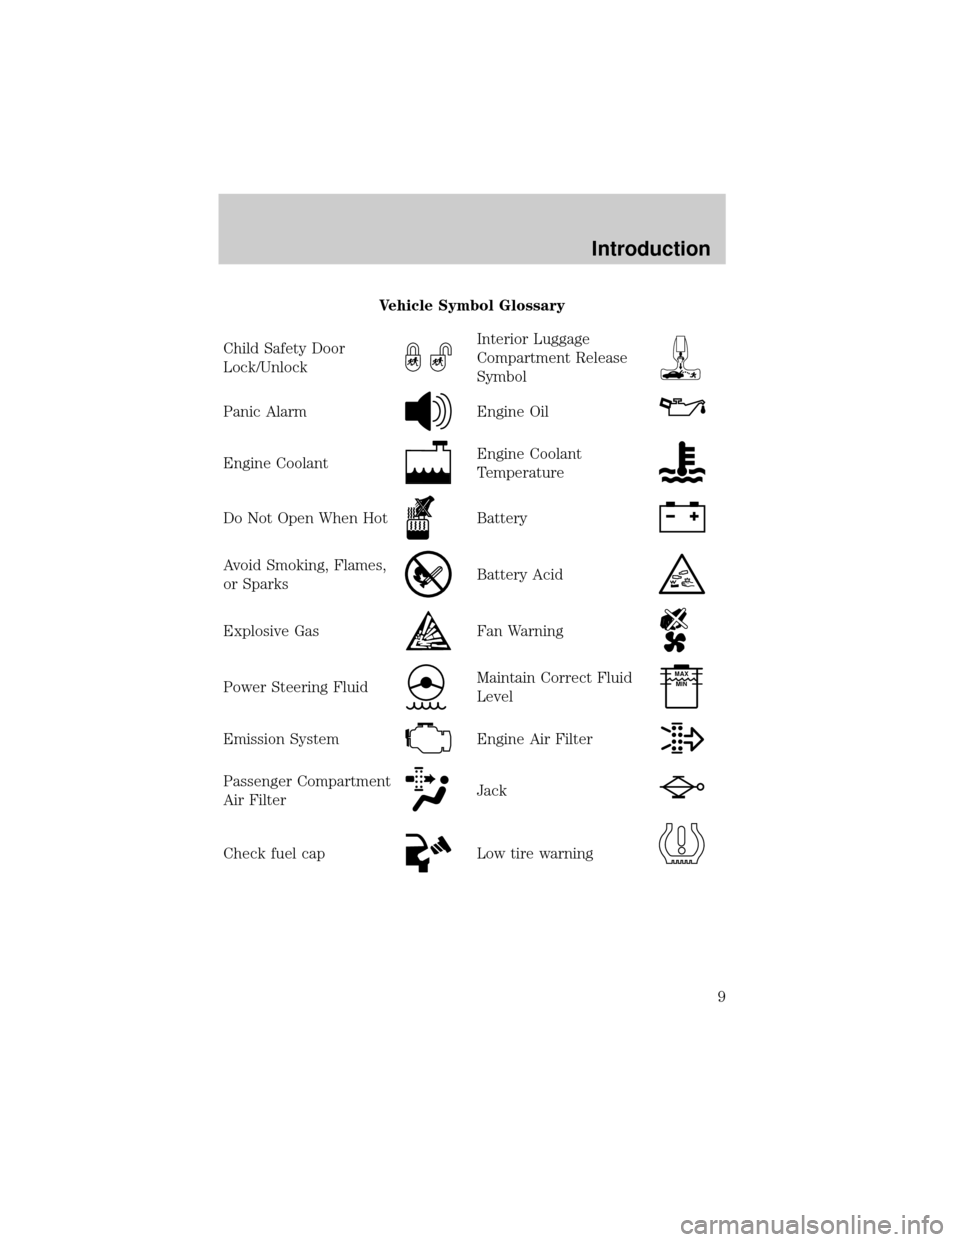
Vehicle Symbol Glossary
Child Safety Door
Lock/Unlock
Interior Luggage
Compartment Release
Symbol
Panic AlarmEngine Oil
Engine CoolantEngine Coolant
Temperature
Do Not Open When HotBattery
Avoid Smoking, Flames,
or SparksBattery Acid
Explosive GasFan Warning
Power Steering FluidMaintain Correct Fluid
LevelMAX
MIN
Emission SystemEngine Air Filter
Passenger Compartment
Air FilterJack
Check fuel capLow tire warning
Introduction
9
Page 12 of 248
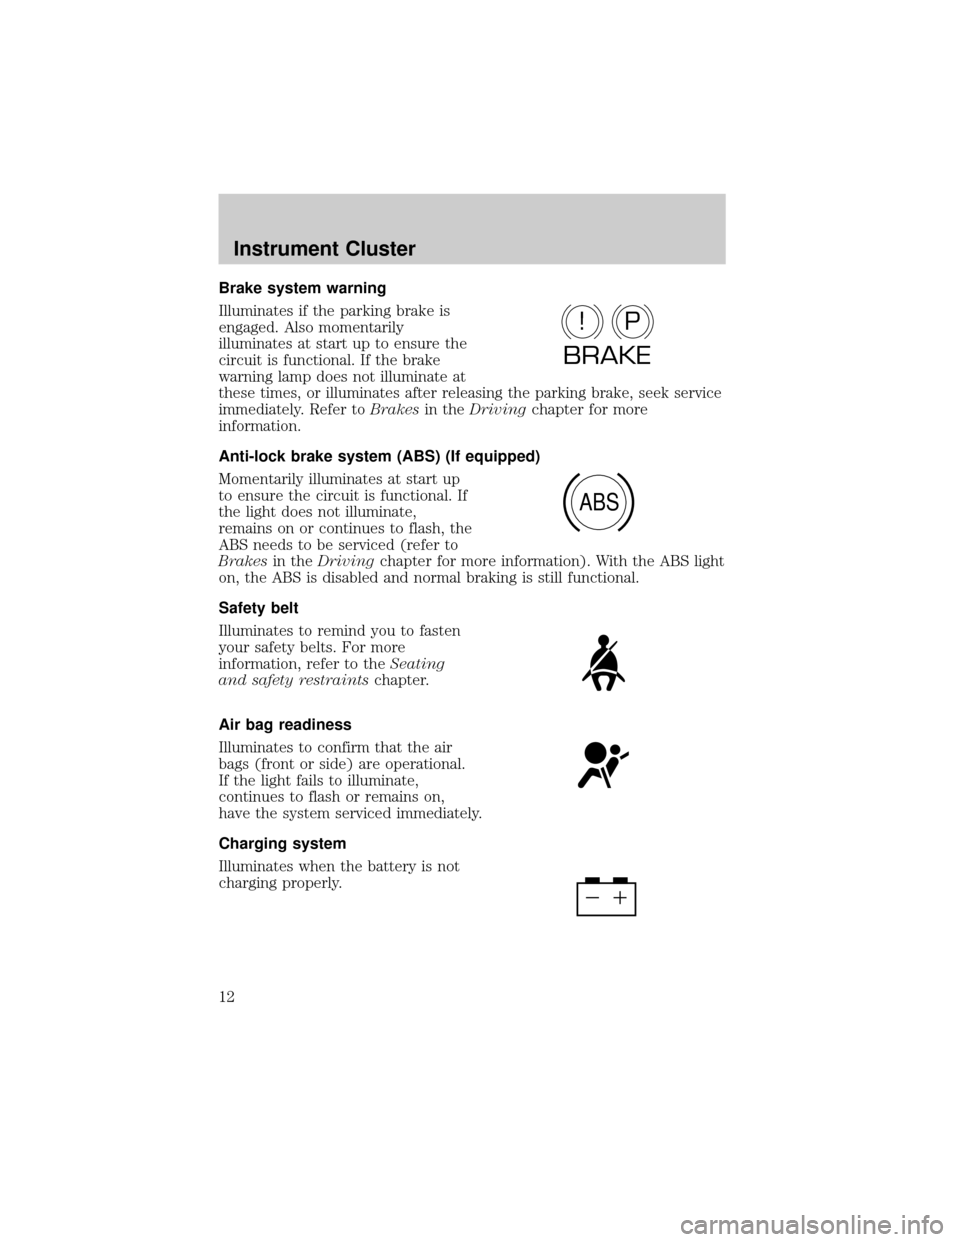
Brake system warning
Illuminates if the parking brake is
engaged. Also momentarily
illuminates at start up to ensure the
circuit is functional. If the brake
warning lamp does not illuminate at
these times, or illuminates after releasing the parking brake, seek service
immediately. Refer toBrakesin theDrivingchapter for more
information.
Anti-lock brake system (ABS) (If equipped)
Momentarily illuminates at start up
to ensure the circuit is functional. If
the light does not illuminate,
remains on or continues to flash, the
ABS needs to be serviced (refer to
Brakesin theDrivingchapter for more information). With the ABS light
on, the ABS is disabled and normal braking is still functional.
Safety belt
Illuminates to remind you to fasten
your safety belts. For more
information, refer to theSeating
and safety restraintschapter.
Air bag readiness
Illuminates to confirm that the air
bags (front or side) are operational.
If the light fails to illuminate,
continues to flash or remains on,
have the system serviced immediately.
Charging system
Illuminates when the battery is not
charging properly.
P!
BRAKE
ABS
Instrument Cluster
12
Page 14 of 248
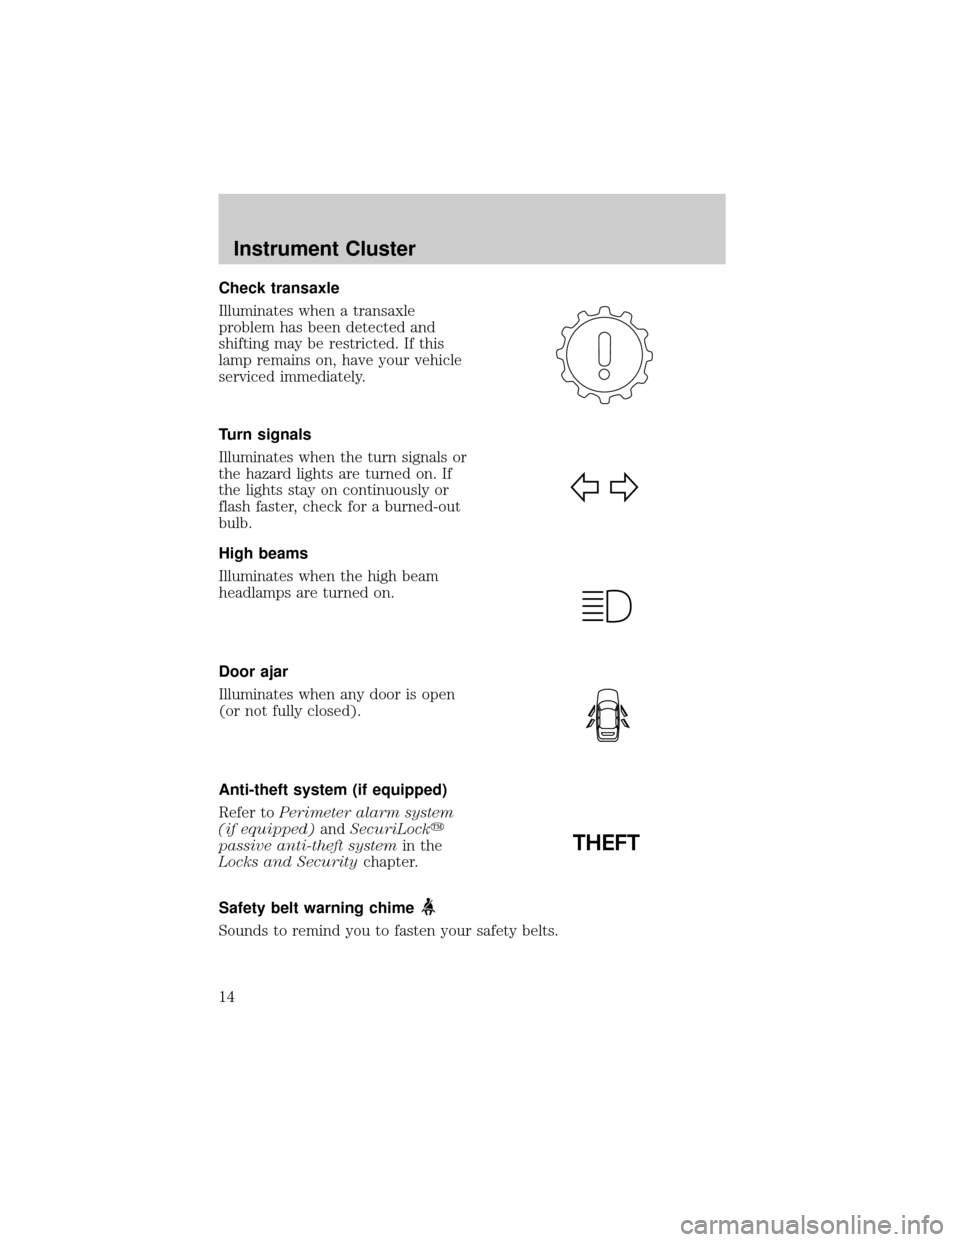
Check transaxle
Illuminates when a transaxle
problem has been detected and
shifting may be restricted. If this
lamp remains on, have your vehicle
serviced immediately.
Turn signals
Illuminates when the turn signals or
the hazard lights are turned on. If
the lights stay on continuously or
flash faster, check for a burned-out
bulb.
High beams
Illuminates when the high beam
headlamps are turned on.
Door ajar
Illuminates when any door is open
(or not fully closed).
Anti-theft system (if equipped)
Refer toPerimeter alarm system
(if equipped)andSecuriLocky
passive anti-theft systemin the
Locks and Securitychapter.
Safety belt warning chime
Sounds to remind you to fasten your safety belts.
THEFT
Instrument Cluster
14
Page 22 of 248
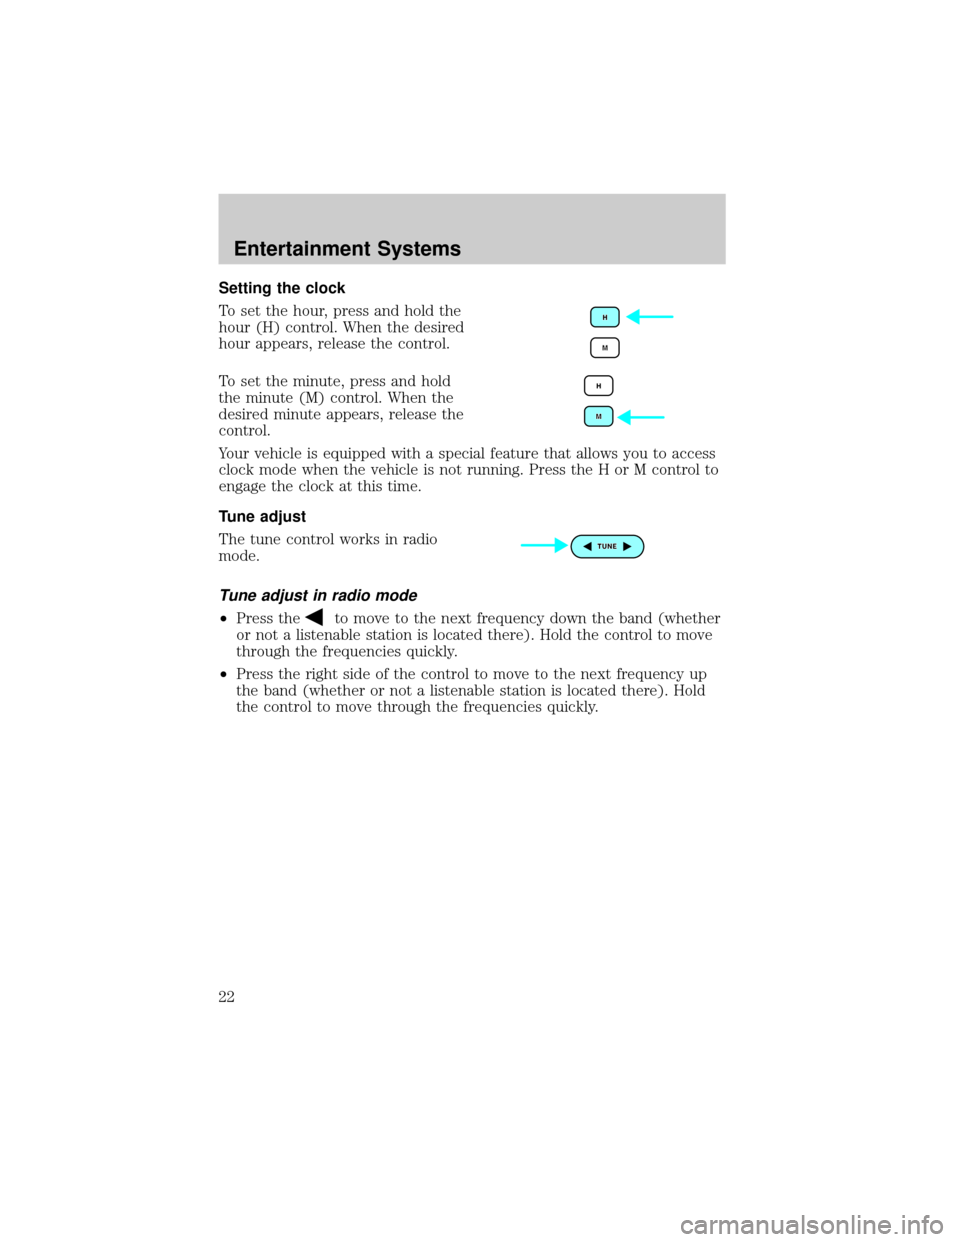
Setting the clock
To set the hour, press and hold the
hour (H) control. When the desired
hour appears, release the control.
To set the minute, press and hold
the minute (M) control. When the
desired minute appears, release the
control.
Your vehicle is equipped with a special feature that allows you to access
clock mode when the vehicle is not running. Press the H or M control to
engage the clock at this time.
Tune adjust
The tune control works in radio
mode.
Tune adjust in radio mode
²Press theto move to the next frequency down the band (whether
or not a listenable station is located there). Hold the control to move
through the frequencies quickly.
²Press the right side of the control to move to the next frequency up
the band (whether or not a listenable station is located there). Hold
the control to move through the frequencies quickly.
Entertainment Systems
22
Page 27 of 248
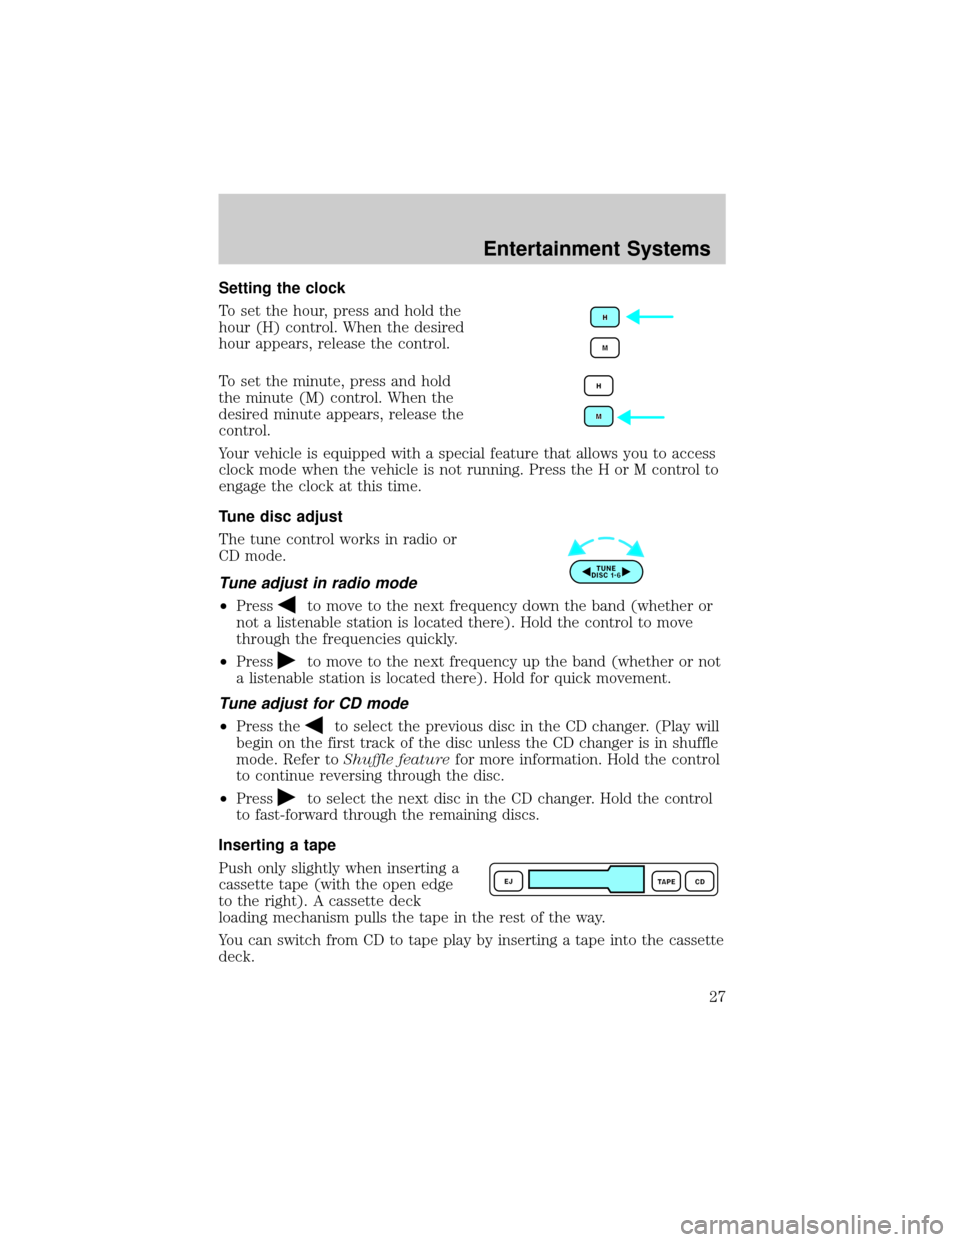
Setting the clock
To set the hour, press and hold the
hour (H) control. When the desired
hour appears, release the control.
To set the minute, press and hold
the minute (M) control. When the
desired minute appears, release the
control.
Your vehicle is equipped with a special feature that allows you to access
clock mode when the vehicle is not running. Press the H or M control to
engage the clock at this time.
Tune disc adjust
The tune control works in radio or
CD mode.
Tune adjust in radio mode
²Pressto move to the next frequency down the band (whether or
not a listenable station is located there). Hold the control to move
through the frequencies quickly.
²Press
to move to the next frequency up the band (whether or not
a listenable station is located there). Hold for quick movement.
Tune adjust for CD mode
²Press theto select the previous disc in the CD changer. (Play will
begin on the first track of the disc unless the CD changer is in shuffle
mode. Refer toShuffle featurefor more information. Hold the control
to continue reversing through the disc.
²Press
to select the next disc in the CD changer. Hold the control
to fast-forward through the remaining discs.
Inserting a tape
Push only slightly when inserting a
cassette tape (with the open edge
to the right). A cassette deck
loading mechanism pulls the tape in the rest of the way.
You can switch from CD to tape play by inserting a tape into the cassette
deck.
Entertainment Systems
27
Page 33 of 248
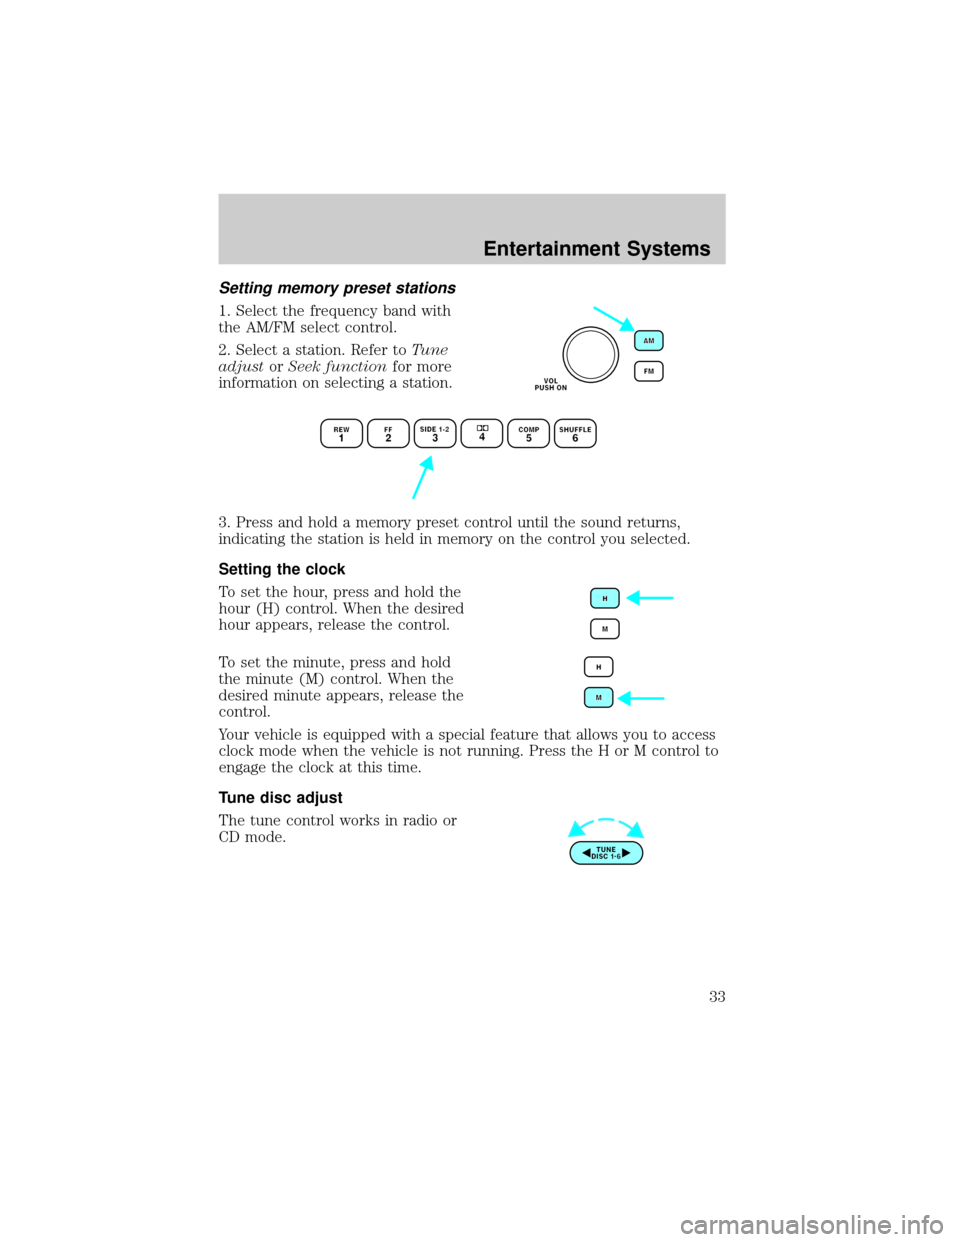
Setting memory preset stations
1. Select the frequency band with
the AM/FM select control.
2. Select a station. Refer toTune
adjustorSeek functionfor more
information on selecting a station.
3. Press and hold a memory preset control until the sound returns,
indicating the station is held in memory on the control you selected.
Setting the clock
To set the hour, press and hold the
hour (H) control. When the desired
hour appears, release the control.
To set the minute, press and hold
the minute (M) control. When the
desired minute appears, release the
control.
Your vehicle is equipped with a special feature that allows you to access
clock mode when the vehicle is not running. Press the H or M control to
engage the clock at this time.
Tune disc adjust
The tune control works in radio or
CD mode.
Entertainment Systems
33
Page 37 of 248
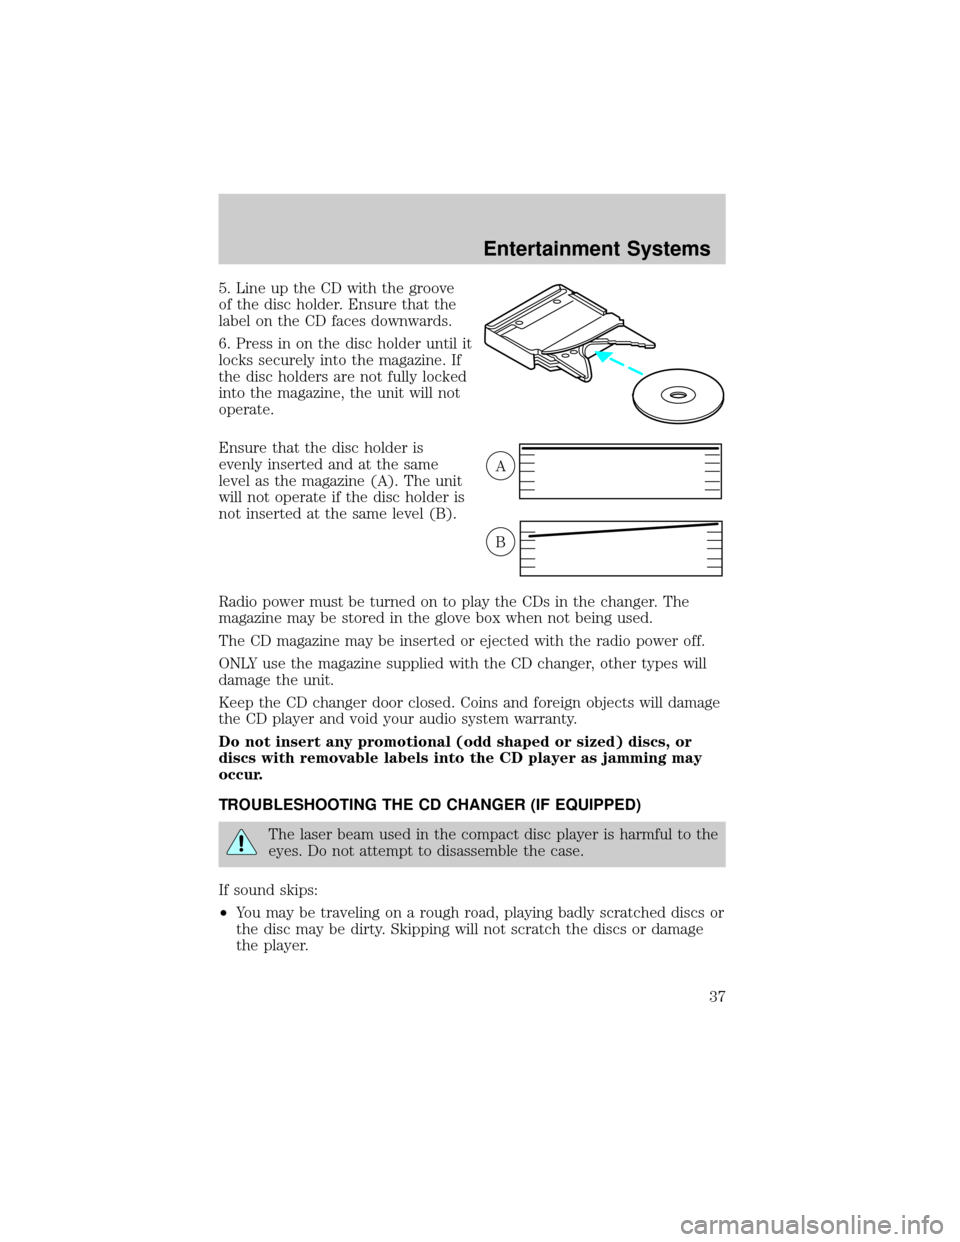
5. Line up the CD with the groove
of the disc holder. Ensure that the
label on the CD faces downwards.
6. Press in on the disc holder until it
locks securely into the magazine. If
the disc holders are not fully locked
into the magazine, the unit will not
operate.
Ensure that the disc holder is
evenly inserted and at the same
level as the magazine (A). The unit
will not operate if the disc holder is
not inserted at the same level (B).
Radio power must be turned on to play the CDs in the changer. The
magazine may be stored in the glove box when not being used.
The CD magazine may be inserted or ejected with the radio power off.
ONLY use the magazine supplied with the CD changer, other types will
damage the unit.
Keep the CD changer door closed. Coins and foreign objects will damage
the CD player and void your audio system warranty.
Do not insert any promotional (odd shaped or sized) discs, or
discs with removable labels into the CD player as jamming may
occur.
TROUBLESHOOTING THE CD CHANGER (IF EQUIPPED)
The laser beam used in the compact disc player is harmful to the
eyes. Do not attempt to disassemble the case.
If sound skips:
²You may be traveling on a rough road, playing badly scratched discs or
the disc may be dirty. Skipping will not scratch the discs or damage
the player.
A
B
Entertainment Systems
37
Page 42 of 248
²(Defrost) ± Distributes outside air through the windshield
defroster ducts. It can be used to clear ice or fog from the windshield.
If the temperature is about 6ÉC (43ÉF) or higher, the air conditioner
will automatically dehumidify the air to reduce fogging.
Operating tips
²In humid weather conditions, place the climate control system in
Defrost mode before driving. This will reduce fogging on your
windshield. Once the windshield has been cleared, operate the climate
control system as desired.
²To reduce humidity buildup inside the vehicle in cold weather
conditions, don't drive with the climate control system in the OFF or
MAX A/C position.
²
To reduce humidity buildup inside the vehicle in warm weather conditions,
don't drive with the climate control system in the OFF position.
²Under normal weather conditions, your vehicle's climate control
system should be left in any position other than the MAX A/C or OFF
when the vehicle is parked. This allows the vehicle to ªbreatheº
through the outside air inlet duct.
²Under snowy or dirty weather conditions, your vehicle's climate
control system should be left in the OFF position when the vehicle is
parked. This allows the climate control system to be free from
contamination of outside pollutants.
²If your vehicle has been parked with the windows closed during warm
weather conditions, the air conditioner will perform more efficiently in
cooling the vehicle if driven for two or three minutes with the
windows open. This will force most of the hot, stale air out of the
vehicle. Once the vehicle has been ªaired outº, operate the climate
control system as desired.
²Do not put objects under the front seat which may interfere with the
airflow to the rear seats (if equipped).
²Remove any snow, ice or leaves from the air intake area (at the
bottom of the windshield and underneath the hood).
²Do not place objects over the defroster outlets. These objects can
block airflow and reduce visibility through your windshield. Avoid
placing small objects on top of the instrument panel. These objects
may fall down into the defroster outlets and block airflow, in addition
to, damaging the climate control system.
Climate Controls
42