brake light FORD TAURUS 2005 4.G User Guide
[x] Cancel search | Manufacturer: FORD, Model Year: 2005, Model line: TAURUS, Model: FORD TAURUS 2005 4.GPages: 248, PDF Size: 2.66 MB
Page 52 of 248
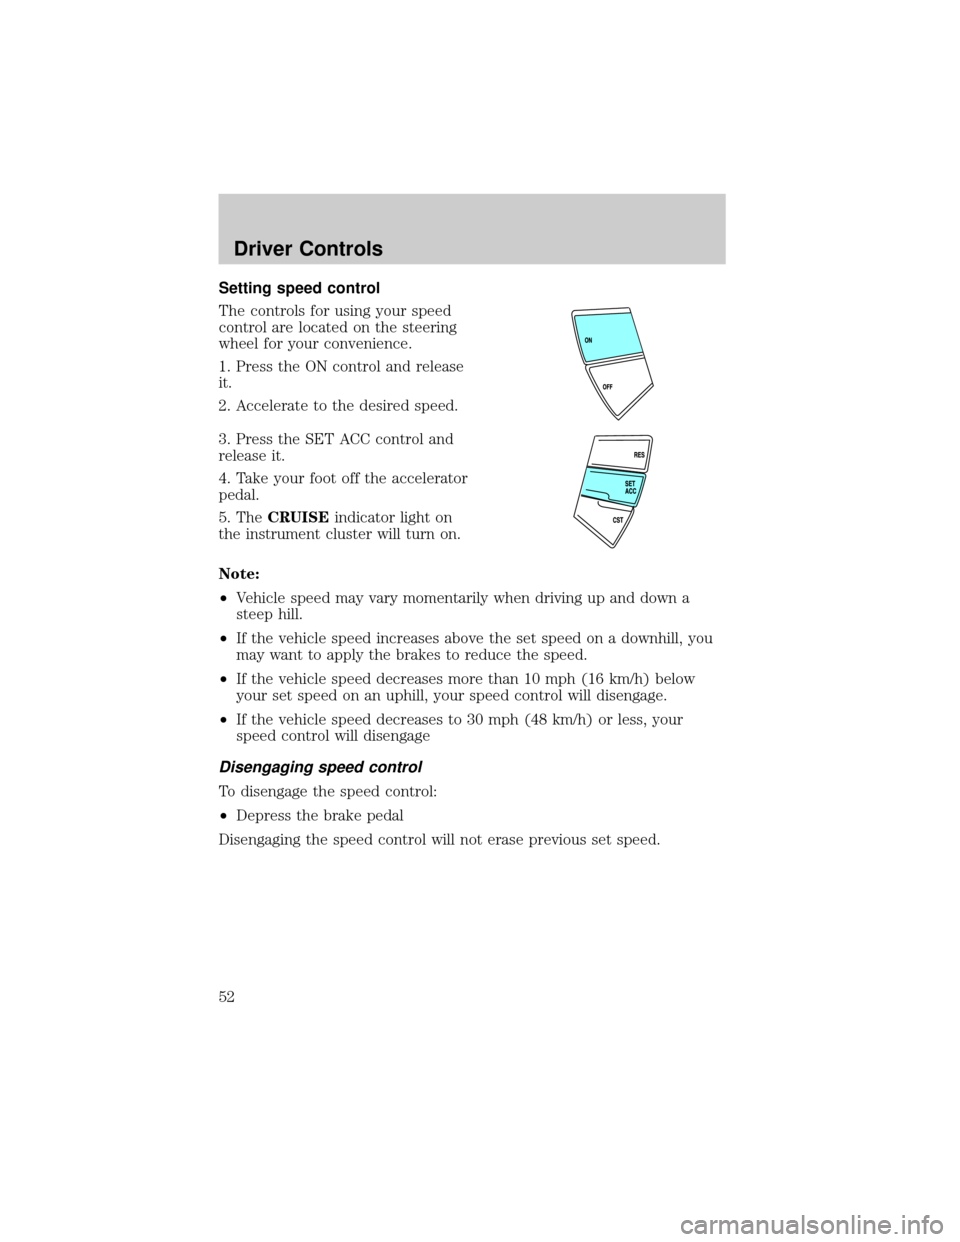
Setting speed control
The controls for using your speed
control are located on the steering
wheel for your convenience.
1. Press the ON control and release
it.
2. Accelerate to the desired speed.
3. Press the SET ACC control and
release it.
4. Take your foot off the accelerator
pedal.
5. TheCRUISEindicator light on
the instrument cluster will turn on.
Note:
²Vehicle speed may vary momentarily when driving up and down a
steep hill.
²If the vehicle speed increases above the set speed on a downhill, you
may want to apply the brakes to reduce the speed.
²If the vehicle speed decreases more than 10 mph (16 km/h) below
your set speed on an uphill, your speed control will disengage.
²If the vehicle speed decreases to 30 mph (48 km/h) or less, your
speed control will disengage
Disengaging speed control
To disengage the speed control:
²Depress the brake pedal
Disengaging the speed control will not erase previous set speed.
Driver Controls
52
Page 102 of 248
shoulder and chest. Be sure the belt is not twisted. If the belt is twisted,
remove the twist. Insert the tongue into the proper buckle for your
seating position until you hear a snap and feel it latch. Make sure the
tongue is securely fastened to the buckle by pulling on the tongue.
The lap belt should fit snugly and as low as possible around the
hips, not across the waist.
Front and rear seat occupants, including pregnant women,
should wear safety belts for optimum protection in an accident.
Each seating position in your vehicle has a specific safety belt
assembly which is made up of one buckle and one tongue that
are designed to be used as a pair. 1) Use the shoulder belt on the
outside shoulder only. Never wear the shoulder belt under the arm. 2)
Never swing the safety belt around your neck over the inside shoulder.
3) Never use a single belt for more than one person.
Due to folding rear seats, sometimes the buckles and tongues toward the
center of the vehicle may be hidden by the rear edge of the seat cushion.
Pull them out so they will be accessible.
While you are fastened in the seat belt, the shoulder belt adjusts to your
movement. However, if you brake hard, turn hard or your vehicle
receives an impact of 5 mph (8 km/h) or more, the safety belt will
become locked and help reduce your forward movement.
To unfasten the belt, push the red release button on the end of the
buckle. This allows the tongue to unlatch from the buckle. While the belt
retracts, guide the tongue to its original position to prevent it from
striking you or the vehicle.
Safety belt warning light and indicator chime
The safety belt warning light illuminates in the instrument cluster and a
chime sounds to remind the occupants to fasten their safety belts.
Seating and Safety Restraints
102
Page 130 of 248
STARTING
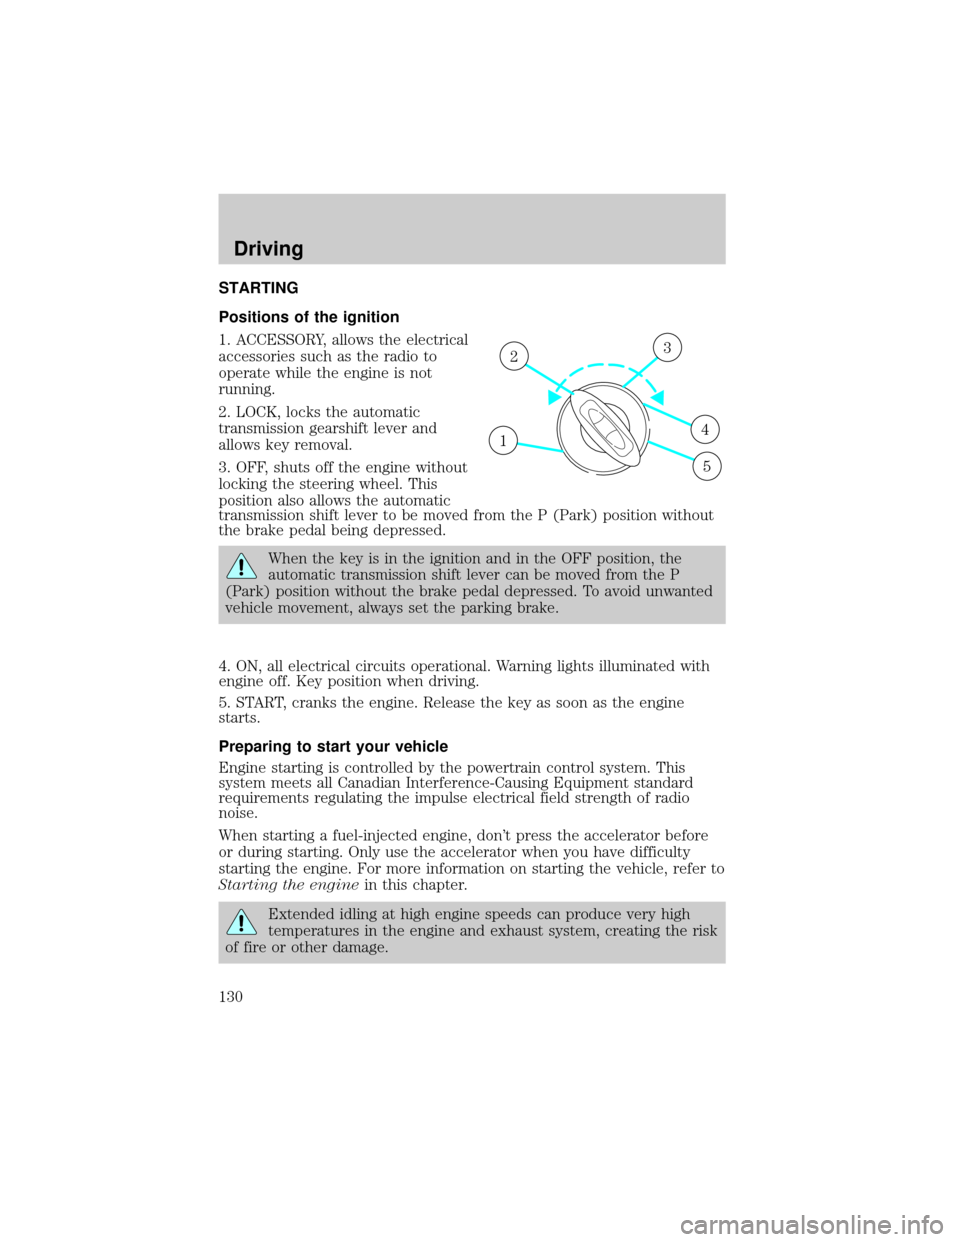
Positions of the ignition
1. ACCESSORY, allows the electrical
accessories such as the radio to
operate while the engine is not
running.
2. LOCK, locks the automatic
transmission gearshift lever and
allows key removal.
3. OFF, shuts off the engine without
locking the steering wheel. This
position also allows the automatic
transmission shift lever to be moved from the P (Park) position without
the brake pedal being depressed.
When the key is in the ignition and in the OFF position, the
automatic transmission shift lever can be moved from the P
(Park) position without the brake pedal depressed. To avoid unwanted
vehicle movement, always set the parking brake.
4. ON, all electrical circuits operational. Warning lights illuminated with
engine off. Key position when driving.
5. START, cranks the engine. Release the key as soon as the engine
starts.
Preparing to start your vehicle
Engine starting is controlled by the powertrain control system. This
system meets all Canadian Interference-Causing Equipment standard
requirements regulating the impulse electrical field strength of radio
noise.
When starting a fuel-injected engine, don't press the accelerator before
or during starting. Only use the accelerator when you have difficulty
starting the engine. For more information on starting the vehicle, refer to
Starting the enginein this chapter.
Extended idling at high engine speeds can produce very high
temperatures in the engine and exhaust system, creating the risk
of fire or other damage.
1
23
4
5
Driving
Driving
130
Page 132 of 248
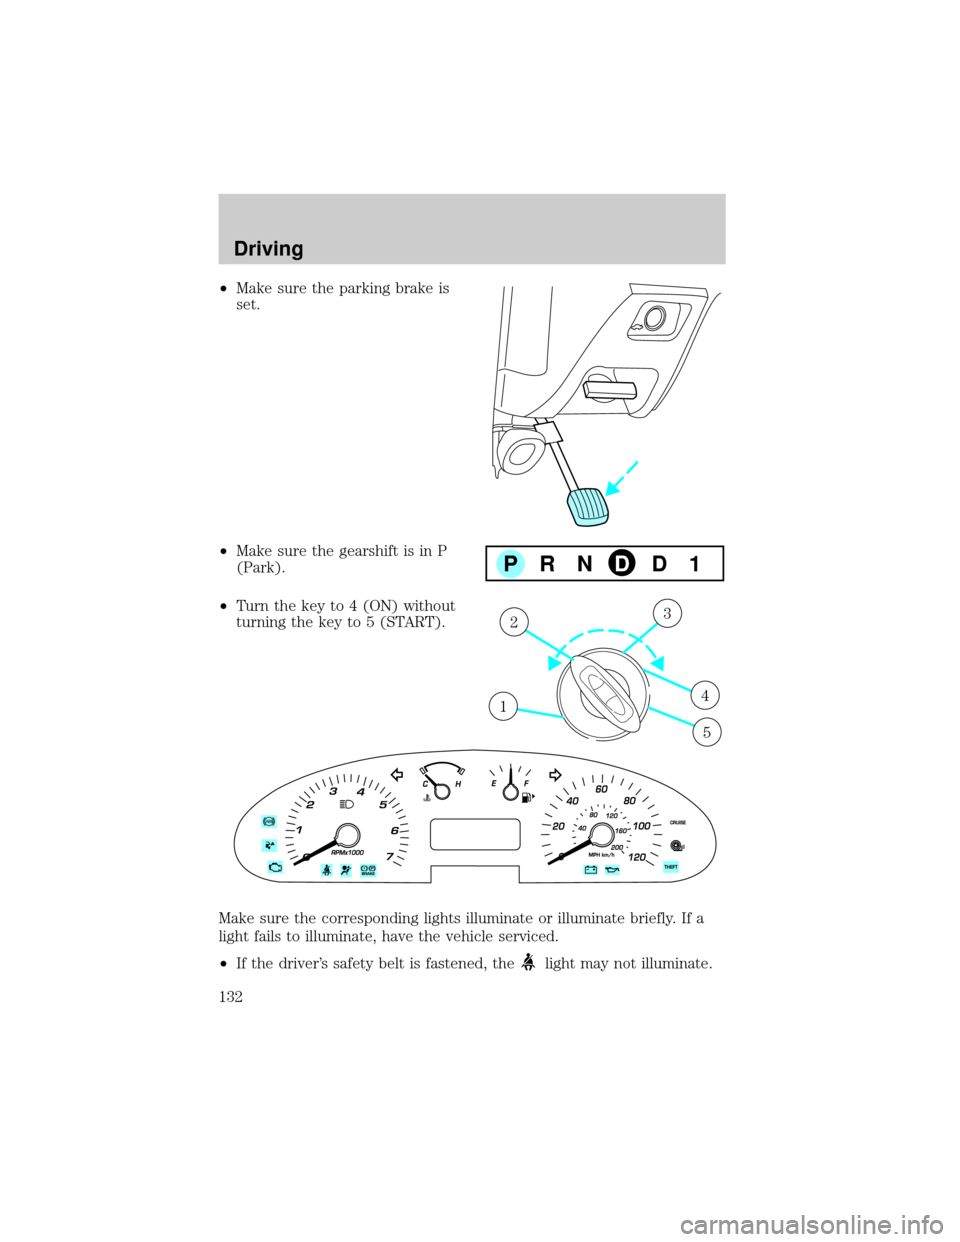
²Make sure the parking brake is
set.
²Make sure the gearshift is in P
(Park).
²Turn the key to 4 (ON) without
turning the key to 5 (START).
Make sure the corresponding lights illuminate or illuminate briefly. If a
light fails to illuminate, have the vehicle serviced.
²If the driver's safety belt is fastened, the
light may not illuminate.
PRNDD1
1
23
4
5
Driving
132
Page 135 of 248
Refer toBrake system warning
lightin theInstrument Cluster
chapter for information on the brake
system warning light.
Four-wheel anti-lock brake system (ABS) (if equipped)
On vehicles equipped with an anti-lock braking system (ABS), a noise
from the hydraulic pump motor and pulsation in the pedal may be
observed during ABS braking events. Pedal pulsation coupled with noise
while braking under panic conditions or on loose gravel, bumps, wet or
snowy roads is normal and indicates proper functioning of the vehicle's
anti-lock brake system. The ABS performs a self-check after you start
the engine and begin to drive away. A brief mechanical noise may be
heard during this test. This is normal. If a malfunction is found, the ABS
warning light will come on.
The ABS operates by detecting the onset of wheel lockup during brake
applications and compensates for this tendency. The wheels are
prevented from locking even when the brakes are firmly applied.
Using ABS
²In an emergency or when maximum efficiency from the four-wheel
ABS is required, apply continuous force on the brake. The four wheel
ABS will be activated immediately, thus allowing you to retain steering
control of your vehicle and, providing there is sufficient space, will
enable you to avoid obstacles and bring the vehicle to a controlled
stop.
²The anti-lock system does not reduce stopping distance. Always leave
enough room between your vehicle and the vehicle in front of you to
stop.
²We recommend that you familiarize yourself with this braking
technique. However, avoid taking any unnecessary risks.
ABS warning lamp
The ABS lamp in the instrument
cluster momentarily illuminates
when the ignition is turned on. If
the light does not illuminate during
start up, remains on or flashes, the
ABS may be disabled and may need to be serviced.
P!
BRAKE
ABS
Driving
135
Page 140 of 248
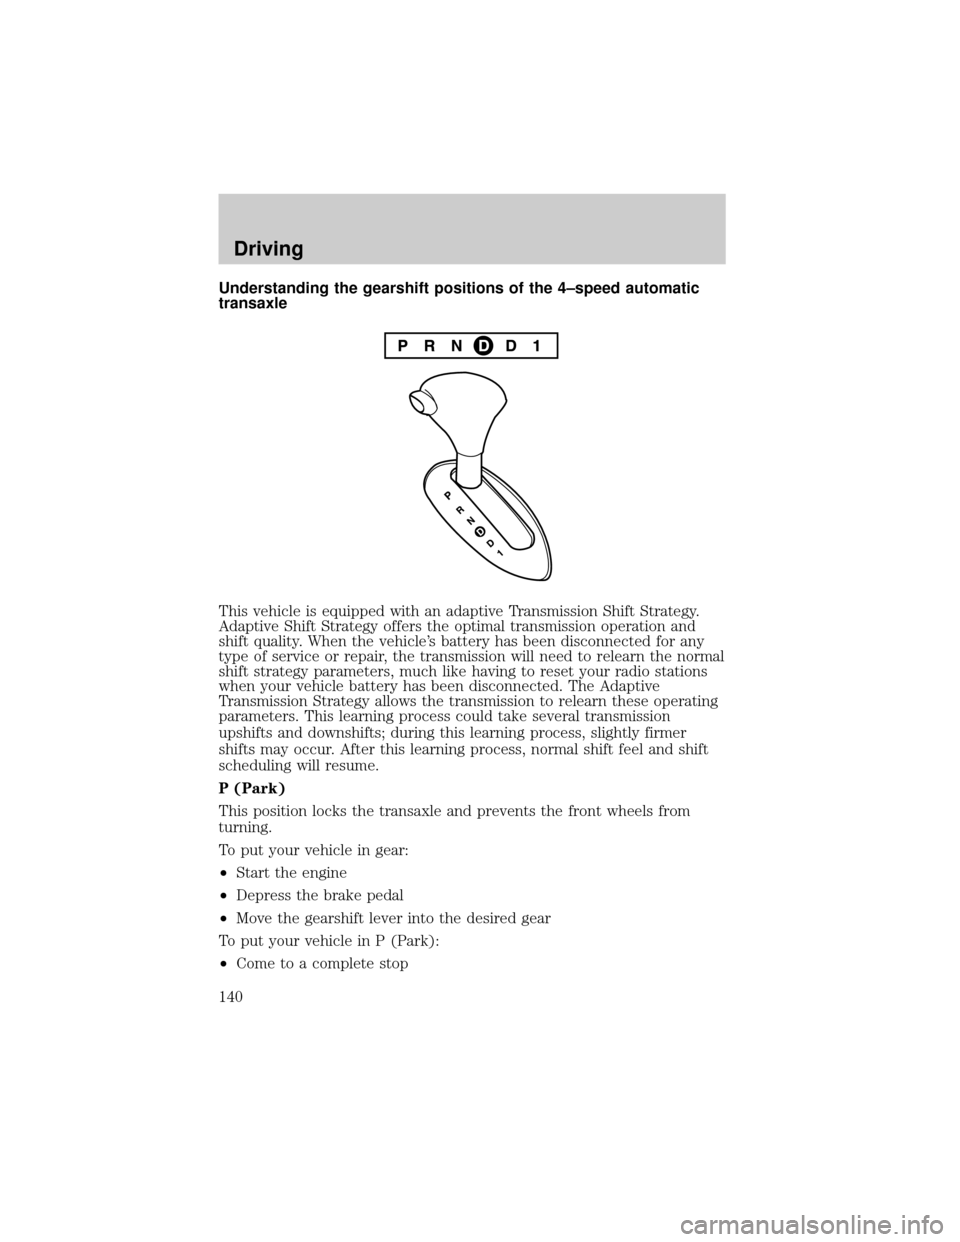
Understanding the gearshift positions of the 4±speed automatic
transaxle
This vehicle is equipped with an adaptive Transmission Shift Strategy.
Adaptive Shift Strategy offers the optimal transmission operation and
shift quality. When the vehicle's battery has been disconnected for any
type of service or repair, the transmission will need to relearn the normal
shift strategy parameters, much like having to reset your radio stations
when your vehicle battery has been disconnected. The Adaptive
Transmission Strategy allows the transmission to relearn these operating
parameters. This learning process could take several transmission
upshifts and downshifts; during this learning process, slightly firmer
shifts may occur. After this learning process, normal shift feel and shift
scheduling will resume.
P (Park)
This position locks the transaxle and prevents the front wheels from
turning.
To put your vehicle in gear:
²Start the engine
²Depress the brake pedal
²Move the gearshift lever into the desired gear
To put your vehicle in P (Park):
²Come to a complete stop
Driving
140
Page 141 of 248
²Move the gearshift lever and securely latch it in P (Park)
Always set the parking brake fully and make sure the gearshift is
latched in P (Park). Turn the ignition to the LOCK position and
remove the key whenever you leave your vehicle.
R (Reverse)
With the gearshift lever in R (Reverse), the vehicle will move backward.
Always come to a complete stop before shifting into and out of R
(Reverse).
N (Neutral)
With the gearshift lever in N (Neutral), the vehicle can be started and is
free to roll. Hold the brake pedal down while in this position.
(Overdrive)
The normal driving position for the best fuel economy. The transaxle
operates in gears one through four.
D (Drive)
²This position allows for all forward gears except overdrive.
²Provides more engine braking than
(Overdrive).
²Use when driving conditions cause excessive shifting from O/D to
other gears. Examples: city traffic, hilly terrain, heavy loads, trailer
towing and when engine braking is required.
1 (First)
²Provides maximum engine braking.
²Allows upshifts by moving gearshift lever.
²Will not downshift into 1 (First) at high speeds; allows for 1 (First)
when vehicle reaches slower speeds.
When parking, do not use the gearshift in place of the parking
brake. Always set the parking brake fully and make sure that the
gearshift is securely latched in Park (P). Turn off the ignition
whenever you leave your vehicle. Never leave your vehicle unattended
while it is running. If you do not take these precautions, your vehicle
may move unexpectedly and injure someone.
If your vehicle gets stuck in mud or snow
If your vehicle gets stuck in mud or snow, it may be rocked out by
shifting between forward and reverse gears, stopping between shifts in a
steady pattern. Press lightly on the accelerator in each gear.
Driving
141
Page 142 of 248

If necessary, try turning the Traction Controlysystem off. This will allow
the wheels to spin, which may help to free your stuck vehicle. For more
information, refer toTraction Controly(if equipped)in this chapter.
Do not rock the vehicle if the engine is not at normal operating
temperature or damage to the transmission may occur.
Do not rock the vehicle for more than a minute or damage to the
transmission and tires may occur, or the engine may overheat.
DRIVING THROUGH WATER
If driving through deep or standing water is unavoidable, proceed very
slowly especially when the depth is not known. Never drive through
water that is higher than the bottom of the hubs (for trucks) or the
bottom of the wheel rims (for cars). When driving through water,
traction or brake capability may be limited. Also, water may enter your
engine's air intake and severely damage your engine or your vehicle may
stall.Driving through deep water where the transmission vent
tube is submerged may allow water into the transmission and
cause internal transmission damage.
Once through the water, always dry the brakes by moving your
vehicle slowly while applying light pressure on the brake pedal.
Wet brakes do not stop the vehicle as quickly as dry brakes.
VEHICLE LOADING ± WITH AND WITHOUT A TRAILER
This section will guide you in the proper loading of your vehicle and/or
trailer, to keep your loaded vehicle weight within its design rating
capability, with or without a trailer. Properly loading your vehicle will
provide maximum return of vehicle design performance. Before loading
your vehicle, familiarize yourself with the following terms for determining
your vehicle's weight ratings, with or without a trailer, from the vehicle's
Safety Certification Label and Tire Label:
Base Curb Weight± is the weight of the vehicle including a full tank of
fuel and all standard equipment. It does not include passengers, cargo, or
optional equipment.
Vehicle Curb Weight± is the weight of your new vehicle when you
picked it up from your dealer plus any aftermarket equipment.
Driving
142
Page 146 of 248
Exceeding any vehicle weight rating limitation could result in
serious damage to the vehicle and/or personal injury.
TRAILER TOWING
Your vehicle is classified as a light duty towing vehicle. The amount of
weight you can safely tow depends on the type of engine you have in
your vehicle. Your vehicle does not come from the factory fully equipped
to tow. No towing packages are available through Ford or
Mercury/Lincoln dealers. Do not tow a trailer until your vehicle has been
driven at least 800 km (500 miles). If towing with a station wagon, inflate
the rear tires to 35 psi.
Towing a trailer places an additional load on your vehicle's engine,
transaxle, brakes, tires and suspension. Inspect these components
carefully after towing.
In order to identify your vehicle's engine, refer toIdentifying
components in the engine compartmentin theMaintenance and
specificationschapter.
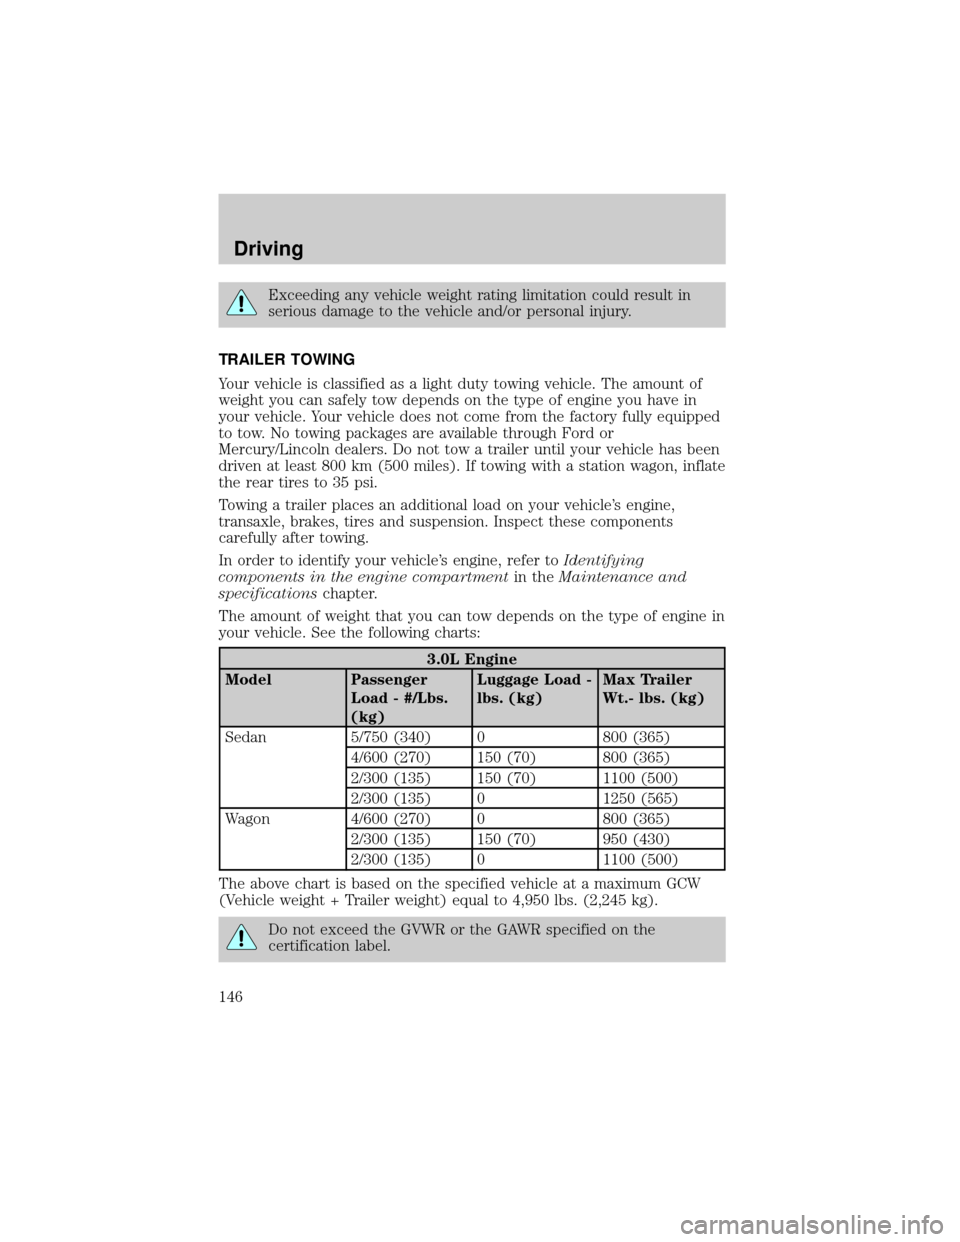
The amount of weight that you can tow depends on the type of engine in
your vehicle. See the following charts:
3.0L Engine
Model Passenger
Load - #/Lbs.
(kg)Luggage Load -
lbs. (kg)Max Trailer
Wt.- lbs. (kg)
Sedan 5/750 (340) 0 800 (365)
4/600 (270) 150 (70) 800 (365)
2/300 (135) 150 (70) 1100 (500)
2/300 (135) 0 1250 (565)
Wagon 4/600 (270) 0 800 (365)
2/300 (135) 150 (70) 950 (430)
2/300 (135) 0 1100 (500)
The above chart is based on the specified vehicle at a maximum GCW
(Vehicle weight + Trailer weight) equal to 4,950 lbs. (2,245 kg).
Do not exceed the GVWR or the GAWR specified on the
certification label.
Driving
146
Page 147 of 248
Towing trailers beyond the maximum recommended gross trailer
weight exceeds the limit of the vehicle and could result in
engine damage, transaxle damage, structural damage, loss of control,
and personal injury.
Preparing to tow
Use the proper equipment for towing a trailer and make sure it is
properly attached to your vehicle. See your dealer or a reliable trailer
dealer if you require assistance.
Hitches
Do not use hitches that clamp onto the vehicle bumper. Use a load
carrying hitch. You must distribute the load in your trailer so that
10±15% of the total weight of the trailer is on the tongue.
Safety chains
Always connect the trailer's safety chains to the frame or hook retainers
of the vehicle hitch. To connect the trailer's safety chains, cross the
chains under the trailer tongue and allow slack for turning corners.
If you use a rental trailer, follow the instructions that the rental agency
gives to you.
Do not attach safety chains to the bumper.
Trailer brakes
Electric brakes and manual, automatic or surge-type trailer brakes are
safe if installed properly and adjusted to the manufacturer's
specifications. The trailer brakes must meet local and Federal
regulations.
Do not connect a trailer's hydraulic brake system directly to your
vehicle's brake system. Your vehicle may not have enough
braking power and your chances of having a collision greatly increase.
The braking system of the tow vehicle is rated for operation at the
GVWR not GCWR.
Trailer lamps
Trailer lamps are required on most towed vehicles. Make sure all running
lights, brake lights, turn signals and hazard lights are working. See your
dealer or trailer rental agency for proper instructions and equipment for
hooking up trailer lamps.
Driving
147