fuel FORD TAURUS 2005 4.G Owner's Manual
[x] Cancel search | Manufacturer: FORD, Model Year: 2005, Model line: TAURUS, Model: FORD TAURUS 2005 4.GPages: 248, PDF Size: 2.66 MB
Page 152 of 248
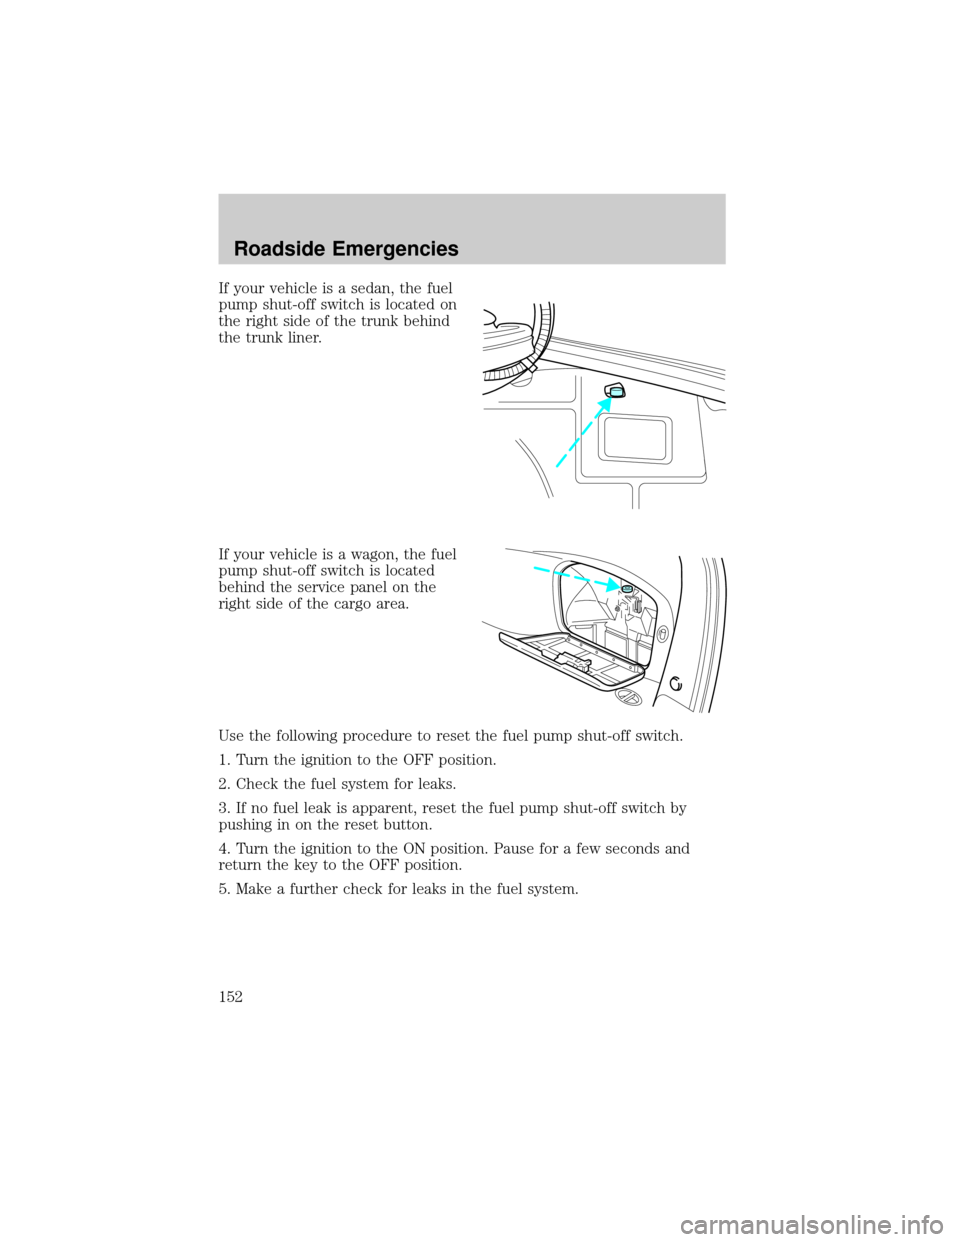
If your vehicle is a sedan, the fuel
pump shut-off switch is located on
the right side of the trunk behind
the trunk liner.
If your vehicle is a wagon, the fuel
pump shut-off switch is located
behind the service panel on the
right side of the cargo area.
Use the following procedure to reset the fuel pump shut-off switch.
1. Turn the ignition to the OFF position.
2. Check the fuel system for leaks.
3. If no fuel leak is apparent, reset the fuel pump shut-off switch by
pushing in on the reset button.
4. Turn the ignition to the ON position. Pause for a few seconds and
return the key to the OFF position.
5. Make a further check for leaks in the fuel system.
Roadside Emergencies
152
Page 156 of 248
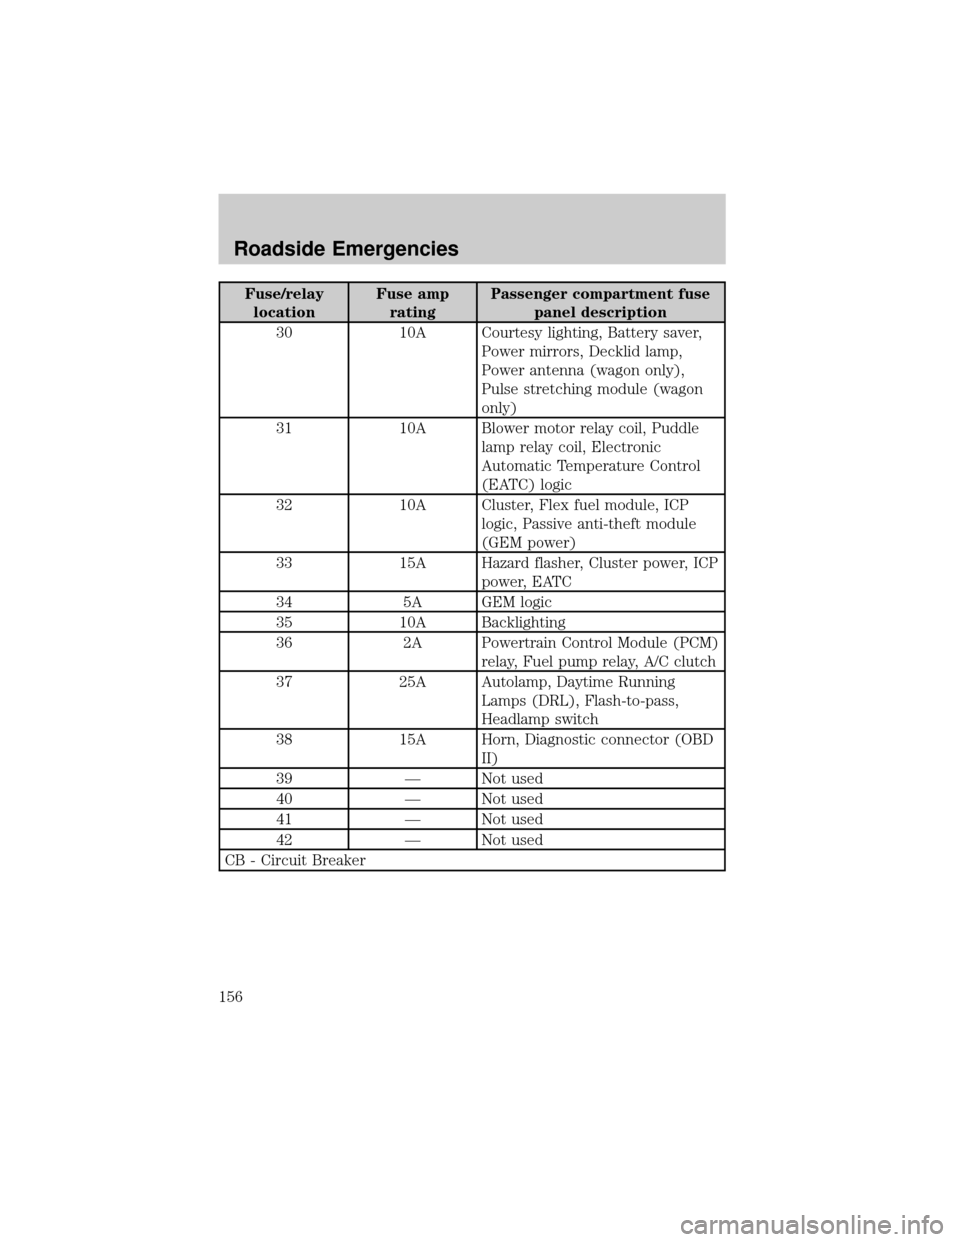
Fuse/relay
locationFuse amp
ratingPassenger compartment fuse
panel description
30 10A Courtesy lighting, Battery saver,
Power mirrors, Decklid lamp,
Power antenna (wagon only),
Pulse stretching module (wagon
only)
31 10A Blower motor relay coil, Puddle
lamp relay coil, Electronic
Automatic Temperature Control
(EATC) logic
32 10A Cluster, Flex fuel module, ICP
logic, Passive anti-theft module
(GEM power)
33 15A Hazard flasher, Cluster power, ICP
power, EATC
34 5A GEM logic
35 10A Backlighting
36 2A Powertrain Control Module (PCM)
relay, Fuel pump relay, A/C clutch
37 25A Autolamp, Daytime Running
Lamps (DRL), Flash-to-pass,
Headlamp switch
38 15A Horn, Diagnostic connector (OBD
II)
39 Ð Not used
40 Ð Not used
41 Ð Not used
42 Ð Not used
CB - Circuit Breaker
Roadside Emergencies
156
Page 158 of 248
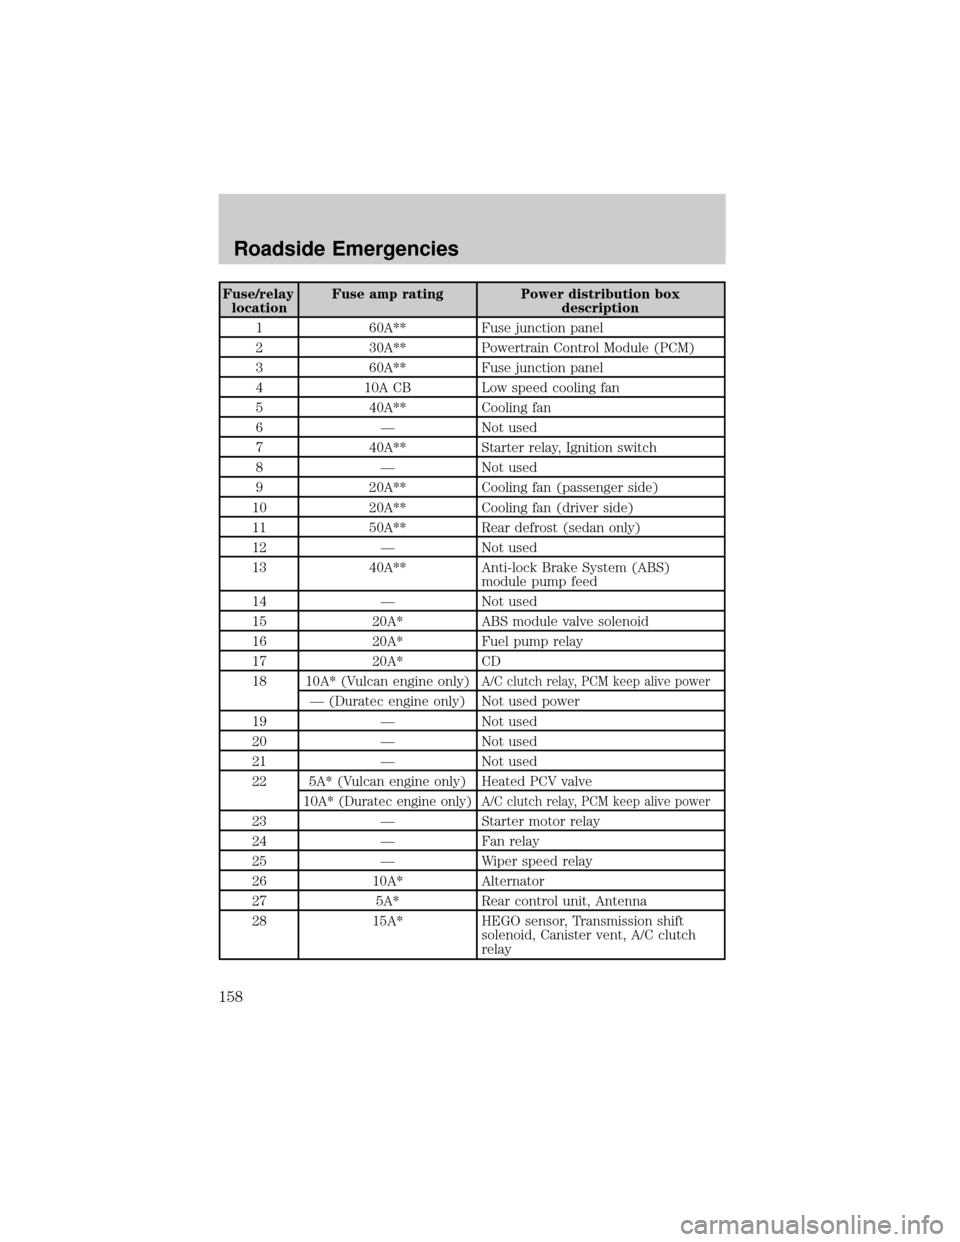
Fuse/relay
locationFuse amp rating Power distribution box
description
1 60A** Fuse junction panel
2 30A** Powertrain Control Module (PCM)
3 60A** Fuse junction panel
4 10A CB Low speed cooling fan
5 40A** Cooling fan
6 Ð Not used
7 40A** Starter relay, Ignition switch
8 Ð Not used
9 20A** Cooling fan (passenger side)
10 20A** Cooling fan (driver side)
11 50A** Rear defrost (sedan only)
12 Ð Not used
13 40A** Anti-lock Brake System (ABS)
module pump feed
14 Ð Not used
15 20A* ABS module valve solenoid
16 20A* Fuel pump relay
17 20A* CD
18 10A* (Vulcan engine only)
A/C clutch relay, PCM keep alive power
Ð (Duratec engine only) Not used power
19 Ð Not used
20 Ð Not used
21 Ð Not used
22 5A* (Vulcan engine only) Heated PCV valve
10A*
(Duratec engine only)A/C clutch relay, PCM keep alive power
23 Ð Starter motor relay
24 Ð Fan relay
25 Ð Wiper speed relay
26 10A* Alternator
27 5A* Rear control unit, Antenna
28 15A* HEGO sensor, Transmission shift
solenoid, Canister vent, A/C clutch
relay
Roadside Emergencies
158
Page 159 of 248
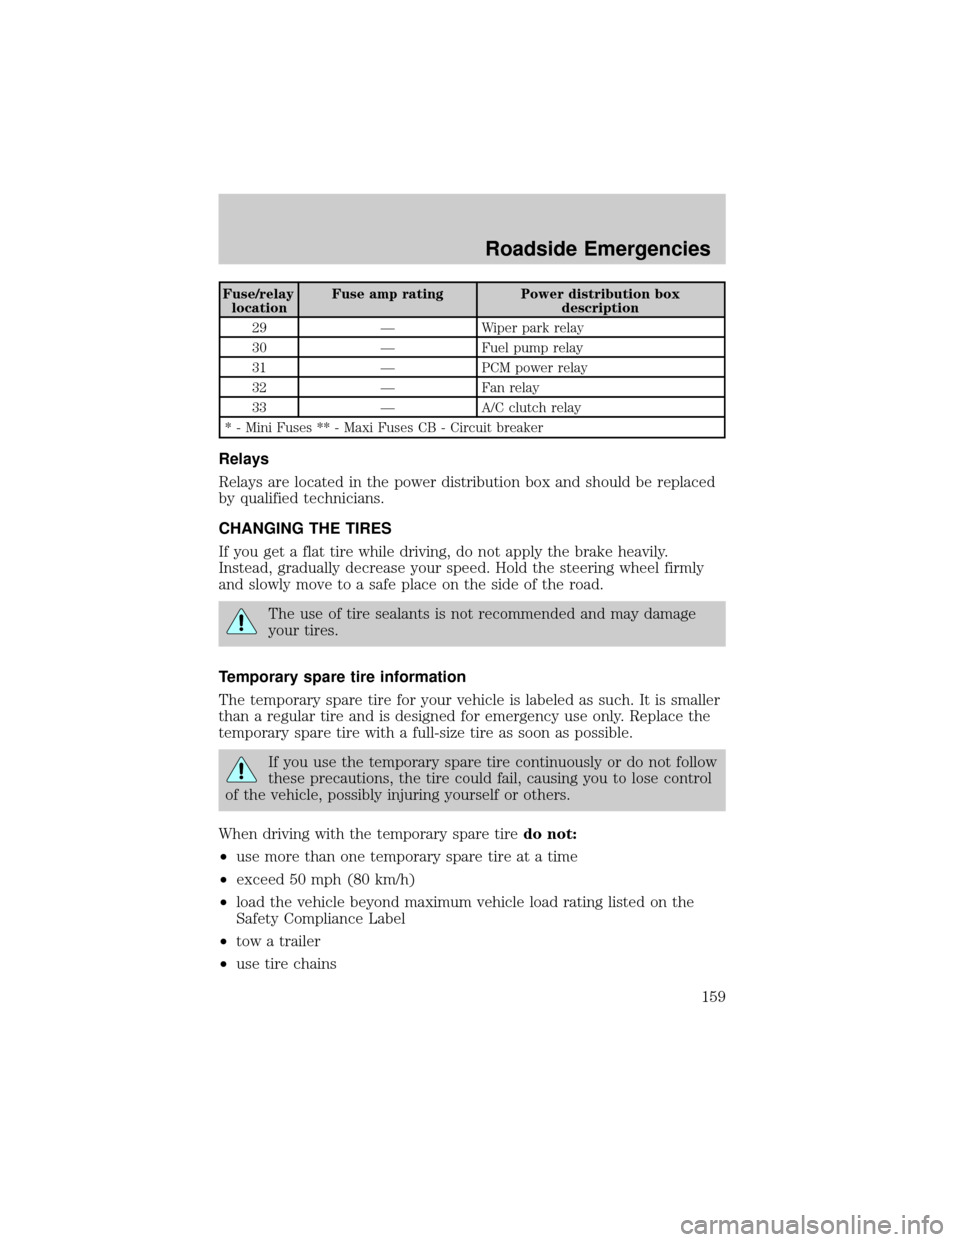
Fuse/relay
locationFuse amp rating Power distribution box
description
29 Ð Wiper park relay
30 Ð Fuel pump relay
31 Ð PCM power relay
32 Ð Fan relay
33 Ð A/C clutch relay
* - Mini Fuses ** - Maxi Fuses CB - Circuit breaker
Relays
Relays are located in the power distribution box and should be replaced
by qualified technicians.
CHANGING THE TIRES
If you get a flat tire while driving, do not apply the brake heavily.
Instead, gradually decrease your speed. Hold the steering wheel firmly
and slowly move to a safe place on the side of the road.
The use of tire sealants is not recommended and may damage
your tires.
Temporary spare tire information
The temporary spare tire for your vehicle is labeled as such. It is smaller
than a regular tire and is designed for emergency use only. Replace the
temporary spare tire with a full-size tire as soon as possible.
If you use the temporary spare tire continuously or do not follow
these precautions, the tire could fail, causing you to lose control
of the vehicle, possibly injuring yourself or others.
When driving with the temporary spare tiredo not:
²use more than one temporary spare tire at a time
²exceed 50 mph (80 km/h)
²load the vehicle beyond maximum vehicle load rating listed on the
Safety Compliance Label
²tow a trailer
²use tire chains
Roadside Emergencies
159
Page 167 of 248
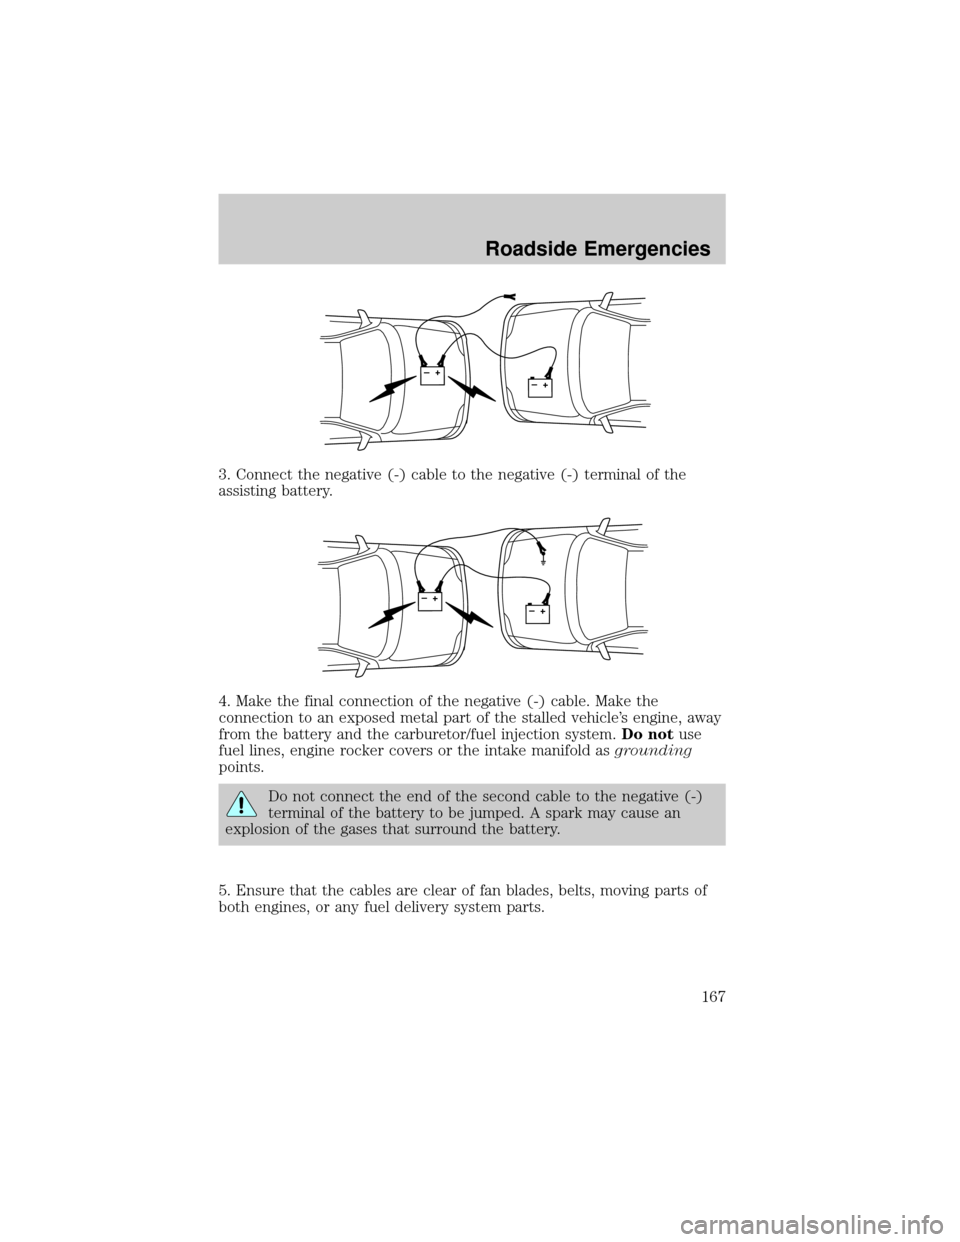
3. Connect the negative (-) cable to the negative (-) terminal of the
assisting battery.
4. Make the final connection of the negative (-) cable. Make the
connection to an exposed metal part of the stalled vehicle's engine, away
from the battery and the carburetor/fuel injection system.Do notuse
fuel lines, engine rocker covers or the intake manifold asgrounding
points.
Do not connect the end of the second cable to the negative (-)
terminal of the battery to be jumped. A spark may cause an
explosion of the gases that surround the battery.
5. Ensure that the cables are clear of fan blades, belts, moving parts of
both engines, or any fuel delivery system parts.
+–+–
+–+–
Roadside Emergencies
167
Page 178 of 248
In the CAMVAP program, impartial third-party arbitrators conduct
hearings at mutually convenient times and places in an informal
environment. These impartial arbitrators review the positions of the
parties, make decisions and, when appropriate, render awards to resolve
disputes. CAMVAP decisions are fast, fair, and final; the arbitrator's
award is binding both to you and Ford of Canada.
CAMVAP services are available in all territories and provinces. For more
information, without charge or obligation, call your CAMVAP Provincial
Administrator directly at 1-800-207-0685.
GETTING ASSISTANCE OUTSIDE THE U.S. AND CANADA
Before exporting your vehicle to a foreign country, contact the
appropriate foreign embassy or consulate. These officials can inform you
of local vehicle registration regulations and where to find unleaded fuel.
If you cannot find unleaded fuel or can only get fuel with an anti-knock
index lower than is recommended for your vehicle, contact a district or
owner relations/customer relationship office.
The use of leaded fuel in your vehicle without proper conversion may
damage the effectiveness of your emission control system and may cause
engine knocking or serious engine damage. Ford Motor Company/Ford of
Canada is not responsible for any damage caused by use of improper
fuel.
In the United States, using leaded fuel may also result in difficulty
importing your vehicle back into the U.S.
If your vehicle must be serviced while you are traveling or living in
Central or South America, the Caribbean, or the Middle East, contact the
nearest Ford dealership. If the dealership cannot help you, write or call:
FORD MOTOR COMPANY
WORLDWIDE DIRECT MARKET OPERATIONS
1555 Fairlane Drive
Fairlane Business Park #3
Allen Park, Michigan 48101
U.S.A.
Telephone: (313) 594-4857
FAX: (313) 390-0804
If you are in another foreign country, contact the nearest Ford
dealership. If the dealership employees cannot help you, they can direct
you to the nearest Ford affiliate office.
If you buy your vehicle in North America and then relocate outside of
the U.S. or Canada, register your vehicle identification number (VIN) and
new address with Ford Motor Company Worldwide Direct Market
Operations.
Customer Assistance
178
Page 181 of 248
WASHING THE EXTERIOR
Wash your vehicle regularly with cool or lukewarm water and a neutral
Ph shampoo, such as Motorcraft Detail Wash (ZC-3±A), which is available
from your dealer.
²Never use strong household detergents or soap, such as dish washing
or laundry liquid. These products can discolor and spot painted
surfaces.
²Never wash a vehicle that is ªhot to the touchº or during exposure to
strong, direct sunlight.
²Always use a clean sponge or car wash mitt with plenty of water for
best results.
²Dry the vehicle with a chamois or soft terry cloth towel in order to
eliminate water spotting.
²It is especially important to wash the vehicle regularly during the
winter months, as dirt and road salt are difficult to remove and cause
damage to the vehicle.
²Immediately remove items such as gasoline, diesel fuel, bird droppings
and insect deposits because they can cause damage to the vehicle's
paintwork and trim over time.
²Remove any exterior accessories, such as antennas, before entering a
car wash.
²Suntan lotions and insect repellents can damage any painted
surface; if these substances come in contact with your vehicle,
wash off as soon as possible.
WAXING
Applying a polymer paint sealant to your vehicle every six months will
assist in reducing minor scratches and paint damage.
²Wash the vehicle first.
²Do not use waxes that contain abrasives.
²Do not allow paint sealant to come in contact with any non-body
(low-gloss black) colored trim, such as grained door handles, roof
racks, bumpers, side moldings, mirror housings or the windshield cowl
area. The paint sealant will ªgrayº or stain the parts over time.
PAINT CHIPS
Your dealer has touch-up paint and sprays to match your vehicle's color.
Take your color code (printed on a sticker in the driver's door jam) to
your dealer to ensure you get the correct color.
Cleaning
Cleaning
181
Page 182 of 248
²Remove particles such as bird droppings, tree sap, insect deposits, tar
spots, road salt and industrial fallout before repairing paint chips.
²Always read the instructions before using the products.
ALUMINUM WHEELS AND WHEEL COVERS
Aluminum wheels and wheel covers are coated with a clearcoat paint
finish. In order to maintain their shine:
²Clean weekly with Motorcraft Wheel and Tire Cleaner (ZC-37±A),
which is available from your dealer. Heavy dirt and brake dust
accumulation may require agitation with a sponge. Rinse thoroughly
with a strong stream of water.
²Never apply any cleaning chemical to hot or warm wheel rims or
covers.
²Some automatic car washes may cause damage to the finish on your
wheel rims or covers. Chemical-strength cleaners, or cleaning
chemicals, in combination with brush agitation to remove brake dust
and dirt, could wear away the clearcoat finish over time.
²Do not use hydrofluoric acid-based or high caustic-based wheel
cleaners, steel wool, fuels or strong household detergent.
²To remove tar and grease, use Motorcraft Bug and Tar Remover
(ZC-42), available from your dealer.
ENGINE
Engines are more efficient when they are clean because grease and dirt
buildup keep the engine warmer than normal. When washing:
²Take care when using a power washer to clean the engine. The
high-pressure fluid could penetrate the sealed parts and cause
damage.
²Do not spray a hot engine with cold water to avoid cracking the
engine block or other engine components.
²Spray Motorcraft Engine Shampoo and Degreaser (ZC-20) on all parts
that require cleaning and pressure rinse clean.
²Cover the highlighted areas to prevent water damage when cleaning
the engine.
Cleaning
182
Page 184 of 248
WINDOWS AND WIPER BLADES
The windshield, rear and side windows and the wiper blades should be
cleaned regularly. If the wipers do not wipe properly, substances on the
vehicle's glass or the wiper blades may be the cause. These may include
hot wax treatments used by commercial car washes, tree sap, or other
organic contamination. To clean these items, please follow these tips:
²The windshield, rear windows and side windows may be cleaned with
a non-abrasive cleaner such as Motorcraft Ultra Clear Spray Glass
Cleaner (ZC-23), available from your dealer.
²Do not use abrasives, as they may cause scratches.
²Do not use fuel, kerosene, or paint thinner to clean any parts.
²Wiper blades can be cleaned with isopropyl (rubbing) alcohol or
windshield washer solution. Be sure to replace wiper blades when they
appear worn or do not function properly.
Do not use sharp objects, such as a razor blade, to clean the
inside of the rear window or to remove decals, as it may cause
damage to the rear window defroster's heated grid lines.
INSTRUMENT PANEL AND CLUSTER LENS
Clean the instrument panel with a damp cloth, then dry with a dry cloth.
²Avoid cleaners or polish that increase the gloss of the upper portion of
the instrument panel. The dull finish in this area helps protect the
driver from undesirable windshield reflection.
Do not use chemical solvents or strong detergents when cleaning
the steering wheel or instrument panel to avoid contamination of
the air bag system.
²Be certain to wash or wipe your hands clean if you have been in
contact with certain products such as insect repellent and suntan
lotion in order to avoid possible damage to the interior painted
surfaces.
INTERIOR
For fabric, carpets, cloth seats, safety belts and seats equipped with side
air bags:
²Remove dust and loose dirt with a vacuum cleaner.
²Remove light stains and soil with Motorcraft Extra Strength
Upholstery Cleaner (ZC-41).
Cleaning
184
Page 187 of 248
SERVICE RECOMMENDATIONS
To help you service your vehicle:
²We highlight do-it-yourself items in the engine compartment for easy
location.
²We provide a scheduled maintenance guide which makes tracking
routine service easy.
If your vehicle requires professional service, your dealership can provide
the necessary parts and service. Check yourWarranty Guide/Owner
Information Guideto find out which parts and services are covered.
Use only recommended fuels, lubricants, fluids and service parts
conforming to specifications. Motorcraft parts are designed and built to
provide the best performance in your vehicle.
PRECAUTIONS WHEN SERVICING YOUR VEHICLE
²Do not work on a hot engine.
²Make sure that nothing gets caught in moving parts.
²Do not work on a vehicle with the engine running in an enclosed
space, unless you are sure you have enough ventilation.
²Keep all open flames and other burning (cigarettes) material away
from the battery and all fuel related parts.
Working with the engine off
1. Set the parking brake and shift to P (Park).
2. Turn off the engine and remove the key.
3. Block the wheels.
Working with the engine on
1. Set the parking brake and ensure the gearshift is securely latched in P
(Park).
2. Block the wheels to prevent the vehicle from moving unexpectedly.
Note:Do not start your engine with the air cleaner removed and do not
remove it while the engine is running.
Maintenance and Specifications
Maintenance and Specifications
187