high FORD TAURUS 2012 6.G User Guide
[x] Cancel search | Manufacturer: FORD, Model Year: 2012, Model line: TAURUS, Model: FORD TAURUS 2012 6.GPages: 406, PDF Size: 2.69 MB
Page 63 of 406
4. Turn the headlamp control to the autolamp position. The headlamps
will turn on.
5. Wait the desired amount of time for the exit delay you want (up to
three minutes), then turn the headlamps off.
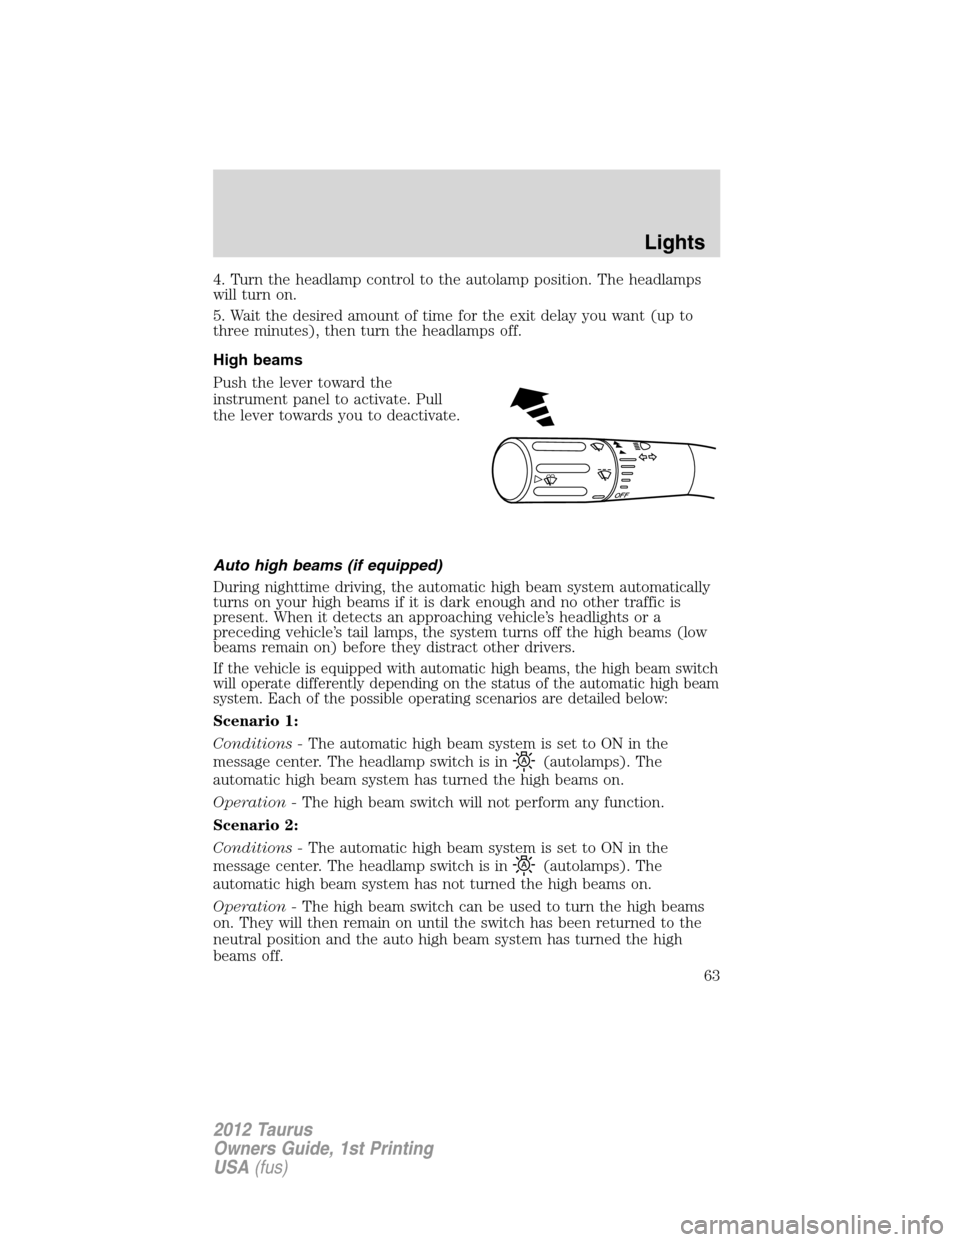
High beams
Push the lever toward the
instrument panel to activate. Pull
the lever towards you to deactivate.
Auto high beams (if equipped)
During nighttime driving, the automatic high beam system automatically
turns on your high beams if it is dark enough and no other traffic is
present. When it detects an approaching vehicle’s headlights or a
preceding vehicle’s tail lamps, the system turns off the high beams (low
beams remain on) before they distract other drivers.
If the vehicle is equipped with automatic high beams, the high beam switch
will operate differently depending on the status of the automatic high beam
system. Each of the possible operating scenarios are detailed below:
Scenario 1:
Conditions -The automatic high beam system is set to ON in the
message center. The headlamp switch is in
(autolamps). The
automatic high beam system has turned the high beams on.
Operation -The high beam switch will not perform any function.
Scenario 2:
Conditions -The automatic high beam system is set to ON in the
message center. The headlamp switch is in
(autolamps). The
automatic high beam system has not turned the high beams on.
Operation -The high beam switch can be used to turn the high beams
on. They will then remain on until the switch has been returned to the
neutral position and the auto high beam system has turned the high
beams off.
O
F
F
Lights
63
2012 Taurus
Owners Guide, 1st Printing
USA(fus)
Page 64 of 406
Scenario 3:
Conditions -The automatic high beam system is set to ON in the
message center. The headlamp switch is in
(off),(park lamps),
or
(on).
Operation -The high beam switch can be used to turn the high beams
on and off.
Scenario 4:
Conditions -The automatic high beam system is set to OFF in the
message center. The headlamp switch is
in
(autolamps),(off),(park lamps), or(on).
Operation -The high beam switch can be used to turn the high beams
on and off.
Enabling/disabling auto high beams
Enabling/disabling and/or checking the status of the automatic high beam
system can be performed using the message center. SeeMessage center
in theInstrument clusterchapter.
Activating high beams
If there is no traffic in front of the vehicle, the high beams will come on
automatically and the
light will display in the instrument panel if
the following are true:
•The headlamp control is in auto lamp
mode.
•The ambient light level is low enough that high beams are needed.
•Vehicle speed must be greater than 32 mph (51 km/h).
•Severe weather is not detected.
Deactivating high beams
The automatic high beams will deactivate if any of the following events
occur:
•An approaching vehicle’s headlights or a preceding vehicle’s tail lamps
are detected.
•The headlamp control is moved out of the autolamps position.
•The vehicle speed falls below 27 mph (43 km/h).
•The ambient light level is high enough that high beams are not
needed.
•Severe rain, snow or fog is detected.
Lights
64
2012 Taurus
Owners Guide, 1st Printing
USA(fus)
Page 65 of 406
•The camera is blocked.
Note:Activating the multi-function lever will put the headlamps in
manual high beam mode (constant or flash-to-pass) until the lever is
returned to the neutral position. To manually override the auto high
beam and go to low beam, the headlamp control must be taken out of
the
(autolamp) position.
Setting auto high beam sensitivity
The automatic high beam system has two sensitivity settings. The default
setting is near. If you would like the high beams to turn off when traffic
is further away, the sensitivity setting can be changed to far. The
procedure is as follows:
Preconditions:
•Vehicle is at a stop.
•Ignition is in the on position.
•The headlamp control is in the
position.
•High-beams are off.
Programming Sequence:
1. Turn the headlamp control from
(On) to(autolamp) three
times within two seconds, ending in
(On).
2. Cycle flash-to-pass three times using the multi-function lever.
3. The sensitivity setting has been changed.
Note: The programming sequence will end if either of the following occur:
•The vehicle speed is not zero.
•The battery voltage is out of normal range.
Troubleshooting
If the automatic high beam camera becomes blocked, the high beams
may not come on automatically. They will only activate when they are
manually turned on with the multi-function lever.
Typical road dust, dirt and water spots will not affect the automatic high
beam system’s performance. However, in cold or inclement weather
conditions, the automatic high beam system’s availability may be
decreased. In such conditions, the manual override may be used to turn
the high beams on or off.
Lights
65
2012 Taurus
Owners Guide, 1st Printing
USA(fus)
Page 66 of 406
For significant blockages (e.g. bird dropping, bug splatter, snow, or ice),
the automatic high beam system uses a blocked sensor computer
program. If a blockage is detected and no changes are observed, the
system will go into low beam mode until the blockage is cleared. If
blockages are repeatedly detected, the system will stay in low beam
mode for the remainder of the ignition cycle unless the system is able to
begin detecting other vehicles again.
If it appears that automatic control of the high beams is not functioning
properly, check the windshield in front of the camera for blockage.
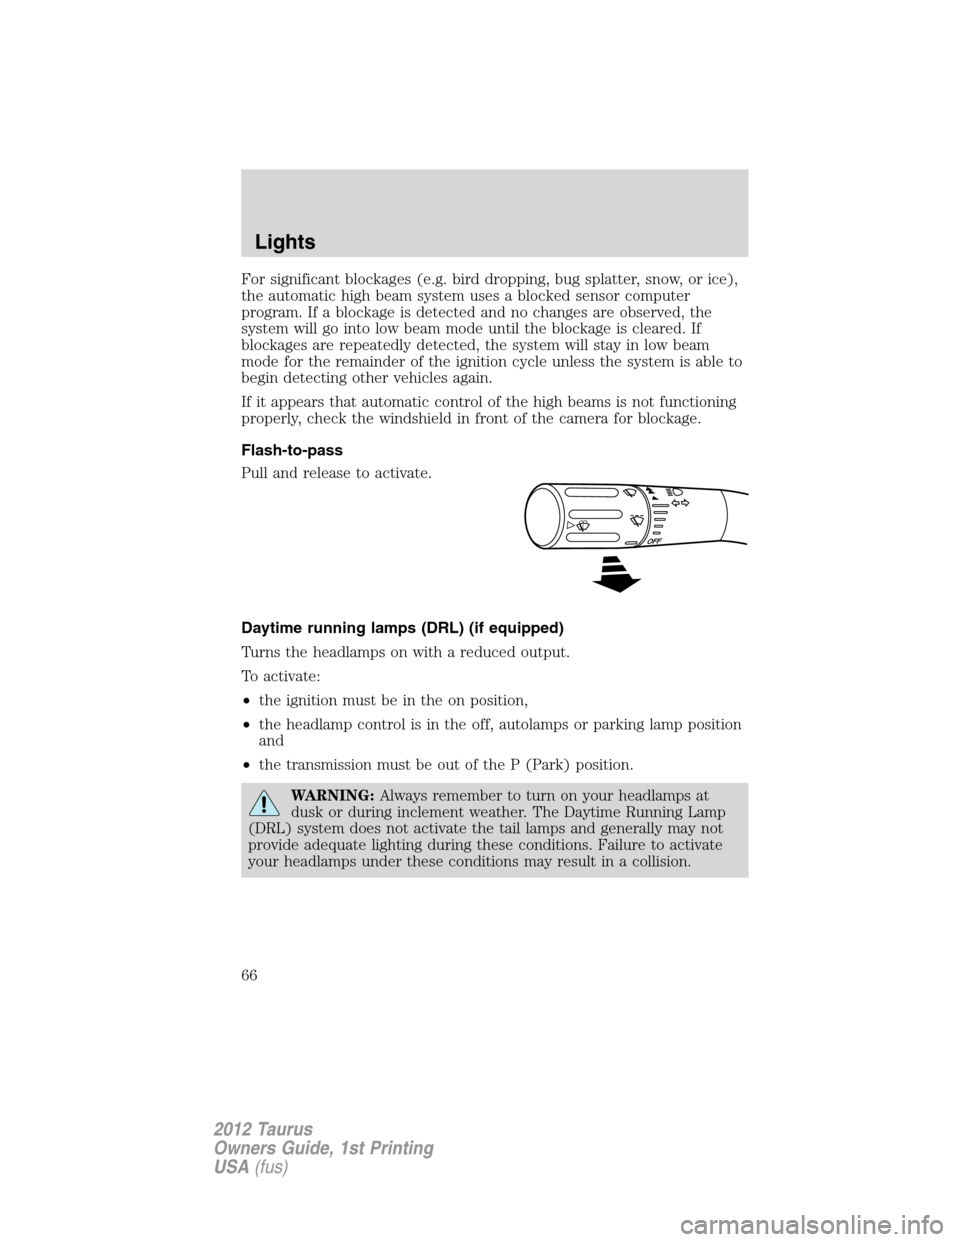
Flash-to-pass
Pull and release to activate.
Daytime running lamps (DRL) (if equipped)
Turns the headlamps on with a reduced output.
To activate:
•the ignition must be in the on position,
•the headlamp control is in the off, autolamps or parking lamp position
and
•the transmission must be out of the P (Park) position.
WARNING:Always remember to turn on your headlamps at
dusk or during inclement weather. The Daytime Running Lamp
(DRL) system does not activate the tail lamps and generally may not
provide adequate lighting during these conditions. Failure to activate
your headlamps under these conditions may result in a collision.
Lights
66
2012 Taurus
Owners Guide, 1st Printing
USA(fus)
Page 68 of 406
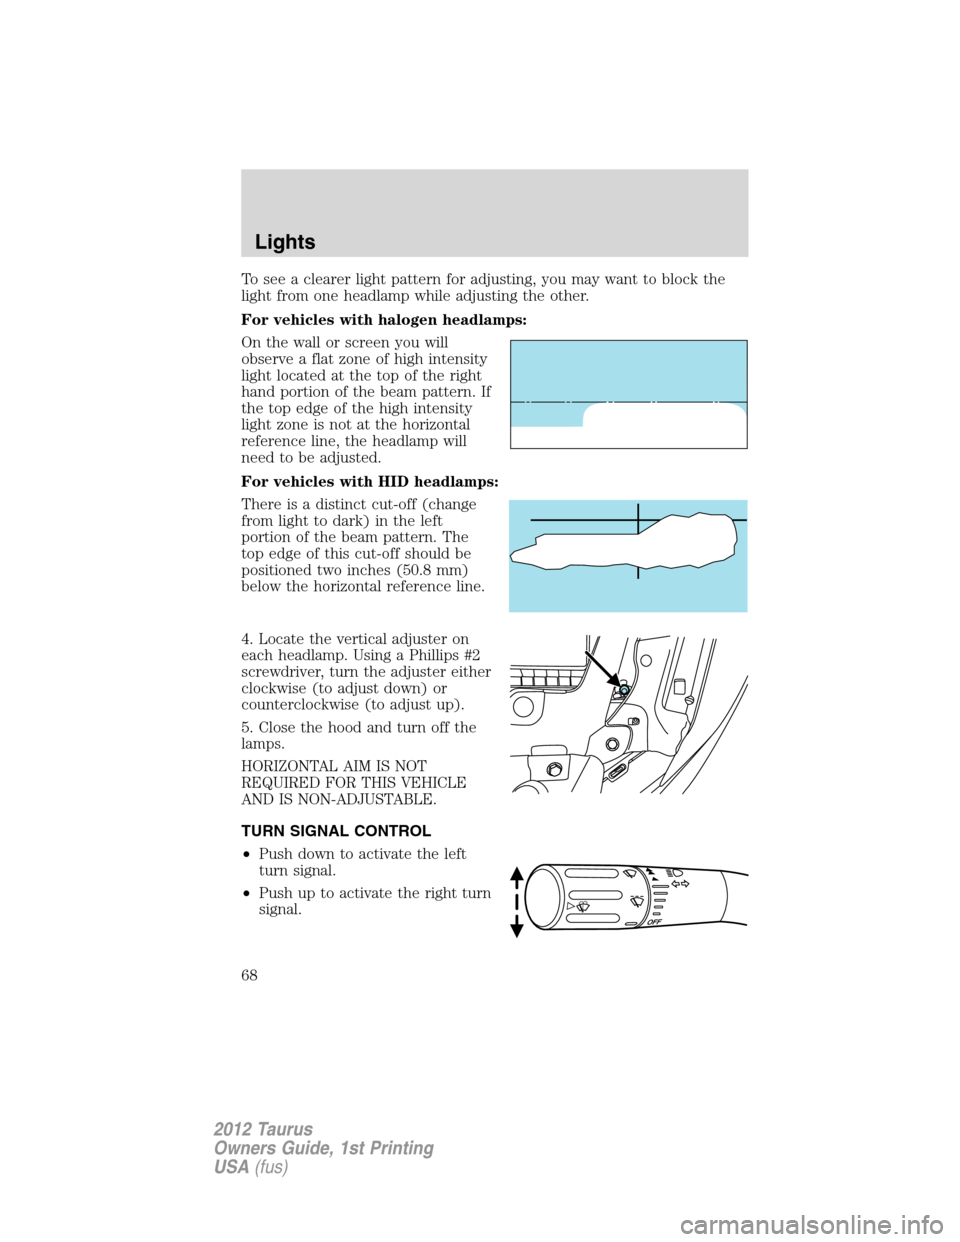
To see a clearer light pattern for adjusting, you may want to block the
light from one headlamp while adjusting the other.
For vehicles with halogen headlamps:
On the wall or screen you will
observe a flat zone of high intensity
light located at the top of the right
hand portion of the beam pattern. If
the top edge of the high intensity
light zone is not at the horizontal
reference line, the headlamp will
need to be adjusted.
For vehicles with HID headlamps:
There is a distinct cut-off (change
from light to dark) in the left
portion of the beam pattern. The
top edge of this cut-off should be
positioned two inches (50.8 mm)
below the horizontal reference line.
4. Locate the vertical adjuster on
each headlamp. Using a Phillips #2
screwdriver, turn the adjuster either
clockwise (to adjust down) or
counterclockwise (to adjust up).
5. Close the hood and turn off the
lamps.
HORIZONTAL AIM IS NOT
REQUIRED FOR THIS VEHICLE
AND IS NON-ADJUSTABLE.
TURN SIGNAL CONTROL
•Push down to activate the left
turn signal.
•Push up to activate the right turn
signal.
Lights
68
2012 Taurus
Owners Guide, 1st Printing
USA(fus)
Page 71 of 406
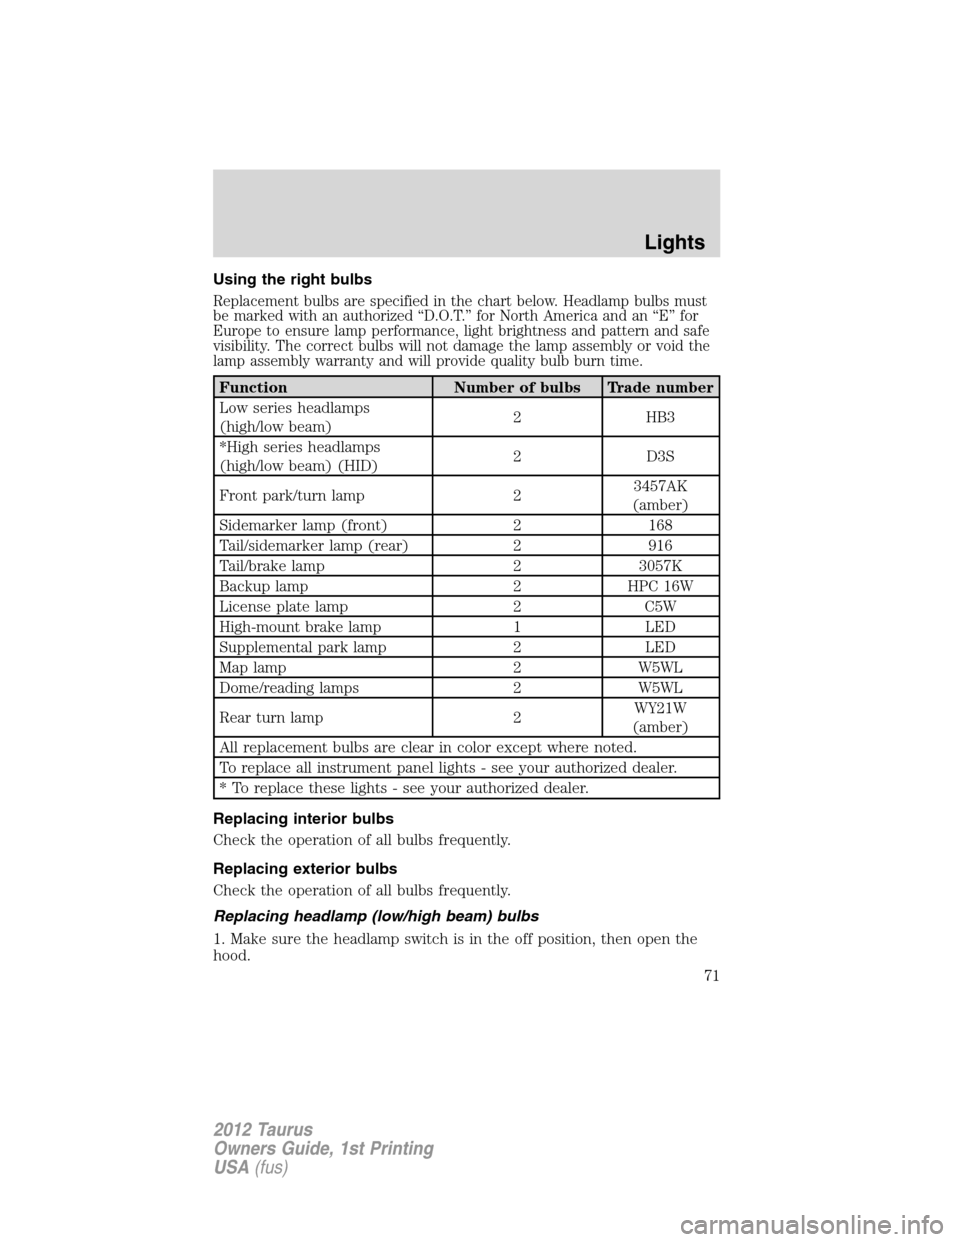
Using the right bulbs
Replacement bulbs are specified in the chart below. Headlamp bulbs must
be marked with an authorized “D.O.T.” for North America and an “E” for
Europe to ensure lamp performance, light brightness and pattern and safe
visibility. The correct bulbs will not damage the lamp assembly or void the
lamp assembly warranty and will provide quality bulb burn time.
Function Number of bulbs Trade number
Low series headlamps
(high/low beam)2 HB3
*High series headlamps
(high/low beam) (HID)2 D3S
Front park/turn lamp 23457AK
(amber)
Sidemarker lamp (front) 2 168
Tail/sidemarker lamp (rear) 2 916
Tail/brake lamp 2 3057K
Backup lamp 2 HPC 16W
License plate lamp 2 C5W
High-mount brake lamp 1 LED
Supplemental park lamp 2 LED
Map lamp 2 W5WL
Dome/reading lamps 2 W5WL
Rear turn lamp 2WY21W
(amber)
All replacement bulbs are clear in color except where noted.
To replace all instrument panel lights - see your authorized dealer.
* To replace these lights - see your authorized dealer.
Replacing interior bulbs
Check the operation of all bulbs frequently.
Replacing exterior bulbs
Check the operation of all bulbs frequently.
Replacing headlamp (low/high beam) bulbs
1. Make sure the headlamp switch is in the off position, then open the
hood.
Lights
71
2012 Taurus
Owners Guide, 1st Printing
USA(fus)
Page 72 of 406
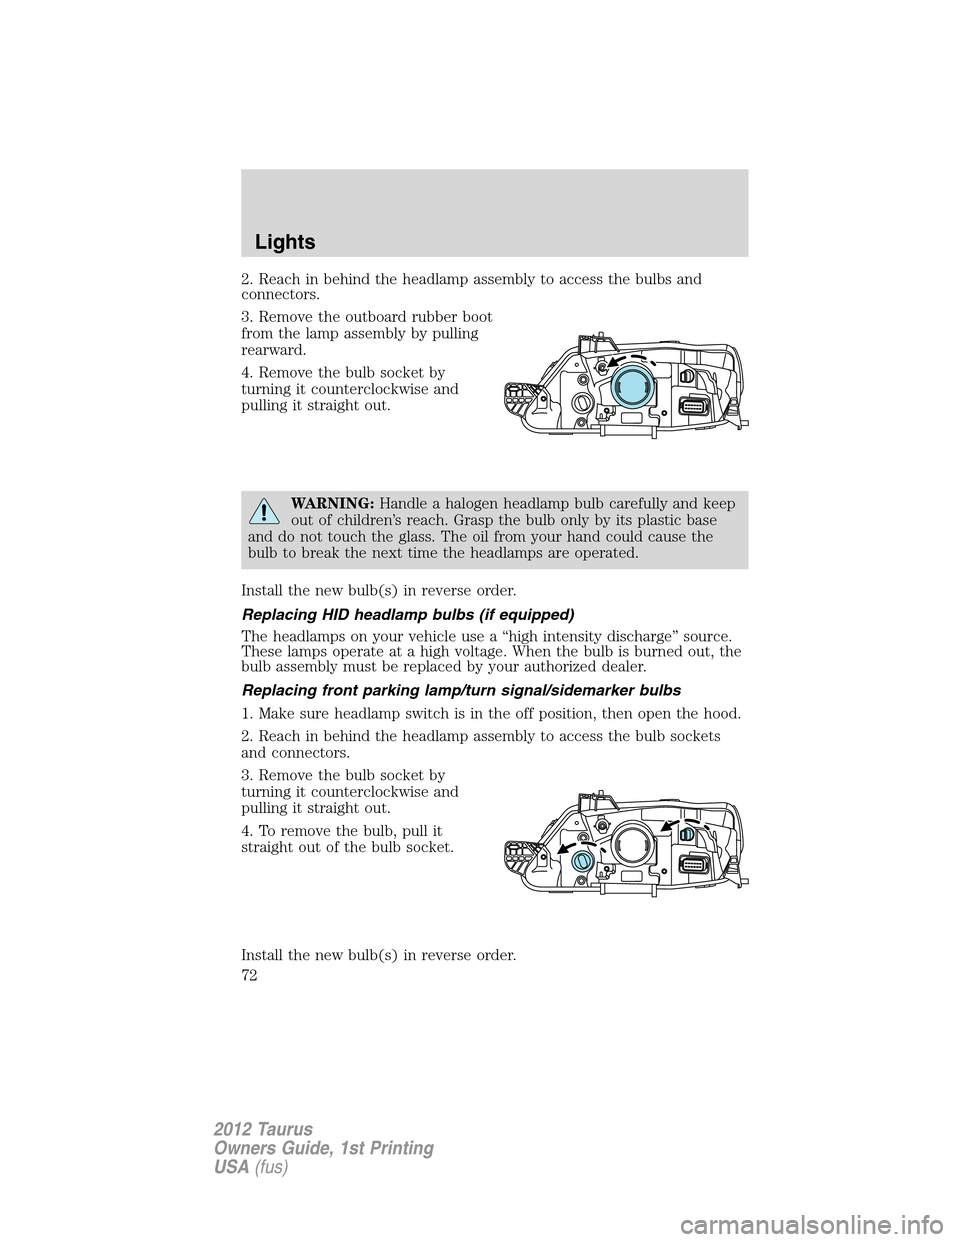
2. Reach in behind the headlamp assembly to access the bulbs and
connectors.
3. Remove the outboard rubber boot
from the lamp assembly by pulling
rearward.
4. Remove the bulb socket by
turning it counterclockwise and
pulling it straight out.
WARNING:Handle a halogen headlamp bulb carefully and keep
out of children’s reach. Grasp the bulb only by its plastic base
and do not touch the glass. The oil from your hand could cause the
bulb to break the next time the headlamps are operated.
Install the new bulb(s) in reverse order.
Replacing HID headlamp bulbs (if equipped)
The headlamps on your vehicle use a “high intensity discharge” source.
These lamps operate at a high voltage. When the bulb is burned out, the
bulb assembly must be replaced by your authorized dealer.
Replacing front parking lamp/turn signal/sidemarker bulbs
1. Make sure headlamp switch is in the off position, then open the hood.
2. Reach in behind the headlamp assembly to access the bulb sockets
and connectors.
3. Remove the bulb socket by
turning it counterclockwise and
pulling it straight out.
4. To remove the bulb, pull it
straight out of the bulb socket.
Install the new bulb(s) in reverse order.
Lights
72
2012 Taurus
Owners Guide, 1st Printing
USA(fus)
Page 74 of 406
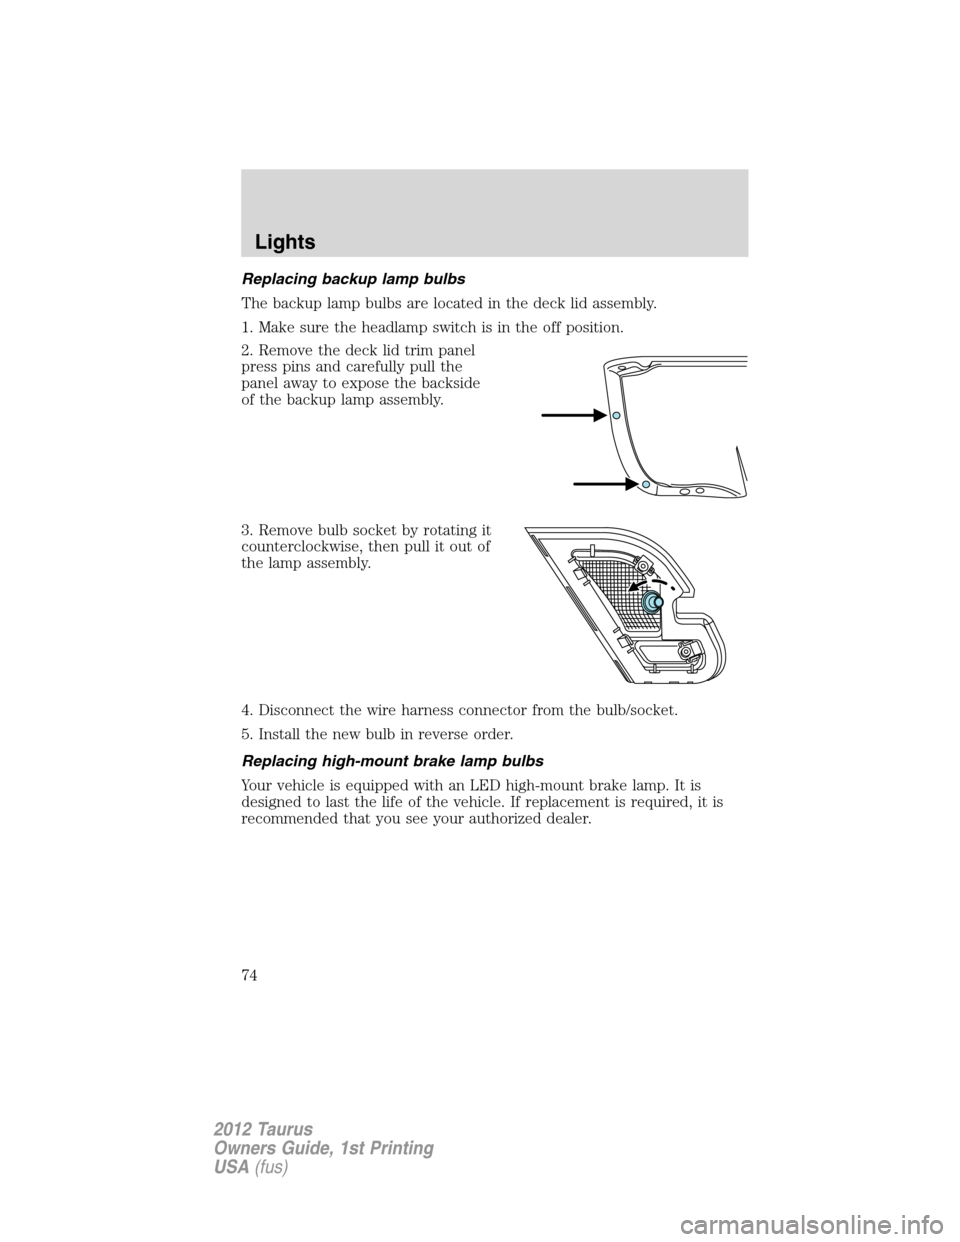
Replacing backup lamp bulbs
The backup lamp bulbs are located in the deck lid assembly.
1. Make sure the headlamp switch is in the off position.
2. Remove the deck lid trim panel
press pins and carefully pull the
panel away to expose the backside
of the backup lamp assembly.
3. Remove bulb socket by rotating it
counterclockwise, then pull it out of
the lamp assembly.
4. Disconnect the wire harness connector from the bulb/socket.
5. Install the new bulb in reverse order.
Replacing high-mount brake lamp bulbs
Your vehicle is equipped with an LED high-mount brake lamp. It is
designed to last the life of the vehicle. If replacement is required, it is
recommended that you see your authorized dealer.
Lights
74
2012 Taurus
Owners Guide, 1st Printing
USA(fus)
Page 76 of 406
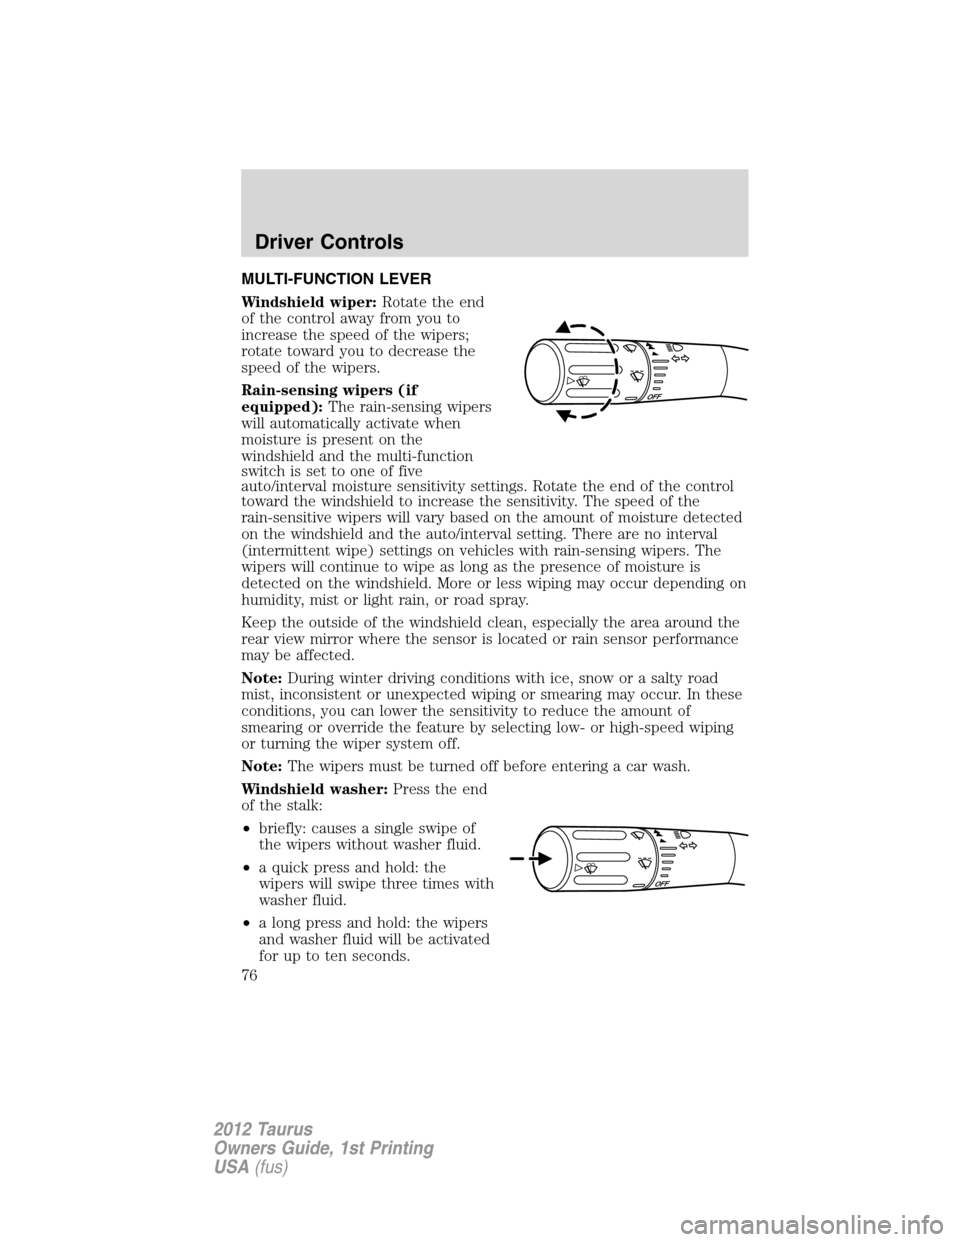
MULTI-FUNCTION LEVER
Windshield wiper:Rotate the end
of the control away from you to
increase the speed of the wipers;
rotate toward you to decrease the
speed of the wipers.
Rain-sensing wipers (if
equipped):The rain-sensing wipers
will automatically activate when
moisture is present on the
windshield and the multi-function
switch is set to one of five
auto/interval moisture sensitivity settings. Rotate the end of the control
toward the windshield to increase the sensitivity. The speed of the
rain-sensitive wipers will vary based on the amount of moisture detected
on the windshield and the auto/interval setting. There are no interval
(intermittent wipe) settings on vehicles with rain-sensing wipers. The
wipers will continue to wipe as long as the presence of moisture is
detected on the windshield. More or less wiping may occur depending on
humidity, mist or light rain, or road spray.
Keep the outside of the windshield clean, especially the area around the
rear view mirror where the sensor is located or rain sensor performance
may be affected.
Note:During winter driving conditions with ice, snow or a salty road
mist, inconsistent or unexpected wiping or smearing may occur. In these
conditions, you can lower the sensitivity to reduce the amount of
smearing or override the feature by selecting low- or high-speed wiping
or turning the wiper system off.
Note:The wipers must be turned off before entering a car wash.
Windshield washer:Press the end
of the stalk:
•briefly: causes a single swipe of
the wipers without washer fluid.
•a quick press and hold: the
wipers will swipe three times with
washer fluid.
•a long press and hold: the wipers
and washer fluid will be activated
for up to ten seconds.
Driver Controls
76
2012 Taurus
Owners Guide, 1st Printing
USA(fus)
Page 80 of 406
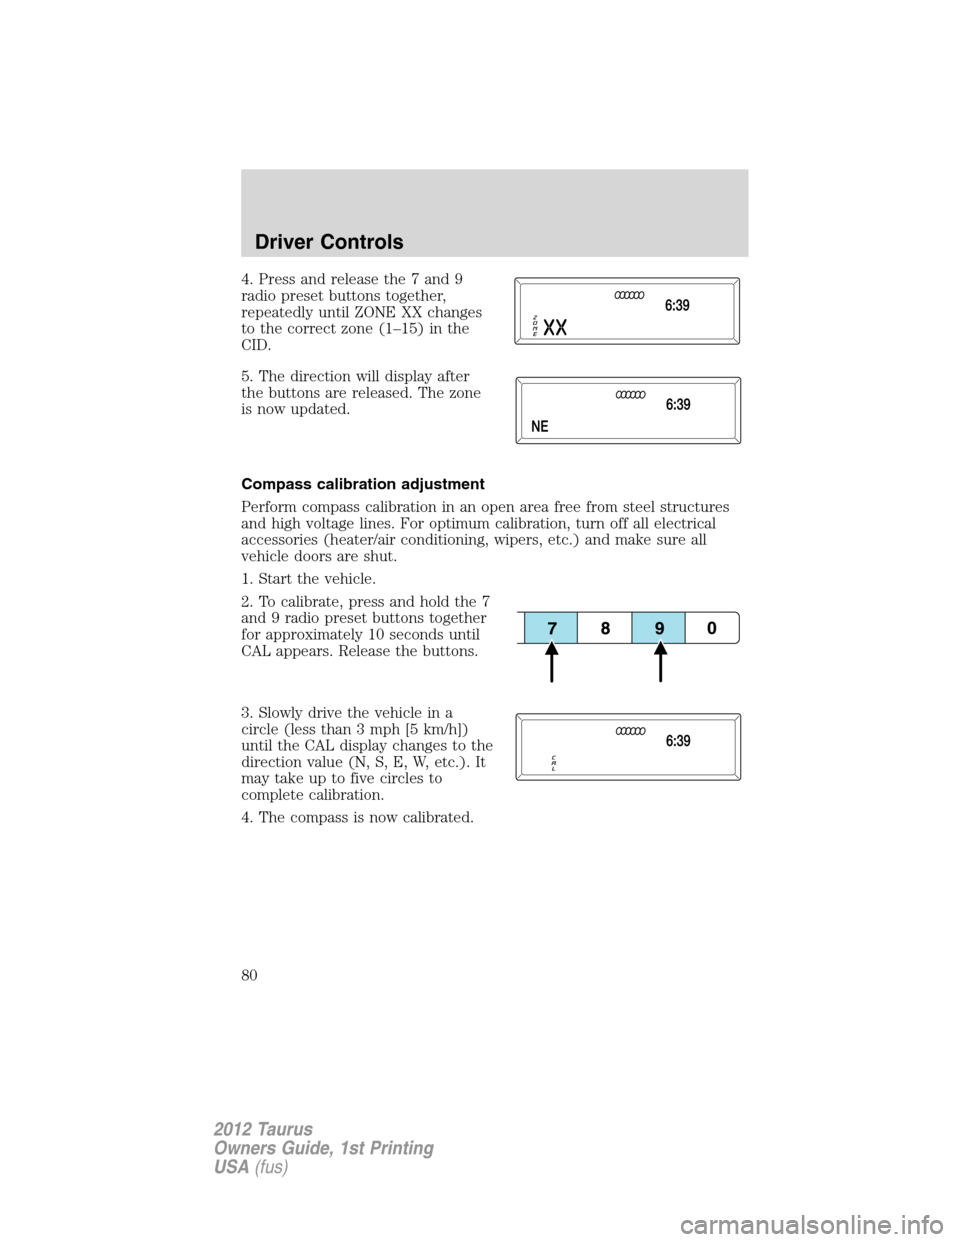
4. Press and release the 7 and 9
radio preset buttons together,
repeatedly until ZONE XX changes
to the correct zone (1–15) in the
CID.
5. The direction will display after
the buttons are released. The zone
is now updated.
Compass calibration adjustment
Perform compass calibration in an open area free from steel structures
and high voltage lines. For optimum calibration, turn off all electrical
accessories (heater/air conditioning, wipers, etc.) and make sure all
vehicle doors are shut.
1. Start the vehicle.
2. To calibrate, press and hold the 7
and 9 radio preset buttons together
for approximately 10 seconds until
CAL appears. Release the buttons.
3. Slowly drive the vehicle in a
circle (less than 3 mph [5 km/h])
until the CAL display changes to the
direction value (N, S, E, W, etc.). It
may take up to five circles to
complete calibration.
4. The compass is now calibrated.
Driver Controls
80
2012 Taurus
Owners Guide, 1st Printing
USA(fus)