spare wheel FORD TAURUS 2017 User Guide
[x] Cancel search | Manufacturer: FORD, Model Year: 2017, Model line: TAURUS, Model: FORD TAURUS 2017Pages: 504, PDF Size: 5.84 MB
Page 288 of 504
Highway Hazards
No matter how carefully you drive,there is always the possibility thatyou may eventually have a flat tireon the highway. Drive slowly to theclosest safe area out of traffic.This may further damage the flattire, but your safety is moreimportant.
If you feel a sudden vibration orride disturbance while driving, oryou suspect your tire or vehiclehas been damaged, immediatelyreduce your speed. Drive withcaution until you can safely pulloff the road. Stop and inspect thetires for damage. If a tire isunder-inflated or damaged,deflate it, remove wheel andreplace it with your spare tire andwheel. If you cannot detect acause, have the vehicle towed tothe nearest repair facility or tiredealer to have the vehicleinspected.
Tire and Wheel Alignment
A bad jolt from hitting a curb orpothole can cause the front endof your vehicle to becomemisaligned or cause damage toyour tires. If your vehicle seems topull to one side when you aredriving, the wheels may be out ofalignment. Have an authorizeddealer check the wheel alignmentperiodically.
Wheel misalignment in the frontor the rear can cause uneven andrapid treadwear of your tires andshould be corrected by anauthorized dealer. Front-wheeldrive vehicles and those with anindependent rear suspension (ifequipped) may require alignmentof all four wheels.
The tires should also be balancedperiodically. An unbalanced tireand wheel assembly may result inirregular tire wear.
Tire Rotation
Note:If your tires show unevenwear, ask an authorized dealer tocheck for and correct any wheelmisalignment, tire imbalance ormechanical problem involved
before tire rotation.
Note:Your vehicle may beequipped with a dissimilar sparewheel and tire assembly. Adissimilar spare wheel and tireassembly is defined as a sparewheel and tire assembly that isdifferent in brand, size orappearance from the road tires andwheels. If you have a dissimilarspare wheel and tire assembly, it isintended for temporary use onlyand should not be used in a tirerotation.
Note:After having your tiresrotated, inflation pressure must bechecked and adjusted to thevehicle requirements.
285
Taurus (CPH) Canada/United States of America, enUSA, First Printing
Wheels and Tires
Page 290 of 504
Note:The suspension insulation andbumpers will help prevent vehicle damage.Do not remove these components from yourvehicle when using snow tires and chains.
If the tires on your vehicle have all seasontreads, they will provide traction in rain andsnow. However, in some climates, you mayneed to use snow tires and cables. If youneed to use cables, it is recommended thatsteel wheels (of the same size andspecifications) be used, as cables may chipaluminum wheels.
Follow these guidelines when using snowtires and chains:
•If possible, avoid fully loading yourvehicle.
•Use only SAE Class S snow chains,snow cables or equivalent on the frontaxle for P235/55R18 equipped vehicles.The use of snow chains, snow cablesor other traction assist devices that arelarger than SAE Class S may causedamage to your vehicle’s wheel house,suspension and/or body.
•Do not install tire chains, cables, oroptional traction devices on the reartires. This could cause damage to thevehicle’s wheel house or body.
•Install cable chains securely, verifyingthat the cables do not touch any wiring,brake lines or fuel lines.
•Do not exceed 30 mph (48 km/h) withtire cables on your vehicle.
•Drive cautiously. If you hear the cablesrub or bang against your vehicle, stopand retighten the cables. If this doesnot work, remove the cables to preventdamage to your vehicle.
•Remove the tire cables when they areno longer needed. Do not use tirecables on dry roads.
TIRE PRESSURE MONITORING
SYSTEM
WARNING
The tire pressure monitoring systemis not a substitute for manuallychecking tire pressures. You shouldperiodically check tire pressures using apressure gauge. Failure to correctlymaintain tire pressures could increase therisk of tire failure, loss of control, vehiclerollover and personal injury.
Each tire, including the spare (ifprovided), should be checkedmonthly when cold and inflatedto the inflation pressure recommended bythe vehicle manufacturer on the vehicleplacard or tire inflation pressure label. (Ifyour vehicle has tires of a different sizethan the size indicated on the vehicleplacard or tire inflation pressure label, youshould determine the proper tire inflationpressure for those tires.)
As an added safety feature, your vehiclehas been equipped with a Tire PressureMonitoring System (TPMS) thatilluminates a low tire pressure telltalewhen one or more of your tires issignificantly under-inflated. Accordingly,when the low tire pressure telltaleilluminates, you should stop and checkyour tires as soon as possible, and inflatethem to the proper pressure. Driving on asignificantly under-inflated tire causes thetire to overheat and can lead to tire failure.Under-inflation also reduces fuel efficiencyand tire tread life, and may affect thevehicle’s handling and stopping ability.
287
Taurus (CPH) Canada/United States of America, enUSA, First Printing
Wheels and Tires
Page 292 of 504
When Your Temporary Spare Tire isInstalled
When one of your road tires needs to bereplaced with the temporary spare, thesystem will continue to identify an issue toremind you that the damaged road wheeland tire assembly needs to be repaired andput back on your vehicle.
To restore the full function of the tirepressure monitoring system, have thedamaged road wheel and tire assemblyrepaired and remounted on your vehicle.
When You Believe Your System is NotOperating Properly
The main function of the tire pressuremonitoring system is to warn you whenyour tires need air. It can also warn you inthe event the system is no longer capableof functioning as intended. See thefollowing chart for information concerningyour tire pressure monitoring system:
289
Taurus (CPH) Canada/United States of America, enUSA, First Printing
Wheels and Tires
Page 293 of 504
Customer action requiredPossible causeLow tire pressurewarning light
Make sure tires are at the proper pres-sure. See Inflating your tires in thischapter. After inflating your tires to themanufacturer’s recommended pressureas shown on the Tire Label (located onthe edge of driver’s door or the B-Pillar),the vehicle must be driven for at leasttwo minutes over 20 mph (32 km/h)before the light turns off.
Tire(s) under-inflatedSolid warning light
Repair the damaged road wheel and tireassembly and reinstall it on the vehicleto restore system function. For adescription on how the system functions,see When your temporary spare tireis installed in this section.
Spare tire in use
If the tires are properly inflated and thespare tire is not in use but the lightremains on, contact your authorizeddealer as soon as possible.
TPMS malfunction
Repair the damaged road wheel and tireassembly and reinstall it on the vehicleto restore system function. For adescription on how the system functions,see When your temporary spare tireis installed in this section.
Spare tire in useFlashing warninglight
If the tires are properly inflated and thespare tire is not in use but the lightremains on, contact your authorizeddealer as soon as possible.
TPMS malfunction
When Inflating Your Tires
When putting air into your tires (such as ata gas station or in your garage), the tirepressure monitoring system may notrespond immediately to the air added toyour tires.
It may take up to two minutes of drivingover 20 mph (32 km/h) for the light to turnoff after you have filled your tires to therecommended inflation pressure
290
Taurus (CPH) Canada/United States of America, enUSA, First Printing
Wheels and Tires
Page 294 of 504
How Temperature Affects Your TirePressure
The tire pressure monitoring systemmonitors tire pressure in each pneumatictire. While driving in a normal manner, atypical passenger tire inflation pressuremay increase about 2–4 psi (14–28 kPa)from a cold start situation. If the vehicle isstationary overnight with the outsidetemperature significantly lower than thedaytime temperature, the tire pressure maydecrease about 3 psi (21 kPa) for a drop of30°F (17°C) in ambient temperature. Thislower pressure value may be detected bythe tire pressure monitoring system asbeing significantly lower than therecommended inflation pressure andactivate the system warning light for lowtire pressure. If the low tire pressurewarning light is on, visually check each tireto verify that no tire is flat. If one or moretires are flat, repair as necessary. Checkthe air pressure in the road tires. If any tireis under-inflated, carefully drive the vehicleto the nearest location where air can beadded to the tires. Inflate all the tires tothe recommended inflation pressure.
CHANGING A ROAD WHEEL
WARNINGS
Do not use tire sealants as they maydamage the tire pressure monitoringsystem.
If the tire pressure monitor sensorbecomes damaged it may notfunction.
Note:The tire pressure monitoring systemindicator light will illuminate when the sparetire is in use. To restore the full function ofthe monitoring system, all road wheelsequipped with tire pressure monitoringsensors must be mounted on the vehicle.
If you get a flat tire while driving, do notapply the brake heavily. Instead, graduallydecrease your speed. Hold the steeringwheel firmly and slowly move to a safeplace on the side of the road.
Have a flat serviced by an authorizeddealer in order to prevent damage to thetire pressure monitoring system sensors.See Tire Pressure Monitoring System(page 287). Replace the spare tire with aroad tire as soon as possible. Duringrepairing or replacing of the flat tire, havethe authorized dealer inspect the tirepressure monitoring system sensor fordamage.
Dissimilar Spare Wheel and TireAssembly Information
WARNING
Failure to follow these guidelinescould result in an increased risk ofloss of vehicle control, injury or death.
If you have a dissimilar spare wheel andtire, then it is intended for temporary useonly. This means that if you need to use it,you should replace it as soon as possiblewith a road wheel and tire assembly thatis the same size and type as the road tiresand wheels that were originally providedby Ford. If the dissimilar spare tire or wheelis damaged, it should be replaced ratherthan repaired.
A dissimilar spare wheel and tire assemblyis defined as a spare wheel and tireassembly that is different in brand, size orappearance from the road tires and wheelsand can be one of three types:
1.T-type mini-spare: This spare tirebegins with the letter T for tire size andmay have Temporary Use Only molded inthe sidewall.
291
Taurus (CPH) Canada/United States of America, enUSA, First Printing
Wheels and Tires
Page 295 of 504
2.Full-size dissimilar spare with labelon wheel: This spare tire has a label onthe wheel that states: THIS WHEEL ANDTIRE ASSEMBLY FOR TEMPORARY USEONLY.
When driving with one of the dissimilarspare tires listed above, do not:
•Exceed 50 mph (80 km/h).
•Load the vehicle beyond maximumvehicle load rating listed on the SafetyCompliance Label.
•Tow a trailer.
•Use snow chains on the end of thevehicle with the dissimilar spare tire.
•Use more than one dissimilar spare tireat a time.
•Use commercial car washingequipment.
•Try to repair the dissimilar spare tire.
Use of one of the dissimilar spare tireslisted above at any one wheel location canlead to impairment of the following:
•Handling, stability and brakingperformance.
•Comfort and noise.
•Ground clearance and parking at curbs.
•Winter weather driving capability.
•Wet weather driving capability.
•All-wheel driving capability.
3.Full-size dissimilar spare withoutlabel on wheel
When driving with the full-size dissimilarspare wheel and tire assembly, do not:
•Exceed 70 mph (113 km/h).
•Use more than one dissimilar sparewheel and tire assembly at a time.
•Use commercial car washingequipment.
•Use snow chains on the end of thevehicle with the dissimilar spare wheeland tire assembly.
The usage of a full-size dissimilar sparewheel and tire assembly can lead toimpairment of the following:
•Handling, stability and brakingperformance.
•Comfort and noise.
•Ground clearance and parking at curbs.
•Winter weather driving capability.
•Wet weather driving capability.
•All-wheel driving capability.
When driving with the full-size dissimilarspare wheel and tire assembly additionalcaution should be given to:
•Towing a trailer.
•Driving vehicles equipped with acamper body.
•Driving vehicles with a load on thecargo rack.
Drive cautiously when using a full-sizedissimilar spare wheel and tire assemblyand seek service as soon as possible.
Tire Change Procedure
WARNINGS
When one of the front wheels is offthe ground, the transmission alonewill not prevent the vehicle frommoving or slipping off the jack, even if thetransmission is in park (P).
To help prevent your vehicle frommoving when changing a wheel, shiftthe transmission into park (P), setthe parking brake and use an appropriateblock or wheel chock to secure the wheeldiagonally opposite to the wheel beingchanged. For example, when changing thefront left wheel, place an appropriate blockor wheel chock on the right rear wheel.
Do not work on your vehicle whenthe jack is the only support. If thevehicle slips off the jack, you orsomeone else could be seriously injured.
292
Taurus (CPH) Canada/United States of America, enUSA, First Printing
Wheels and Tires
Page 296 of 504
WARNINGS
Do not attempt to change a tire onthe side of the vehicle close tomoving traffic. Pull far enough off theroad to avoid the danger of being hit whenoperating the jack or changing the wheel.
Always use the jack provided asoriginal equipment with your vehicle.If using a jack other than the oneprovided, make sure the jack capacity isadequate for the vehicle weight, includingany vehicle cargo or modifications. If youare unsure if the jack capacity is adequate,contact the authorized dealer.
Note:Passengers should not remain in yourvehicle when the vehicle is being jacked.
Note:Jack at the specified locations toavoid damage to the vehicle.
1.Park on a level surface, set the parkingbrake and activate the hazard flashers.
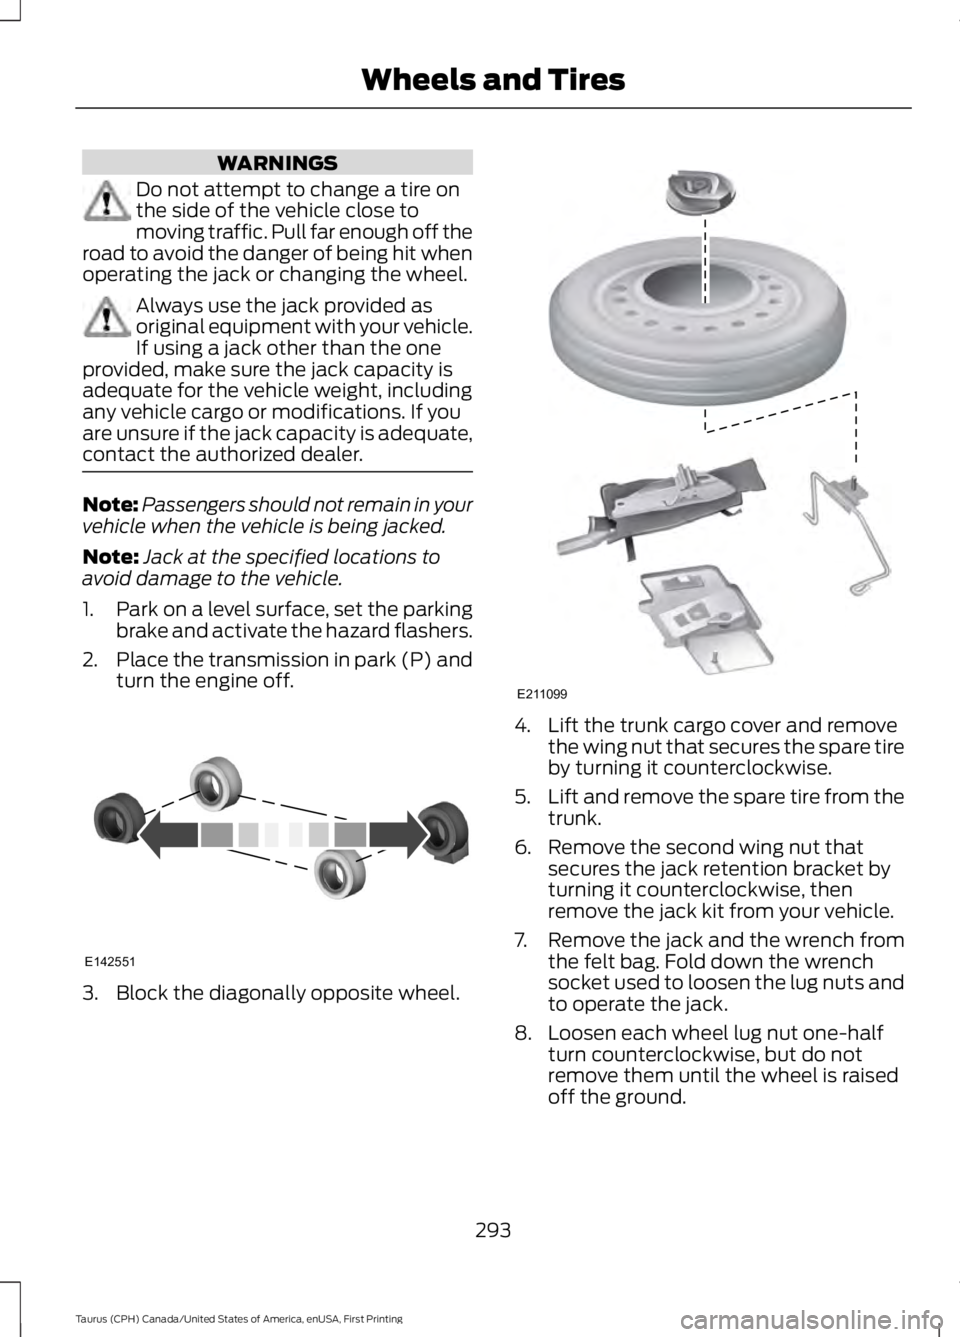
2.Place the transmission in park (P) andturn the engine off.
3. Block the diagonally opposite wheel.
4. Lift the trunk cargo cover and removethe wing nut that secures the spare tireby turning it counterclockwise.
5.Lift and remove the spare tire from thetrunk.
6. Remove the second wing nut thatsecures the jack retention bracket byturning it counterclockwise, thenremove the jack kit from your vehicle.
7. Remove the jack and the wrench fromthe felt bag. Fold down the wrenchsocket used to loosen the lug nuts andto operate the jack.
8. Loosen each wheel lug nut one-halfturn counterclockwise, but do notremove them until the wheel is raisedoff the ground.
293
Taurus (CPH) Canada/United States of America, enUSA, First Printing
Wheels and TiresE142551 E211099
Page 297 of 504
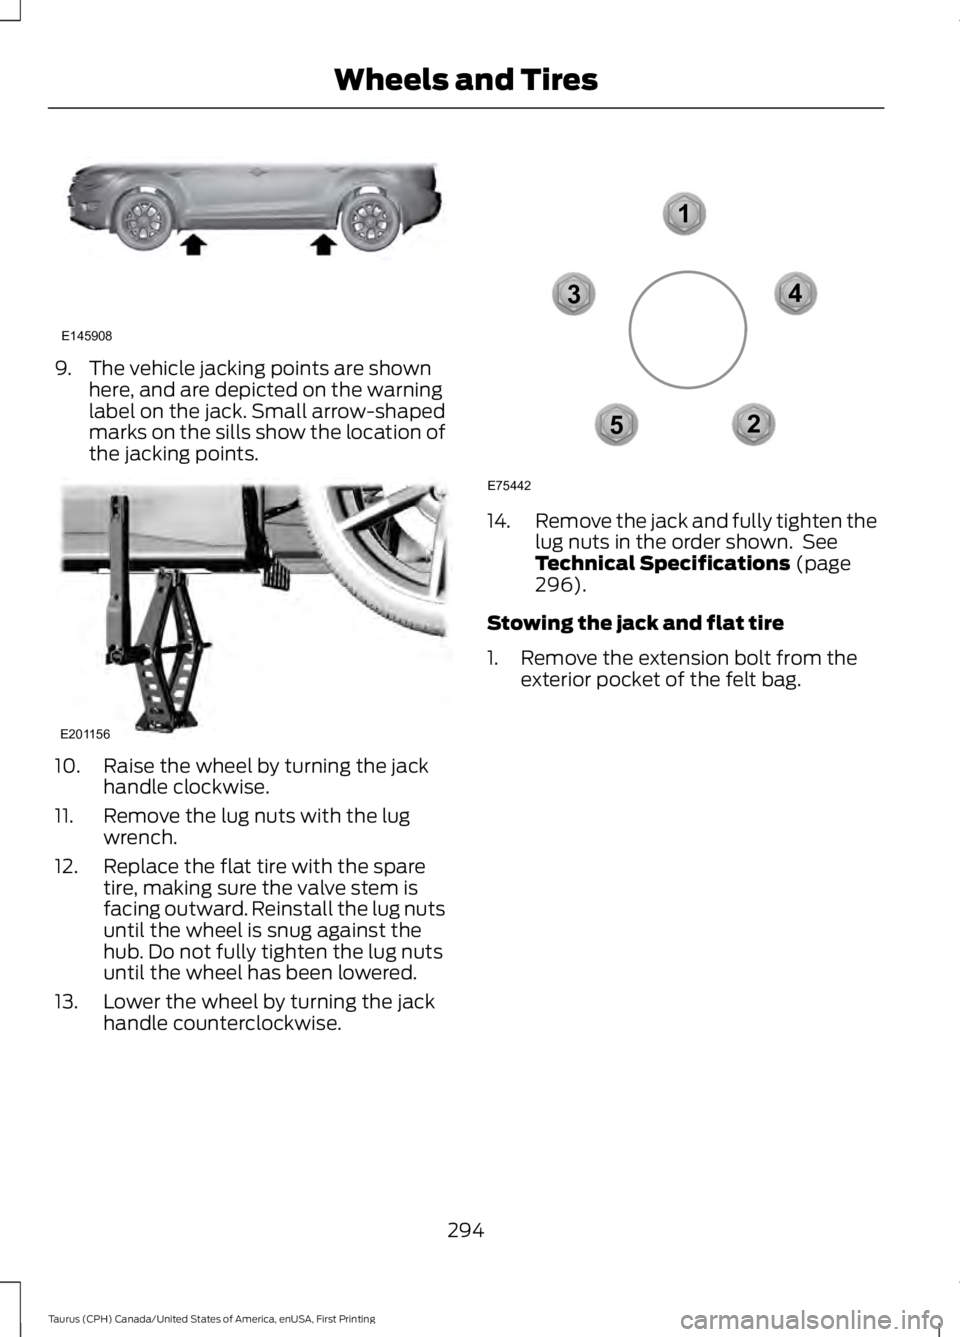
9. The vehicle jacking points are shownhere, and are depicted on the warninglabel on the jack. Small arrow-shapedmarks on the sills show the location ofthe jacking points.
10. Raise the wheel by turning the jackhandle clockwise.
11. Remove the lug nuts with the lugwrench.
12. Replace the flat tire with the sparetire, making sure the valve stem isfacing outward. Reinstall the lug nutsuntil the wheel is snug against thehub. Do not fully tighten the lug nutsuntil the wheel has been lowered.
13. Lower the wheel by turning the jackhandle counterclockwise.
14.Remove the jack and fully tighten thelug nuts in the order shown. SeeTechnical Specifications (page296).
Stowing the jack and flat tire
1. Remove the extension bolt from theexterior pocket of the felt bag.
294
Taurus (CPH) Canada/United States of America, enUSA, First Printing
Wheels and TiresE145908 E201156 12
3
4
5
E75442
Page 298 of 504
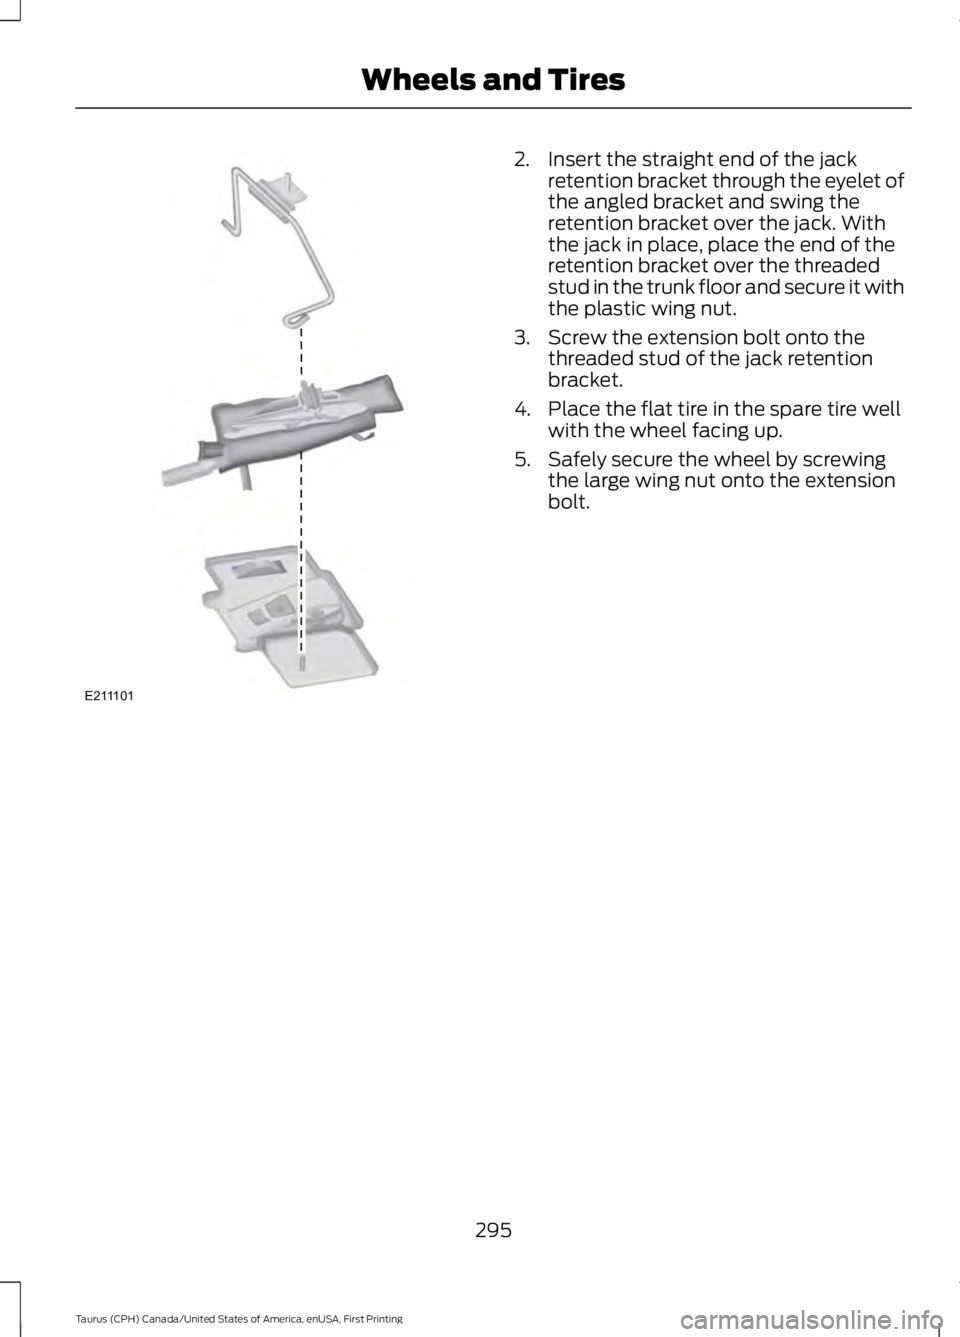
2. Insert the straight end of the jackretention bracket through the eyelet ofthe angled bracket and swing theretention bracket over the jack. Withthe jack in place, place the end of theretention bracket over the threadedstud in the trunk floor and secure it withthe plastic wing nut.
3. Screw the extension bolt onto thethreaded stud of the jack retentionbracket.
4. Place the flat tire in the spare tire wellwith the wheel facing up.
5. Safely secure the wheel by screwingthe large wing nut onto the extensionbolt.
295
Taurus (CPH) Canada/United States of America, enUSA, First Printing
Wheels and TiresE211101
Page 495 of 504
Automatic Transmission Fluid Check -2.0L EcoBoost™........................................2476F35 Transmission............................................247Automatic Transmission Fluid Check -3.5L Duratec/3.5L Ecoboost™............2476F50/6F55 Transmission...............................247Autowipers........................................................70Auxiliary Power Points................................13512 Volt DC Power Point.....................................135Locations...............................................................135AWDSee: All-Wheel Drive..........................................157
B
BatterySee: Changing the 12V Battery......................252Blind Spot Information System...............191Switching the System Off and On...............193System Errors.......................................................193System Limitations............................................193Using the System................................................192Bonnet LockSee: Opening and Closing the Hood..........236Booster Seats..................................................25Types of Booster Seats......................................25Brake Fluid Check.........................................251Brakes...............................................................164General Information..........................................164Breaking-In.......................................................211Bulb Specification Chart...........................257
C
Cabin Air Filter.................................................117California Proposition 65..............................11Capacities and Specifications - 2.0LEcoBoost™................................................304Specifications.....................................................304Capacities and Specifications - 3.5LDuratec.........................................................307Specifications.....................................................308Capacities and Specifications - 3.5LEcoboost™...................................................311Specifications........................................................311Capacities and Specifications................297Cargo Nets.....................................................200
Car WashSee: Cleaning the Exterior..............................260Center Console..............................................136Changing a Bulb...........................................256Front Fog Lamp..................................................256High-Intensity DischargeHeadlamps.....................................................256LED Lamps...........................................................256License Plate Lamp..........................................256Changing a Fuse...........................................234Fuses......................................................................234Changing a Road Wheel............................291Dissimilar Spare Wheel and Tire AssemblyInformation......................................................291Tire Change Procedure....................................292Changing the 12V Battery.........................252Battery Management System.......................253Changing the Engine Air Filter................259Changing the Wiper Blades.....................254Changing the Windshield WiperBlades...............................................................254Checking MyKey System Status...............54Checking the Wiper Blades.....................254Child Restraint and SeatbeltMaintenance.................................................35Child Restraint Positioning..........................27Child Safety.......................................................18General Information.............................................18Child Safety Locks.........................................28Left-Hand Side......................................................29Right-Hand Side...................................................29Cleaning Leather Seats.............................264Cleaning Products......................................260Materials...............................................................260Cleaning the Engine....................................262Cleaning the Exterior.................................260Exterior Chrome Parts.......................................261Exterior Plastic Parts.........................................261Stripes or Graphics.............................................261Underbody............................................................261Under Hood..........................................................261Cleaning the Instrument Panel andInstrument Cluster Lens.........................263Cleaning the Interior...................................263Cleaning the Wheels..................................264Cleaning the Windows and WiperBlades...........................................................262Clearing All MyKeys.......................................53
492
Taurus (CPH) Canada/United States of America, enUSA, First Printing
Index