sensor FORD TAURUS 2017 Service Manual
[x] Cancel search | Manufacturer: FORD, Model Year: 2017, Model line: TAURUS, Model: FORD TAURUS 2017Pages: 504, PDF Size: 5.84 MB
Page 232 of 504
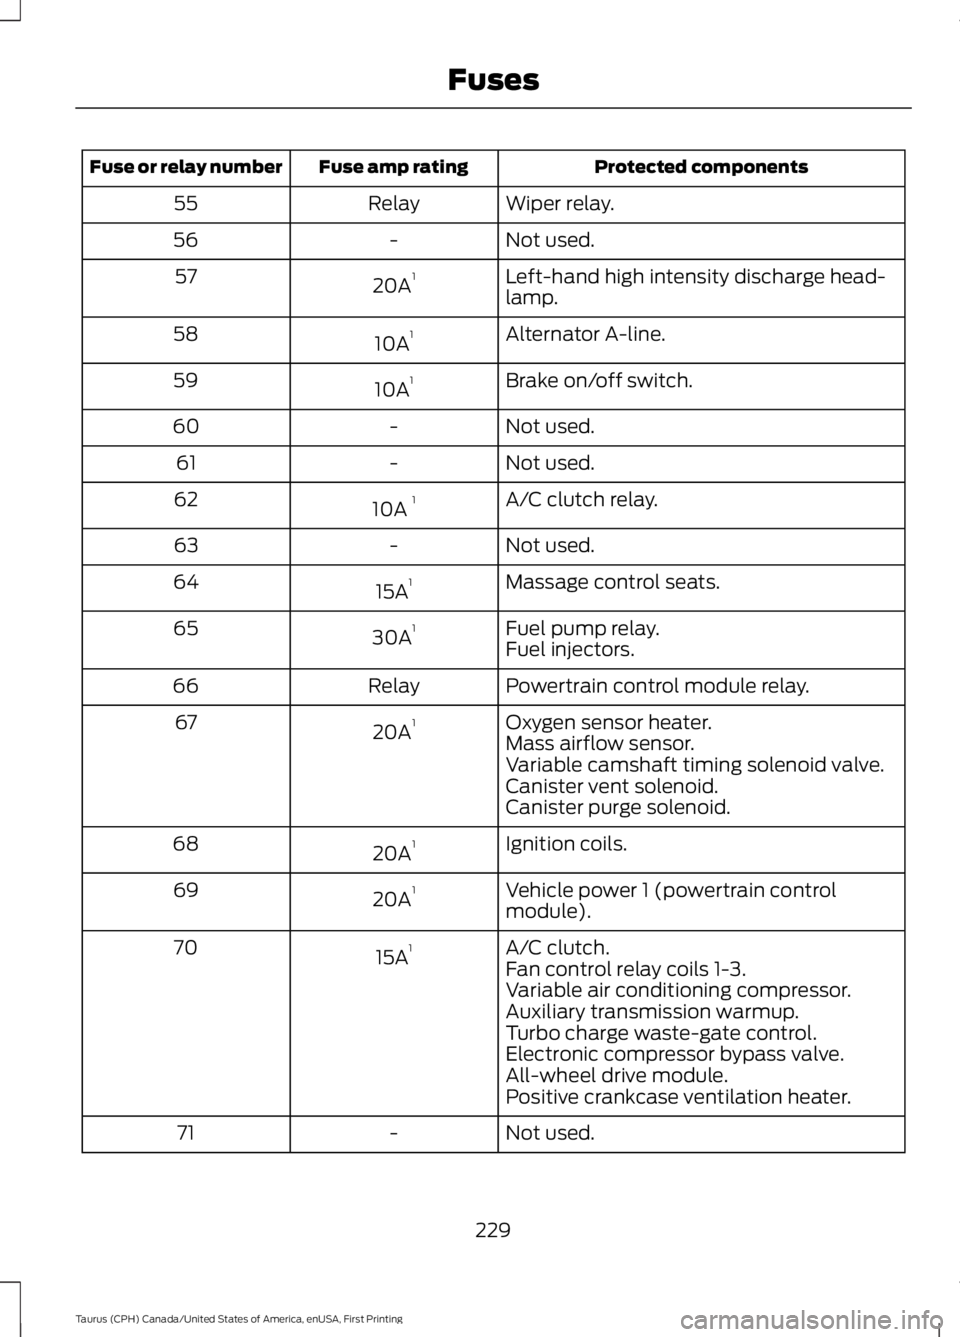
Protected componentsFuse amp ratingFuse or relay number
Wiper relay.Relay55
Not used.-56
Left-hand high intensity discharge head-lamp.20A157
Alternator A-line.10A158
Brake on/off switch.10A159
Not used.-60
Not used.-61
A/C clutch relay.10A 162
Not used.-63
Massage control seats.15A164
Fuel pump relay.30A165Fuel injectors.
Powertrain control module relay.Relay66
Oxygen sensor heater.20A167Mass airflow sensor.Variable camshaft timing solenoid valve.Canister vent solenoid.Canister purge solenoid.
Ignition coils.20A168
Vehicle power 1 (powertrain controlmodule).20A169
A/C clutch.15A170Fan control relay coils 1-3.Variable air conditioning compressor.Auxiliary transmission warmup.Turbo charge waste-gate control.Electronic compressor bypass valve.All-wheel drive module.Positive crankcase ventilation heater.
Not used.-71
229
Taurus (CPH) Canada/United States of America, enUSA, First Printing
Fuses
Page 236 of 504
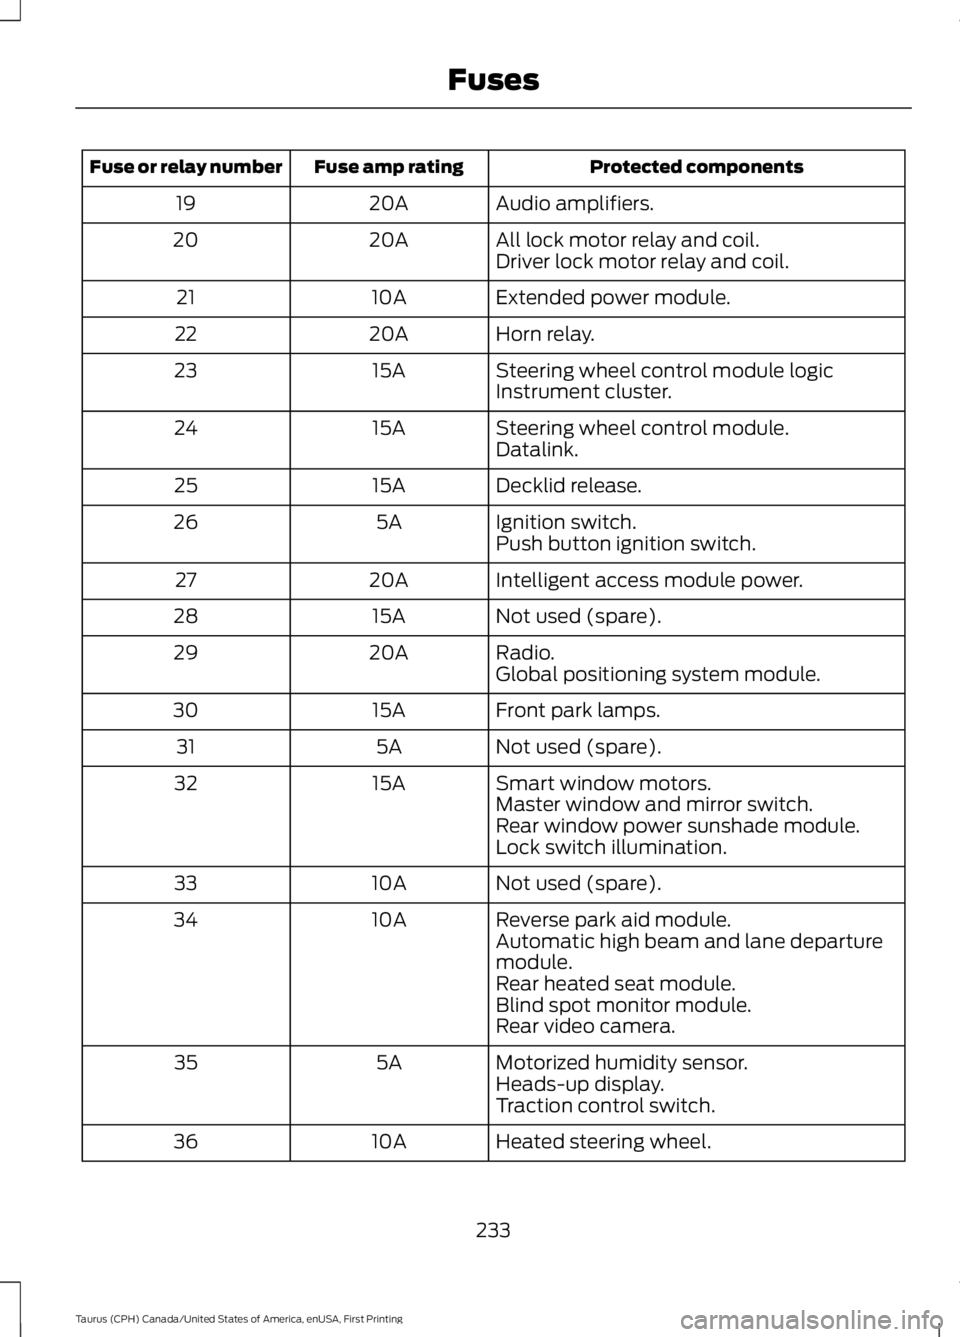
Protected componentsFuse amp ratingFuse or relay number
Audio amplifiers.20A19
All lock motor relay and coil.20A20Driver lock motor relay and coil.
Extended power module.10A21
Horn relay.20A22
Steering wheel control module logic15A23Instrument cluster.
Steering wheel control module.15A24Datalink.
Decklid release.15A25
Ignition switch.5A26Push button ignition switch.
Intelligent access module power.20A27
Not used (spare).15A28
Radio.20A29Global positioning system module.
Front park lamps.15A30
Not used (spare).5A31
Smart window motors.15A32Master window and mirror switch.Rear window power sunshade module.Lock switch illumination.
Not used (spare).10A33
Reverse park aid module.10A34Automatic high beam and lane departuremodule.Rear heated seat module.Blind spot monitor module.Rear video camera.
Motorized humidity sensor.5A35Heads-up display.Traction control switch.
Heated steering wheel.10A36
233
Taurus (CPH) Canada/United States of America, enUSA, First Printing
Fuses
Page 252 of 504
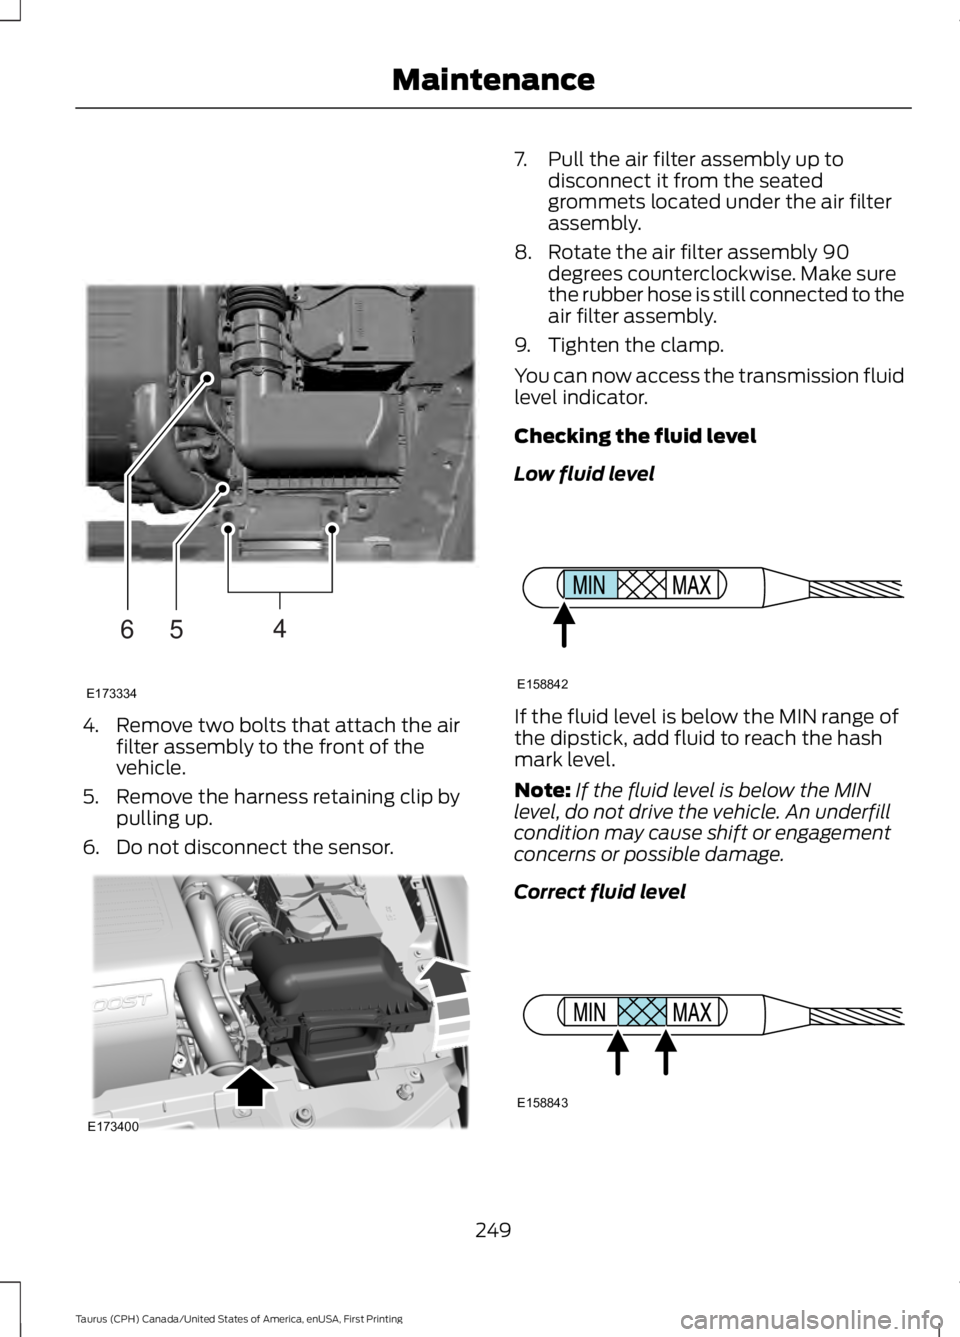
4. Remove two bolts that attach the airfilter assembly to the front of thevehicle.
5. Remove the harness retaining clip bypulling up.
6. Do not disconnect the sensor.
7. Pull the air filter assembly up todisconnect it from the seatedgrommets located under the air filterassembly.
8. Rotate the air filter assembly 90degrees counterclockwise. Make surethe rubber hose is still connected to theair filter assembly.
9. Tighten the clamp.
You can now access the transmission fluidlevel indicator.
Checking the fluid level
Low fluid level
If the fluid level is below the MIN range ofthe dipstick, add fluid to reach the hashmark level.
Note:If the fluid level is below the MINlevel, do not drive the vehicle. An underfillcondition may cause shift or engagementconcerns or possible damage.
Correct fluid level
249
Taurus (CPH) Canada/United States of America, enUSA, First Printing
MaintenanceE173334
654 E173400 E158842 E158843
Page 271 of 504
General Information
WARNING
Failure to follow these guidelinescould result in an increased risk ofloss of vehicle control, injury or death.
Note:Do not use the kit if a tire has becomeseverely damaged by driving the vehicle witha tire that has insufficient air pressure. Onlypunctured areas located within the tire treadcan be sealed with the kit.
Do not attempt to repair punctures largerthan ¼ inch (6 millimeters) or damage tothe tire's sidewall. The tire may notcompletely seal.
Loss of air pressure may adversely affecttire performance. For this reason:
Note:Do not drive the vehicle above50 mph (80 km/h).
Note:Do not drive further than 120 mi(200 km). Drive only to the closestauthorized Ford dealer or tire repair shop tohave your tire inspected.
•Drive carefully and avoid abruptsteering maneuvers.
•Periodically monitor tire inflationpressure in the affected tire. If the tireis losing pressure, have the vehicletowed.
•Read the information in the Tips forUse of the Kit section to make sure safeoperation of the kit and your vehicle.
Tips for Use of the Kit
Read the following list of tips to ensuresafe operation of the kit:
•Before operating the kit, make sureyour vehicle is safely off the road andaway from moving traffic. Turn on thehazard lights.
•Always set the parking brake to ensurethe vehicle does not moveunexpectedly.
•Do not remove any foreign objects,such as nails or screws, from the tire.
•When using the kit, leave the enginerunning (only if the vehicle is outdoorsor in a well-ventilated area) so thecompressor does not drain the vehiclebattery.
•Do not allow the compressor tooperate continuously for more than 15minutes. This will help prevent thecompressor from overheating.
•Never leave the kit unattended whenit is operating.
•Sealant compound contains latex.Make sure that you use the non-latexgloves provided to avoid an allergicreaction.
•Keep the kit away from children.
•Only use the kit when the ambienttemperature is between -22°F (-30°C)and 158°F (70°C).
•Only use the sealing compound beforethe use by date. The use by date is onthe lower right hand corner of the labellocated on the sealant canister(bottle). Check the use by dateregularly and replace the canister afterfour years.
•Do not store the kit unsecured insidethe passenger compartment of thevehicle as it may cause injury during asudden stop or crash. Always store thekit in its original location.
•After sealant use, the tire pressuremonitoring system sensor and valvestem on the wheel must be replacedby an authorized Ford dealer.
268
Taurus (CPH) Canada/United States of America, enUSA, First Printing
Wheels and Tires
Page 274 of 504
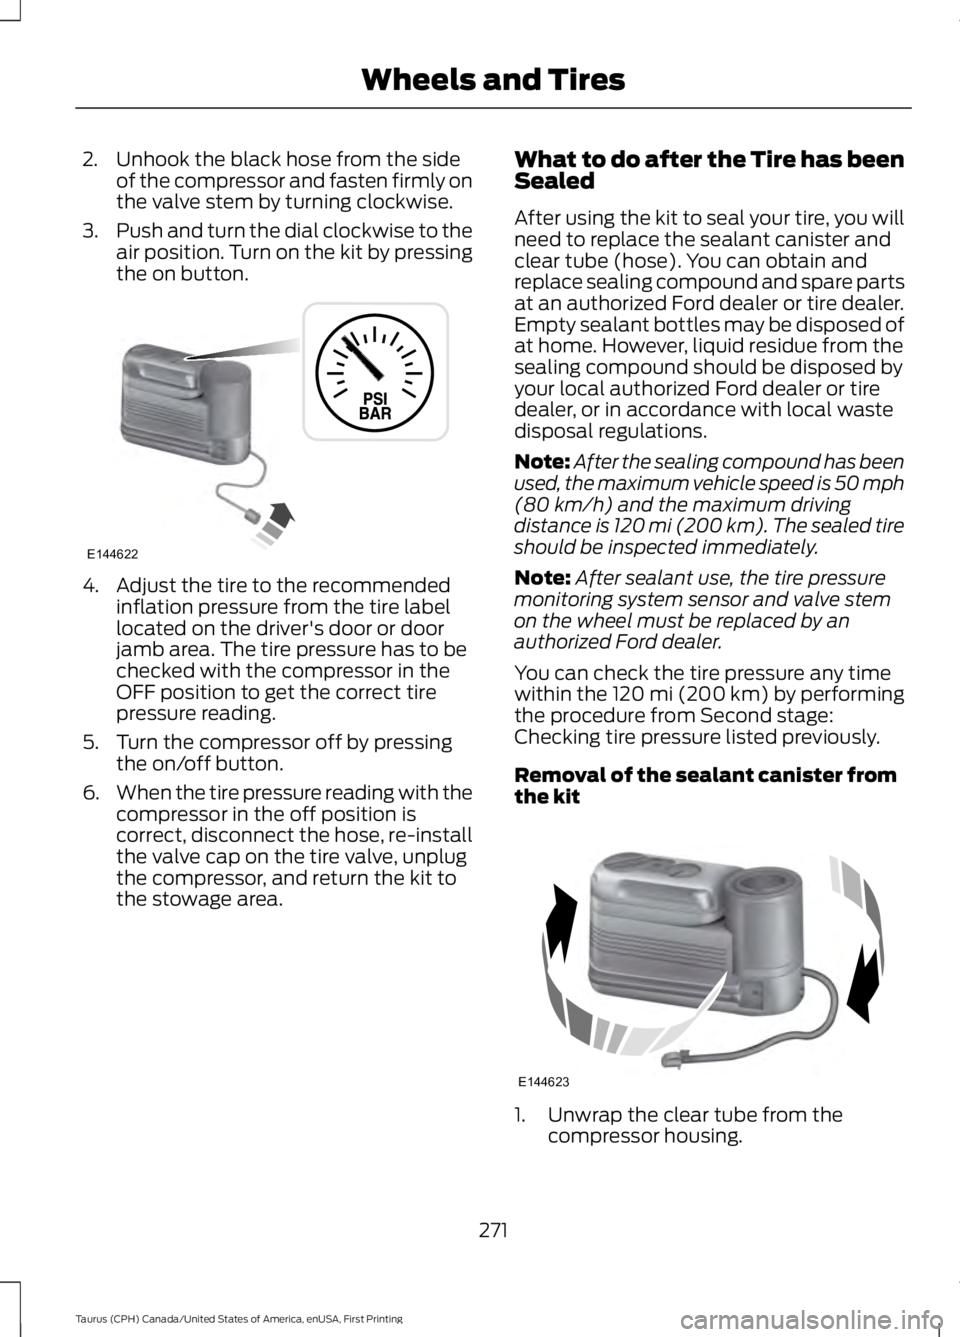
2. Unhook the black hose from the sideof the compressor and fasten firmly onthe valve stem by turning clockwise.
3.Push and turn the dial clockwise to theair position. Turn on the kit by pressingthe on button.
4. Adjust the tire to the recommendedinflation pressure from the tire labellocated on the driver's door or doorjamb area. The tire pressure has to bechecked with the compressor in theOFF position to get the correct tirepressure reading.
5. Turn the compressor off by pressingthe on/off button.
6.When the tire pressure reading with thecompressor in the off position iscorrect, disconnect the hose, re-installthe valve cap on the tire valve, unplugthe compressor, and return the kit tothe stowage area.
What to do after the Tire has beenSealed
After using the kit to seal your tire, you willneed to replace the sealant canister andclear tube (hose). You can obtain andreplace sealing compound and spare partsat an authorized Ford dealer or tire dealer.Empty sealant bottles may be disposed ofat home. However, liquid residue from thesealing compound should be disposed byyour local authorized Ford dealer or tiredealer, or in accordance with local wastedisposal regulations.
Note:After the sealing compound has beenused, the maximum vehicle speed is 50 mph(80 km/h) and the maximum drivingdistance is 120 mi (200 km). The sealed tireshould be inspected immediately.
Note:After sealant use, the tire pressuremonitoring system sensor and valve stemon the wheel must be replaced by anauthorized Ford dealer.
You can check the tire pressure any timewithin the 120 mi (200 km) by performingthe procedure from Second stage:Checking tire pressure listed previously.
Removal of the sealant canister fromthe kit
1. Unwrap the clear tube from thecompressor housing.
271
Taurus (CPH) Canada/United States of America, enUSA, First Printing
Wheels and TiresE144622 E144623
Page 287 of 504
WARNINGS
3. Stand at a minimum of 12 ft(3.66 m) away from the wheeland tire assembly.
4. Use both eye and earprotection.
For a mounting pressure morethan 20 psi (1.38 bar) greater thanthe maximum pressure, a Forddealer or other tire serviceprofessional should do themounting.
Always inflate steel carcass tireswith a remote air fill with theperson inflating standing at aminimum of 12 ft (3.66 m) awayfrom the wheel and tire assembly.
Important: Remember to replacethe wheel valve stems when theroad tires are replaced on yourvehicle.
It is recommended that the twofront tires or two rear tiresgenerally be replaced as a pair.
The tire pressure sensors mountedin the wheels (originally installedon your vehicle) are not designedto be used in aftermarket wheels.
The use of wheels or tires notrecommended by Ford MotorCompany may affect theoperation of your tire pressuremonitoring system.
If the tire pressure monitoringsystem indicator is flashing, yoursystem is malfunctioning. Yourreplacement tire might beincompatible with your tirepressure monitoring system, orsome component of the systemmay be damaged.
Safety Practices
WARNINGS
If your vehicle is stuck insnow, mud or sand, do notrapidly spin the tires; spinning thetires can tear the tire and causean explosion. A tire can explode inas little as three to five seconds.
Do not spin the wheels atover 34 mph (55 km/h). Thetires may fail and injure a
passenger or bystander.
Driving habits have a great dealto do with your tire mileage andsafety.
*Observe posted speed limits
*Avoid fast starts, stops and turns
*Avoid potholes and objects onthe road
*Do not run over curbs or hit thetire against a curb when parking
284
Taurus (CPH) Canada/United States of America, enUSA, First Printing
Wheels and Tires
Page 291 of 504
Please note that the TPMS is not asubstitute for proper tire maintenance, andit is the driver’s responsibility to maintaincorrect tire pressure, even if under-inflationhas not reached the level to triggerillumination of the TPMS low tire pressuretelltale.
Your vehicle has also been equipped witha TPMS malfunction indicator to indicatewhen the system is not operating properly.The TPMS malfunction indicator iscombined with the low tire pressuretelltale. When the system detects amalfunction, the telltale will flash forapproximately one minute and then remaincontinuously illuminated. This sequencewill continue upon subsequent vehiclestart-ups as long as the malfunction exists.
When the malfunction indicator isilluminated, the system may not be ableto detect or signal low tire pressure asintended. TPMS malfunctions may occurfor a variety of reasons, including theinstallation of replacement or alternatetires or wheels on the vehicle that preventthe TPMS from functioning properly.Always check the TPMS malfunctiontelltale after replacing one or more tires orwheels on your vehicle to ensure that thereplacement or alternate tires and wheelsallow the TPMS to continue to functionproperly.
This device complies with Part 15 of theFCC Rules and with Industry Canadalicense-exempt RSS standard(s).Operation is subject to the following twoconditions:
•This device may not cause harmfulinterference.
•This device must accept anyinterference received, includinginterference that may cause undesiredoperation.
Changing Tires With a TirePressure Monitoring System
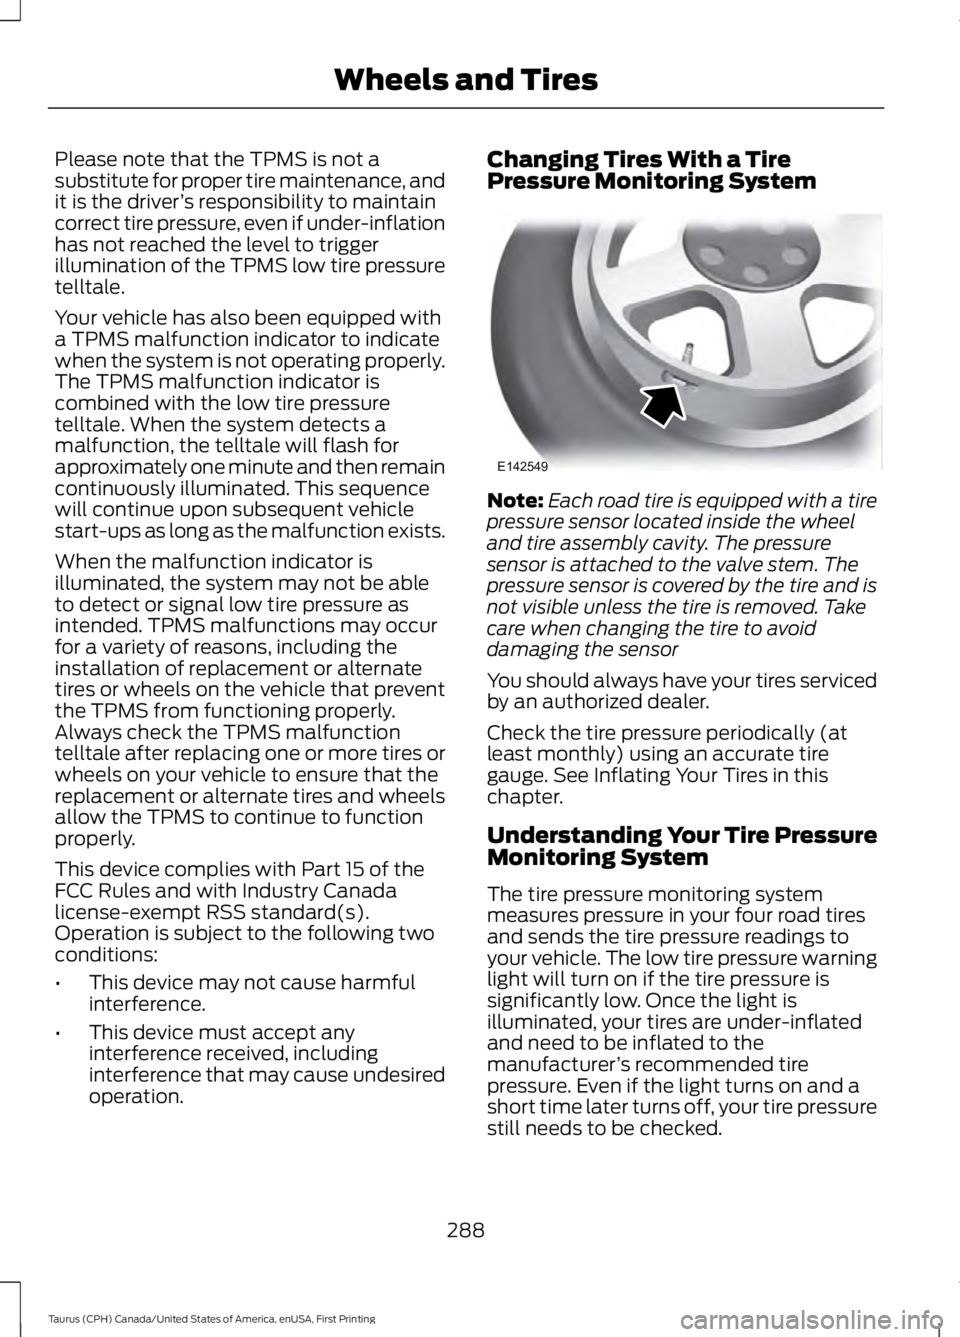
Note:Each road tire is equipped with a tirepressure sensor located inside the wheeland tire assembly cavity. The pressuresensor is attached to the valve stem. Thepressure sensor is covered by the tire and isnot visible unless the tire is removed. Takecare when changing the tire to avoiddamaging the sensor
You should always have your tires servicedby an authorized dealer.
Check the tire pressure periodically (atleast monthly) using an accurate tiregauge. See Inflating Your Tires in thischapter.
Understanding Your Tire PressureMonitoring System
The tire pressure monitoring systemmeasures pressure in your four road tiresand sends the tire pressure readings toyour vehicle. The low tire pressure warninglight will turn on if the tire pressure issignificantly low. Once the light isilluminated, your tires are under-inflatedand need to be inflated to themanufacturer’s recommended tirepressure. Even if the light turns on and ashort time later turns off, your tire pressurestill needs to be checked.
288
Taurus (CPH) Canada/United States of America, enUSA, First Printing
Wheels and TiresE142549
Page 294 of 504
How Temperature Affects Your TirePressure
The tire pressure monitoring systemmonitors tire pressure in each pneumatictire. While driving in a normal manner, atypical passenger tire inflation pressuremay increase about 2–4 psi (14–28 kPa)from a cold start situation. If the vehicle isstationary overnight with the outsidetemperature significantly lower than thedaytime temperature, the tire pressure maydecrease about 3 psi (21 kPa) for a drop of30°F (17°C) in ambient temperature. Thislower pressure value may be detected bythe tire pressure monitoring system asbeing significantly lower than therecommended inflation pressure andactivate the system warning light for lowtire pressure. If the low tire pressurewarning light is on, visually check each tireto verify that no tire is flat. If one or moretires are flat, repair as necessary. Checkthe air pressure in the road tires. If any tireis under-inflated, carefully drive the vehicleto the nearest location where air can beadded to the tires. Inflate all the tires tothe recommended inflation pressure.
CHANGING A ROAD WHEEL
WARNINGS
Do not use tire sealants as they maydamage the tire pressure monitoringsystem.
If the tire pressure monitor sensorbecomes damaged it may notfunction.
Note:The tire pressure monitoring systemindicator light will illuminate when the sparetire is in use. To restore the full function ofthe monitoring system, all road wheelsequipped with tire pressure monitoringsensors must be mounted on the vehicle.
If you get a flat tire while driving, do notapply the brake heavily. Instead, graduallydecrease your speed. Hold the steeringwheel firmly and slowly move to a safeplace on the side of the road.
Have a flat serviced by an authorizeddealer in order to prevent damage to thetire pressure monitoring system sensors.See Tire Pressure Monitoring System(page 287). Replace the spare tire with aroad tire as soon as possible. Duringrepairing or replacing of the flat tire, havethe authorized dealer inspect the tirepressure monitoring system sensor fordamage.
Dissimilar Spare Wheel and TireAssembly Information
WARNING
Failure to follow these guidelinescould result in an increased risk ofloss of vehicle control, injury or death.
If you have a dissimilar spare wheel andtire, then it is intended for temporary useonly. This means that if you need to use it,you should replace it as soon as possiblewith a road wheel and tire assembly thatis the same size and type as the road tiresand wheels that were originally providedby Ford. If the dissimilar spare tire or wheelis damaged, it should be replaced ratherthan repaired.
A dissimilar spare wheel and tire assemblyis defined as a spare wheel and tireassembly that is different in brand, size orappearance from the road tires and wheelsand can be one of three types:
1.T-type mini-spare: This spare tirebegins with the letter T for tire size andmay have Temporary Use Only molded inthe sidewall.
291
Taurus (CPH) Canada/United States of America, enUSA, First Printing
Wheels and Tires
Page 446 of 504
For a complete listing of the accessoriesthat are available for your vehicle, pleasecontact your authorized dealer or visit theonline store web site:
Web address (United States)
www.Accessories.Ford.com
Web address (Canada)
www.Accessories.Ford.ca
We will repair or replace any properlyauthorized dealer-installed Ford OriginalAccessory found to be defective infactory-supplied materials or workmanshipduring the warranty period, as well as anycomponent damaged by the defectiveaccessories.
We will warrant your Ford Originalaccessory through the warranty thatprovides the greatest benefit:
•24 months, unlimited mileage.
•The remainder of your new vehiclelimited warranty.
Contact an authorized dealer for detailsand a copy of the warranty.
Exterior Style
•Chrome mirror caps.
•Hood deflector*.
•Moon roof deflector.
•Rear spoiler.
•Side window deflector.
•Splash guards.
Interior Style
•All-weather floor mats.
•Ambient lighting.
•Carpeted floor mats.
•Sport pedals.
•Table cradle*.
Lifestyle
•Ash cup (smoker's package).
•Car cover*.
•Cargo area protector.
•Cargo net.
•Cargo organization and management.
Peace of Mind
•Bumper-mounted parking sensors*.
•Locking fuel plug.
•Remote start.
•Roadside assistance kits*.
•Vehicle security system.
•Wheel locks.
*Ford Licensed Accessories. The accessorymanufacturer designs, develops andtherefore warrants Ford LicensedAccessories, and does not design or testthese accessories to Ford Motor Companyengineering requirements. Contact anauthorized Ford dealer for themanufacturer’s limited warranty details,and request a copy of the Ford LicensedAccessories product limited warranty fromthe accessory manufacturer.
443
Taurus (CPH) Canada/United States of America, enUSA, First Printing
Accessories
Page 496 of 504
Climate............................................................399Climate Control............................................109Climate Controlled Seats..........................128Cooled Seats........................................................128Heated Seats........................................................128Collision Warning System..........................197PRINCIPLE OF OPERATION............................197Coolant CheckSee: Engine Coolant Check............................243Crash Sensors and Airbag Indicator.......44Creating a MyKey............................................52Programming/Changing ConfigurableSettings...............................................................52Cross Traffic Alert.........................................193False Alerts...........................................................196Switching the System Off and On...............196System Errors.......................................................196System Lights, Messages and AudibleAlerts..................................................................195System Limitations............................................195Using the System...............................................193Cruise Control.................................................68Principle of Operation.......................................178Type 1........................................................................68Type 2.......................................................................68Cruise controlSee: Using Cruise Control................................178Customer Assistance..................................219
D
Data Recording..................................................9Event Data Recording..........................................10Service Data Recording........................................9Daytime Running Lamps.............................74Direction Indicators........................................76Doors and Locks..............................................57Driver Alert......................................................186PRINCIPLE OF OPERATION...........................186USING DRIVER ALERT.....................................186Driver and Passenger Airbags...................39Children and Airbags..........................................39Proper Driver and Front Passenger SeatingAdjustment........................................................39Driving Aids.....................................................186Driving Hints.....................................................211Driving Through Water................................212
DRLSee: Daytime Running Lamps.........................74
E
Economical Driving.......................................211Emission Control System..........................150On-Board Diagnostics (OBD-II).....................151Readiness for Inspection and Maintenance(I/M) Testing.....................................................151End User License Agreement.................465VEHICLE SOFTWARE END USER LICENSEAGREEMENT (EULA) ................................465Engine Block Heater.....................................141Using the Engine Block Heater......................142Engine Coolant Check................................243Adding Coolant..................................................244Coolant Change.................................................245Engine Coolant TemperatureManagement..................................................246Fail-Safe Cooling...............................................245Recycled Coolant...............................................245Severe Climates.................................................245Engine ImmobilizerSee: Passive Anti-Theft System.....................64Engine Oil Check...........................................241Adding Engine Oil...............................................242Engine Oil Dipstick - 2.0LEcoBoost™..................................................241Engine Oil Dipstick - 3.5L Duratec/3.5LEcoboost™..................................................241Engine Specifications - 2.0LEcoBoost™.................................................297Drivebelt Routing...............................................297Engine Specifications - 3.5LDuratec..........................................................297Drivebelt Routing...............................................298Engine Specifications - 3.5LEcoboost™.................................................298Drivebelt Routing...............................................298Entertainment..............................................389AM/FM Radio......................................................390Apps.......................................................................398Bluetooth Stereo or USB.................................397CD (If equipped)................................................396HD Radio™ Information (IfAvailable)........................................................393
493
Taurus (CPH) Canada/United States of America, enUSA, First Printing
Index