tow FORD TAURUS 2018 User Guide
[x] Cancel search | Manufacturer: FORD, Model Year: 2018, Model line: TAURUS, Model: FORD TAURUS 2018Pages: 510, PDF Size: 22.04 MB
Page 74 of 510
WINDSHIELD WIPERS
Note:
Fully defrost the windshield before
you switch the windshield wipers on.
Note: Make sure you switch the windshield
wipers off before entering a car wash.
Note: If streaks or smears appear on the
windshield, clean the windshield and the
wiper blades. If that does not resolve the
issue, install new wiper blades.
Note: Do not operate the wipers on a dry
windshield. This may scratch the glass,
damage the wiper blades or cause the wiper
motor to burn out. Always use the
windshield washers before wiping a dry
windshield. •
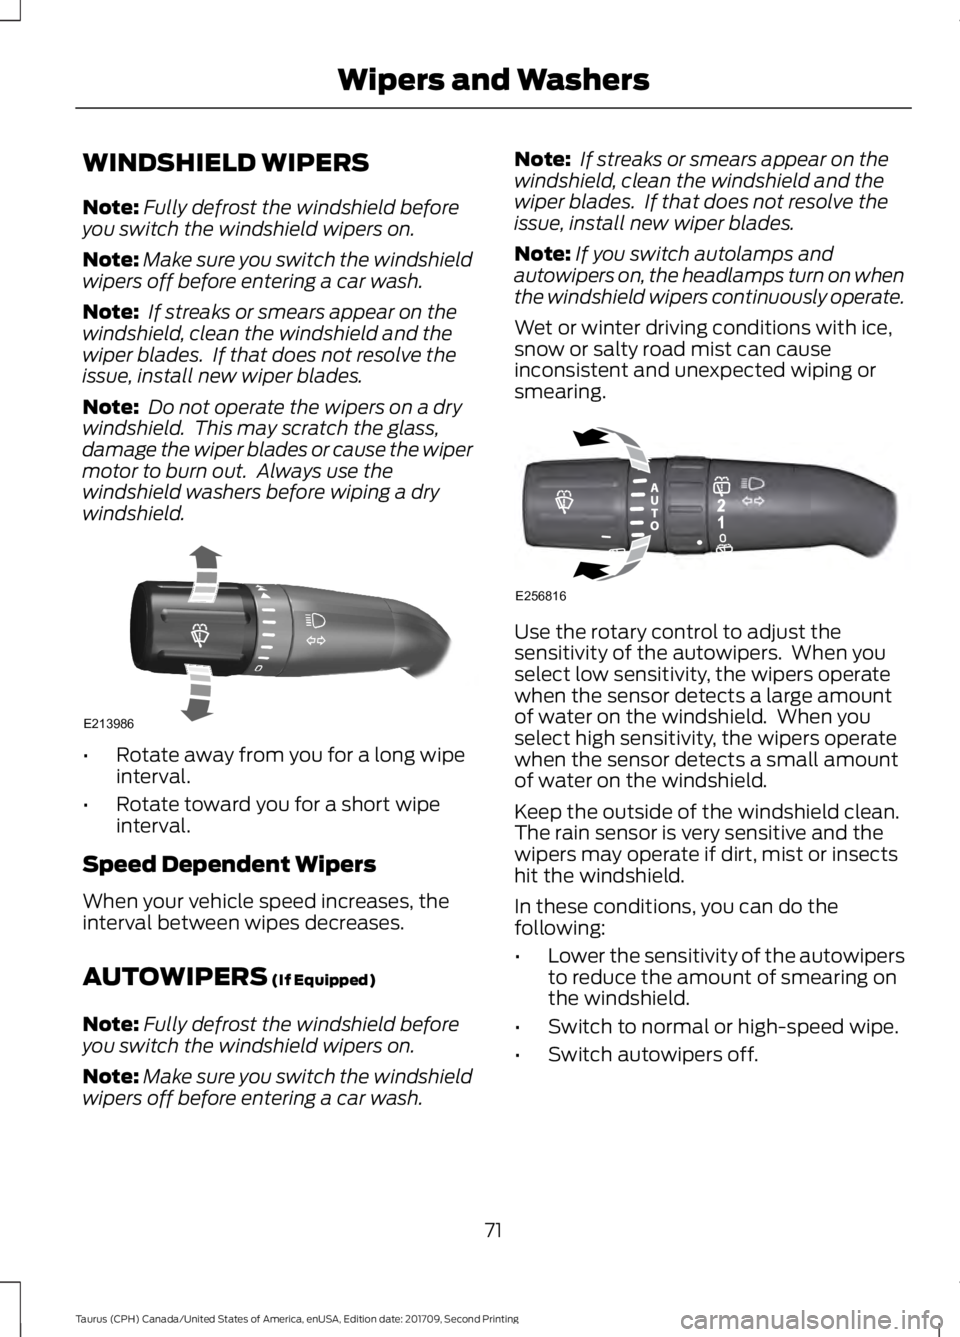
Rotate away from you for a long wipe
interval.
• Rotate toward you for a short wipe
interval.
Speed Dependent Wipers
When your vehicle speed increases, the
interval between wipes decreases.
AUTOWIPERS (If Equipped)
Note: Fully defrost the windshield before
you switch the windshield wipers on.
Note: Make sure you switch the windshield
wipers off before entering a car wash. Note:
If streaks or smears appear on the
windshield, clean the windshield and the
wiper blades. If that does not resolve the
issue, install new wiper blades.
Note: If you switch autolamps and
autowipers on, the headlamps turn on when
the windshield wipers continuously operate.
Wet or winter driving conditions with ice,
snow or salty road mist can cause
inconsistent and unexpected wiping or
smearing. Use the rotary control to adjust the
sensitivity of the autowipers. When you
select low sensitivity, the wipers operate
when the sensor detects a large amount
of water on the windshield. When you
select high sensitivity, the wipers operate
when the sensor detects a small amount
of water on the windshield.
Keep the outside of the windshield clean.
The rain sensor is very sensitive and the
wipers may operate if dirt, mist or insects
hit the windshield.
In these conditions, you can do the
following:
•
Lower the sensitivity of the autowipers
to reduce the amount of smearing on
the windshield.
• Switch to normal or high-speed wipe.
• Switch autowipers off.
71
Taurus (CPH) Canada/United States of America, enUSA, Edition date: 201709, Second Printing Wipers and WashersE213986 E256816
Page 76 of 510
GENERAL INFORMATION
Condensation in the Exterior Front
Lamps and Rear Lamps
Exterior front lamps and rear lamps have
vents to accommodate normal changes
in air pressure.
Condensation can be a natural by-product
of this design. When moist air enters the
lamp assembly through the vents, there is
a possibility that condensation can occur
when the temperature is cold. When
normal condensation occurs, a fine mist
can form on the interior of the lens. The
fine mist eventually clears and exits
through the vents during normal operation.
Clearing time may take as long as 48 hours
under dry weather conditions.
Examples of acceptable condensation are:
•
The presence of a fine mist (no streaks,
drip marks or large droplets).
• A fine mist covers less than 50% of the
lens.
Examples of unacceptable condensation
are:
• A water puddle inside the lamp.
• Streaks, drip marks or large droplets
present on the interior of the lens.
If you see any unacceptable condensation,
have your vehicle checked by an authorized
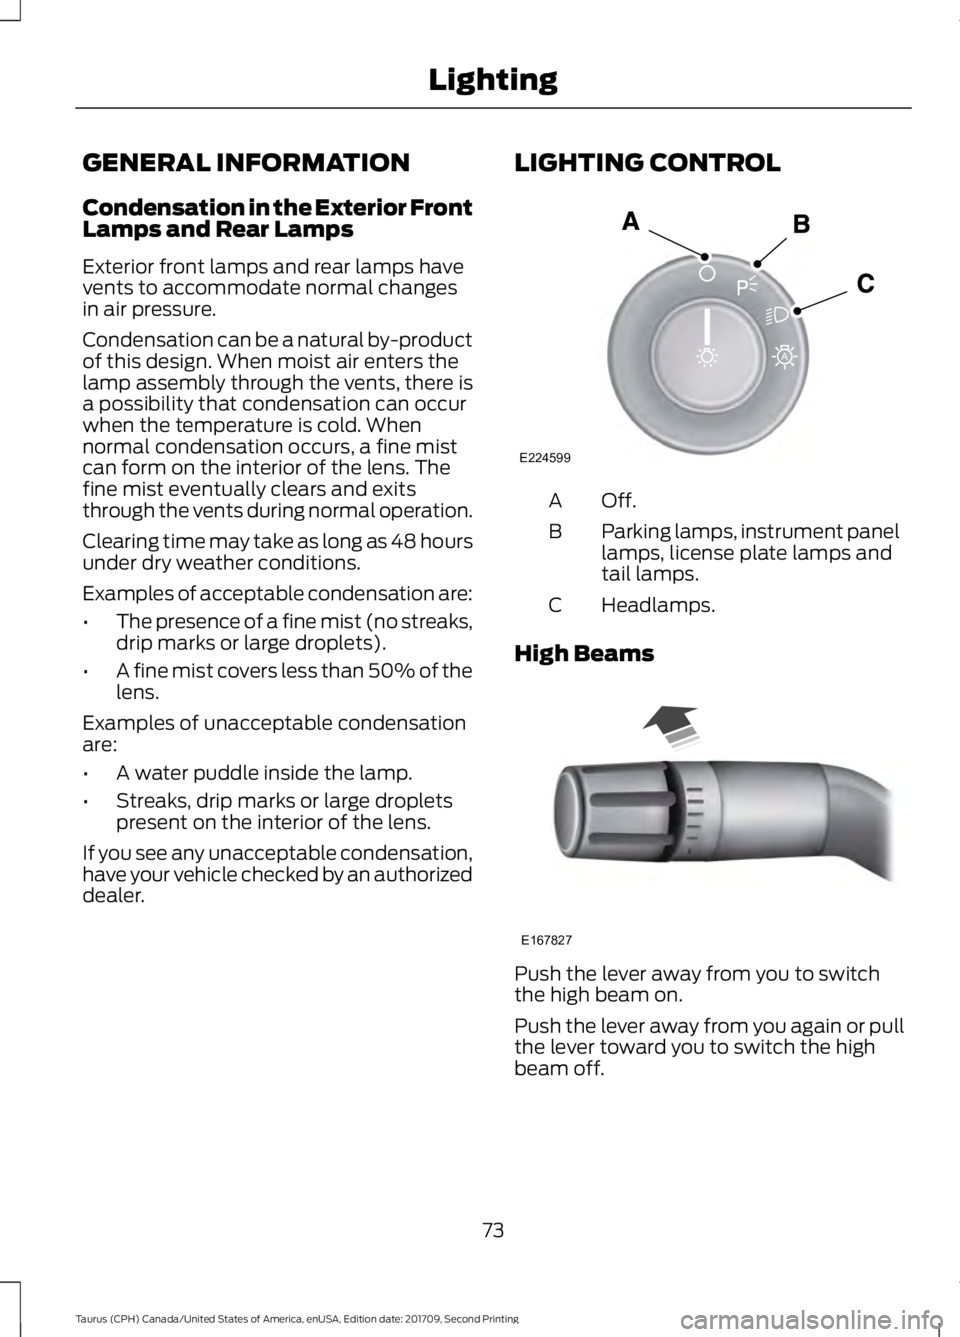
dealer. LIGHTING CONTROL Off.A
Parking lamps, instrument panel
lamps, license plate lamps and
tail lamps.
B
Headlamps.
C
High Beams Push the lever away from you to switch
the high beam on.
Push the lever away from you again or pull
the lever toward you to switch the high
beam off.
73
Taurus (CPH) Canada/United States of America, enUSA, Edition date: 201709, Second Printing LightingE224599
A E167827
Page 77 of 510
Headlamp Flasher
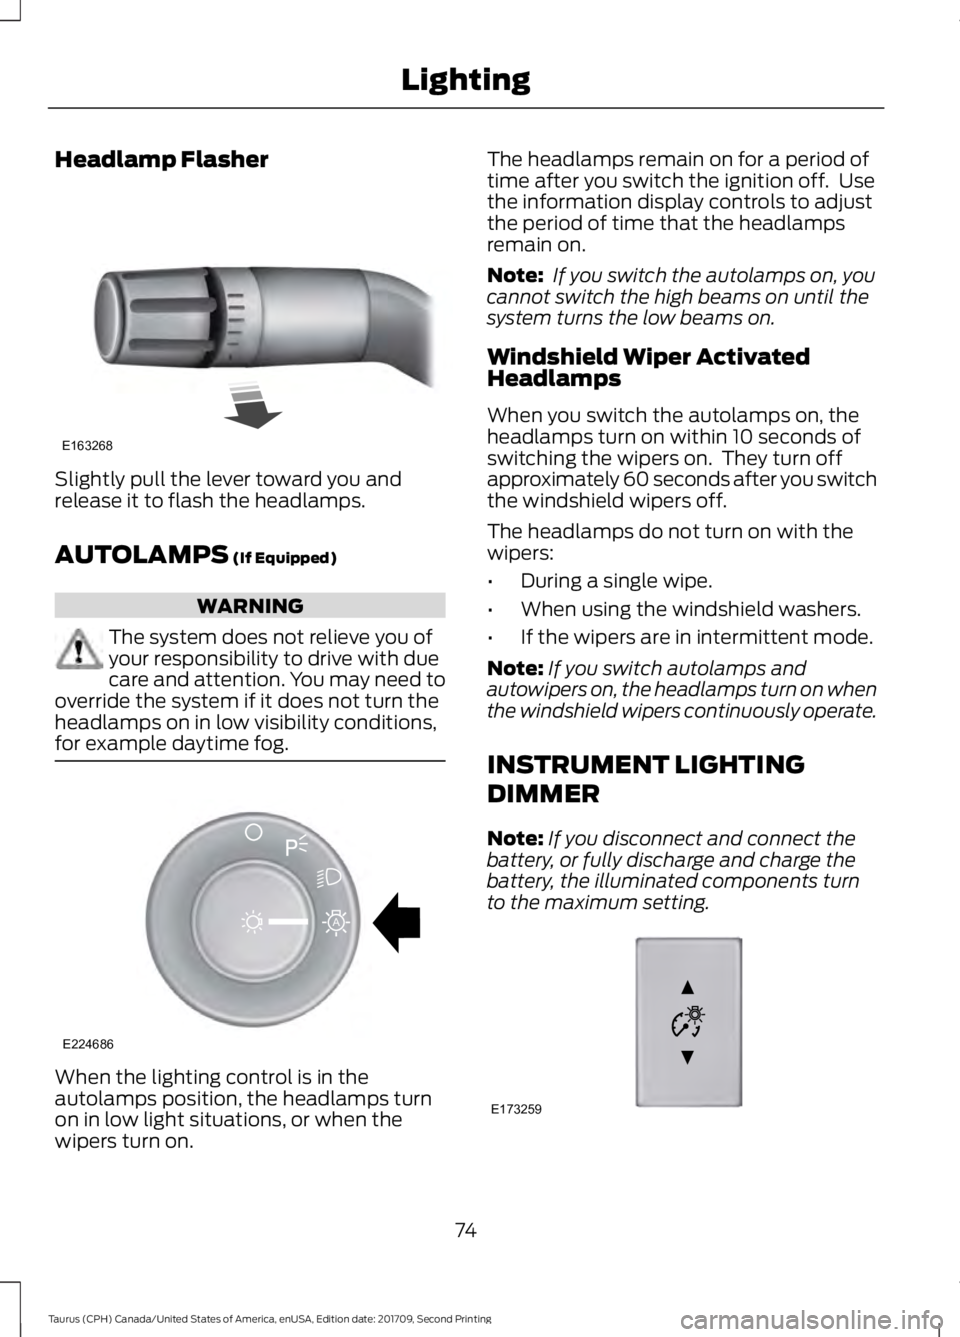
Slightly pull the lever toward you and
release it to flash the headlamps.
AUTOLAMPS (If Equipped)
WARNING
The system does not relieve you of
your responsibility to drive with due
care and attention. You may need to
override the system if it does not turn the
headlamps on in low visibility conditions,
for example daytime fog. When the lighting control is in the
autolamps position, the headlamps turn
on in low light situations, or when the
wipers turn on. The headlamps remain on for a period of
time after you switch the ignition off. Use
the information display controls to adjust
the period of time that the headlamps
remain on.
Note:
If you switch the autolamps on, you
cannot switch the high beams on until the
system turns the low beams on.
Windshield Wiper Activated
Headlamps
When you switch the autolamps on, the
headlamps turn on within 10 seconds of
switching the wipers on. They turn off
approximately 60 seconds after you switch
the windshield wipers off.
The headlamps do not turn on with the
wipers:
• During a single wipe.
• When using the windshield washers.
• If the wipers are in intermittent mode.
Note: If you switch autolamps and
autowipers on, the headlamps turn on when
the windshield wipers continuously operate.
INSTRUMENT LIGHTING
DIMMER
Note: If you disconnect and connect the
battery, or fully discharge and charge the
battery, the illuminated components turn
to the maximum setting. 74
Taurus (CPH) Canada/United States of America, enUSA, Edition date: 201709, Second Printing LightingE163268 E224686
A E173259
Page 82 of 510
Window Lock
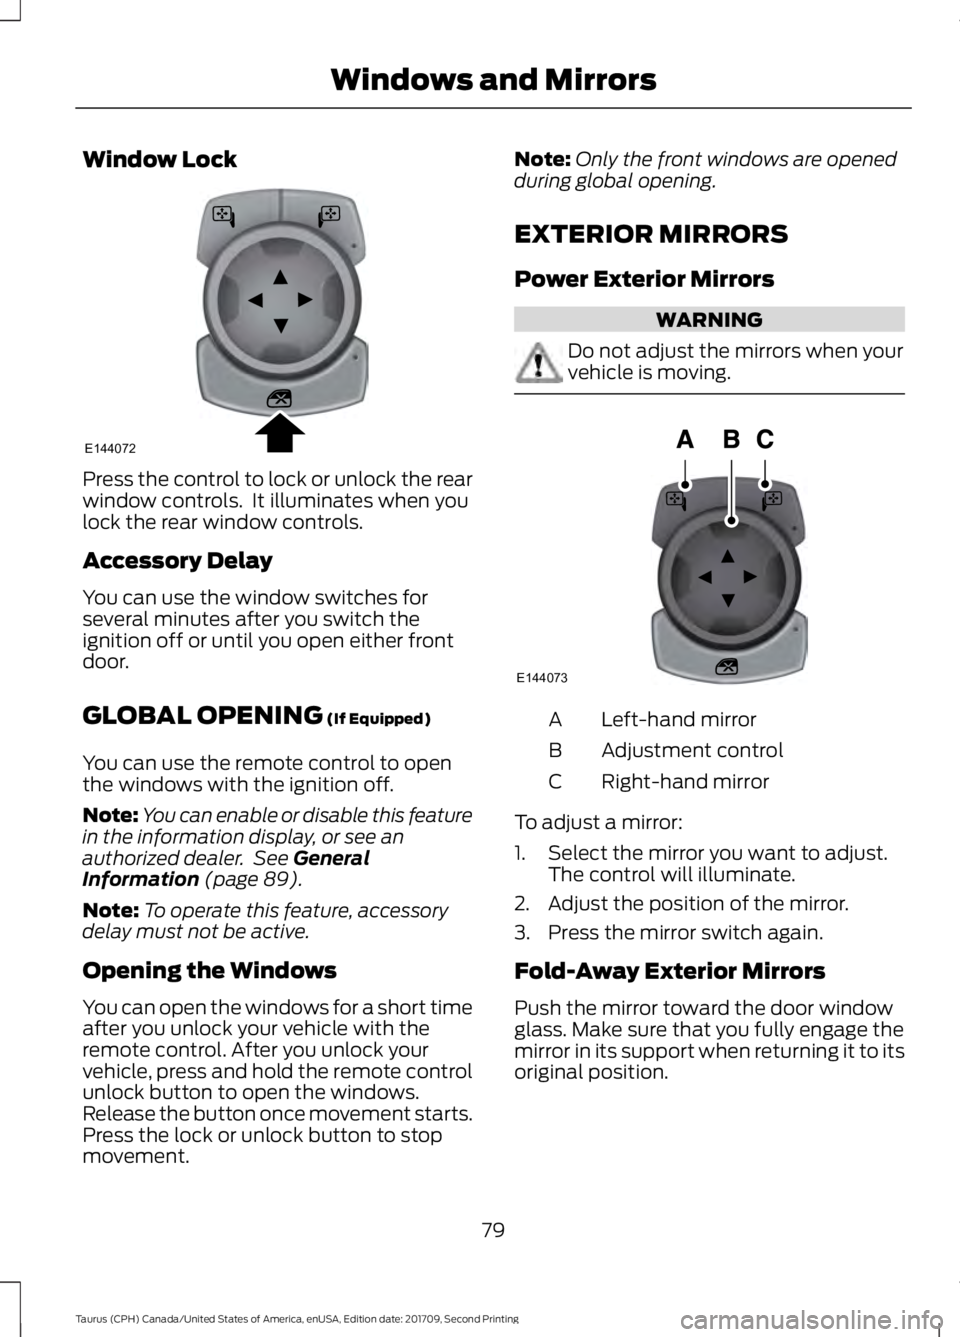
Press the control to lock or unlock the rear
window controls. It illuminates when you
lock the rear window controls.
Accessory Delay
You can use the window switches for
several minutes after you switch the
ignition off or until you open either front
door.
GLOBAL OPENING (If Equipped)
You can use the remote control to open
the windows with the ignition off.
Note: You can enable or disable this feature
in the information display, or see an
authorized dealer. See
General
Information (page 89).
Note: To operate this feature, accessory
delay must not be active.
Opening the Windows
You can open the windows for a short time
after you unlock your vehicle with the
remote control. After you unlock your
vehicle, press and hold the remote control
unlock button to open the windows.
Release the button once movement starts.
Press the lock or unlock button to stop
movement. Note:
Only the front windows are opened
during global opening.
EXTERIOR MIRRORS
Power Exterior Mirrors WARNING
Do not adjust the mirrors when your
vehicle is moving.
Left-hand mirror
A
Adjustment control
B
Right-hand mirror
C
To adjust a mirror:
1. Select the mirror you want to adjust. The control will illuminate.
2. Adjust the position of the mirror.
3. Press the mirror switch again.
Fold-Away Exterior Mirrors
Push the mirror toward the door window
glass. Make sure that you fully engage the
mirror in its support when returning it to its
original position.
79
Taurus (CPH) Canada/United States of America, enUSA, Edition date: 201709, Second Printing Windows and MirrorsE144072 E144073
Page 84 of 510
INTERIOR MIRROR
Manual Dimming Mirror
WARNING
Do not adjust the mirrors when your
vehicle is moving. This could result
in the loss of control of your vehicle,
serious personal injury or death. Pull the tab below the mirror toward you
to reduce the effect of bright light from
behind.
Automatic Dimming Mirror (If Equipped)
WARNING
Do not adjust the mirrors when your
vehicle is moving. This could result
in the loss of control of your vehicle,
serious personal injury or death. The mirror dims to reduce the effect of
bright light from behind. It returns to
normal when the bright light from behind
is no longer present or if you shift into
reverse (R).
Do not block the sensors on the front and
back of the mirror.
Note:
A rear center passenger or raised rear
center head restraint could prevent light
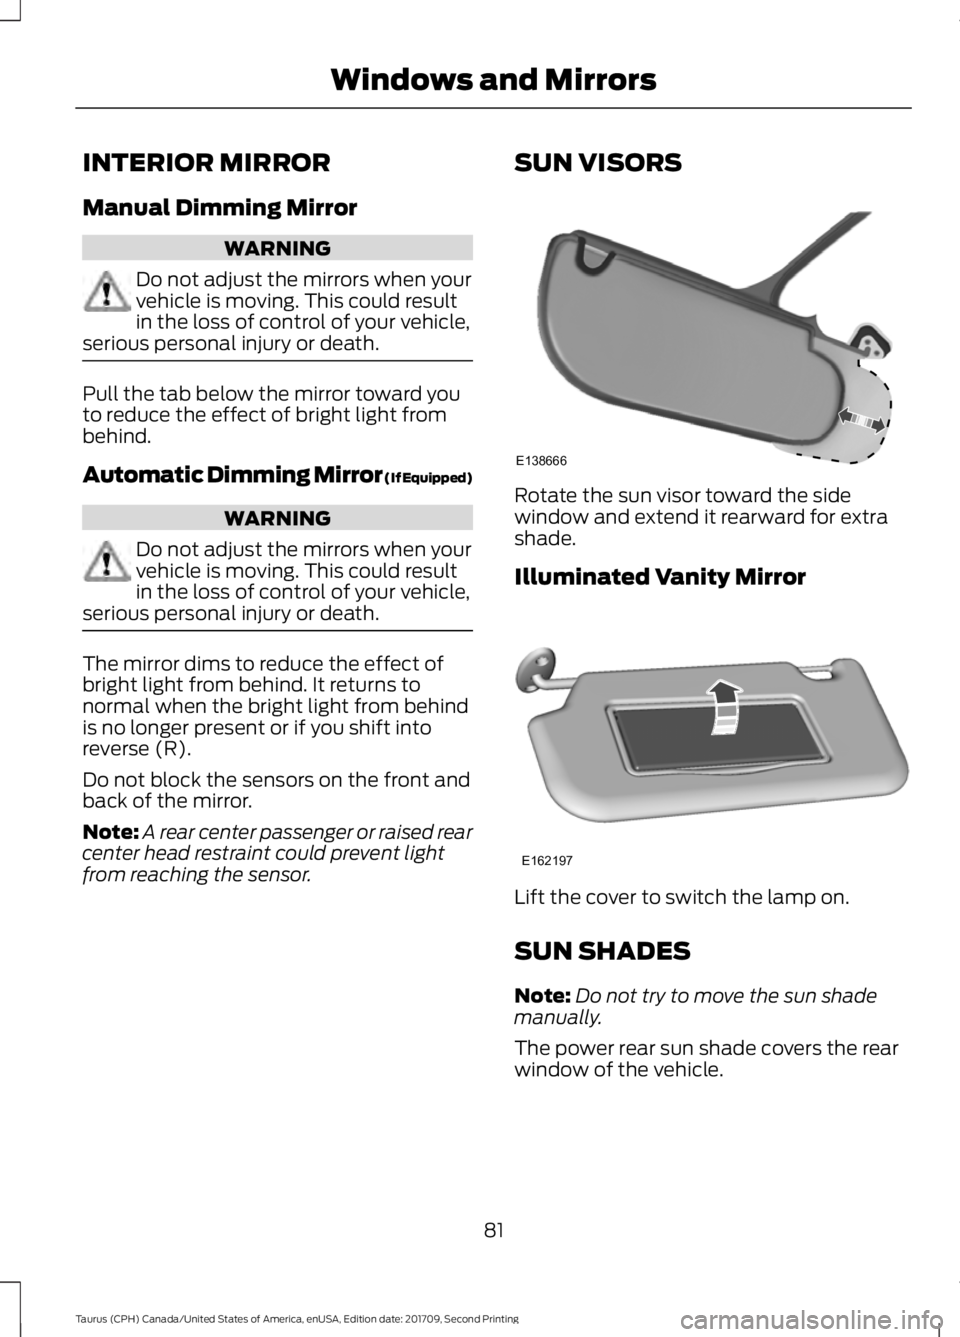
from reaching the sensor. SUN VISORS Rotate the sun visor toward the side
window and extend it rearward for extra
shade.
Illuminated Vanity Mirror
Lift the cover to switch the lamp on.
SUN SHADES
Note:
Do not try to move the sun shade
manually.
The power rear sun shade covers the rear
window of the vehicle.
81
Taurus (CPH) Canada/United States of America, enUSA, Edition date: 201709, Second Printing Windows and MirrorsE138666 E162197
Page 85 of 510
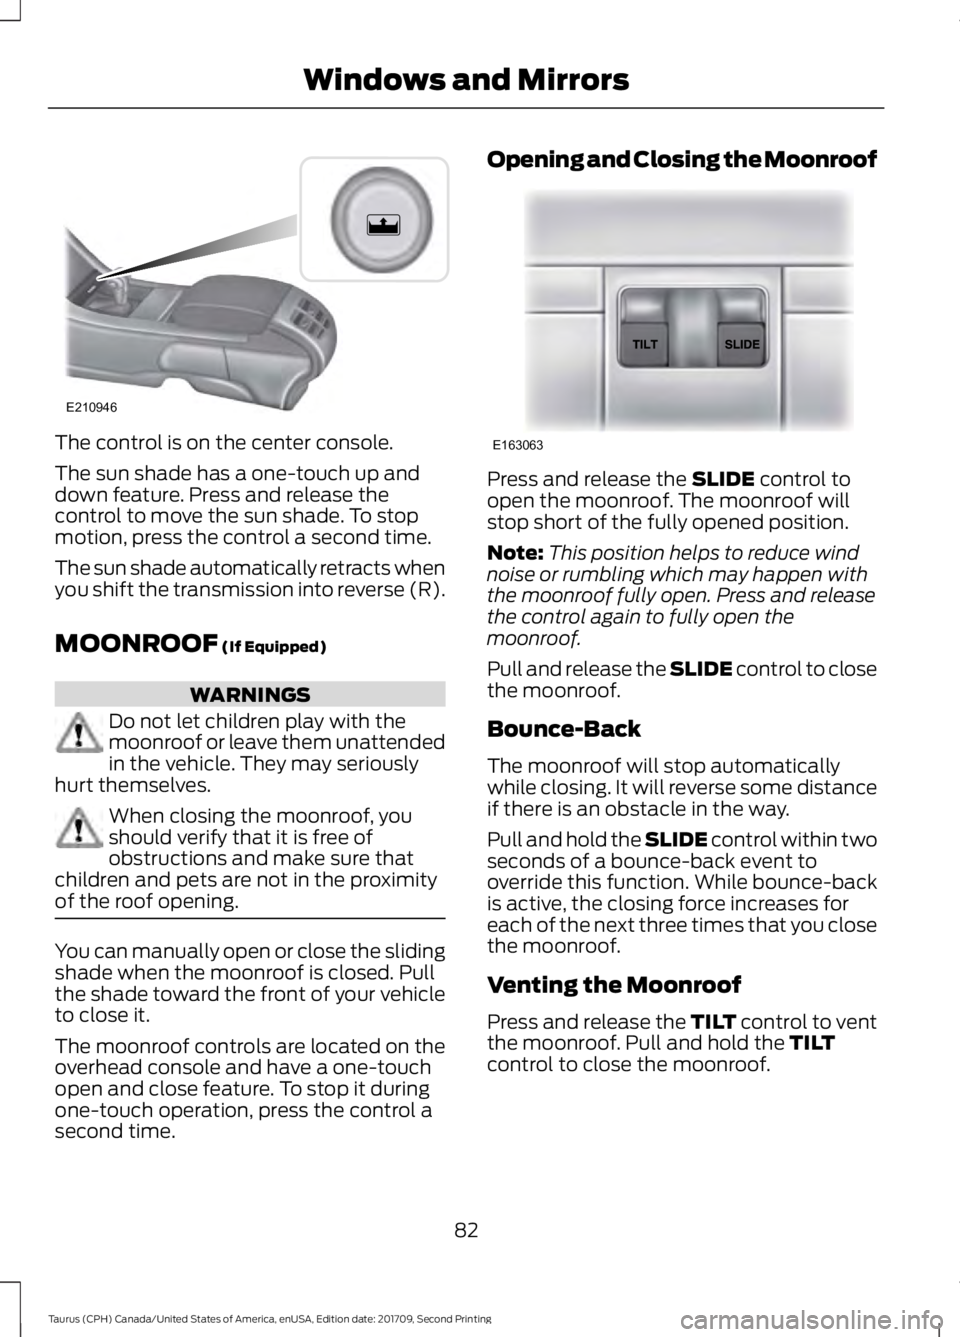
The control is on the center console.
The sun shade has a one-touch up and
down feature. Press and release the
control to move the sun shade. To stop
motion, press the control a second time.
The sun shade automatically retracts when
you shift the transmission into reverse (R).
MOONROOF (If Equipped)
WARNINGS
Do not let children play with the
moonroof or leave them unattended
in the vehicle. They may seriously
hurt themselves. When closing the moonroof, you
should verify that it is free of
obstructions and make sure that
children and pets are not in the proximity
of the roof opening. You can manually open or close the sliding
shade when the moonroof is closed. Pull
the shade toward the front of your vehicle
to close it.
The moonroof controls are located on the
overhead console and have a one-touch
open and close feature. To stop it during
one-touch operation, press the control a
second time. Opening and Closing the Moonroof
Press and release the
SLIDE control to
open the moonroof. The moonroof will
stop short of the fully opened position.
Note: This position helps to reduce wind
noise or rumbling which may happen with
the moonroof fully open. Press and release
the control again to fully open the
moonroof.
Pull and release the SLIDE control to close
the moonroof.
Bounce-Back
The moonroof will stop automatically
while closing. It will reverse some distance
if there is an obstacle in the way.
Pull and hold the SLIDE control within two
seconds of a bounce-back event to
override this function. While bounce-back
is active, the closing force increases for
each of the next three times that you close
the moonroof.
Venting the Moonroof
Press and release the TILT control to vent
the moonroof. Pull and hold the
TILT
control to close the moonroof.
82
Taurus (CPH) Canada/United States of America, enUSA, Edition date: 201709, Second Printing Windows and MirrorsE210946 E163063
Page 87 of 510
Type 2
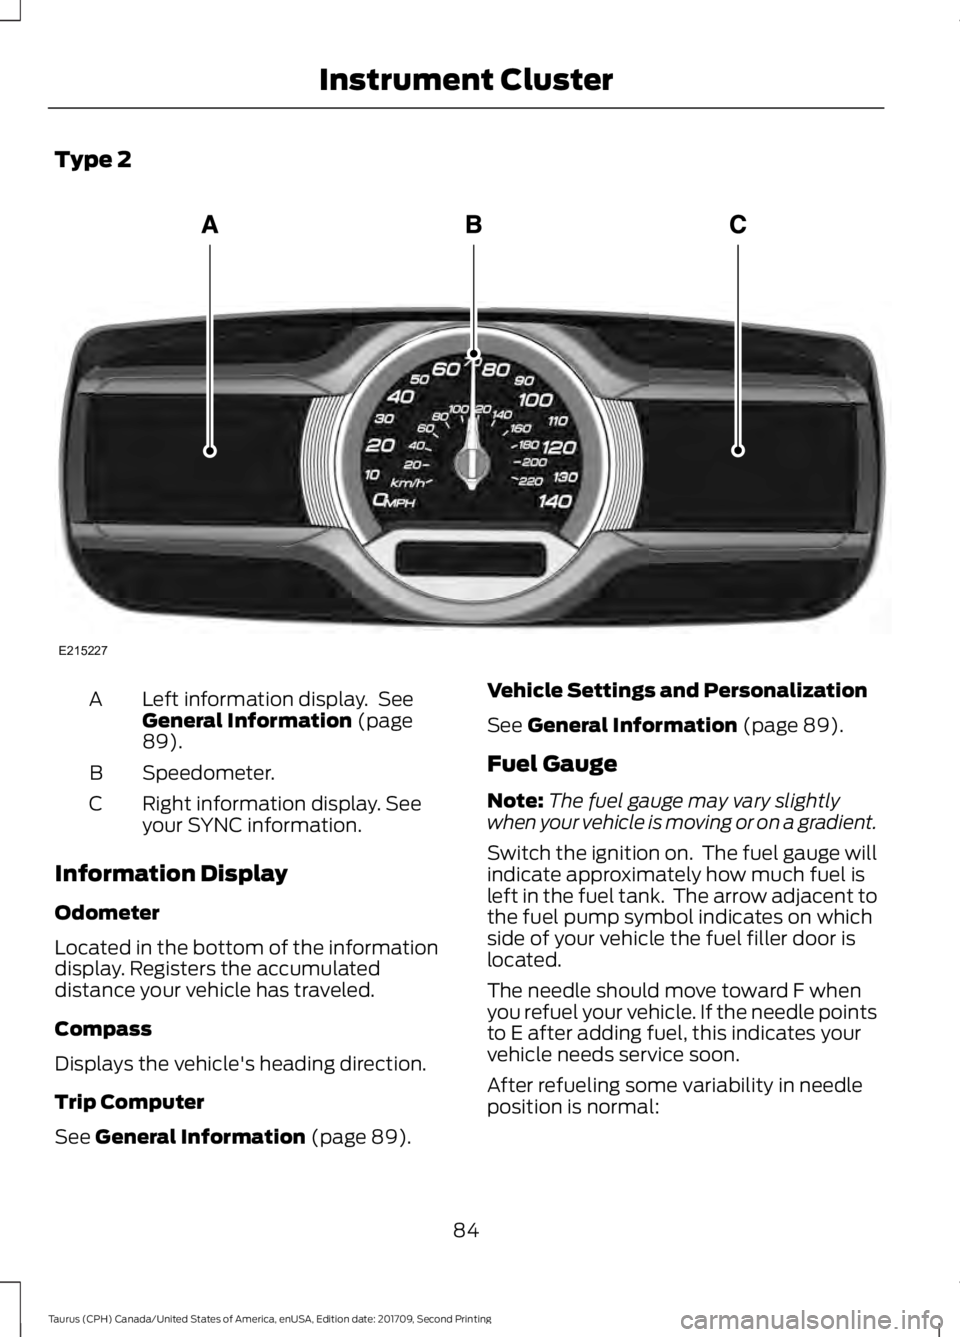
Left information display. See
General Information (page
89).
A
Speedometer.
B
Right information display. See
your SYNC information.
C
Information Display
Odometer
Located in the bottom of the information
display. Registers the accumulated
distance your vehicle has traveled.
Compass
Displays the vehicle's heading direction.
Trip Computer
See
General Information (page 89). Vehicle Settings and Personalization
See
General Information (page 89).
Fuel Gauge
Note: The fuel gauge may vary slightly
when your vehicle is moving or on a gradient.
Switch the ignition on. The fuel gauge will
indicate approximately how much fuel is
left in the fuel tank. The arrow adjacent to
the fuel pump symbol indicates on which
side of your vehicle the fuel filler door is
located.
The needle should move toward F when
you refuel your vehicle. If the needle points
to E after adding fuel, this indicates your
vehicle needs service soon.
After refueling some variability in needle
position is normal:
84
Taurus (CPH) Canada/United States of America, enUSA, Edition date: 201709, Second Printing Instrument ClusterE215227
Page 95 of 510
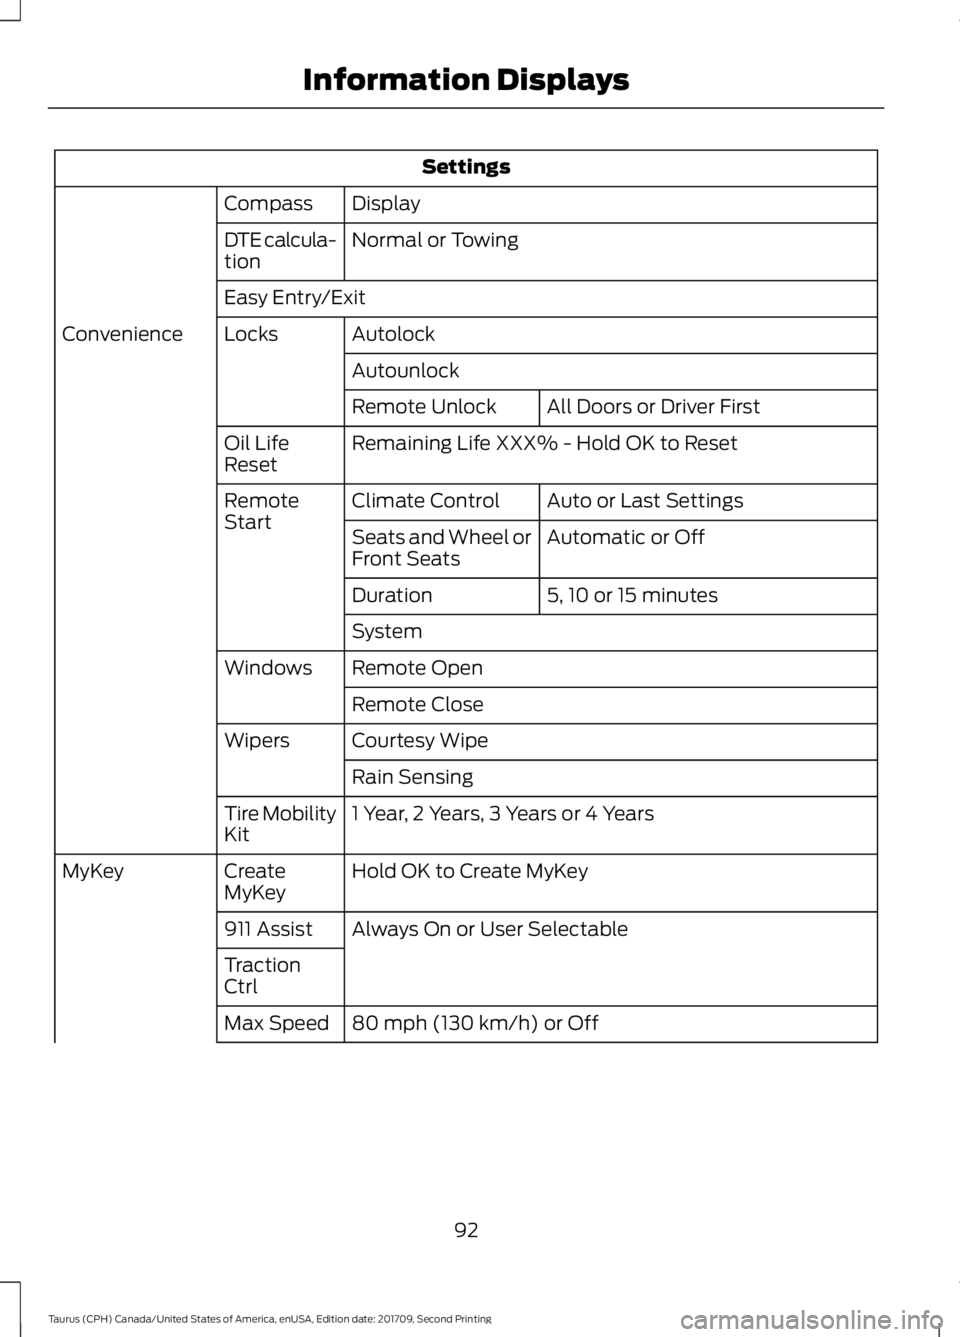
Settings
Display
Compass
Normal or Towing
DTE calcula-
tion
Easy Entry/Exit
Autolock
Locks
Convenience
AutounlockAll Doors or Driver First
Remote Unlock
Remaining Life XXX% - Hold OK to Reset
Oil Life
Reset
Auto or Last Settings
Climate Control
Remote
Start
Automatic or Off
Seats and Wheel or
Front Seats
5, 10 or 15 minutes
Duration
System
Remote Open
Windows
Remote Close
Courtesy Wipe
Wipers
Rain Sensing
1 Year, 2 Years, 3 Years or 4 Years
Tire Mobility
Kit
Hold OK to Create MyKey
Create
MyKey
MyKey
Always On or User Selectable
911 Assist
Traction
Ctrl
80 mph (130 km/h) or Off
Max Speed
92
Taurus (CPH) Canada/United States of America, enUSA, Edition date: 201709, Second Printing Information Displays
Page 99 of 510
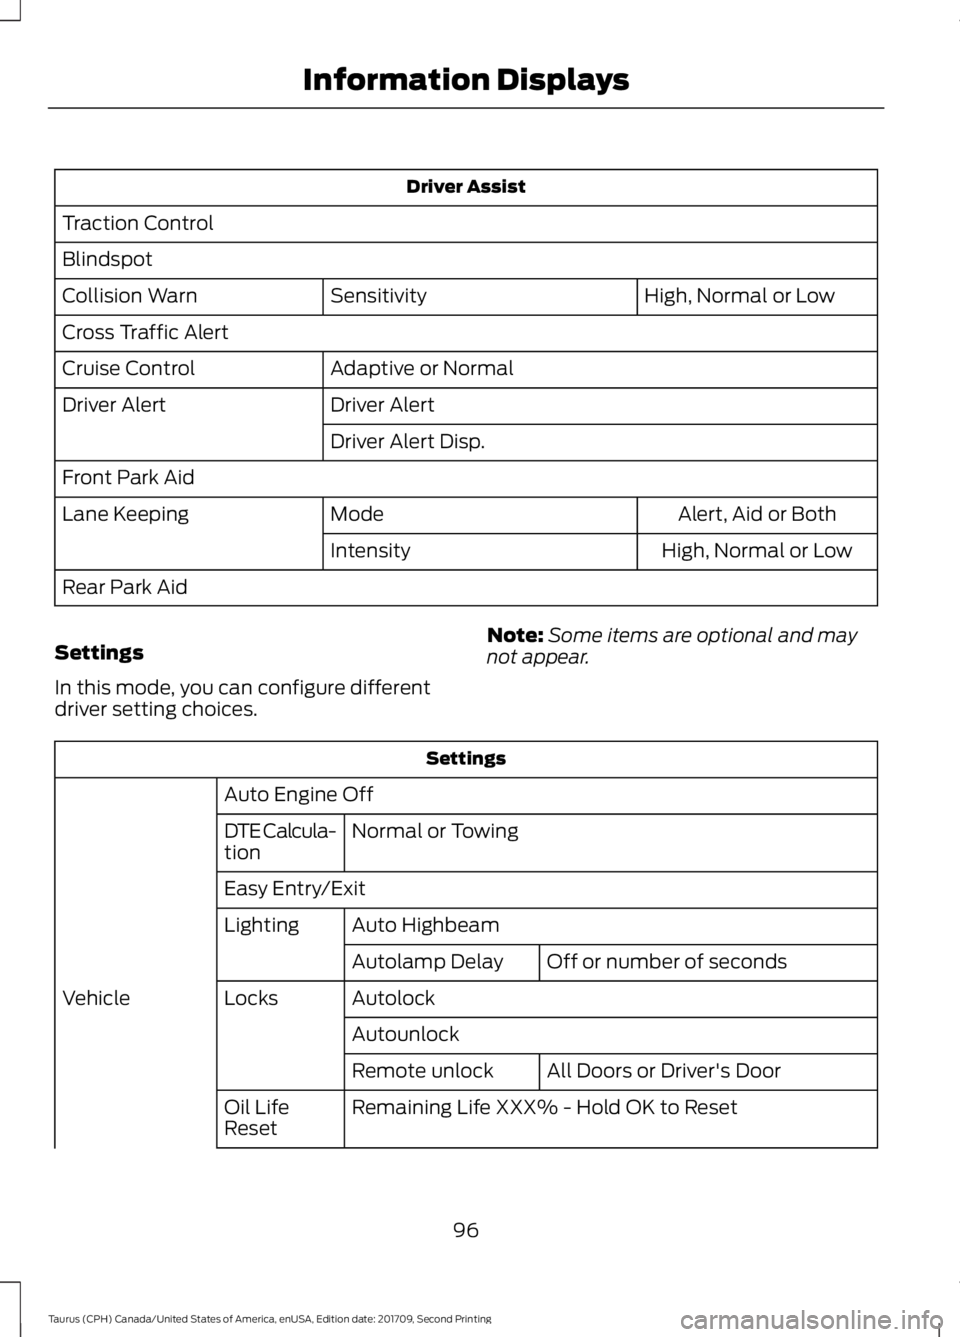
Driver Assist
Traction Control
Blindspot High, Normal or Low
Sensitivity
Collision Warn
Cross Traffic Alert
Adaptive or Normal
Cruise Control
Driver Alert
Driver Alert
Driver Alert Disp.
Front Park Aid Alert, Aid or Both
Mode
Lane Keeping
High, Normal or Low
Intensity
Rear Park Aid
Settings
In this mode, you can configure different
driver setting choices. Note:
Some items are optional and may
not appear. Settings
Auto Engine Off Normal or Towing
DTE Calcula-
tion
Easy Entry/Exit
Auto Highbeam
Lighting
Off or number of seconds
Autolamp Delay
Autolock
Locks
Vehicle
AutounlockAll Doors or Driver's Door
Remote unlock
Remaining Life XXX% - Hold OK to Reset
Oil Life
Reset
96
Taurus (CPH) Canada/United States of America, enUSA, Edition date: 201709, Second Printing Information Displays
Page 124 of 510
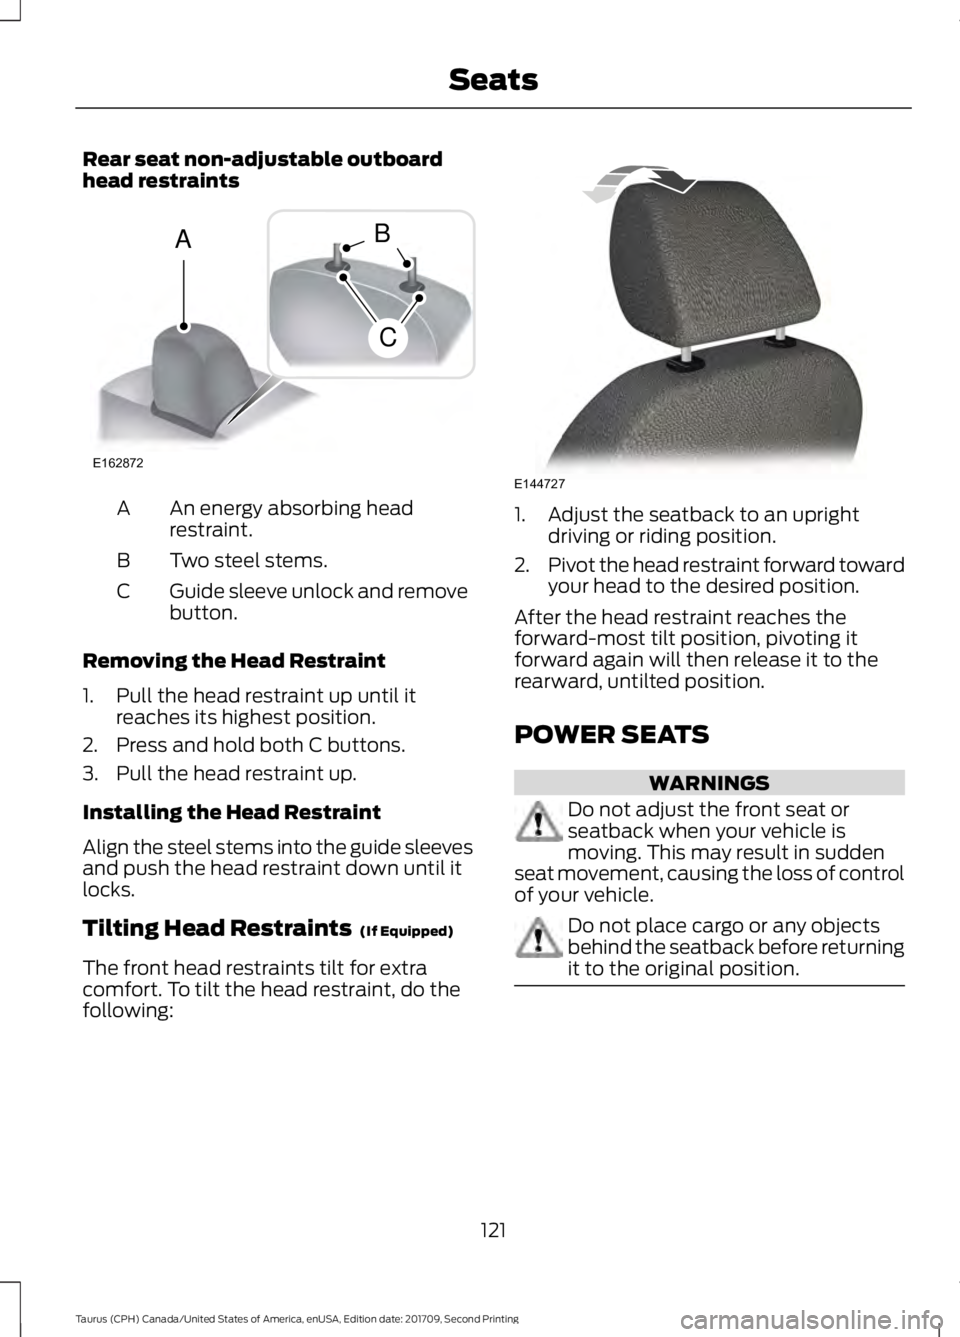
Rear seat non-adjustable outboard
head restraints
An energy absorbing head
restraint.
A
Two steel stems.
B
Guide sleeve unlock and remove
button.
C
Removing the Head Restraint
1. Pull the head restraint up until it reaches its highest position.
2. Press and hold both C buttons.
3. Pull the head restraint up.
Installing the Head Restraint
Align the steel stems into the guide sleeves
and push the head restraint down until it
locks.
Tilting Head Restraints (If Equipped)
The front head restraints tilt for extra
comfort. To tilt the head restraint, do the
following: 1. Adjust the seatback to an upright
driving or riding position.
2. Pivot the head restraint forward toward
your head to the desired position.
After the head restraint reaches the
forward-most tilt position, pivoting it
forward again will then release it to the
rearward, untilted position.
POWER SEATS WARNINGS
Do not adjust the front seat or
seatback when your vehicle is
moving. This may result in sudden
seat movement, causing the loss of control
of your vehicle. Do not place cargo or any objects
behind the seatback before returning
it to the original position.
121
Taurus (CPH) Canada/United States of America, enUSA, Edition date: 201709, Second Printing SeatsE162872
A
C
B E144727