FORD THUNDERBIRD 2003 11.G User Guide
Manufacturer: FORD, Model Year: 2003, Model line: THUNDERBIRD, Model: FORD THUNDERBIRD 2003 11.GPages: 200, PDF Size: 1.79 MB
Page 11 of 200
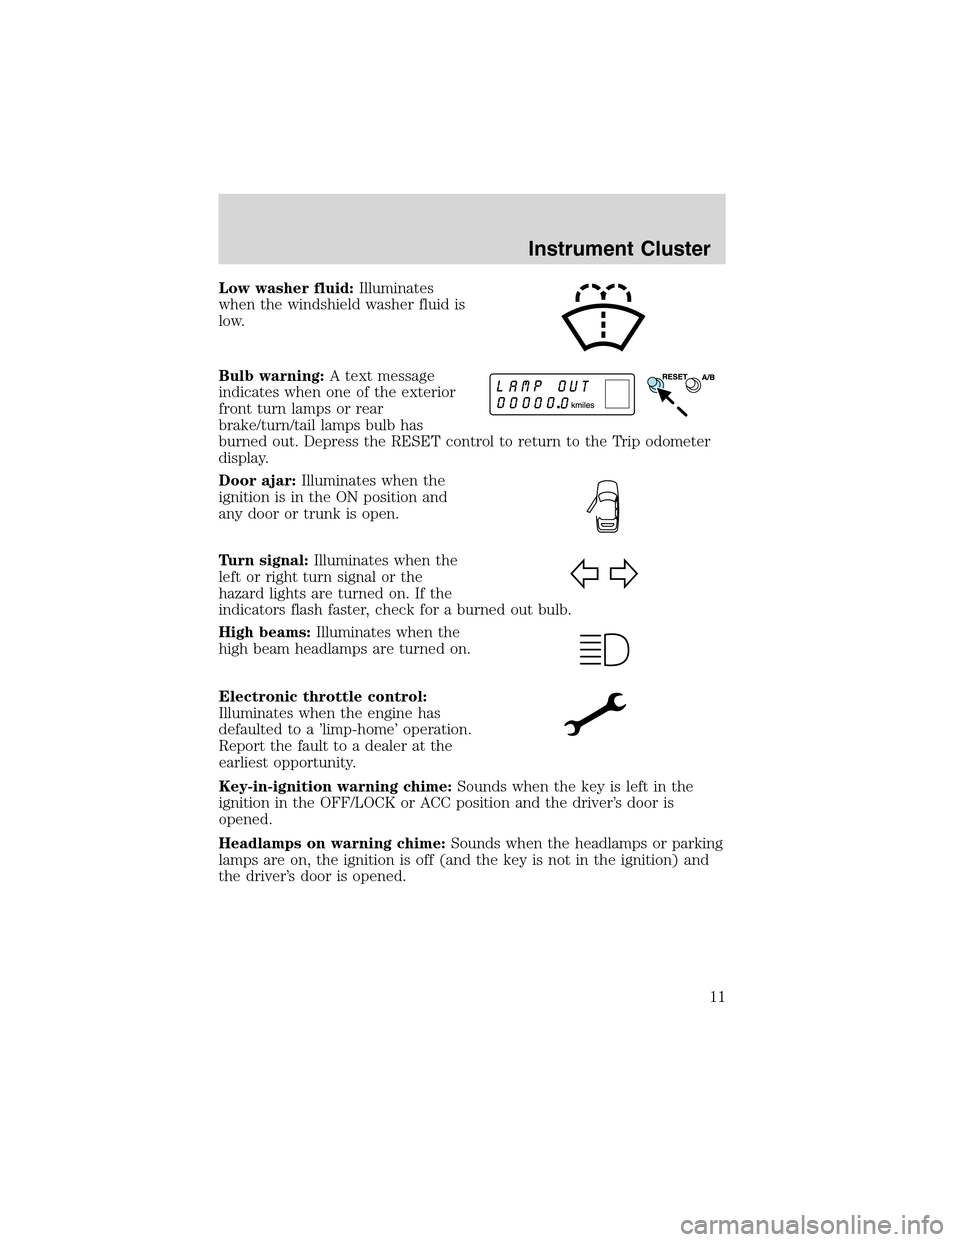
Low washer fluid:Illuminates
when the windshield washer fluid is
low.
Bulb warning:A text message
indicates when one of the exterior
front turn lamps or rear
brake/turn/tail lamps bulb has
burned out. Depress the RESET control to return to the Trip odometer
display.
Door ajar:Illuminates when the
ignition is in the ON position and
any door or trunk is open.
Turn signal:Illuminates when the
left or right turn signal or the
hazard lights are turned on. If the
indicators flash faster, check for a burned out bulb.
High beams:Illuminates when the
high beam headlamps are turned on.
Electronic throttle control:
Illuminates when the engine has
defaulted to a’limp-home’operation.
Report the fault to a dealer at the
earliest opportunity.
Key-in-ignition warning chime:Sounds when the key is left in the
ignition in the OFF/LOCK or ACC position and the driver’s door is
opened.
Headlamps on warning chime:Sounds when the headlamps or parking
lamps are on, the ignition is off (and the key is not in the ignition) and
the driver’s door is opened.
Instrument Cluster
11
Page 12 of 200
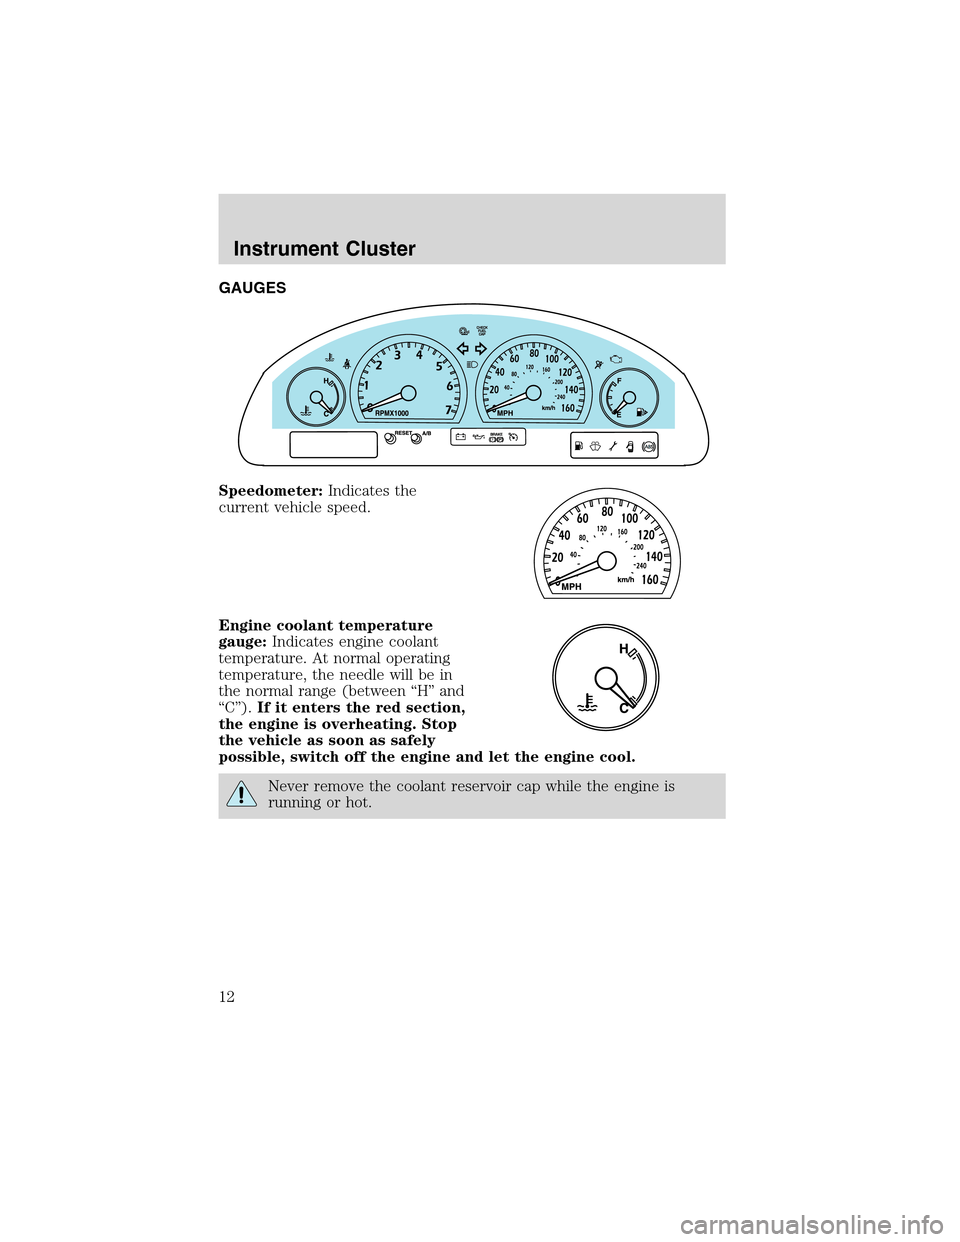
GAUGES
Speedometer:Indicates the
current vehicle speed.
Engine coolant temperature
gauge:Indicates engine coolant
temperature. At normal operating
temperature, the needle will be in
the normal range (between“H”and
“C”).If it enters the red section,
the engine is overheating. Stop
the vehicle as soon as safely
possible, switch off the engine and let the engine cool.
Never remove the coolant reservoir cap while the engine is
running or hot.
Instrument Cluster
12
Page 13 of 200
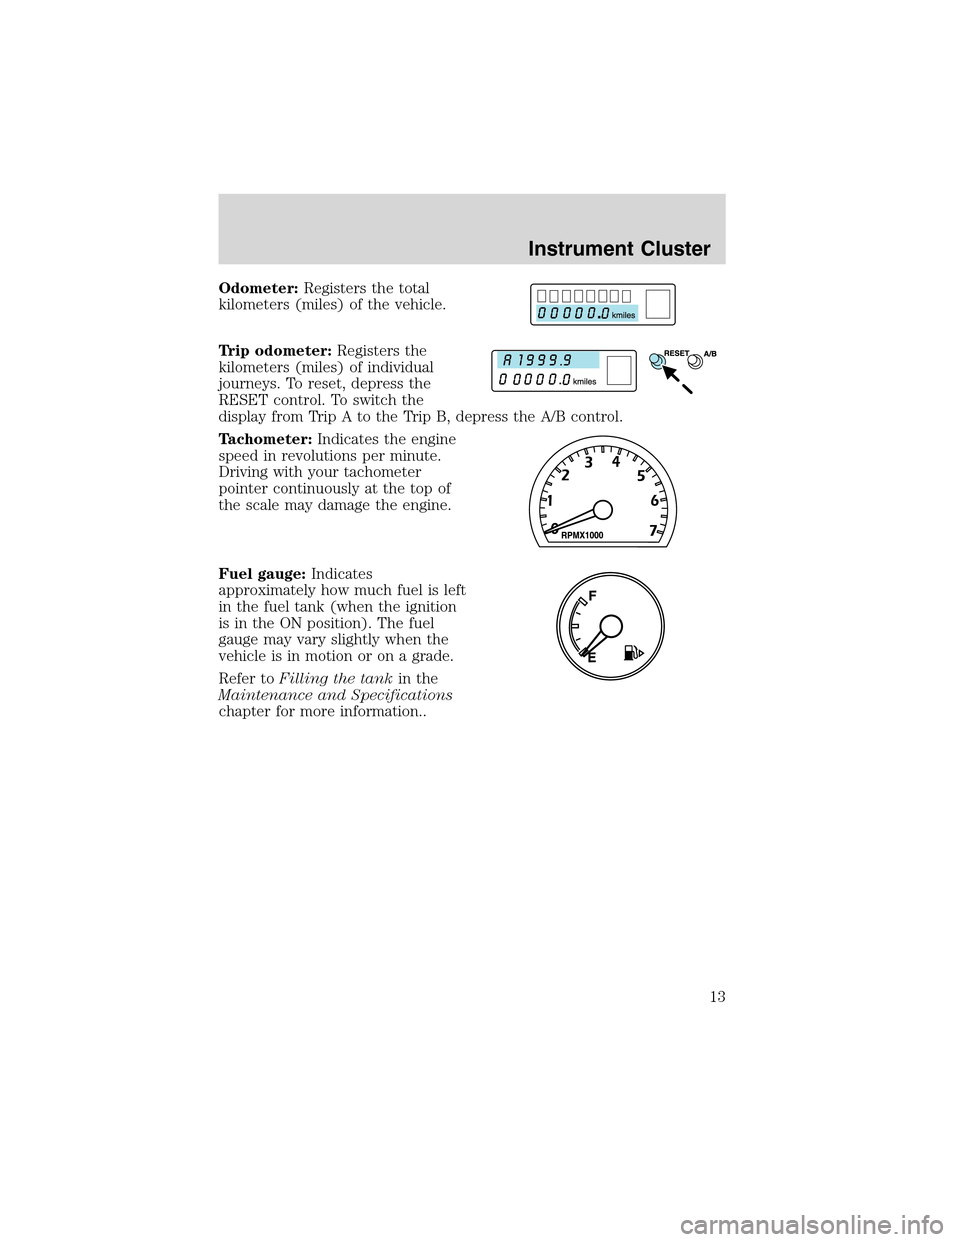
Odometer:Registers the total
kilometers (miles) of the vehicle.
Trip odometer:Registers the
kilometers (miles) of individual
journeys. To reset, depress the
RESET control. To switch the
display from Trip A to the Trip B, depress the A/B control.
Tachometer:Indicates the engine
speed in revolutions per minute.
Driving with your tachometer
pointer continuously at the top of
the scale may damage the engine.
Fuel gauge:Indicates
approximately how much fuel is left
in the fuel tank (when the ignition
is in the ON position). The fuel
gauge may vary slightly when the
vehicle is in motion or on a grade.
Refer toFilling the tankin the
Maintenance and Specifications
chapter for more information..
Instrument Cluster
13
Page 14 of 200
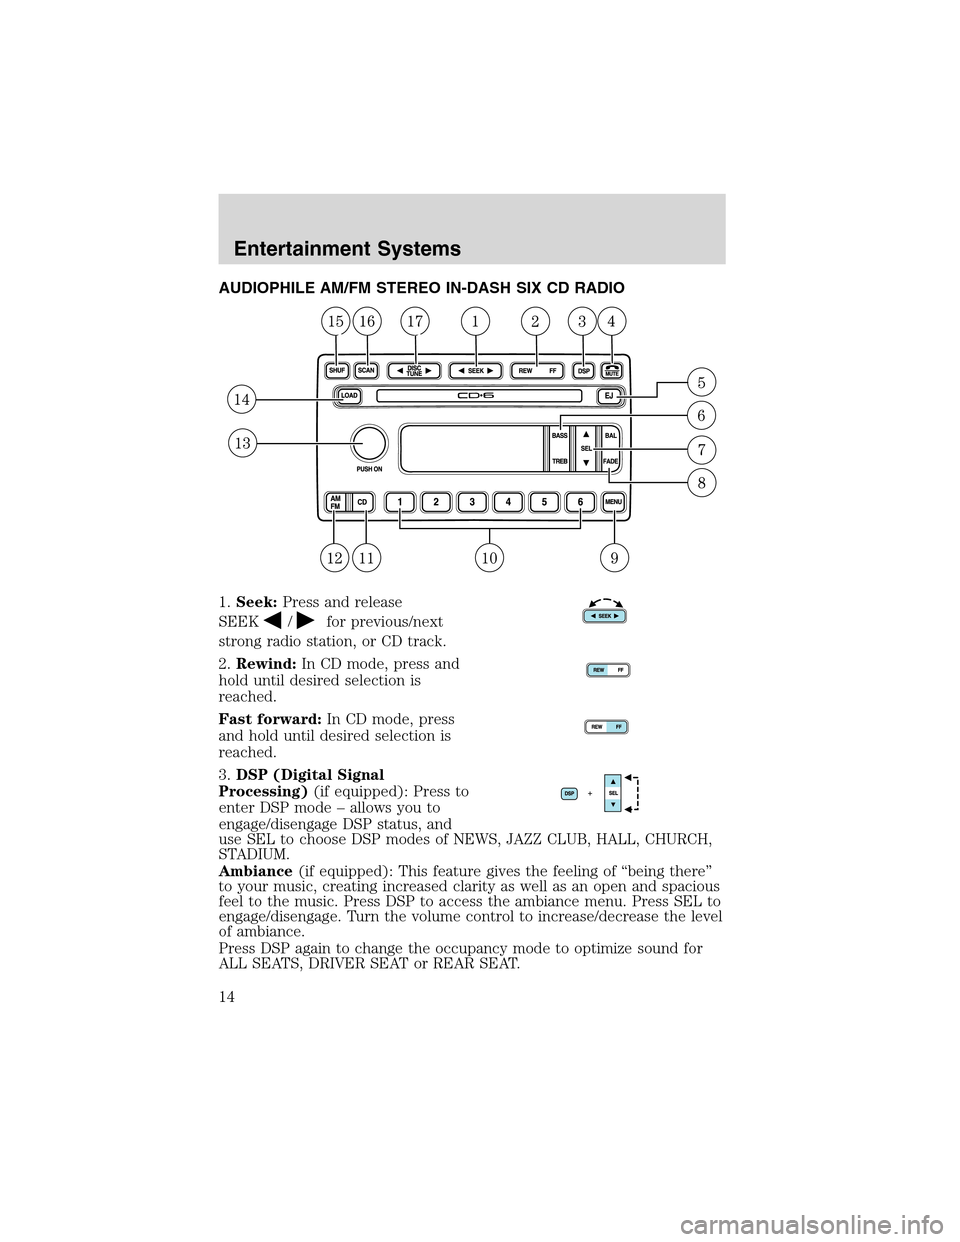
AUDIOPHILE AM/FM STEREO IN-DASH SIX CD RADIO
1.Seek:Press and release
SEEK
/for previous/next
strong radio station, or CD track.
2.Rewind:In CD mode, press and
hold until desired selection is
reached.
Fast forward:In CD mode, press
and hold until desired selection is
reached.
3.DSP (Digital Signal
Processing)(if equipped): Press to
enter DSP mode–allows you to
engage/disengage DSP status, and
use SEL to choose DSP modes of NEWS, JAZZ CLUB, HALL, CHURCH,
STADIUM.
Ambiance(if equipped): This feature gives the feeling of“being there”
to your music, creating increased clarity as well as an open and spacious
feel to the music. Press DSP to access the ambiance menu. Press SEL to
engage/disengage. Turn the volume control to increase/decrease the level
of ambiance.
Press DSP again to change the occupancy mode to optimize sound for
ALL SEATS, DRIVER SEAT or REAR SEAT.
Entertainment Systems
14
Page 15 of 200
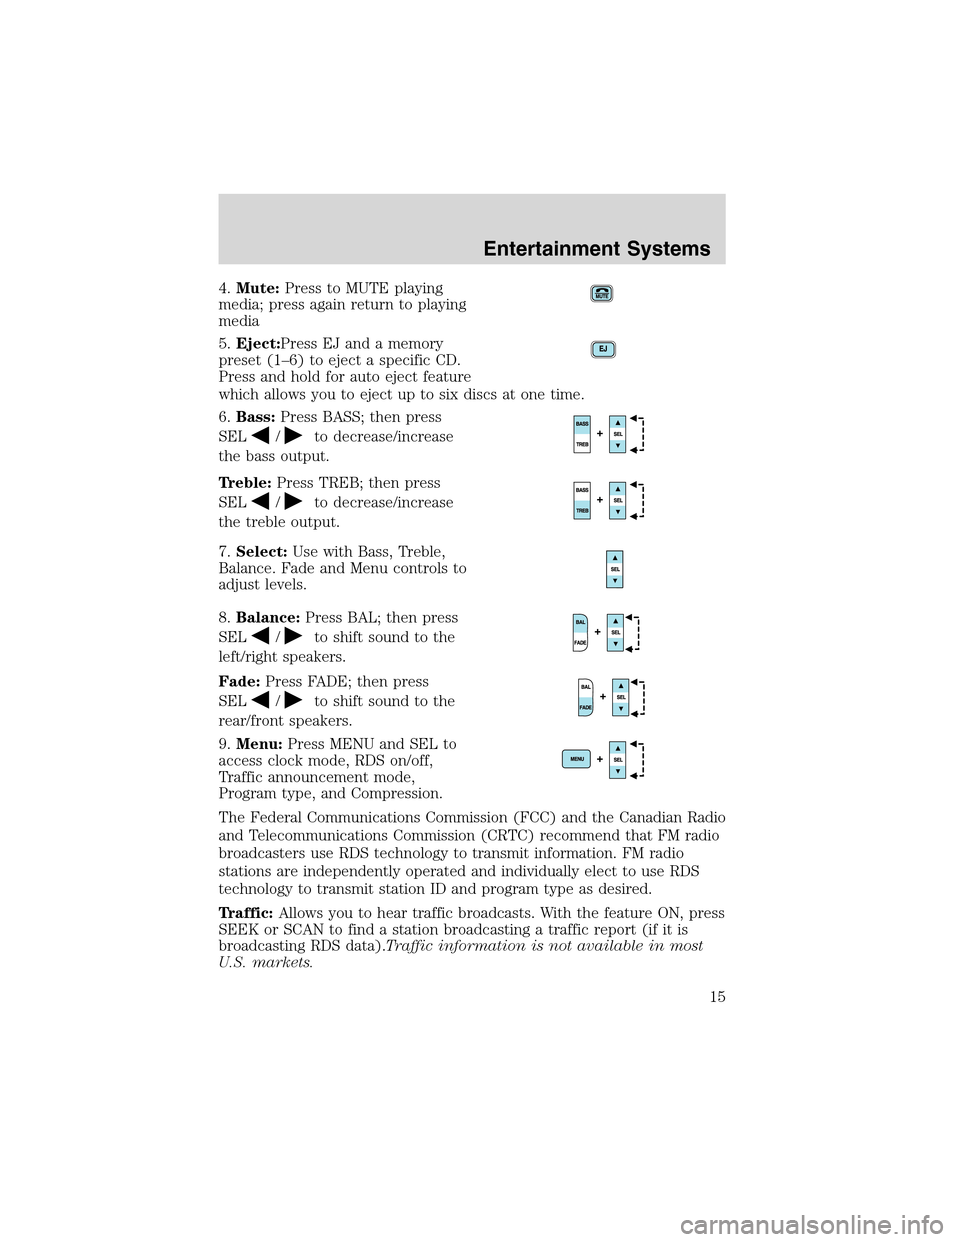
4.Mute:Press to MUTE playing
media; press again return to playing
media
5.Eject:Press EJ and a memory
preset (1–6) to eject a specific CD.
Press and hold for auto eject feature
which allows you to eject up to six discs at one time.
6.Bass:Press BASS; then press
SEL
/to decrease/increase
the bass output.
Treble:Press TREB; then press
SEL
/to decrease/increase
the treble output.
7.Select:Use with Bass, Treble,
Balance. Fade and Menu controls to
adjust levels.
8.Balance:Press BAL; then press
SEL
/to shift sound to the
left/right speakers.
Fade:Press FADE; then press
SEL
/to shift sound to the
rear/front speakers.
9.Menu:Press MENU and SEL to
access clock mode, RDS on/off,
Traffic announcement mode,
Program type, and Compression.
The Federal Communications Commission (FCC) and the Canadian Radio
and Telecommunications Commission (CRTC) recommend that FM radio
broadcasters use RDS technology to transmit information. FM radio
stations are independently operated and individually elect to use RDS
technology to transmit station ID and program type as desired.
Traffic:Allows you to hear traffic broadcasts. With the feature ON, press
SEEK or SCAN to find a station broadcasting a traffic report (if it is
broadcasting RDS data).Traffic information is not available in most
U.S. markets.
Entertainment Systems
15
Page 16 of 200
FIND Program type:Allows you to search RDS-equipped stations for a
certain category of music format: Classic, Country, Info, Jazz, Oldies,
R&B, Religious, Rock, Soft, Top 40.
Show TYPE:Displays the station’s call letters and format.
Compression:Brings soft and loud CD passages together for a more
consistent listening level. In CD mode, press MENU until COMP OFF is
displayed. Press SEL to engage the feature (COMP ON).
Setting the clock:Press MENU until SELECT HOUR or SELECT
MINUTE is displayed. Use SEL to manually increase (
) or decrease
(
) the hours/minutes. Press MENU again to disengage clock mode.
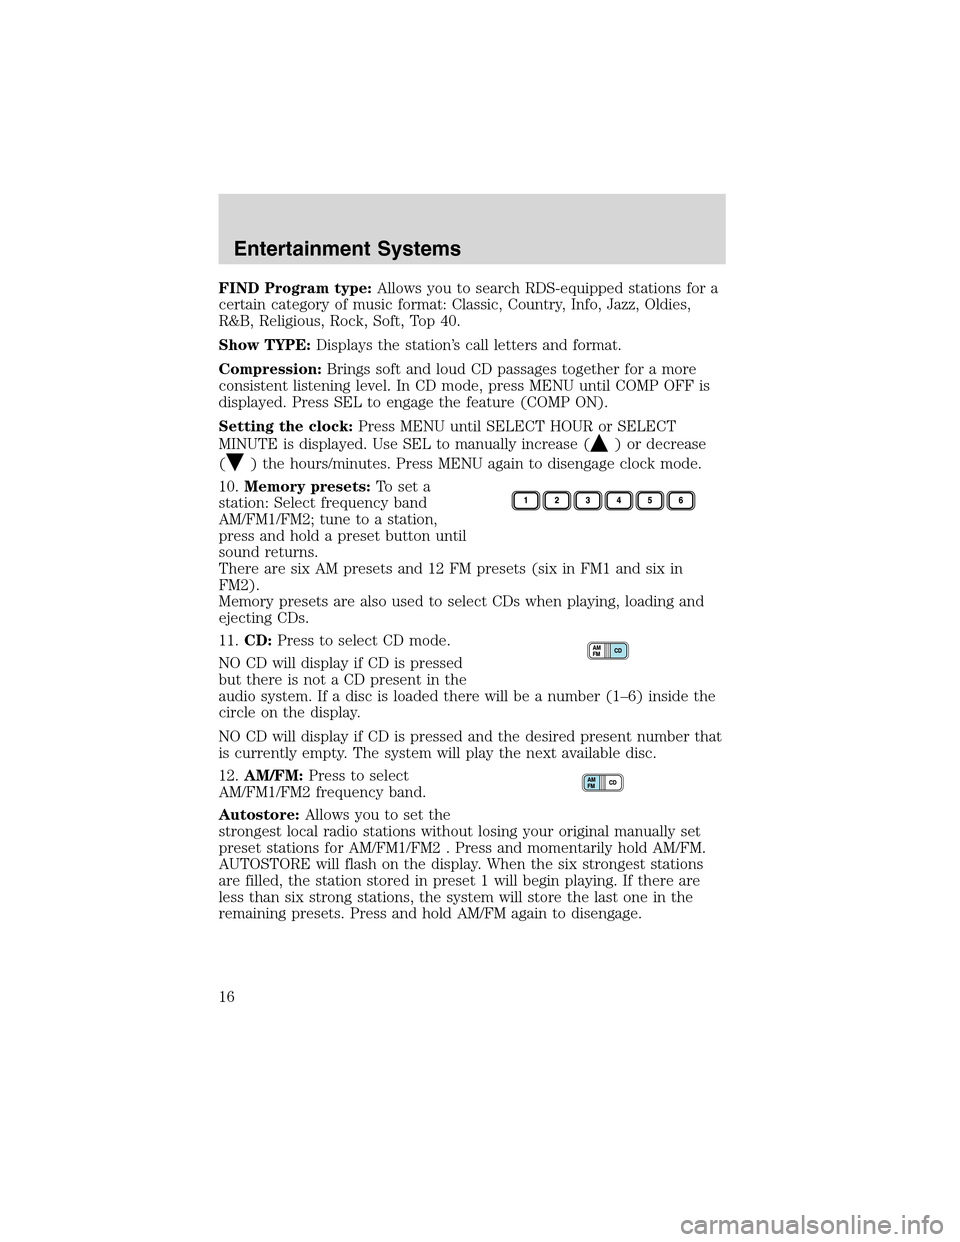
10.Memory presets:To set a
station: Select frequency band
AM/FM1/FM2; tune to a station,
press and hold a preset button until
sound returns.
There are six AM presets and 12 FM presets (six in FM1 and six in
FM2).
Memory presets are also used to select CDs when playing, loading and
ejecting CDs.
11.CD:Press to select CD mode.
NO CD will display if CD is pressed
but there is not a CD present in the
audio system. If a disc is loaded there will be a number (1–6) inside the
circle on the display.
NO CD will display if CD is pressed and the desired present number that
is currently empty. The system will play the next available disc.
12.AM/FM:Press to select
AM/FM1/FM2 frequency band.
Autostore:Allows you to set the
strongest local radio stations without losing your original manually set
preset stations for AM/FM1/FM2 . Press and momentarily hold AM/FM.
AUTOSTORE will flash on the display. When the six strongest stations
are filled, the station stored in preset 1 will begin playing. If there are
less than six strong stations, the system will store the last one in the
remaining presets. Press and hold AM/FM again to disengage.
Entertainment Systems
16
Page 17 of 200
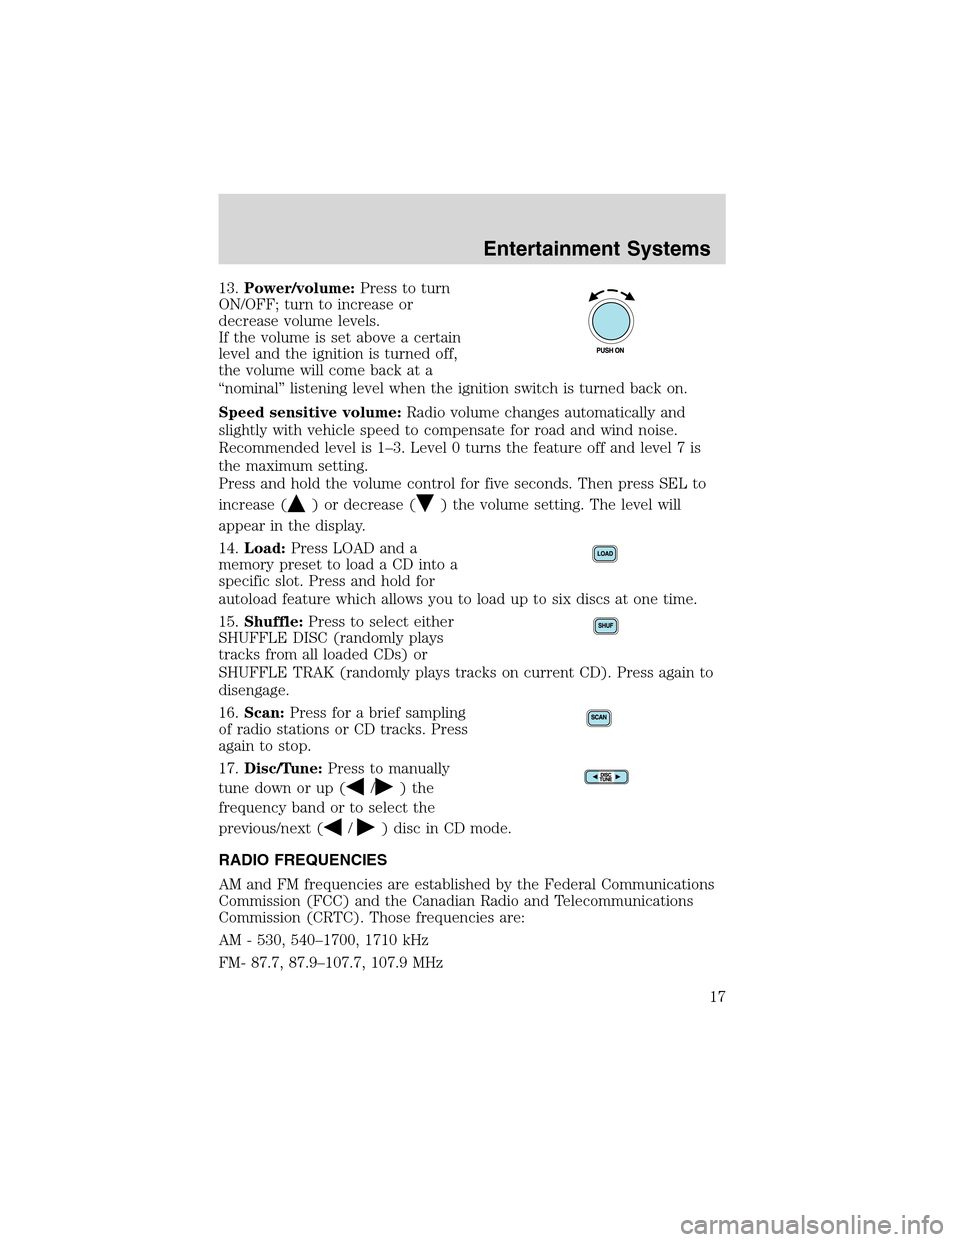
13.Power/volume:Press to turn
ON/OFF; turn to increase or
decrease volume levels.
If the volume is set above a certain
level and the ignition is turned off,
the volume will come back at a
“nominal”listening level when the ignition switch is turned back on.
Speed sensitive volume:Radio volume changes automatically and
slightly with vehicle speed to compensate for road and wind noise.
Recommended level is 1–3. Level 0 turns the feature off and level 7 is
the maximum setting.
Press and hold the volume control for five seconds. Then press SEL to
increase (
) or decrease () the volume setting. The level will
appear in the display.
14.Load:Press LOAD and a
memory preset to load a CD into a
specific slot. Press and hold for
autoload feature which allows you to load up to six discs at one time.
15.Shuffle:Press to select either
SHUFFLE DISC (randomly plays
tracks from all loaded CDs) or
SHUFFLE TRAK (randomly plays tracks on current CD). Press again to
disengage.
16.Scan:Press for a brief sampling
of radio stations or CD tracks. Press
again to stop.
17.Disc/Tune:Press to manually
tune down or up (
/)the
frequency band or to select the
previous/next (
/) disc in CD mode.
RADIO FREQUENCIES
AM and FM frequencies are established by the Federal Communications
Commission (FCC) and the Canadian Radio and Telecommunications
Commission (CRTC). Those frequencies are:
AM - 530, 540–1700, 1710 kHz
FM- 87.7, 87.9–107.7, 107.9 MHz
Entertainment Systems
17
Page 18 of 200
RADIO RECEPTION FACTORS
There are three factors that can effect radio reception:
•Distance/strength: The further you travel from an FM station, the
weaker the signal and the weaker the reception.
•Terrain: Hills, mountains, tall buildings, power lines, electric fences,
traffic lights and thunderstorms can interfere with your reception.
•Station overload: When you pass a broadcast tower, a stronger signal
may overtake a weaker one and play while the weak station frequency
is displayed.
CD/CD PLAYER CARE
Do:
•Handle discs by their edges only. Never touch the playing surface.
•Inspect discs before playing. Clean only with an approved CD cleaner
and wipe from the center out.
Don’t:
•Expose discs to direct sunlight or heat sources for extended periods
of time.
•Insert more than one disc into each slot of the CD changer magazine.
•Clean using a circular motion.
CD units are designed to play commercially pressed 12 cm (4.75
in) audio compact discs only. Due to technical incompatibility,
certain recordable and re-recordable compact discs may not
function correctly when used in Ford CD players. Irregular
shaped CDs, CDs with a scratch protection film attached, and CDs
with homemade paper (adhesive) labels should not be inserted
into the CD player. The label may peel and cause the CD to
become jammed. It is recommended that homemade CDs be
identified with permanent felt tip marker rather than adhesive
labels. Ball point pens may damage CDs. Please contact your
dealer for further information.
AUDIO SYSTEM WARRANTY AND SERVICE
Refer to theWarranty Guidefor audio system warranty information. If
service is necessary, see your dealer or qualified technician.
Entertainment Systems
18
Page 19 of 200
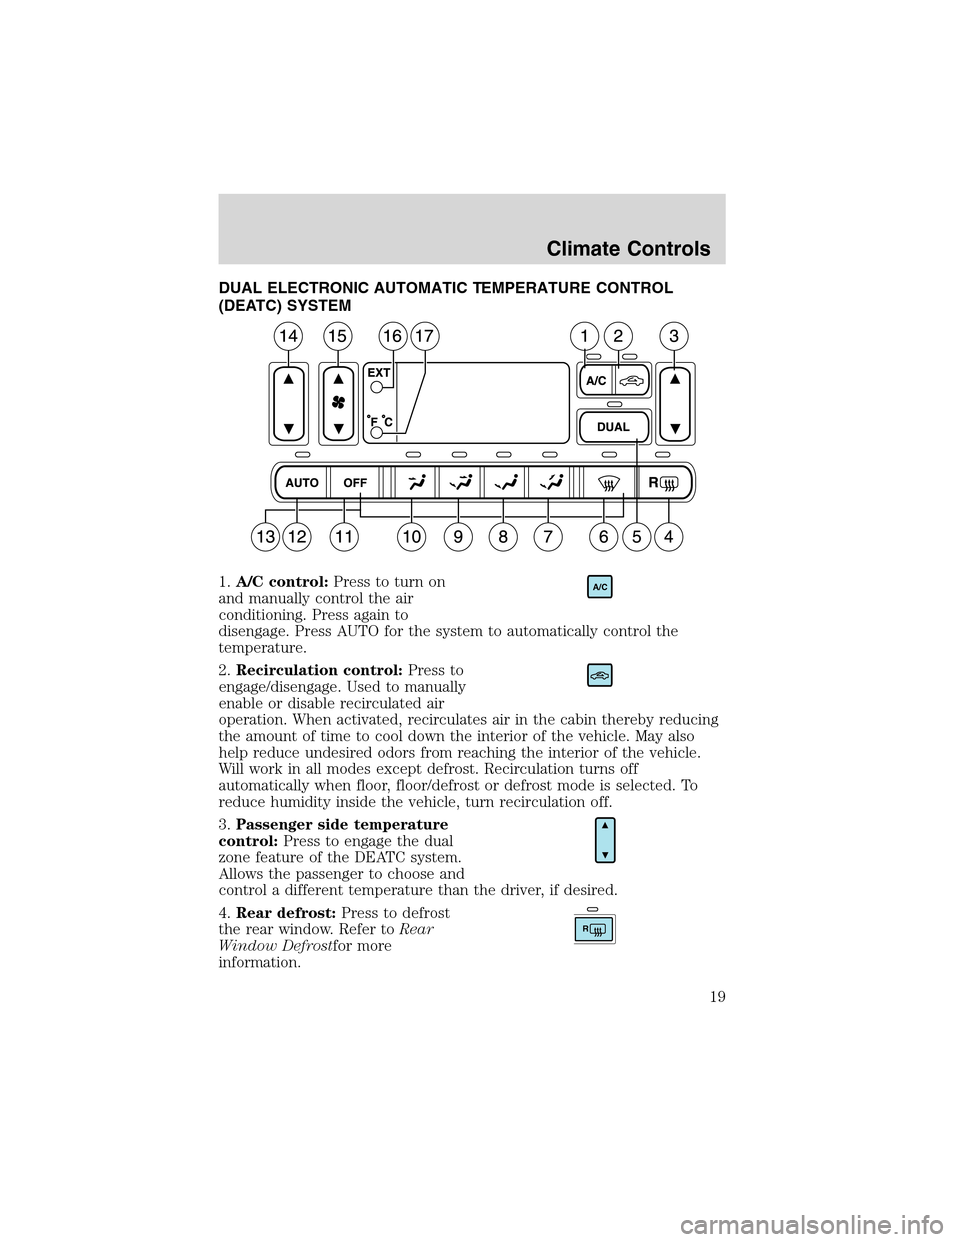
DUAL ELECTRONIC AUTOMATIC TEMPERATURE CONTROL
(DEATC) SYSTEM
1.A/C control:Press to turn on
and manually control the air
conditioning. Press again to
disengage. Press AUTO for the system to automatically control the
temperature.
2.Recirculation control:Press to
engage/disengage. Used to manually
enable or disable recirculated air
operation. When activated, recirculates air in the cabin thereby reducing
the amount of time to cool down the interior of the vehicle. May also
help reduce undesired odors from reaching the interior of the vehicle.
Will work in all modes except defrost. Recirculation turns off
automatically when floor, floor/defrost or defrost mode is selected. To
reduce humidity inside the vehicle, turn recirculation off.
3.Passenger side temperature
control:Press to engage the dual
zone feature of the DEATC system.
Allows the passenger to choose and
control a different temperature than the driver, if desired.
4.Rear defrost:Press to defrost
the rear window. Refer toRear
Window Defrostfor more
information.
A/C
R
Climate Controls
19
Page 20 of 200
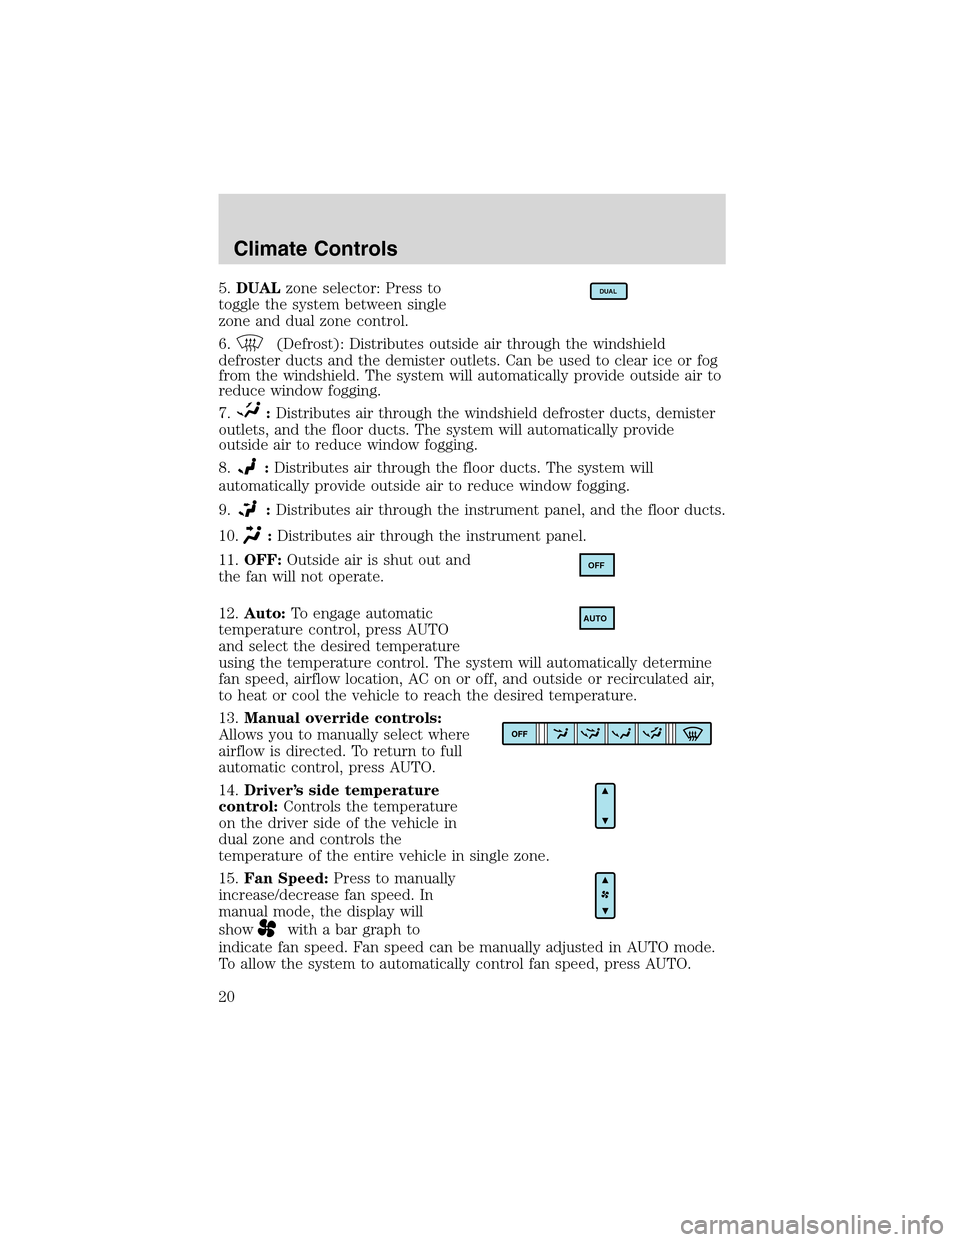
5.DUALzone selector: Press to
toggle the system between single
zone and dual zone control.
6.
(Defrost): Distributes outside air through the windshield
defroster ducts and the demister outlets. Can be used to clear ice or fog
from the windshield. The system will automatically provide outside air to
reduce window fogging.
7.
:Distributes air through the windshield defroster ducts, demister
outlets, and the floor ducts. The system will automatically provide
outside air to reduce window fogging.
8.
:Distributes air through the floor ducts. The system will
automatically provide outside air to reduce window fogging.
9.
:Distributes air through the instrument panel, and the floor ducts.
10.
:Distributes air through the instrument panel.
11.OFF:Outside air is shut out and
the fan will not operate.
12.Auto:To engage automatic
temperature control, press AUTO
and select the desired temperature
using the temperature control. The system will automatically determine
fan speed, airflow location, AC on or off, and outside or recirculated air,
to heat or cool the vehicle to reach the desired temperature.
13.Manual override controls:
Allows you to manually select where
airflow is directed. To return to full
automatic control, press AUTO.
14.Driver’s side temperature
control:Controls the temperature
on the driver side of the vehicle in
dual zone and controls the
temperature of the entire vehicle in single zone.
15.Fan Speed:Press to manually
increase/decrease fan speed. In
manual mode, the display will
show
with a bar graph to
indicate fan speed. Fan speed can be manually adjusted in AUTO mode.
To allow the system to automatically control fan speed, press AUTO.
DUAL
OFF
AUTO
Climate Controls
20