lights FORD THUNDERBIRD 2003 11.G User Guide
[x] Cancel search | Manufacturer: FORD, Model Year: 2003, Model line: THUNDERBIRD, Model: FORD THUNDERBIRD 2003 11.GPages: 200, PDF Size: 1.79 MB
Page 30 of 200
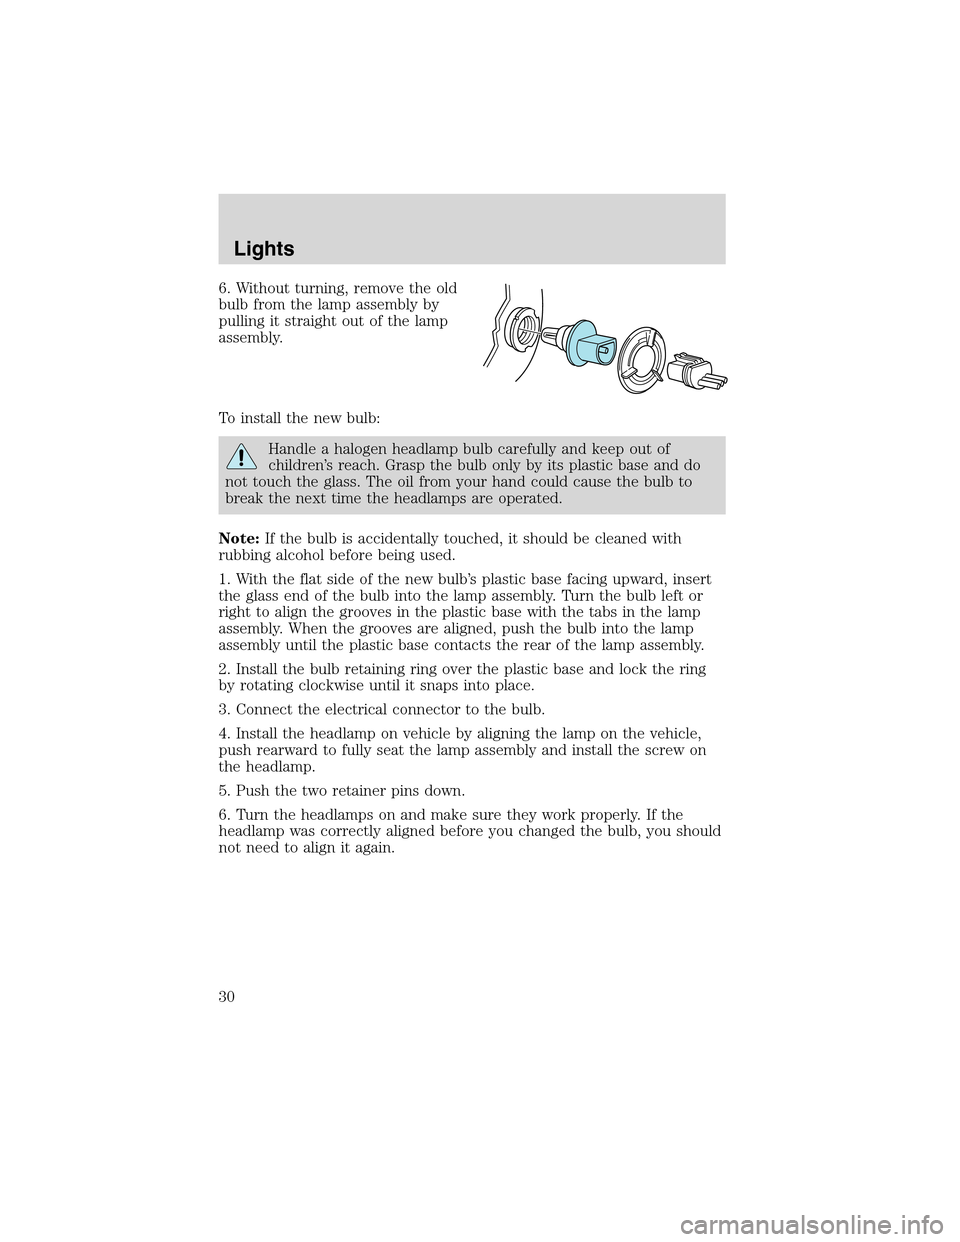
6. Without turning, remove the old
bulb from the lamp assembly by
pulling it straight out of the lamp
assembly.
To install the new bulb:
Handle a halogen headlamp bulb carefully and keep out of
children’s reach. Grasp the bulb only by its plastic base and do
not touch the glass. The oil from your hand could cause the bulb to
break the next time the headlamps are operated.
Note:If the bulb is accidentally touched, it should be cleaned with
rubbing alcohol before being used.
1. With the flat side of the new bulb’s plastic base facing upward, insert
the glass end of the bulb into the lamp assembly. Turn the bulb left or
right to align the grooves in the plastic base with the tabs in the lamp
assembly. When the grooves are aligned, push the bulb into the lamp
assembly until the plastic base contacts the rear of the lamp assembly.
2. Install the bulb retaining ring over the plastic base and lock the ring
by rotating clockwise until it snaps into place.
3. Connect the electrical connector to the bulb.
4. Install the headlamp on vehicle by aligning the lamp on the vehicle,
push rearward to fully seat the lamp assembly and install the screw on
the headlamp.
5. Push the two retainer pins down.
6. Turn the headlamps on and make sure they work properly. If the
headlamp was correctly aligned before you changed the bulb, you should
not need to align it again.
Lights
30
Page 31 of 200
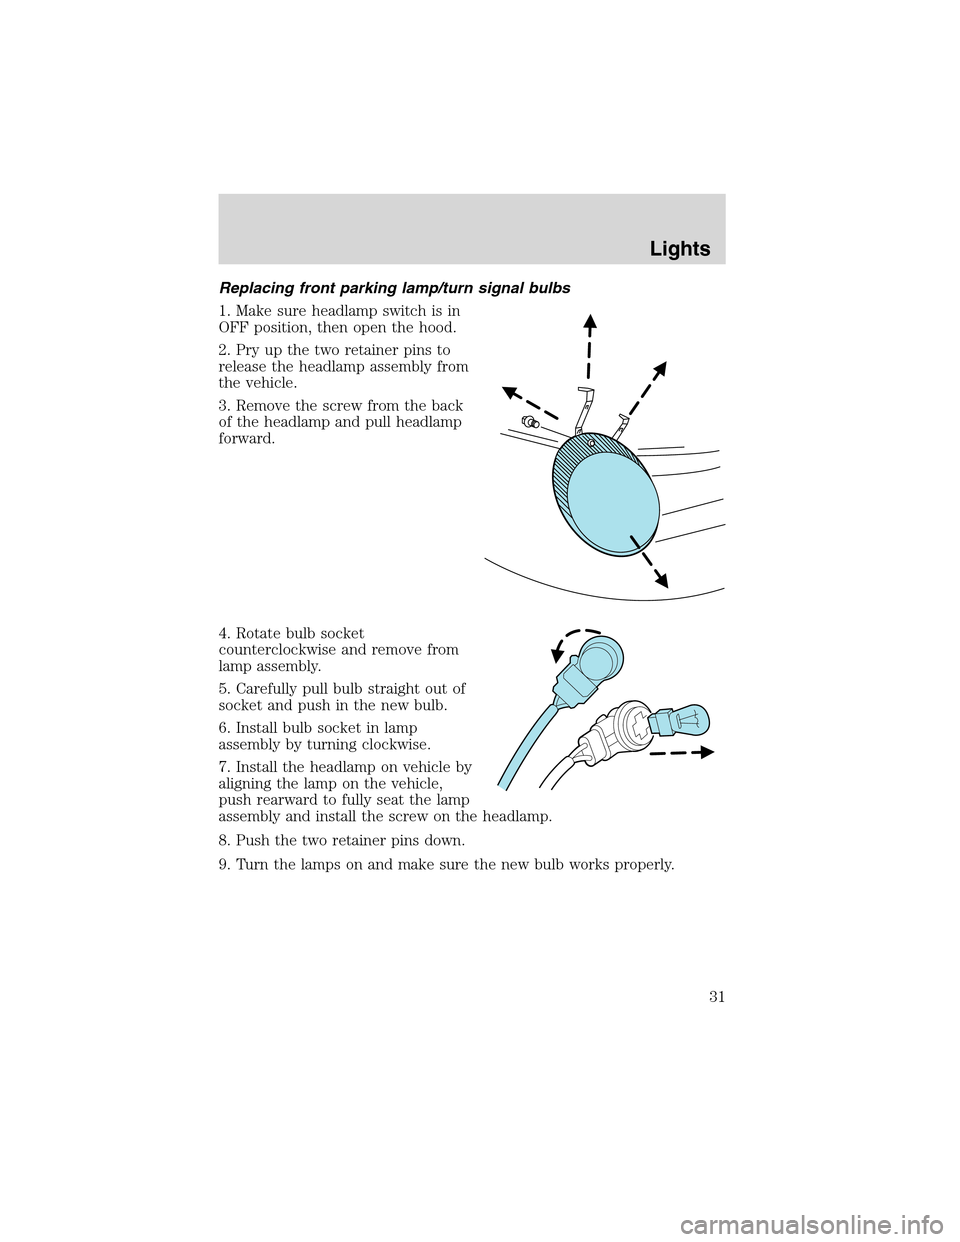
Replacing front parking lamp/turn signal bulbs
1. Make sure headlamp switch is in
OFF position, then open the hood.
2. Pry up the two retainer pins to
release the headlamp assembly from
the vehicle.
3. Remove the screw from the back
of the headlamp and pull headlamp
forward.
4. Rotate bulb socket
counterclockwise and remove from
lamp assembly.
5. Carefully pull bulb straight out of
socket and push in the new bulb.
6. Install bulb socket in lamp
assembly by turning clockwise.
7. Install the headlamp on vehicle by
aligning the lamp on the vehicle,
push rearward to fully seat the lamp
assembly and install the screw on the headlamp.
8. Push the two retainer pins down.
9. Turn the lamps on and make sure the new bulb works properly.
Lights
31
Page 32 of 200
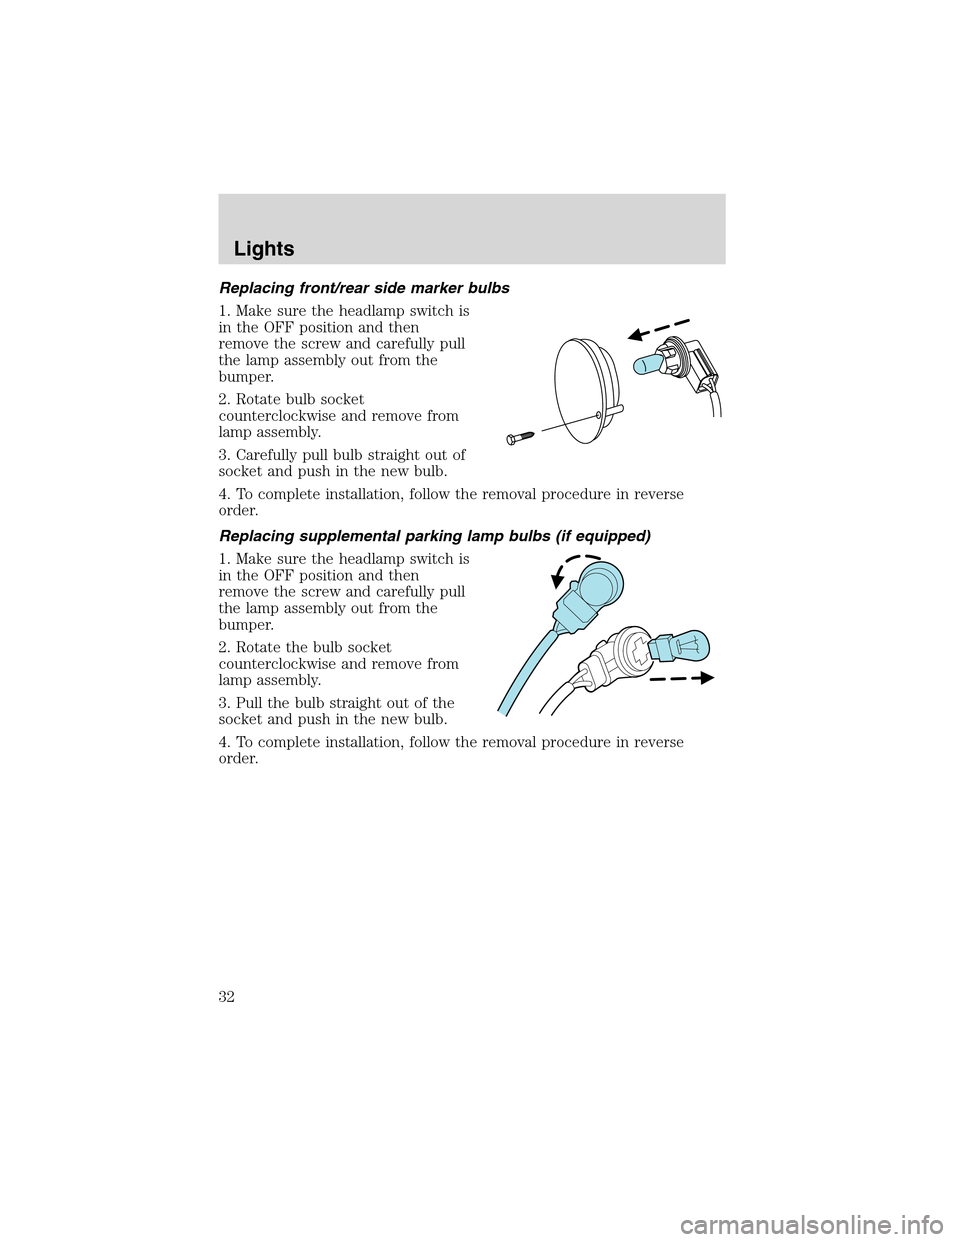
Replacing front/rear side marker bulbs
1. Make sure the headlamp switch is
in the OFF position and then
remove the screw and carefully pull
the lamp assembly out from the
bumper.
2. Rotate bulb socket
counterclockwise and remove from
lamp assembly.
3. Carefully pull bulb straight out of
socket and push in the new bulb.
4. To complete installation, follow the removal procedure in reverse
order.
Replacing supplemental parking lamp bulbs (if equipped)
1. Make sure the headlamp switch is
in the OFF position and then
remove the screw and carefully pull
the lamp assembly out from the
bumper.
2. Rotate the bulb socket
counterclockwise and remove from
lamp assembly.
3. Pull the bulb straight out of the
socket and push in the new bulb.
4. To complete installation, follow the removal procedure in reverse
order.
Lights
32
Page 33 of 200
Replacing tail/brake/turn/backup lamp bulbs
The tail/brake//turn/backup bulbs are located in the tail lamp assembly,
one just below the other. Follow the same steps to replace either bulb:
Prior to pulling the carpet away, in
step 1, the trunk trim scuff plate
must be removed. This can be
accomplished by pulling gently on
the component until the 6 push pins
along the rear of the trunk release.
The part can be placed aside and
the carpet pulled away. To replace
the piece, re-align the pins and push
into place.
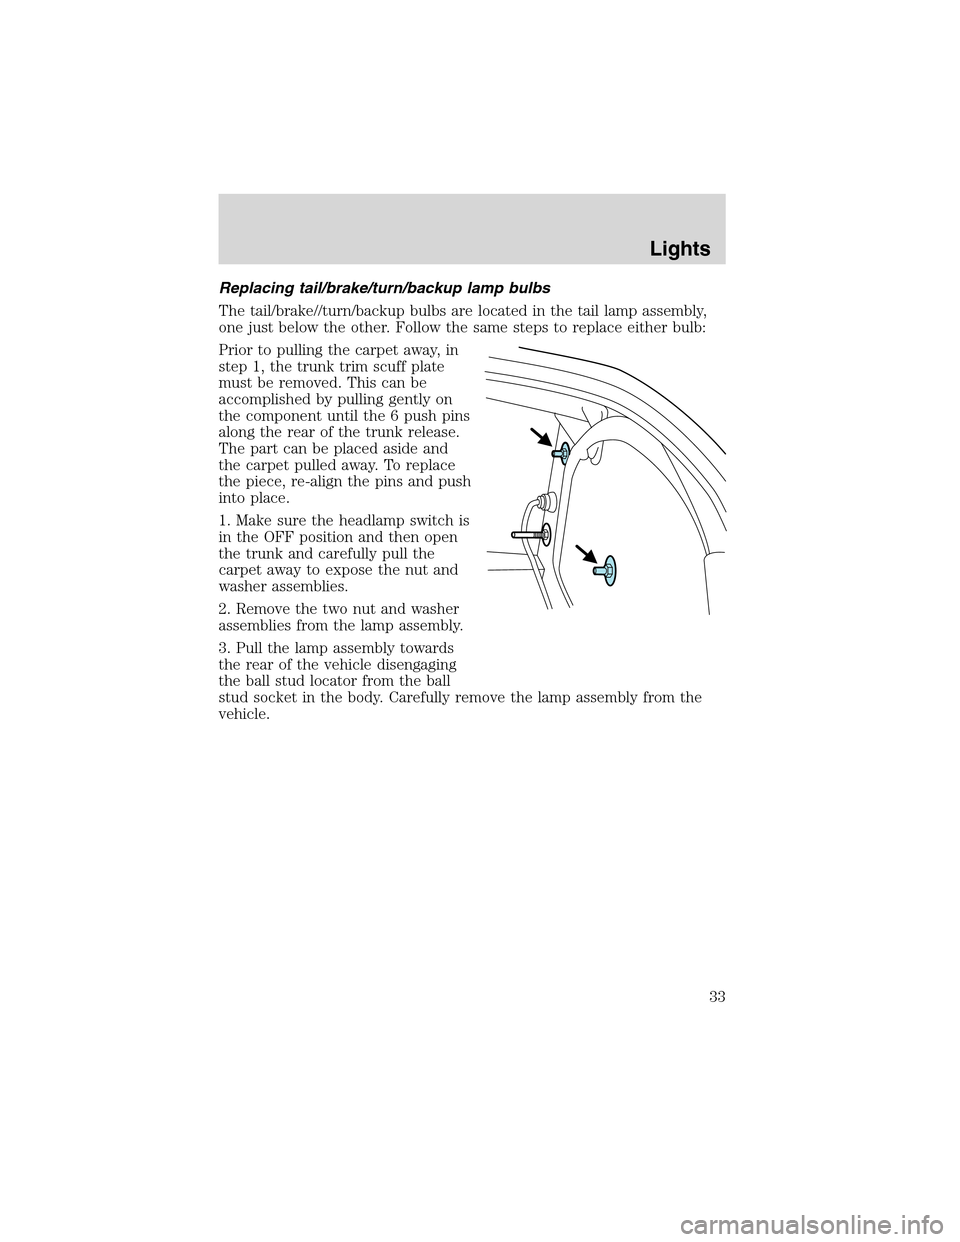
1. Make sure the headlamp switch is
in the OFF position and then open
the trunk and carefully pull the
carpet away to expose the nut and
washer assemblies.
2. Remove the two nut and washer
assemblies from the lamp assembly.
3. Pull the lamp assembly towards
the rear of the vehicle disengaging
the ball stud locator from the ball
stud socket in the body. Carefully remove the lamp assembly from the
vehicle.
Lights
33
Page 34 of 200
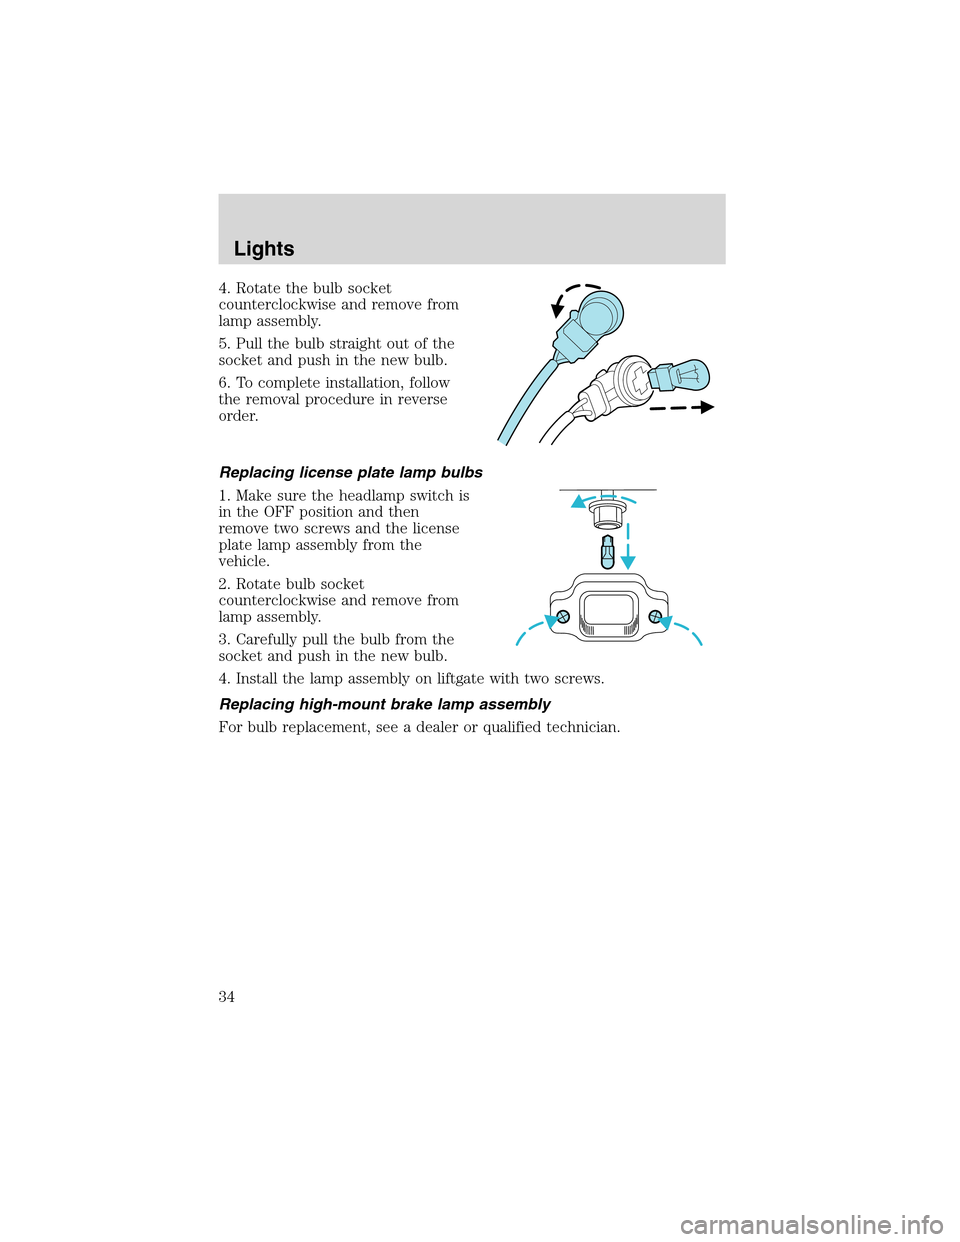
4. Rotate the bulb socket
counterclockwise and remove from
lamp assembly.
5. Pull the bulb straight out of the
socket and push in the new bulb.
6. To complete installation, follow
the removal procedure in reverse
order.
Replacing license plate lamp bulbs
1. Make sure the headlamp switch is
in the OFF position and then
remove two screws and the license
plate lamp assembly from the
vehicle.
2. Rotate bulb socket
counterclockwise and remove from
lamp assembly.
3. Carefully pull the bulb from the
socket and push in the new bulb.
4. Install the lamp assembly on liftgate with two screws.
Replacing high-mount brake lamp assembly
For bulb replacement, see a dealer or qualified technician.
Lights
34
Page 56 of 200
Doorkeyunlocking/locking
Unlocking the doors
Turn the key in the door cylinder to unlock the driver’s door.
The illuminated entry feature will turn on all the interior lamps for 25
seconds or until the ignition is turned to the RUN position.
The inside lights will not turn off if:
•they have been turned on using the dimmer control or
•any door is open.
The battery saver feature will turn off the interior lamps 30 minutes after
the ignition is turned to the OFF position.
Locking the doors
Turn the key in the door cylinder to lock the driver’s door.Note:Locking
the driver’s door using a key does not arm the perimeter alarm.
INTERIOR LUGGAGE COMPARTMENT RELEASE
Your vehicle is equipped with a mechanical interior luggage compartment
release handle that provides a means of escape for children and adults in
the event they become locked inside the luggage compartment.
Adults are advised to familiarize themselves with the operation and
location of the release handle.
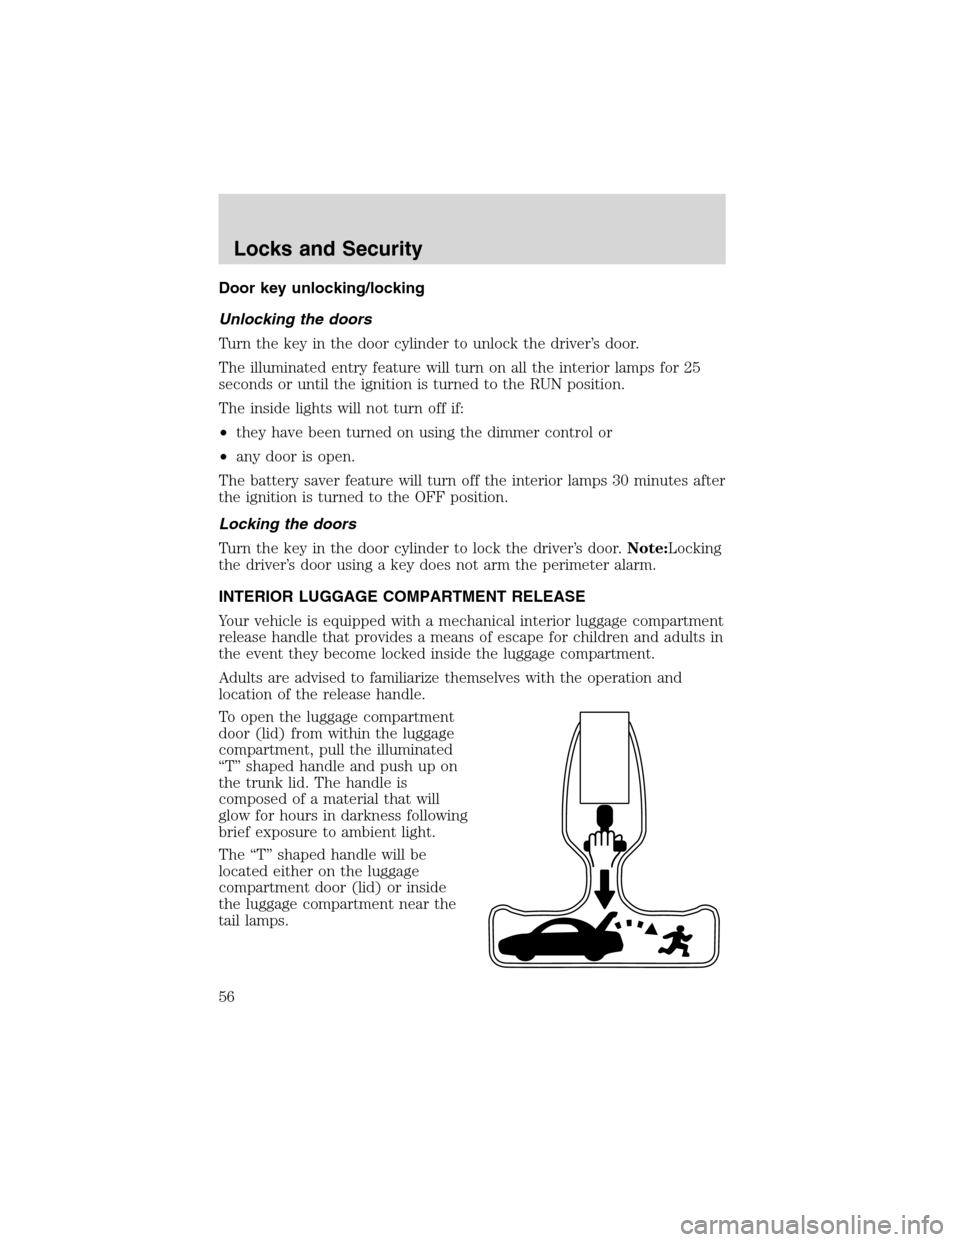
To open the luggage compartment
door (lid) from within the luggage
compartment, pull the illuminated
“T”shaped handle and push up on
the trunk lid. The handle is
composed of a material that will
glow for hours in darkness following
brief exposure to ambient light.
The“T”shaped handle will be
located either on the luggage
compartment door (lid) or inside
the luggage compartment near the
tail lamps.
Locks and Security
56
Page 58 of 200
If there is any potential remote keyless entry problem with your vehicle,
ensureALL remote entry transmittersare taken to your authorized
dealer to aid in troubleshooting.
Locking the doors
1. Pressand release to lock all the doors and activate the anti-theft
system.Note:the turn signal lamps will flash once to confirm the doors,
trunk and hood are closed.
2. Press
and release again within three seconds to confirm that all the
doors, trunk and hood are closed and locked.Note:the doors will lock
again, and the horn will chirp once.
If any of the doors , the trunk or the hood are not properly closed the
horn will make two quick chirps.
Unlocking the doors
1. Pressand release to unlock the driver’s door and deactivate the
perimeter alarm (if activated).Note:The interior lamps will illuminate.
2. Press
and release again within three seconds to unlock all the
doors.
The remote entry system comes with an illuminated entry feature. This
feature turns on the interior lamps for 25 seconds or until the ignition is
turned to the RUN position.
The inside lights will not turn off if:
•they have been turned on using the dimmer control or
•any door is open.
The battery saver feature will turn off the interior lamps 30 minutes after
the ignition is turned to the OFF position.
Opening the trunk
Pressonce to open the trunk.
•Ensure that the trunk is closed and latched before driving your
vehicle. Failure to properly latch the trunk may cause objects to fall
out or block the driver’s rear view.
Sounding a panic alarm
Press
to activate the alarm. The horn will sound for a maximum of
30 seconds and the turn signal lamps will flash for a maximum of 5
Locks and Security
58
Page 60 of 200
Howto reprogram your remote entry transmitters
You must haveall remote entry transmitters(maximum of four)
available before beginning this procedure.
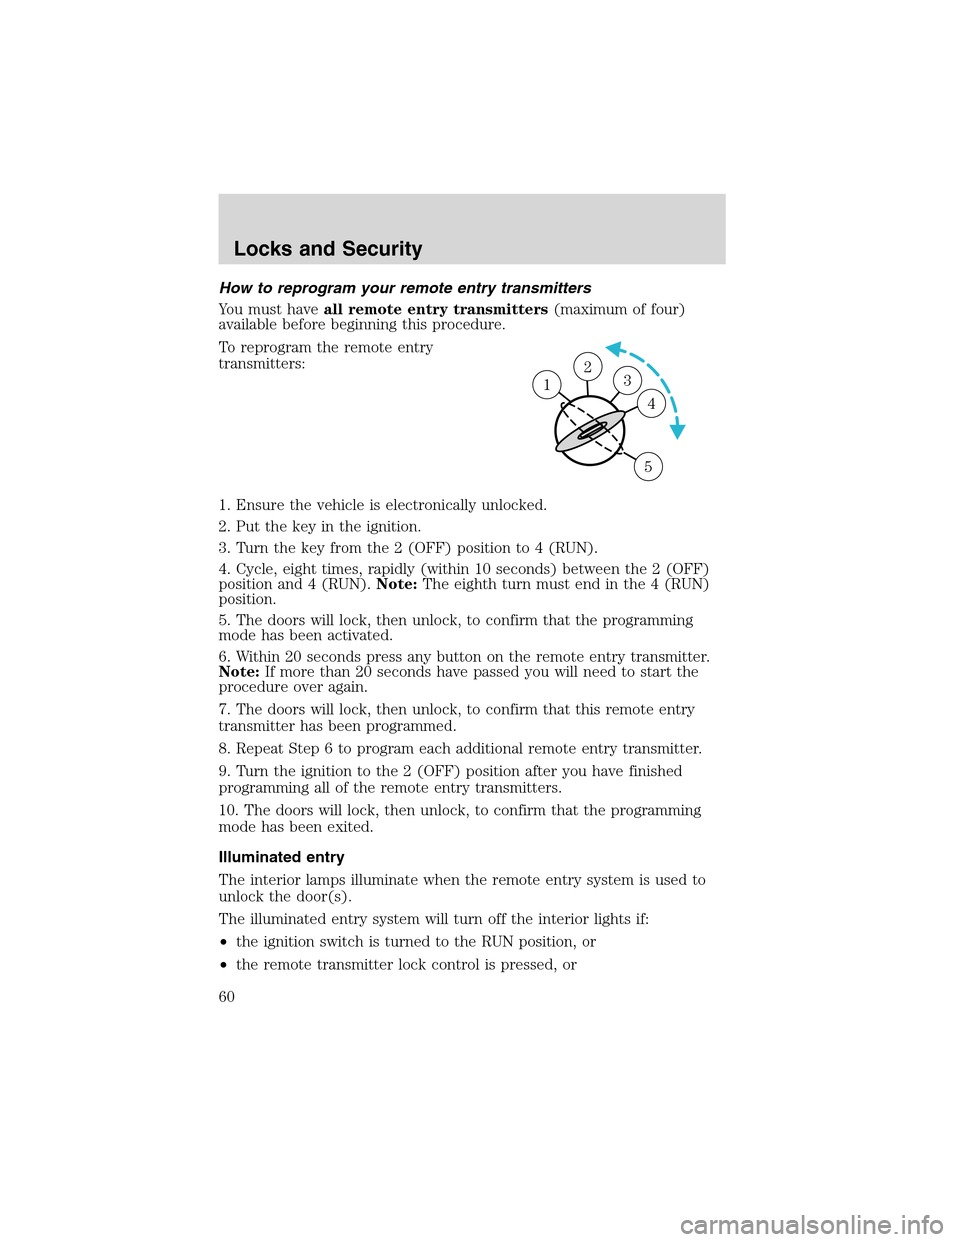
To reprogram the remote entry
transmitters:
1. Ensure the vehicle is electronically unlocked.
2. Put the key in the ignition.
3. Turn the key from the 2 (OFF) position to 4 (RUN).
4. Cycle, eight times, rapidly (within 10 seconds) between the 2 (OFF)
position and 4 (RUN).Note:The eighth turn must end in the 4 (RUN)
position.
5. The doors will lock, then unlock, to confirm that the programming
mode has been activated.
6. Within 20 seconds press any button on the remote entry transmitter.
Note:If more than 20 seconds have passed you will need to start the
procedure over again.
7. The doors will lock, then unlock, to confirm that this remote entry
transmitter has been programmed.
8. Repeat Step 6 to program each additional remote entry transmitter.
9. Turn the ignition to the 2 (OFF) position after you have finished
programming all of the remote entry transmitters.
10. The doors will lock, then unlock, to confirm that the programming
mode has been exited.
Illuminated entry
The interior lamps illuminate when the remote entry system is used to
unlock the door(s).
The illuminated entry system will turn off the interior lights if:
•the ignition switch is turned to the RUN position, or
•the remote transmitter lock control is pressed, or
23 1
4
5
Locks and Security
60
Page 61 of 200
•after 25 seconds of illumination.
The inside lights will not turn off if:
•they have been turned on with the dimmer control, or
•any door is open.
The battery saver will shut off the interior lamps 30 minutes after the
ignition has been turned to the OFF position.
Autolock
The autolock feature will lock the vehicle’s doors when:
•all the doors are closed,
•the ignition is in the RUN position, and
•you shift into forward or reverse, putting the vehicle in motion.
Relock
The autolock feature repeats when:
•either door is opened then closed while the ignition is in the RUN
position,
•you shift into forward or reverse, and
•you put the vehicle in motion by releasing the brake pedal.
Deactivating/activating autolock
Your vehicle comes with the autolock feature activated. There are two
methods to enable/disable this feature: One is through your dealer, and
the second is using a power door unlock/lock sequence.
Before following the activation or deactivation procedures, make sure
that the anti-theft system is not activated, ignition is off, and the vehicle
doors are closed.
Power door unlock/lock procedure
You must complete steps 1-5 within
30 seconds or the procedure will
have to be repeated.
1. Turn the ignition to the RUN
position.
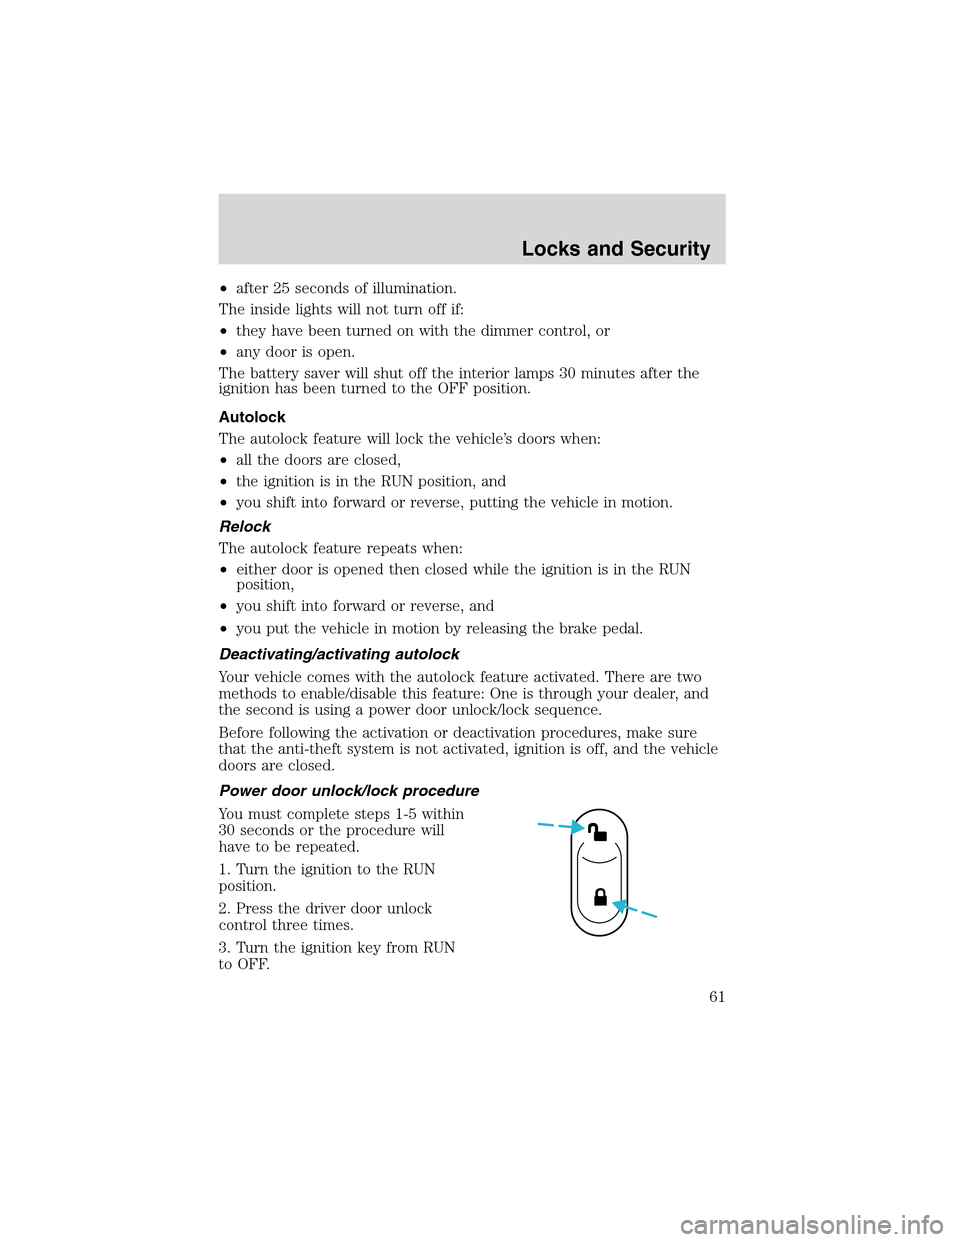
2. Press the driver door unlock
control three times.
3. Turn the ignition key from RUN
to OFF.
Locks and Security
61
Page 102 of 200
STARTING
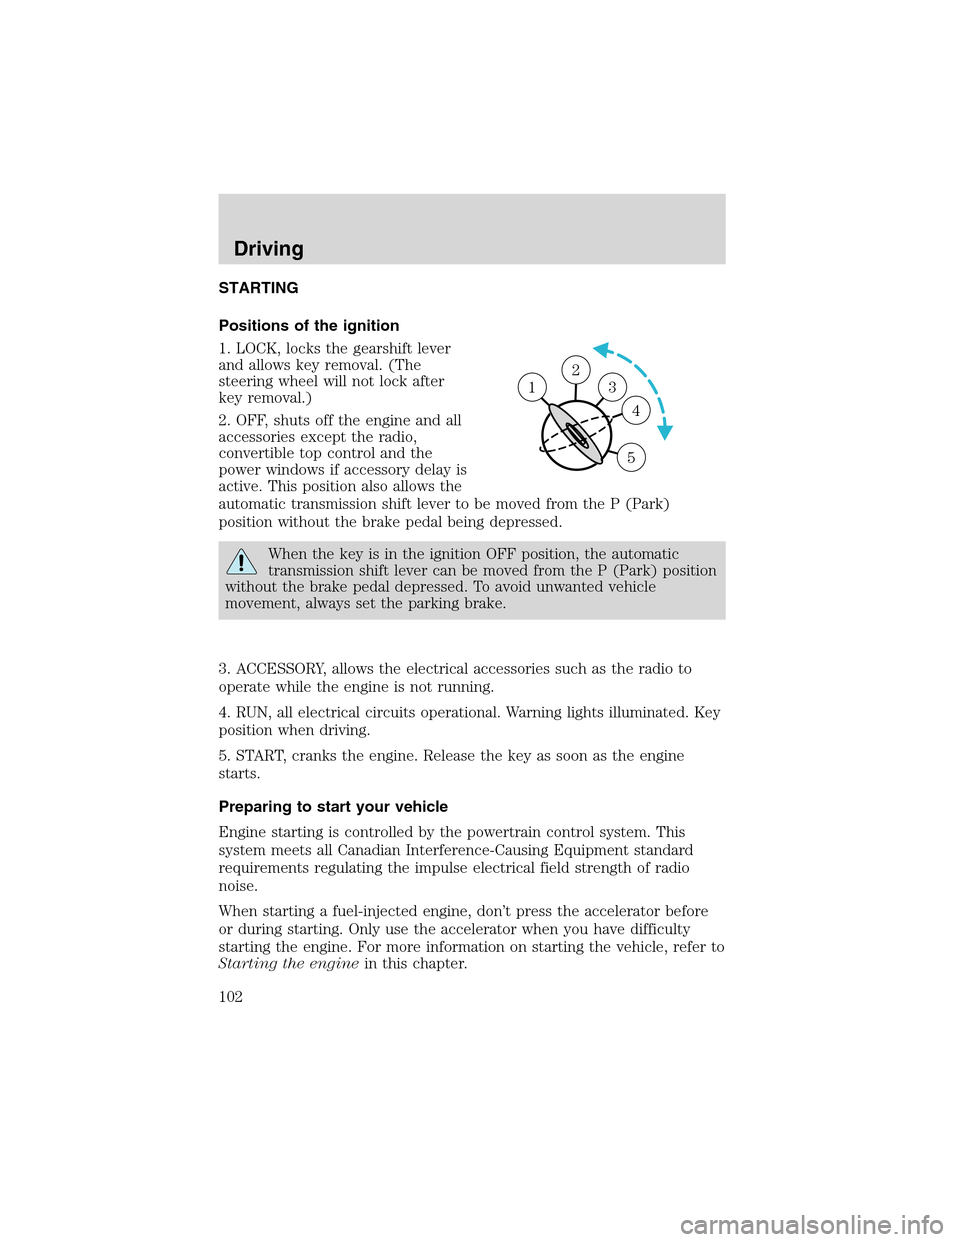
Positions of the ignition
1. LOCK, locks the gearshift lever
and allows key removal. (The
steering wheel will not lock after
key removal.)
2. OFF, shuts off the engine and all
accessories except the radio,
convertible top control and the
power windows if accessory delay is
active. This position also allows the
automatic transmission shift lever to be moved from the P (Park)
position without the brake pedal being depressed.
When the key is in the ignition OFF position, the automatic
transmission shift lever can be moved from the P (Park) position
without the brake pedal depressed. To avoid unwanted vehicle
movement, always set the parking brake.
3. ACCESSORY, allows the electrical accessories such as the radio to
operate while the engine is not running.
4. RUN, all electrical circuits operational. Warning lights illuminated. Key
position when driving.
5. START, cranks the engine. Release the key as soon as the engine
starts.
Preparing to start your vehicle
Engine starting is controlled by the powertrain control system. This
system meets all Canadian Interference-Causing Equipment standard
requirements regulating the impulse electrical field strength of radio
noise.
When starting a fuel-injected engine, don’t press the accelerator before
or during starting. Only use the accelerator when you have difficulty
starting the engine. For more information on starting the vehicle, refer to
Starting the enginein this chapter.
2
3
4
5
1
Driving
102