cooling FORD THUNDERBIRD 2003 11.G Owners Manual
[x] Cancel search | Manufacturer: FORD, Model Year: 2003, Model line: THUNDERBIRD, Model: FORD THUNDERBIRD 2003 11.GPages: 200, PDF Size: 1.79 MB
Page 124 of 200
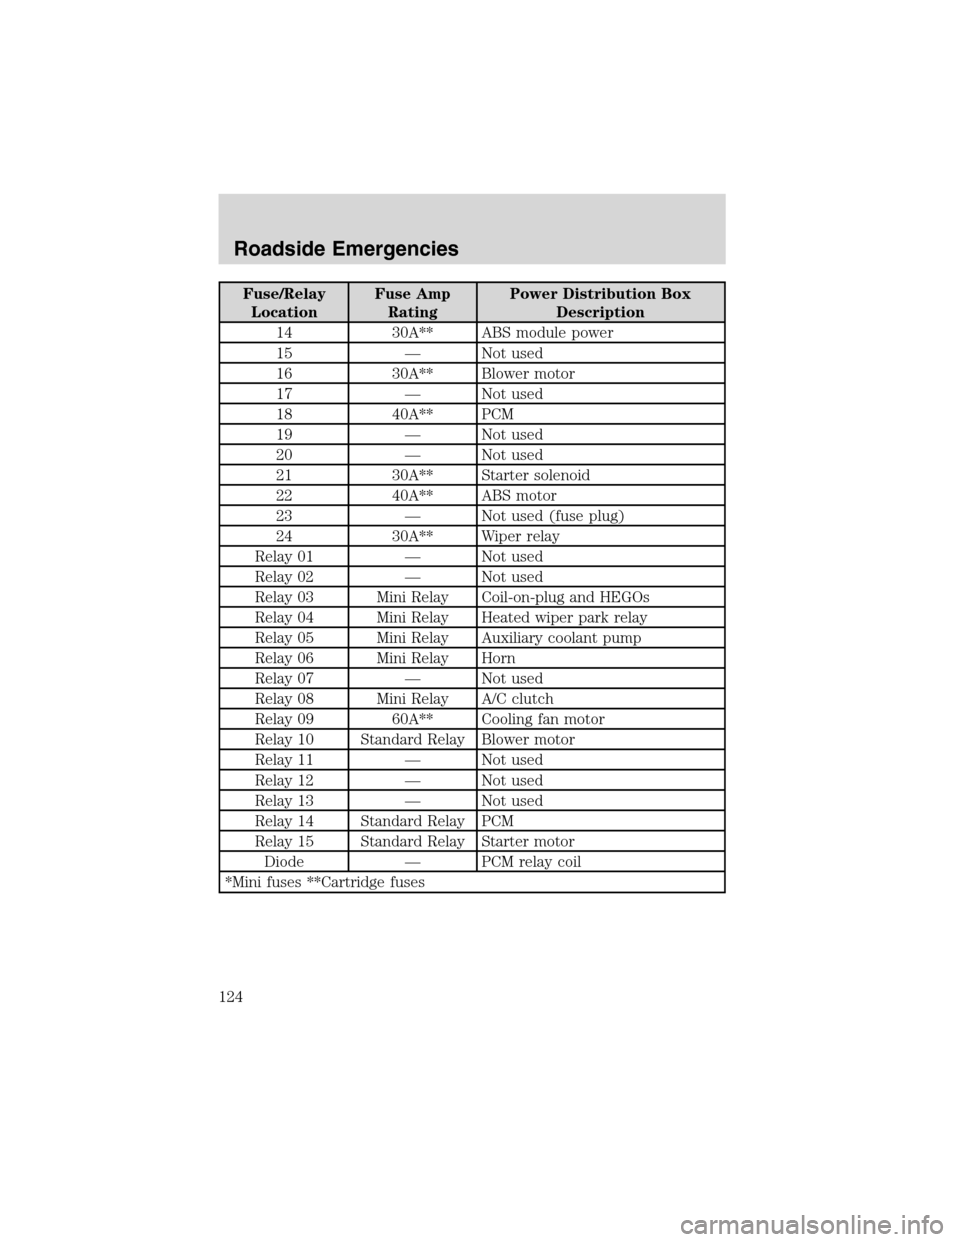
Fuse/Relay
LocationFuse Amp
RatingPower Distribution Box
Description
14 30A** ABS module power
15—Not used
16 30A** Blower motor
17—Not used
18 40A** PCM
19—Not used
20—Not used
21 30A** Starter solenoid
22 40A** ABS motor
23—Not used (fuse plug)
24 30A** Wiper relay
Relay 01—Not used
Relay 02—Not used
Relay 03 Mini Relay Coil-on-plug and HEGOs
Relay 04 Mini Relay Heated wiper park relay
Relay 05 Mini Relay Auxiliary coolant pump
Relay 06 Mini Relay Horn
Relay 07—Not used
Relay 08 Mini Relay A/C clutch
Relay 09 60A** Cooling fan motor
Relay 10 Standard Relay Blower motor
Relay 11—Not used
Relay 12—Not used
Relay 13—Not used
Relay 14 Standard Relay PCM
Relay 15 Standard Relay Starter motor
Diode—PCM relay coil
*Mini fuses **Cartridge fuses
Roadside Emergencies
124
Page 133 of 200
1.Useonly a 12–volt supply to start your vehicle.
2. Do not disconnect the battery of your disabled vehicle as this could
damage the vehicle’s electrical system. Keep the battery vent hose
attached at all times.
3. Park the booster vehicle close to the trunk of your disabled vehicle
making sure the two vehiclesdo nottouch. Set the parking brake on
both vehicles and stay clear of the engine cooling fan and other moving
parts.
4. Check all battery terminals and remove any excessive corrosion before
you attach the battery cables. Ensure the vent caps are tight and level.
5. Turn the heater fan on in both vehicles to protect any electrical
surges. Turn all other accessories off.
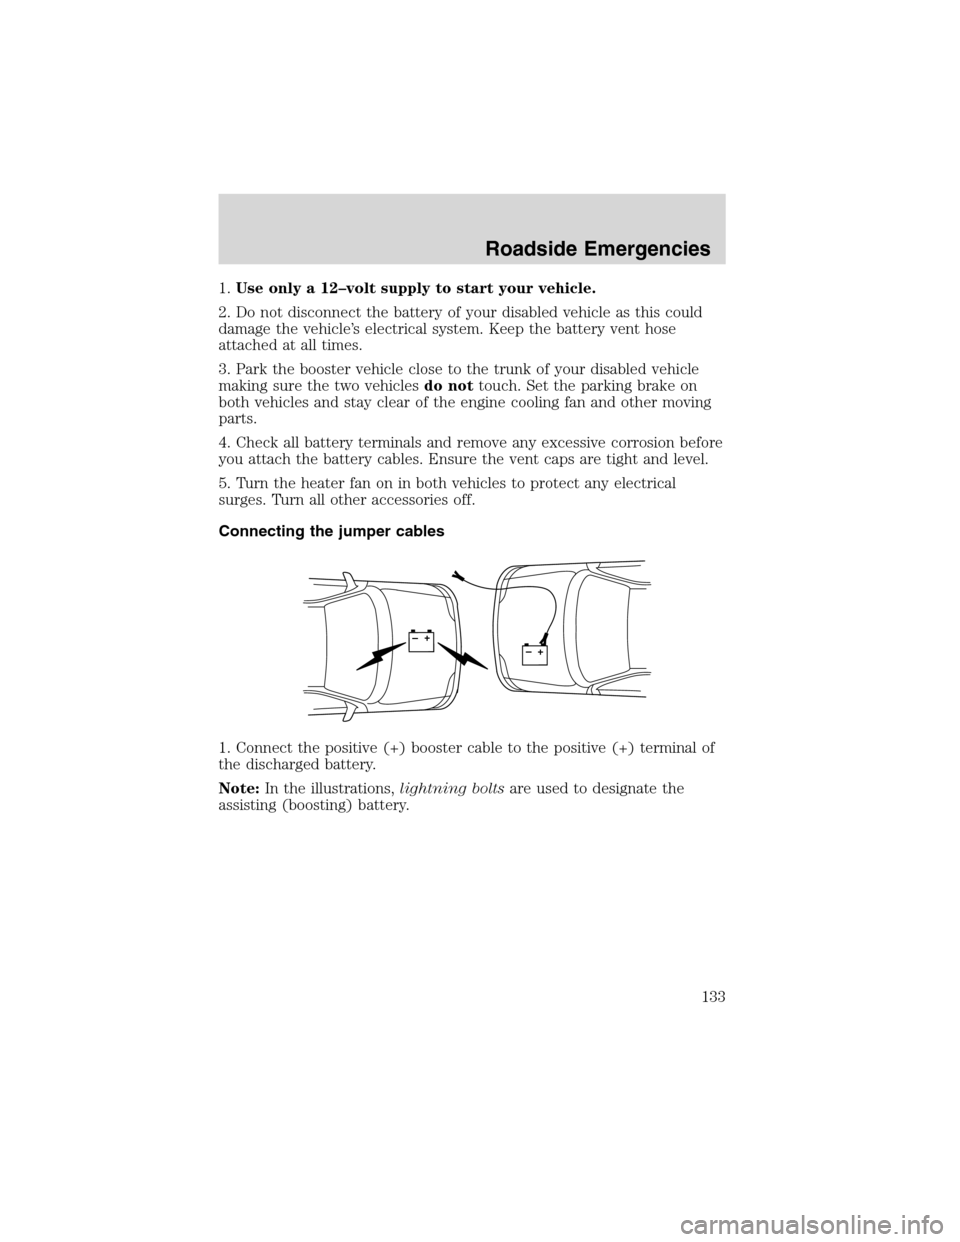
Connecting the jumper cables
1. Connect the positive (+) booster cable to the positive (+) terminal of
the discharged battery.
Note:In the illustrations,lightning boltsare used to designate the
assisting (boosting) battery.
+–+–
Roadside Emergencies
133
Page 156 of 200
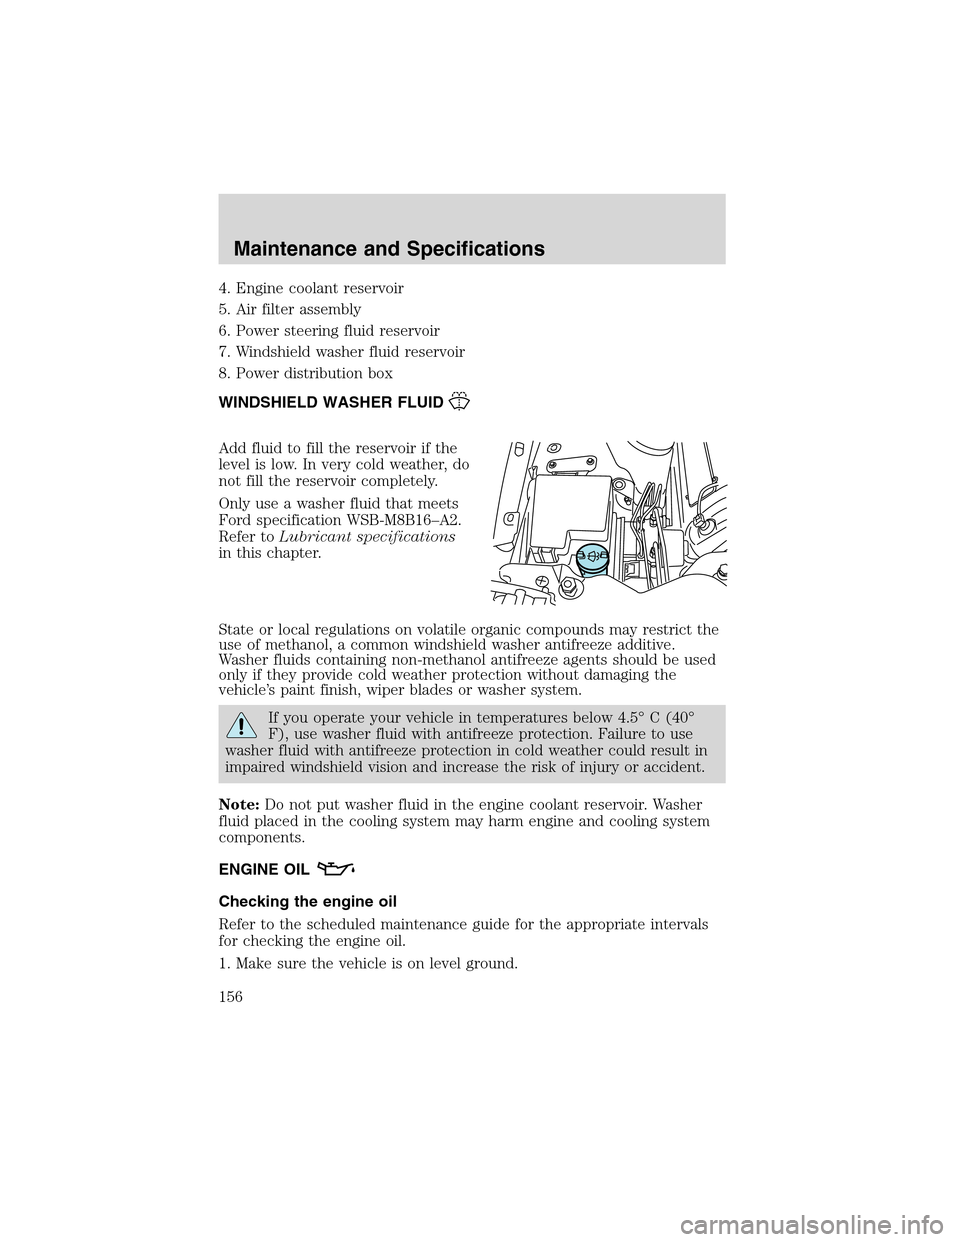
4. Engine coolant reservoir
5. Air filter assembly
6. Power steering fluid reservoir
7. Windshield washer fluid reservoir
8. Power distribution box
WINDSHIELD WASHER FLUID
Add fluid to fill the reservoir if the
level is low. In very cold weather, do
not fill the reservoir completely.
Only use a washer fluid that meets
Ford specification WSB-M8B16–A2.
Refer toLubricant specifications
in this chapter.
State or local regulations on volatile organic compounds may restrict the
use of methanol, a common windshield washer antifreeze additive.
Washer fluids containing non-methanol antifreeze agents should be used
only if they provide cold weather protection without damaging the
vehicle’s paint finish, wiper blades or washer system.
If you operate your vehicle in temperatures below 4.5°C (40°
F), use washer fluid with antifreeze protection. Failure to use
washer fluid with antifreeze protection in cold weather could result in
impaired windshield vision and increase the risk of injury or accident.
Note:Do not put washer fluid in the engine coolant reservoir. Washer
fluid placed in the cooling system may harm engine and cooling system
components.
ENGINE OIL
Checking the engine oil
Refer to the scheduled maintenance guide for the appropriate intervals
for checking the engine oil.
1. Make sure the vehicle is on level ground.
Maintenance and Specifications
156
Page 163 of 200
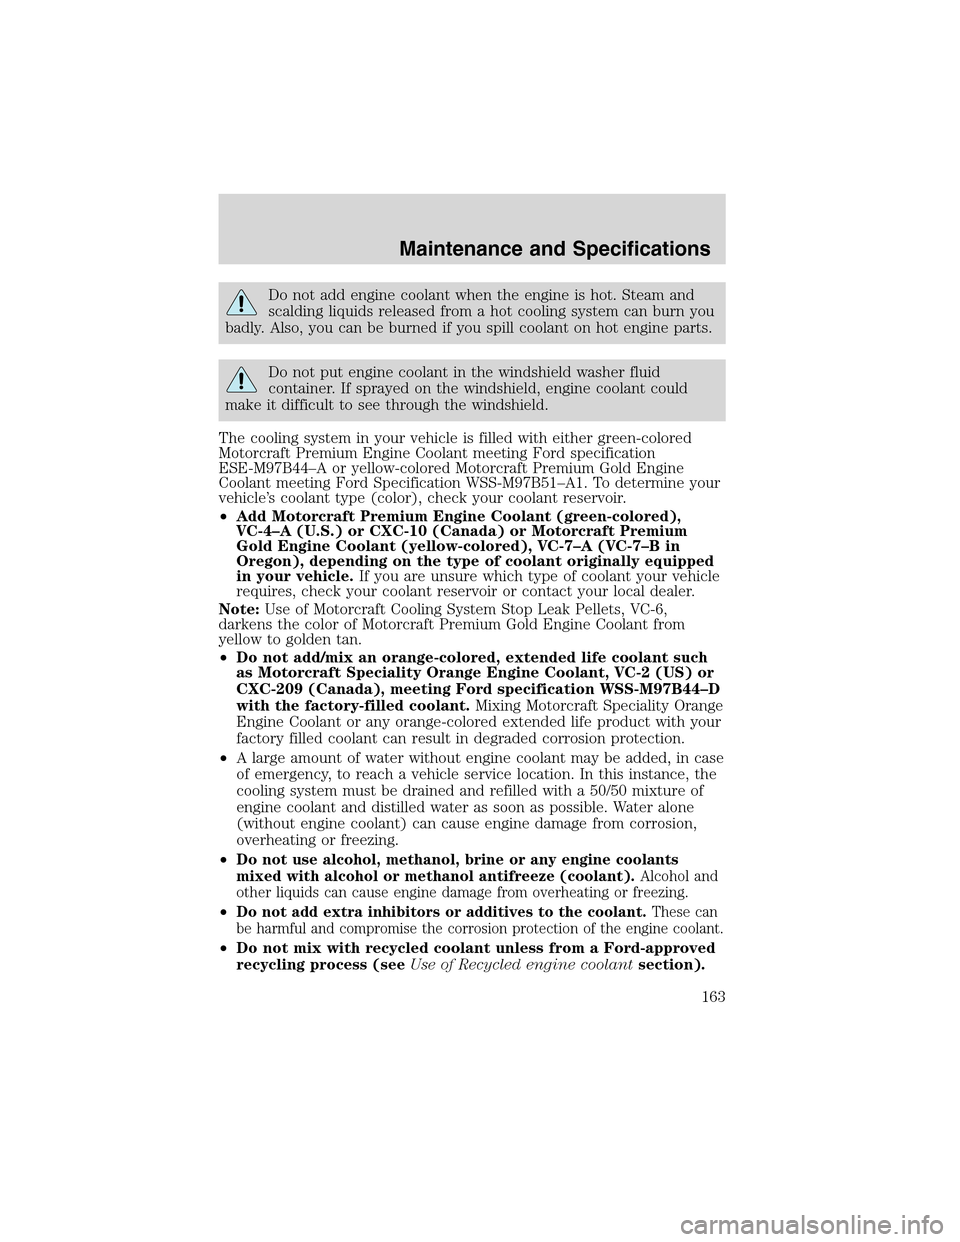
Do not add engine coolant when the engine is hot. Steam and
scalding liquids released from a hot cooling system can burn you
badly. Also, you can be burned if you spill coolant on hot engine parts.
Do not put engine coolant in the windshield washer fluid
container. If sprayed on the windshield, engine coolant could
make it difficult to see through the windshield.
The cooling system in your vehicle is filled with either green-colored
Motorcraft Premium Engine Coolant meeting Ford specification
ESE-M97B44–A or yellow-colored Motorcraft Premium Gold Engine
Coolant meeting Ford Specification WSS-M97B51–A1. To determine your
vehicle’s coolant type (color), check your coolant reservoir.
•Add Motorcraft Premium Engine Coolant (green-colored),
VC-4–A (U.S.) or CXC-10 (Canada) or Motorcraft Premium
Gold Engine Coolant (yellow-colored), VC-7–A (VC-7–Bin
Oregon), depending on the type of coolant originally equipped
in your vehicle.If you are unsure which type of coolant your vehicle
requires, check your coolant reservoir or contact your local dealer.
Note:Use of Motorcraft Cooling System Stop Leak Pellets, VC-6,
darkens the color of Motorcraft Premium Gold Engine Coolant from
yellow to golden tan.
•Do not add/mix an orange-colored, extended life coolant such
as Motorcraft Speciality Orange Engine Coolant, VC-2 (US) or
CXC-209 (Canada), meeting Ford specification WSS-M97B44–D
with the factory-filled coolant.Mixing Motorcraft Speciality Orange
Engine Coolant or any orange-colored extended life product with your
factory filled coolant can result in degraded corrosion protection.
•A large amount of water without engine coolant may be added, in case
of emergency, to reach a vehicle service location. In this instance, the
cooling system must be drained and refilled with a 50/50 mixture of
engine coolant and distilled water as soon as possible. Water alone
(without engine coolant) can cause engine damage from corrosion,
overheating or freezing.
•
Do not use alcohol, methanol, brine or any engine coolants
mixed with alcohol or methanol antifreeze (coolant).
Alcohol and
other liquids can cause engine damage from overheating or freezing.
•Do not add extra inhibitors or additives to the coolant.These can
be harmful and compromise the corrosion protection of the engine coolant.
•Do not mix with recycled coolant unless from a Ford-approved
recycling process (seeUse of Recycled engine coolantsection).
Maintenance and Specifications
163
Page 164 of 200
For vehicles with overflow coolant systems with a non-pressurized cap
on the coolant recovery system, add coolant to the coolant recovery
reservoir when the engine is cool. Add the proper mixture of coolant and
water to the“cold full”level. For all other vehicles, which have a coolant
degas system with a pressurized cap, or if it is necessary to remove the
coolant pressure relief cap on the radiator of a vehicle with an overflow
system, follow these steps to add engine coolant.
To reduce the risk of personal injury, make sure the engine is
cool before unscrewing the coolant pressure relief cap. The
cooling system is under pressure; steam and hot liquid can come out
forcefully when the cap is loosened slightly.
1. Before you begin, turn the engine off and let it cool.
2. When the engine is cool, wrap a thick cloth around the coolant
pressure relief cap on the coolant reservoir (an opaque plastic bottle).
Slowly turn cap counterclockwise (left) until pressure begins to release.
3. Step back while the pressure releases.
4. When you are sure that all the pressure has been released, use the
cloth to turn it counterclockwise and remove the cap.
5. Fill the coolant reservoir slowly with the proper coolant mixture (see
above), to within the“cold fill range”or the“cold full”level on the
reservoir. If you removed the radiator cap in an overflow system, fill the
radiator until the coolant is visible and radiator is almost full.
6. Replace the cap. Turn until tightly installed. (Cap must be tightly
installed to prevent coolant loss.)
After any coolant has been added, check the coolant concentration, refer
toChecking Engine Coolantsection. If the concentration is not 50/50
(protection to–34°F/–36°C), drain some coolant and adjust the
concentration. It may take several drains and additions to obtain a 50/50
coolant concentration.
Whenever coolant has been added, the coolant level in the coolant
reservoir should be checked the next few times you drive the vehicle. If
necessary, add enough 50/50 concentration of engine coolant and
distilled water to bring the liquid level to the proper level.
If you have to add more than 1.0 liter (1.0 quart) of engine coolant per
month, have your dealer check the engine cooling system. Your cooling
system may have a leak. Operating an engine with a low level of coolant
can result in engine overheating and possible engine damage.
Maintenance and Specifications
164
Page 165 of 200
Recycled engine coolant
Ford Motor Company recommends the use of a recycled engine coolant
produced by Ford-approved processes in vehicles originally equipped
with Motorcraft Premium Engine Coolant (green-colored). However, not
all coolant recycling processes produce coolant that meets Ford
specification ESE-M97B44–A. Use of such coolant may harm the engine
and cooling system components.
Ford Motor Company does NOT recommend the use of recycled engine
coolant in vehicles originally equipped with Motorcraft Premium Gold
Engine Coolant since a Ford-approved recycling process is not yet
available.
Used engine coolant should be disposed of in an appropriate
manner. Follow your community’s regulations and standards for recycling
and disposing of automotive fluids.
Coolant refill capacity
To find out how much fluid your vehicle’s cooling system can hold, refer
toRefill capacitiesin this chapter.
Fill your engine coolant reservoir as outlined inAdding engine coolant
in this chapter.
Severe climates
If you drive in extremely cold climates (less than–36°C[–34°F]), it
may be necessary to increase the coolant concentration above 50%.
Refer to the chart on the coolant container to ensure the coolant
concentration in your vehicle will provide adequate freeze protection.
Never increase the engine coolant concentration above 60%
(protection to–60°F). At a level over 60%, your engine could overheat
and become damaged.
If you drive in extremely hot climates, it is still necessary to maintain the
coolant concentration at 50/50 coolant and water.Do not allow the
coolant concentration to fall below 40% coolant.At a concentration
less than 40%, the corrosion protection to your engine and cooling
components may be compromised and permanent damage may result.
What you should know about fail-safe cooling
If the engine coolant supply is depleted, this feature allows the vehicle to
be driven temporarily before incremental component damage is incurred.
The“fail-safe”distance depends on ambient temperatures, vehicle load
and terrain.
Maintenance and Specifications
165
Page 166 of 200
How fail-safe cooling works
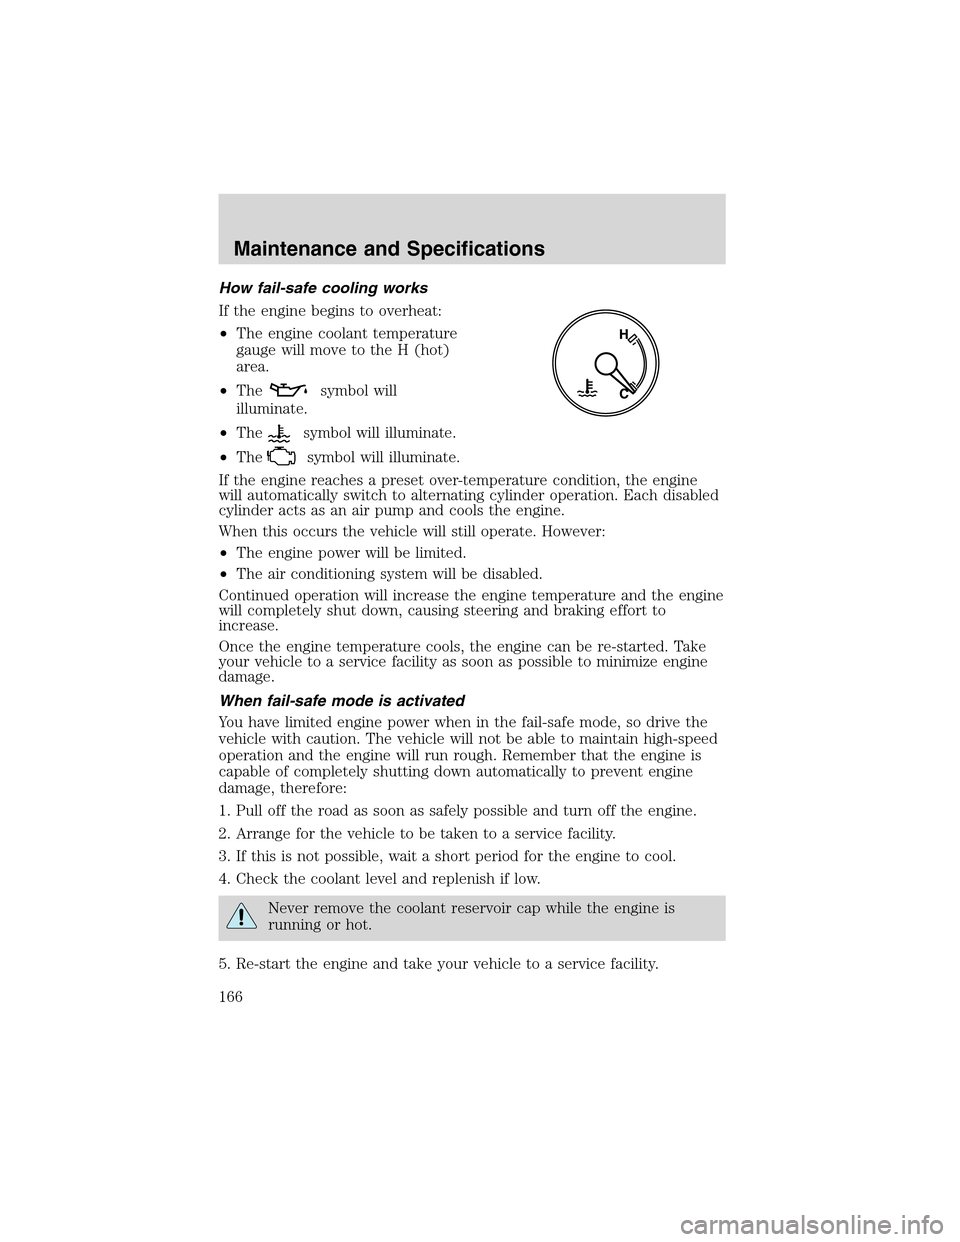
If the engine begins to overheat:
•The engine coolant temperature
gauge will move to the H (hot)
area.
•The
symbol will
illuminate.
•The
symbol will illuminate.
•The
symbol will illuminate.
If the engine reaches a preset over-temperature condition, the engine
will automatically switch to alternating cylinder operation. Each disabled
cylinder acts as an air pump and cools the engine.
When this occurs the vehicle will still operate. However:
•The engine power will be limited.
•The air conditioning system will be disabled.
Continued operation will increase the engine temperature and the engine
will completely shut down, causing steering and braking effort to
increase.
Once the engine temperature cools, the engine can be re-started. Take
your vehicle to a service facility as soon as possible to minimize engine
damage.
When fail-safe mode is activated
You have limited engine power when in the fail-safe mode, so drive the
vehicle with caution. The vehicle will not be able to maintain high-speed
operation and the engine will run rough. Remember that the engine is
capable of completely shutting down automatically to prevent engine
damage, therefore:
1. Pull off the road as soon as safely possible and turn off the engine.
2. Arrange for the vehicle to be taken to a service facility.
3. If this is not possible, wait a short period for the engine to cool.
4. Check the coolant level and replenish if low.
Never remove the coolant reservoir cap while the engine is
running or hot.
5. Re-start the engine and take your vehicle to a service facility.
Maintenance and Specifications
166
Page 193 of 200
F
Fail safe cooling ........................165
Floor mats ...................................54
Fluid capacities .........................183
Fuel ............................................167
calculating fuel economy .......171
cap ...........................................169
capacity ...................................183
choosing the right fuel ...........169
comparisons with EPA fuel
economy estimates .................174
detergent in fuel .....................170
filling your vehicle with
fuel ...........................167, 169, 171
filter, specifications ........171, 182
improving fuel economy ........171
octane rating ...................170, 186
quality ......................................170
running out of fuel .................171
safety information relating to
automotive fuels .....................167
Fuses ..................................118–119
G
Gas cap (see Fuel cap) ............169
Gas mileage (see Fuel
economy) ...................................171
Gauges .........................................12
GAWR (Gross Axle Weight
Rating) .......................................114
definition .................................114
driving with a heavy load ......114
location ....................................114
GVWR (Gross Vehicle Weight
Rating) .......................................114
calculating ...............................114
definition .................................114
driving with a heavy load ......114location ....................................114
H
Head restraints ...........................66
Headlamps ...................................24
aiming ........................................26
autolamp system
.......................24
bulb specifications
....................28
daytime running lights
.............25
flash to pass
..............................25
replacing bulbs
.........................29
turning on and off
....................24
Heating
heating and air conditioning
system
.......................................19
Hood
..........................................155
I
Ignition
...............................102, 186
Infant seats (see Safety seats)
..94
Inspection/maintenance (I/M)
testing
........................................175
Instrument panel
cleaning
...................................151
cluster
..........................................8
lighting up panel and
interior
.......................................26
J
Jack
............................................127
positioning
...............................127
storage
.....................................127
Jump-starting your vehicle
......132
Index
193