park assist FORD TRANSIT 2017 5.G Owners Manual
[x] Cancel search | Manufacturer: FORD, Model Year: 2017, Model line: TRANSIT, Model: FORD TRANSIT 2017 5.GPages: 484, PDF Size: 11.45 MB
Page 6 of 484
Brakes
General Information....................................146
Hints on Driving With Anti-Lock Brakes...........................................................146
Parking Brake
..................................................147
Hill Start Assist - Vehicles With: Hill Start Assist.............................................................147
Traction Control
Principle of Operation................................149
Using Traction Control...............................149
Stability Control
Principle of Operation................................150
Using Stability Control.................................151
Parking Aids
Principle of Operation.................................152
Parking Aid......................................................152
Rear View Camera
.......................................154
Cruise Control
Principle of Operation
.................................157
Using Cruise Control....................................157
Driving Aids
Speed Limiter
.................................................159
Driver Alert
......................................................159
Lane Keeping System.................................160
Steering............................................................162
Load Carrying
Load Retaining Fixtures.............................164
Load Limit.......................................................164
Towing
Towing a Trailer
.............................................169
Trailer Sway Control
....................................170
Recommended Towing Weights............170
Essential Towing Checks
............................172 Towing the Vehicle on Four Wheels......178
Driving Hints
Breaking-In.....................................................180
Reduced Engine Performance................180
Economical Driving.....................................180
Cold Weather Precautions
.........................181
Driving Through Water.................................181
Floor Mats
........................................................181
Roadside Emergencies
Roadside Assistance
...................................183
Hazard Warning Flashers
..........................184
Fuel Shutoff
...................................................184
Jump Starting the Vehicle.........................184
Post-Crash Alert System...........................187
Transporting the Vehicle............................187
Customer Assistance
Getting the Services You Need...............189
In California (U.S. Only).............................190
The Better Business Bureau (BBB) Auto Line Program (U.S. Only).......................191
Utilizing the Mediation/Arbitration Program (Canada Only)........................192
Getting Assistance Outside the U.S. and Canada
.........................................................192
Ordering Additional Owner's Literature.....................................................193
Reporting Safety Defects (U.S. Only).............................................................194
Reporting Safety Defects (Canada Only).............................................................194
Fuses
Fuse Box Locations
.....................................196
Fuse Specification Chart
............................197
Changing a Fuse..........................................209
Maintenance
General Information
.....................................211
3
Transit (TTH) Canada/United States of America, HK3J 19A321 AA enUSA, Edition date: 04/2016, First Printing Table of Contents
Page 54 of 484
PRINCIPLE OF OPERATION
MyKey allows you to program keys with
restricted driving modes to promote good
driving habits. All but one of the keys can
be activated with these restricted modes.
Any keys that remain unprogrammed are
referred to as administrator keys or admin
keys. They can be used to:
•
Create a MyKey.
• Program configurable MyKey settings.
• Clear all MyKey features.
When you have created a MyKey, you can
access the following information by using
the information display to determine:
• How many admin keys and MyKeys are
programmed to your vehicle.
• The total distance your vehicle traveled
with a MyKey.
Note: Switch the ignition on to use the
system.
Note: All MyKeys are programmed to the
same settings. You cannot program them
individually.
Non-configurable Settings
The following settings cannot be changed
by an admin key user:
• Safety belt minder. You cannot disable
this feature. The audio system will
mute when the driver's safety belt is
not fastened.
• Early low fuel. The low-fuel warning
activates earlier, giving the MyKey user
more time to refuel.
• Driver assist features, if equipped on
your vehicle, are forced on: parking aid,
Blind Spot Information System (BLIS)
with cross traffic alert, lane departure
warning and forward collision warning
system. Configurable Settings
With an admin key, you can configure
certain MyKey settings when you first
create a MyKey and before you recycle the
key or restart the engine. You can also
change the settings afterward with an
admin key.
•
A vehicle speed limit can be set.
Warnings will be shown in the display
followed by an audible tone when your
vehicle reaches the set speed. You
cannot override the set speed by fully
depressing the accelerator pedal or by
setting cruise control. WARNING
Do not set MyKey maximum speed
limit to a limit that will prevent the
driver from maintaining a safe speed
considering posted speed limits and
prevailing road conditions. The driver is
always responsible to drive in accordance
with local laws and prevailing conditions.
Failure to do so could result in accident or
injury. •
Various vehicle speed minders can be
set. Once you select a speed, it will be
shown in the display, followed by an
audible tone when the preselected
vehicle speed is exceeded.
• Audio system maximum volume of
45%. A message will be shown in the
display when you attempt to exceed
the limited volume. Also, the
speed-sensitive or compensated
automatic volume control will be
disabled.
• Always on setting. When this is
selected, you will not be able to turn
off traction control (if your vehicle is
equipped with this feature).
51
Transit (TTH) Canada/United States of America, HK3J 19A321 AA enUSA, Edition date: 04/2016, First Printing MyKey
™ (If Equipped)
Page 118 of 484
Note:
Do not press the accelerator pedal.
5. Turn the key to the start position to start the engine.
6. Release the key.
DIESEL PARTICULATE FILTER
The filter forms part of the emissions
reduction system on your vehicle. It filters
harmful diesel particulates (soot) from the
exhaust gas.
Regeneration WARNING
Do not park or idle your vehicle over
dry leaves, dry grass or other
combustible materials. The
regeneration process creates very high
exhaust gas temperatures and the exhaust
will radiate a considerable amount of heat
during and after regeneration and after you
have switched the engine off. This is a
potential fire hazard. Note:
Avoid running out of fuel.
Note: During regeneration at low speed or
engine idle, you may smell a hot metallic
odor and could notice a clicking metallic
sound. This is due to the high temperatures
reached during regeneration and is normal.
Note: Changes in the engine or exhaust
sound may be heard during the regeneration
process.
Note: Under certain conditions, the engine
cooling fan may continue to run for several
minutes after you switch your vehicle off.
This could happen in low ambient
temperatures and independent of the
engine coolant temperature, for example
short journeys or low coolant temperature. The diesel particulate filter on your vehicle
requires periodic regeneration to maintain
its correct function. Your vehicle will carry
out this process automatically.
If your journeys meet one of the following
conditions:
•
You drive only short distances.
• You frequently switch the ignition on
and off.
• Your journeys contain a high level of
acceleration and deceleration.
You must carry out occasional trips with
the following conditions to assist the
regeneration process:
• Drive your vehicle in more favorable
conditions, which you will find at higher
vehicle speeds in normal driving, on a
main road or freeway for a minimum
of 20 minutes. This drive may include
short stops that will not affect the
regeneration process.
• Avoid prolonged idling and always
observe speed limits and road
conditions.
• Do not switch the ignition off.
• Select a suitable gear to ideally
maintain engine speed between 1500
and 3000 RPM.
SWITCHING OFF THE ENGINE
Vehicles With a Turbocharger WARNING
Do not switch the engine off when it
is running at high speed. If you do, the
turbocharger will continue running
after the engine oil pressure has dropped
to zero. This will lead to premature
turbocharger bearing wear. 115
Transit (TTH) Canada/United States of America, HK3J 19A321 AA enUSA, Edition date: 04/2016, First Printing Starting and Stopping the Engine
Page 149 of 484
GENERAL INFORMATION
Note:
Occasional brake noise is normal. If
a metal-to-metal, continuous grinding or
continuous squeal sound is present, the
brake linings may be worn-out. Have the
system checked by an authorized dealer. If
your vehicle has continuous vibration or
shudder in the steering wheel while braking,
have it checked by an authorized dealer.
Note: Brake dust may accumulate on the
wheels, even under normal driving
conditions. Some dust is inevitable as the
brakes wear and does not contribute to
brake noise. See Cleaning the Wheels
(page 244). See
Warning Lamps and
Indicators (page 81).
Wet brakes result in reduced braking
efficiency. Gently press the brake pedal a
few times when driving from a car wash or
standing water to dry the brakes.
Brake Over Accelerator
In the event the accelerator pedal
becomes stuck or entrapped, apply steady
and firm pressure to the brake pedal to
slow the vehicle and reduce engine power.
If you experience this condition, apply the
brakes and bring your vehicle to a safe
stop. Move the gearshift lever to park (P),
switch the engine off and apply the parking
brake. Inspect the accelerator pedal for
any interference. If none are found and the
condition persists, have your vehicle towed
to the nearest authorized dealer.
Brake Assist
Brake assist detects when you brake
rapidly by measuring the rate at which you
press the brake pedal. It provides
maximum braking efficiency as long as you
press the pedal, and can reduce stopping
distances in critical situations. Anti-lock Brake System
This system helps you maintain steering
control during emergency stops by keeping
the brakes from locking. This lamp momentarily
illuminates when you turn the
ignition on. If the light does not
illuminate during start up, remains on or
flashes, the system may be disabled. Have
the system checked by an authorized
dealer. If the system is disabled, normal
braking is still effective. If the
brake warning lamp illuminates
when you release the parking brake, have
the system checked by an authorized
dealer.
HINTS ON DRIVING WITH
ANTI-LOCK BRAKES
Note: When the system is operating, the
brake pedal may pulse and may travel
further. Maintain pressure on the brake
pedal. You may also hear a noise from the
system. This is normal.
The anti-lock braking system will not
eliminate the risks when:
• You drive too closely to the vehicle in
front of you.
• Your vehicle is hydroplaning.
• You take corners too fast.
• The road surface is poor.
146
Transit (TTH) Canada/United States of America, HK3J 19A321 AA enUSA, Edition date: 04/2016, First Printing BrakesE138644 E138644
Page 150 of 484
PARKING BRAKE
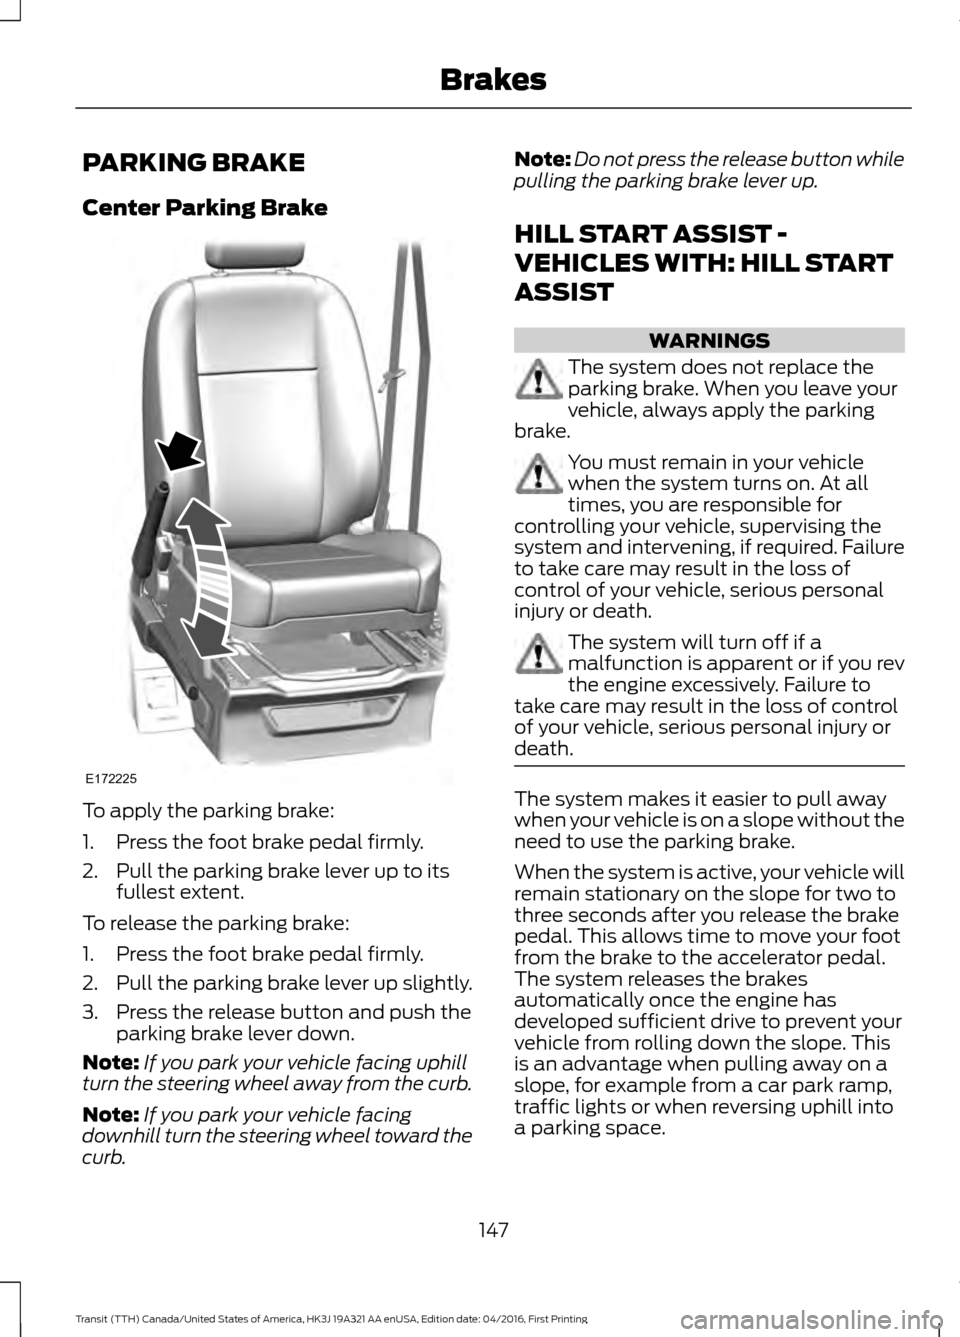
Center Parking Brake
To apply the parking brake:
1. Press the foot brake pedal firmly.
2. Pull the parking brake lever up to its
fullest extent.
To release the parking brake:
1. Press the foot brake pedal firmly.
2. Pull the parking brake lever up slightly.
3. Press the release button and push the parking brake lever down.
Note: If you park your vehicle facing uphill
turn the steering wheel away from the curb.
Note: If you park your vehicle facing
downhill turn the steering wheel toward the
curb. Note:
Do not press the release button while
pulling the parking brake lever up.
HILL START ASSIST -
VEHICLES WITH: HILL START
ASSIST WARNINGS
The system does not replace the
parking brake. When you leave your
vehicle, always apply the parking
brake. You must remain in your vehicle
when the system turns on. At all
times, you are responsible for
controlling your vehicle, supervising the
system and intervening, if required. Failure
to take care may result in the loss of
control of your vehicle, serious personal
injury or death. The system will turn off if a
malfunction is apparent or if you rev
the engine excessively. Failure to
take care may result in the loss of control
of your vehicle, serious personal injury or
death. The system makes it easier to pull away
when your vehicle is on a slope without the
need to use the parking brake.
When the system is active, your vehicle will
remain stationary on the slope for two to
three seconds after you release the brake
pedal. This allows time to move your foot
from the brake to the accelerator pedal.
The system releases the brakes
automatically once the engine has
developed sufficient drive to prevent your
vehicle from rolling down the slope. This
is an advantage when pulling away on a
slope, for example from a car park ramp,
traffic lights or when reversing uphill into
a parking space.
147
Transit (TTH) Canada/United States of America, HK3J 19A321 AA enUSA, Edition date: 04/2016, First Printing BrakesE172225
Page 151 of 484
Note:
The system will not operate if the
parking brake is applied.
Note: There is no warning light to indicate
the system is either on or off.
Using Hill Start Assist
1. Press the brake pedal to bring your vehicle to a complete standstill. Keep
the brake pedal pressed.
2. If the sensors detect that your vehicle is on a slope, the system will activate
automatically.
3. When you remove your foot from the brake pedal, your vehicle will remain
on the slope without rolling away for
approximately two to three seconds.
This hold time will automatically be
extended if you are in the process of
driving off.
4. Drive off in the normal manner. The system will release the brakes
automatically.
Note: When you remove your foot from the
brake pedal and press the pedal again when
the system is active, you will experience
significantly reduced brake pedal travel. This
is normal.
Switching the System On and Off
Vehicles with Manual Transmission
You can switch this feature on or off in the
information display. The system
remembers the last setting when you start
your vehicle.
Vehicles with Automatic Transmission
You cannot turn the system on or off.
When you switch the ignition on, the
system automatically turns on.
148
Transit (TTH) Canada/United States of America, HK3J 19A321 AA enUSA, Edition date: 04/2016, First Printing Brakes
Page 155 of 484
PRINCIPLE OF OPERATION
WARNINGS
To help avoid personal injury, please
read and understand the limitations
of the system as contained in this
section. Sensing is only an aid for some
(generally large and fixed) objects when
moving on a flat surface at parking speeds.
Certain objects with surfaces that absorb
ultrasonic waves, surrounding vehicle's
parking aid systems, traffic control
systems, fluorescent lamps, inclement
weather, air brakes, and external motors
and fans may also affect the function of
the sensing system; this may include
reduced performance or a false activation. To help avoid personal injury, always
use caution when in reverse (R) and
when using the sensing system.
This system is not designed to
prevent contact with small or moving
objects. The system is designed to
provide a warning to assist the driver in
detecting large stationary objects to avoid
damaging your vehicle. The system may
not detect smaller objects, particularly
those close to the ground. Certain add-on devices such as large
trailer hitches, bike or surfboard racks
and any device that may block the
normal detection zone of the system, may
create false beeps. Note:
Keep the sensors, located on the
bumper or fascia, free from snow, ice and
large accumulations of dirt. If the sensors
are covered, the system ’s accuracy can be
affected. Do not clean the sensors with
sharp objects.
Note: If your vehicle sustains damage to
the bumper or fascia, leaving it misaligned
or bent, the sensing zone may be altered
causing inaccurate measurement of
obstacles or false alarms. Note:
The sensing system cannot be turned
off when a MyKey is present. See Principle
of Operation (page 51).
Note: If you attach certain add-on devices
such as a trailer or bike rack, the rear sensing
system may detect that add-on device and
therefore provide warnings. It is suggested
that you disable the rear sensing system
when you attach an add-on device to your
vehicle to prevent these warnings.
The sensing system warns the driver of
obstacles within a certain range of your
vehicle. The system turns on automatically
whenever you switch the ignition on. You can turn the system on or
off by pressing the parking aid
button. If your vehicle does not
have a parking aid button, the system can
be switched off through the information
display menu or from the pop-up message
that appears once you shift the
transmission into reverse (R). See
Information Messages
(page 89).
If a fault is present in the system, a warning
message appears in the information
display. See
General Information (page
85).
PARKING AID WARNINGS
The parking aid system can only
assist you to detect objects when
your vehicle is moving at parking
speeds. To help avoid personal injury you
must take care when using the parking aid
system. Traffic control systems, inclement
weather, air brakes, external motors
and fans may affect the correct
operation of the sensing system.This may
cause reduced performance or false alerts.
152
Transit (TTH) Canada/United States of America, HK3J 19A321 AA enUSA, Edition date: 04/2016, First Printing Parking Aids
(If Equipped)E139213
Page 180 of 484
•
The trailer brake controller is fitted with
a feature that reduces output at vehicle
speeds below 11 mph (18 km/h) so
trailer and vehicle braking is not jerky
or harsh. This feature is only available
when applying the brakes using your
vehicle's brake pedal, not the
controller.
• The controller interacts with the brake
control system and powertrain control
system of your vehicle to provide the
best performance on different road
conditions.
• Your vehicle's brake system and the
trailer brake system work
independently of each other. Changing
the gain setting on the controller does
not affect the operation of your
vehicle's brake system whether you
attach a trailer or not.
• When you switch the engine off, the
controller output is disabled and the
display and module shut down. The
controller module and display turn on
when you switch the ignition on.
• The trailer brake controller is only a
factory-installed or dealer-installed
item. Ford is not responsible for
warranty or performance of the
controller due to misuse or customer
installation.
Trailer Lamps WARNING
Never connect any trailer lamp wiring
to the vehicle's tail lamp wiring; this
may damage the electrical system
resulting in fire. Contact an authorized
dealer as soon as possible for assistance
in correct trailer tow wiring installation.
Additional electrical equipment may be
required. Trailer lamps are required on most towed
vehicles. Make sure all running lamps,
brake lamps, turn signals and hazard
warning lamps are working.
Before Towing a Trailer
Practice turning, stopping and backing up
to get the feel of your vehicle-trailer
combination before starting on a trip.
When turning, make wider turns so the
trailer wheels clear curbs and other
obstacles.
When Towing a Trailer
•
Do not drive faster than
70 mph
(113 km/h) until you drive your vehicle
at least 495 mi (800 km). See
Breaking-In (page 180).
• Do not make full-throttle starts.
• Check the tow hitch, electrical
connections and trailer wheel lug nuts
thoroughly after you have traveled
50 mi (80 km)
.
• When stopped in congested or heavy
traffic during hot weather, place the
gearshift in position park (
P) to aid
engine and transmission cooling and
to help A/C performance.
• Turn off the speed control with heavy
loads or on hilly terrain. The speed
control may turn off automatically
when you are towing on long, steep
grades.
• Shift to a lower gear when driving down
a long or steep hill. Do not apply the
brakes continuously, as they may
overheat and become less effective.
• If the transmission is fitted with a
Grade Assist, Tow/Haul
feature, use
this feature when towing. This provides
engine braking and helps eliminate
excessive transmission shifting for
optimum fuel economy and
transmission cooling.
177
Transit (TTH) Canada/United States of America, HK3J 19A321 AA enUSA, Edition date: 04/2016, First Printing Towing
Page 187 of 484
This program is separate from the New
Vehicle Limited Warranty, but the coverage
is concurrent with the powertrain coverage
period of your vehicle.
Canadian customers who require roadside
assistance, call 1-800-665-2006.
Vehicles Sold in Canada: Using
Roadside Assistance
Complete the roadside assistance
identification card and place it in your
wallet for quick reference.
In Canada, this card is found in the
Warranty Guide in the glove compartment
of your vehicle.
Vehicles Sold in Canada: Roadside
Assistance Program Coverage
The service is available 24 hours a day,
seven days a week.
Canadian roadside coverage and benefits
may differ from the U.S. coverage.
For complete program coverage details
you may contact your dealer, you can call
us in Canada at 1-800-665-2006, or visit
our website at www.ford.ca.
HAZARD WARNING FLASHERS
The hazard warning button is
located on the instrument panel.
Switch the hazard warning
flashers on when your vehicle is creating a
safety hazard.
Press the button to switch the hazard
warning flashers on. The front and rear
direction indicators will flash.
Press the button again to switch the
hazard warning flashers off.
Note: Prolonged use of the hazard warning
flashers will cause the battery to run out of
charge. There may be insufficient power to
restart the engine. FUEL SHUTOFF WARNING
Failure to inspect and, if necessary,
repair fuel leaks after a collision may
increase the risk of fire and serious
injury. Ford Motor Company recommends
that the fuel system be inspected by an
authorized dealer after any collision. In the event of a moderate to severe
collision, this vehicle includes a fuel pump
shutoff feature that stops the flow of fuel
to the engine. Not every impact will cause
a shutoff.
Should your vehicle shut off after a
collision, you may restart your vehicle. For
vehicles equipped with a key system:
1. Switch off the ignition.
2. Switch on the ignition.
3. Repeat Steps 1 and 2 to re-enable the
fuel pump.
Note: When you try to restart your vehicle
after a fuel shutoff, the vehicle makes sure
that various systems are safe to restart.
Once your vehicle determines that the
systems are safe, then the vehicle will allow
you to restart.
Note: In the event that your vehicle does
not restart after your third attempt, contact
an authorized dealer.
JUMP STARTING THE VEHICLE WARNINGS
The gases around the battery can
explode if exposed to flames, sparks
or lit cigarettes. An explosion could
result in personal injury or vehicle damage. Batteries contain sulfuric acid which
can burn skin, eyes and clothing, if
contacted.
184
Transit (TTH) Canada/United States of America, HK3J 19A321 AA enUSA, Edition date: 04/2016, First Printing Roadside EmergenciesE71943
Page 189 of 484
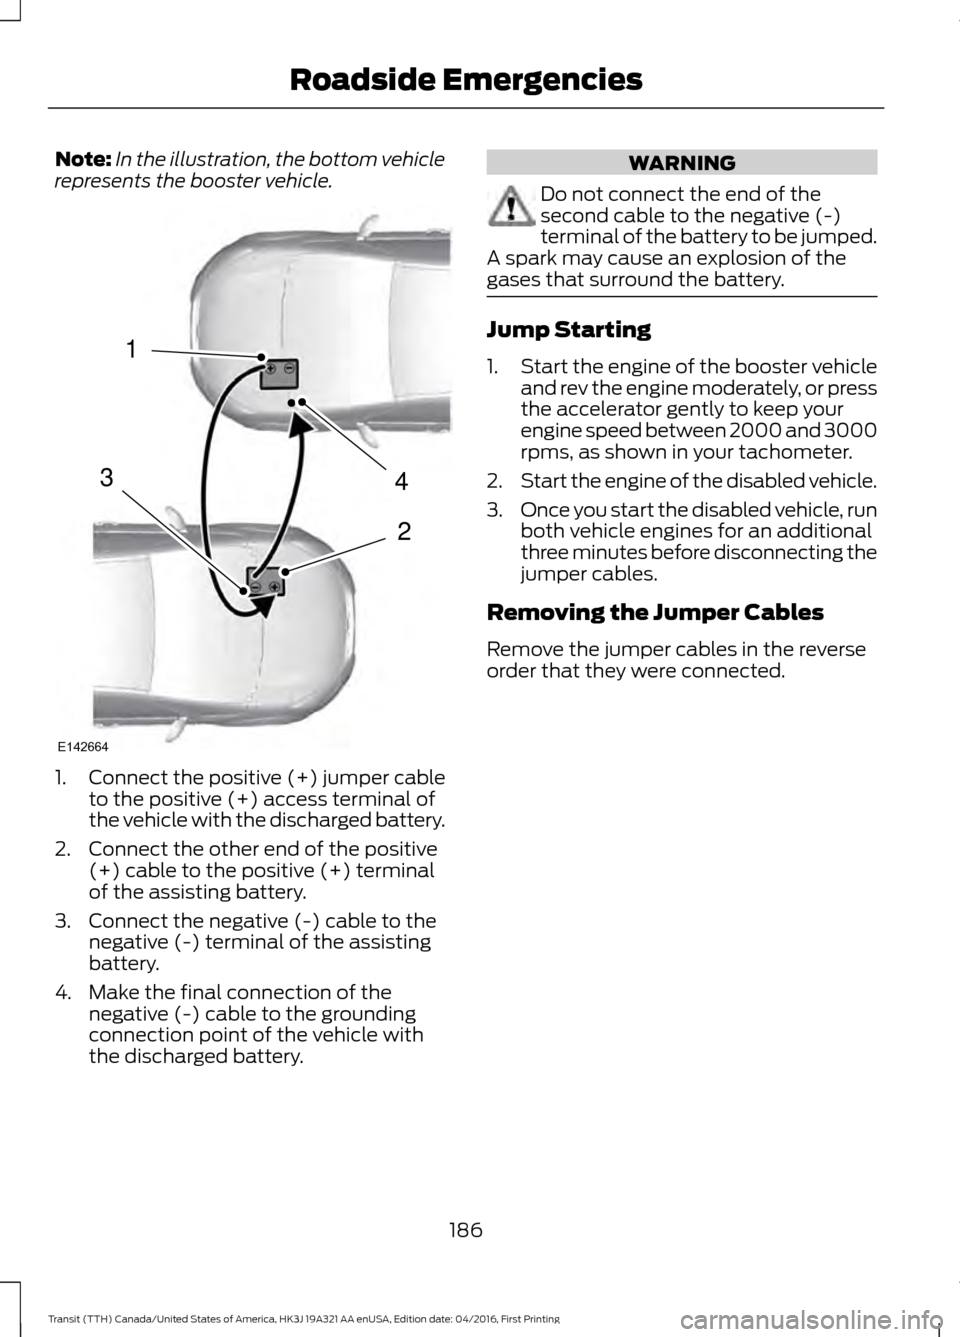
Note:
In the illustration, the bottom vehicle
represents the booster vehicle. 1.
Connect the positive (+) jumper cable
to the positive (+) access terminal of
the vehicle with the discharged battery.
2. Connect the other end of the positive (+) cable to the positive (+) terminal
of the assisting battery.
3. Connect the negative (-) cable to the negative (-) terminal of the assisting
battery.
4. Make the final connection of the negative (-) cable to the grounding
connection point of the vehicle with
the discharged battery. WARNING
Do not connect the end of the
second cable to the negative (-)
terminal of the battery to be jumped.
A spark may cause an explosion of the
gases that surround the battery. Jump Starting
1.
Start the engine of the booster vehicle
and rev the engine moderately, or press
the accelerator gently to keep your
engine speed between 2000 and 3000
rpms, as shown in your tachometer.
2. Start the engine of the disabled vehicle.
3. Once you start the disabled vehicle, run
both vehicle engines for an additional
three minutes before disconnecting the
jumper cables.
Removing the Jumper Cables
Remove the jumper cables in the reverse
order that they were connected.
186
Transit (TTH) Canada/United States of America, HK3J 19A321 AA enUSA, Edition date: 04/2016, First Printing Roadside Emergencies4
2
1
3
E142664