sensor FORD TRANSIT 2018 Owner's Guide
[x] Cancel search | Manufacturer: FORD, Model Year: 2018, Model line: TRANSIT, Model: FORD TRANSIT 2018Pages: 521, PDF Size: 8.65 MB
Page 259 of 521
4.
Carefully lift the air filter housing cover.
Remove the air filter element from the
air filter housing.
5. Install a new air filter element. Make sure that the groove seal on the
pleated paper filter traps both sides of
the vertical partition of the air box.
6. Replace the air filter housing. Engage the clamps that secure the air filter
housing cover to the air filter housing.
Be careful not to crimp the filter
element edges between the air filter
housing and cover. Make sure that the
tabs on the edge are correctly aligned
into the slots.
7. Slip the air tube onto the air filter cover
and snugly tighten the bolt on the air
tube clamp, but do not overtighten.
8. Reconnect the mass air flow sensor electrical connector to the outlet tube.
Make sure the locking tab on the
connector is in the locked position.
CHANGING THE ENGINE AIR
FILTER - 3.5L ECOBOOST™ WARNING: To reduce the risk of
vehicle damage and personal burn injuries,
do not start your engine with the air cleaner
removed and do not remove it while the
engine is running.
Note: Failure to use the correct air filter
element may result in severe engine
damage. The vehicle Warranty may be void
for any damage to the engine if the correct
air filter element is not used.
Only use the specified air filter.
See
Capacities and Specifications (page
305).
Change the air filter element at the proper
interval.
See Scheduled Maintenance
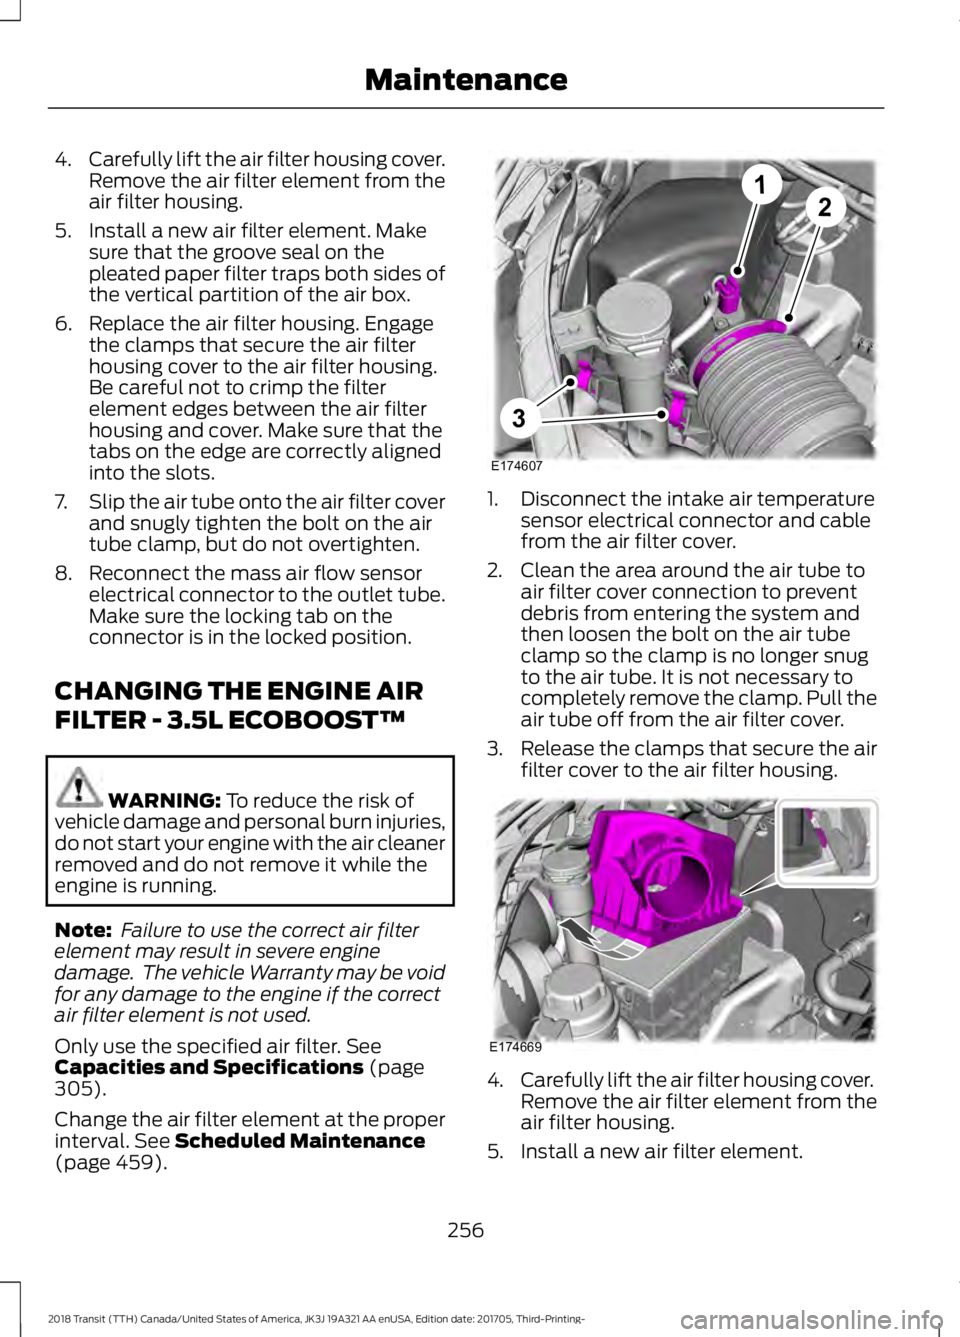
(page 459). 1. Disconnect the intake air temperature
sensor electrical connector and cable
from the air filter cover.
2. Clean the area around the air tube to air filter cover connection to prevent
debris from entering the system and
then loosen the bolt on the air tube
clamp so the clamp is no longer snug
to the air tube. It is not necessary to
completely remove the clamp. Pull the
air tube off from the air filter cover.
3. Release the clamps that secure the air
filter cover to the air filter housing. 4.
Carefully lift the air filter housing cover.
Remove the air filter element from the
air filter housing.
5. Install a new air filter element.
256
2018 Transit (TTH) Canada/United States of America, JK3J 19A321 AA enUSA, Edition date: 201705, Third-Printing- MaintenanceE174607
12
3 E174669
Page 260 of 521
6. Replace the air filter housing cover.
Engage the clamps that secure the air
filter housing cover to the air filter
housing. Be careful not to crimp the
filter element edges between the air
filter housing and cover. Make sure
that the tabs on the edge are correctly
aligned into the slots.
7. Slip the air tube onto the air filter cover
and snugly tighten the bolt on the air
tube clamp, but do not overtighten.
8. Reconnect the intake air temperature sensor electrical connector to the
outlet tube. Make sure the locking tab
on the connector is in the locked
position.
CHANGING THE ENGINE AIR
FILTER - 3.7L WARNING: To reduce the risk of
vehicle damage and personal burn injuries,
do not start your engine with the air cleaner
removed and do not remove it while the
engine is running.
Note: Failure to use the correct air filter
element may result in severe engine
damage. The vehicle Warranty may be void
for any damage to the engine if the correct
air filter element is not used.
Only use the specified air filter. See
Capacities and Specifications
(page
305).
Change the air filter element at the proper
interval. See
Scheduled Maintenance
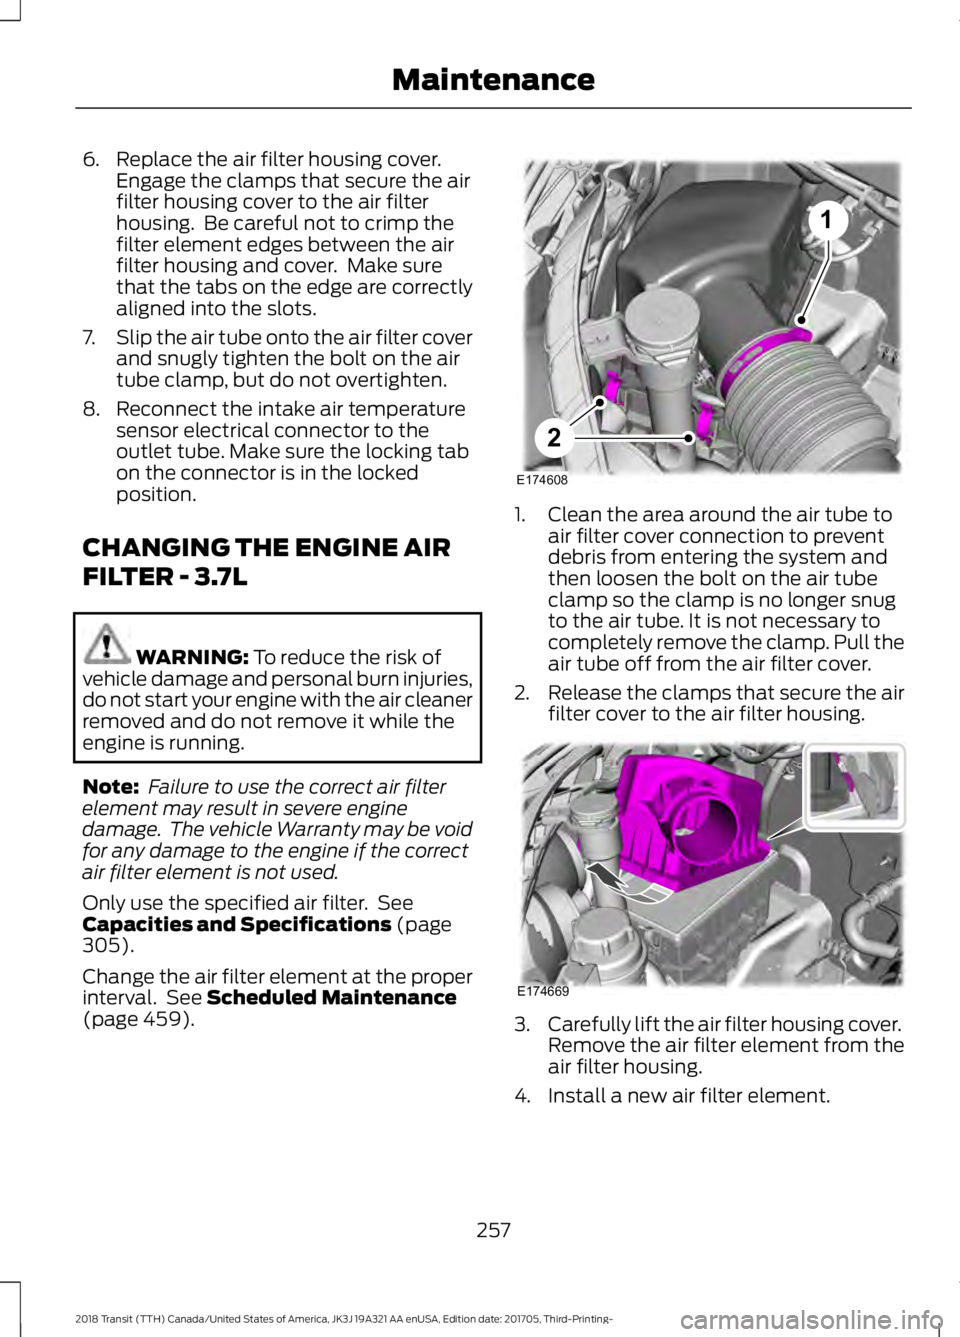
(page 459). 1. Clean the area around the air tube to
air filter cover connection to prevent
debris from entering the system and
then loosen the bolt on the air tube
clamp so the clamp is no longer snug
to the air tube. It is not necessary to
completely remove the clamp. Pull the
air tube off from the air filter cover.
2. Release the clamps that secure the air
filter cover to the air filter housing. 3.
Carefully lift the air filter housing cover.
Remove the air filter element from the
air filter housing.
4. Install a new air filter element.
257
2018 Transit (TTH) Canada/United States of America, JK3J 19A321 AA enUSA, Edition date: 201705, Third-Printing- Maintenance1
2
E174608 E174669
Page 265 of 521
Note:
Do not apply cleaning product to hot
surfaces and do not leave cleaning product
on chrome surfaces for a period of time
exceeding that which is recommended.
Note: Industrial-strength (heavy-duty)
cleaners, or cleaning chemicals, may cause
damage over a period of time.
Body Paintwork Preservation
We recommend that you wax the
paintwork once or twice a year.
Note: Do not apply polish in strong sunlight
as this dries the polish too quickly.
Note: Do not allow polish to come in
contact with plastic surfaces as it can be
difficult to remove.
Note: Do not apply polish to the windshield
or rear window. A contaminated windshield
or contaminated wiper blades may lead to
increased wiper noise, reduced wipe quality
or reduced rain sensor performance.
Sliding Door Tracks (If Equipped) WARNING: Do not open or close the
sliding doors when your hands are near the
tracks or rollers.
To clean the sliding door tracks, wipe the
surface using a clean, cotton cloth with a
mild soap and water solution.
Do not use a commercial or high-pressure
washer.
WAXING
Regular waxing is necessary to protect your
car's paint from the elements. We
recommend that you wash and wax the
painted surface once or twice a year. When washing and waxing, park your
vehicle in a shaded area out of direct
sunlight. Always wash your vehicle before
applying wax.
•
Use a quality wax that does not contain
abrasives.
• Follow the manufacturer ’s instructions
to apply and remove the wax.
• Apply a small amount of wax in a
back-and-forth motion, not in circles.
• Do not allow wax to come in contact
with any non-body (low-gloss black)
colored trim. The wax will discolor or
stain the parts over time.
•Roof racks.
• Bumpers.
• Grained door handles.
• Side moldings.
• Mirror housings.
• Windshield cowl area.
• Do not apply wax to glass areas.
• After waxing, your car's paint should
feel smooth, and be free of streaks and
smudges.
CLEANING THE ENGINE
Engines are more efficient when they are
clean because grease and dirt buildup keep
the engine warmer than normal.
When washing:
• Take care when using a power washer
to clean the engine. The high-pressure
fluid could penetrate the sealed parts
and cause damage.
• Do not spray a hot engine with cold
water to avoid cracking the engine
block or other engine components.
262
2018 Transit (TTH) Canada/United States of America, JK3J 19A321 AA enUSA, Edition date: 201705, Third-Printing- Vehicle Care
Page 286 of 521
Fitting Replacement Tires
WARNING: To reduce the
risk of serious injury, when
mounting replacement tires and
wheels, you should not exceed the
maximum pressure indicated on
the sidewall of the tire to set the
beads without additional
precautions listed below. If the
beads do not seat at the
maximum pressure indicated,
re-lubricate and try again. WARNING:
When inflating
the tire for mounting pressures up
to
20 psi (1.38 bar) greater than
the maximum pressure on the tire
sidewall, the following
precautions must be taken to
protect the person mounting the
tire:
1. Make sure that you have the correct tire and wheel size.
2. Lubricate the tire bead and
wheel bead seat area again.
3. Stand at a minimum of
12 ft
(3.66 m) away from the wheel
and tire assembly.
4. Use both eye and ear
protection. Tire Pressure Monitoring
System
(If Equipped)
The use of wheels or tires not
recommended by Ford Motor
Company may affect the
operation of the tire pressure
monitoring system. If the tire
pressure monitoring system
indicator is flashing, the tire
pressure monitoring system is
malfunctioning. The replacement
tire might be incompatible with
the tire pressure monitoring
system, or a component of the tire
pressure monitoring system may
be damaged. See
Tire Pressure
Monitoring System (page 287).
The tire pressure sensors mounted
in the wheels (originally installed
on your vehicle) are not designed
to be used in aftermarket wheels.
Tire Safety Practices WARNING:
If your vehicle is
stuck in snow, mud or sand, do not
rapidly spin the tires; spinning the
tires can tear the tire and cause
an explosion. A tire can explode in
as little as three to five seconds.
283
2018 Transit (TTH) Canada/United States of America, JK3J 19A321 AA enUSA, Edition date: 201705, Third-Printing- Wheels and Tires
Page 288 of 521
Tire Rotation
WARNING: If the tire label
shows different tire pressures for
the front and rear tires and the
vehicle has a tire pressure
monitoring system, then you need
to update the settings for the
system sensors. Always perform
the system reset procedure after
tire rotation. If you do not reset the
system, it may not provide a low
tire pressure warning when
necessary. See
Tire Pressure
Monitoring System (page 287).
Rotating the tires at the
recommended interval detailed in
the Scheduled Maintenance
chapter will help the tires wear
more evenly, providing better tire
performance and longer tire life.
Sometimes irregular tire wear can
be corrected by rotating the tires.
Note: After rotating the tires the
inflation pressure must be checked
and adjusted to the vehicle
requirements.
Note: If the tires show uneven
wear ask an authorized dealer to
check for and correct any wheel
misalignment, tire imbalance or
mechanical problem involved
before tire rotation. Note:
Your vehicle may have a
dissimilar spare wheel and tire
assembly. A dissimilar spare wheel
and tire assembly is defined as a
spare wheel and tire assembly that
is different in brand, size or
appearance from the road tires and
wheels. If you have a dissimilar
spare wheel and tire assembly it is
intended for temporary use only
and should not be used in a tire
rotation.
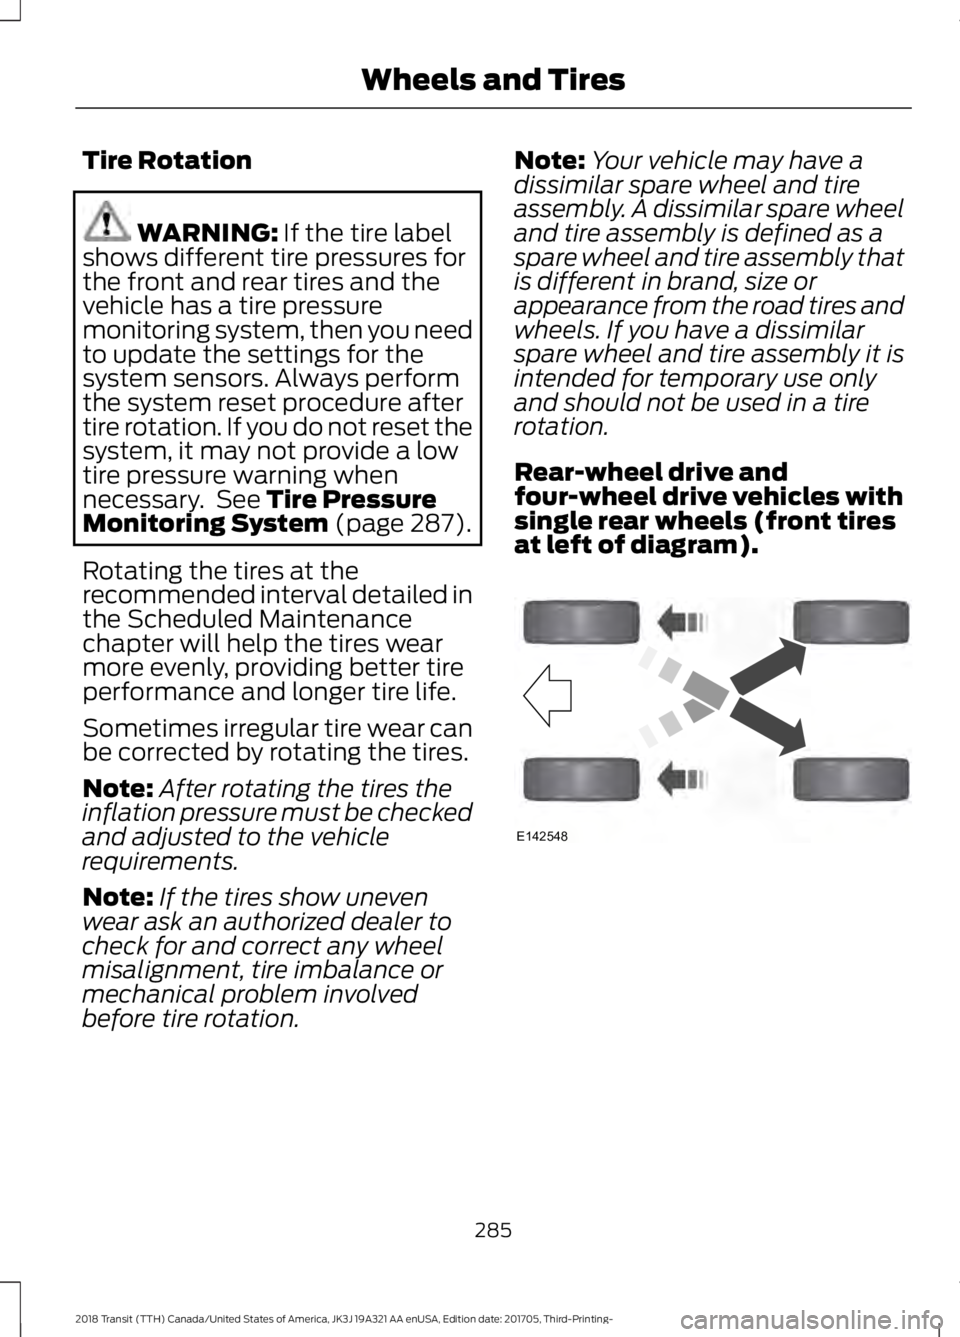
Rear-wheel drive and
four-wheel drive vehicles with
single rear wheels (front tires
at left of diagram). 285
2018 Transit (TTH) Canada/United States of America, JK3J 19A321 AA enUSA, Edition date: 201705, Third-Printing- Wheels and TiresE142548
Page 290 of 521
WARNING: If you choose to install
snow tires on your vehicle, they must be
the same size, construction, and load range
as the original tires listed on the tire
placard, and they must be installed on all
four wheels. Mixing tires of different size
or construction on your vehicle can
adversely affect your vehicle's handling
and braking, and may lead to loss of
vehicle control. WARNING:
Only fit snow chains to
specified tires.
The tires on your vehicle have all-weather
treads to provide traction in rain and snow.
However, in some climates, you may need
to use snow tires, snow chains or cables.
If you use snow chains or cables, we
recommended that steel wheels of the
same size and specifications are used,
snow chains or cables may damage alloy
wheels.
Follow these guidelines when using snow
chains or cables:
• Avoid fully loading your vehicle.
• Only certain snow chains or cables
have been approved by Ford as safe
for use on vehicles with either 235/65
R16C or 195/75 R16C tires.
• Snow chains or cables must be
mounted in pairs on the rear tires only.
• Do not use snow chains or cables on
dual rear alloy wheels.
• Install snow chains or cables securely,
make sure they do not touch any wiring,
brake lines or fuel lines.
• Use only SAE Class S snow chains,
snow cables or equivalent that
measure
0.4 in (10 mm) or less in
dimension as measured on the sidewall
of the tire. •
Do not exceed
30 mph (48 km/h) or
the maximum speed recommended by
the snow chains or cables
manufacturer, whichever is less.
• Purchase snow chains or cables from
a manufacturer that clearly labels the
body to tire dimension restrictions.
• Remove the snow chains or cables
when they are no longer needed.
• Do not use snow chains or cables on
dry roads.
• If you have any questions regarding
snow chains or cables, see an
authorized dealer.
TIRE PRESSURE MONITORING
SYSTEM
(If Equipped) WARNING:
The tire pressure
monitoring system is not a substitute for
manually checking tire pressures. You
should periodically check tire pressures
using a pressure gauge. Failure to correctly
maintain tire pressures could increase the
risk of tire failure, loss of control, vehicle
rollover and personal injury. WARNING:
Do not use tire sealants
as they may damage the tire pressure
monitoring system. WARNING:
If the tire pressure
monitor sensor becomes damaged it may
not function.
287
2018 Transit (TTH) Canada/United States of America, JK3J 19A321 AA enUSA, Edition date: 201705, Third-Printing- Wheels and Tires
Page 292 of 521
Changing Tires With a Tire
Pressure Monitoring System
Note:
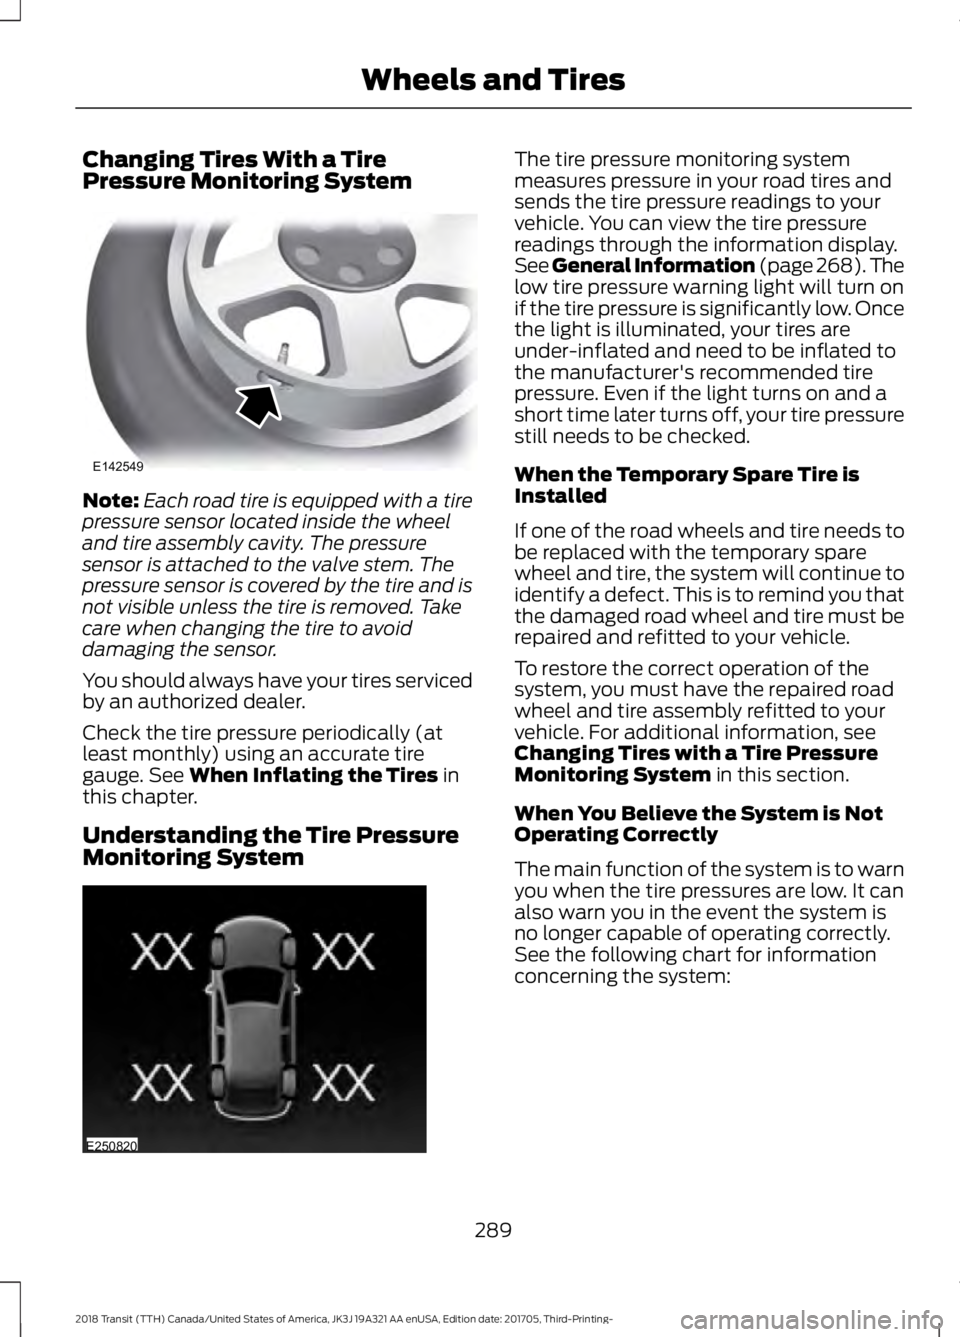
Each road tire is equipped with a tire
pressure sensor located inside the wheel
and tire assembly cavity. The pressure
sensor is attached to the valve stem. The
pressure sensor is covered by the tire and is
not visible unless the tire is removed. Take
care when changing the tire to avoid
damaging the sensor.
You should always have your tires serviced
by an authorized dealer.
Check the tire pressure periodically (at
least monthly) using an accurate tire
gauge. See When Inflating the Tires in
this chapter.
Understanding the Tire Pressure
Monitoring System The tire pressure monitoring system
measures pressure in your road tires and
sends the tire pressure readings to your
vehicle. You can view the tire pressure
readings through the information display.
See General Information (page
268). The
low tire pressure warning light will turn on
if the tire pressure is significantly low. Once
the light is illuminated, your tires are
under-inflated and need to be inflated to
the manufacturer's recommended tire
pressure. Even if the light turns on and a
short time later turns off, your tire pressure
still needs to be checked.
When the Temporary Spare Tire is
Installed
If one of the road wheels and tire needs to
be replaced with the temporary spare
wheel and tire, the system will continue to
identify a defect. This is to remind you that
the damaged road wheel and tire must be
repaired and refitted to your vehicle.
To restore the correct operation of the
system, you must have the repaired road
wheel and tire assembly refitted to your
vehicle. For additional information, see
Changing Tires with a Tire Pressure
Monitoring System
in this section.
When You Believe the System is Not
Operating Correctly
The main function of the system is to warn
you when the tire pressures are low. It can
also warn you in the event the system is
no longer capable of operating correctly.
See the following chart for information
concerning the system:
289
2018 Transit (TTH) Canada/United States of America, JK3J 19A321 AA enUSA, Edition date: 201705, Third-Printing- Wheels and TiresE142549 E250820
Page 294 of 521
How Temperature Affects the Tire
Pressures
While driving in a normal manner, tire
pressures may increase up to 4 psi
(30 kPa) from a cold start situation. If the
vehicle is stationary overnight and the
temperature significantly lower than the
daytime temperature, tire pressures may
decrease up to 3 psi (20 kPa) for a drop of
30°F (17°C) in ambient temperature. This
lower pressure value will be detected by
the system as being significantly lower
than the correct inflation pressure and the
warning light will illuminate.
If the warning light is on:
• Check each tire to verify that none are
flat.
• If one or more tires are flat, repair as
necessary.
• Check the tire pressures and Inflate all
the tires to the correct pressure.
Tire Pressure Monitoring System
Reset Procedure
Carry out the tire pressure monitoring
system reset procedure after:
• Every tire rotation.
• Each tire replacement, only when the
sensor stays the same and does not
change.
Note: The tire pressure monitoring system
reset procedure will not work with a new
sensor until an authorized dealer programs
the new sensor. Overview WARNING:
To determine the
required pressure(s) for your vehicle, see
the Safety Compliance Certification Label
(on the door hinge pillar, door-latch post
or the door edge that meets the door-latch
post, next to the driver seat) or the Tire
Label on the B-Pillar or the edge of the
driver door.
To maintain your vehicle ’s load carrying
capability, this vehicle requires different
tire pressures in the front tires compared
to the rear tires. The system on your vehicle
is designed to illuminate the warning light
at different pressures for the front and rear
tires.
The tires need to be periodically rotated
to provide consistent performance and
maximum tire life, the system needs to
know when the tires have been rotated to
determine which set of tires are on the
front and rear axles. With this information,
the system can detect and correctly warn
of low tire pressures.
System Reset Tips:
• To reduce the chance of interference
from another vehicle, the system reset
procedure should be carried out at
least three feet (one meter) away from
another Ford vehicle undergoing the
system reset procedure.
• Do not wait more than two minutes
between resetting each tire sensor or
the system will time-out and the entire
procedure will have to be repeated on
all four wheels. A double horn chirp
indicates the need to repeat the
procedure.
Carrying Out the System Reset
Procedure
Read the entire procedure before carrying
out a system reset.
291
2018 Transit (TTH) Canada/United States of America, JK3J 19A321 AA enUSA, Edition date: 201705, Third-Printing- Wheels and Tires
Page 295 of 521
1. Drive your vehicle above 20 mph
(32 km/h) for at least two minutes and
then park in a safe location where you
can easily get to all four tires and have
access to a tire inflation pump.
2. Switch the ignition off.
3. Switch the ignition on with the engine off.
4. Turn the hazard flashers on then off three times, this must be completed
within 10 seconds. If the reset mode
has been entered successfully, the horn
will chirp once and the system indicator
will flash. If this does not occur, repeat
the procedure from step 2. If after
repeated attempts to enter the reset
mode, the horn does not chirp and the
system indicator does not flash, have
your vehicle checked by an authorized
dealer as soon as possible.
5. Train the system sensors in the tires using the following reset sequence
starting with the left front tire and
following a clockwise order: Left front,
right front, right rear, left rear.
6. Remove the valve cap from the valve stem on the left front tire. Decrease the
air pressure until the horn chirps.
Note: The single horn chirp confirms that
the sensor identification code has been
learned by your vehicle for this position. If a
double horn chirp is heard, the reset
procedure was unsuccessful and must be
repeated.
7. Remove the valve cap from the valve stem on the right front tire. Decrease
the air pressure until the horn chirps.
8. Remove the valve cap from the valve stem on the right rear tire. Decrease the
air pressure until the horn chirps. 9. Remove the valve cap from the valve
stem on the left rear tire. Decrease the
air pressure until the horn chirps.
Training is complete when the horn
chirps after the last system sensor (left
rear) has been trained and the system
indicator stops flashing.
10. Switch the ignition off. If two short horn chirps are heard, the reset
procedure was unsuccessful and
must be repeated.
Note: If after repeating the procedure two
short horn chirps are heard again, have your
vehicle checked by an authorized dealer as
soon as possible.
11. Set all four tires to the correct pressure
See Maintenance (page
229). or the tire inflation pressure label
(located on the edge of driver door or
the B-Pillar).
CHANGING A ROAD WHEEL WARNING:
Do not use tire sealants
as they may damage the tire pressure
monitoring system. WARNING:
If the tire pressure
monitor sensor becomes damaged it may
not function.
Note: The tire pressure monitoring system
indicator light will illuminate when the spare
tire is in use. To restore the full function of
the monitoring system, all road wheels
equipped with tire pressure monitoring
sensors must be mounted on this vehicle.
If you get a flat tire while driving, do not
apply the brake heavily. Instead, gradually
decrease your speed. Hold the steering
wheel firmly and slowly move to a safe
place on the side of the road.
292
2018 Transit (TTH) Canada/United States of America, JK3J 19A321 AA enUSA, Edition date: 201705, Third-Printing- Wheels and Tires
Page 296 of 521
Have a flat serviced by an authorized
dealer in order to prevent damage to the
system sensors See Tire Pressure
Monitoring System (page 287). Replace
the spare tire with a road tire as soon as
possible. During repairing or replacing of
the flat tire, have the authorized dealer
inspect the system sensor for damage.
Dissimilar Spare Wheel and Tire
Assembly Information WARNING:
Failure to follow these
guidelines could result in an increased risk
of loss of vehicle control, injury or death.
If you have a dissimilar spare wheel and
tire, then it is intended for temporary use
only. This means that if you need to use it,
you should replace it as soon as possible
with a road wheel and tire assembly that
is the same size and type as the road tires
and wheels that were originally provided
by Ford. If the dissimilar spare tire or wheel
is damaged, it should be replaced rather
than repaired.
A dissimilar spare wheel and tire assembly
is defined as a spare wheel and tire
assembly that is different in brand, size or
appearance from the road tires and wheels
and can be one of three types:
1. T-type mini-spare:
This spare tire
begins with the letter T for tire size and
may have Temporary Use Only molded in
the sidewall.
2. Full-size dissimilar spare with label
on wheel:
This spare tire has a label on
the wheel that states: THIS WHEEL AND
TIRE ASSEMBLY FOR TEMPORARY USE
ONLY.
When driving with one of the dissimilar
spare tires listed above, do not: •
Exceed
50 mph (80 km/h).
• Load the vehicle beyond maximum
vehicle load rating listed on the Safety
Compliance Label.
• Tow a trailer.
• Use snow chains on the end of the
vehicle with the dissimilar spare tire.
• Use more than one dissimilar spare tire
at a time.
• Use commercial car washing
equipment.
• Try to repair the dissimilar spare tire.
Use of one of the dissimilar spare tires
listed above at any one wheel location can
lead to impairment of the following:
• Handling, stability and braking
performance.
• Comfort and noise.
• Ground clearance and parking at curbs.
• Winter weather driving capability.
• Wet weather driving capability.
• All-wheel driving capability.
3. Full-size dissimilar spare without
label on wheel
When driving with the full-size dissimilar
spare wheel and tire assembly, do not:
• Exceed
70 mph (113 km/h).
• Use more than one dissimilar spare
wheel and tire assembly at a time.
• Use commercial car washing
equipment.
• Use snow chains on the end of the
vehicle with the dissimilar spare wheel
and tire assembly.
The usage of a full-size dissimilar spare
wheel and tire assembly can lead to
impairment of the following:
• Handling, stability and braking
performance.
• Comfort and noise.
293
2018 Transit (TTH) Canada/United States of America, JK3J 19A321 AA enUSA, Edition date: 201705, Third-Printing- Wheels and Tires