key FORD TRANSIT 2019 Owner's Guide
[x] Cancel search | Manufacturer: FORD, Model Year: 2019, Model line: TRANSIT, Model: FORD TRANSIT 2019Pages: 529, PDF Size: 8.57 MB
Page 165 of 529
PRINCIPLE OF OPERATION
WARNING: To help avoid personal
injury, always use caution when in
reverse (R) and when using the sensing
system. WARNING: The system may not
detect objects with surfaces that absorb
reflection. Always drive with due care
and attention. Failure to take care may
result in a crash. WARNING:
Traffic control
systems, inclement weather, air brakes,
external motors and fans may affect the
correct operation of the sensing
system.This may cause reduced
performance or false alerts. WARNING:
The system may not
detect small or moving objects,
particularly those close to the ground.
Note: If your vehicle has MyKey ™, the
sensing system cannot be switched off
when a MyKey ™ is present.
See Principle
of Operation (page 61).
Note: Keep the sensors on the bumper or
fascia free from snow, ice and large
accumulations of dirt. If the sensors are
covered, the system ’s accuracy can be
affected. Do not clean the sensors with
sharp objects.
Note: If your vehicle sustains damage to
the bumper or fascia, leaving it misaligned
or bent, the sensing zone may be altered
causing inaccurate measurement of
obstacles or false alerts. Note:
Certain add-on devices installed
around the bumper or fascia may create
false alerts. For example, large trailer
hitches, bike or surfboard racks, license plate
brackets, bumper covers or any other device
that may block the normal detection zone
of the system. Remove the add-on device
to prevent false alerts.
Note: When you connect a trailer to your
vehicle, the rear parking aid may detect the
trailer and therefore provide an alert. Disable
the rear parking aid when you connect a
trailer to prevent the alert.
The sensing system warns the driver of
obstacles within a certain range of your
vehicle. The system turns on automatically
whenever you switch the ignition on.
You can switch the system off through the
information display menu or from the
pop-up message that appears once you
shift the transmission into reverse (R). See
General Information
(page 97). If your
vehicle has a parking aid button, you can
switch the system off by pressing the
button.
If a fault is present in the system, a warning
message appears in the information
display. See
Information Messages
(page 101).
PARKING AID WARNING: The parking aid system
can only assist you to detect objects
when your vehicle is moving at parking
speeds. To help avoid personal injury you
must take care when using the parking
aid system.
162
2019 Transit (TTH) Canada/United States of America, Vehicles Built From: 02-01-2019, KK3J 19A321 AB enUSA, Edition date: 201812, First-Printing Parking Aids
(If Equipped)
Page 197 of 529
ROADSIDE ASSISTANCE
Vehicles Sold in the United States:
Getting Roadside Assistance
To fully assist you should you have a
vehicle concern, Ford Motor Company
offers a complimentary roadside
assistance program. This program is
separate from the New Vehicle Limited
Warranty.
The service is available:
•
24 hours a day, seven days a week.
• For the coverage period listed on the
Roadside Assistance Card included in
your Owner's Manual portfolio.
Roadside Assistance covers:
• A flat tire change with a good spare
(except vehicles supplied with a tire
inflation kit).
• Battery jump start.
• Lock-out assistance (key replacement
cost is the customer's responsibility).
• Fuel delivery — independent service
contractors, if not prohibited by state,
local or municipal law, shall deliver up
to 2 gal (8 L) of gasoline or 5 gal (20 L)
of diesel fuel to a disabled vehicle.
Roadside Assistance limits fuel delivery
service to two no-charge occurrences
within a 12-month period.
• Winch out — available within 100 ft
(30 m) of a paved or county
maintained road, no recoveries. •
Towing — independent service
contractors, if not prohibited by state,
local or municipal law, shall tow Ford
eligible vehicles to an authorized dealer
within
35 mi (56 km) of the
disablement location or to the nearest
authorized dealer. If a member
requests a tow to an authorized dealer
that is more than
35 mi (56 km) from
the disablement location, the member
shall be responsible for any mileage
costs in excess of
35 mi (56 km).
• Roadside Assistance includes up to
$200 for a towed trailer if the disabled
eligible vehicle requires service at the
nearest authorized dealer. If the towing
vehicle is operational but the trailer is
not, then the trailer does not qualify for
any roadside services.
Vehicles Sold in the United States:
Using Roadside Assistance
Complete the roadside assistance
identification card and place it in your
wallet for quick reference. This card is in
the owner's information portfolio in the
glove compartment.
United States vehicle customers who
require Roadside Assistance, call
1-800-241-3673.
If you need to arrange roadside assistance
for yourself, Ford Motor Company
reimburses a reasonable amount for
towing to the nearest dealership within
35 mi (56 km)
. To obtain reimbursement
information, United States vehicle
customers call 1-800-241-3673.
Customers need to submit their original
receipts.
194
2019 Transit (TTH) Canada/United States of America, Vehicles Built From: 02-01-2019, KK3J 19A321 AB enUSA, Edition date: 201812, First-Printing Roadside Emergencies
Page 217 of 529
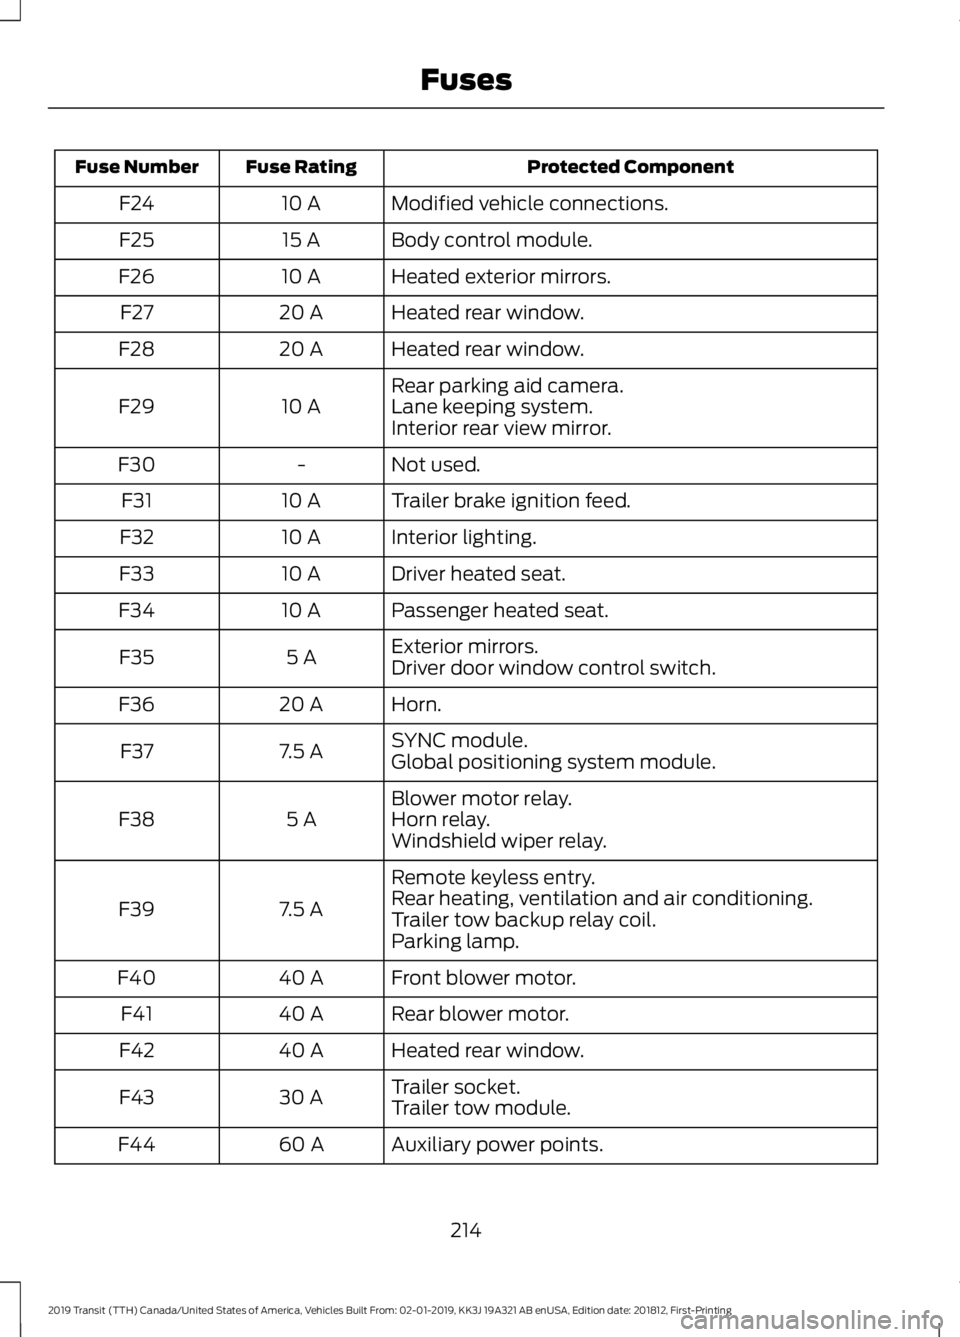
Protected Component
Fuse Rating
Fuse Number
Modified vehicle connections.
10 A
F24
Body control module.
15 A
F25
Heated exterior mirrors.
10 A
F26
Heated rear window.
20 A
F27
Heated rear window.
20 A
F28
Rear parking aid camera.
10 A
F29 Lane keeping system.
Interior rear view mirror.
Not used.
-
F30
Trailer brake ignition feed.
10 A
F31
Interior lighting.
10 A
F32
Driver heated seat.
10 A
F33
Passenger heated seat.
10 A
F34
Exterior mirrors.
5 A
F35
Driver door window control switch.
Horn.
20 A
F36
SYNC module.
7.5 A
F37
Global positioning system module.
Blower motor relay.
5 A
F38 Horn relay.
Windshield wiper relay.
Remote keyless entry.
7.5 A
F39 Rear heating, ventilation and air conditioning.
Trailer tow backup relay coil.
Parking lamp.
Front blower motor.
40 A
F40
Rear blower motor.
40 A
F41
Heated rear window.
40 A
F42
Trailer socket.
30 A
F43
Trailer tow module.
Auxiliary power points.
60 A
F44
214
2019 Transit (TTH) Canada/United States of America, Vehicles Built From: 02-01-2019, KK3J 19A321 AB enUSA, Edition date: 201812, First-Printing Fuses
Page 226 of 529
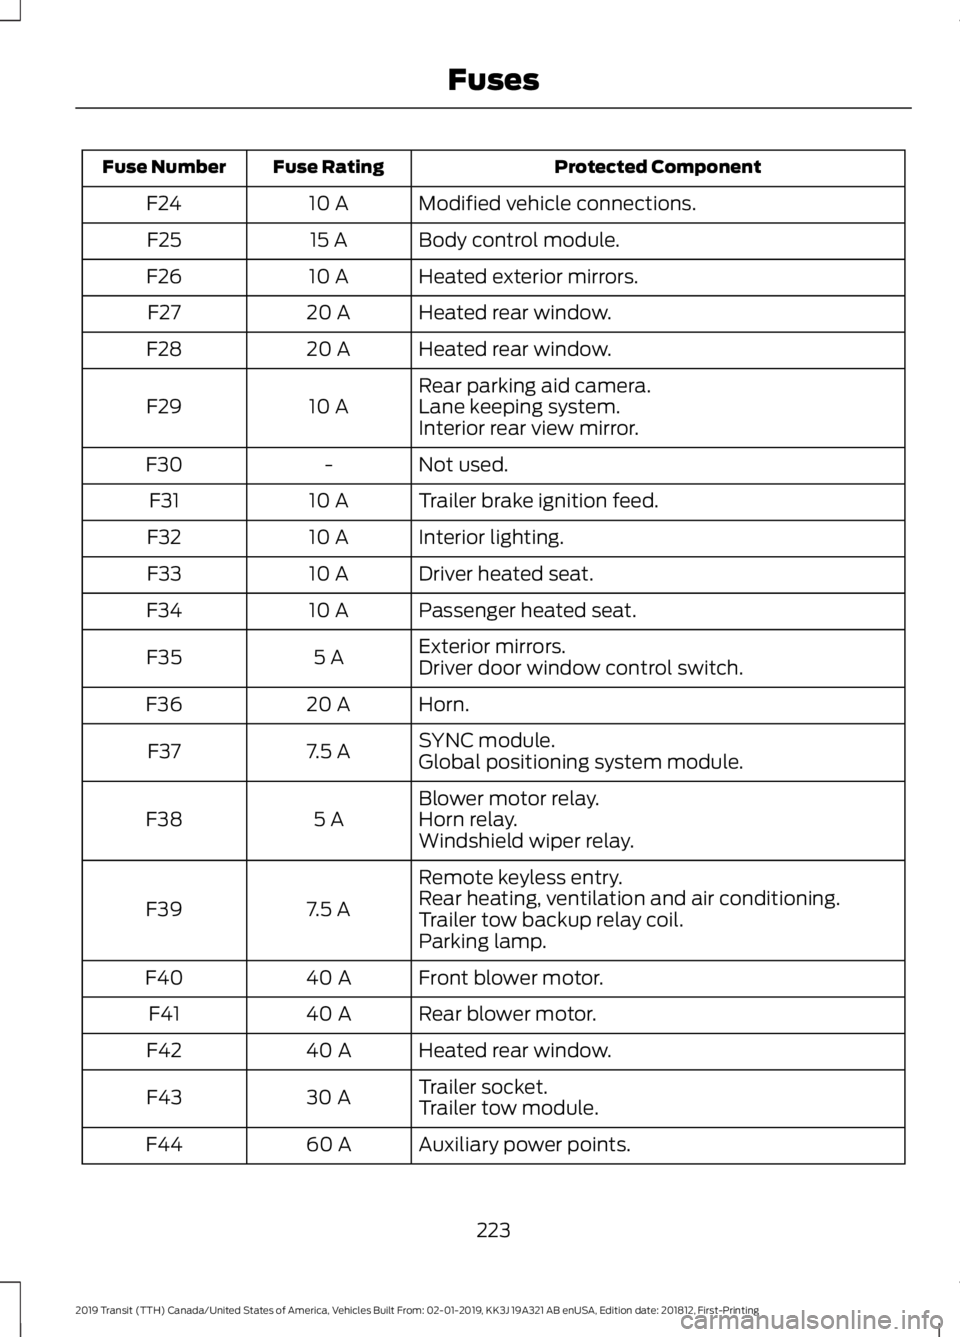
Protected Component
Fuse Rating
Fuse Number
Modified vehicle connections.
10 A
F24
Body control module.
15 A
F25
Heated exterior mirrors.
10 A
F26
Heated rear window.
20 A
F27
Heated rear window.
20 A
F28
Rear parking aid camera.
10 A
F29 Lane keeping system.
Interior rear view mirror.
Not used.
-
F30
Trailer brake ignition feed.
10 A
F31
Interior lighting.
10 A
F32
Driver heated seat.
10 A
F33
Passenger heated seat.
10 A
F34
Exterior mirrors.
5 A
F35
Driver door window control switch.
Horn.
20 A
F36
SYNC module.
7.5 A
F37
Global positioning system module.
Blower motor relay.
5 A
F38 Horn relay.
Windshield wiper relay.
Remote keyless entry.
7.5 A
F39 Rear heating, ventilation and air conditioning.
Trailer tow backup relay coil.
Parking lamp.
Front blower motor.
40 A
F40
Rear blower motor.
40 A
F41
Heated rear window.
40 A
F42
Trailer socket.
30 A
F43
Trailer tow module.
Auxiliary power points.
60 A
F44
223
2019 Transit (TTH) Canada/United States of America, Vehicles Built From: 02-01-2019, KK3J 19A321 AB enUSA, Edition date: 201812, First-Printing Fuses
Page 298 of 529
•
Ground clearance and parking at curbs.
• Winter weather driving capability.
• Wet weather driving capability.
• All-wheel driving capability.
When driving with the full-size dissimilar
spare wheel and tire assembly additional
caution should be given to:
• Towing a trailer.
• Driving vehicles equipped with a
camper body.
• Driving vehicles with a load on the
cargo rack.
Drive cautiously when using a full-size
dissimilar spare wheel and tire assembly
and seek service as soon as possible.
Locking Lug Nuts
You can obtain replacement locking lug
nuts or a locking lug nut key using the
reference number certificate.
Vehicles With a Spare Wheel
The spare wheel is under the rear of your
vehicle.
If the spare wheel is the same type and
size as your vehicle road wheel, you can fit
the spare wheel and continue to drive in
the normal manner.
If the spare wheel is not the same type and
size as your vehicle road wheel, it has a
label showing the maximum driving speed
limit. Note:
If your vehicle is fitted with a tire
pressure monitoring system, the warning
indicator will flash if you fit the spare wheel
to your vehicle. To restore the correct
operation of the tire pressure monitoring
system, you must have the repaired road
wheel and tire assembly refitted to your
vehicle. See Tire Pressure Monitoring
System (page 288). To prevent damage
occurring to the tire pressure monitoring
system sensors, make sure you have a
damage tire repaired or replaced by a tire
professional.
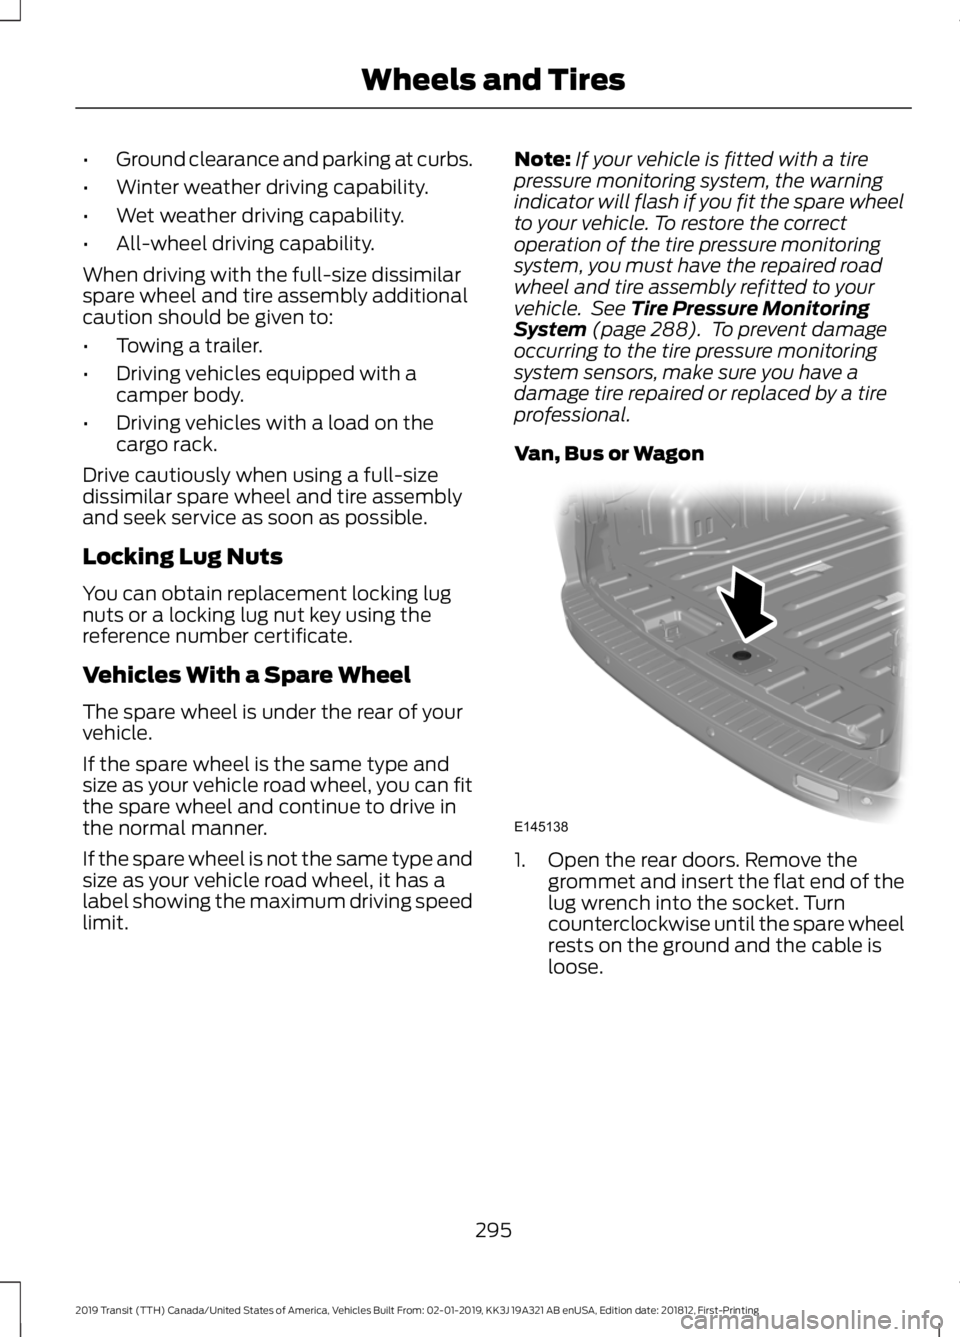
Van, Bus or Wagon 1. Open the rear doors. Remove the
grommet and insert the flat end of the
lug wrench into the socket. Turn
counterclockwise until the spare wheel
rests on the ground and the cable is
loose.
295
2019 Transit (TTH) Canada/United States of America, Vehicles Built From: 02-01-2019, KK3J 19A321 AB enUSA, Edition date: 201812, First-Printing Wheels and TiresE145138
Page 306 of 529
WARNING: Chock the diagonally
opposite wheel to the punctured tire with
an appropriate block or wheel chock. A
wheel chock may be in the B-pillar or in
a storage compartment in the front
right-hand side stepwell. WARNING:
Make sure that the
arrows on directional tires point in the
direction of rotation when your vehicle
is moving forward. If you have to fit a
spare tire with the arrows pointing in the
opposite direction have the tire refitted
as soon as possible.
1. Use the locking lug nut key to loosen the locking lug nut.
2. Loosen the remaining lug nuts, but do not remove them.
3. Raise your vehicle until the tire is clear of the ground.
4. Remove the lug nuts and the road wheel.
Note: Do not lay alloy road wheels face
down on the ground.
Installing a Road Wheel WARNING:
Use only approved
wheel and tire sizes. Using other sizes
could damage your vehicle and will make
the National Type Approval invalid. WARNING:
Make sure there is no
grease or oil on the threads or the
surface between the wheel lugs and
nuts. This can cause the lug nuts to
loosen while driving. WARNING:
When you install a
wheel, always remove any corrosion, dirt
or foreign materials present on the
mounting surfaces of the wheel or the
surface of the wheel hub, brake drum or
brake disc that contacts the wheel. Make
sure to secure any fasteners that attach
the rotor to the hub so they do not
interfere with the mounting surfaces of
the wheel. Installing wheels without
correct metal-to-metal contact at the
wheel mounting surfaces can cause the
wheel nuts to loosen and the wheel to
come off while your vehicle is in motion,
resulting in loss of vehicle control,
personal injury or death. WARNING:
Only use the specific
lug nuts and wheels supplied with your
vehicle. If in doubt, contact an authorized
dealer. WARNING:
Do not install alloy
wheels using lug nuts designed for use
with steel wheels. WARNING:
The lug nuts of alloy
wheels and spoked steel wheels can also
be used for the steel spare wheel for a
short time (maximum two weeks).
1. Install the wheel.
303
2019 Transit (TTH) Canada/United States of America, Vehicles Built From: 02-01-2019, KK3J 19A321 AB enUSA, Edition date: 201812, First-Printing Wheels and Tires
Page 344 of 529
SOUND: Press the button to adjust the sound settings for bass, treble, balance
and fade.
C
Seek, Fast Forward and Reverse:
In radio mode, select a frequency band
and press either button.The system stops at the first station it finds in that
direction. Press and hold to quickly seek up or down the frequency band. In
media mode, press to select the previous or next track. Press and hold either
button to move quickly forward or backward through the current track.
D
Dial and end call:
Press the button to make or end a call.
D
Numeric keypad:
Press the button to recall a previously stored station. To
store a favorite station press and hold until the sound returns. In Phone mode,
use these keys to dial the number.
E
Clock:
Press the button to select clock setup.
F
Information:
Press the button to access the complete information if it does
not fit the display.
G
On, Off and Volume:
Press the button to switch the audio system on or off.
Turn the dial to adjust the volume.
H
MENU:
: Press the button to access different audio system features, depending
on which mode has been selected.
I
Voice Pass-Through
and Phone: Press the button to say commands to your
cell phone or to access the Bluetooth phone feature of the system by pressing
PHONE
then MENU. When paired further presses of this button will display
phone name, signal strength and the battery level.
J
MEDIA:
Press the button to access Bluetooth audio streaming, USB or Aux
input playback.
K
RADIO:
Press the button to select different radio bands. Press to cancel the
menu or list browsing.
L
Cursor up and down:
Press a button to scroll through on-screen choices. In
radio mode press to manual tune.
M
OK, Play and Pause:
Press the button to confirm on-screen selections. Press
to play or pause during playback with compatible external devices.
N
Sound Button
This allows you to adjust the sound
settings (for example bass, treble, balance
and fade).
1. Press the
MINbutton.
2. Use the up and down arrow buttons to
select the required level. Waveband Button
Press the
MINbutton to select from the
wavebands available (AM, FM1,FM2). You
can use the button to return to radio
reception when you have been listening to
another source.
341
2019 Transit (TTH) Canada/United States of America, Vehicles Built From: 02-01-2019, KK3J 19A321 AB enUSA, Edition date: 201812, First-Printing Audio System
Page 347 of 529
Phonebook Downloading
If your phonebook was not downloaded
during initial Bluetooth pairing follow this
process:
1. Press the PHONE button and then
keep pressing the MENU button to
scroll to the LOAD PHONEBK display.
2. Press the
OK button.
Deleting a Paired Device or Phone
To remove a paired device follow this
process:
1. Press the
PHONE button and then
keep pressing the MENU button to
scroll to the DEL DEVICE display.
2. Press the
OK button. The first paired
device name will be shown. Scroll to
the required device name using the up
and down arrow. Once choose the
device, press
OK, the message "DEL
DEVICE" will appear. Press OK, Scroll
to select
"YES" and press OK to
confirm. Select delete all to erase all
paired devices.
3. Press the
OK button multiple times to
unpair the device from the audio unit.
Privacy Mode
You can transfer a call from hands free to
private mode during an active call.
Press the
MENU button until PRIVACY
appears, then press the OK button to
transfer. To return to hands free mode,
press the dial button.
Phone Menu Options
Press the
PHONE button to select phone
mode. Press the PHONE button again to
display information such as phone name,
signal strength and battery level. When in phone mode, press the
MENU
button to scroll through the various phone
options:
• Dial.
• Phonebook.
• Call History.
• Add Device.
• Select Device.
• Set Primary.
• Delete Device.
• Bluetooth on and off.
• Load Phonebook.
• Reject on or off.
Press the OK button to select the required
option, and use the up and down arrows
to change features.
Making and Receiving Calls
Outgoing calls can be made by:
• Entering a number using the keys on
the radio.
• Saying a command to call someone
after pressing the
Voice
Pass-Through button.
• Selecting a contact from the
downloaded phonebook.
• Selecting a number or contact from the
call history log.
• Using quick dial by pressing one of the
radio preset buttons.
• Using the redial function.
• Using the cell phone.
Incoming calls can be answered by:
• Pressing the call pickup button on the
audio unit.
• Using the cell phone.
Calls can be rejected using the end call
button on the audio unit or by using the cell
phone directly.
344
2019 Transit (TTH) Canada/United States of America, Vehicles Built From: 02-01-2019, KK3J 19A321 AB enUSA, Edition date: 201812, First-Printing Audio System
Page 348 of 529
USB
Note:
Only use USB Mass-Storage device
compliant devices.
Note: Always switch your audio unit to a
different source (for example the radio)
before unplugging the USB device.
Note: Do not install or connect USB hubs
or splitters.
Note: The system is only designed to
recognize and read suitable audio files from
a USB device that conforms to the USB
Mass-Storage device class or an iPod. Not
all available USB devices can be guaranteed
to function with the system.
Note: It is possible to connect compatible
devices with a trailing USB lead as well as
those that plug into the USB socket directly
(for example USB memory sticks and pen
drives).
Note: Some USB devices with a higher
power consumption may not be compatible
(for example some larger hard drives).
Note: Access time to read the files on the
external device will vary depending upon
factors such as the file structure, size and
device content.
The audio unit supports a range of external
devices. Once connected, control of the
external device is possible via the audio
unit.
Operating the USB Device
Note: USB playback will start automatically
when you connect a compatible device. To
turn this feature off, select AUTOPL and
then select OFF using the menu function.
Connect the device to the audio unit. Select the USB device as the audio source
by pressing the
MEDIA button until the
USB screen appears in the display. After
first connecting the USB device, the first
track within the first folder will start to play
automatically. Following audio source
switching, the position of playback on the
USB device is remembered.
Press the seek up and down keys to skip
backward and forward through tracks.
Press and hold to fast forward and reverse
through the track.
iPod
Connect the iPod to the audio unit.
Select the iPod as the audio source by
pressing the
MEDIA button until IPOD
appears in the display. After first
connecting the iPod, the first track within
the first folder will start to play
automatically. Following audio source
switching, the position of playback on the
iPod is remembered.
Press the seek up and down keys to skip
backward and forward through tracks.
Press and hold the seek keys to enable fast
rewind or fast forward through track
content.
Various functions may be controlled from
the audio unit including:
• Next and previous track select.
• Track seek.
• Shuffle.
• Repeat.
Bluetooth Audio Streaming
Note: Make sure the device is paired before
using this feature.
Compatible Bluetooth devices can be
connected to the audio unit to playback
using the vehicle audio system.
345
2019 Transit (TTH) Canada/United States of America, Vehicles Built From: 02-01-2019, KK3J 19A321 AB enUSA, Edition date: 201812, First-Printing Audio System
Page 350 of 529
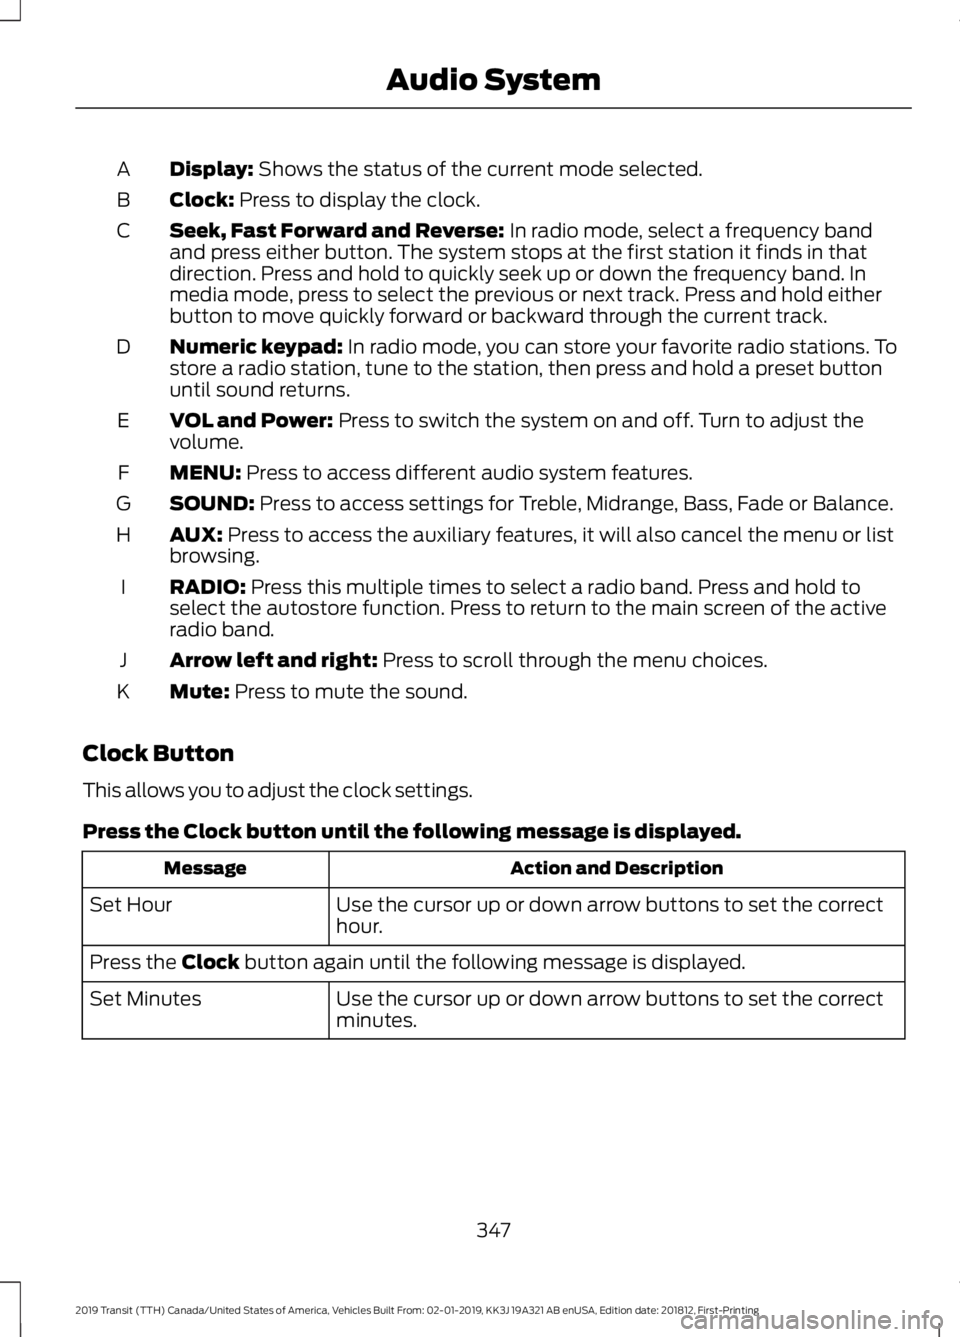
Display: Shows the status of the current mode selected.
A
Clock:
Press to display the clock.
B
Seek, Fast Forward and Reverse:
In radio mode, select a frequency band
and press either button. The system stops at the first station it finds in that
direction. Press and hold to quickly seek up or down the frequency band. In
media mode, press to select the previous or next track. Press and hold either
button to move quickly forward or backward through the current track.
C
Numeric keypad:
In radio mode, you can store your favorite radio stations. To
store a radio station, tune to the station, then press and hold a preset button
until sound returns.
D
VOL and Power:
Press to switch the system on and off. Turn to adjust the
volume.
E
MENU:
Press to access different audio system features.
F
SOUND:
Press to access settings for Treble, Midrange, Bass, Fade or Balance.
G
AUX:
Press to access the auxiliary features, it will also cancel the menu or list
browsing.
H
RADIO:
Press this multiple times to select a radio band. Press and hold to
select the autostore function. Press to return to the main screen of the active
radio band.
I
Arrow left and right:
Press to scroll through the menu choices.
J
Mute:
Press to mute the sound.
K
Clock Button
This allows you to adjust the clock settings.
Press the
Clock button until the following message is displayed. Action and Description
Message
Use the cursor up or down arrow buttons to set the correct
hour.
Set Hour
Press the
Clock button again until the following message is displayed.
Use the cursor up or down arrow buttons to set the correct
minutes.
Set Minutes
347
2019 Transit (TTH) Canada/United States of America, Vehicles Built From: 02-01-2019, KK3J 19A321 AB enUSA, Edition date: 201812, First-Printing Audio System