warning light FORD TRANSIT 2019 Owner's Guide
[x] Cancel search | Manufacturer: FORD, Model Year: 2019, Model line: TRANSIT, Model: FORD TRANSIT 2019Pages: 529, PDF Size: 8.57 MB
Page 162 of 529
PRINCIPLE OF OPERATION
The traction control system helps avoid
drive wheel spin and loss of traction.
If your vehicle begins to slide, the system
applies the brakes to individual wheels
and, when needed, reduces engine power
at the same time. If the wheels spin when
accelerating on slippery or loose surfaces,
the system reduces engine power in order
to increase traction.
USING TRACTION CONTROL
WARNING: The stability and
traction control light illuminates steadily
if the system detects a failure. Make sure
you did not manually disable the traction
control system using the information
display controls or the switch. If the
stability control and traction control light
is still illuminating steadily, have the
system serviced by an authorized dealer
immediately. Operating your vehicle with
the traction control disabled could lead
to an increased risk of loss of vehicle
control, vehicle rollover, personal injury
and death.
The system automatically turns on each
time you switch the ignition on.
If your vehicle is stuck in mud or snow,
switching traction control off may be
beneficial as this allows the wheels to spin.
Note: When you switch traction control off,
stability control remains fully active.
Switching the System Off
When you switch the system off or on, a
message appears in the information
display showing system status. You can switch the system off by either
using the information display controls or
the switch.
Using the Information Display
Controls
You can switch this feature off or on in the
information display.
See General
Information (page 97).
Using a Switch
(If Equipped)
Use the traction control switch on the
instrument panel to switch the system off
or on.
System Indicator Lights and
Messages The stability and traction control
light:
• Temporarily illuminates on engine
start-up.
• Flashes when a driving condition
activates either of the systems.
• Illuminates if a problem occurs in either
of the systems. The stability and traction control
off light temporarily illuminates
on engine start-up and stays on
when you switch the traction control
system off.
159
2019 Transit (TTH) Canada/United States of America, Vehicles Built From: 02-01-2019, KK3J 19A321 AB enUSA, Edition date: 201812, First-Printing Traction ControlE138639 E130458
Page 163 of 529
PRINCIPLE OF OPERATION
WARNING: Vehicle modifications
involving braking system, aftermarket
roof racks, suspension, steering system,
tire construction and wheel and tire size
may change the handling characteristics
of your vehicle and may adversely affect
the performance of the electronic
stability control system. In addition,
installing any stereo loudspeakers may
interfere with and adversely affect the
electronic stability control system. Install
any aftermarket stereo loudspeaker as
far as possible from the front center
console, the tunnel, and the front seats
in order to minimize the risk of interfering
with the electronic stability control
sensors. Reducing the effectiveness of
the electronic stability control system
could lead to an increased risk of loss of
vehicle control, vehicle rollover, personal
injury and death. WARNING:
Remember that even
advanced technology cannot defy the
laws of physics. It's always possible to
lose control of a vehicle due to
inappropriate driver input for the
conditions. Aggressive driving on any
road condition can cause you to lose
control of your vehicle increasing the risk
of personal injury or property damage.
Activation of the electronic stability
control system is an indication that at
least some of the tires have exceeded
their ability to grip the road; this could
reduce the operator's ability to control
the vehicle potentially resulting in a loss
of vehicle control, vehicle rollover,
personal injury and death. If your
electronic stability control system
activates, SLOW DOWN.
The system automatically turns on each
time you switch the ignition on. If the stability control or traction control
system detects a fault, the following may
occur:
•
The stability and traction control light
illuminates steadily.
• The stability control and traction
control systems do not enhance your
vehicle's ability to maintain traction of
the wheels.
If the stability control or traction control
system activates, the following may occur:
• The stability and traction control light
flashes.
• Your vehicle slows down.
• Reduced engine power.
• A vibration in the brake pedal.
• The brake pedal is stiffer than usual.
• If the driving condition is severe and
your foot is not on the brake pedal, the
pedal may move as the system applies
higher brake force.
The stability control system has several
features built into it to help you maintain
control of your vehicle.
Electronic Stability Control
The system helps to prevent your vehicle
skidding or laterally sliding by individually
applying the brakes to one or more wheels
and, if necessary, reducing engine power.
Roll Stability Control
The system helps to prevent rollovers by
detecting your vehicle's roll motion, and
individually applying the brakes to one or
more wheels.
160
2019 Transit (TTH) Canada/United States of America, Vehicles Built From: 02-01-2019, KK3J 19A321 AB enUSA, Edition date: 201812, First-Printing Stability Control
Page 182 of 529
TOWING A TRAILER
WARNING: Towing trailers
beyond the maximum
recommended gross trailer
weight exceeds the limit of your
vehicle and could result in engine
damage, transmission damage,
structural damage, loss of
vehicle control, vehicle rollover
and personal injury. WARNING:
Do not exceed
the GVWR or the GAWR
specified on the certification
label.
Note: See
Recommended
Towing Weights (page 180).
Your vehicle may have electrical
items, such as fuses or relays,
related to towing. See
Fuses
(page 208).
Your vehicle's load capacity
designation is by weight, not by
volume, so you cannot necessarily
use all available space when
loading a vehicle or trailer.
Towing a trailer places an extra
load on your vehicle's engine,
transmission, axle, brakes, tires
and suspension. Inspect these
components periodically during,
and after, any towing operation. Load Placement
To help minimize how trailer
movement affects your vehicle
when driving:
•
Load the heaviest items closest
to the trailer floor.
• Load the heaviest items
centered between the left and
right side trailer tires.
• Load the heaviest items above
the trailer axles or just slightly
forward toward the trailer
tongue. Do not allow the final
trailer tongue weight to go
above or below 10-15% of the
loaded trailer weight.
• Select a ball mount with the
correct rise or drop and load
capacity. When both the
loaded vehicle and trailer are
connected, the trailer frame
should be level, or slightly
angled down toward your
vehicle, when viewed from the
side.
When driving with a trailer or
payload, a slight takeoff vibration
or shudder may be present due to
the increased payload weight.
Additional information regarding
proper trailer loading and setting
your vehicle up for towing is
located in another chapter of this
manual. See
Load Limit (page
174).
You can also find information in
the
RV & Trailer Towing Guide
available at your authorized
dealer, or online.
179
2019 Transit (TTH) Canada/United States of America, Vehicles Built From: 02-01-2019, KK3J 19A321 AB enUSA, Edition date: 201812, First-Printing Towing
Page 195 of 529
COLD WEATHER
PRECAUTIONS
The functional operation of some
components and systems can be affected
at temperatures below -13°F (-25°C).
DRIVING THROUGH WATER WARNING:
Do not drive through
flowing or deep water as you may lose
control of your vehicle.
Note: Driving through standing water can
cause vehicle damage.
Note: Engine damage can occur if water
enters the air filter.
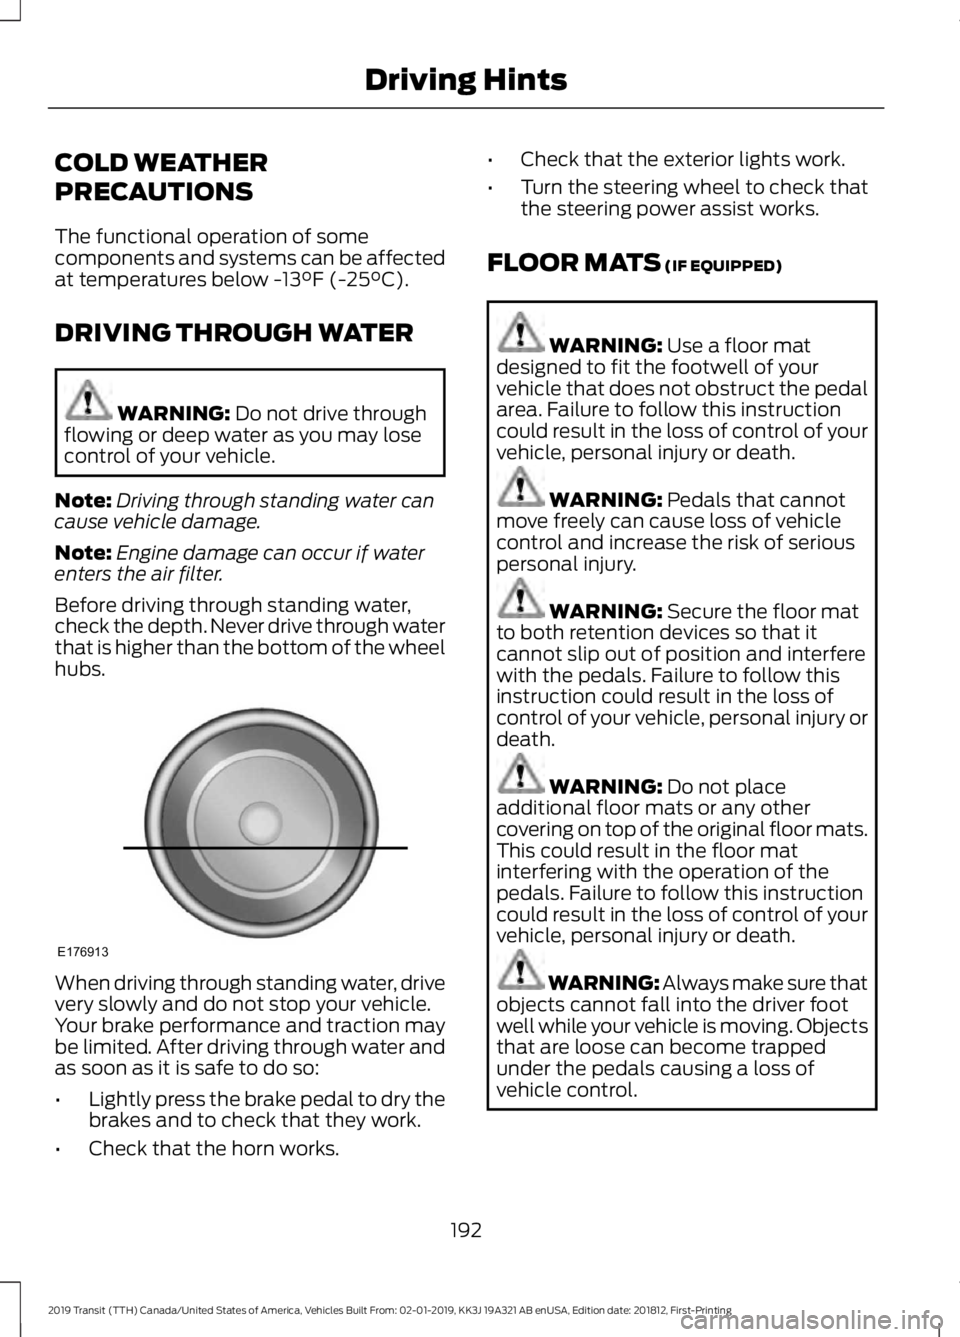
Before driving through standing water,
check the depth. Never drive through water
that is higher than the bottom of the wheel
hubs. When driving through standing water, drive
very slowly and do not stop your vehicle.
Your brake performance and traction may
be limited. After driving through water and
as soon as it is safe to do so:
•
Lightly press the brake pedal to dry the
brakes and to check that they work.
• Check that the horn works. •
Check that the exterior lights work.
• Turn the steering wheel to check that
the steering power assist works.
FLOOR MATS
(IF EQUIPPED) WARNING:
Use a floor mat
designed to fit the footwell of your
vehicle that does not obstruct the pedal
area. Failure to follow this instruction
could result in the loss of control of your
vehicle, personal injury or death. WARNING:
Pedals that cannot
move freely can cause loss of vehicle
control and increase the risk of serious
personal injury. WARNING:
Secure the floor mat
to both retention devices so that it
cannot slip out of position and interfere
with the pedals. Failure to follow this
instruction could result in the loss of
control of your vehicle, personal injury or
death. WARNING:
Do not place
additional floor mats or any other
covering on top of the original floor mats.
This could result in the floor mat
interfering with the operation of the
pedals. Failure to follow this instruction
could result in the loss of control of your
vehicle, personal injury or death. WARNING: Always make sure that
objects cannot fall into the driver foot
well while your vehicle is moving. Objects
that are loose can become trapped
under the pedals causing a loss of
vehicle control.
192
2019 Transit (TTH) Canada/United States of America, Vehicles Built From: 02-01-2019, KK3J 19A321 AB enUSA, Edition date: 201812, First-Printing Driving HintsE176913
Page 240 of 529
WARNING: To reduce the risk of
personal injury, make sure the engine is
cool before unscrewing the coolant
pressure relief cap. The cooling system
is under pressure. Steam and hot liquid
can come out forcefully when you loosen
the cap slightly. WARNING:
Do not add coolant
further than the MAX mark.
When the engine is cold, check the
concentration and level of the coolant at
the intervals listed in the scheduled
maintenance information. See Scheduled
Maintenance
(page 464).
Note: Make sure that the coolant level is
between the
MIN and MAX marks on the
coolant reservoir.
Note: Coolant expands when it is hot. The
level may extend beyond the
MAX mark.
Maintain coolant concentration within
48% to 50%, which equates to a freeze
point between
-29°F (-34°C) and -35°F
(-37°C). Coolant concentration should be
checked using a refractometer. We do not
recommend the use of hydrometers or
coolant test strips for measuring coolant
concentration.
Adding Coolant WARNING:
Do not add engine
coolant when the engine is hot. Failure
to follow this instruction could result in
personal injury. WARNING:
Do not remove the
coolant reservoir cap when the engine is
on or the cooling system is hot. Wait 10
minutes for the cooling system to cool
down. Cover the coolant reservoir cap
with a thick cloth to prevent the
possibility of scalding and slowly remove
the cap. Failure to follow this instruction
could result in personal injury. WARNING:
Do not put coolant in
the windshield washer reservoir. If
sprayed on the windshield, coolant could
make it difficult to see through the
windshield.
Note: Do not use stop leak pellets, cooling
system sealants, or non-specified additives
as they can cause damage to the engine
cooling or heating systems. Resulting
component damage may not be covered by
the vehicle Warranty.
Note: Automotive fluids are not
interchangeable.
It is very important to use prediluted
coolant approved to the correct
specification in order to avoid plugging the
small passageways in the engine cooling
system. See
Capacities and
Specifications (page 307). Do not mix
different colors or types of coolant in your
vehicle. Mixing of engine coolants or using
an incorrect coolant may harm the engine
or cooling system components and may
not be covered by the vehicle Warranty.
Note: If prediluted coolant is not available,
use the approved concentrated coolant
diluting it to 50/50 with distilled water. See
Capacities and Specifications (page 307).
Using water that has not been deionised
may contribute to deposit formation,
corrosion and plugging of the small cooling
system passageways.
237
2019 Transit (TTH) Canada/United States of America, Vehicles Built From: 02-01-2019, KK3J 19A321 AB enUSA, Edition date: 201812, First-Printing Maintenance
Page 251 of 529
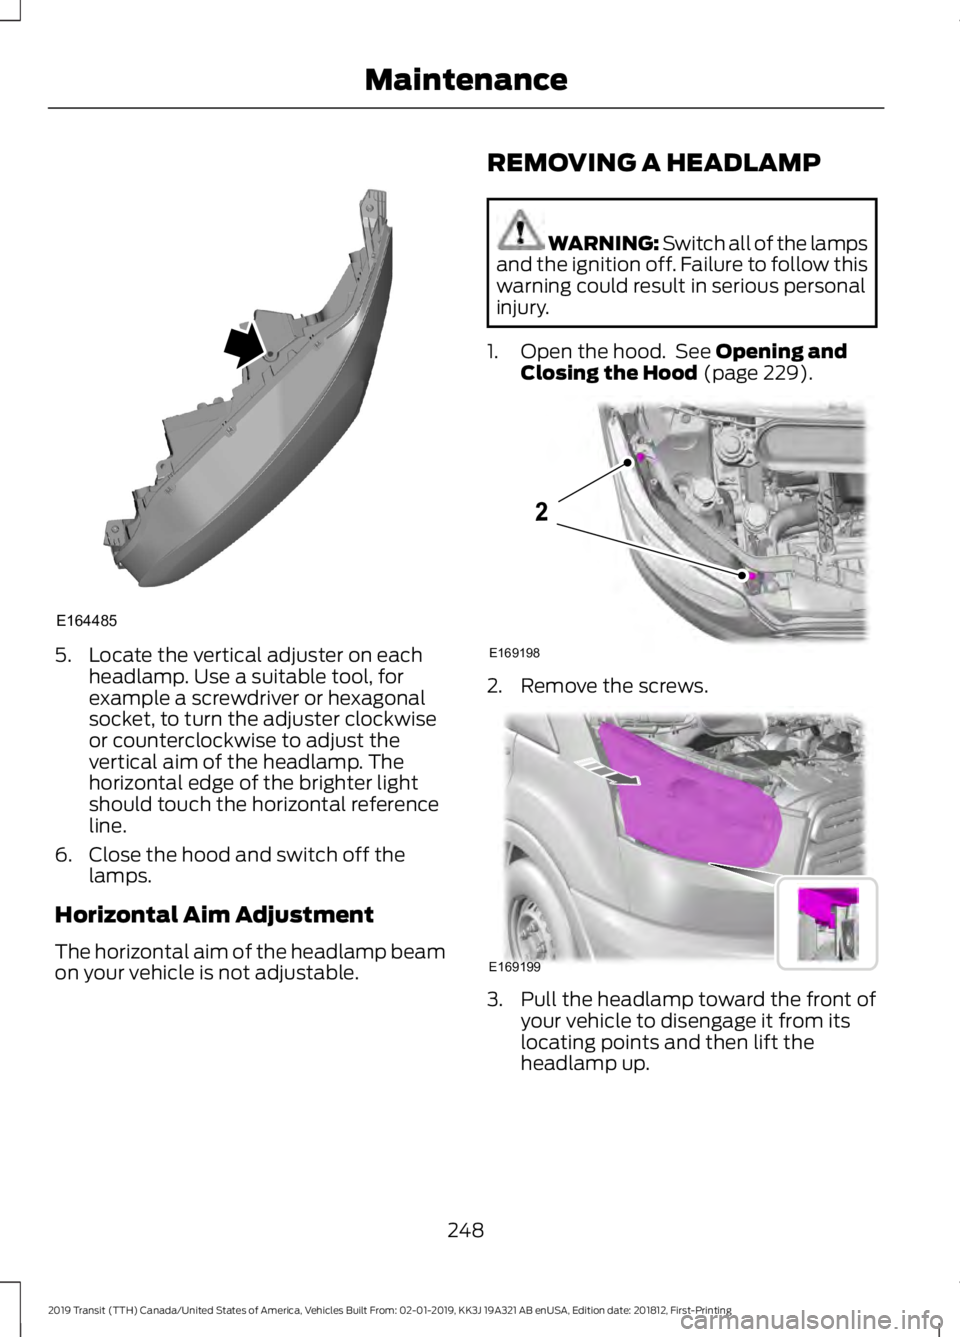
5. Locate the vertical adjuster on each
headlamp. Use a suitable tool, for
example a screwdriver or hexagonal
socket, to turn the adjuster clockwise
or counterclockwise to adjust the
vertical aim of the headlamp. The
horizontal edge of the brighter light
should touch the horizontal reference
line.
6. Close the hood and switch off the lamps.
Horizontal Aim Adjustment
The horizontal aim of the headlamp beam
on your vehicle is not adjustable. REMOVING A HEADLAMP WARNING: Switch all of the lamps
and the ignition off. Failure to follow this
warning could result in serious personal
injury.
1. Open the hood. See Opening and
Closing the Hood (page 229). 2. Remove the screws.
3. Pull the headlamp toward the front of
your vehicle to disengage it from its
locating points and then lift the
headlamp up.
248
2019 Transit (TTH) Canada/United States of America, Vehicles Built From: 02-01-2019, KK3J 19A321 AB enUSA, Edition date: 201812, First-Printing MaintenanceE164485 E169198
2 E169199
Page 265 of 529
Note:
Do not apply cleaning product to hot
surfaces and do not leave cleaning product
on chrome surfaces for a period of time
exceeding that which is recommended.
Note: Industrial-strength (heavy-duty)
cleaners, or cleaning chemicals, may cause
damage over a period of time.
Body Paintwork Preservation
Frequently remove particles such as bird
droppings, tree sap, insect deposits, tar
spots, road salt and industrial fallout to
avoid paint surface damage.
Frequently wash the underbody of your
vehicle if salt is applied on the road.
We recommend that you wax the
paintwork once or twice a year.
Note: Do not apply polish in strong sunlight
as this dries the polish too quickly.
Note: Do not allow polish to come in
contact with plastic surfaces as it can be
difficult to remove.
Note: Do not apply polish to the windshield
or rear window. A contaminated windshield
or contaminated wiper blades may lead to
increased wiper noise, reduced wipe quality
or reduced rain sensor performance.
Sliding Door Tracks WARNING: Do not open or close
the sliding doors when your hands are
near the tracks or rollers.
To clean the sliding door tracks, wipe the
surface using a clean, cotton cloth with a
mild soap and water solution.
Do not use a commercial or high-pressure
washer. WAXING
Regular waxing is necessary to protect your
car's paint from the elements. We
recommend that you wash and wax the
painted surface once or twice a year.
When washing and waxing, park your
vehicle in a shaded area out of direct
sunlight. Always wash your vehicle before
applying wax.
•
Use a quality wax that does not contain
abrasives.
• Follow the manufacturer ’s instructions
to apply and remove the wax.
• Apply a small amount of wax in a
back-and-forth motion, not in circles.
• Do not allow wax to come in contact
with any non-body (low-gloss black)
colored trim. The wax will discolor or
stain the parts over time.
•Roof racks.
• Bumpers.
• Grained door handles.
• Side moldings.
• Mirror housings.
• Windshield cowl area.
• Do not apply wax to glass areas.
• After waxing, your car's paint should
feel smooth, and be free of streaks and
smudges.
CLEANING THE ENGINE
Engines are more efficient when they are
clean because grease and dirt buildup keep
the engine warmer than normal.
262
2019 Transit (TTH) Canada/United States of America, Vehicles Built From: 02-01-2019, KK3J 19A321 AB enUSA, Edition date: 201812, First-Printing Vehicle Care
Page 293 of 529
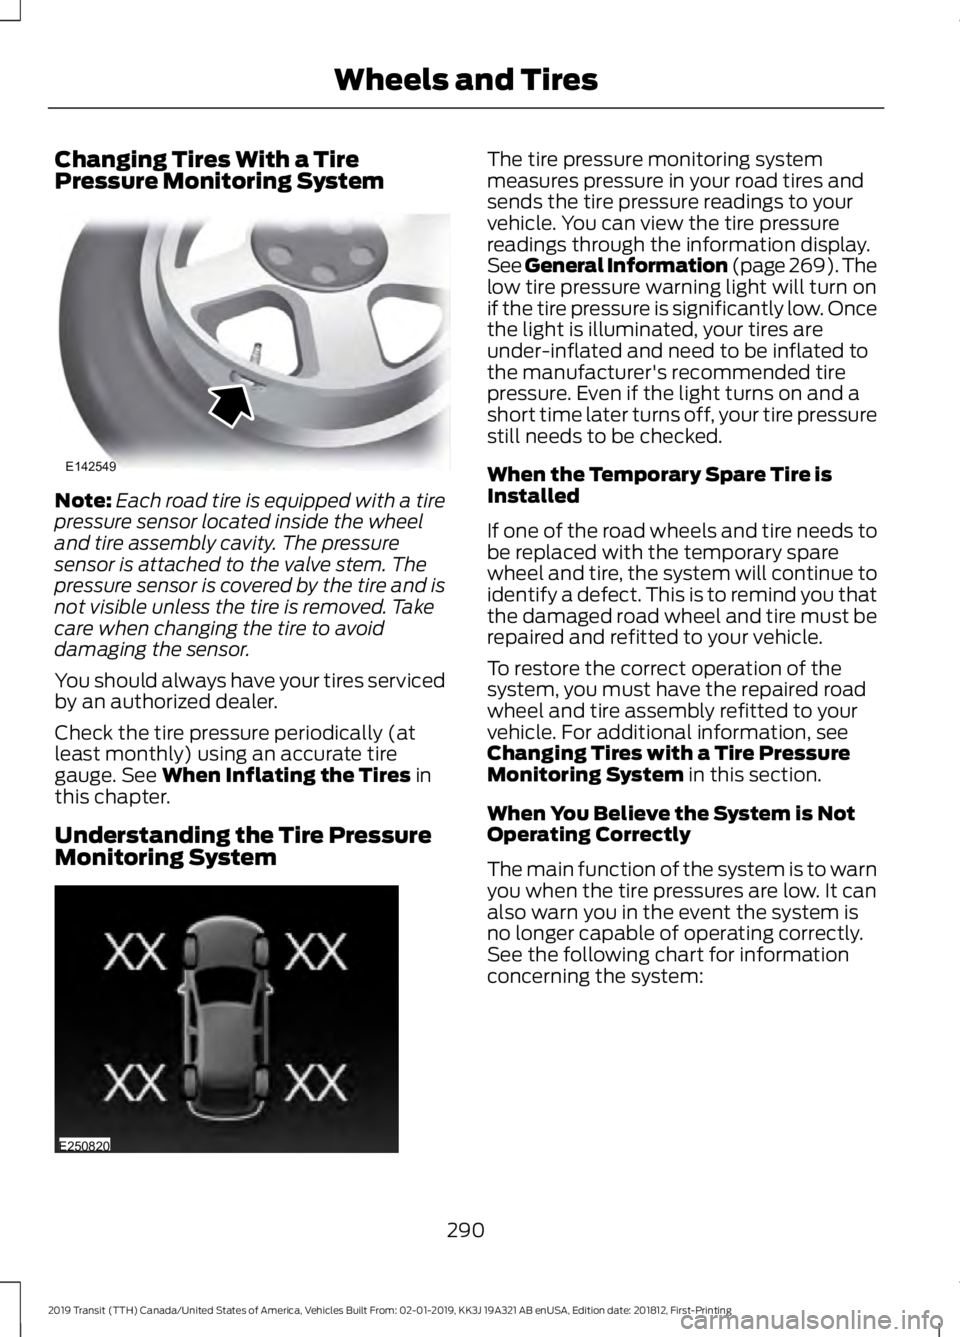
Changing Tires With a Tire
Pressure Monitoring System
Note:
Each road tire is equipped with a tire
pressure sensor located inside the wheel
and tire assembly cavity. The pressure
sensor is attached to the valve stem. The
pressure sensor is covered by the tire and is
not visible unless the tire is removed. Take
care when changing the tire to avoid
damaging the sensor.
You should always have your tires serviced
by an authorized dealer.
Check the tire pressure periodically (at
least monthly) using an accurate tire
gauge. See When Inflating the Tires in
this chapter.
Understanding the Tire Pressure
Monitoring System The tire pressure monitoring system
measures pressure in your road tires and
sends the tire pressure readings to your
vehicle. You can view the tire pressure
readings through the information display.
See
General Information (page 269). The
low tire pressure warning light will turn on
if the tire pressure is significantly low. Once
the light is illuminated, your tires are
under-inflated and need to be inflated to
the manufacturer's recommended tire
pressure. Even if the light turns on and a
short time later turns off, your tire pressure
still needs to be checked.
When the Temporary Spare Tire is
Installed
If one of the road wheels and tire needs to
be replaced with the temporary spare
wheel and tire, the system will continue to
identify a defect. This is to remind you that
the damaged road wheel and tire must be
repaired and refitted to your vehicle.
To restore the correct operation of the
system, you must have the repaired road
wheel and tire assembly refitted to your
vehicle. For additional information, see
Changing Tires with a Tire Pressure
Monitoring System
in this section.
When You Believe the System is Not
Operating Correctly
The main function of the system is to warn
you when the tire pressures are low. It can
also warn you in the event the system is
no longer capable of operating correctly.
See the following chart for information
concerning the system:
290
2019 Transit (TTH) Canada/United States of America, Vehicles Built From: 02-01-2019, KK3J 19A321 AB enUSA, Edition date: 201812, First-Printing Wheels and TiresE142549 E250820
Page 294 of 529
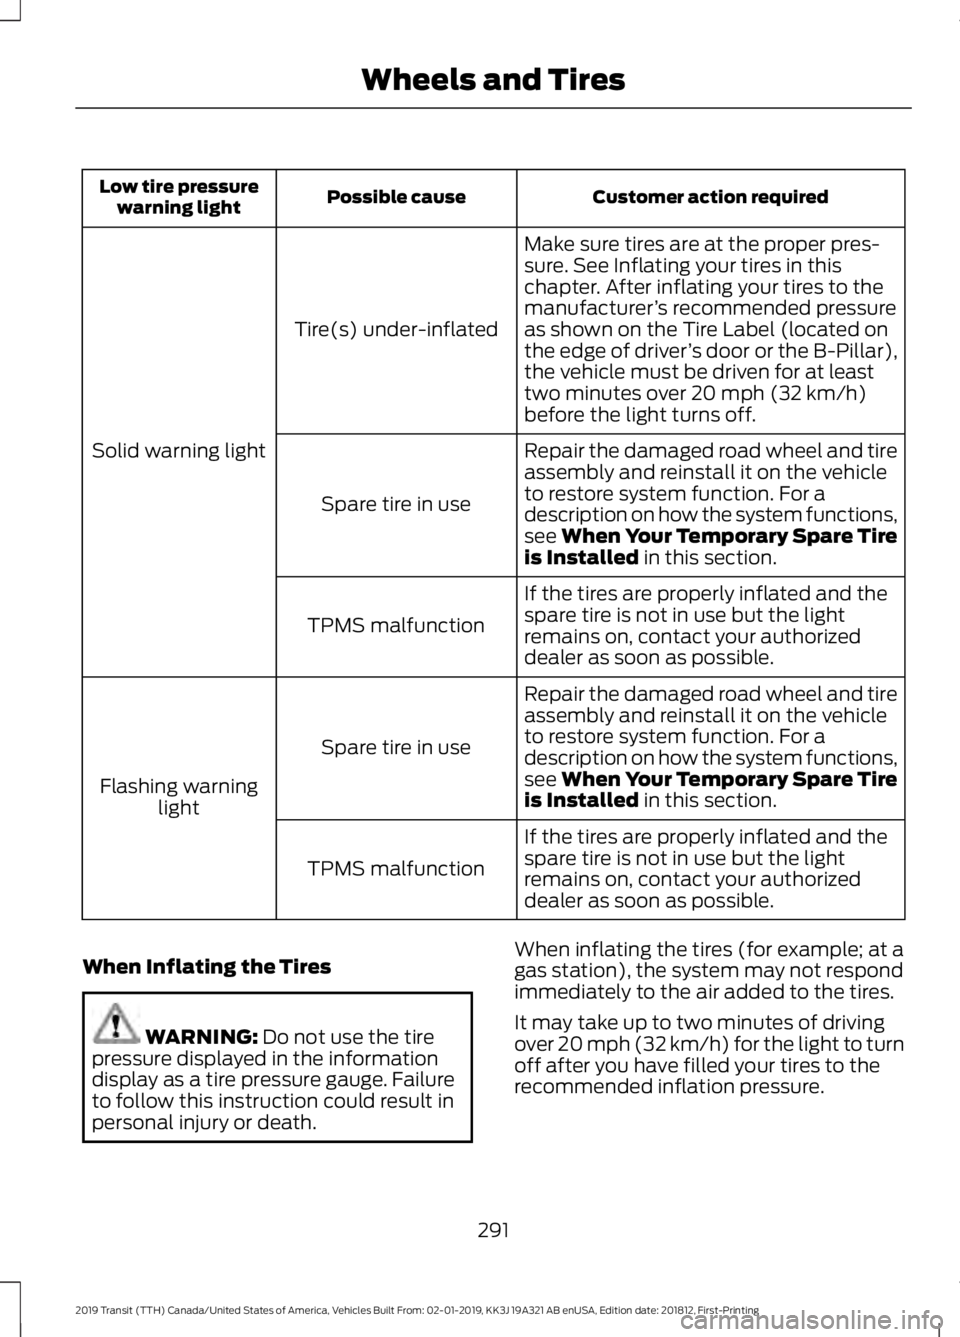
Customer action required
Possible cause
Low tire pressure
warning light
Make sure tires are at the proper pres-
sure. See Inflating your tires in this
chapter. After inflating your tires to the
manufacturer’s recommended pressure
as shown on the Tire Label (located on
the edge of driver ’s door or the B-Pillar),
the vehicle must be driven for at least
two minutes over 20 mph (32 km/h)
before the light turns off.
Tire(s) under-inflated
Solid warning light Repair the damaged road wheel and tire
assembly and reinstall it on the vehicle
to restore system function. For a
description on how the system functions,
see When Your Temporary Spare Tire
is Installed
in this section.
Spare tire in use
If the tires are properly inflated and the
spare tire is not in use but the light
remains on, contact your authorized
dealer as soon as possible.
TPMS malfunction
Repair the damaged road wheel and tire
assembly and reinstall it on the vehicle
to restore system function. For a
description on how the system functions,
see When Your Temporary Spare Tire
is Installed
in this section.
Spare tire in use
Flashing warning light
If the tires are properly inflated and the
spare tire is not in use but the light
remains on, contact your authorized
dealer as soon as possible.
TPMS malfunction
When Inflating the Tires WARNING:
Do not use the tire
pressure displayed in the information
display as a tire pressure gauge. Failure
to follow this instruction could result in
personal injury or death. When inflating the tires (for example; at a
gas station), the system may not respond
immediately to the air added to the tires.
It may take up to two minutes of driving
over 20 mph (32 km/h) for the light to turn
off after you have filled your tires to the
recommended inflation pressure.
291
2019 Transit (TTH) Canada/United States of America, Vehicles Built From: 02-01-2019, KK3J 19A321 AB enUSA, Edition date: 201812, First-Printing Wheels and Tires
Page 295 of 529
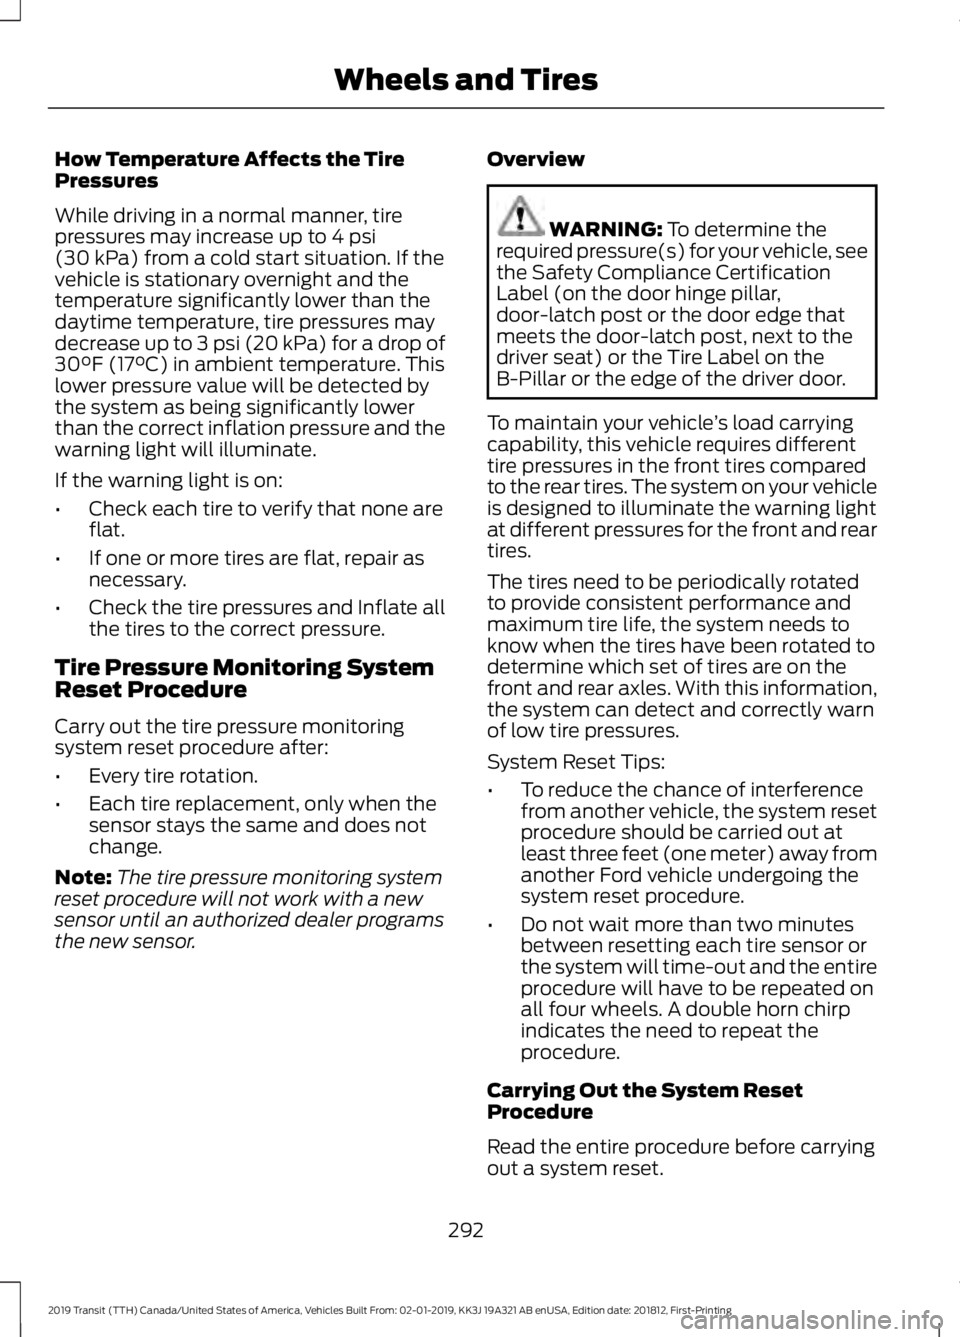
How Temperature Affects the Tire
Pressures
While driving in a normal manner, tire
pressures may increase up to 4 psi
(30 kPa) from a cold start situation. If the
vehicle is stationary overnight and the
temperature significantly lower than the
daytime temperature, tire pressures may
decrease up to 3 psi (20 kPa) for a drop of
30°F (17°C) in ambient temperature. This
lower pressure value will be detected by
the system as being significantly lower
than the correct inflation pressure and the
warning light will illuminate.
If the warning light is on:
• Check each tire to verify that none are
flat.
• If one or more tires are flat, repair as
necessary.
• Check the tire pressures and Inflate all
the tires to the correct pressure.
Tire Pressure Monitoring System
Reset Procedure
Carry out the tire pressure monitoring
system reset procedure after:
• Every tire rotation.
• Each tire replacement, only when the
sensor stays the same and does not
change.
Note: The tire pressure monitoring system
reset procedure will not work with a new
sensor until an authorized dealer programs
the new sensor. Overview WARNING:
To determine the
required pressure(s) for your vehicle, see
the Safety Compliance Certification
Label (on the door hinge pillar,
door-latch post or the door edge that
meets the door-latch post, next to the
driver seat) or the Tire Label on the
B-Pillar or the edge of the driver door.
To maintain your vehicle ’s load carrying
capability, this vehicle requires different
tire pressures in the front tires compared
to the rear tires. The system on your vehicle
is designed to illuminate the warning light
at different pressures for the front and rear
tires.
The tires need to be periodically rotated
to provide consistent performance and
maximum tire life, the system needs to
know when the tires have been rotated to
determine which set of tires are on the
front and rear axles. With this information,
the system can detect and correctly warn
of low tire pressures.
System Reset Tips:
• To reduce the chance of interference
from another vehicle, the system reset
procedure should be carried out at
least three feet (one meter) away from
another Ford vehicle undergoing the
system reset procedure.
• Do not wait more than two minutes
between resetting each tire sensor or
the system will time-out and the entire
procedure will have to be repeated on
all four wheels. A double horn chirp
indicates the need to repeat the
procedure.
Carrying Out the System Reset
Procedure
Read the entire procedure before carrying
out a system reset.
292
2019 Transit (TTH) Canada/United States of America, Vehicles Built From: 02-01-2019, KK3J 19A321 AB enUSA, Edition date: 201812, First-Printing Wheels and Tires