display FORD TRANSIT 2020 Owners Manual
[x] Cancel search | Manufacturer: FORD, Model Year: 2020, Model line: TRANSIT, Model: FORD TRANSIT 2020Pages: 529, PDF Size: 8.3 MB
Page 299 of 529
OIL CHANGE INDICATOR
RESET - GASOLINE
Only reset the system after changing the
engine oil and oil filter.
Resetting the Oil Life Monitoring
System
1.
Switch the ignition on. Do not start the
engine.
2. Fully press the accelerator and brake pedals at the same time.
3. Keep the accelerator and brake pedals
fully pressed.
4. After 25 seconds, the oil change reminder resets.
5. Release the accelerator and brake pedals.
6. Switch the ignition off.
7. Switch the ignition on to confirm that the oil change reminder does not
display.
CHANGING THE ENGINE AIR
FILTER WARNING: To reduce the risk of
vehicle damage and personal burn
injuries, do not start your engine with the
air cleaner removed and do not remove
it while the engine is running.
Note: Failure to use the correct air filter
element may result in severe engine
damage. The vehicle Warranty may be void
for any damage to the engine if the correct
air filter element is not used.
Only use the specified air filter.
See
Capacities and Specifications (page
362). Change the air filter element at the proper
interval.
See Scheduled Maintenance
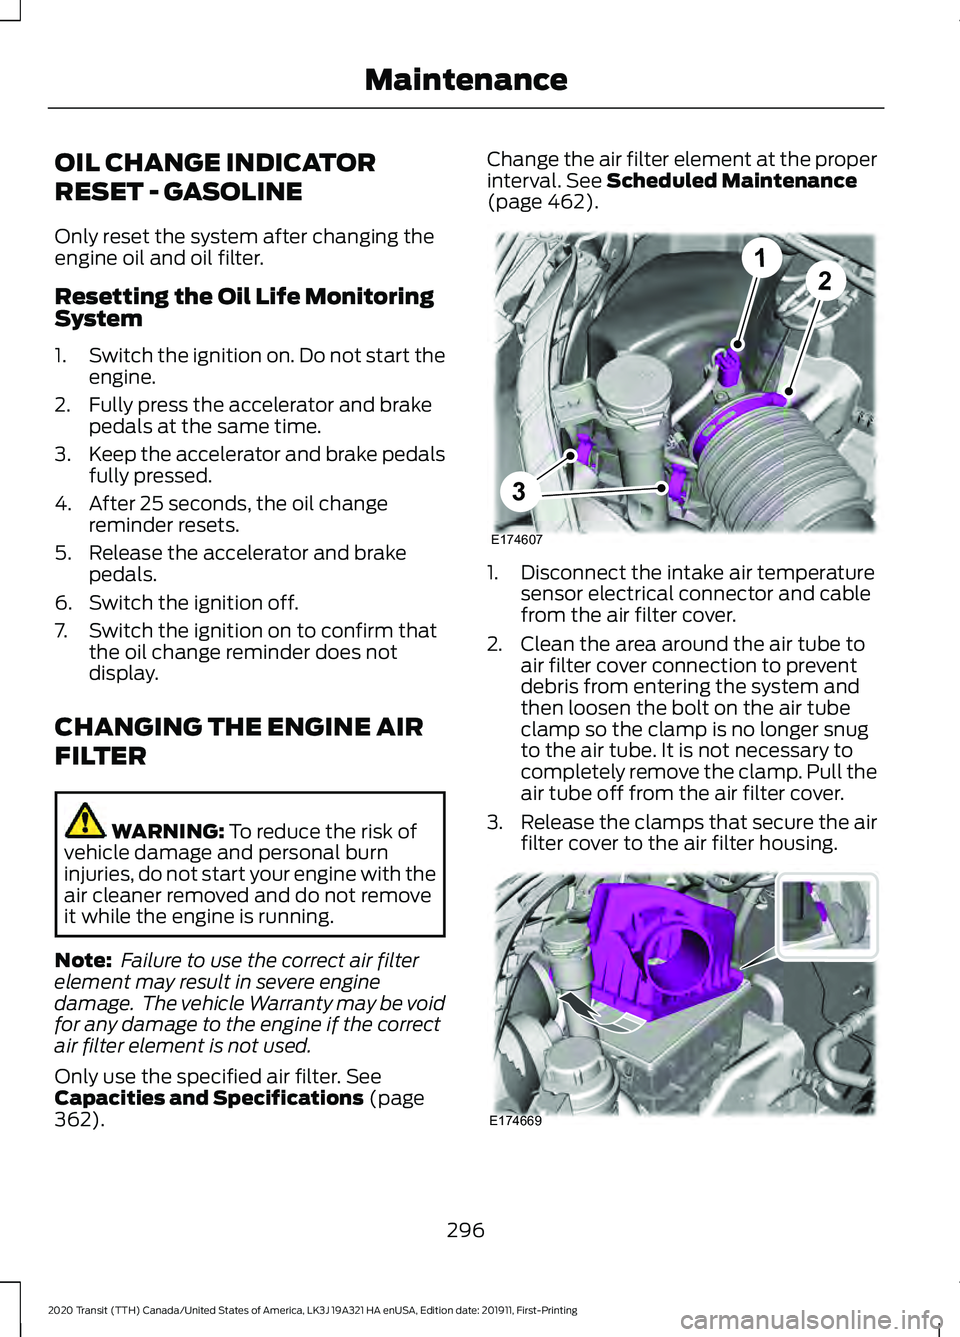
(page 462). 1. Disconnect the intake air temperature
sensor electrical connector and cable
from the air filter cover.
2. Clean the area around the air tube to air filter cover connection to prevent
debris from entering the system and
then loosen the bolt on the air tube
clamp so the clamp is no longer snug
to the air tube. It is not necessary to
completely remove the clamp. Pull the
air tube off from the air filter cover.
3. Release the clamps that secure the air
filter cover to the air filter housing. 296
2020 Transit (TTH) Canada/United States of America, LK3J 19A321 HA enUSA, Edition date: 201911, First-Printing MaintenanceE174607
12
3 E174669
Page 300 of 529
4.
Carefully lift the air filter housing cover.
Remove the air filter element from the
air filter housing.
5. Install a new air filter element.
6. Replace the air filter housing cover. Engage the clamps that secure the air
filter housing cover to the air filter
housing. Be careful not to crimp the
filter element edges between the air
filter housing and cover. Make sure
that the tabs on the edge are correctly
aligned into the slots.
7. Slip the air tube onto the air filter cover
and snugly tighten the bolt on the air
tube clamp, but do not overtighten.
8. Reconnect the intake air temperature sensor electrical connector to the
outlet tube. Make sure the locking tab
on the connector is in the locked
position.
DRAINING THE FUEL FILTER
WATER TRAP - DIESEL WARNING: Do not dispose of fuel
in the household refuse or the public
sewage system. Use an authorized waste
disposal facility. You should drain water from the
fuel filter water trap whenever
the warning light illuminates or
a message appears in the information
display.
This occurs when approximately
7 fl oz
(200 ml) of water accumulates in the fuel
filter water trap. If you ignore the warning
lamp, water may pass through to the
system and may cause damage not
covered by the vehicle Warranty. Draining the Fuel Filter Water Trap
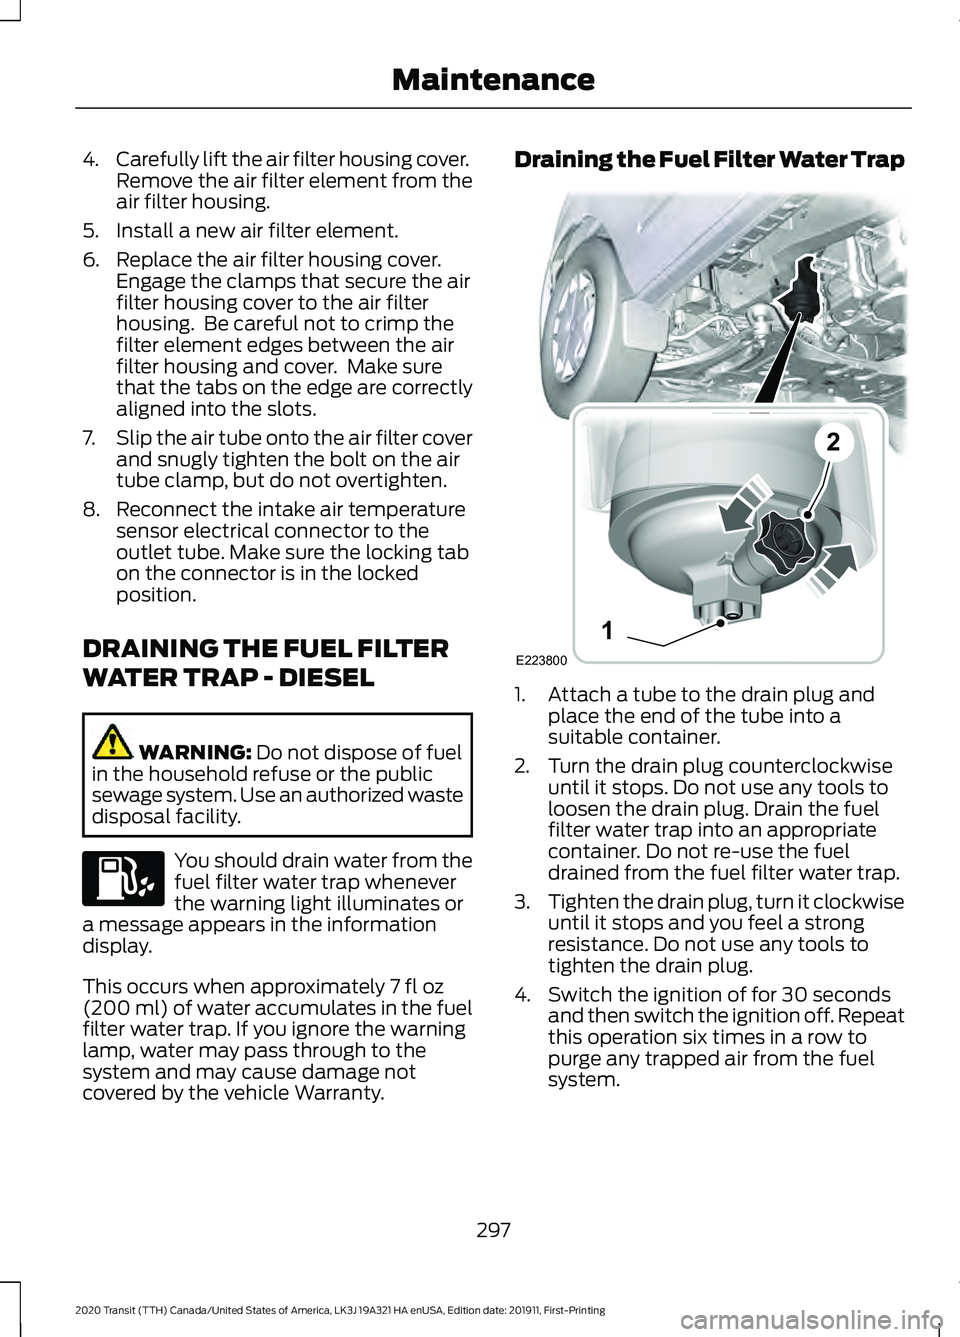
1. Attach a tube to the drain plug and
place the end of the tube into a
suitable container.
2. Turn the drain plug counterclockwise until it stops. Do not use any tools to
loosen the drain plug. Drain the fuel
filter water trap into an appropriate
container. Do not re-use the fuel
drained from the fuel filter water trap.
3. Tighten the drain plug, turn it clockwise
until it stops and you feel a strong
resistance. Do not use any tools to
tighten the drain plug.
4. Switch the ignition of for 30 seconds and then switch the ignition off. Repeat
this operation six times in a row to
purge any trapped air from the fuel
system.
297
2020 Transit (TTH) Canada/United States of America, LK3J 19A321 HA enUSA, Edition date: 201911, First-Printing Maintenance E223800
1
2
Page 303 of 529
Do not use the following as a coolant
substitute:
•
Alcohol.
• Methanol.
• Brine.
• Any coolant mixed with alcohol or
methanol antifreeze.
Alcohol and other liquids can cause engine
damage from overheating or freezing.
Do not add extra inhibitors or additives to
the coolant. These can be harmful and
compromise the corrosion protection of
the coolant.
Recycled Coolant
We do not recommend the use of recycled
coolant as an approved recycling process
is not yet available.
Note: Dispose of used coolant in the
appropriate manner.
Follow your community's regulations and
standards for recycling and disposing of
automotive fluids.
Severe Climates
If you drive in extremely cold climates:
• It may be necessary to increase the
coolant concentration above 50%.
• A coolant concentration of 60%
provides improved freeze point
protection. Coolant concentrations
above 60% decrease the overheat
protection characteristics of the
coolant and may cause engine
damage. If you drive in extremely hot climates:
•
You can decrease the coolant
concentration to 40%.
• Coolant concentrations below 40%
decrease the freeze and corrosion
protection characteristics of the
coolant and may cause engine
damage.
Vehicles driven year-round in non-extreme
climates should use prediluted coolant for
optimum cooling system and engine
protection.
Coolant Change
At specific mileage intervals, as listed in
the scheduled maintenance information,
the coolant should be changed. Add
prediluted coolant approved to the correct
specification.
Fail-Safe Cooling
Fail-safe cooling allows you to temporarily
drive your vehicle before any incremental
component damage occurs. The fail-safe
distance depends on ambient
temperature, vehicle load and terrain.
How Fail-Safe Cooling Works If the engine begins to overheat,
the coolant temperature gauge
moves toward the red zone:
A warning lamp illuminates and
a message may appear in the
information display.
If the engine reaches a preset
over-temperature condition, the engine
automatically switches to alternating
cylinder operation. Each disabled cylinder
acts as an air pump and cools the engine.
When this occurs, your vehicle still
operates, however:
• Engine power is limited.
• The air conditioning system turns off.
300
2020 Transit (TTH) Canada/United States of America, LK3J 19A321 HA enUSA, Edition date: 201911, First-Printing Maintenance
Page 304 of 529

Continued operation increases the engine
temperature, causing the engine to
completely shut down. Your steering and
braking effort increases in this situation.
When the engine temperature cools, you
can re-start the engine. Have your vehicle
checked as soon as possible to minimize
engine damage.
When Fail-Safe Mode Is Activated
WARNING: Fail-safe mode is for
use during emergencies only. Operate
your vehicle in fail-safe mode only as
long as necessary to bring your vehicle
to rest in a safe location and seek
immediate repairs. When in fail-safe
mode, your vehicle will have limited
power, will not be able to maintain
high-speed operation, and may
completely shut down without warning,
potentially losing engine power, power
steering assist, and power brake assist,
which may increase the possibility of a
crash resulting in serious injury. WARNING:
Do not remove the
coolant reservoir cap when the engine is
on or the cooling system is hot. Wait 10
minutes for the cooling system to cool
down. Cover the coolant reservoir cap
with a thick cloth to prevent the
possibility of scalding and slowly remove
the cap. Failure to follow this instruction
could result in personal injury.
Your vehicle has limited engine power
when in the fail-safe mode, drive your
vehicle with caution. Your vehicle does not
maintain high-speed operation and the
engine may operate poorly.
Remember that the engine is capable of
automatically shutting down to prevent
engine damage. In this situation:
1. Pull off the road as soon as safely possible and switch the engine off. 2. If you are a member of a roadside
assistance program, we recommend
that you contact your roadside
assistance service provider.
3. If this is not possible, wait for a short period of time for the engine to cool.
4. Check the coolant level. If the coolant level is at or below the minimum mark,
add prediluted coolant immediately.
5. When the engine temperature cools, you can re-start the engine. Have your
vehicle checked as soon as possible to
minimize engine damage.
Note: Driving your vehicle without repair
increases the chance of engine damage.
Engine Coolant Temperature
Management
(If Equipped) WARNING:
To reduce the risk of
crash and injury, be prepared that the
vehicle speed may reduce and the
vehicle may not be able to accelerate
with full power until the coolant
temperature reduces.
If you tow a trailer with your vehicle, the
engine may temporarily reach a higher
temperature during severe operating
conditions, for example ascending a long
or steep grade in high ambient
temperatures.
At this time, you may notice the coolant
temperature gauge moves toward the red
zone and a message may appear in the
information display.
301
2020 Transit (TTH) Canada/United States of America, LK3J 19A321 HA enUSA, Edition date: 201911, First-Printing Maintenance
Page 305 of 529
You may notice a reduction in vehicle
speed caused by reduced engine power in
order to manage the engine coolant
temperature. Your vehicle may enter this
mode if certain high-temperature and
high-load conditions take place. The
amount of speed reduction depends on
vehicle loading, grade and ambient
temperature. If this occurs, there is no
need to stop your vehicle. You can
continue to drive.
The air conditioning may automatically
turn on and off during severe operating
conditions to protect the engine from
overheating. When the coolant
temperature decreases to the normal
operating temperature, the air conditioning
turns on.
If the coolant temperature gauge moves
fully into the red zone, or if the coolant
temperature warning or service engine
soon messages appear in your information
display, do the following:
1. Stop your vehicle as soon as it is safe
to do so. Fully apply the parking brake,
shift into park (P) or neutral (N).
2. Leave the engine running until the coolant temperature gauge needle
returns to the normal position. If the
temperature does not drop after
several minutes, follow the remaining
steps.
3. Switch the engine off and wait for it to
cool. Check the coolant level.
4. If the coolant level is at or below the minimum mark, add prediluted coolant
immediately.
5. If the coolant level is normal, restart the engine and continue. AUTOMATIC TRANSMISSION
FLUID CHECK
The automatic transmission does not have
a transmission fluid dipstick.
Have an authorized dealer check and
change the transmission fluid at the
correct service interval. See Scheduled
Maintenance (page 462). Your
transmission does not consume fluid.
However, if the transmission slips, shifts
slowly or if you notice a sign of leaking
fluid, contact an authorized dealer.
Do not use supplemental transmission
fluid additives, treatments or cleaning
agents. The use of these materials may
affect transmission operation and result
in damage to internal transmission
components.
BRAKE FLUID CHECK WARNING:
Do not use any fluid
other than the recommended brake fluid
as this will reduce brake efficiency. Use
of incorrect fluid could result in the loss
of vehicle control, serious personal injury
or death. WARNING:
Only use brake fluid
from a sealed container. Contamination
with dirt, water, petroleum products or
other materials may result in brake
system damage or failure. Failure to
adhere to this warning could result in the
loss of vehicle control, serious personal
injury or death. WARNING:
Do not allow the fluid
to touch your skin or eyes. If this
happens, rinse the affected areas
immediately with plenty of water and
contact your physician.
302
2020 Transit (TTH) Canada/United States of America, LK3J 19A321 HA enUSA, Edition date: 201911, First-Printing Maintenance
Page 323 of 529
Instrument Cluster Screens, LCD
Screens and Radio Screens
Note:
Do not use abrasives, alcoholic
solvents or chemical solvents to clean the
instrument cluster screens, LCD screens or
radio screens. These cleaning products can
damage the screens.
Clean the instrument panel and cluster
lens with a clean, damp and soft cloth,
then use a clean, dry and soft cloth to dry
these areas.
Do not spray any liquid directly onto the
screens.
Do not use a microfiber cloth to clean the
bezel around the display screens as it could
damage the surface.
Rear Windows
Note: Do not use any abrasive materials to
clean the interior of the rear windows.
Note: Do not install stickers or labels to the
interior of the rear windows.
Mirrors
Do not clean the housing or glass of any
mirror with harsh abrasives, fuel or other
petroleum or ammonia-based cleaning
products.
Storage Compartments, Cup
Holders and Ashtrays
To clean:
• Take out any removable inserts.
• Wipe the surface with a soft, damp
cloth and a mild soap and water
solution. Dry the area with a clean, soft
cloth. CLEANING THE INSTRUMENT
PANEL AND INSTRUMENT
CLUSTER LENS WARNING: Do not use chemical
solvents or strong detergents when
cleaning the steering wheel or
instrument panel to avoid contamination
of the airbag system.
Note: Follow the same procedure as
cleaning leather seats for cleaning leather
instrument panels and leather interior trim
surfaces.
Clean the instrument panel and cluster
lens with a clean, damp and soft cloth,
then use a clean, dry and soft cloth to dry
these areas.
• Avoid cleaners or polishes that increase
the gloss of the upper portion of the
instrument panel. The dull finish in this
area helps protect you from
undesirable windshield reflection.
• Do not use any household cleaning
products or glass cleaners as these
may damage the finish of the
instrument panel, interior trim and
cluster lens.
• Wash or wipe your hands clean if you
have been in contact with certain
products such as insect repellent and
suntan lotion to avoid possible damage
to the interior painted surfaces.
• Do not allow air fresheners and hand
sanitizers to spill onto interior surfaces.
If a spill occurs, wipe off immediately.
Your warranty may not cover these
damages.
If a staining liquid like coffee or juice has
been spilled on the instrument panel or on
interior trim surfaces:
1. Wipe up spilled liquid using a clean, soft cloth as quickly as possible.
320
2020 Transit (TTH) Canada/United States of America, LK3J 19A321 HA enUSA, Edition date: 201911, First-Printing Vehicle Care
Page 349 of 529
If the vehicle is stationary overnight and
the temperature significantly lower than
the daytime temperature, tire pressures
may decrease by up to 3 psi (0.2 bar) when
there is a drop in the ambient temperature
of 63°F (17°C) or more. The system
detects this pressure decrease as being
significantly below the correct inflation
pressure and the warning lamp illuminates.
When Inflating Tires WARNING:
Do not use the tire
pressure displayed in the information
display as a tire pressure gauge. Failure
to follow this instruction could result in
personal injury or death.
When inflating the tires the system may
not respond immediately to the air added
to the tires.
Only inflate tires when they are cold.
If the warning lamp is on:
• Check each tire to verify that none are
flat.
• If one or more tires are flat, repair as
necessary.
• Check the tire pressures and inflate all
tires to the correct pressure.
• Carry out the tire pressure monitoring
system reset procedure. When Changing Tires You should always have tires serviced by
an authorized dealer.
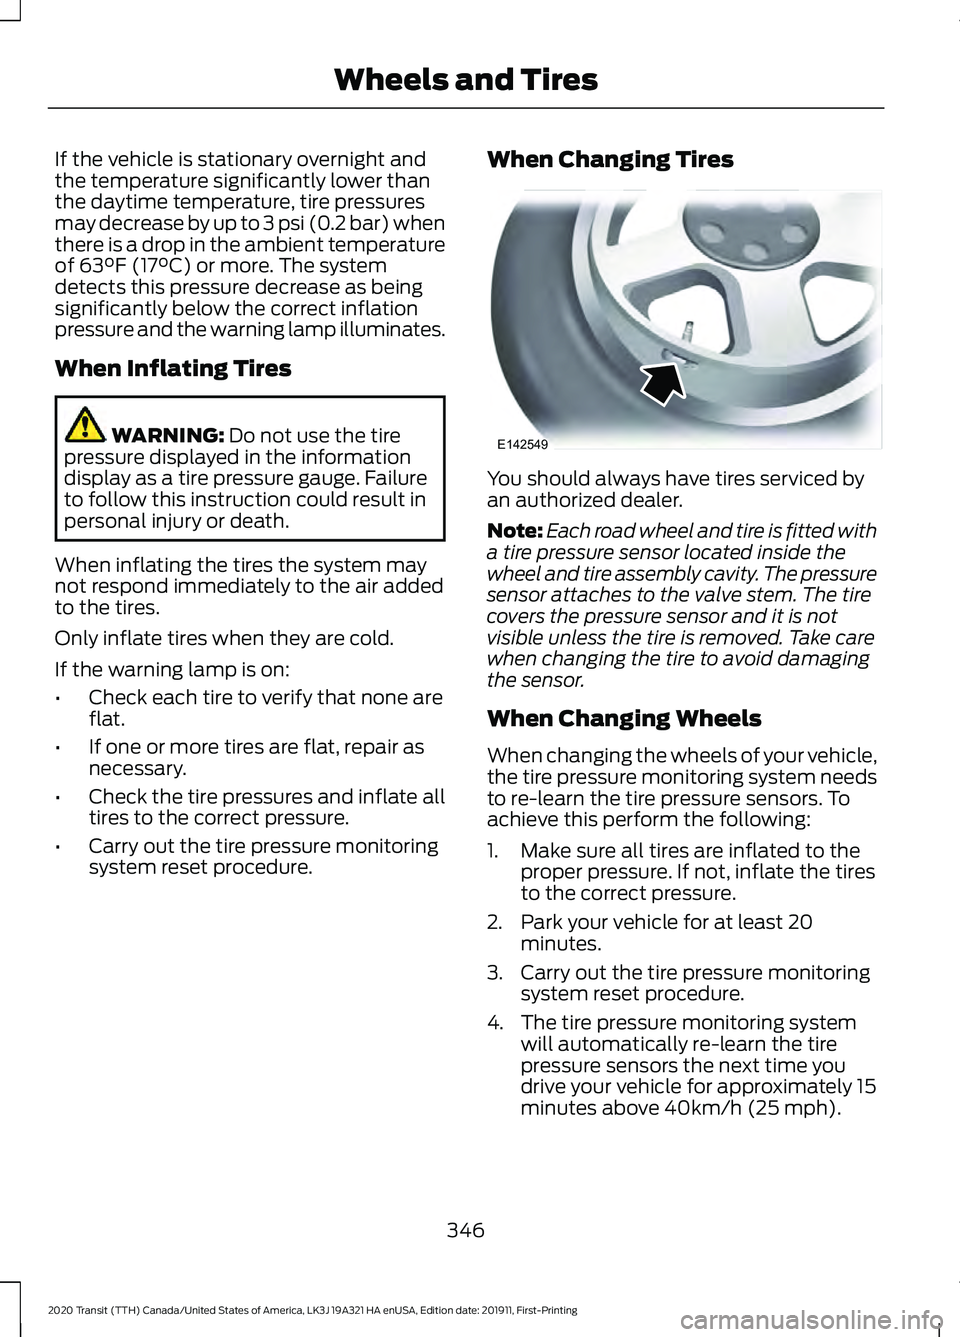
Note:
Each road wheel and tire is fitted with
a tire pressure sensor located inside the
wheel and tire assembly cavity. The pressure
sensor attaches to the valve stem. The tire
covers the pressure sensor and it is not
visible unless the tire is removed. Take care
when changing the tire to avoid damaging
the sensor.
When Changing Wheels
When changing the wheels of your vehicle,
the tire pressure monitoring system needs
to re-learn the tire pressure sensors. To
achieve this perform the following:
1. Make sure all tires are inflated to the proper pressure. If not, inflate the tires
to the correct pressure.
2. Park your vehicle for at least 20 minutes.
3. Carry out the tire pressure monitoring system reset procedure.
4. The tire pressure monitoring system will automatically re-learn the tire
pressure sensors the next time you
drive your vehicle for approximately 15
minutes above 40km/h (25 mph).
346
2020 Transit (TTH) Canada/United States of America, LK3J 19A321 HA enUSA, Edition date: 201911, First-Printing Wheels and TiresE142549
Page 350 of 529
Understanding the Tire Pressure
Monitoring System
The system measures the pressure in the
four road tires and displays the readings in
the instrument cluster.
The system detects this lower pressure as
being significantly below the correct
inflation pressure and the warning lamp
illuminates. You must inflate the tires to
the correct pressure.
When the Temporary Spare Tire is
Installed
If you need to replace a road wheel and
tire with the temporary spare wheel, the
system will continue to identify a defect.
This is to remind you to repair the damaged
road wheel and tire and refit the repaired
road wheel and tire assembly to your
vehicle. To restore the correct operation
of the system, you must have the repaired
road wheel and tire assembly refitted to
your vehicle.
When You Believe the System is Not
Operating Correctly
The main function of the system is to warn
you when the tire pressures are low. It can
also warn you in the event the system is
no longer capable of operating correctly.
See the following chart for information
concerning the system:
347
2020 Transit (TTH) Canada/United States of America, LK3J 19A321 HA enUSA, Edition date: 201911, First-Printing Wheels and Tires
Page 352 of 529
Tire Pressure Monitoring System
Reset Procedure
Overview
WARNING: To determine the
required pressure(s) for your vehicle, see
the Safety Compliance Certification
Label (on the door hinge pillar,
door-latch post or the door edge that
meets the door-latch post, next to the
driver seat) or the Tire Label on the
B-Pillar or the edge of the driver door.
You must carry out the system reset
procedure after each tire replacement or
adjustment of the tire pressures. To maintain your vehicle load carrying
capability, your vehicle requires different
tire pressures in the front tires compared
to the rear tires.
The system illuminates the warning lamp
at different pressures for the front and rear
tires.
If the tires are rotated, the Tire Pressure
Monitoring System needs to be reset to
relearn the new tire pressures. It does not
know which sensor is where and assumes
you have set the pressures correctly.
Carrying Out the System Reset
Procedure
Switch the ignition on. Using the
information display control select: Action
Message
Press the
OK button.
Settings
Press the
OK button.
Driver assist
Press and hold the
OK button until a confirmation message
appears in the information display. Alternatively, if your
vehicle has a tire pressure monitoring system reset button,
press and hold the button until a confirmation message
appears in the information display.
Tire Monitor
CHANGING A ROAD WHEEL WARNING: Do not use tire sealants
as they may damage the tire pressure
monitoring system. WARNING:
If the tire pressure
monitor sensor becomes damaged it
may not function. Note:
The tire pressure monitoring system
indicator light will illuminate when the spare
tire is in use. To restore the full function of
the monitoring system, all road wheels
equipped with tire pressure monitoring
sensors must be mounted on this vehicle.
If you get a flat tire while driving, do not
apply the brake heavily. Instead, gradually
decrease your speed. Hold the steering
wheel firmly and slowly move to a safe
place on the side of the road.
349
2020 Transit (TTH) Canada/United States of America, LK3J 19A321 HA enUSA, Edition date: 201911, First-Printing Wheels and Tires
Page 374 of 529
Engine
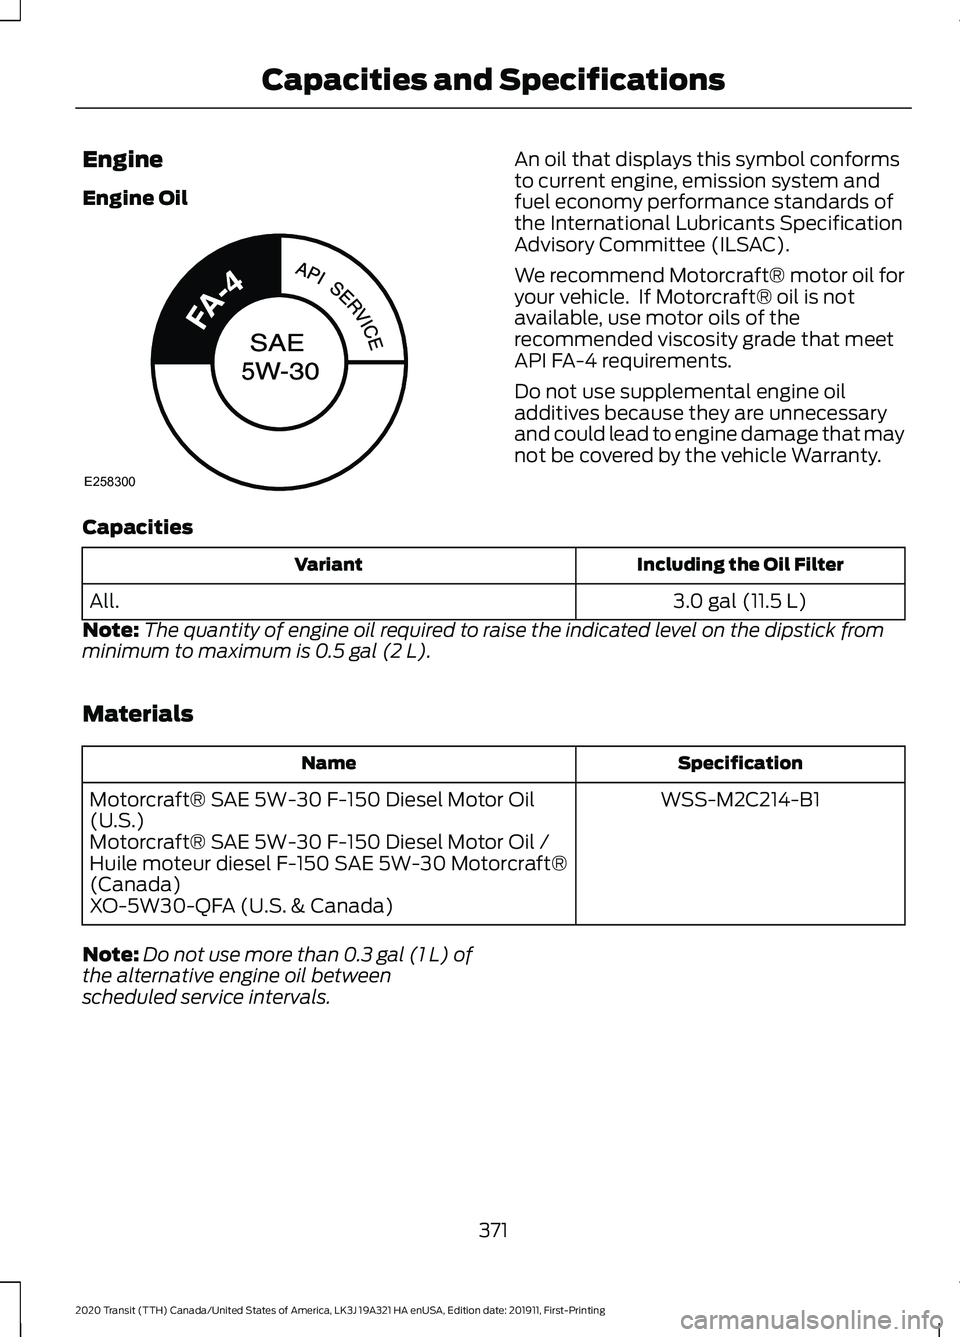
Engine Oil An oil that displays this symbol conforms
to current engine, emission system and
fuel economy performance standards of
the International Lubricants Specification
Advisory Committee (ILSAC).
We recommend Motorcraft® motor oil for
your vehicle. If Motorcraft® oil is not
available, use motor oils of the
recommended viscosity grade that meet
API FA-4 requirements.
Do not use supplemental engine oil
additives because they are unnecessary
and could lead to engine damage that may
not be covered by the vehicle Warranty.
Capacities Including the Oil Filter
Variant
3.0 gal (11.5 L)
All.
Note: The quantity of engine oil required to raise the indicated level on the dipstick from
minimum to maximum is 0.5 gal (2 L).
Materials Specification
Name
WSS-M2C214-B1
Motorcraft® SAE 5W-30 F-150 Diesel Motor Oil
(U.S.)
Motorcraft® SAE 5W-30 F-150 Diesel Motor Oil /
Huile moteur diesel F-150 SAE 5W-30 Motorcraft®
(Canada)
XO-5W30-QFA (U.S. & Canada)
Note: Do not use more than 0.3 gal (1 L) of
the alternative engine oil between
scheduled service intervals.
371
2020 Transit (TTH) Canada/United States of America, LK3J 19A321 HA enUSA, Edition date: 201911, First-Printing Capacities and SpecificationsE258300