battery FORD TRANSIT 2020 User Guide
[x] Cancel search | Manufacturer: FORD, Model Year: 2020, Model line: TRANSIT, Model: FORD TRANSIT 2020Pages: 529, PDF Size: 8.3 MB
Page 72 of 529
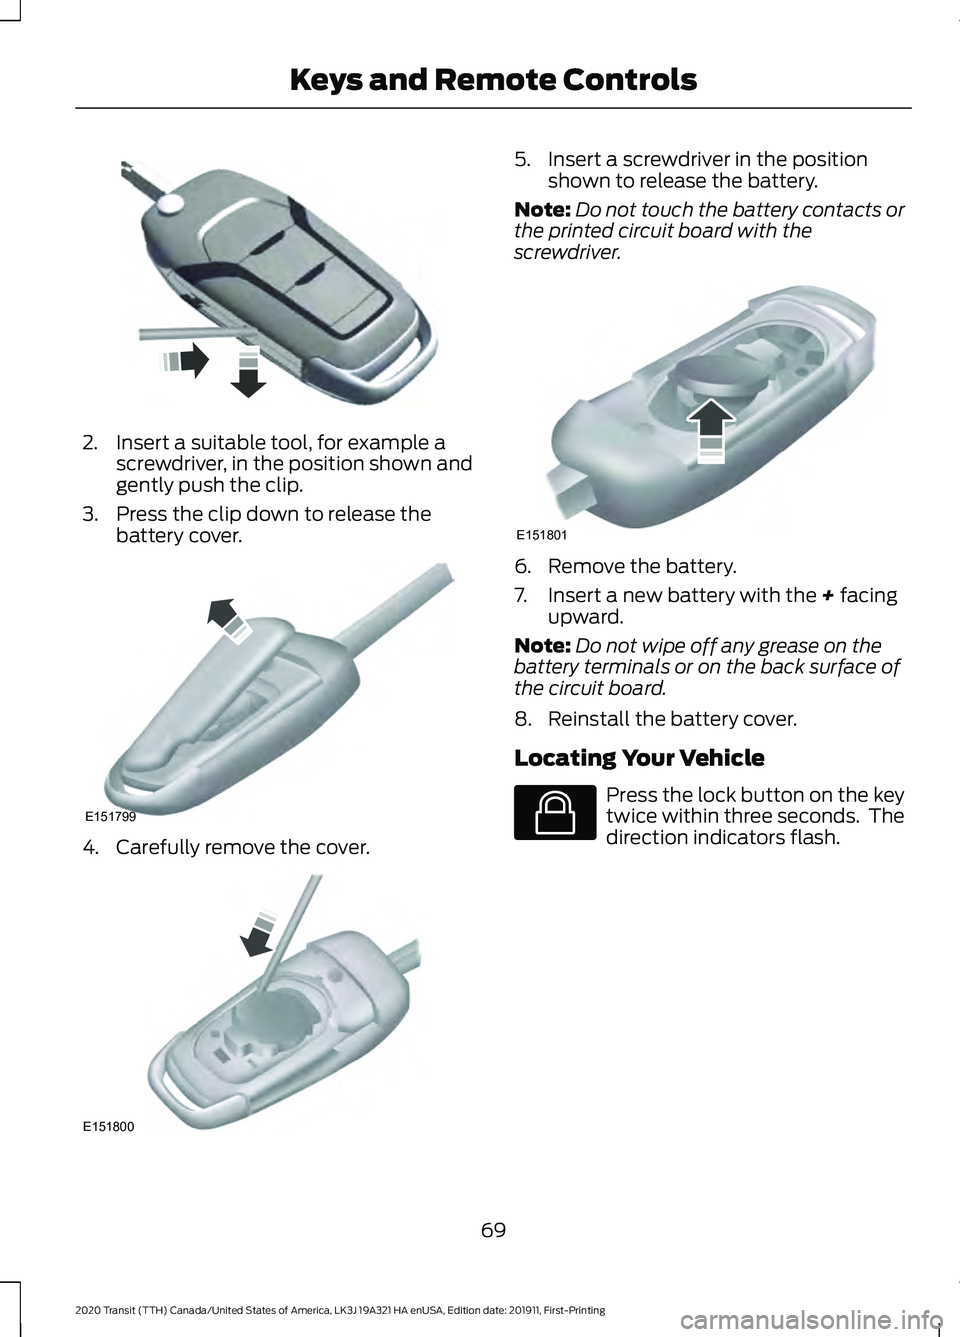
2. Insert a suitable tool, for example a
screwdriver, in the position shown and
gently push the clip.
3. Press the clip down to release the battery cover. 4. Carefully remove the cover. 5. Insert a screwdriver in the position
shown to release the battery.
Note: Do not touch the battery contacts or
the printed circuit board with the
screwdriver. 6. Remove the battery.
7. Insert a new battery with the + facing
upward.
Note: Do not wipe off any grease on the
battery terminals or on the back surface of
the circuit board.
8. Reinstall the battery cover.
Locating Your Vehicle Press the lock button on the key
twice within three seconds. The
direction indicators flash.
69
2020 Transit (TTH) Canada/United States of America, LK3J 19A321 HA enUSA, Edition date: 201911, First-Printing Keys and Remote ControlsE302822 E151799 E151800 E151801 E138623
Page 73 of 529
Remote Control Information Messages
Action
Message
Displays when the remote control battery requires replacing.
Key Battery Low Replace
Soon
REPLACING A LOST KEY OR
REMOTE CONTROL
You can purchase replacement keys or
remote controls from an authorized dealer.
Authorized dealers can program remote
controls for your vehicle. See Remote
Control (page 68).
To re-program the passive anti-theft
system see an authorized dealer.
70
2020 Transit (TTH) Canada/United States of America, LK3J 19A321 HA enUSA, Edition date: 201911, First-Printing Keys and Remote Controls
Page 94 of 529
2.
Switch the ignition from off to on. Keep
the ignition on for at least three
seconds, but no more than 10 seconds.
3. Switch the ignition off and remove the
first correctly coded key from the
ignition.
4. After three seconds but within 10 seconds of switching the ignition off,
insert the second previously correctly
coded key into the ignition.
5. Switch the ignition from off to on. Keep
the ignition on for at least three
seconds, but no more than 10 seconds.
6. Switch the ignition off and remove the
second previously programmed
correctly coded key from the ignition.
7. After three seconds but within 10 seconds of switching the ignition off
and removing the previously
programmed correctly coded key,
insert the new unprogrammed key into
the ignition.
8. Switch the ignition from off to on. Keep
the ignition on for at least six seconds.
9. Remove the newly programmed correctly coded key from the ignition.
If the key has been successfully
programmed it will start the engine and
operate the remote entry system (if the
new key is an integrated keyhead
transmitter).
If the key was not successfully
programmed, wait 10 seconds and repeat
Steps 1 through 8. If you are still
unsuccessful, take your vehicle to an
authorized dealer.
Note: You can program a maximum of eight
coded keys to your vehicle. All eight can be
integrated keyhead transmitters. ANTI-THEFT ALARM -
VEHICLES WITHOUT: ANTI-
THEFT ALARM HORN WITH
INTEGRAL BATTERY
Alarm System
The perimeter alarm is a deterrent against
unauthorized access to your vehicle
through the doors, luggage compartment
and the hood.
Triggering the Alarm
Once armed, the alarm is triggered in any
of the following ways:
•
If someone opens a door, cargo area
or the hood without a valid key or
remote control.
• If you switch the ignition on without a
valid key.
If the alarm is triggered, the horn will sound
for 30 seconds and the hazard warning
flasher will flash for five minutes.
Any further attempts to perform one of the
above will trigger the alarm again.
Arming the Alarm
To arm the alarm, lock your vehicle. See
Doors and Locks (page 77).
Disarming the Alarm
Disarm and silence the alarm by unlocking
the doors with the key and switching the
ignition on with a correctly coded key
within 12 seconds, or by unlocking the
doors or the cargo area with the remote
control.
91
2020 Transit (TTH) Canada/United States of America, LK3J 19A321 HA enUSA, Edition date: 201911, First-Printing Security
Page 95 of 529
ANTI-THEFT ALARM -
VEHICLES WITH: ANTI-THEFT
ALARM HORN WITH INTEGRAL
BATTERY
Alarm System
Your vehicle may have one of the following
alarm systems:
•
Category one alarm with interior
sensors and battery back-up sounder.
• Perimeter alarm.
Perimeter Alarm
The perimeter alarm is a deterrent against
unauthorized access to your vehicle
through the doors and the hood.
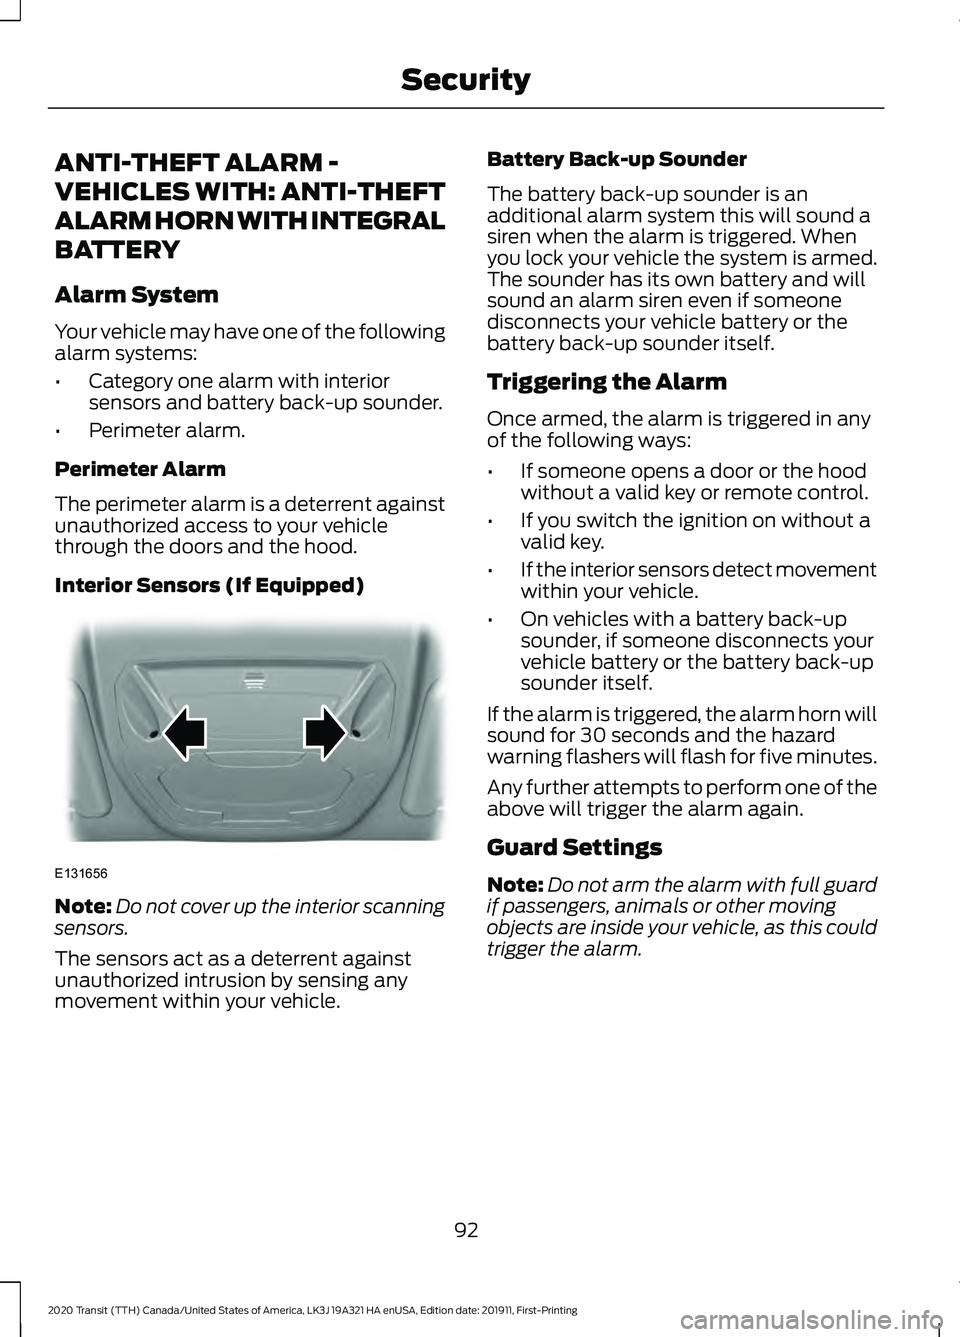
Interior Sensors (If Equipped) Note:
Do not cover up the interior scanning
sensors.
The sensors act as a deterrent against
unauthorized intrusion by sensing any
movement within your vehicle. Battery Back-up Sounder
The battery back-up sounder is an
additional alarm system this will sound a
siren when the alarm is triggered. When
you lock your vehicle the system is armed.
The sounder has its own battery and will
sound an alarm siren even if someone
disconnects your vehicle battery or the
battery back-up sounder itself.
Triggering the Alarm
Once armed, the alarm is triggered in any
of the following ways:
•
If someone opens a door or the hood
without a valid key or remote control.
• If you switch the ignition on without a
valid key.
• If the interior sensors detect movement
within your vehicle.
• On vehicles with a battery back-up
sounder, if someone disconnects your
vehicle battery or the battery back-up
sounder itself.
If the alarm is triggered, the alarm horn will
sound for 30 seconds and the hazard
warning flashers will flash for five minutes.
Any further attempts to perform one of the
above will trigger the alarm again.
Guard Settings
Note: Do not arm the alarm with full guard
if passengers, animals or other moving
objects are inside your vehicle, as this could
trigger the alarm.
92
2020 Transit (TTH) Canada/United States of America, LK3J 19A321 HA enUSA, Edition date: 201911, First-Printing SecurityE131656
Page 104 of 529
GENERAL INFORMATION
Condensation in the Exterior Front
Lamps and Rear Lamps
Exterior front lamps and rear lamps have
vents to accommodate normal changes
in air pressure.
Condensation can be a natural by-product
of this design. When moist air enters the
lamp assembly through the vents, there is
a possibility that condensation can occur
when the temperature is cold. When
normal condensation occurs, a fine mist
can form on the interior of the lens. The
fine mist eventually clears and exits
through the vents during normal operation.
Clearing time may take as long as 48 hours
under dry weather conditions.
Examples of acceptable condensation are:
•
The presence of a fine mist (no streaks,
drip marks or large droplets).
• A fine mist covers less than 50% of the
lens.
Examples of unacceptable condensation
are:
• A water puddle inside the lamp.
• Streaks, drip marks or large droplets
present on the interior of the lens.
If you see any unacceptable condensation,
have your vehicle checked by an authorized
dealer. LIGHTING CONTROL
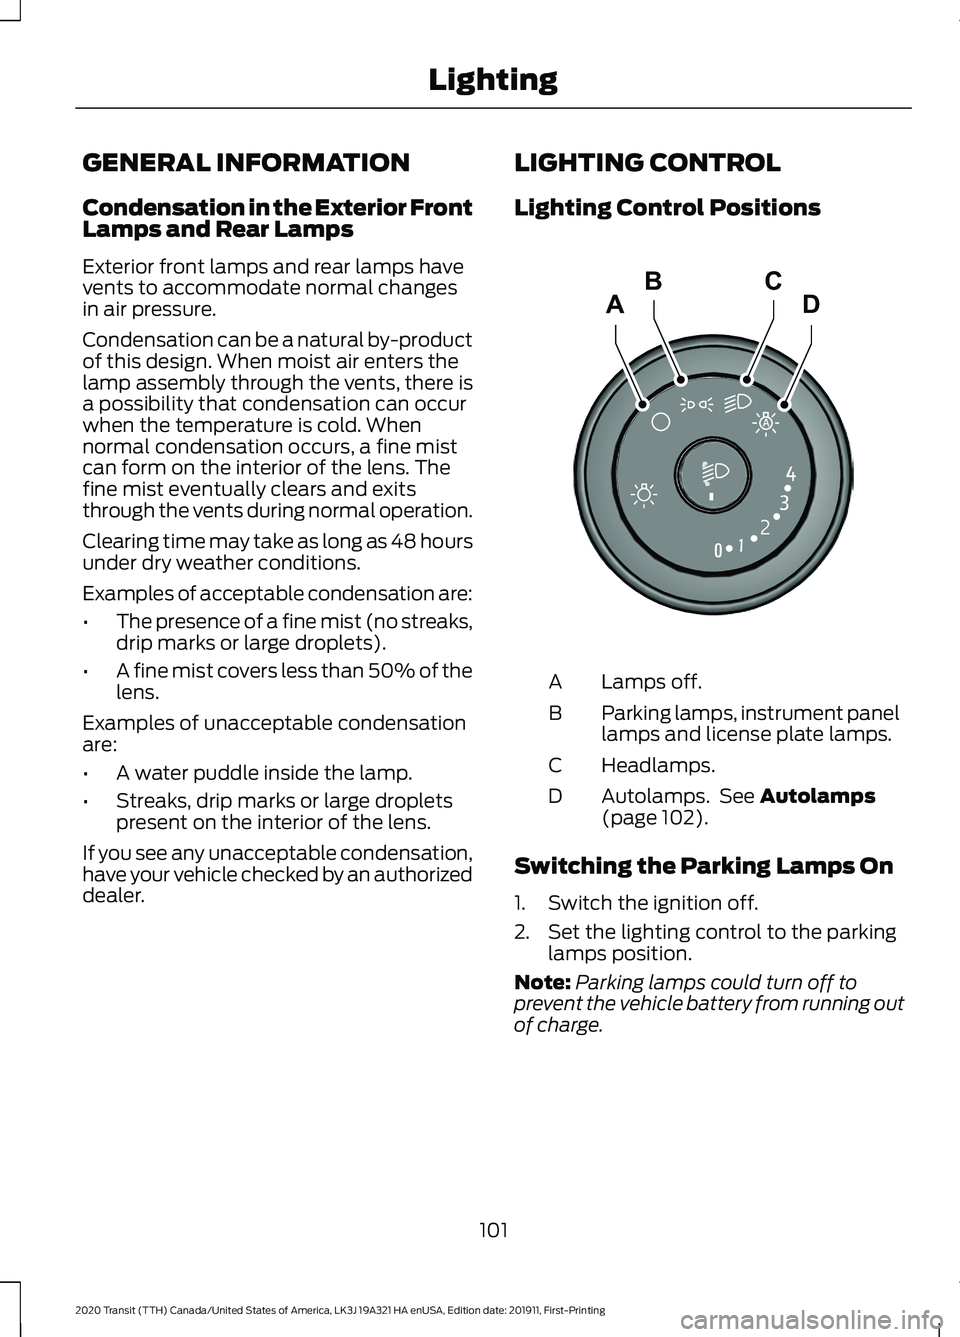
Lighting Control Positions
Lamps off.
A
Parking lamps, instrument panel
lamps and license plate lamps.
B
Headlamps.
C
Autolamps. See Autolamps
(page 102).
D
Switching the Parking Lamps On
1. Switch the ignition off.
2. Set the lighting control to the parking lamps position.
Note: Parking lamps could turn off to
prevent the vehicle battery from running out
of charge.
101
2020 Transit (TTH) Canada/United States of America, LK3J 19A321 HA enUSA, Edition date: 201911, First-Printing LightingADCBE245649
Page 110 of 529
CARGO LAMPS
Switching the Cargo Lamps Off
Press the button to switch the cargo lamps
off when a door is open.
Note:
The cargo lamps switch only
operates when the ignition is off.
The switch is inside the cargo area, behind
the left-hand rear door.
The cargo lamps turn off after a short
period of time to prevent the battery from
running out of charge.
Switching the Cargo Lamps On
Press the button to switch the cargo lamps
on.
If the cargo lamps turned off to prevent
the battery from running out of charge or
you switched them off by pressing the
button, reset the switch first.
Resetting the Switch
To reset the switch, do one of the
following:
• Lock or unlock a door.
• Open or close a front door.
• Switch the ignition on then off.
Press the button to switch the cargo lamps
on.
107
2020 Transit (TTH) Canada/United States of America, LK3J 19A321 HA enUSA, Edition date: 201911, First-Printing Lighting
Page 112 of 529
5. Lift the switch again for one more
second.
Note: Repeat the procedure if the window
does not close when you use one-touch.
Note: If you have disconnected the battery,
you must reset the bounce-back memory.
EXTERIOR MIRRORS
Power Exterior Mirrors WARNING: Do not adjust the
mirrors when your vehicle is moving. This
could result in the loss of control of your
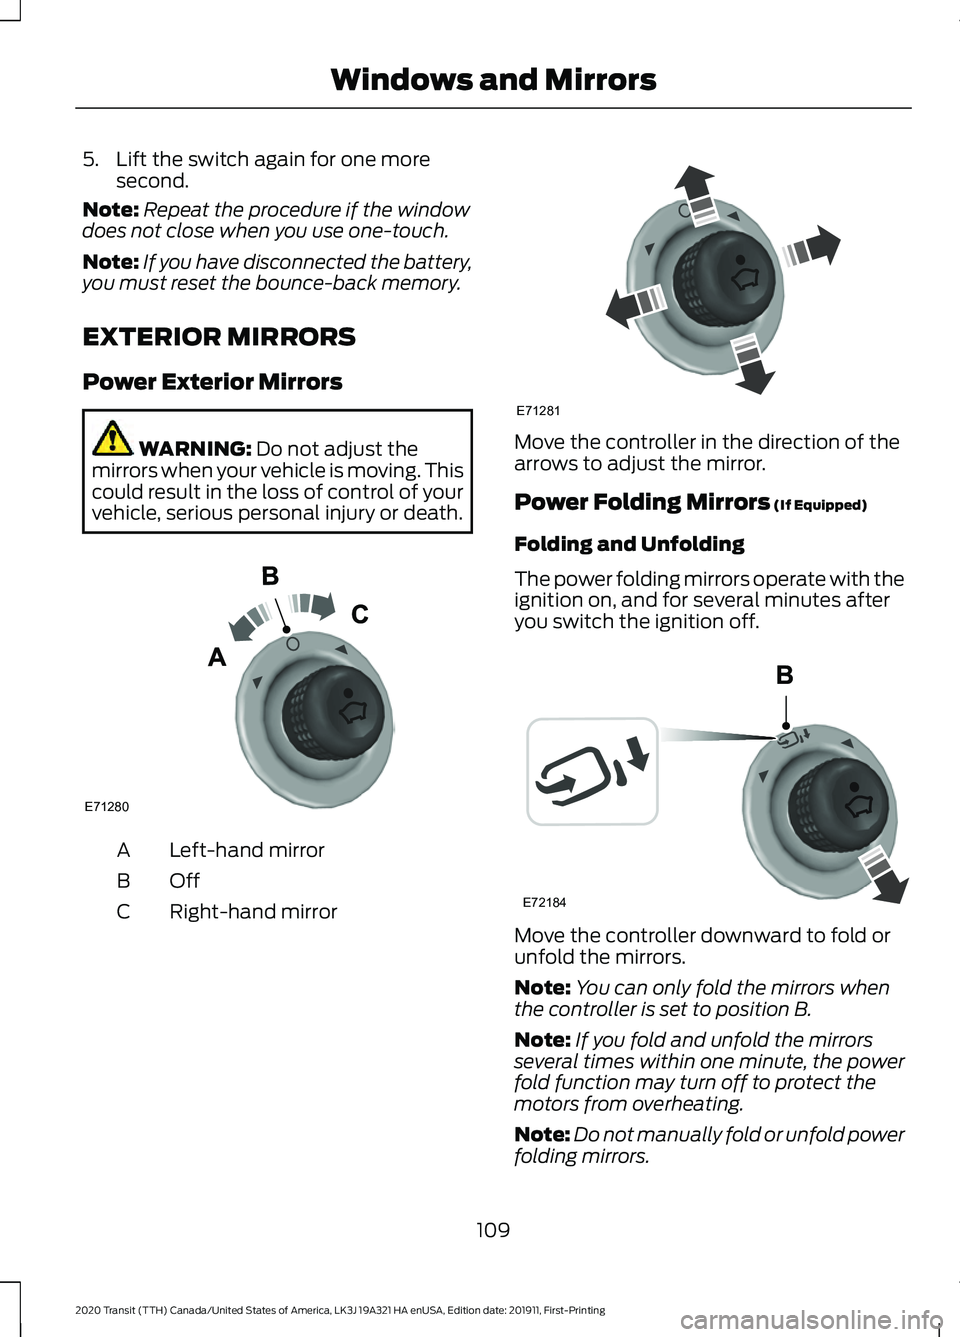
vehicle, serious personal injury or death. Left-hand mirror
A
OffB
Right-hand mirror
C Move the controller in the direction of the
arrows to adjust the mirror.
Power Folding Mirrors
(If Equipped)
Folding and Unfolding
The power folding mirrors operate with the
ignition on, and for several minutes after
you switch the ignition off. Move the controller downward to fold or
unfold the mirrors.
Note:
You can only fold the mirrors when
the controller is set to position B.
Note: If you fold and unfold the mirrors
several times within one minute, the power
fold function may turn off to protect the
motors from overheating.
Note: Do not manually fold or unfold power
folding mirrors.
109
2020 Transit (TTH) Canada/United States of America, LK3J 19A321 HA enUSA, Edition date: 201911, First-Printing Windows and MirrorsE71280 E71281 E72184
Page 127 of 529
AUXILIARY HEATER
Principle of Operation
The system is designed to reduce the time
needed to heat the engine when it is
running. It turns on or off depending on the
outside air temperature and the coolant
temperature.
The system warms the engine and the
vehicle interior. It uses fuel from the
vehicle fuel tank.
Using the Auxiliary Heater
WARNING: We recommend that
you have a qualified technician check
and repair the heater system after a
crash. Failure to follow this instruction
could result in personal injury or death. WARNING: Do not use the auxiliary
heater at fuel filling stations or near
sources of combustible vapors, dust or
in enclosed spaces. Failure to follow this
instruction could result in personal injury
or death. The system requires a minimum of
6.1 gal
(23 L) of fuel in the vehicle fuel tank and
the outside air temperature has to be
below
37°F (3°C).
Note: The system does not operate if the
battery charge level is low.
Note: Do not use biodiesel fuel B20 as this
reduces the lifetime of the heater operation.
Note: Make sure the heater exhaust outlet,
under the vehicle, under the driver
compartment, is free from snow, ice, mud
and any other blockages to avoid issues with
the heater operation.
Note: Driving through water can cause
damage to the heater. See Driving Through
Water
(page 255).
Note: When the system is on, exhaust
fumes come from under your vehicle. This
is normal.
Note: If the heater is in the process of
stopping, excess fuel in the heater burns out
and there is some heat, exhaust and noise.
Switching the Auxiliary Heater On and Off
To switch the auxiliary heater on or off, use the information display controls on
the steering wheel to select the following: Action
Menu Item
Press the menu button.
Settings
Press the
OK button.
Vehicle Settings
Press the
OK button.
Aux Heater
124
2020 Transit (TTH) Canada/United States of America, LK3J 19A321 HA enUSA, Edition date: 201911, First-Printing Climate Control
Page 133 of 529
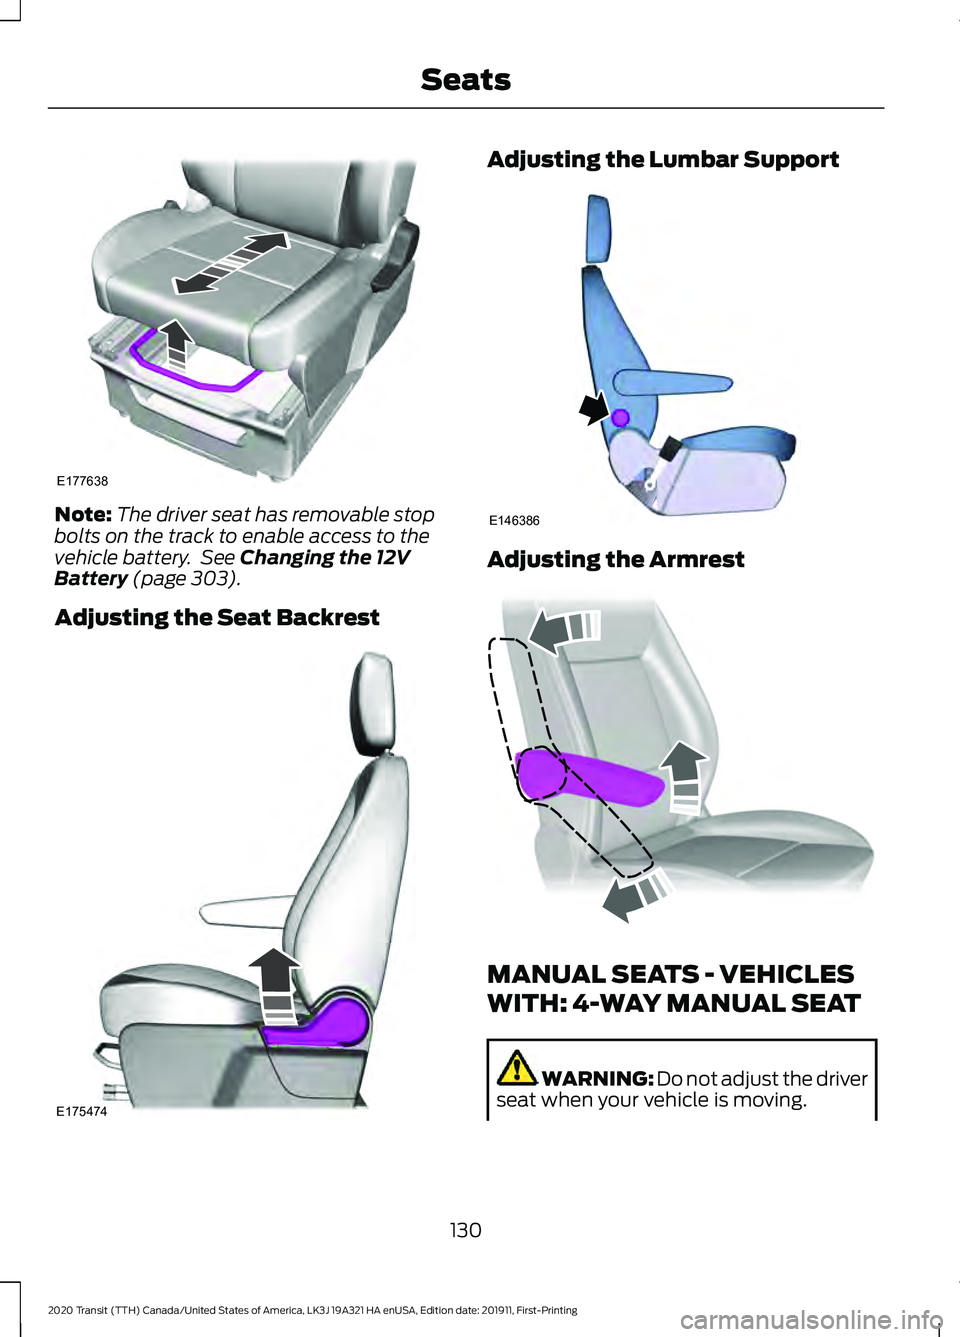
Note:
The driver seat has removable stop
bolts on the track to enable access to the
vehicle battery. See Changing the 12V
Battery (page 303).
Adjusting the Seat Backrest Adjusting the Lumbar Support
Adjusting the Armrest
MANUAL SEATS - VEHICLES
WITH: 4-WAY MANUAL SEAT
WARNING: Do not adjust the driver
seat when your vehicle is moving.
130
2020 Transit (TTH) Canada/United States of America, LK3J 19A321 HA enUSA, Edition date: 201911, First-Printing SeatsE177638 E175474 E146386 E315192
Page 134 of 529

WARNING: Do not place cargo or
any objects behind the seatback before
returning it to the original position.
Moving the Seat Backward and
Forward WARNING: Make sure the seat fully
locks into place by rocking it backward
and forward. Not securing the seat into
the locked position can be dangerous in
a crash and could cause serious personal
injury or death. Note:
The driver seat has removable stop
bolts on the track to enable access to the
vehicle battery. See
Changing the 12V
Battery (page 303). Adjusting the Seat Backrest
Adjusting the Seat Height
131
2020 Transit (TTH) Canada/United States of America, LK3J 19A321 HA enUSA, Edition date: 201911, First-Printing SeatsE130249 E146385 E146384