FORD TRANSIT 2020 Owners Manual
Manufacturer: FORD, Model Year: 2020, Model line: TRANSIT, Model: FORD TRANSIT 2020Pages: 529, PDF Size: 8.3 MB
Page 231 of 529
Note:
Vehicles with an automatic
transmission do not have a bar for gear
shifting.
Viewing the Trip Summary
1. Using the information display controls on the steering wheel, select MyView.
2. Select
Eco Coach.
Efficient Drive Mode
What Is Efficient Drive Mode
Efficient drive mode is a predictive coach
that provides near real-time traffic
information to help you drive more
efficiently by releasing the accelerator
pedal.
Switching Efficient Drive Mode On and
Off
1. Using the information display controls on the steering wheel, select
Driver
Assist..
2. Select
Eco Coach.
3. Switch
Eco Advice on and off.
Displaying the Efficient Drive Mode
1. Using the information display controls on the steering wheel, select
Driver
Assist..
The display ring can provide information
about speed limit, freeway ramp, slope,
curve, crosswalk, etc.
Efficient Drive Mode Indicator It indicates that you have to
slowly decelerate. Trip Summary
The calculated trip summary is shown as
five colored bars. The bars travel from left
to right as the calculated efficiency levels
increase. The bars indicate the average
efficiency level for acceleration,
deceleration, speed, gear shifting and
compliance score during the total distance
traveled by your vehicle for both last and
current trips.
Note:
Vehicles with an automatic
transmission do not have a bar for gear
shifting.
Viewing the trip summary
1. Using the information display controls on the steering wheel, select
MyView.
2. Select
Eco Coach.
3. Switch the engine off.
4. Press the
OK button.
STEERING
Electric Power Steering WARNING:
The electric power
steering system has diagnostic checks
that continuously monitor the system. If
a fault is detected, a message displays
in the information display. Stop your
vehicle as soon as it is safe to do so.
Switch the ignition off. After at least 10
seconds, switch the ignition on and
watch the information display for a
steering system warning message. If a
steering system warning message
returns, have the system checked as
soon as possible.
228
2020 Transit (TTH) Canada/United States of America, LK3J 19A321 HA enUSA, Edition date: 201911, First-Printing Driving AidsE308186
Page 232 of 529
WARNING: If the system detects
an error, you may not feel a difference in
the steering, however a serious condition
may exist. Have your vehicle checked as
soon as possible. Failure to do so may
result in loss of steering control.
Your vehicle has an electric power steering
system, there is no fluid reservoir, no
maintenance is required.
If your vehicle loses electrical power while
you are driving, electric power steering
assistance is lost. The steering system still
operates and you can steer your vehicle
manually. Manually steering your vehicle
requires more effort.
Extreme continuous steering may increase
the effort required for you to steer your
vehicle, this increased effort prevents
overheating and permanent damage to
the steering system. You do not lose the
ability to steer your vehicle manually.
Typical steering and driving maneuvers
allow the system to cool and return to
normal operation. Steering Tips
If the steering wanders or pulls, check for:
•
Correct tire pressures.
• Uneven tire wear.
• Loose or worn suspension
components.
• Loose or worn steering components.
• Improper vehicle alignment.
Note: A high crown in the road or high
crosswinds may also make the steering
seem to wander or pull.
Adaptive Learning
(If Equipped)
The electronic power steering system
adaptive learning helps correct road
irregularities and improves overall handling
and steering feel. It communicates with
the brake system to help operate
advanced stability control and accident
avoidance systems. Additionally, whenever
the battery is disconnected or a new
battery installed, you must drive your
vehicle a short distance before the system
relearns the strategy and reactivates all
systems.
Steering Information Messages Description
Message
The system has malfunctioned. Stop your vehicle as soon
as it is safe to do so. You continue to have full steering but
you need to exert greater force on the steering wheel. Have
your vehicle checked as soon as possible.
Steering Fault Service
Now
Steering Loss Stop
Safely
Steering Assist Fault
Service Required
229
2020 Transit (TTH) Canada/United States of America, LK3J 19A321 HA enUSA, Edition date: 201911, First-Printing Driving Aids
Page 233 of 529
PRE-COLLISION ASSIST
WARNING: You are responsible for
controlling your vehicle at all times. The
system is designed to be an aid and does
not relieve you of your responsibility to
drive with due care and attention. Failure
to follow this instruction could result in
the loss of control of your vehicle,
personal injury or death. WARNING: The system does not
operate during hard acceleration or
steering. Failure to take care may lead
to a crash or personal injury. WARNING: The system may fail or
operate with reduced function during
cold and severe weather conditions.
Snow, ice, rain, spray and fog can
adversely affect the system. Keep the
front camera and radar free of snow and
ice. Failure to take care may result in the
loss of control of your vehicle, serious
personal injury or death. WARNING:
The system may not
operate properly if your vehicle has a
non-Ford windshield. Do not carry out
windshield repairs in the area around the
sensor. WARNING:
Some situations and
objects prevent hazard detection. For
example low or direct sunlight, inclement
weather, unconventional vehicle types,
and pedestrians. Apply the brakes when
necessary. Failure to follow this
instruction could result in the loss of
control of your vehicle, personal injury or
death. WARNING: The Pre-Collision Assist
system with brake support cannot help
prevent all collisions. Do not rely on this
system to replace your judgment and the
need to maintain correct distance and
speed.
The pre-collision assist system is active
when your vehicle reaches a speed greater
than approximately
6 mph (10 km/h).
Pedestrian detection is active at speeds
up to
50 mph (80 km/h).
Note: The system is not designed to detect
animals.
Note: The system is not designed to detect
vehicles or cyclists that are traveling in a
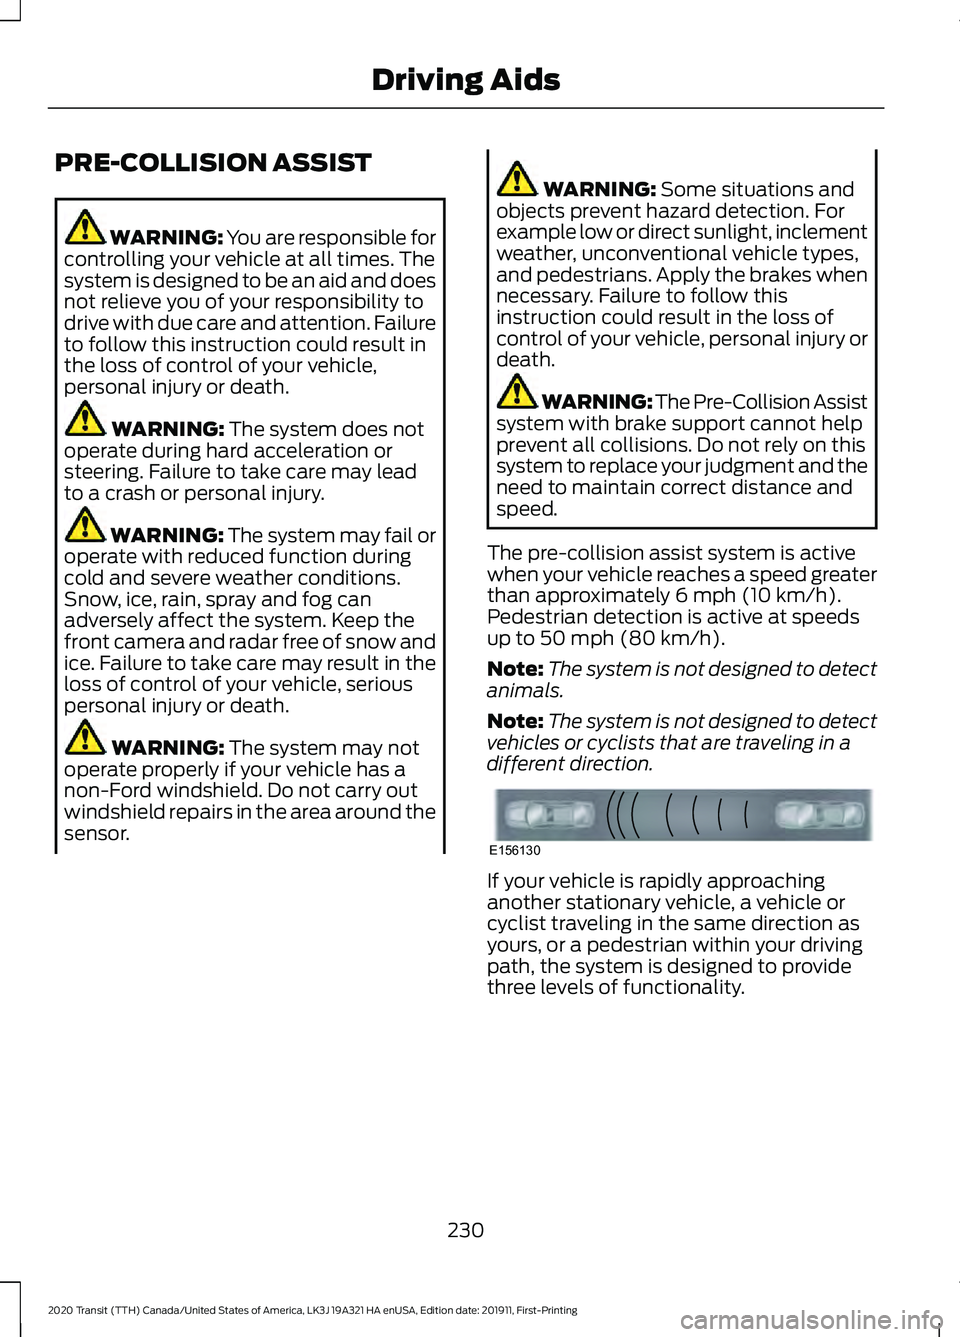
different direction. If your vehicle is rapidly approaching
another stationary vehicle, a vehicle or
cyclist traveling in the same direction as
yours, or a pedestrian within your driving
path, the system is designed to provide
three levels of functionality.
230
2020 Transit (TTH) Canada/United States of America, LK3J 19A321 HA enUSA, Edition date: 201911, First-Printing Driving AidsE156130
Page 234 of 529
Description
Level of Functionality
When activated, a warning lamp flashes and an audible
warning sounds.
Alert
The system is designed to help reduce the impact speed by
preparing the brakes for rapid braking. The system does not
automatically apply the brakes. If you press the brake pedal,
the system could apply additional braking up to maximum
braking force, even if you lightly press the brake pedal.
Brake support
The system is designed to apply the brakes if it detects a
crash is imminent. This may help reduce impact or avoid the
crash.
Active braking
Switching Active Braking On and
Off
1. Using the information display controls on the steering wheel, select Driver
Assist..
2. Select
Pre-Collision Assist.
3. Switch
Active Braking on or off.
Distance Alert
(If Equipped)
A warning lamp illuminates if the distance
to the vehicle ahead is small.
Note: The warning lamp does not
illuminate if cruise control or adaptive cruise
control is active. Adjusting the Sensitivity of Distance
Alert
1. Using the information display controls
on the steering wheel, select
Driver
Assist..
2. Select
Pre-Collision Assist.
3. Select
Alert Sensitivity.
4. Select a setting and press the
OK
button.
Distance Indication
(If Equipped)
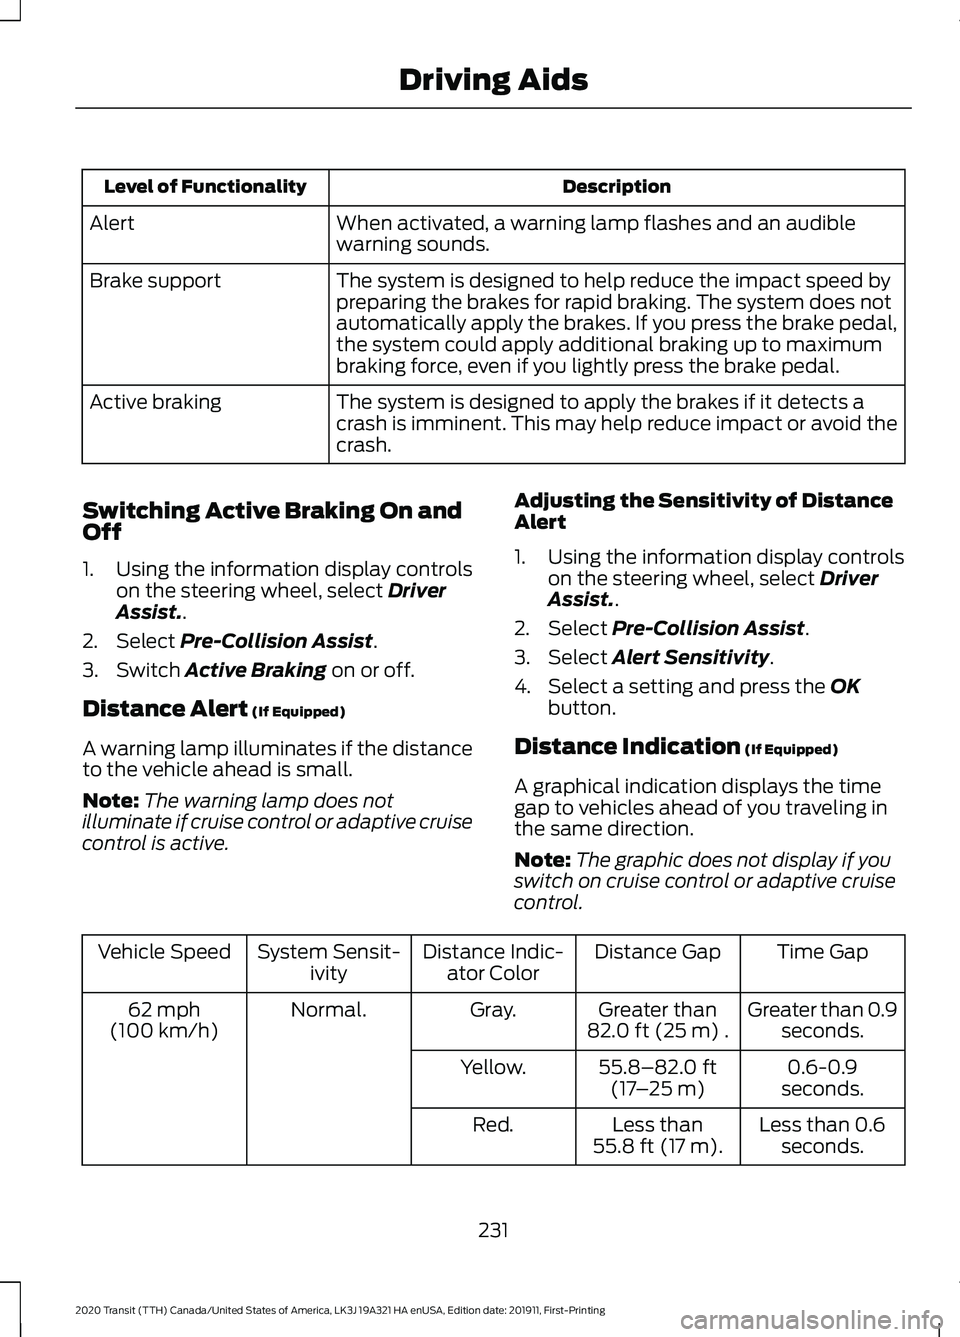
A graphical indication displays the time
gap to vehicles ahead of you traveling in
the same direction.
Note: The graphic does not display if you
switch on cruise control or adaptive cruise
control. Time Gap
Distance Gap
Distance Indic-
ator Color
System Sensit-
ivity
Vehicle Speed
Greater than 0.9seconds.
Greater than
82.0 ft (25 m)
.
Gray.
Normal.
62 mph
(100 km/h)
0.6-0.9
seconds.
55.8–82.0 ft
(17 –25 m)
Yellow.
Less than 0.6seconds.
Less than
55.8 ft (17 m)
.
Red.
231
2020 Transit (TTH) Canada/United States of America, LK3J 19A321 HA enUSA, Edition date: 201911, First-Printing Driving Aids
Page 235 of 529
Switching Distance Indication On and
Off
1. Using the information display controls
on the steering wheel, select Driver
Assist..
2. Select
Pre-Collision Assist.
3. Switch
Distance Indication on or off.
Pre-Collision Assist System
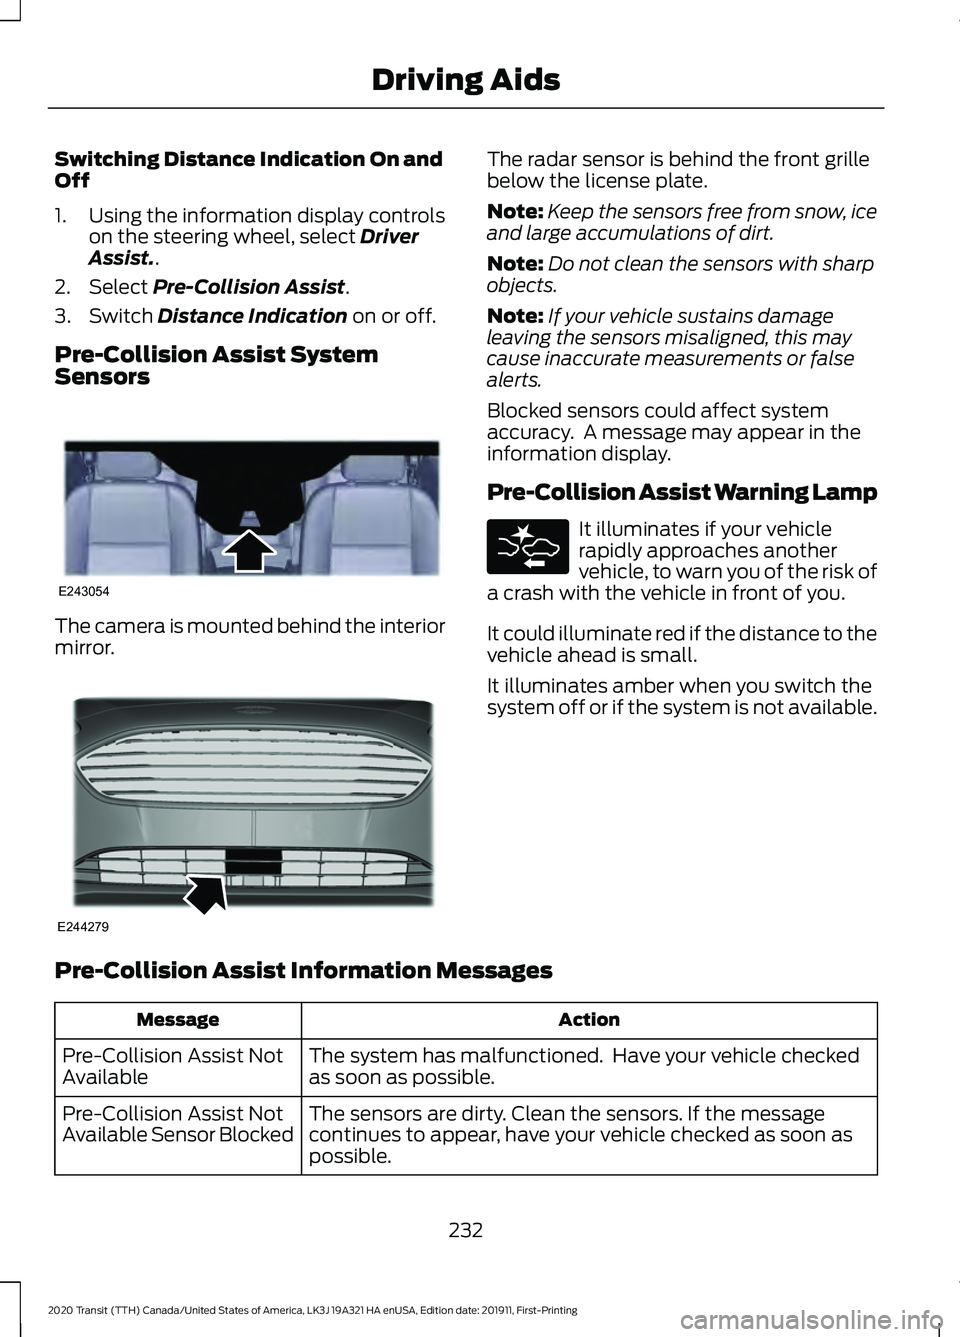
Sensors The camera is mounted behind the interior
mirror. The radar sensor is behind the front grille
below the license plate.
Note:
Keep the sensors free from snow, ice
and large accumulations of dirt.
Note: Do not clean the sensors with sharp
objects.
Note: If your vehicle sustains damage
leaving the sensors misaligned, this may
cause inaccurate measurements or false
alerts.
Blocked sensors could affect system
accuracy. A message may appear in the
information display.
Pre-Collision Assist Warning Lamp It illuminates if your vehicle
rapidly approaches another
vehicle, to warn you of the risk of
a crash with the vehicle in front of you.
It could illuminate red if the distance to the
vehicle ahead is small.
It illuminates amber when you switch the
system off or if the system is not available.
Pre-Collision Assist Information Messages Action
Message
The system has malfunctioned. Have your vehicle checked
as soon as possible.
Pre-Collision Assist Not
Available
The sensors are dirty. Clean the sensors. If the message
continues to appear, have your vehicle checked as soon as
possible.
Pre-Collision Assist Not
Available Sensor Blocked
232
2020 Transit (TTH) Canada/United States of America, LK3J 19A321 HA enUSA, Edition date: 201911, First-Printing Driving AidsE243054 E244279
Page 236 of 529
The following table lists possible causes and actions for when a blocked sensor
message may display.
Action
Cause
Clean the radiator grille in front of the radar
or remove any obstruction.
The surface of the radar in the radiator grille
is dirty or obstructed.
Wait for a short period of time. It may take
several minutes for the system to detect
that there is no obstruction.
The surface of the radar is clean but the
message remains in the display.
The system is temporarily disabled. The
system should reactivate after a short
period of time when the weather conditions
improve.
Heavy rain, spray, snow, or fog is interfering
with the radar signals.
Have your vehicle checked as soon as
possible.
The radar is misaligned.
Clean the outside of the windshield in front
of the camera.
The windshield in front of the camera is
dirty or obstructed.
Wait for a short period of time. It may take
several minutes for the camera to detect
that there is no obstruction.
The windshield in front of the camera is
clean but the message remains in the
display.
Wait for a short period of time. The
message should clear when the temper-
ature around the camera decreases.
Excessive heat around the camera.
FRONT VIEW CAMERA WARNING: The front camera
system still requires the driver to use it
in conjunction with looking out of your
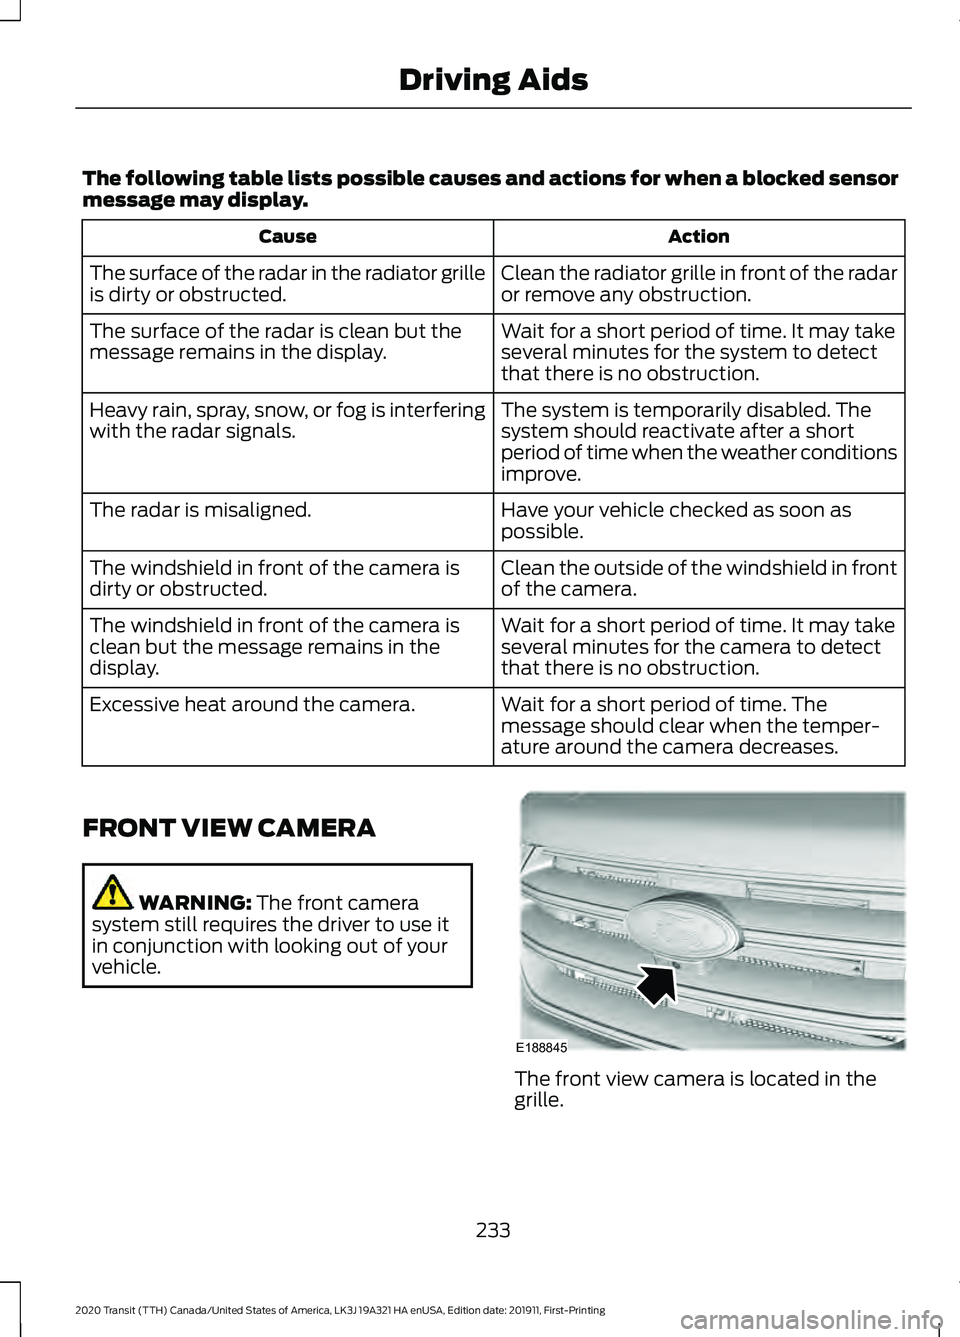
vehicle. The front view camera is located in the
grille.
233
2020 Transit (TTH) Canada/United States of America, LK3J 19A321 HA enUSA, Edition date: 201911, First-Printing Driving AidsE188845
Page 237 of 529
Using the Front View Camera
The front view camera provides a video
image of the area in front of your vehicle.
To use the front view camera system,
place the transmission in any gear except
reverse (R). An image of the front of your
vehicle appears once you press the camera
enable button and your vehicle speed is
below 6 mph (10 km/h).
Note: The area displayed on the screen may
vary according to your vehicle's orientation
or road condition.
Note: The front view camera will switch off
if your vehicle speed exceeds
6 mph
(10 km/h). You will have to switch the
system back on by using the enable button
once below the speed threshold.
Note: The camera system may not operate
correctly if mud, water or debris obstructs
the camera's view. You can clean the lens
with a soft, lint-free cloth and non-abrasive
cleaner or by using your front washer. See
Wipers and Washers
(page 98). The camera button is located on
the audio unit.
Camera Views
Press the camera button to toggle
between different views.
• Front Normal View: Provides an image
of what is directly in front of your
vehicle.
• Front Split View: Provides an extended
view of what is in front of your vehicle.
Access this view by pressing the
camera button from the Front Normal
View screen. DRIVE CONTROL
Selectable Drive Modes
Your vehicle has various drive modes that
you can select for different driving
conditions. Depending on the drive mode
that you select, the system adjusts various
vehicle settings, for example steering, gear
shifting, handling and powertrain response.
Selecting a Drive Mode
The button is on the instrument panel.
Repeatedly press the button to
scroll through the available drive
modes. Release the button to
confirm your selected drive mode.
Normal Vehicle settings suited for
balanced driving.
Note: This is the default mode each time
you switch the ignition on.
Eco Vehicle settings suited for
economical driving.
Slippery Vehicle settings suited for driving
on slippery roads.
Tow/Haul Vehicle settings suited for
towing or hauling.
Mud/Ruts Vehicle settings suited for driving
through mud and ruts.
234
2020 Transit (TTH) Canada/United States of America, LK3J 19A321 HA enUSA, Edition date: 201911, First-Printing Driving AidsE188847 E298514 E225310 E267164 E269320 E246592 E296606
Page 238 of 529
Selectable Drive Modes Information Messages
Action
Message
The system is not available. If it is still not available the next
time you switch the ignition on, the system has detected a
fault that requires service. Have your vehicle checked as soon
as possible.
Drive Mode Not Available
235
2020 Transit (TTH) Canada/United States of America, LK3J 19A321 HA enUSA, Edition date: 201911, First-Printing Driving Aids
Page 239 of 529
ROOF RACKS AND LOAD
CARRIERS - BUS
WARNING: Your vehicle is not
approved for roof racks. Never install a
roof rack to your vehicle.
ROOF RACKS AND LOAD
CARRIERS - VAN WARNING:
When loading the roof
racks, we recommend you evenly
distribute the load, as well as maintain
a low center of gravity. Loaded vehicles,
with higher centers of gravity, may
handle differently than unloaded
vehicles. Take extra precautions, such
as slower speeds and increased stopping
distance, when driving a heavily loaded
vehicle. WARNING:
Do not exceed the
maximum front and rear axle loads for
your vehicle. WARNING:
Read and follow the
manufacturer's instructions when you
are fitting a roof rack.
Maximum Roof Load lb (kg)
Variant
419 (190)
Low-Roof.
331 (150)
Medium-Roof.
220 (100)
High-Roof.
Make sure that you securely fasten the
load. Check that the straps are secure
before driving and at each fuel stop. We recommend that you use genuine Ford
accessory crossbars specifically designed
for your vehicle.
Never place loads directly on the roof
panel.
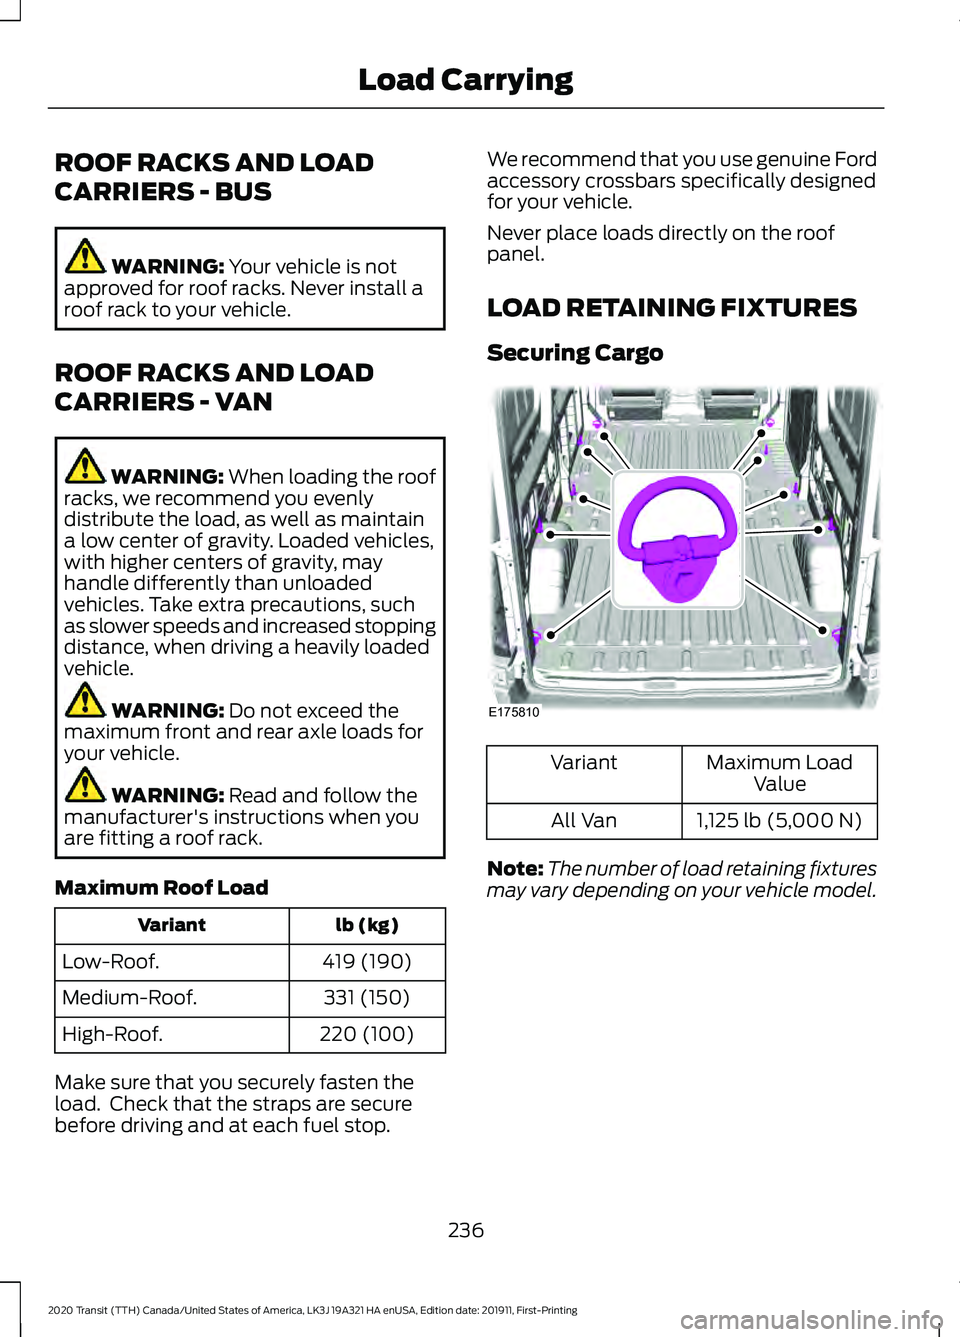
LOAD RETAINING FIXTURES
Securing Cargo
Maximum Load
Value
Variant
1,125 lb (5,000 N)
All Van
Note: The number of load retaining fixtures
may vary depending on your vehicle model.
236
2020 Transit (TTH) Canada/United States of America, LK3J 19A321 HA enUSA, Edition date: 201911, First-Printing Load CarryingE175810
Page 240 of 529
LOAD LIMIT
Vehicle Loading - with and
without a Trailer
This section guides you in the
proper loading of your vehicle,
trailer, or both. Keep your loaded
vehicle weight within its design
rating capability, with or without
a trailer. Properly loading your
vehicle provides maximum return
of vehicle design performance.
Before you load your vehicle,
become familiar with the
following terms for determining
your vehicle
’s weight rating, with
or without a trailer, from the
vehicle ’s Tire and Loading
Information label or Safety
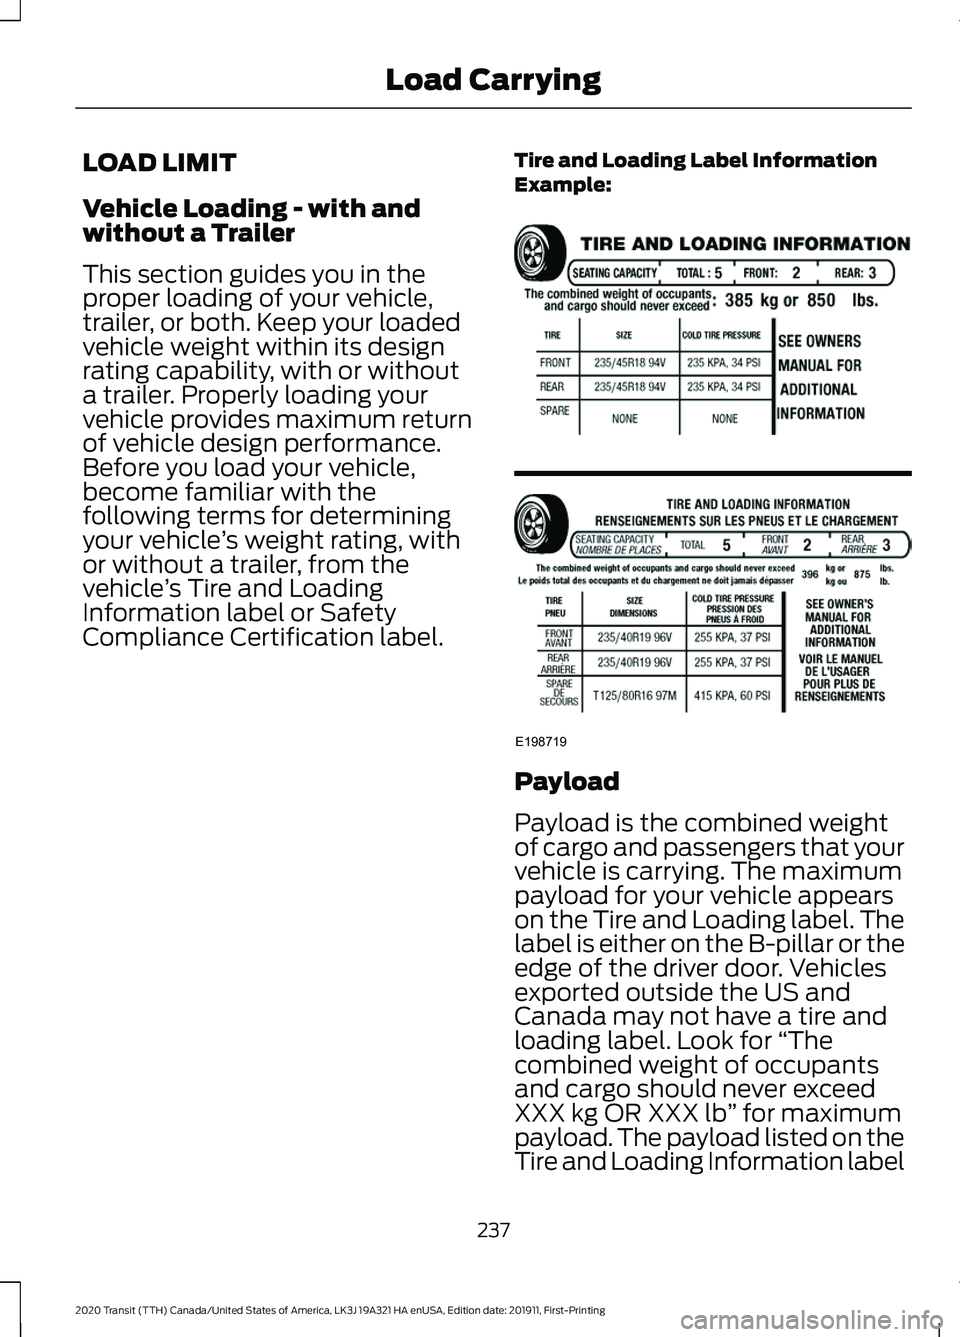
Compliance Certification label. Tire and Loading Label Information
Example: Payload
Payload is the combined weight
of cargo and passengers that your
vehicle is carrying. The maximum
payload for your vehicle appears
on the Tire and Loading label. The
label is either on the B-pillar or the
edge of the driver door. Vehicles
exported outside the US and
Canada may not have a tire and
loading label. Look for
“The
combined weight of occupants
and cargo should never exceed
XXX kg OR XXX lb ” for maximum
payload. The payload listed on the
Tire and Loading Information label
237
2020 Transit (TTH) Canada/United States of America, LK3J 19A321 HA enUSA, Edition date: 201911, First-Printing Load CarryingE198719