ECO mode FORD TRANSIT 2020 Owner's Manual
[x] Cancel search | Manufacturer: FORD, Model Year: 2020, Model line: TRANSIT, Model: FORD TRANSIT 2020Pages: 529, PDF Size: 8.3 MB
Page 248 of 529
Calculating the Maximum
Loaded Trailer Weight for Your
Vehicle
1. Start with the gross combined
weight rating for your vehicle
model and axle ratio. See the
previous charts.
2. Subtract all of the following
that apply to your vehicle:
• Vehicle curb weight
• Hitch hardware weight, such as
a draw bar, ball, locks or weight
distributing hardware
• Driver weight
• Passenger(s) weight
• Payload, cargo and luggage
weight
• Aftermarket equipment weight.
This equals the maximum loaded
trailer weight for this combination.
Note: The trailer tongue load is
considered part of the payload for
your vehicle. Reduce the total
payload by the final trailer tongue
weight.
Note: Consult an authorized dealer
to determine the maximum trailer
weight allowed for your vehicle if
you are not sure. RECOMMENDED TOWING
WEIGHTS - M2 BUS
Note:
Make sure to take into
consideration trailer frontal area.
Vehicles equipped with the Trailer
Tow Package or the Heavy Duty
Payload Package should not
exceed 55 ft² (5.1 m²) trailer frontal
area.
Note: Exceeding this limitation
may significantly reduce the
performance of your towing
vehicle. Selecting a trailer with a
low aerodynamic drag and rounded
front design helps optimize
performance and fuel economy.
Note: For high altitude operation,
reduce the gross combined weight
by 2% per 1,000 ft (300 m)
starting at the 1,000 ft (300 m)
elevation point.
Note: Certain states require
electric trailer brakes for trailers
over a specified weight. Be sure to
check state regulations for this
specified weight. The maximum
trailer weights listed may be limited
to this specified weight, as your
vehicle's electrical system may not
include the wiring connector
needed to use electric trailer
brakes.
Your vehicle may tow a trailer
provided the maximum trailer
weight is less than or equal to the
maximum trailer weight listed for
your vehicle configuration on the
following charts.
245
2020 Transit (TTH) Canada/United States of America, LK3J 19A321 HA enUSA, Edition date: 201911, First-Printing Towing
Page 266 of 529
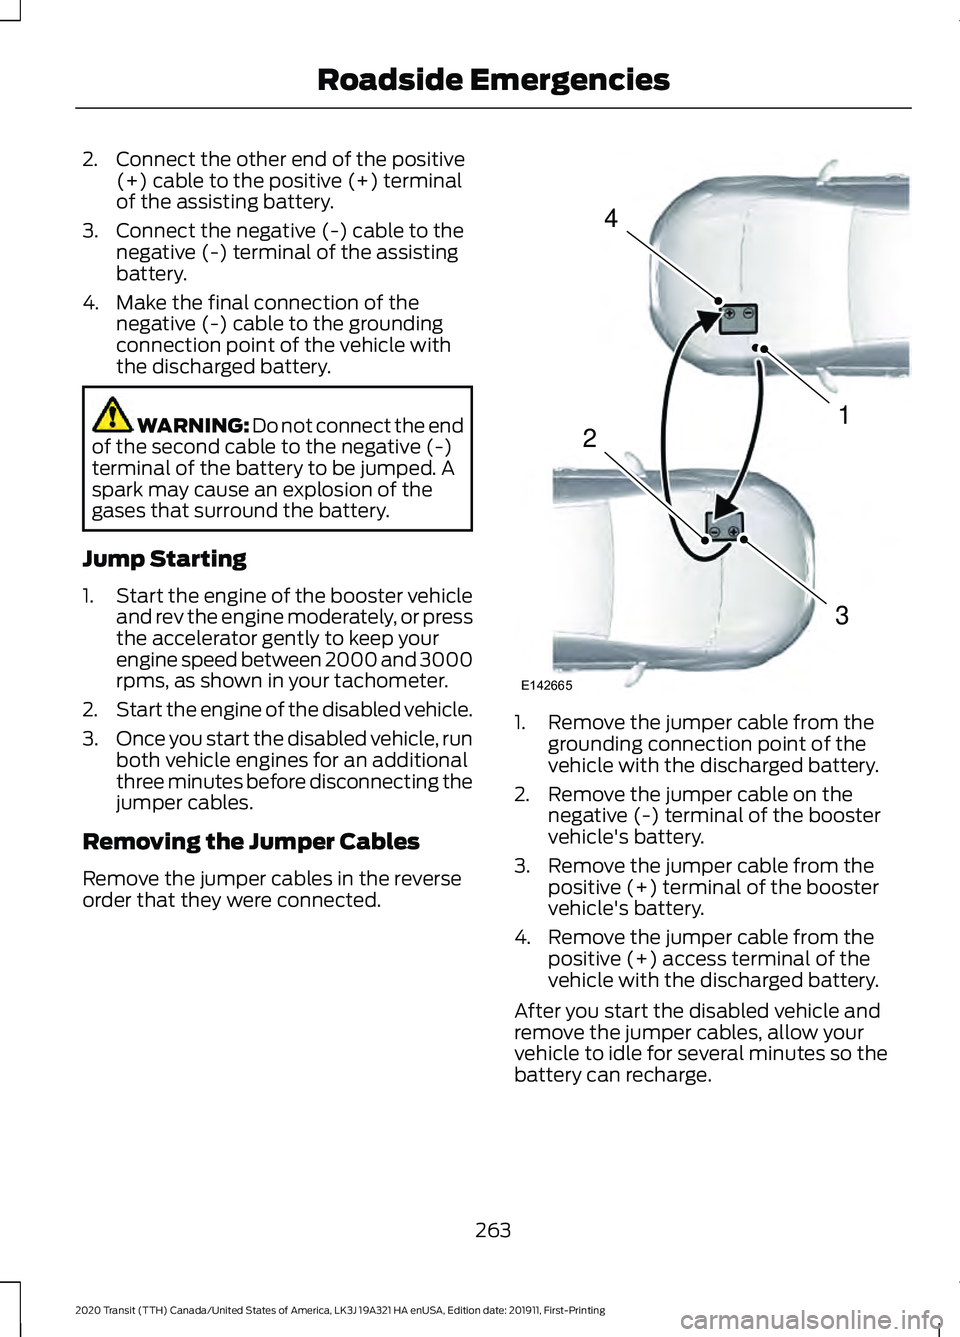
2. Connect the other end of the positive
(+) cable to the positive (+) terminal
of the assisting battery.
3. Connect the negative (-) cable to the negative (-) terminal of the assisting
battery.
4. Make the final connection of the negative (-) cable to the grounding
connection point of the vehicle with
the discharged battery. WARNING: Do not connect the end
of the second cable to the negative (-)
terminal of the battery to be jumped. A
spark may cause an explosion of the
gases that surround the battery.
Jump Starting
1. Start the engine of the booster vehicle
and rev the engine moderately, or press
the accelerator gently to keep your
engine speed between 2000 and 3000
rpms, as shown in your tachometer.
2. Start the engine of the disabled vehicle.
3. Once you start the disabled vehicle, run
both vehicle engines for an additional
three minutes before disconnecting the
jumper cables.
Removing the Jumper Cables
Remove the jumper cables in the reverse
order that they were connected. 1. Remove the jumper cable from the
grounding connection point of the
vehicle with the discharged battery.
2. Remove the jumper cable on the negative (-) terminal of the booster
vehicle's battery.
3. Remove the jumper cable from the positive (+) terminal of the booster
vehicle's battery.
4. Remove the jumper cable from the positive (+) access terminal of the
vehicle with the discharged battery.
After you start the disabled vehicle and
remove the jumper cables, allow your
vehicle to idle for several minutes so the
battery can recharge.
263
2020 Transit (TTH) Canada/United States of America, LK3J 19A321 HA enUSA, Edition date: 201911, First-Printing Roadside Emergencies4
1
3
2
E142665
Page 304 of 529

Continued operation increases the engine
temperature, causing the engine to
completely shut down. Your steering and
braking effort increases in this situation.
When the engine temperature cools, you
can re-start the engine. Have your vehicle
checked as soon as possible to minimize
engine damage.
When Fail-Safe Mode Is Activated
WARNING: Fail-safe mode is for
use during emergencies only. Operate
your vehicle in fail-safe mode only as
long as necessary to bring your vehicle
to rest in a safe location and seek
immediate repairs. When in fail-safe
mode, your vehicle will have limited
power, will not be able to maintain
high-speed operation, and may
completely shut down without warning,
potentially losing engine power, power
steering assist, and power brake assist,
which may increase the possibility of a
crash resulting in serious injury. WARNING:
Do not remove the
coolant reservoir cap when the engine is
on or the cooling system is hot. Wait 10
minutes for the cooling system to cool
down. Cover the coolant reservoir cap
with a thick cloth to prevent the
possibility of scalding and slowly remove
the cap. Failure to follow this instruction
could result in personal injury.
Your vehicle has limited engine power
when in the fail-safe mode, drive your
vehicle with caution. Your vehicle does not
maintain high-speed operation and the
engine may operate poorly.
Remember that the engine is capable of
automatically shutting down to prevent
engine damage. In this situation:
1. Pull off the road as soon as safely possible and switch the engine off. 2. If you are a member of a roadside
assistance program, we recommend
that you contact your roadside
assistance service provider.
3. If this is not possible, wait for a short period of time for the engine to cool.
4. Check the coolant level. If the coolant level is at or below the minimum mark,
add prediluted coolant immediately.
5. When the engine temperature cools, you can re-start the engine. Have your
vehicle checked as soon as possible to
minimize engine damage.
Note: Driving your vehicle without repair
increases the chance of engine damage.
Engine Coolant Temperature
Management
(If Equipped) WARNING:
To reduce the risk of
crash and injury, be prepared that the
vehicle speed may reduce and the
vehicle may not be able to accelerate
with full power until the coolant
temperature reduces.
If you tow a trailer with your vehicle, the
engine may temporarily reach a higher
temperature during severe operating
conditions, for example ascending a long
or steep grade in high ambient
temperatures.
At this time, you may notice the coolant
temperature gauge moves toward the red
zone and a message may appear in the
information display.
301
2020 Transit (TTH) Canada/United States of America, LK3J 19A321 HA enUSA, Edition date: 201911, First-Printing Maintenance
Page 305 of 529
You may notice a reduction in vehicle
speed caused by reduced engine power in
order to manage the engine coolant
temperature. Your vehicle may enter this
mode if certain high-temperature and
high-load conditions take place. The
amount of speed reduction depends on
vehicle loading, grade and ambient
temperature. If this occurs, there is no
need to stop your vehicle. You can
continue to drive.
The air conditioning may automatically
turn on and off during severe operating
conditions to protect the engine from
overheating. When the coolant
temperature decreases to the normal
operating temperature, the air conditioning
turns on.
If the coolant temperature gauge moves
fully into the red zone, or if the coolant
temperature warning or service engine
soon messages appear in your information
display, do the following:
1. Stop your vehicle as soon as it is safe
to do so. Fully apply the parking brake,
shift into park (P) or neutral (N).
2. Leave the engine running until the coolant temperature gauge needle
returns to the normal position. If the
temperature does not drop after
several minutes, follow the remaining
steps.
3. Switch the engine off and wait for it to
cool. Check the coolant level.
4. If the coolant level is at or below the minimum mark, add prediluted coolant
immediately.
5. If the coolant level is normal, restart the engine and continue. AUTOMATIC TRANSMISSION
FLUID CHECK
The automatic transmission does not have
a transmission fluid dipstick.
Have an authorized dealer check and
change the transmission fluid at the
correct service interval. See Scheduled
Maintenance (page 462). Your
transmission does not consume fluid.
However, if the transmission slips, shifts
slowly or if you notice a sign of leaking
fluid, contact an authorized dealer.
Do not use supplemental transmission
fluid additives, treatments or cleaning
agents. The use of these materials may
affect transmission operation and result
in damage to internal transmission
components.
BRAKE FLUID CHECK WARNING:
Do not use any fluid
other than the recommended brake fluid
as this will reduce brake efficiency. Use
of incorrect fluid could result in the loss
of vehicle control, serious personal injury
or death. WARNING:
Only use brake fluid
from a sealed container. Contamination
with dirt, water, petroleum products or
other materials may result in brake
system damage or failure. Failure to
adhere to this warning could result in the
loss of vehicle control, serious personal
injury or death. WARNING:
Do not allow the fluid
to touch your skin or eyes. If this
happens, rinse the affected areas
immediately with plenty of water and
contact your physician.
302
2020 Transit (TTH) Canada/United States of America, LK3J 19A321 HA enUSA, Edition date: 201911, First-Printing Maintenance
Page 326 of 529
Brakes
•
Make sure the brakes and parking brake
release fully.
Tires
• Maintain recommended air pressure.
Miscellaneous
• Make sure all linkages, cables, levers
and pins under your vehicle are covered
with grease to prevent rust.
• Move vehicles at least 25 ft (7.5 m)
every 15 days to lubricate working parts
and prevent corrosion.
Removing Vehicle From Storage
When your vehicle is ready to come out of
storage, do the following:
• Wash your vehicle to remove any dirt
or grease film build-up on window
surfaces.
• Check windshield wipers for any
deterioration.
• Check under the hood for any foreign
material that may have collected
during storage such as mice or squirrel
nests.
• Check the exhaust for any foreign
material that may have collected
during storage.
• Check tire pressures and set tire
inflation per the Tire Label.
• Check brake pedal operation. Drive
your vehicle
15 ft (4.5 m) back and
forth to remove rust build-up.
• Check fluid levels (including coolant,
oil and gas) to make sure there are no
leaks, and fluids are at recommended
levels.
• If you remove the battery, clean the
battery cable ends and check for
damage. Contact an authorized dealer if you have
any concerns or issues.
BODY STYLING KITS
The distance between the underside of
your vehicle and the ground is less than
that of other models. Drive with extreme
care to avoid damage to your vehicle.
323
2020 Transit (TTH) Canada/United States of America, LK3J 19A321 HA enUSA, Edition date: 201911, First-Printing Vehicle Care
Page 396 of 529
GENERAL INFORMATION
Radio Frequencies and Reception
Factors
AM and FM frequencies are established by
the Federal Communications Commission
(FCC) and the Canadian Radio and
Telecommunications Commission (CRTC).
Those frequencies are:
•
AM: 530-1710 kHz
• FM: 87.9-107.9 MHz
Note: Listening to loud audio for long
periods of time could damage your hearing. Radio Reception Factors
The further you travel from an AM or FM station, the
weaker the signal and the weaker the reception.
Distance and strength
Hills, mountains, tall buildings, bridges, tunnels, freeway
overpasses, parking garages, dense tree foliage and
thunderstorms can interfere with the reception.
Terrain
When you pass a ground-based broadcast repeating
tower, a stronger signal may overtake a weaker one and
result in the audio system muting.
Station overload
AUDIO UNIT - VEHICLES
WITHOUT: SYNC
Switching the Audio Unit On and
Off Adjusting the Volume
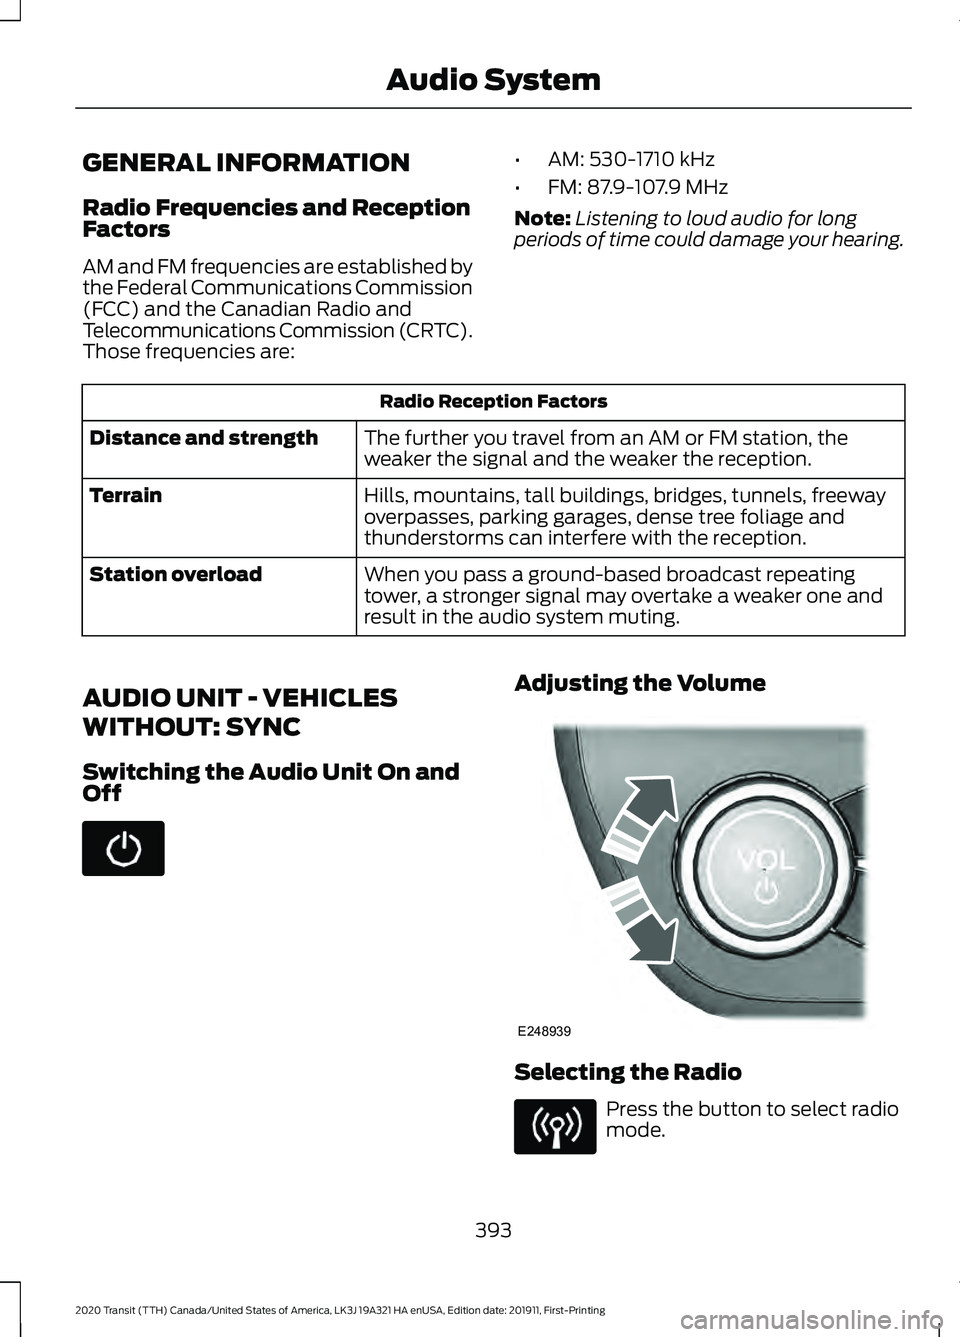
Selecting the Radio
Press the button to select radio
mode.
393
2020 Transit (TTH) Canada/United States of America, LK3J 19A321 HA enUSA, Edition date: 201911, First-Printing Audio System E248939
Page 404 of 529
Helpful Hints
•
Make sure the interior of your vehicle is
as quiet as possible. Wind noise from
open windows and road vibrations may
prevent the system from correctly
recognizing spoken commands.
• Before giving a voice command, wait
for the system announcement to finish,
followed by a single tone. Any
command spoken before this does not
register with the system.
• Speak naturally, without long pauses
between words.
• You can interrupt the system at any
time while it is speaking by pressing the
voice button. You can cancel a voice
session by pressing and holding the
voice button. System Interaction and Feedback
The system provides feedback through
audible tones, prompts, questions and
spoken confirmations depending on the
situation and the chosen level of
interaction. You can customize the voice
recognition system to provide more or less
instruction and feedback.
The default setting is to a higher level of
interaction in order to help you learn to use
the system. You can change these settings
at any time.
Adjusting the Interaction Level Press the voice button. When
prompted, say:
Action and Description
Voice Command
Provides more detailed interaction and
guidance. (Recommended for first time
users.)
Interaction Mode Standard
Provides less audible interaction and guid-
ance.
Interaction Mode Advanced
Phone Confirmation
Using phone confirmations the system
asks you to verify before placing any calls.
To adjust this setting press the voice button, when prompted say: Action and Description
Voice Command
When enabled, this feature will prompt you
to confirm any voice initiated call command
prior to the call being placed.
Phone Confirmation Off
The system will make a best guess; you
may still occasionally be asked to confirm
settings.
Phone Confirmation On
401
2020 Transit (TTH) Canada/United States of America, LK3J 19A321 HA enUSA, Edition date: 201911, First-Printing SYNC™E142599
Page 435 of 529
Function
Button
For MP3 CDs, this button allows you to toggle through repeat
off, repeat one track (a small number one displays), and repeat
current folder (a small folder displays).
Select the shuffle symbol to have the audio on the disk play
in random order.
Shuffle
You can use the forward, reverse, pause or
play buttons to control the audio playback. Bluetooth Stereo or USB
Bluetooth Stereo and USB allow you to
access media that you store on your
Bluetooth device or USB device such as
music, audio books or podcasts.
The following buttons are available for Bluetooth and USB: Function
Button
Pressing the repeat button toggles the repeat setting through
three modes: repeat off (button not highlighted), repeat all
(button highlighted) and repeat track (button highlighted with
a small number one).
Repeat
Play the tracks in random order.
Shuffle
You can use the forward, reverse, pause or
play buttons to control the audio playback.
To get more information about the
currently playing track, press the cover art
or Info button. For some devices, SYNC 3 is able to
provide 30-second skip buttons when you
listen to audio books or podcasts. These
buttons allow you to skip forward or
backward within a track.
While playing audio from a USB device you
can look for certain music by selecting the
following: Function
Button
If available, displays the list of tracks in the
Now Playing playlist.
Browse
This option, which is available under
browse, allows you to play all tracks or to
filter the available media into one of the
below categories.
New Search
Play All
432
2020 Transit (TTH) Canada/United States of America, LK3J 19A321 HA enUSA, Edition date: 201911, First-Printing SYNC™ 3
Page 468 of 529
NORMAL SCHEDULED
MAINTENANCE
Intelligent Oil-Life Monitor™
Your vehicle is equipped with an Intelligent
Oil-Life Monitor that determines when you
should change the engine oil based on how
your vehicle is used. By using several
important factors in its calculations, the
monitor helps reduce the cost of owning
your vehicle and reduces environmental
waste at the same time.
The following table provides examples of
vehicle use and its impact on oil change
intervals. It is a guideline only. Actual oil
change intervals depend on several factors
and generally decrease with severity of
use.When to expect the oil change message
Vehicle use and example
Interval
Normal
7500-10000 miles
(12000-16000 km) Normal commuting with highway driving.
No, or moderate, load or towing.
Flat to moderately hilly roads.
No extended idling.
Severe
5000-7499 miles
(8000-11999 km) Moderate to heavy load or towing.
Mountainous or off-road conditions.
Extended idling.
Extended hot or cold operation.
Extreme
3000-4999 miles
(4800-7999 km) Maximum load or towing.
Extreme hot or cold operation.
Normal Maintenance Intervals At every oil change interval as indicated by the information display
*
Change engine oil and filter. **
Rotate tires, inspect tire wear and measure tread depth.
Perform a multi-point inspection (recommended).
Inspect the automatic transmission fluid level (if equipped with dipstick). Consult your
dealer for requirements.
Inspect the brake pads, shoes, rotors, drums, brake linings, hoses and parking brake.
465
2020 Transit (TTH) Canada/United States of America, LK3J 19A321 HA enUSA, Edition date: 201911, First-Printing Scheduled Maintenance
Page 509 of 529
including any copyrighted material or
music file information. You agree that
Gracenote may enforce its respective
rights, collectively or separately, under this
agreement against you, directly in each
company's own name.
Gracenote uses a unique identifier to track
queries for statistical purposes. The
purpose of a randomly assigned numeric
identifier is to allow Gracenote to count
queries without knowing anything about
who you are. For more information, see the
web page at www.gracenote.com for the
Gracenote Privacy Policy.
THE GRACENOTE SOFTWARE, EACH ITEM
OF GRACENOTE DATA AND THE
GRACENOTE CONTENT ARE LICENSED
TO YOU "AS IS". NEITHER GRACENOTE
MAKES ANY REPRESENTATIONS OR
WARRANTIES, EXPRESS OR IMPLIED,
REGARDING THE ACCURACY OF ANY
GRACENOTE DATA FROM THE
GRACENOTE SERVERS OR GRACENOTE
CONTENT. GRACENOTE COLLECTIVELY
AND SEPARATELY RESERVE THE RIGHT
TO DELETE DATA AND/OR CONTENT
FROM THE COMPANIES' RESPECTIVE
SERVERS OR, IN THE CASE OF
GRACENOTE, CHANGE DATA
CATEGORIES FOR ANY CAUSE THAT
GRACENOTE DEEMS SUFFICIENT. NO
WARRANTY IS MADE THAT EITHER
GRACENOTE CONTENT OR THE
GRACENOTE SOFTWARE OR
GRACENOTE SERVERS ARE ERROR-FREE
OR THAT THE FUNCTIONING OF THE
GRACENOTE SOFTWARE OR
GRACENOTE SERVERS WILL BE
UNINTERRUPTED. GRACENOTE IS NOT
OBLIGATED TO PROVIDE YOU WITH ANY
ENHANCED OR ADDITIONAL DATA TYPES
THAT GRACENOTE MAY CHOOSE TO
PROVIDE IN THE FUTURE AND IS FREE
TO DISCONTINUE ITS ONLINE SERVICES
AT ANY TIME. GRACENOTE DISCLAIM ALL
WARRANTIES EXPRESS OR IMPLIED,
INCLUDING, BUT NOT LIMITED TO,
IMPLIED WARRANTIES OF
MERCHANTABILITY, FITNESS FOR A
PARTICULAR PURPOSE, TITLE, AND
NON-INFRINGEMENT. NEITHER
GRACENOTE WARRANTS THE RESULTS
THAT WILL BE OBTAINED BY YOUR USE
OF THE GRACENOTE SOFTWARE OR ANY
GRACENOTE SERVER. IN NO CASE WILL
GRACENOTE BE LIABLE FOR ANY
CONSEQUENTIAL OR INCIDENTAL
DAMAGES OR FOR ANY LOST PROFITS
OR LOST REVENUES FOR ANY REASON
WHATSOEVER. © Gracenote 2007.
Taiwan Territory
Note: In accordance with the management
approach of low-power radio wave
radiation motors:
Article 12: For approved and certified
low-power radiation motor models,
companies, firms or users must not alter
the frequency, increase the power or
change the characteristics and functions
of the original design without authorization.
Article 14: The usage of low-power
radio-frequency motors must not affect
aviation safety and interfere with legal
telecommunications. Should interference
be detected, immediately stop using the
device and only resume usage after
ensuring that there is no longer any
interference. For the legal
telecommunication and wireless
telecommunication of the telco, the
low-power radio frequency motor must be
able to tolerate legal limits of interference
from telecommunication, industrial,
scientific and radio wave equipment.
506
2020 Transit (TTH) Canada/United States of America, LK3J 19A321 HA enUSA, Edition date: 201911, First-Printing Appendices