for panel FORD TRANSIT 2021 User Guide
[x] Cancel search | Manufacturer: FORD, Model Year: 2021, Model line: TRANSIT, Model: FORD TRANSIT 2021Pages: 509, PDF Size: 8.21 MB
Page 141 of 509
WARNING: Do not plug optional
electrical accessories into the cigar
lighter socket. Incorrect use of the cigar
lighter can cause damage not covered
by the vehicle warranty, and can result
in fire or serious injury. WARNING:
Do not use a power
point for operating a cigar lighter.
Incorrect use of the power points can
cause damage not covered by the
vehicle warranty, and can result in fire or
serious injury.
Do not use the power point over the vehicle
capacity of 12 volt DC 180 watts or a fuse
may blow.
Note: Do not hang any accessory from the
accessory plug.
Note: Always keep the power point caps
closed when not in use.
Note: The power points turn off after 30
minutes when the ignition is switched off.
The power points could turn off earlier if the
vehicle battery charge level is low.
Run the vehicle for full capacity use of the
power point.
To prevent the battery from running out of
charge:
• Do not use the power point longer than
necessary when the vehicle is not
running.
• Do not leave devices plugged in
overnight or when you park your vehicle
for extended periods.
Power points may be in the following
locations:
• Inside the instrument panel storage
compartment.
• On the front of the center console.
• Inside the cargo area. 110 Volt - 150 Watt Capacity AC
Power Outlet WARNING:
Do not keep electrical
devices plugged in the power point
whenever the device is not in use. Do not
use any extension cord with the 110 volt
AC power point, since it will defeat the
safety protection design. Doing so may
cause the power point to overload due
to powering multiple devices that can
reach beyond the 150 watt load limit and
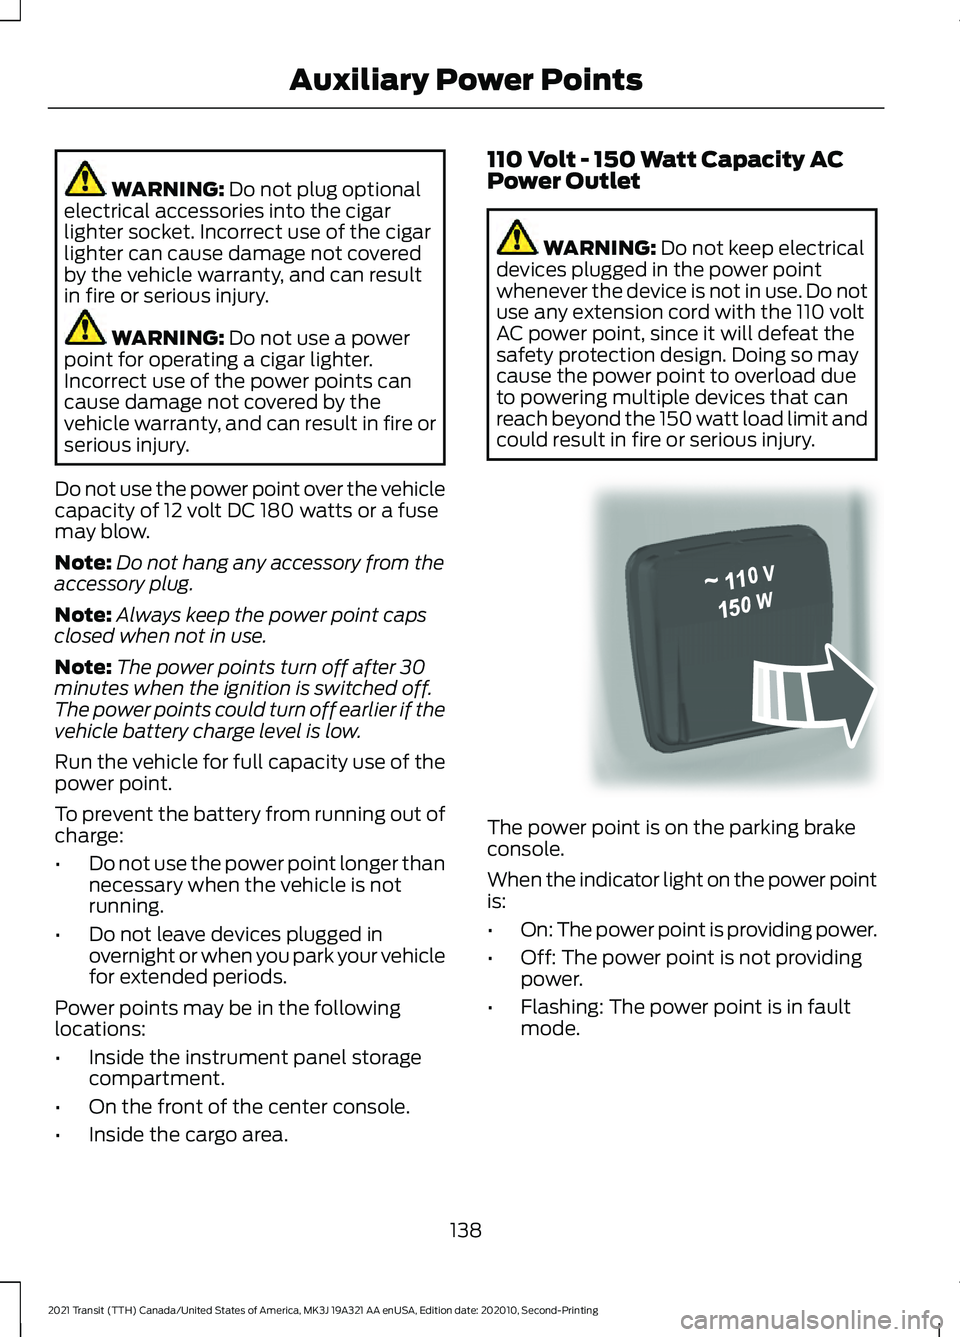
could result in fire or serious injury. The power point is on the parking brake
console.
When the indicator light on the power point
is:
•
On: The power point is providing power.
• Off: The power point is not providing
power.
• Flashing: The power point is in fault
mode.
138
2021 Transit (TTH) Canada/United States of America, MK3J 19A321 AA enUSA, Edition date: 202010, Second-Printing Auxiliary Power PointsE305821
Page 165 of 509
Press the – button again to lock out gears
beginning with the highest gear. For
example, press the
– button twice to lock
out 10th and 9th gears.
Note: The instrument cluster only displays
the available gears and the transmission
automatically shifts between the available
gears.
Press the + button to unlock gears to allow
the transmission to shift to higher gears.
Note: The transmission automatically shifts
within the gear range you select.
Brake Shift Interlock WARNING:
Do not drive your
vehicle until you verify that the
stoplamps are working. WARNING:
When doing this
procedure, you need to take the
transmission out of park (P) which
means your vehicle can roll freely. To
avoid unwanted vehicle movement,
always fully apply the parking brake prior
to doing this procedure. Use wheels
chocks if appropriate. WARNING:
If the parking brake is
fully released, but the brake warning
lamp remains illuminated, the brakes
may not be working properly. Have your
vehicle checked as soon as possible.
Brake shift interlock prevents you from
shifting out of park (P) when you have
switched the ignition on and not pressed
the brake pedal.
Use the brake shift interlock lever to move
the selector lever out of park (P) if you
cannot start the engine.
In the event of an electrical malfunction,
it is possible that a fuse has blown or the
stoplamps are not working. See
Fuse
Specification Chart (page 264). If the vehicle battery has no charge, jump
start your vehicle. See Jump Starting the
Vehicle
(page 251).
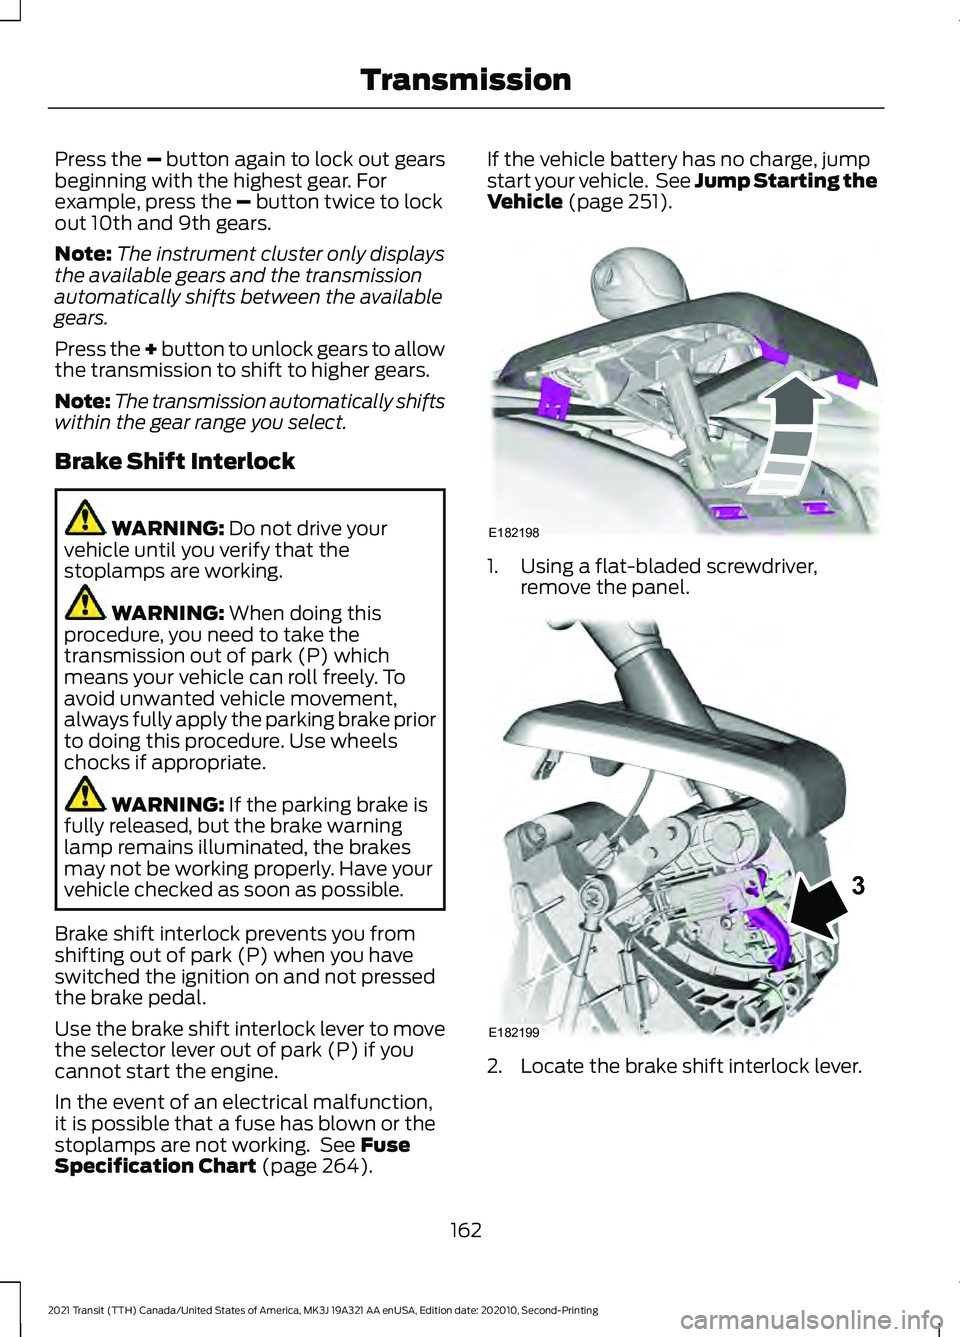
1. Using a flat-bladed screwdriver,
remove the panel. 2. Locate the brake shift interlock lever.
162
2021 Transit (TTH) Canada/United States of America, MK3J 19A321 AA enUSA, Edition date: 202010, Second-Printing TransmissionE182198 E182199
3
Page 166 of 509
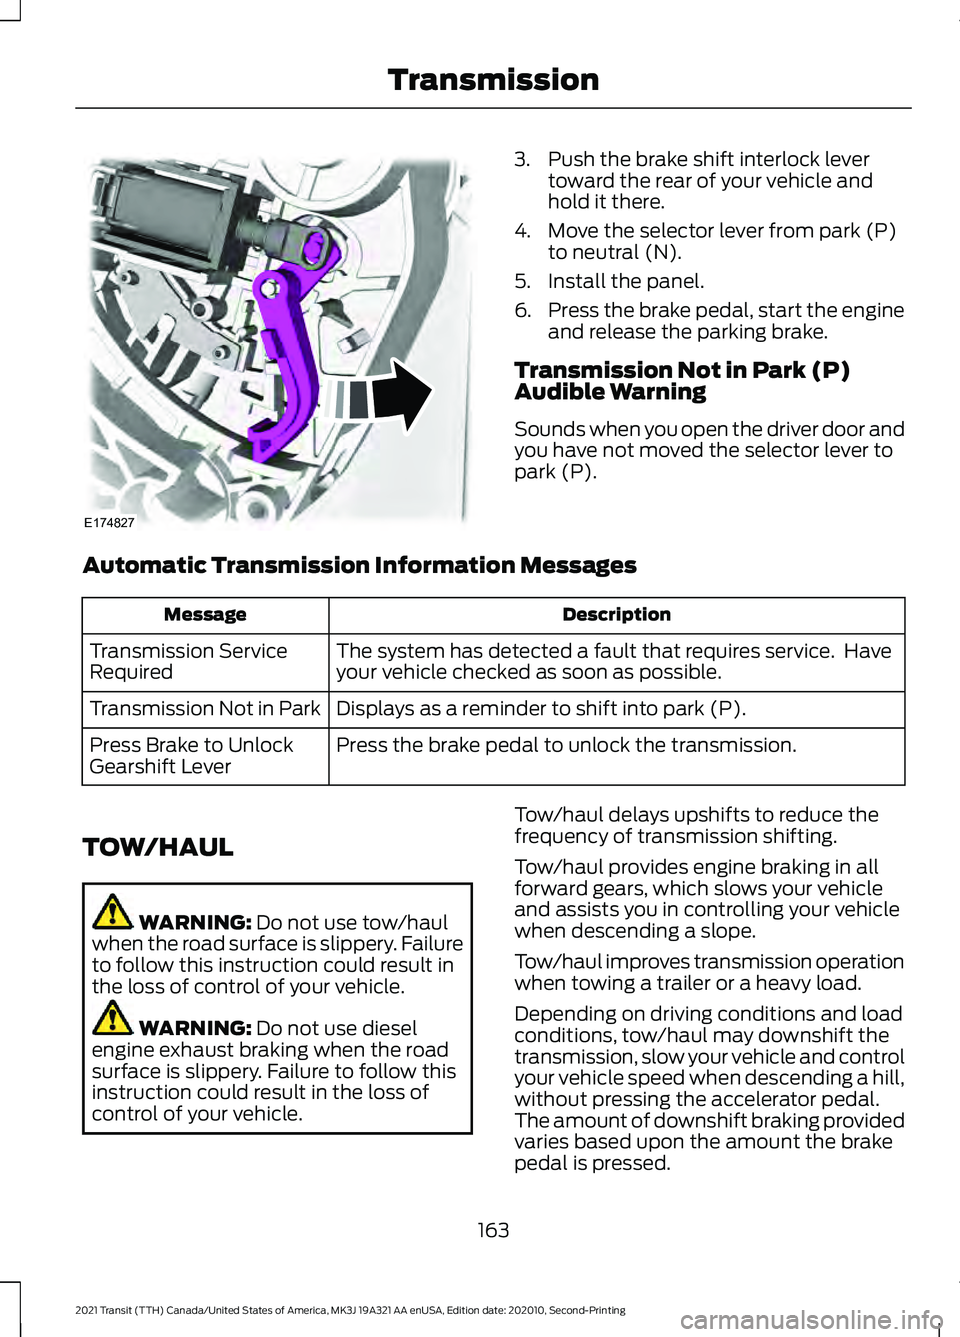
3. Push the brake shift interlock lever
toward the rear of your vehicle and
hold it there.
4. Move the selector lever from park (P) to neutral (N).
5. Install the panel.
6. Press the brake pedal, start the engine
and release the parking brake.
Transmission Not in Park (P)
Audible Warning
Sounds when you open the driver door and
you have not moved the selector lever to
park (P).
Automatic Transmission Information Messages Description
Message
The system has detected a fault that requires service. Have
your vehicle checked as soon as possible.
Transmission Service
Required
Displays as a reminder to shift into park (P).
Transmission Not in Park
Press the brake pedal to unlock the transmission.
Press Brake to Unlock
Gearshift Lever
TOW/HAUL WARNING: Do not use tow/haul
when the road surface is slippery. Failure
to follow this instruction could result in
the loss of control of your vehicle. WARNING:
Do not use diesel
engine exhaust braking when the road
surface is slippery. Failure to follow this
instruction could result in the loss of
control of your vehicle. Tow/haul delays upshifts to reduce the
frequency of transmission shifting.
Tow/haul provides engine braking in all
forward gears, which slows your vehicle
and assists you in controlling your vehicle
when descending a slope.
Tow/haul improves transmission operation
when towing a trailer or a heavy load.
Depending on driving conditions and load
conditions, tow/haul may downshift the
transmission, slow your vehicle and control
your vehicle speed when descending a hill,
without pressing the accelerator pedal.
The amount of downshift braking provided
varies based upon the amount the brake
pedal is pressed.
163
2021 Transit (TTH) Canada/United States of America, MK3J 19A321 AA enUSA, Edition date: 202010, Second-Printing TransmissionE174827
Page 183 of 509
PRINCIPLE OF OPERATION
The traction control system helps avoid
drive wheel spin and loss of traction.
If your vehicle begins to slide, the system
applies the brakes to individual wheels
and, when needed, reduces engine power
at the same time. If the wheels spin when
accelerating on slippery or loose surfaces,
the system reduces engine power in order
to increase traction.
USING TRACTION CONTROL
WARNING: The stability and
traction control light illuminates steadily
if the system detects a failure. Make sure
you did not manually disable the traction
control system using the information
display controls or the switch. If the
stability control and traction control light
is still illuminating steadily, have the
system serviced by an authorized dealer
immediately. Operating your vehicle with
the traction control disabled could lead
to an increased risk of loss of vehicle
control, vehicle rollover, personal injury
and death.
The system automatically turns on each
time you switch the ignition on.
If your vehicle is stuck in mud or snow,
switching traction control off may be
beneficial as this allows the wheels to spin.
Note: When you switch traction control off,
stability control remains fully active.
Switching the System Off or On
When you switch the system off or on, a
message appears in the information
display showing system status. Press the traction control button
on the instrument panel to
switch the system off or on.
System Indicator Lights and
Messages The stability and traction control
light:
• Temporarily illuminates on engine
start-up.
• Flashes when a driving condition
activates either of the systems.
• Illuminates if a problem occurs in either
of the systems. The stability and traction control
off light temporarily illuminates
on engine start-up and stays on
when you switch the traction control
system off.
180
2021 Transit (TTH) Canada/United States of America, MK3J 19A321 AA enUSA, Edition date: 202010, Second-Printing Traction ControlE313166 E138639 E130458
Page 207 of 509
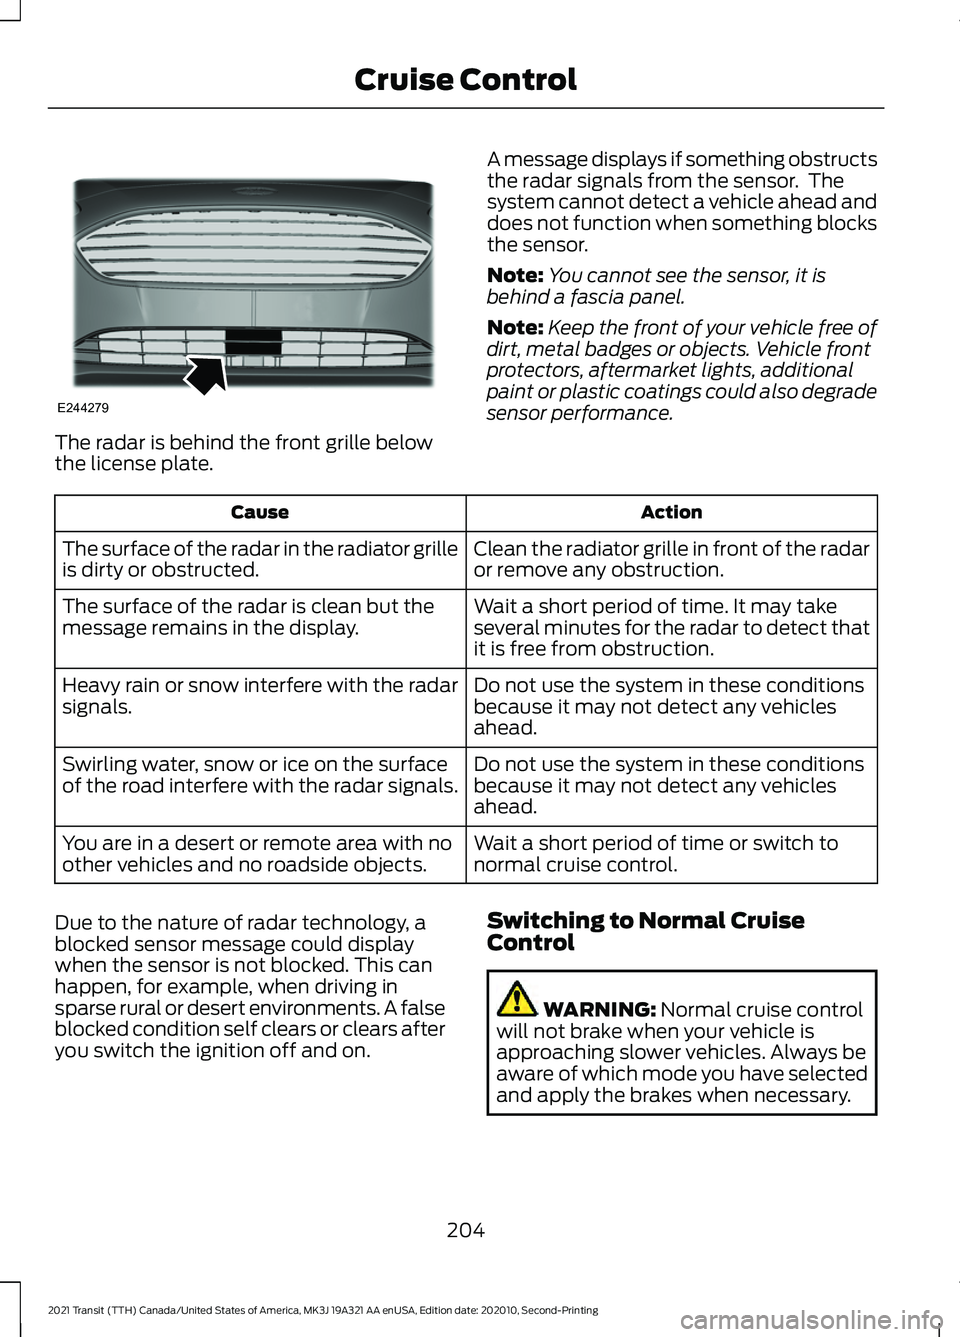
The radar is behind the front grille below
the license plate.
A message displays if something obstructs
the radar signals from the sensor. The
system cannot detect a vehicle ahead and
does not function when something blocks
the sensor.
Note:
You cannot see the sensor, it is
behind a fascia panel.
Note: Keep the front of your vehicle free of
dirt, metal badges or objects. Vehicle front
protectors, aftermarket lights, additional
paint or plastic coatings could also degrade
sensor performance. Action
Cause
Clean the radiator grille in front of the radar
or remove any obstruction.
The surface of the radar in the radiator grille
is dirty or obstructed.
Wait a short period of time. It may take
several minutes for the radar to detect that
it is free from obstruction.
The surface of the radar is clean but the
message remains in the display.
Do not use the system in these conditions
because it may not detect any vehicles
ahead.
Heavy rain or snow interfere with the radar
signals.
Do not use the system in these conditions
because it may not detect any vehicles
ahead.
Swirling water, snow or ice on the surface
of the road interfere with the radar signals.
Wait a short period of time or switch to
normal cruise control.
You are in a desert or remote area with no
other vehicles and no roadside objects.
Due to the nature of radar technology, a
blocked sensor message could display
when the sensor is not blocked. This can
happen, for example, when driving in
sparse rural or desert environments. A false
blocked condition self clears or clears after
you switch the ignition off and on. Switching to Normal Cruise
Control WARNING: Normal cruise control
will not brake when your vehicle is
approaching slower vehicles. Always be
aware of which mode you have selected
and apply the brakes when necessary.
204
2021 Transit (TTH) Canada/United States of America, MK3J 19A321 AA enUSA, Edition date: 202010, Second-Printing Cruise ControlE244279
Page 229 of 509
Using the Front View Camera
The front view camera provides a video
image of the area in front of your vehicle.
To use the front view camera system,
place the transmission in any gear except
reverse (R). An image of the front of your
vehicle appears once you press the camera
enable button and your vehicle speed is
below 6 mph (10 km/h).
Note: The area displayed on the screen may
vary according to your vehicle's orientation
or road condition.
Note: The front view camera will switch off
if your vehicle speed exceeds
6 mph
(10 km/h). You will have to switch the
system back on by using the enable button
once below the speed threshold.
Note: The camera system may not operate
correctly if mud, water or debris obstructs
the camera's view. You can clean the lens
with a soft, lint-free cloth and non-abrasive
cleaner or by using your front washer. See
Wipers and Washers
(page 97). The camera button is located on
the audio unit.
Camera Views
Press the camera button to toggle
between different views.
• Front Normal View: Provides an image
of what is directly in front of your
vehicle.
• Front Split View: Provides an extended
view of what is in front of your vehicle.
Access this view by pressing the
camera button from the Front Normal
View screen. DRIVE CONTROL
Selectable Drive Modes
Your vehicle has various drive modes that
you can select for different driving
conditions. Depending on the drive mode
that you select, the system adjusts various
vehicle settings, for example steering, gear
shifting, handling and powertrain response.
Selecting a Drive Mode
The button is on the instrument panel.
Repeatedly press the button to
scroll through the available drive
modes. Release the button to
confirm your selected drive mode.
Normal Vehicle settings suited for
balanced driving.
Note: This is the default mode each time
you switch the ignition on.
Eco Vehicle settings suited for
economical driving.
Slippery Vehicle settings suited for driving
on slippery roads.
Tow/Haul Vehicle settings suited for
towing or hauling.
Mud/Ruts Vehicle settings suited for driving
through mud and ruts.
226
2021 Transit (TTH) Canada/United States of America, MK3J 19A321 AA enUSA, Edition date: 202010, Second-Printing Driving AidsE188847 E298514 E225310 E267164 E269320 E246592 E296606
Page 231 of 509
ROOF RACKS AND LOAD
CARRIERS - BUS
WARNING: Your vehicle is not
approved for roof racks. Never install a
roof rack to your vehicle.
ROOF RACKS AND LOAD
CARRIERS - VAN WARNING:
When loading the roof
racks, we recommend you evenly
distribute the load, as well as maintain
a low center of gravity. Loaded vehicles,
with higher centers of gravity, may
handle differently than unloaded
vehicles. Take extra precautions, such
as slower speeds and increased stopping
distance, when driving a heavily loaded
vehicle. WARNING:
Do not exceed the
maximum front and rear axle loads for
your vehicle. WARNING:
Read and follow the
manufacturer's instructions when you
are fitting a roof rack.
Maximum Roof Load lb (kg)
Variant
419 (190)
Low-Roof.
331 (150)
Medium-Roof.
220 (100)
High-Roof.
Make sure that you securely fasten the
load. Check that the straps are secure
before driving and at each fuel stop. We recommend that you use genuine Ford
accessory crossbars specifically designed
for your vehicle.
Never place loads directly on the roof
panel.
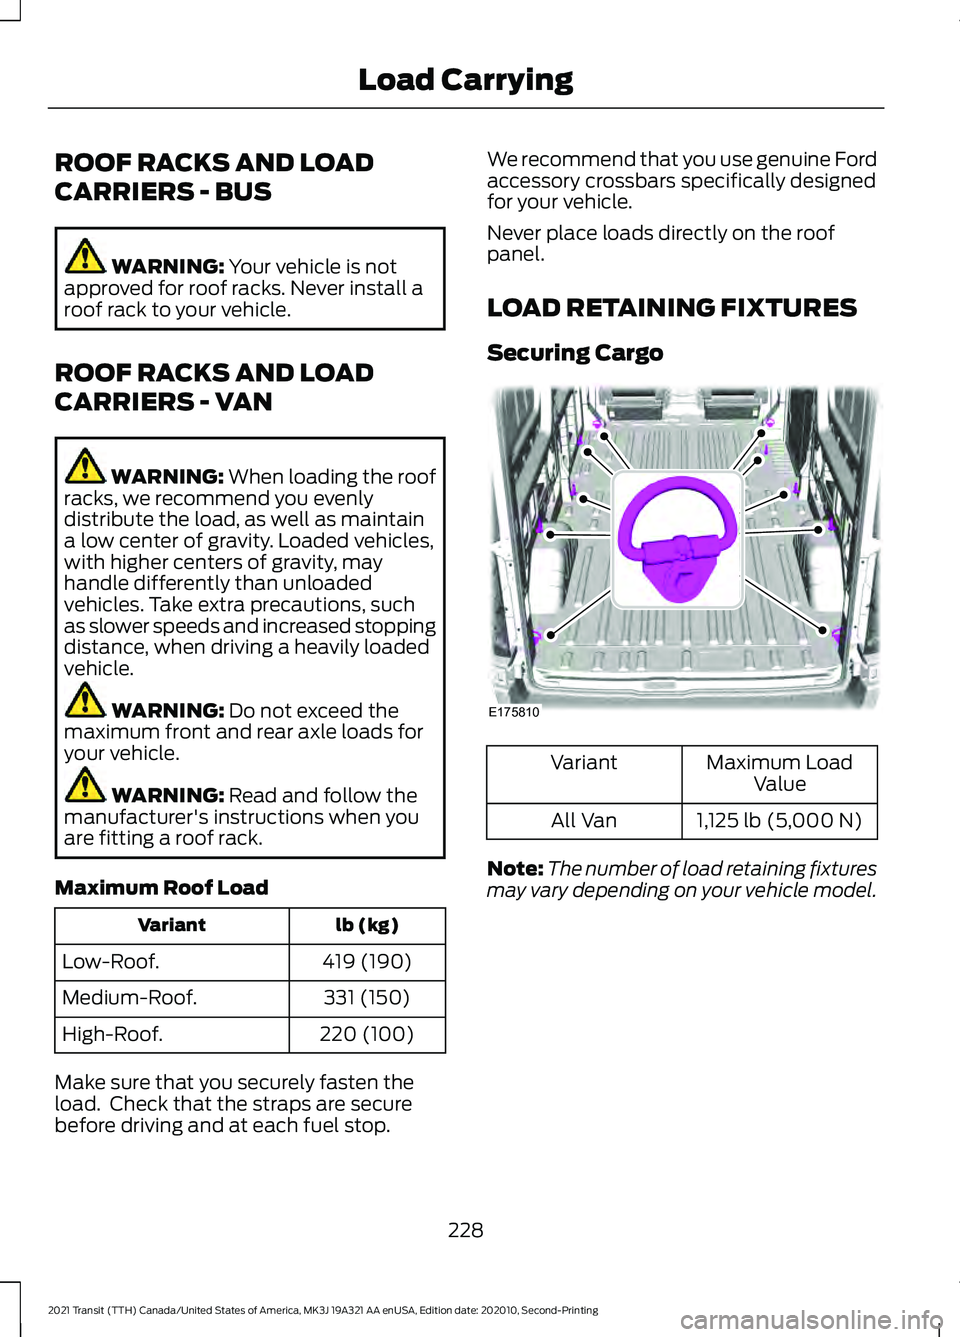
LOAD RETAINING FIXTURES
Securing Cargo
Maximum Load
Value
Variant
1,125 lb (5,000 N)
All Van
Note: The number of load retaining fixtures
may vary depending on your vehicle model.
228
2021 Transit (TTH) Canada/United States of America, MK3J 19A321 AA enUSA, Edition date: 202010, Second-Printing Load CarryingE175810
Page 253 of 509
Vehicles Sold in Canada: Getting
Roadside Assistance
To fully assist you should you have a
vehicle concern, Ford Motor Company of
Canada, Limited offers a complimentary
roadside assistance program. This program
is eligible within Canada or the continental
United States.
The service is available 24 hours a day,
seven days a week.
This program is separate from the New
Vehicle Limited Warranty, but the coverage
is concurrent with the powertrain coverage
period of your vehicle. Canadian roadside
coverage and benefits may differ from the
U.S. coverage.
If you require more information, please call
us in Canada at 1-800-665-2006, or visit
our website at www.ford.ca.
HAZARD FLASHERS
The hazard warning button is
located on the instrument panel.
Switch the hazard warning
flashers on when your vehicle is creating a
safety hazard.
Press the button to switch the hazard
warning flashers on. The front and rear
direction indicators will flash.
Press the button again to switch the
hazard warning flashers off.
Note: Prolonged use of the hazard warning
flashers will cause the battery to run out of
charge. There may be insufficient power to
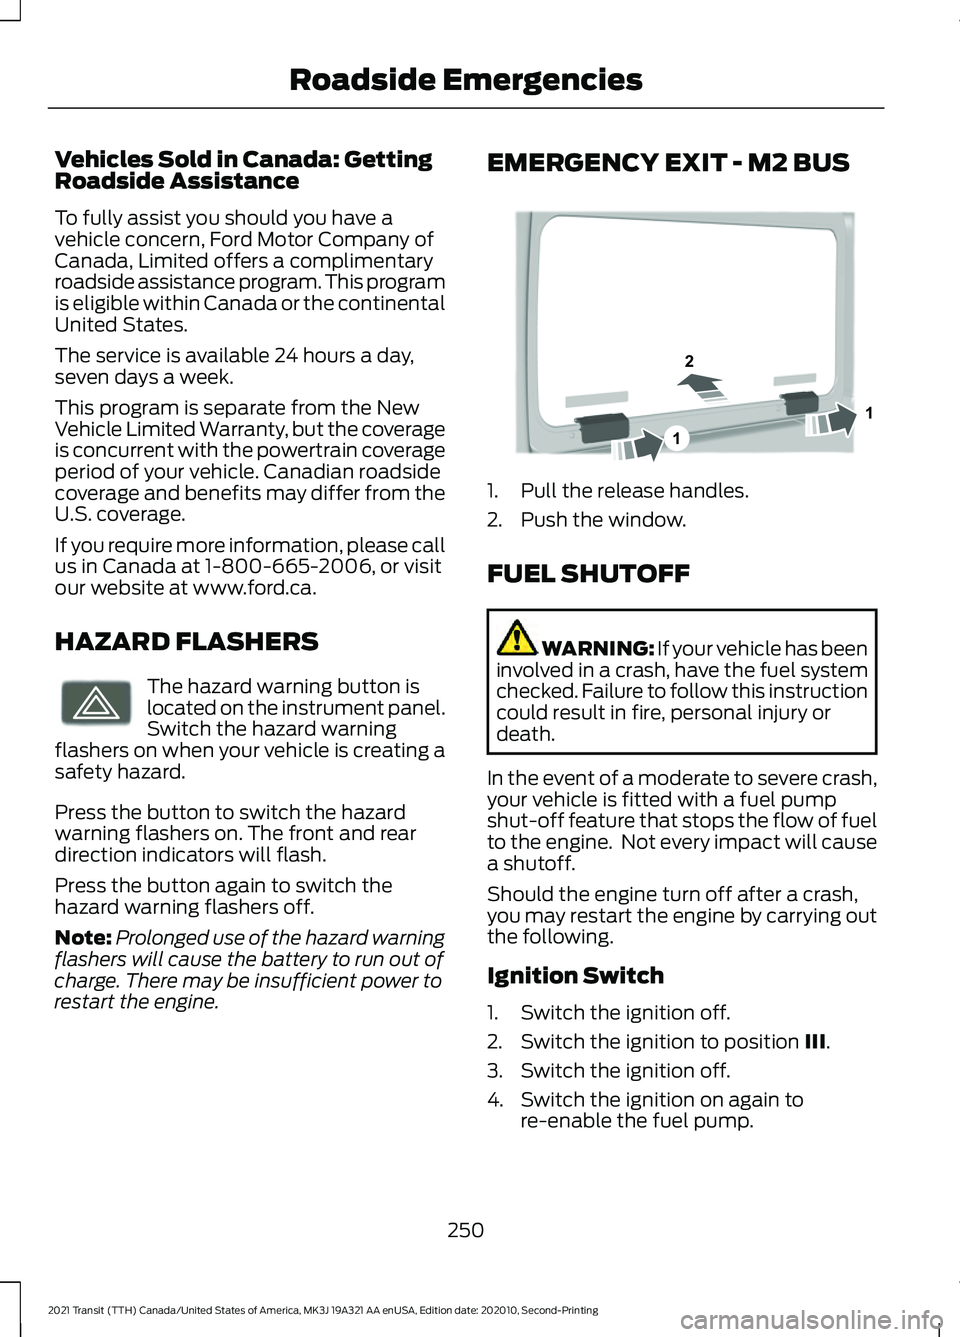
restart the engine. EMERGENCY EXIT - M2 BUS
1. Pull the release handles.
2. Push the window.
FUEL SHUTOFF
WARNING: If your vehicle has been
involved in a crash, have the fuel system
checked. Failure to follow this instruction
could result in fire, personal injury or
death.
In the event of a moderate to severe crash,
your vehicle is fitted with a fuel pump
shut-off feature that stops the flow of fuel
to the engine. Not every impact will cause
a shutoff.
Should the engine turn off after a crash,
you may restart the engine by carrying out
the following.
Ignition Switch
1. Switch the ignition off.
2. Switch the ignition to position III.
3. Switch the ignition off.
4. Switch the ignition on again to re-enable the fuel pump.
250
2021 Transit (TTH) Canada/United States of America, MK3J 19A321 AA enUSA, Edition date: 202010, Second-Printing Roadside EmergenciesE71943 1
2
1E323705
Page 308 of 509
Note:
If your vehicle has an engine cover
remove the cover before application of
Motorcraft Engine Shampoo and Degreaser.
Immediately rinse away any over spray.
• Never wash or rinse the engine while it
is hot or running; water in the running
engine may cause internal damage.
• Never wash or rinse any ignition coil,
spark plug wire or spark plug well, or
the area in and around these locations.
• Cover the battery, power distribution
box, and air filter assembly to prevent
water damage when cleaning the
engine.
CLEANING THE WINDOWS AND
WIPER BLADES
Car wash chemicals and environmental
fallout can result in windshield and wiper
blade contamination. Dirty windshield and
wipers will result in poor windshield wiper
operation. Keep the windshield and wiper
blades clean to maintain windshield wiper
performance.
To clean the windshield and wiper blades:
• Clean the windshield with a
non-abrasive glass cleaner. When
cleaning the interior of the windshield,
avoid getting any glass cleaner on the
instrument panel or door panels. Wipe
any glass cleaner off these surfaces
immediately.
• For windshields contaminated with
tree sap, chemicals, wax or bugs, clean
the entire windshield using steel wool
(no greater than 0000 grade) in a
circular motion and rinse with water.
• Clean the wiper blades with isopropyl
rubbing alcohol or windshield washer
concentrate. Note:
Do not use razor blades or other
sharp objects to clean or remove decals
from the inside of the heated rear window.
The vehicle warranty does not cover
damage caused to the heated rear window
grid lines.
CLEANING THE INTERIOR
Note: Do not allow air fresheners and hand
sanitizers to spill on interior surfaces. If a
spill occurs, wipe off immediately. Damage
may not be covered by the vehicle Warranty.
Note: Do not use household cleaning
products or glass cleaners, which can stain
and discolor the fabric and affect the flame
retardant abilities of the seat materials.
Note: We recommend distilled water when
cleaning.
Fabric, Carpets, Cloth Seats,
Headliners and Floor Mats
Note: Avoid soaking any surface. Do not
use excessive amounts of water to clean
the vehicle interior.
Note: To avoid spots or discoloration, clean
the entire surface.
To clean:
• Remove dust and loose dirt with a
vacuum cleaner or brush.
• Wipe the surface with a soft, damp
cloth and a mild soap and water
solution. Dry the area with a clean, soft
cloth.
• If a ring forms on the fabric after spot
cleaning, clean the entire area
immediately, but do not soak or the
ring will set.
305
2021 Transit (TTH) Canada/United States of America, MK3J 19A321 AA enUSA, Edition date: 202010, Second-Printing Vehicle Care
Page 309 of 509
Seatbelts
WARNING: Do not use cleaning
solvents, bleach or dye on the vehicle's
seatbelts, as these actions may weaken
the belt webbing. WARNING:
On vehicles equipped
with seat-mounted airbags, do not use
chemical solvents or strong detergents.
Such products could contaminate the
side airbag system and affect
performance of the side airbag in a crash.
Note: Do not use abrasives, or chemical
solvents to clean them.
Note: Do not allow moisture to penetrate
the seatbelt retractor mechanism.
Cleaning may safely be carried out using
mild soap and water. Let them dry
naturally, away from artificial heat.
Leather Interior
(If Equipped)
Note: Follow the same procedure as
cleaning leather seats for cleaning leather
instrument panels and leather interior trim
surfaces.
For routine cleaning, wipe the surface with
a soft, damp cloth and a mild soap and
water solution. Dry the area with a clean,
soft cloth.
For cleaning and removing stains such as
dye transfer, use a leather cleaning product
for automotive interiors.
Do not use the following products as these
may damage the leather:
• Oil and petroleum or silicone-based
leather conditioners.
• Household cleaners. •
Alcohol solutions.
• Solvents or cleaners intended
specifically for rubber, vinyl and
plastics.
Suede Micro Fiber Fabric
(If Equipped)
Note: Do not steam clean.
Note: To avoid spots or discoloration, clean
the entire surface.
Do not use the following products:
• Leather care products.
• Household cleaners.
• Alcoholic solutions.
• Spot removers.
• Shoe polish.
To clean:
• Remove dust and loose dirt with a
vacuum cleaner.
• Wipe the surface with a soft, damp
cloth and a mild soap and water
solution. Dry the area with a clean, soft
cloth.
• If a ring forms on the fabric after spot
cleaning, clean the entire area
immediately, but do not soak or the
ring will set.
Instrument Cluster Screens, LCD
Screens and Radio Screens
Note: Do not use abrasives, alcoholic
solvents or chemical solvents to clean the
instrument cluster screens, LCD screens or
radio screens. These cleaning products can
damage the screens.
Clean the instrument panel and cluster
lens with a clean, damp and soft cloth,
then use a clean, dry and soft cloth to dry
these areas.
Do not spray any liquid directly onto the
screens.
306
2021 Transit (TTH) Canada/United States of America, MK3J 19A321 AA enUSA, Edition date: 202010, Second-Printing Vehicle Care