ECU FORD TRANSIT CONNECT 2010 1.G Owner's Manual
[x] Cancel search | Manufacturer: FORD, Model Year: 2010, Model line: TRANSIT CONNECT, Model: FORD TRANSIT CONNECT 2010 1.GPages: 258, PDF Size: 1.98 MB
Page 114 of 258
towards the buckle will additionally help to remove remaining slack from
the belt.
9. Attach the tether strap (if the child seat is equipped). Refer to
Attaching child safety seats with tether strapslater in this chapter.
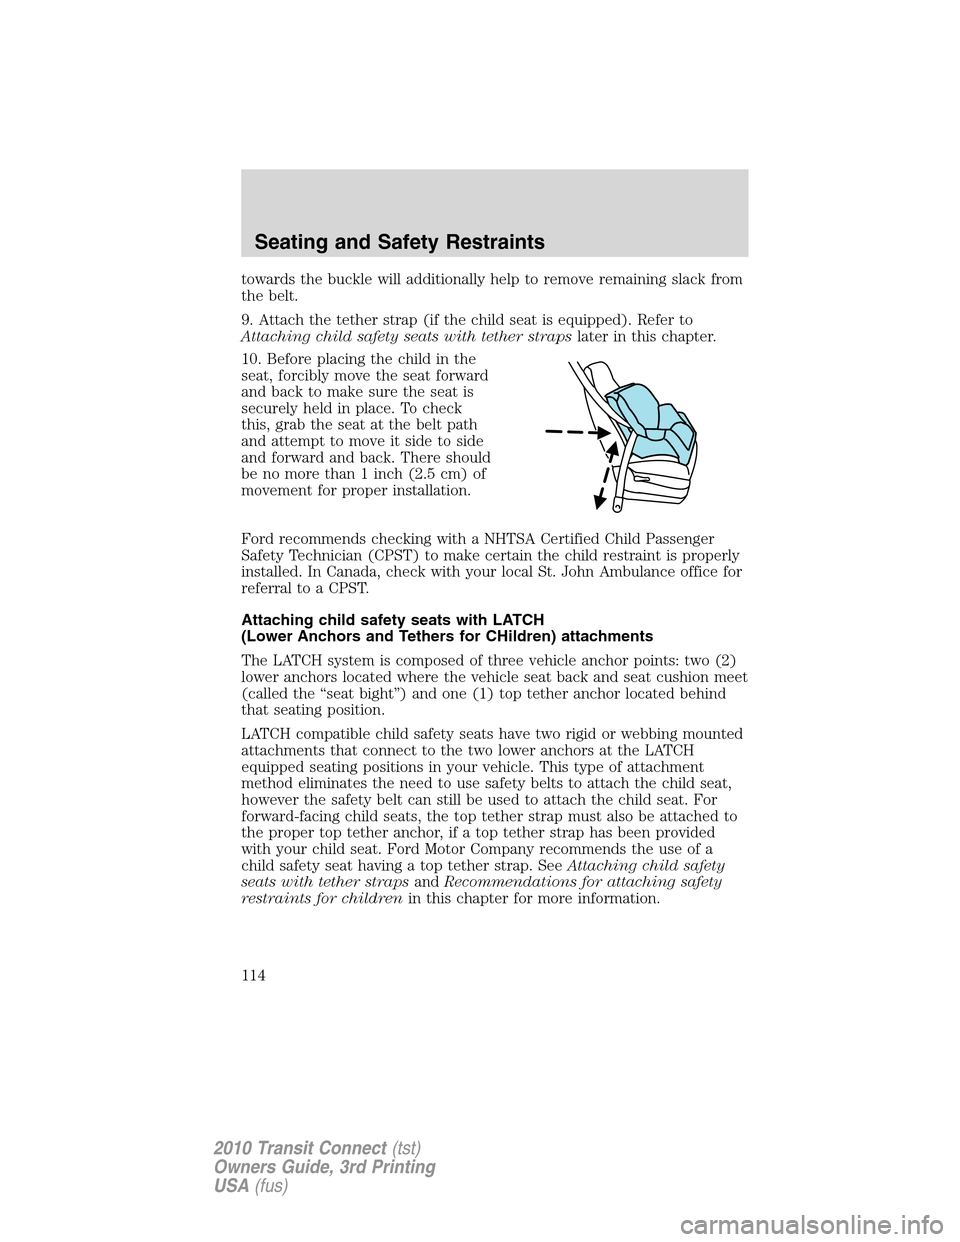
10. Before placing the child in the
seat, forcibly move the seat forward
and back to make sure the seat is
securely held in place. To check
this, grab the seat at the belt path
and attempt to move it side to side
and forward and back. There should
be no more than 1 inch (2.5 cm) of
movement for proper installation.
Ford recommends checking with a NHTSA Certified Child Passenger
Safety Technician (CPST) to make certain the child restraint is properly
installed. In Canada, check with your local St. John Ambulance office for
referral to a CPST.
Attaching child safety seats with LATCH
(Lower Anchors and Tethers for CHildren) attachments
The LATCH system is composed of three vehicle anchor points: two (2)
lower anchors located where the vehicle seat back and seat cushion meet
(called the “seat bight”) and one (1) top tether anchor located behind
that seating position.
LATCH compatible child safety seats have two rigid or webbing mounted
attachments that connect to the two lower anchors at the LATCH
equipped seating positions in your vehicle. This type of attachment
method eliminates the need to use safety belts to attach the child seat,
however the safety belt can still be used to attach the child seat. For
forward-facing child seats, the top tether strap must also be attached to
the proper top tether anchor, if a top tether strap has been provided
with your child seat. Ford Motor Company recommends the use of a
child safety seat having a top tether strap. SeeAttaching child safety
seats with tether strapsandRecommendations for attaching safety
restraints for childrenin this chapter for more information.
Seating and Safety Restraints
114
2010 Transit Connect(tst)
Owners Guide, 3rd Printing
USA(fus)
Page 115 of 258
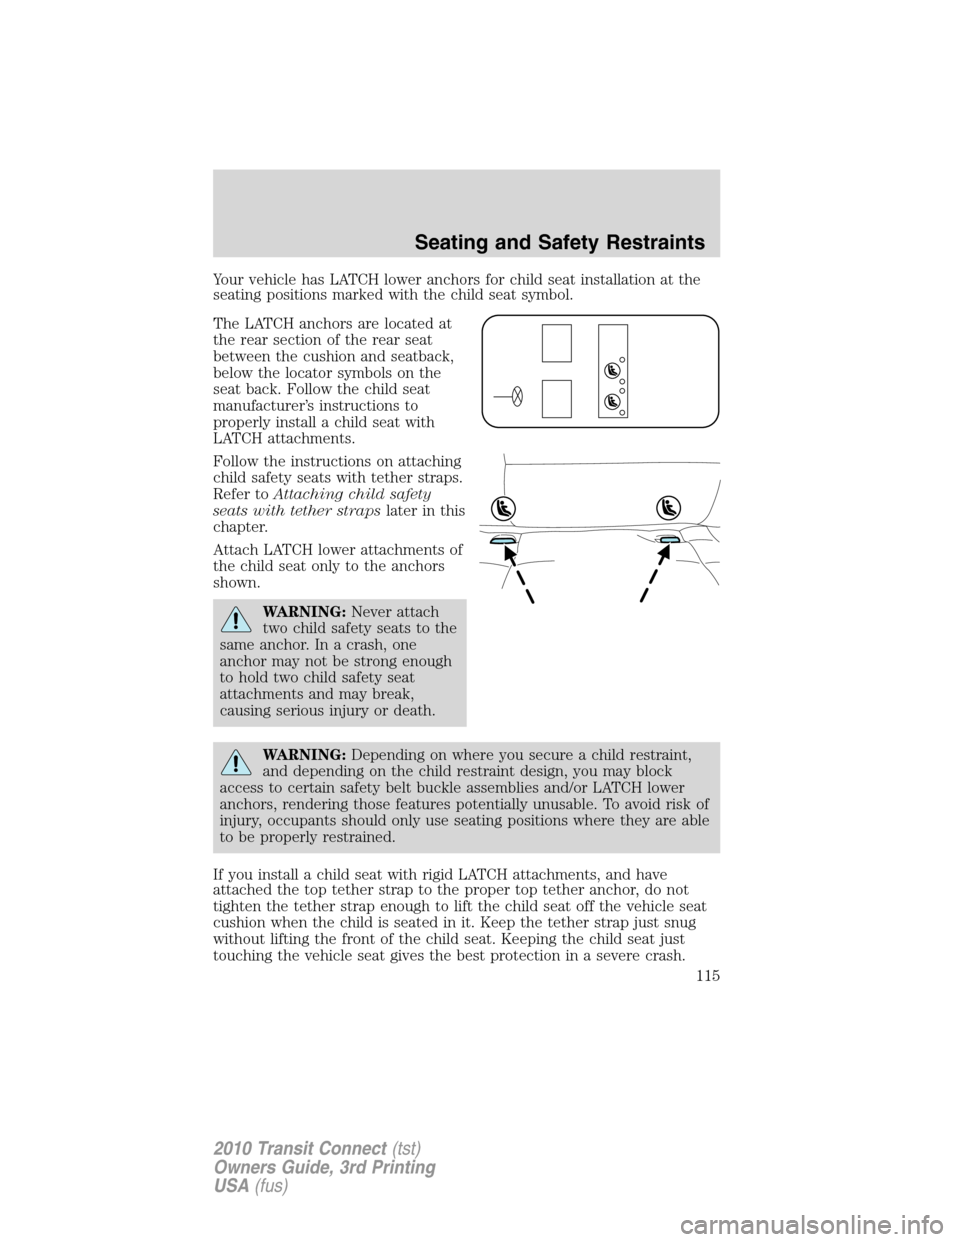
Your vehicle has LATCH lower anchors for child seat installation at the
seating positions marked with the child seat symbol.
The LATCH anchors are located at
the rear section of the rear seat
between the cushion and seatback,
below the locator symbols on the
seat back. Follow the child seat
manufacturer’s instructions to
properly install a child seat with
LATCH attachments.
Follow the instructions on attaching
child safety seats with tether straps.
Refer toAttaching child safety
seats with tether strapslater in this
chapter.
Attach LATCH lower attachments of
the child seat only to the anchors
shown.
WARNING:Never attach
two child safety seats to the
same anchor. In a crash, one
anchor may not be strong enough
to hold two child safety seat
attachments and may break,
causing serious injury or death.
WARNING:Depending on where you secure a child restraint,
and depending on the child restraint design, you may block
access to certain safety belt buckle assemblies and/or LATCH lower
anchors, rendering those features potentially unusable. To avoid risk of
injury, occupants should only use seating positions where they are able
to be properly restrained.
If you install a child seat with rigid LATCH attachments, and have
attached the top tether strap to the proper top tether anchor, do not
tighten the tether strap enough to lift the child seat off the vehicle seat
cushion when the child is seated in it. Keep the tether strap just snug
without lifting the front of the child seat. Keeping the child seat just
touching the vehicle seat gives the best protection in a severe crash.
Seating and Safety Restraints
115
2010 Transit Connect(tst)
Owners Guide, 3rd Printing
USA(fus)
Page 116 of 258
Each time you use the safety seat, check that the seat is properly
attached to the lower anchors and tether anchor, if applicable. Tug the
child seat from side to side and forward and back where it is secured to
the vehicle. The seat should move less than one inch when you do this
for a proper installation.
If the safety seat is not anchored properly, the risk of a child being
injured in a crash greatly increases.
Combining safety belt and LATCH lower anchors for attaching
child safety seats
When used in combination, either the safety belt or the LATCH lower
anchors may be attached first, provided a proper installation is achieved.
Attach the tether strap afterward, if included with the child seat. Refer
toRecommendations for attaching child safety restraints for children
in this chapter.
Attaching child safety seats with tether straps
Many forward-facing child safety seats include a tether strap which
extends from the back of the child safety seat and hooks to an anchoring
point called the top tether anchor. Tether straps are available as an
accessory for many older safety seats. Contact the manufacturer of your
child seat for information about ordering a tether strap, or to obtain a
longer tether strap if the tether strap on your safety seat does not reach
the appropriate top tether anchor in the vehicle.
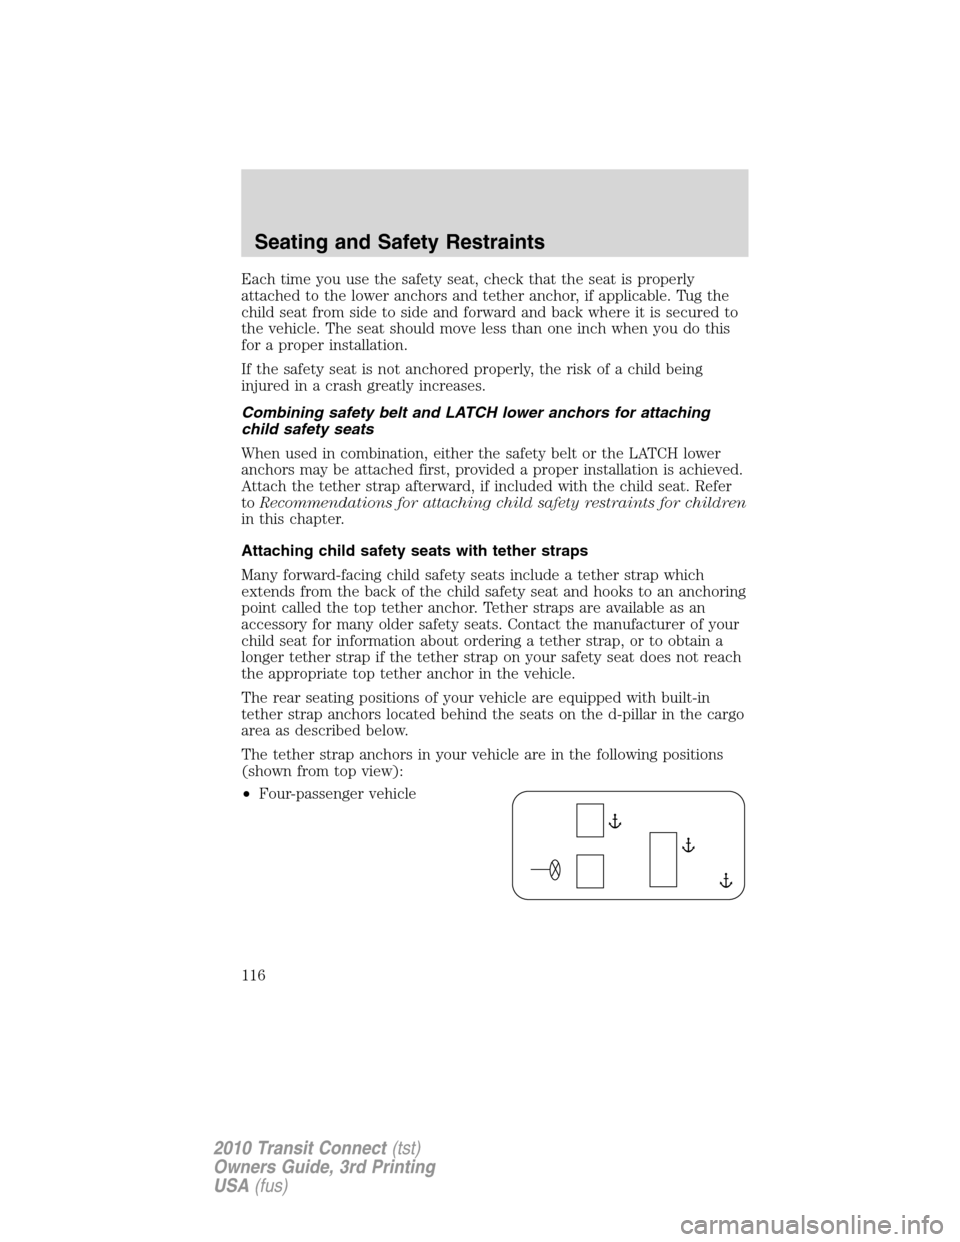
The rear seating positions of your vehicle are equipped with built-in
tether strap anchors located behind the seats on the d-pillar in the cargo
area as described below.
The tether strap anchors in your vehicle are in the following positions
(shown from top view):
•Four-passenger vehicle
Seating and Safety Restraints
116
2010 Transit Connect(tst)
Owners Guide, 3rd Printing
USA(fus)
Page 119 of 258
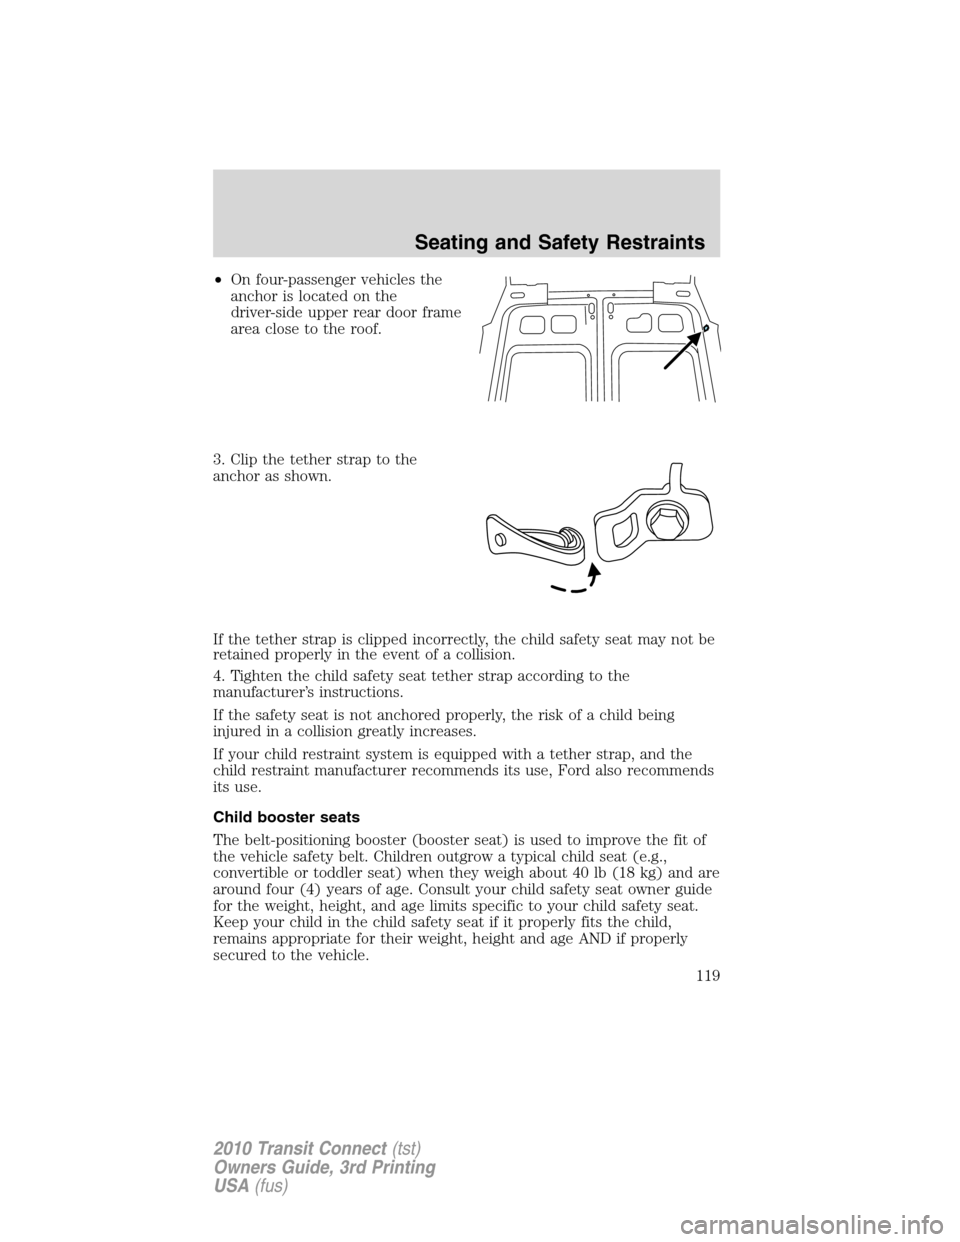
•On four-passenger vehicles the
anchor is located on the
driver-side upper rear door frame
area close to the roof.
3. Clip the tether strap to the
anchor as shown.
If the tether strap is clipped incorrectly, the child safety seat may not be
retained properly in the event of a collision.
4. Tighten the child safety seat tether strap according to the
manufacturer’s instructions.
If the safety seat is not anchored properly, the risk of a child being
injured in a collision greatly increases.
If your child restraint system is equipped with a tether strap, and the
child restraint manufacturer recommends its use, Ford also recommends
its use.
Child booster seats
The belt-positioning booster (booster seat) is used to improve the fit of
the vehicle safety belt. Children outgrow a typical child seat (e.g.,
convertible or toddler seat) when they weigh about 40 lb (18 kg) and are
around four (4) years of age. Consult your child safety seat owner guide
for the weight, height, and age limits specific to your child safety seat.
Keep your child in the child safety seat if it properly fits the child,
remains appropriate for their weight, height and age AND if properly
secured to the vehicle.
Seating and Safety Restraints
119
2010 Transit Connect(tst)
Owners Guide, 3rd Printing
USA(fus)
Page 143 of 258
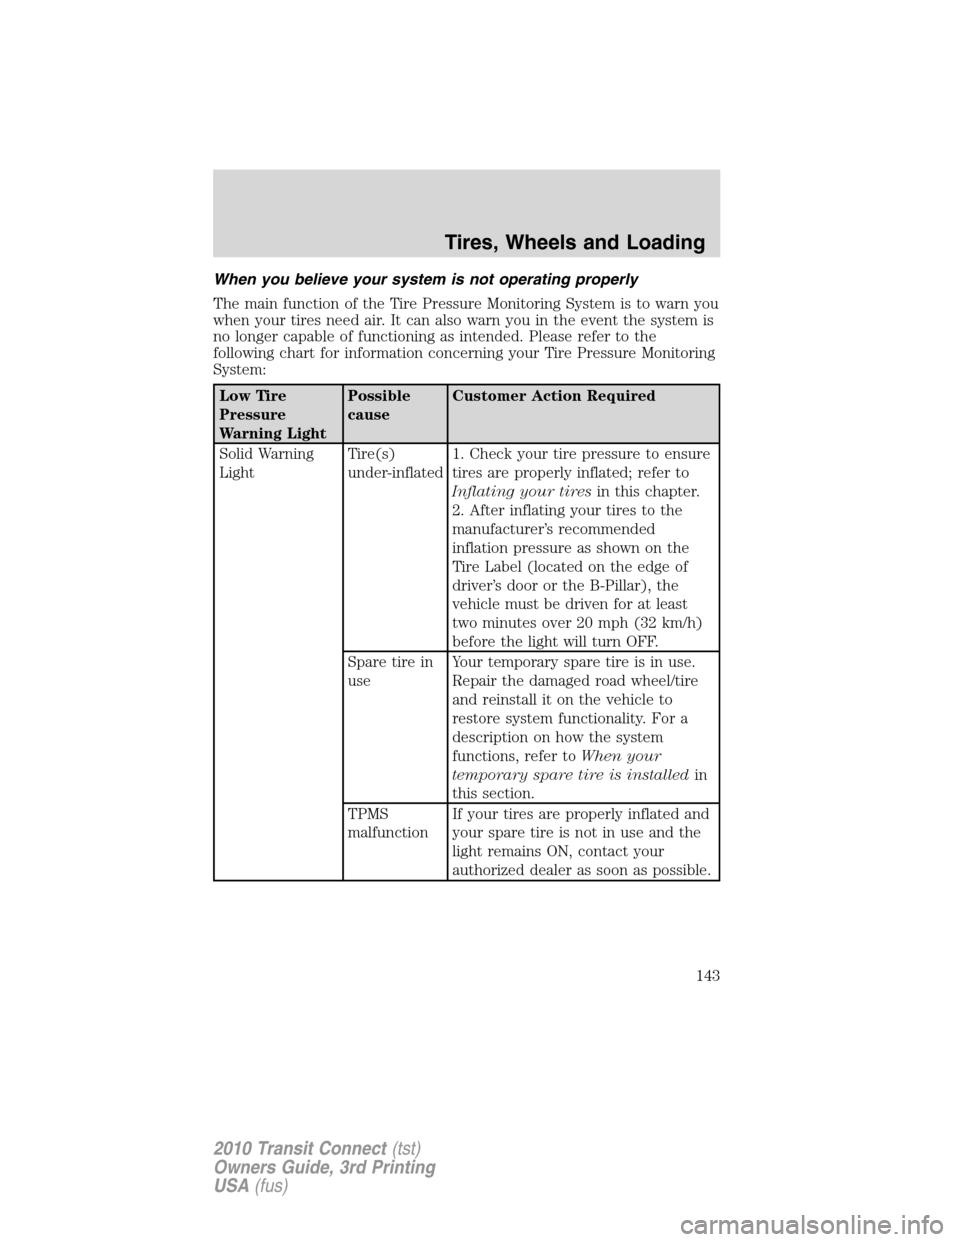
When you believe your system is not operating properly
The main function of the Tire Pressure Monitoring System is to warn you
when your tires need air. It can also warn you in the event the system is
no longer capable of functioning as intended. Please refer to the
following chart for information concerning your Tire Pressure Monitoring
System:
Low Tire
Pressure
Warning LightPossible
causeCustomer Action Required
Solid Warning
LightTire(s)
under-inflated1. Check your tire pressure to ensure
tires are properly inflated; refer to
Inflating your tiresin this chapter.
2. After inflating your tires to the
manufacturer’s recommended
inflation pressure as shown on the
Tire Label (located on the edge of
driver’s door or the B-Pillar), the
vehicle must be driven for at least
two minutes over 20 mph (32 km/h)
before the light will turn OFF.
Spare tire in
useYour temporary spare tire is in use.
Repair the damaged road wheel/tire
and reinstall it on the vehicle to
restore system functionality. For a
description on how the system
functions, refer toWhen your
temporary spare tire is installedin
this section.
TPMS
malfunctionIf your tires are properly inflated and
your spare tire is not in use and the
light remains ON, contact your
authorized dealer as soon as possible.
Tires, Wheels and Loading
143
2010 Transit Connect(tst)
Owners Guide, 3rd Printing
USA(fus)
Page 144 of 258
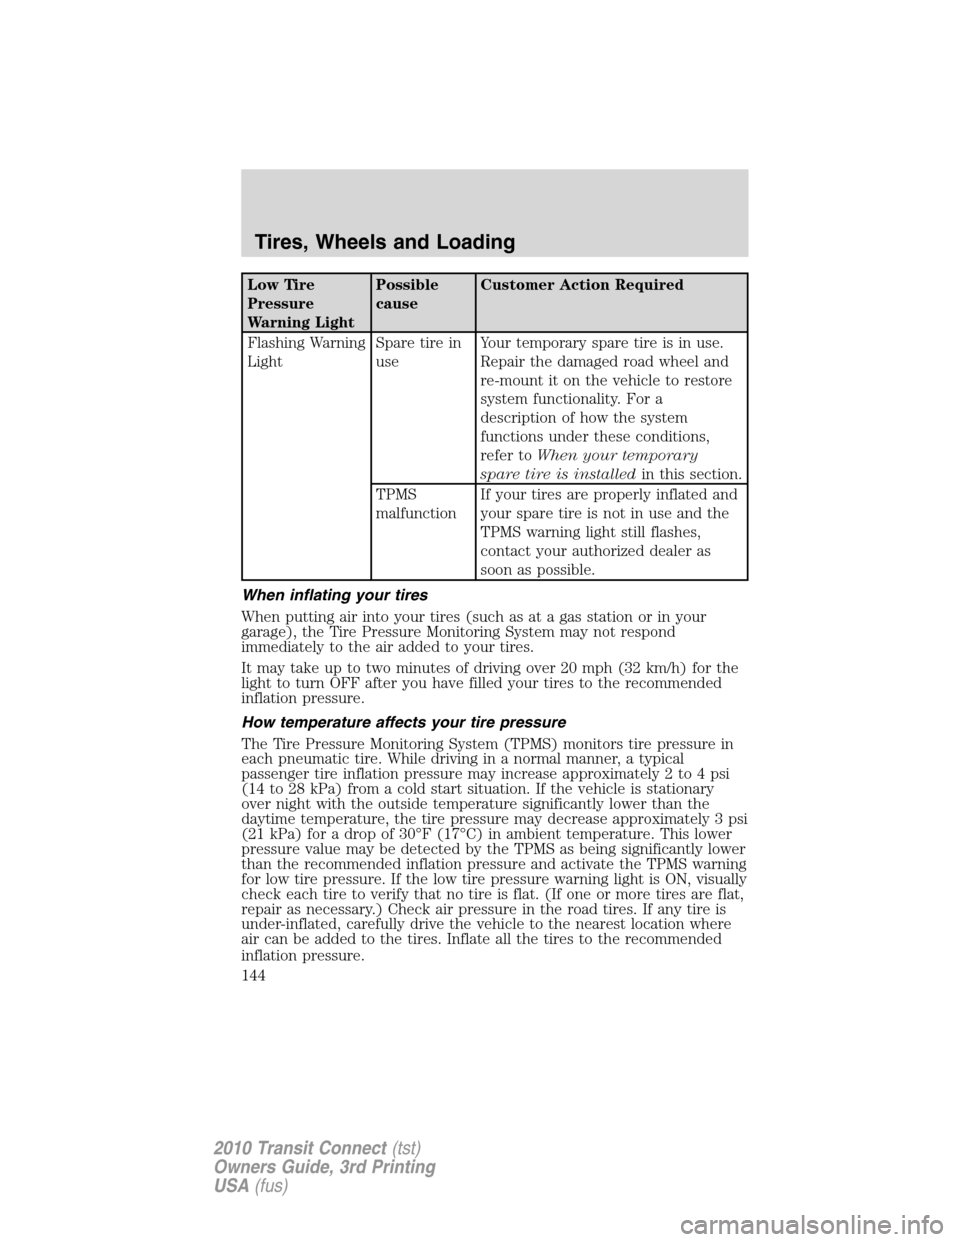
Low Tire
Pressure
Warning LightPossible
causeCustomer Action Required
Flashing Warning
LightSpare tire in
useYour temporary spare tire is in use.
Repair the damaged road wheel and
re-mount it on the vehicle to restore
system functionality. For a
description of how the system
functions under these conditions,
refer toWhen your temporary
spare tire is installedin this section.
TPMS
malfunctionIf your tires are properly inflated and
your spare tire is not in use and the
TPMS warning light still flashes,
contact your authorized dealer as
soon as possible.
When inflating your tires
When putting air into your tires (such as at a gas station or in your
garage), the Tire Pressure Monitoring System may not respond
immediately to the air added to your tires.
It may take up to two minutes of driving over 20 mph (32 km/h) for the
light to turn OFF after you have filled your tires to the recommended
inflation pressure.
How temperature affects your tire pressure
The Tire Pressure Monitoring System (TPMS) monitors tire pressure in
each pneumatic tire. While driving in a normal manner, a typical
passenger tire inflation pressure may increase approximately 2 to 4 psi
(14 to 28 kPa) from a cold start situation. If the vehicle is stationary
over night with the outside temperature significantly lower than the
daytime temperature, the tire pressure may decrease approximately 3 psi
(21 kPa) for a drop of 30°F (17°C) in ambient temperature. This lower
pressure value may be detected by the TPMS as being significantly lower
than the recommended inflation pressure and activate the TPMS warning
for low tire pressure. If the low tire pressure warning light is ON, visually
check each tire to verify that no tire is flat. (If one or more tires are flat,
repair as necessary.) Check air pressure in the road tires. If any tire is
under-inflated, carefully drive the vehicle to the nearest location where
air can be added to the tires. Inflate all the tires to the recommended
inflation pressure.
Tires, Wheels and Loading
144
2010 Transit Connect(tst)
Owners Guide, 3rd Printing
USA(fus)
Page 161 of 258
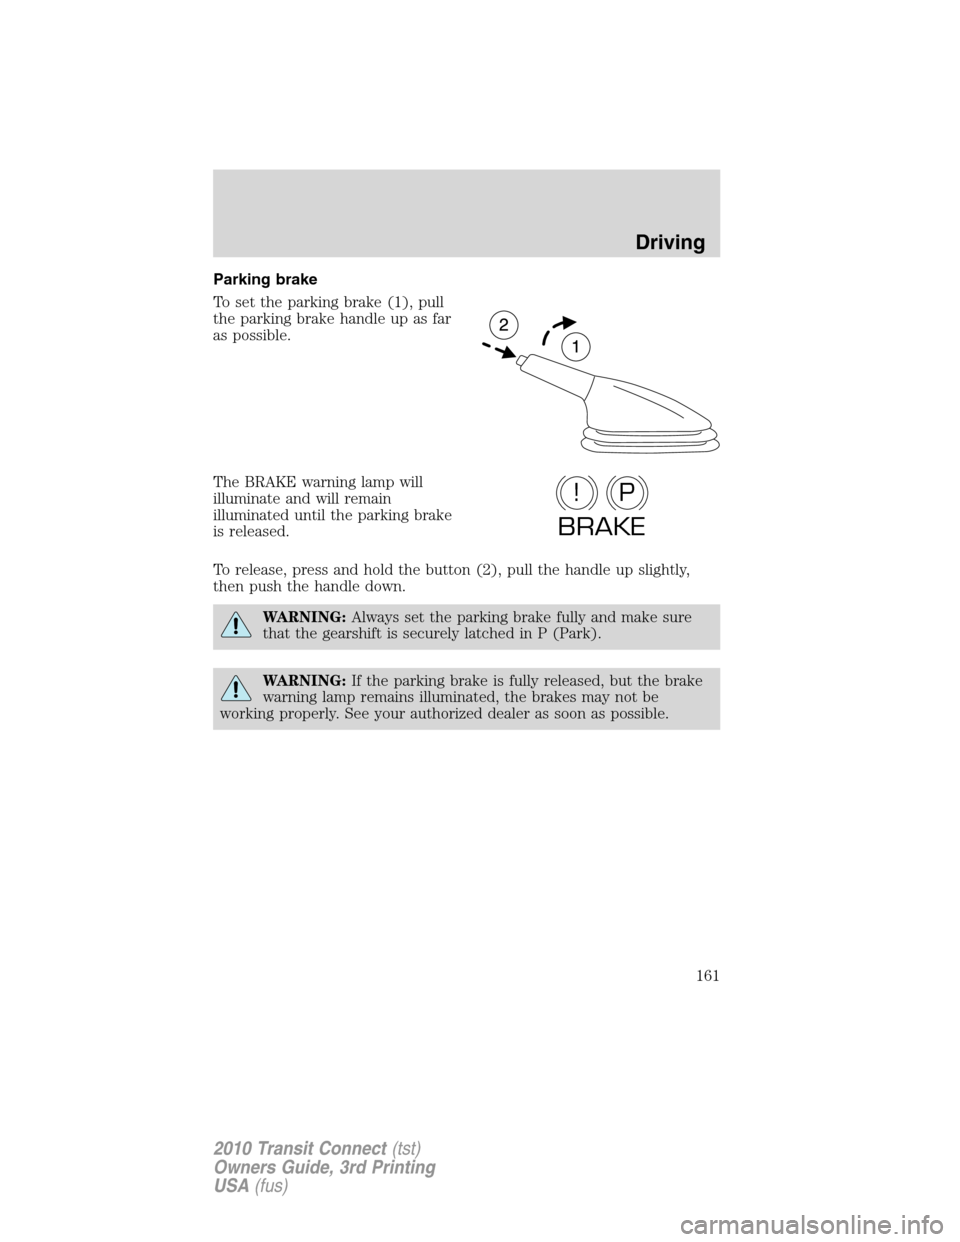
Parking brake
To set the parking brake (1), pull
the parking brake handle up as far
as possible.
The BRAKE warning lamp will
illuminate and will remain
illuminated until the parking brake
is released.
To release, press and hold the button (2), pull the handle up slightly,
then push the handle down.
WARNING:Always set the parking brake fully and make sure
that the gearshift is securely latched in P (Park).
WARNING:If the parking brake is fully released, but the brake
warning lamp remains illuminated, the brakes may not be
working properly. See your authorized dealer as soon as possible.
P!
BRAKE
Driving
161
2010 Transit Connect(tst)
Owners Guide, 3rd Printing
USA(fus)
Page 169 of 258
WARNING:If the parking brake is fully released, but the brake
warning lamp remains illuminated, the brakes may not be
working properly. See your authorized dealer.
AUTOMATIC TRANSMISSION OPERATION
Understanding the gearshift positions of the 4–speed automatic
transmission
This vehicle is equipped with an adaptive Transmission Shift Strategy.
Adaptive Shift Strategy offers the optimal transmission operation and
shift quality. When the vehicle’s battery has been disconnected for any
type of service or repair, the transmission will need to relearn the normal
shift strategy parameters, much like having to reset your radio stations
when your vehicle battery has been disconnected. The Adaptive
Transmission Strategy allows the transmission to relearn these operating
parameters. This learning process could take several transmission
upshifts and downshifts; during this learning process, slightly firmer
shifts may occur. After this learning process, normal shift feel and shift
scheduling will resume.
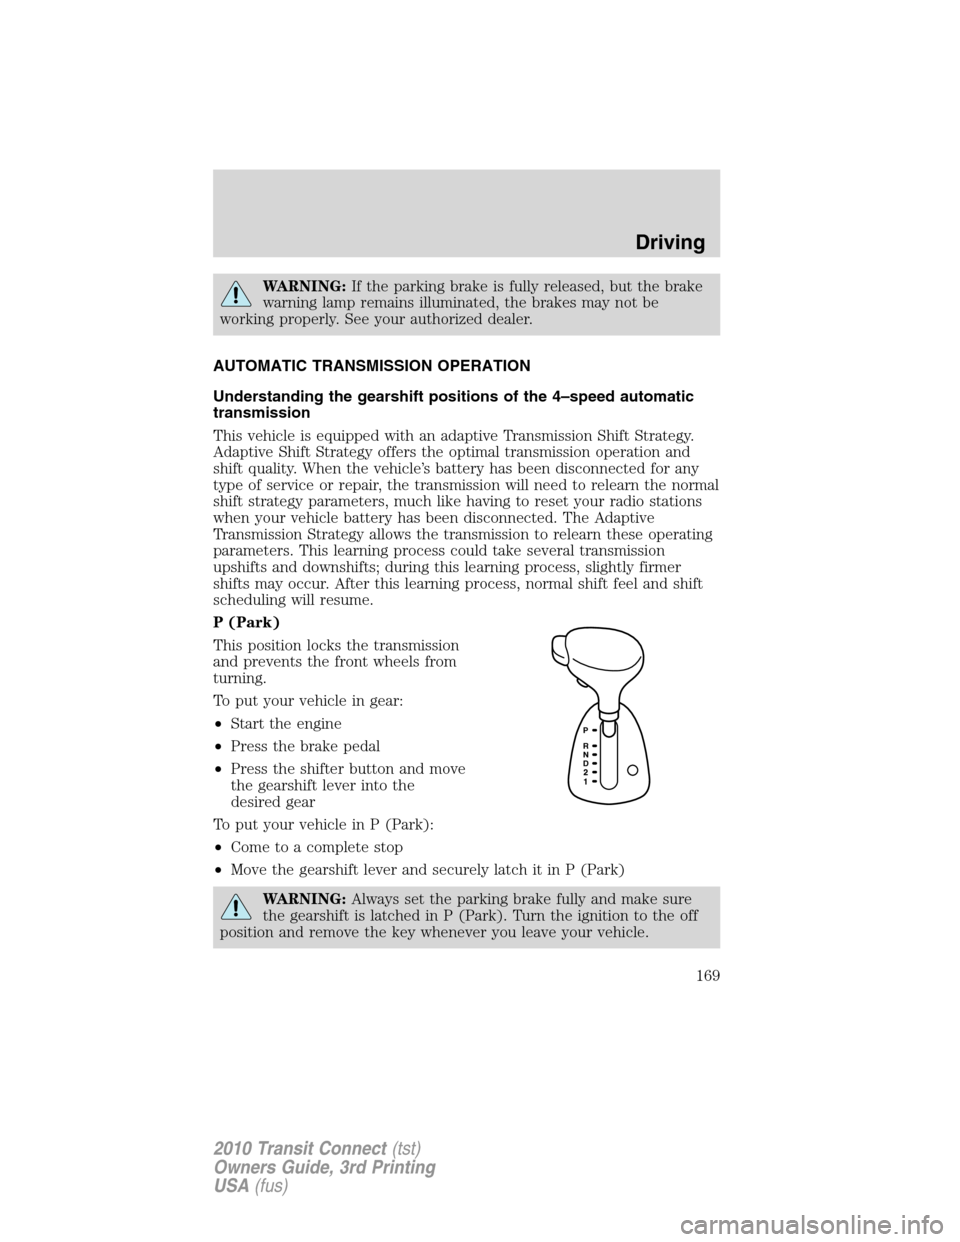
P (Park)
This position locks the transmission
and prevents the front wheels from
turning.
To put your vehicle in gear:
•Start the engine
•Press the brake pedal
•Press the shifter button and move
the gearshift lever into the
desired gear
To put your vehicle in P (Park):
•Come to a complete stop
•Move the gearshift lever and securely latch it in P (Park)
WARNING:Always set the parking brake fully and make sure
the gearshift is latched in P (Park). Turn the ignition to the off
position and remove the key whenever you leave your vehicle.
Driving
169
2010 Transit Connect(tst)
Owners Guide, 3rd Printing
USA(fus)
Page 186 of 258
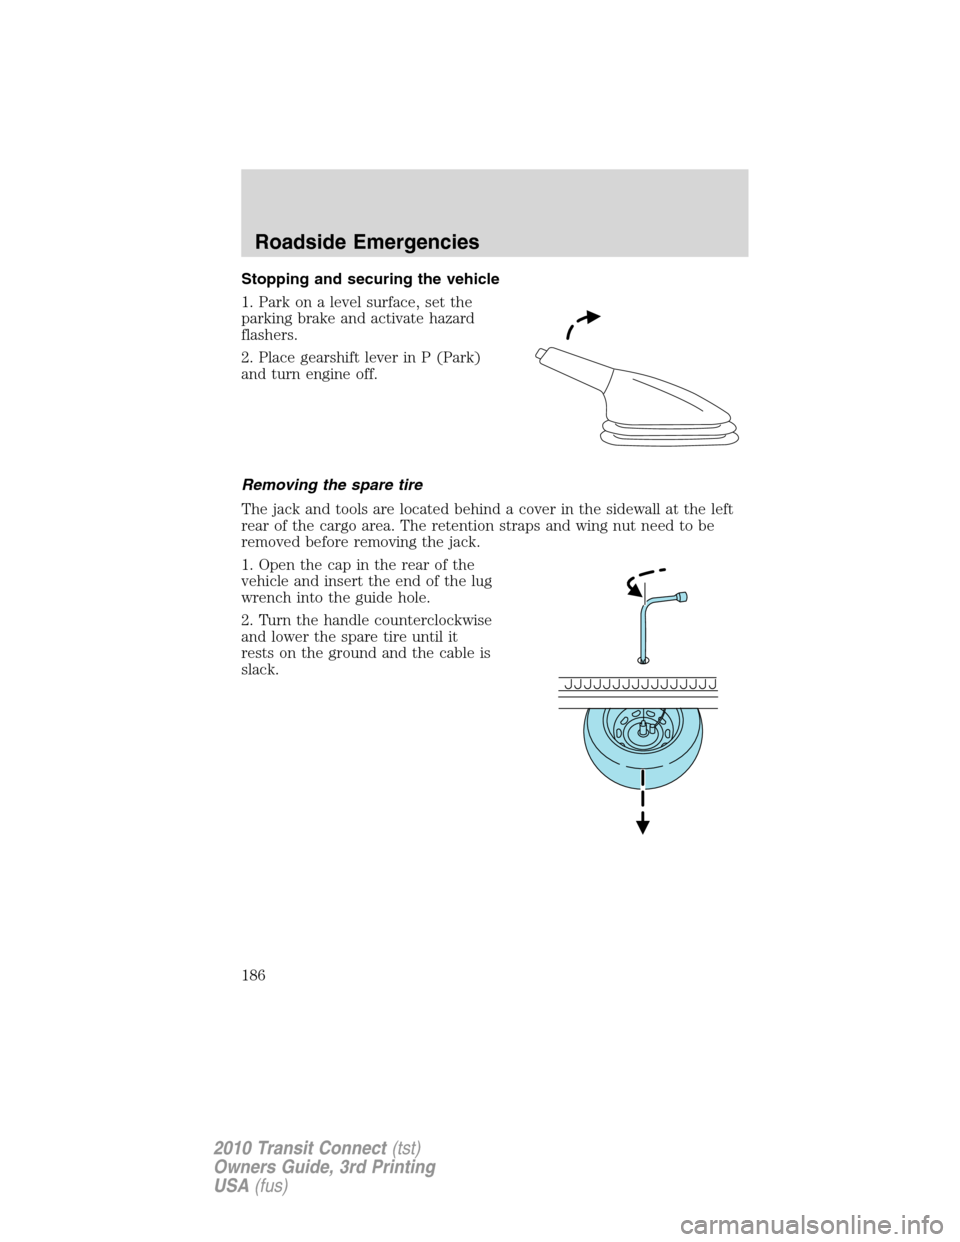
Stopping and securing the vehicle
1. Park on a level surface, set the
parking brake and activate hazard
flashers.
2. Place gearshift lever in P (Park)
and turn engine off.
Removing the spare tire
The jack and tools are located behind a cover in the sidewall at the left
rear of the cargo area. The retention straps and wing nut need to be
removed before removing the jack.
1. Open the cap in the rear of the
vehicle and insert the end of the lug
wrench into the guide hole.
2. Turn the handle counterclockwise
and lower the spare tire until it
rests on the ground and the cable is
slack.
Roadside Emergencies
186
2010 Transit Connect(tst)
Owners Guide, 3rd Printing
USA(fus)
Page 191 of 258
WHEEL LUG NUT TORQUE SPECIFICATIONS
Retighten the lug nuts to the specified torque within 100 miles (160 km)
after any wheel disturbance (rotation, flat tire, wheel removal, etc.).
Bolt size Wheel lug nut torque*
lb.ft. N•m
M12 x 1.5 66 90
* Torque specifications are for nut and bolt threads free of dirt and
rust. Use only Ford recommended replacement fasteners.
WARNING:When a wheel is installed, always remove any
corrosion, dirt or foreign materials present on the mounting
surfaces of the wheel or the surface of the wheel hub, brake drum or
brake disc that contacts the wheel. Ensure that any fasteners that
attach the rotor to the hub are secured so they do not interfere with
the mounting surfaces of the wheel. Installing wheels without correct
metal-to-metal contact at the wheel mounting surfaces can cause the
wheel nuts to loosen and the wheel to come off while the vehicle is in
motion, resulting in loss of control.
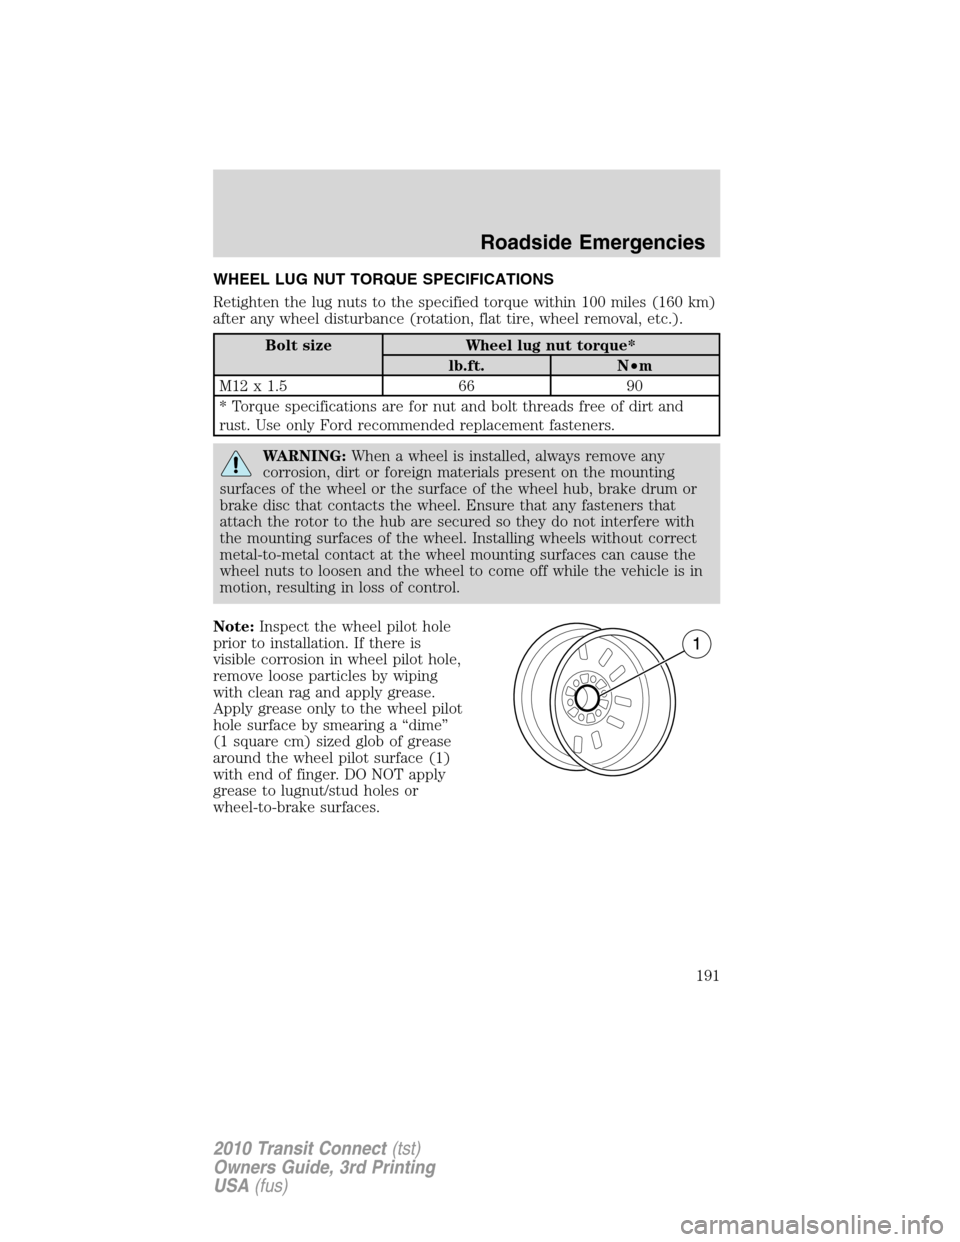
Note:Inspect the wheel pilot hole
prior to installation. If there is
visible corrosion in wheel pilot hole,
remove loose particles by wiping
with clean rag and apply grease.
Apply grease only to the wheel pilot
hole surface by smearing a “dime”
(1 square cm) sized glob of grease
around the wheel pilot surface (1)
with end of finger. DO NOT apply
grease to lugnut/stud holes or
wheel-to-brake surfaces.
Roadside Emergencies
191
2010 Transit Connect(tst)
Owners Guide, 3rd Printing
USA(fus)