clock setting FORD TRANSIT CONNECT 2010 1.G Owners Manual
[x] Cancel search | Manufacturer: FORD, Model Year: 2010, Model line: TRANSIT CONNECT, Model: FORD TRANSIT CONNECT 2010 1.GPages: 258, PDF Size: 1.98 MB
Page 19 of 258

Information display
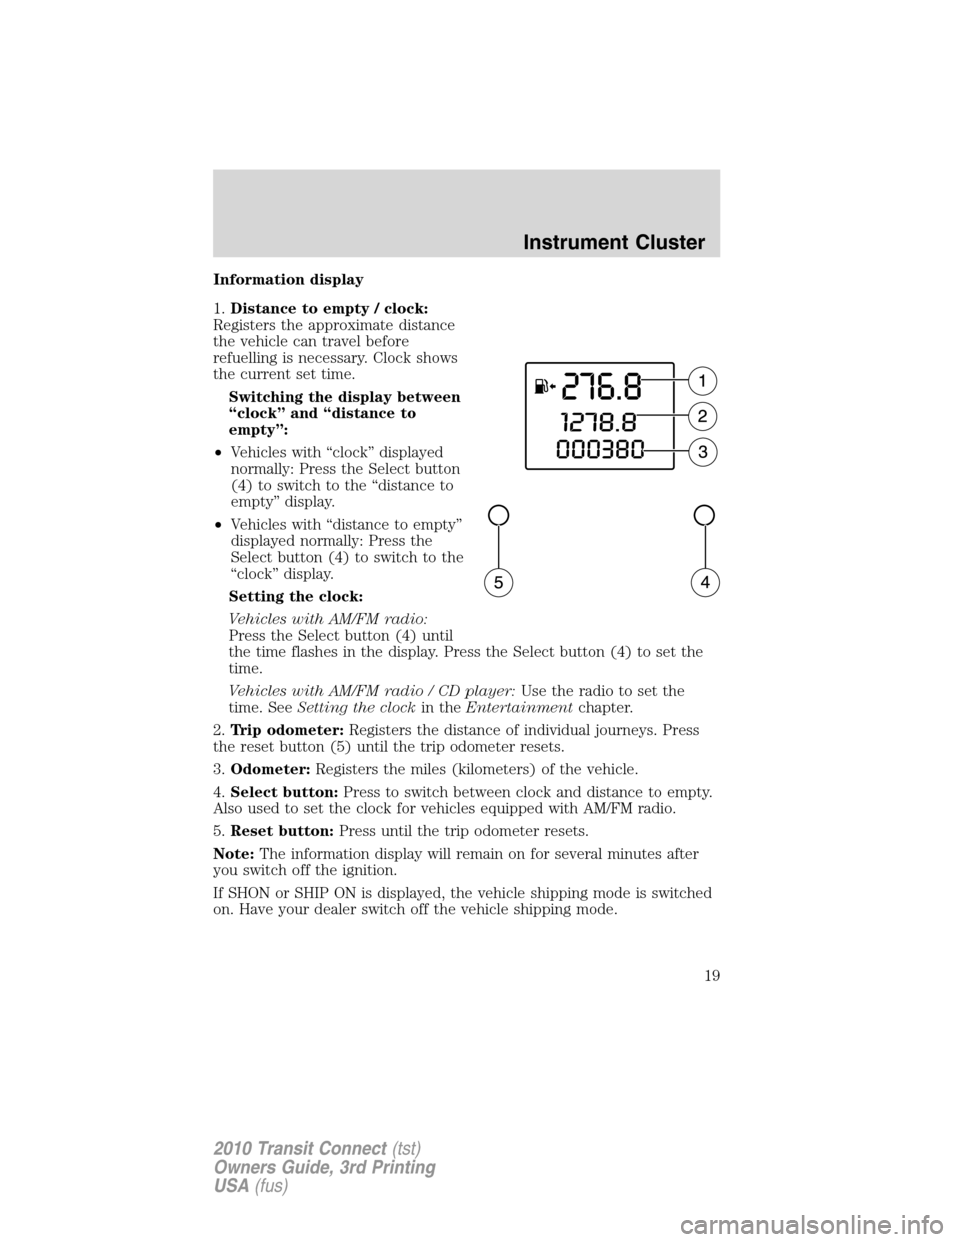
1.Distance to empty / clock:
Registers the approximate distance
the vehicle can travel before
refuelling is necessary. Clock shows
the current set time.
Switching the display between
“clock” and “distance to
empty”:
•Vehicles with “clock” displayed
normally: Press the Select button
(4) to switch to the “distance to
empty” display.
•Vehicles with “distance to empty”
displayed normally: Press the
Select button (4) to switch to the
“clock” display.
Setting the clock:
Vehicles with AM/FM radio:
Press the Select button (4) until
the time flashes in the display. Press the Select button (4) to set the
time.
Vehicles with AM/FM radio / CD player:Use the radio to set the
time. SeeSetting the clockin theEntertainmentchapter.
2.Trip odometer:Registers the distance of individual journeys. Press
the reset button (5) until the trip odometer resets.
3.Odometer:Registers the miles (kilometers) of the vehicle.
4.Select button:Press to switch between clock and distance to empty.
Also used to set the clock for vehicles equipped with AM/FM radio.
5.Reset button:Press until the trip odometer resets.
Note:The information display will remain on for several minutes after
you switch off the ignition.
If SHON or SHIP ON is displayed, the vehicle shipping mode is switched
on. Have your dealer switch off the vehicle shipping mode.
Instrument Cluster
19
2010 Transit Connect(tst)
Owners Guide, 3rd Printing
USA(fus)
Page 22 of 258

Setting the clock
To set the time or date, turn the radio on and press CLOCK until the
time begins to flash. Press
orto access the desired selection
(date or time). Once the desired selection is flashing, turn the VOL
(Volume) control to adjust the time or date forward/backward. Press
CLOCK again.
AM/FM radio
AM/FM:Press repeatedly to select AM/FM1/FM2 frequency bands.
(Seek): Press to access the next strong station on the frequency
band.
SCAN:Press for a brief sampling of all strong radio stations.
(1–6):(Memory Presets): When tuned to any station, press and hold a
preset button until sound returns.
Note:If TP appears in the display, it is an indicator that RDS is active.
Autostore feature:The autostore feature allows you to store the six
strongest stations available from the FM frequency band. To use, press
and hold the AM/FM button. The sound will mute and AST will appear in
the display indicating the feature is active. When the search is complete,
the sound will return and the six strongest stations will be stored in the
memory presets (and overwrite any stations previously stored in the AST
band).
Note:You can also manually store stations in the AST band. When the
AST band is active, simply tune to the desired station and press and hold
a memory preset. The new station will be saved and will override the
previously saved station.
CD player
To load a CD, simply insert the disc, label side up, into the CD slot.
(Eject): Press to eject the CD.
(Seek): Pressto access the previous/next track.
SCAN:Press for a brief sampling of all tracks on the current disc.
Sound Adjustments
BASS/TRE:Press to toggle between bass and treble adjustments. Once
the desired selection appears in the display, press
to adjust the
levels.
Entertainment Systems
22
2010 Transit Connect(tst)
Owners Guide, 3rd Printing
USA(fus)
Page 220 of 258

7. Drive the vehicle to complete the relearning process.
•The vehicle may need to be driven 10 miles (16 km) or more to
relearn the idle and fuel trim strategy.
•If you do not allow the engine to relearn its idle trim, the idle
quality of your vehicle may be adversely affected until the idle
trim is eventually relearned.
If the battery has been disconnected or a new battery has been installed,
the clock and radio settings must be reset once the battery is
reconnected.
•Always dispose of automotive
batteries in a responsible manner.
Follow your local authorized
standards for disposal. Call your
local authorized recycling center
to find out more about recycling
automotive batteries.
ENGINE COOLANT
Checking engine coolant
The concentration and level of engine coolant should be checked at the
intervals listed inscheduled maintenance information.The coolant
concentration should be maintained at 50/50 coolant and distilled water,
which equates to a freeze point of -34°F (-36°C). Coolant concentration
testing is possible with a hydrometer or antifreeze tester. The level of
coolant should be maintained at the MAX level in the coolant reservoir. If
the level falls below, add coolant per the instructions in theAdding
engine coolantsection.
Your vehicle was factory-filled with a 50/50 engine coolant and water
concentration. If the concentration of coolant falls below 40% or above
60%, the engine parts could become damaged or not work properly.A
50/50 mixture of coolant and water provides the following:
•Freeze protection down to -34°F (-36°C).
•Boiling protection up to 265°F (129°C).
•Protection against rust and other forms of corrosion.
•Proper function of calibrated gauges.
L
E
A
D
RETURN
RECYCLE
Maintenance and Specifications
220
2010 Transit Connect(tst)
Owners Guide, 3rd Printing
USA(fus)
Page 257 of 258

Safety restraints - LATCH
anchors ......................................114
Safety seats for children ..........110
Safety Compliance
Certification Label ....................246
Seats ............................................71
child safety seats ....................110
front seats .................................74
SecuriLock passive anti-theft
system ..........................................67
Servicing your vehicle ..............212
Setting the clock .........................20
Spark plugs,
specifications .....................241, 245
Special notice
ambulance conversions ..............6
utility-type vehicles ....................6
Specification chart,
lubricants ...................................242
Speed control ..............................56
Starting your vehicle ........155–157
jump starting ..........................192
Steering wheel
controls ......................................58
tilting .........................................52
T
Tilt steering wheel ......................52
Tire Pressure Monitoring
System (TPMS)
Tires, Wheels and Loading ....140
Tires ...........................126–127, 183
alignment ................................134
care ..........................................130
changing ..........................183, 187
checking the pressure ............130inflating ...................................128
label .........................................140
replacing ..................................132
rotating ....................................134
safety practices .......................133
sidewall information ...............135
snow tires and chains ............147
spare tire .................................184
terminology .............................127
tire grades ...............................127
treadwear ........................126, 131
Towing .......................................154
recreational towing .................154
trailer towing ..........................154
wrecker ....................................197
Transaxle
lubricant specifications ..........242
Transmission .............................169
brake-shift interlock (BSI) ....168
fluid, checking and adding
(automatic) .............................238
fluid, refill capacities ..............242
Trunk
remote release ..........................64
Turn signal ..................................42
V
Vehicle Identification Number
(VIN) ..........................................246
Vehicle loading ..........................148
Ventilating your vehicle ...........158
W
Warning lights (see Lights) .......12
Washer fluid ..............................215
Water, Driving through .............173
Index
257
2010 Transit Connect(tst)
Owners Guide, 3rd Printing
USA(fus)