headlamp FORD TRANSIT CONNECT 2013 1.G User Guide
[x] Cancel search | Manufacturer: FORD, Model Year: 2013, Model line: TRANSIT CONNECT, Model: FORD TRANSIT CONNECT 2013 1.GPages: 321, PDF Size: 4.5 MB
Page 168 of 321
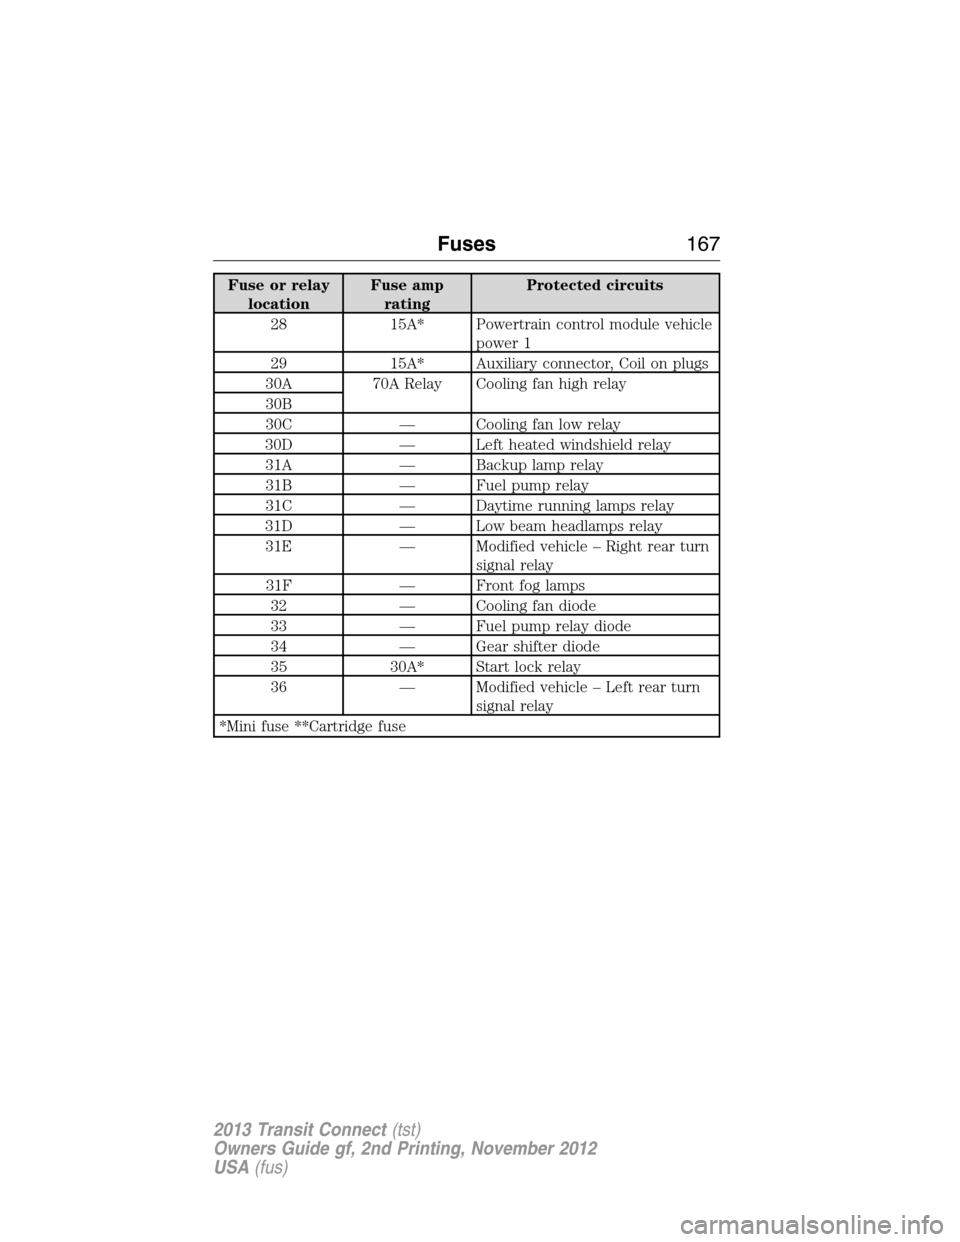
Fuse or relay
locationFuse amp
ratingProtected circuits
28 15A* Powertrain control module vehicle
power 1
29 15A* Auxiliary connector, Coil on plugs
30A 70A Relay Cooling fan high relay
30B
30C — Cooling fan low relay
30D — Left heated windshield relay
31A — Backup lamp relay
31B — Fuel pump relay
31C — Daytime running lamps relay
31D — Low beam headlamps relay
31E — Modified vehicle – Right rear turn
signal relay
31F — Front fog lamps
32 — Cooling fan diode
33 — Fuel pump relay diode
34 — Gear shifter diode
35 30A* Start lock relay
36 — Modified vehicle – Left rear turn
signal relay
*Mini fuse **Cartridge fuse
Fuses167
2013 Transit Connect(tst)
Owners Guide gf, 2nd Printing, November 2012
USA(fus)
Page 169 of 321
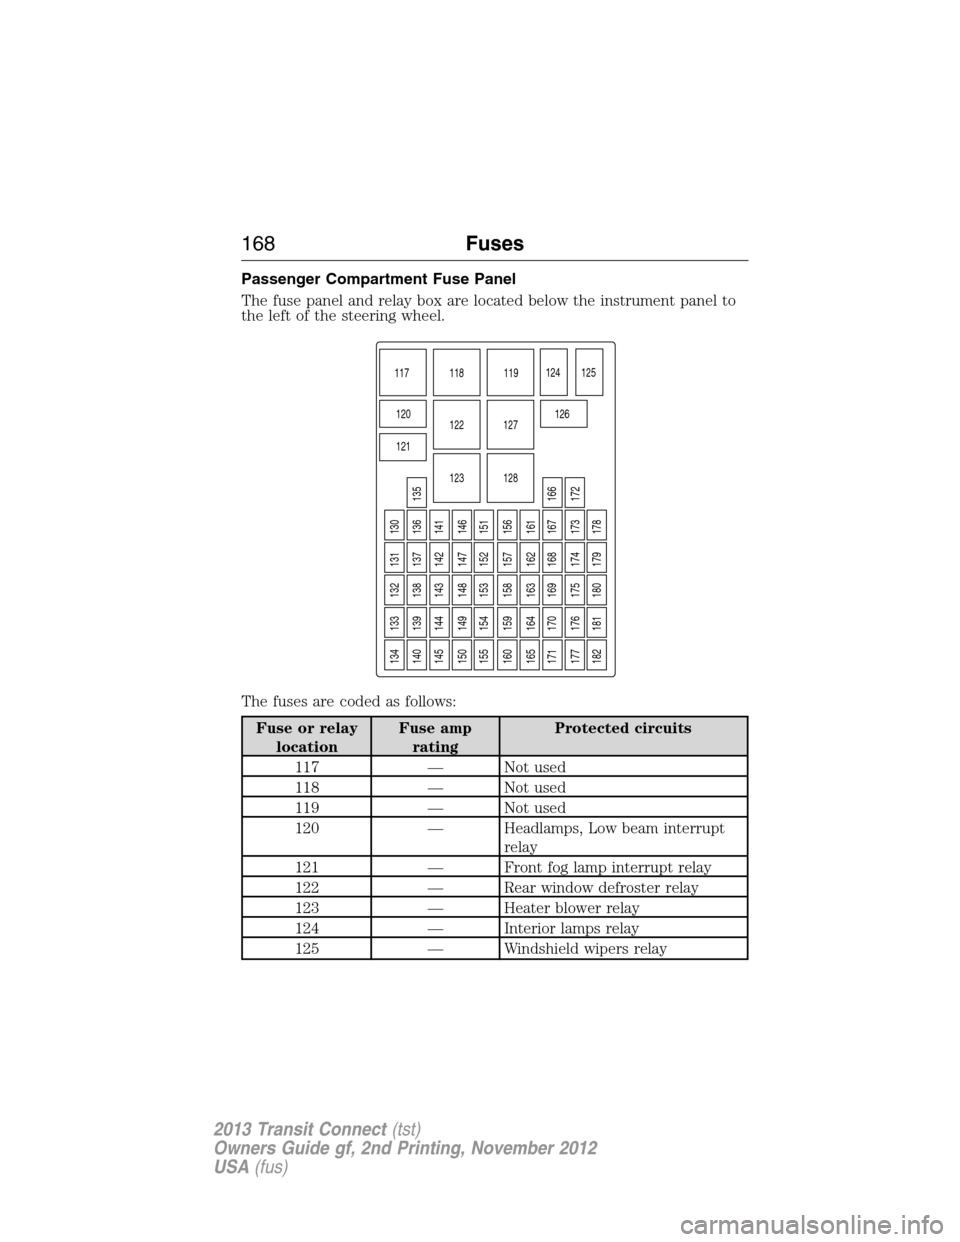
Passenger Compartment Fuse Panel
The fuse panel and relay box are located below the instrument panel to
the left of the steering wheel.
The fuses are coded as follows:
Fuse or relay
locationFuse amp
ratingProtected circuits
117 — Not used
118 — Not used
119 — Not used
120 — Headlamps, Low beam interrupt
relay
121 — Front fog lamp interrupt relay
122 — Rear window defroster relay
123 — Heater blower relay
124 — Interior lamps relay
125 — Windshield wipers relay
122 127
128119 117 118
123120
121124 125
126
155
160
171
177
182154
159
170
176
181153
158
169
175
180152
157
168
174
179151
156
165 164 163 162 161
167
173
178166
172134
140
145
150133
139
144
149132
138
143
148131
137
142
147130
136
141
146135
168Fuses
2013 Transit Connect(tst)
Owners Guide gf, 2nd Printing, November 2012
USA(fus)
Page 190 of 321
ADJUSTING THE HEADLAMPS
The headlamps on your vehicle are properly aimed at the assembly plant.
If your vehicle has been in an accident, the alignment of your headlamps
should be checked by your authorized dealer.
Vertical Aim Adjustment
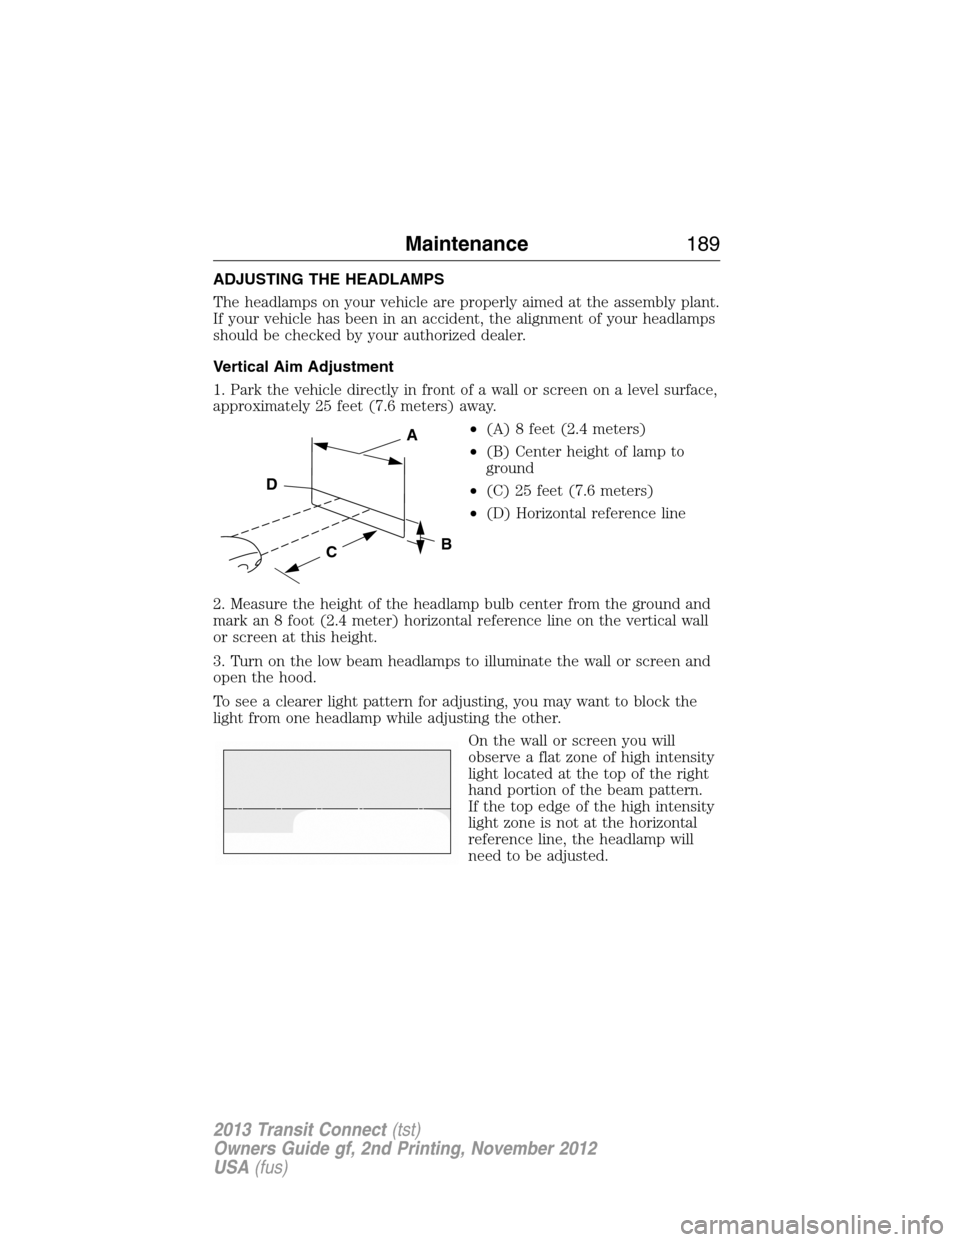
1. Park the vehicle directly in front of a wall or screen on a level surface,
approximately 25 feet (7.6 meters) away.
•(A) 8 feet (2.4 meters)
•(B) Center height of lamp to
ground
•(C) 25 feet (7.6 meters)
•(D) Horizontal reference line
2. Measure the height of the headlamp bulb center from the ground and
mark an 8 foot (2.4 meter) horizontal reference line on the vertical wall
or screen at this height.
3. Turn on the low beam headlamps to illuminate the wall or screen and
open the hood.
To see a clearer light pattern for adjusting, you may want to block the
light from one headlamp while adjusting the other.
On the wall or screen you will
observe a flat zone of high intensity
light located at the top of the right
hand portion of the beam pattern.
If the top edge of the high intensity
light zone is not at the horizontal
reference line, the headlamp will
need to be adjusted.
C
A
B
D
Maintenance189
2013 Transit Connect(tst)
Owners Guide gf, 2nd Printing, November 2012
USA(fus)
Page 191 of 321
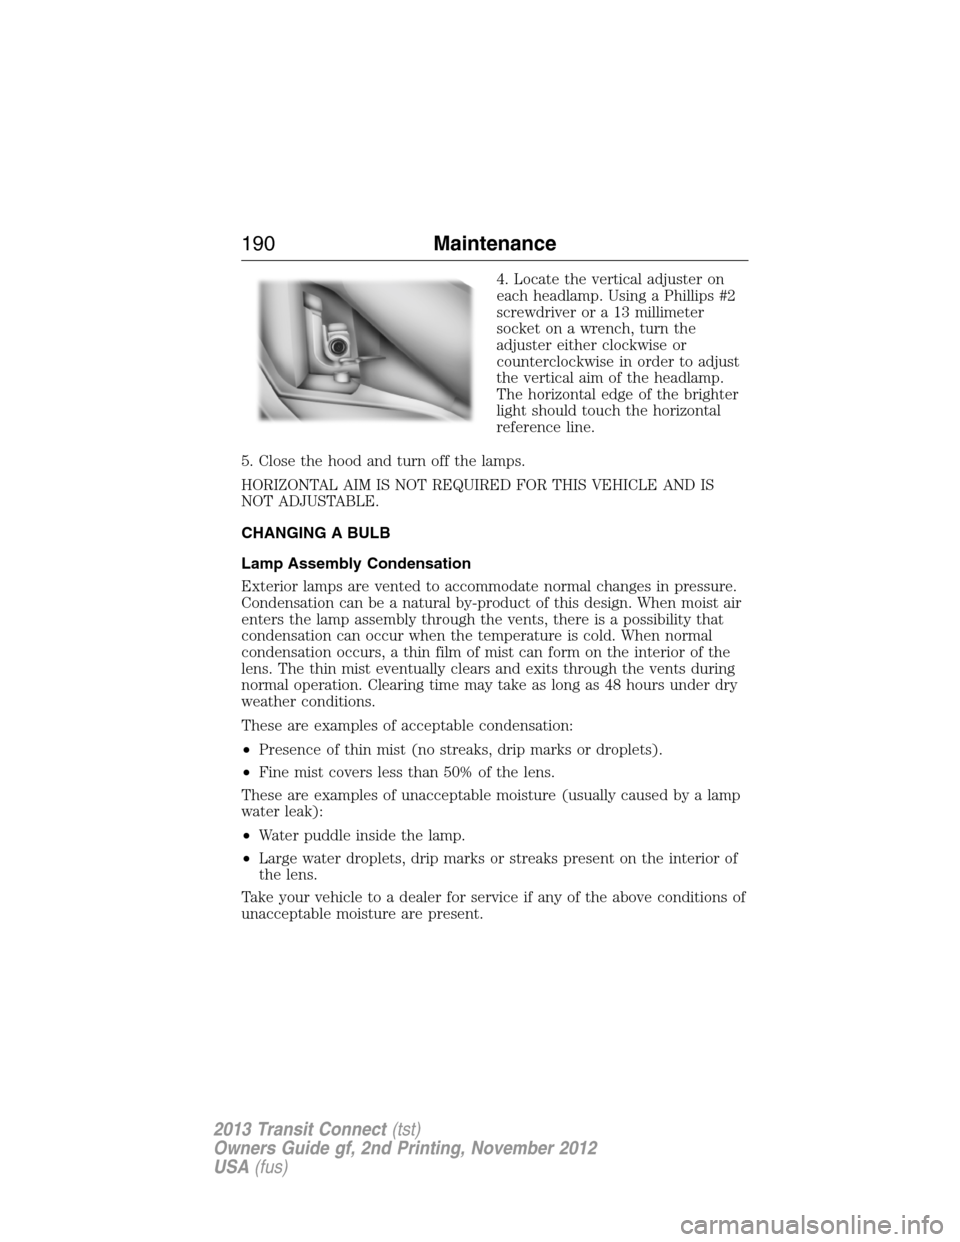
4. Locate the vertical adjuster on
each headlamp. Using a Phillips #2
screwdriver or a 13 millimeter
socket on a wrench, turn the
adjuster either clockwise or
counterclockwise in order to adjust
the vertical aim of the headlamp.
The horizontal edge of the brighter
light should touch the horizontal
reference line.
5. Close the hood and turn off the lamps.
HORIZONTAL AIM IS NOT REQUIRED FOR THIS VEHICLE AND IS
NOT ADJUSTABLE.
CHANGING A BULB
Lamp Assembly Condensation
Exterior lamps are vented to accommodate normal changes in pressure.
Condensation can be a natural by-product of this design. When moist air
enters the lamp assembly through the vents, there is a possibility that
condensation can occur when the temperature is cold. When normal
condensation occurs, a thin film of mist can form on the interior of the
lens. The thin mist eventually clears and exits through the vents during
normal operation. Clearing time may take as long as 48 hours under dry
weather conditions.
These are examples of acceptable condensation:
•Presence of thin mist (no streaks, drip marks or droplets).
•Fine mist covers less than 50% of the lens.
These are examples of unacceptable moisture (usually caused by a lamp
water leak):
•Water puddle inside the lamp.
•Large water droplets, drip marks or streaks present on the interior of
the lens.
Take your vehicle to a dealer for service if any of the above conditions of
unacceptable moisture are present.
190Maintenance
2013 Transit Connect(tst)
Owners Guide gf, 2nd Printing, November 2012
USA(fus)
Page 192 of 321
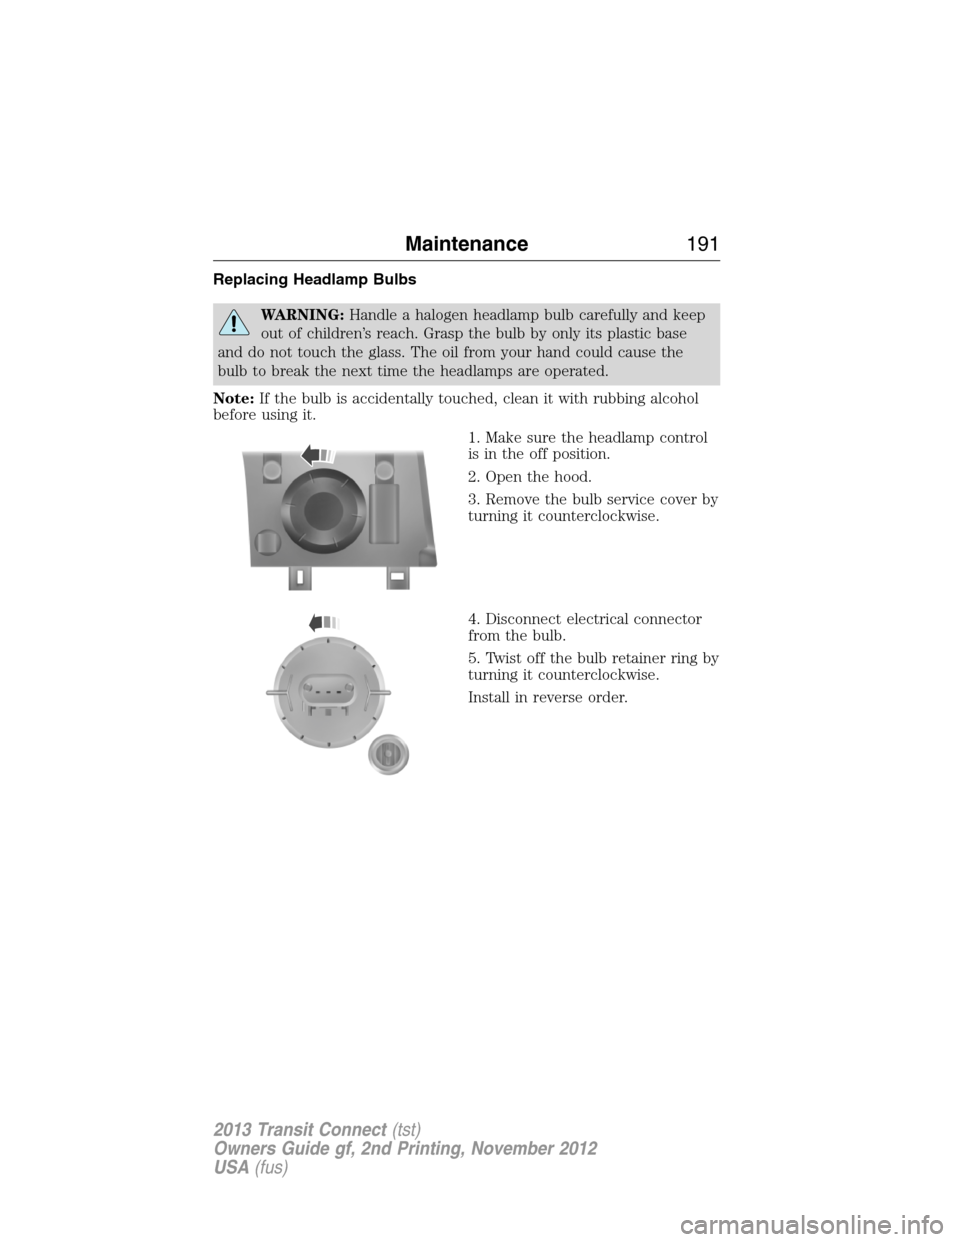
Replacing Headlamp Bulbs
WARNING:Handle a halogen headlamp bulb carefully and keep
out of children’s reach. Grasp the bulb by only its plastic base
and do not touch the glass. The oil from your hand could cause the
bulb to break the next time the headlamps are operated.
Note:If the bulb is accidentally touched, clean it with rubbing alcohol
before using it.
1. Make sure the headlamp control
is in the off position.
2. Open the hood.
3. Remove the bulb service cover by
turning it counterclockwise.
4. Disconnect electrical connector
from the bulb.
5. Twist off the bulb retainer ring by
turning it counterclockwise.
Install in reverse order.
Maintenance191
2013 Transit Connect(tst)
Owners Guide gf, 2nd Printing, November 2012
USA(fus)
Page 193 of 321
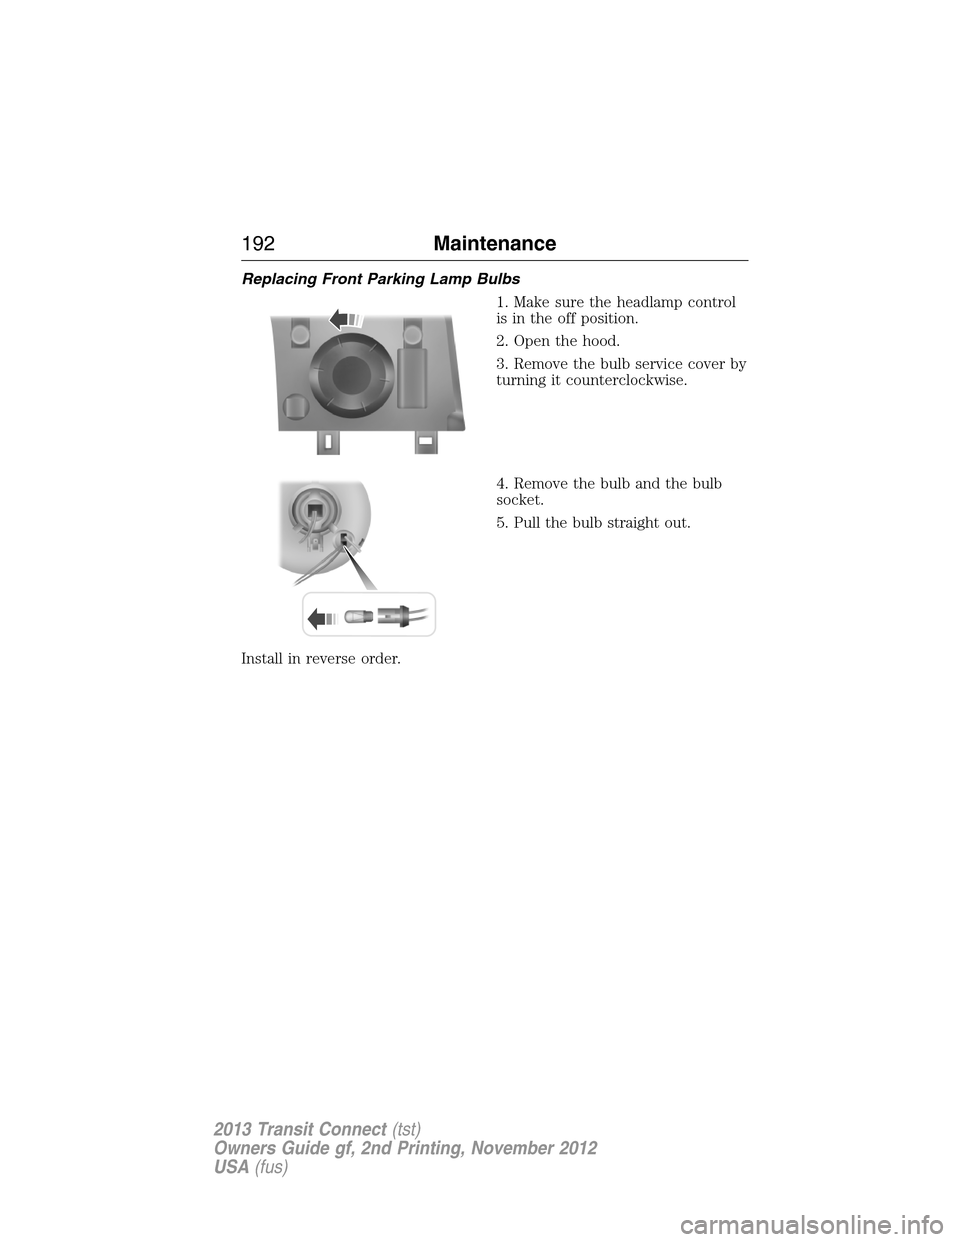
Replacing Front Parking Lamp Bulbs
1. Make sure the headlamp control
is in the off position.
2. Open the hood.
3. Remove the bulb service cover by
turning it counterclockwise.
4. Remove the bulb and the bulb
socket.
5. Pull the bulb straight out.
Install in reverse order.
192Maintenance
2013 Transit Connect(tst)
Owners Guide gf, 2nd Printing, November 2012
USA(fus)
Page 194 of 321
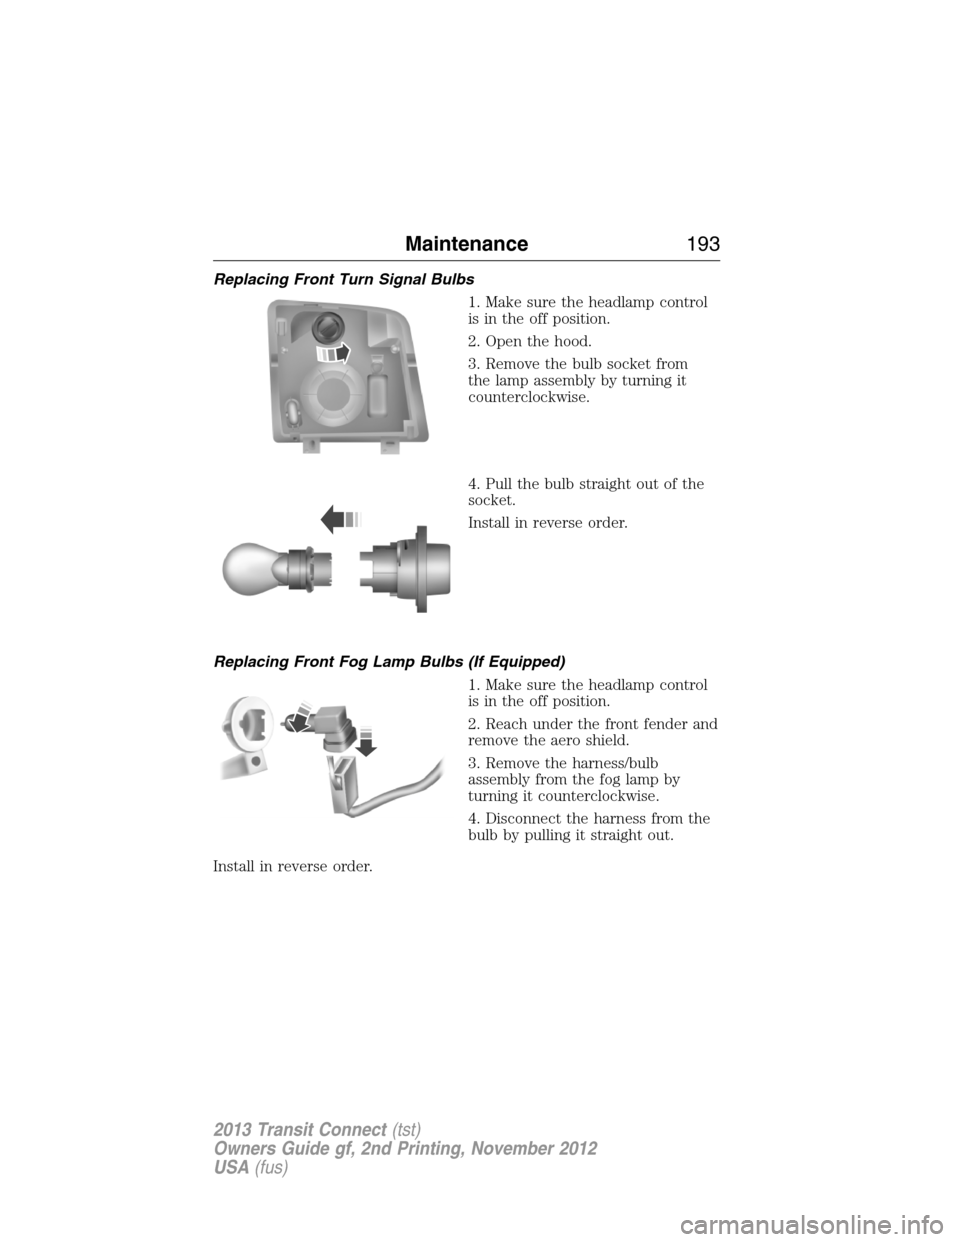
Replacing Front Turn Signal Bulbs
1. Make sure the headlamp control
is in the off position.
2. Open the hood.
3. Remove the bulb socket from
the lamp assembly by turning it
counterclockwise.
4. Pull the bulb straight out of the
socket.
Install in reverse order.
Replacing Front Fog Lamp Bulbs (If Equipped)
1. Make sure the headlamp control
is in the off position.
2. Reach under the front fender and
remove the aero shield.
3. Remove the harness/bulb
assembly from the fog lamp by
turning it counterclockwise.
4. Disconnect the harness from the
bulb by pulling it straight out.
Install in reverse order.
Maintenance193
2013 Transit Connect(tst)
Owners Guide gf, 2nd Printing, November 2012
USA(fus)
Page 195 of 321
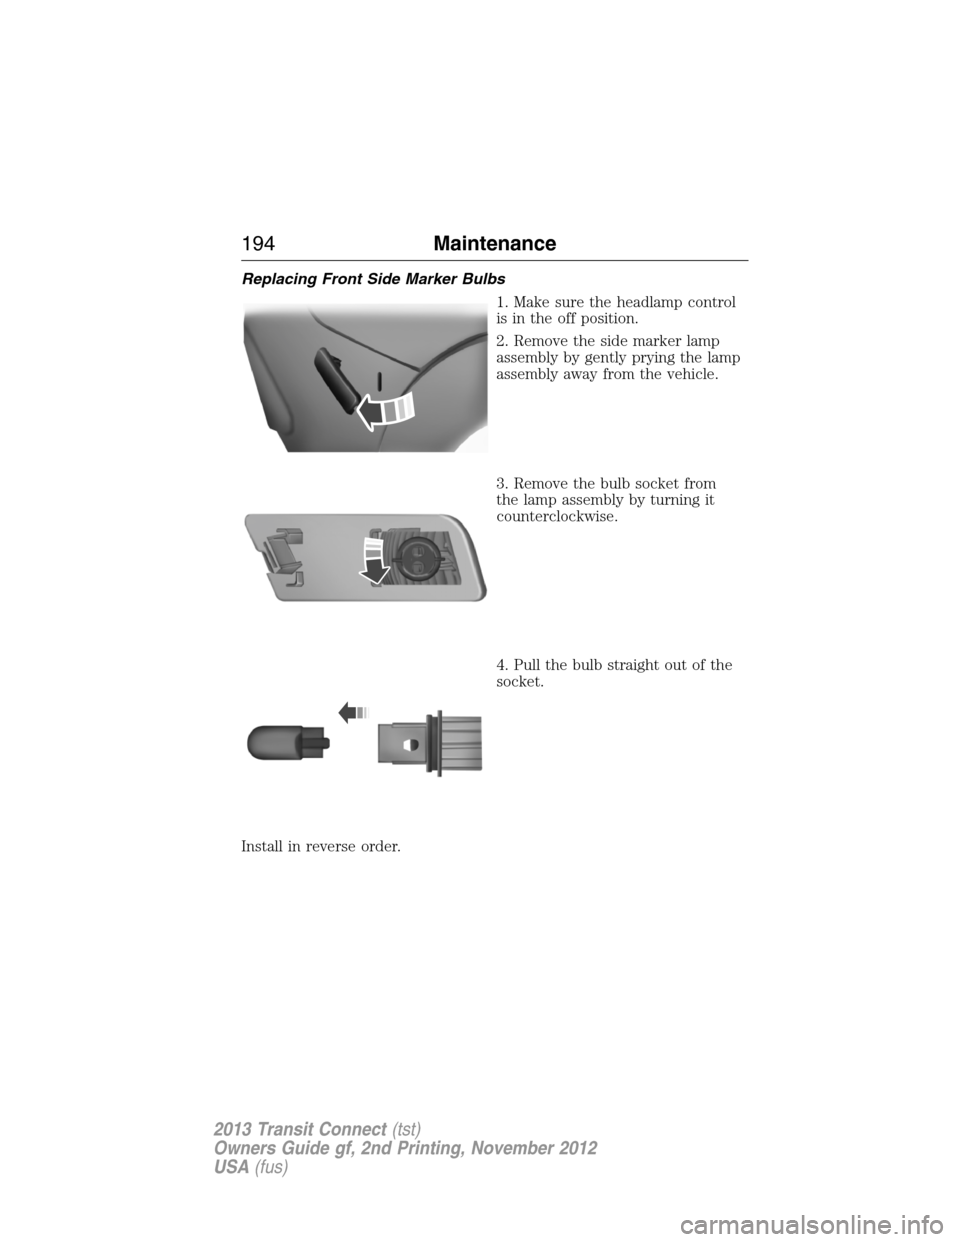
Replacing Front Side Marker Bulbs
1. Make sure the headlamp control
is in the off position.
2. Remove the side marker lamp
assembly by gently prying the lamp
assembly away from the vehicle.
3. Remove the bulb socket from
the lamp assembly by turning it
counterclockwise.
4. Pull the bulb straight out of the
socket.
Install in reverse order.
194Maintenance
2013 Transit Connect(tst)
Owners Guide gf, 2nd Printing, November 2012
USA(fus)
Page 196 of 321
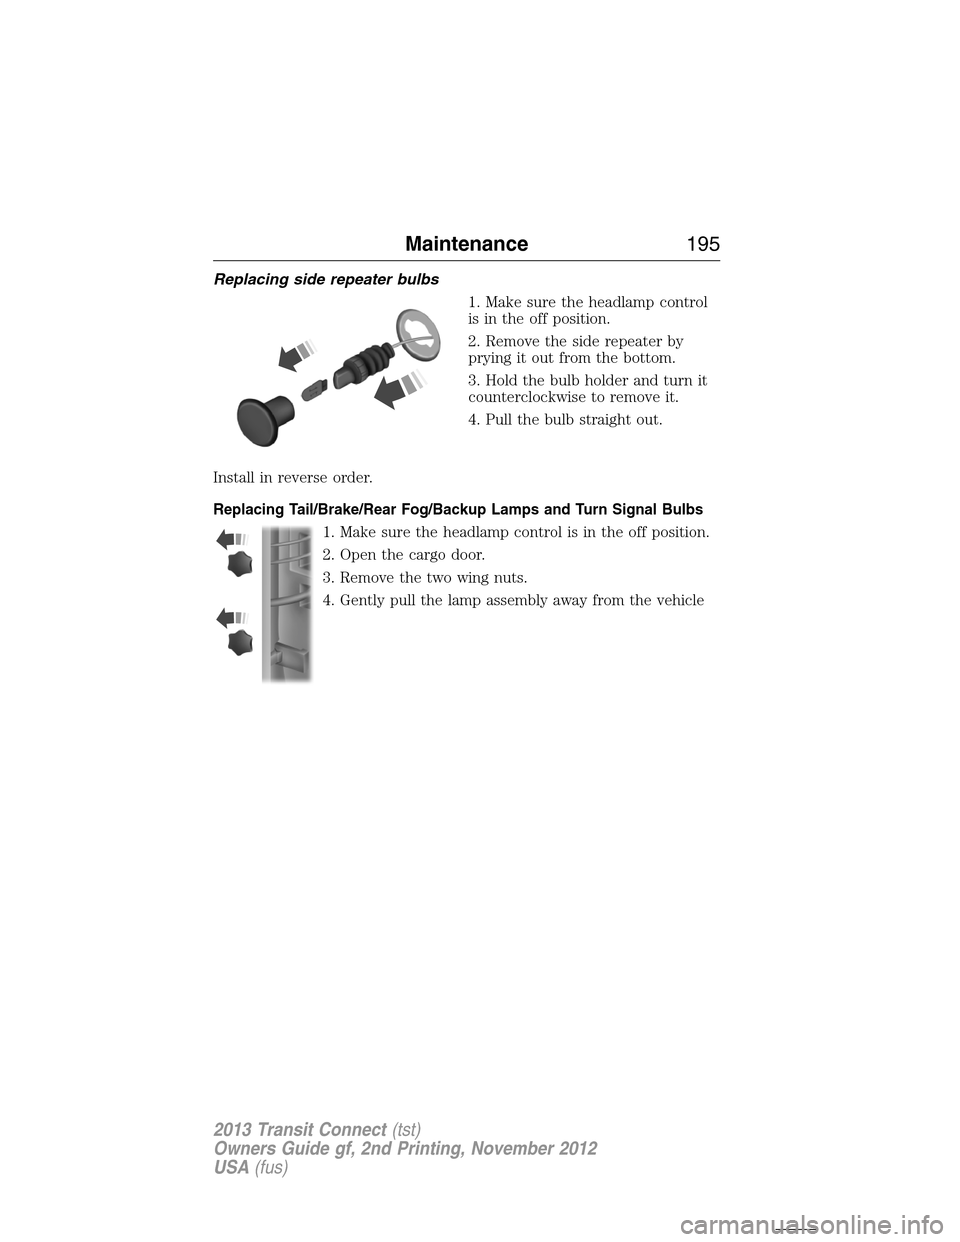
Replacing side repeater bulbs
1. Make sure the headlamp control
is in the off position.
2. Remove the side repeater by
prying it out from the bottom.
3. Hold the bulb holder and turn it
counterclockwise to remove it.
4. Pull the bulb straight out.
Install in reverse order.
Replacing Tail/Brake/Rear Fog/Backup Lamps and Turn Signal Bulbs
1. Make sure the headlamp control is in the off position.
2. Open the cargo door.
3. Remove the two wing nuts.
4. Gently pull the lamp assembly away from the vehicle
Maintenance195
2013 Transit Connect(tst)
Owners Guide gf, 2nd Printing, November 2012
USA(fus)
Page 198 of 321
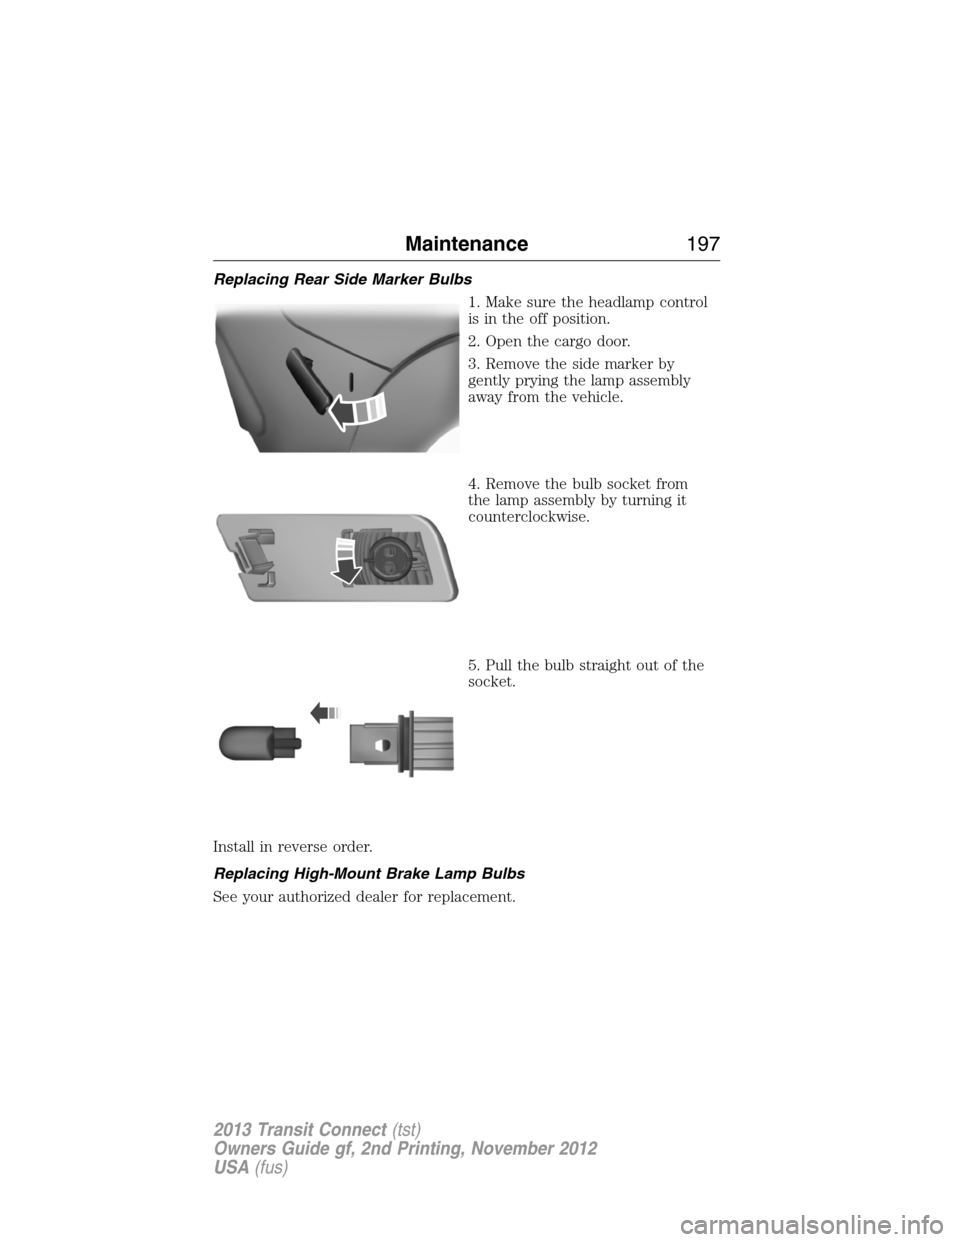
Replacing Rear Side Marker Bulbs
1. Make sure the headlamp control
is in the off position.
2. Open the cargo door.
3. Remove the side marker by
gently prying the lamp assembly
away from the vehicle.
4. Remove the bulb socket from
the lamp assembly by turning it
counterclockwise.
5. Pull the bulb straight out of the
socket.
Install in reverse order.
Replacing High-Mount Brake Lamp Bulbs
See your authorized dealer for replacement.
Maintenance197
2013 Transit Connect(tst)
Owners Guide gf, 2nd Printing, November 2012
USA(fus)