seats FORD TRANSIT CONNECT 2014 2.G Quick Reference Guide
[x] Cancel search | Manufacturer: FORD, Model Year: 2014, Model line: TRANSIT CONNECT, Model: FORD TRANSIT CONNECT 2014 2.GPages: 10, PDF Size: 9.45 MB
Page 7 of 10

*if equipped
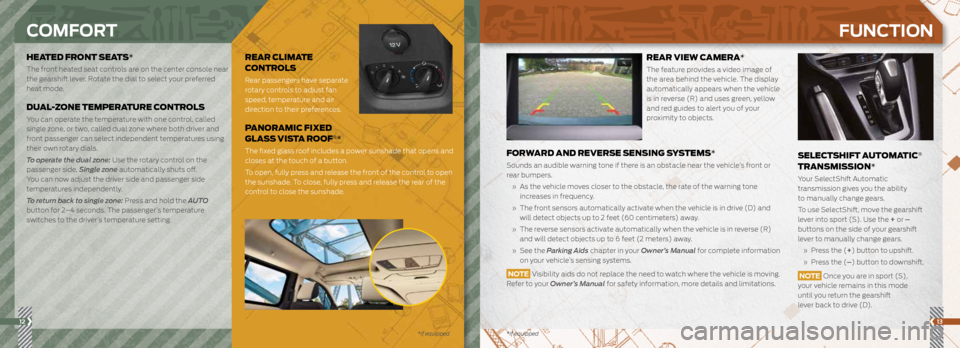
HEATED FRONT SEATS*
The front heated seat controls are on the center console near
the gearshift lever. Rotate the dial to select your preferred
heat mode.
DUAL-ZONE TEMPERATURE CONTROLS
You can operate the temperature with one control, called
single zone, or two, called dual zone where both driver and
front passenger can select independent temperatures using
their own rotary dials.
To operate the dual zone: Use the rotary control on the
passenger side. Single zone automatically shuts off.
You can now adjust the driver side and passenger side
temperatures independently.
To return back to single zone: Press and hold the AUTO
button for 2–4 seconds. The passenger’s temperature
switches to the driver’s temperature setting.
12
COMFORT
SELECTSHIFT AUTOMATIC®
TRANSMISSION*
Your SelectShift Automatic
transmission gives you the ability
to manually change gears.
To use SelectShift, move the gearshift
lever into sport (S). Use the + or –
buttons on the side of your gearshift
lever to manually change gears.
» Press the (+ ) button to upshift.
» Press the (– ) button to downshift.
NOTE Once you are in sport (S),
your vehicle remains in this mode
until you return the gearshift
lever back to drive (D).
FUNCTION
13
REAR CLIMATE
CONTROLS
Rear passengers have separate
rotary controls to adjust fan
speed, temperature and air
direction to their preferences.
PANORAMIC FIXED
GLASS VISTA ROOF®*
The fixed glass roof includes a power sunshade that opens and
closes at the touch of a button.
To open, fully press and release the front of the control to open
the sunshade. To close, fully press and release the rear of the
control to close the sunshade.
*if equipped
REAR VIEW CAMERA*
The feature provides a video image of
the area behind the vehicle. The display
automatically appears when the vehicle
is in reverse (R) and uses green, yellow
and red guides to alert you of your
proximity to objects.
FORWARD AND REVERSE SENSING SYSTEMS*
Sounds an audible warning tone if there is an obstacle near the vehicle’s front or
rear bumpers.
» As the vehicle moves closer to the obstacle, the rate of the warning tone
increases in frequency.
» The front sensors automatically activate when the vehicle is in drive (D) and
will detect objects up to 2 feet (60 centimeters) away.
» The reverse sensors activate automatically when the vehicle is in reverse (R)
and will detect objects up to 6 feet (2 meters) away.
» See the Parking Aids chapter in your Owner’s Manual for complete information
on your vehicle’s sensing systems.
NOTE Visibility aids do not replace the need to watch where the vehicle is moving.
Refer to your Owner’s Manual for safety information, more details and limitations.
Page 8 of 10

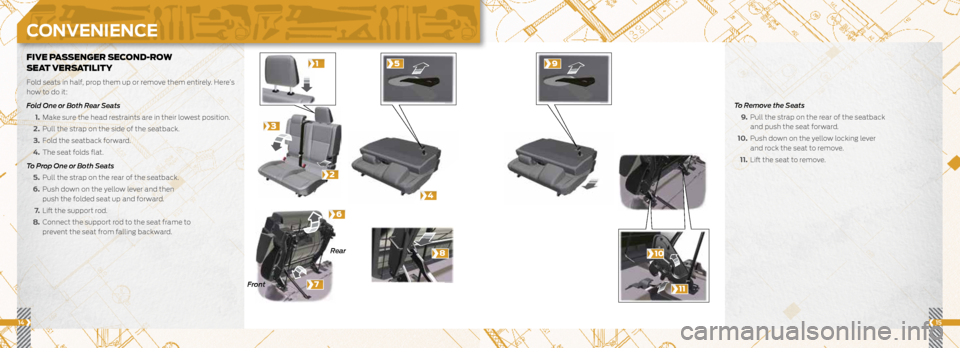
FIVE PASSENGER SECOND-ROW
SEAT VERSATILITY
Fold seats in half, prop them up or remove them entirely. Here’s
how to do it:
Fold One or Both Rear Seats
1. Make sure the head restraints are in their lowest position.
2.
Pull the strap on the side of the seatback.
3.
Fold the seatback forward.
4.
The seat folds flat.
To Prop One or Both Seats
5. Pull the strap on the rear of the seatback.
6.
Push down on the yellow lever and then
push the folded seat up and forward.
7. Lift the support rod.
8.
Connect the support rod to the seat frame to
prevent the seat from falling backward.
To Remove the Seats
9. Pull the strap on the rear of the seatback
and push the seat forward.
10. Push down on the yellow locking lever
and rock the seat to remove.
11. Lift the seat to remove.
1415
Front Rear
CONVENIENCE
1
2
5
6
3
4
7
8
9
10
11
Page 9 of 10

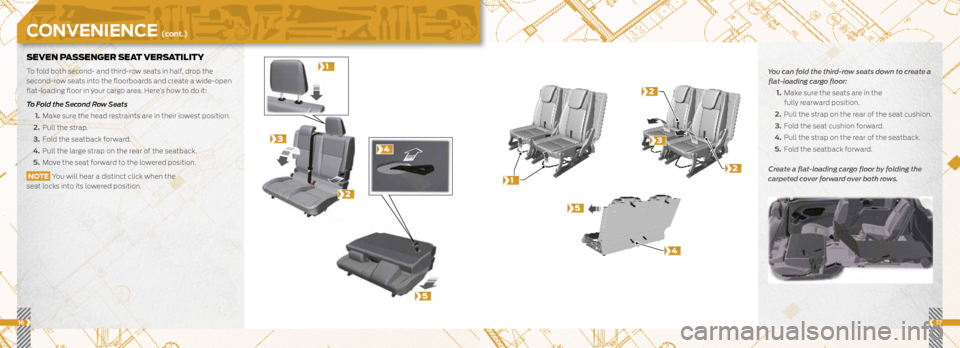
SEVEN PASSENGER SEAT VERSATILITY
To fold both second- and third-row seats in half, drop the
second-row seats into the floorboards and create a wide-open
flat-loading floor in your cargo area. Here’s how to do it:
To Fold the Second Row Seats
1. Make sure the head restraints are in their lowest position.
2.
Pull the strap.
3.
Fold the seatback forward.
4.
Pull the large strap on the rear of the seatback.
5.
Move the seat forward to the lowered position.
NOTE You will hear a distinct click when the
seat locks into its lowered position.
1617
CONVENIENCE (cont.)
1
1
2
3
5
4
2
2
3
5
4
You can fold the third-row seats down to create a flat-loading cargo floor:
1. Make sure the seats are in the
fully rearward position.
2.
Pull the strap on the rear of the seat cushion.
3.
Fold the seat cushion forward.
4.
Pull the strap on the rear of the seatback.
5.
Fold the seatback forward.
Create a flat-loading cargo floor by folding the
carpeted cover forward over both rows.