remote control FORD TRANSIT CONNECT 2019 User Guide
[x] Cancel search | Manufacturer: FORD, Model Year: 2019, Model line: TRANSIT CONNECT, Model: FORD TRANSIT CONNECT 2019Pages: 493, PDF Size: 7.43 MB
Page 71 of 493
KEYLESS ENTRY
General Information
The system will not function if:
•
The vehicle battery has no charge.
• The passive key battery has no charge.
• The passive key frequencies are
jammed.
• The door handle is not clean.
Note: If the system does not function, you
will need to use the key blade to lock and
unlock your vehicle.
The system allows you to operate your
vehicle without the use of a key or remote
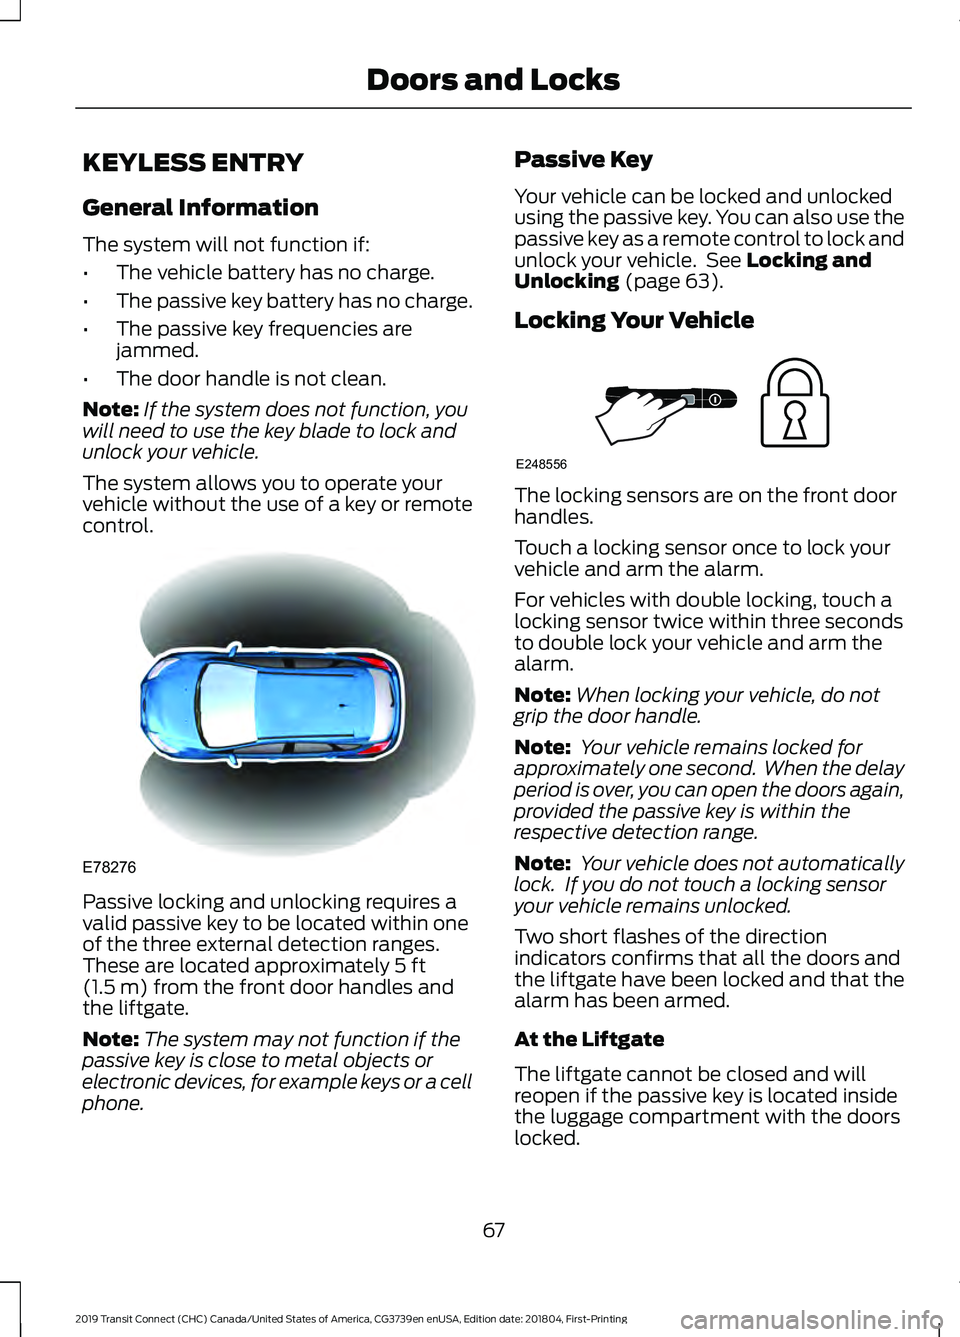
control. Passive locking and unlocking requires a
valid passive key to be located within one
of the three external detection ranges.
These are located approximately 5 ft
(1.5 m) from the front door handles and
the liftgate.
Note: The system may not function if the
passive key is close to metal objects or
electronic devices, for example keys or a cell
phone. Passive Key
Your vehicle can be locked and unlocked
using the passive key. You can also use the
passive key as a remote control to lock and
unlock your vehicle. See
Locking and
Unlocking (page 63).
Locking Your Vehicle The locking sensors are on the front door
handles.
Touch a locking sensor once to lock your
vehicle and arm the alarm.
For vehicles with double locking, touch a
locking sensor twice within three seconds
to double lock your vehicle and arm the
alarm.
Note:
When locking your vehicle, do not
grip the door handle.
Note: Your vehicle remains locked for
approximately one second. When the delay
period is over, you can open the doors again,
provided the passive key is within the
respective detection range.
Note: Your vehicle does not automatically
lock. If you do not touch a locking sensor
your vehicle remains unlocked.
Two short flashes of the direction
indicators confirms that all the doors and
the liftgate have been locked and that the
alarm has been armed.
At the Liftgate
The liftgate cannot be closed and will
reopen if the passive key is located inside
the luggage compartment with the doors
locked.
67
2019 Transit Connect (CHC) Canada/United States of America, CG3739en enUSA, Edition date: 201804, First-Printing Doors and LocksE78276 E248556
Page 72 of 493
Note:
If a second valid passive key is
located within the liftgate detection range,
the liftgate can be closed.
Unlocking Your Vehicle Pull a front exterior door handle to unlock
and open the door. Do not touch the lock
sensor on the front of the handle.
One long flash of the direction indicators
confirms that all the doors and the liftgate
have been unlocked and that the alarm
has been disarmed.
Note:
A valid passive key must be located
within the detection range of that door.
Unlocking Only the Driver's Door
You can program the system so that only
the driver door is unlocked. See Locking
and Unlocking (page 63).
If you program the unlocking function so
that only the driver door unlocks, the
following occurs:
• If the driver ’s door is the first door
which is opened, the other doors will
remain locked. All the other doors can
be unlocked from inside your vehicle
by pressing the unlock button located
on the driver's and front passenger's
door. You can unlock individual doors
by pulling the interior door handles on
those doors.
• If the front passenger's door is the first
door which is opened, all the doors and
the liftgate will be unlocked.
Disabled Keys
Any keys left inside your vehicle interior
when it is locked will be disabled. You cannot use a disabled key to switch
the ignition on or start the engine.
You must enable all passive keys again in
order to use them. To enable all your
passive keys, unlock your vehicle using a
passive key that has not been disabled or
the remote control unlocking function. All
passive keys will then be enabled if you
switch the ignition on or you start your
vehicle with a valid key.
Note:
You can still start your vehicle when
the passive key is in the back-up position.
See
Push Button Ignition Switch (page
135).
Locking and Unlocking the Doors
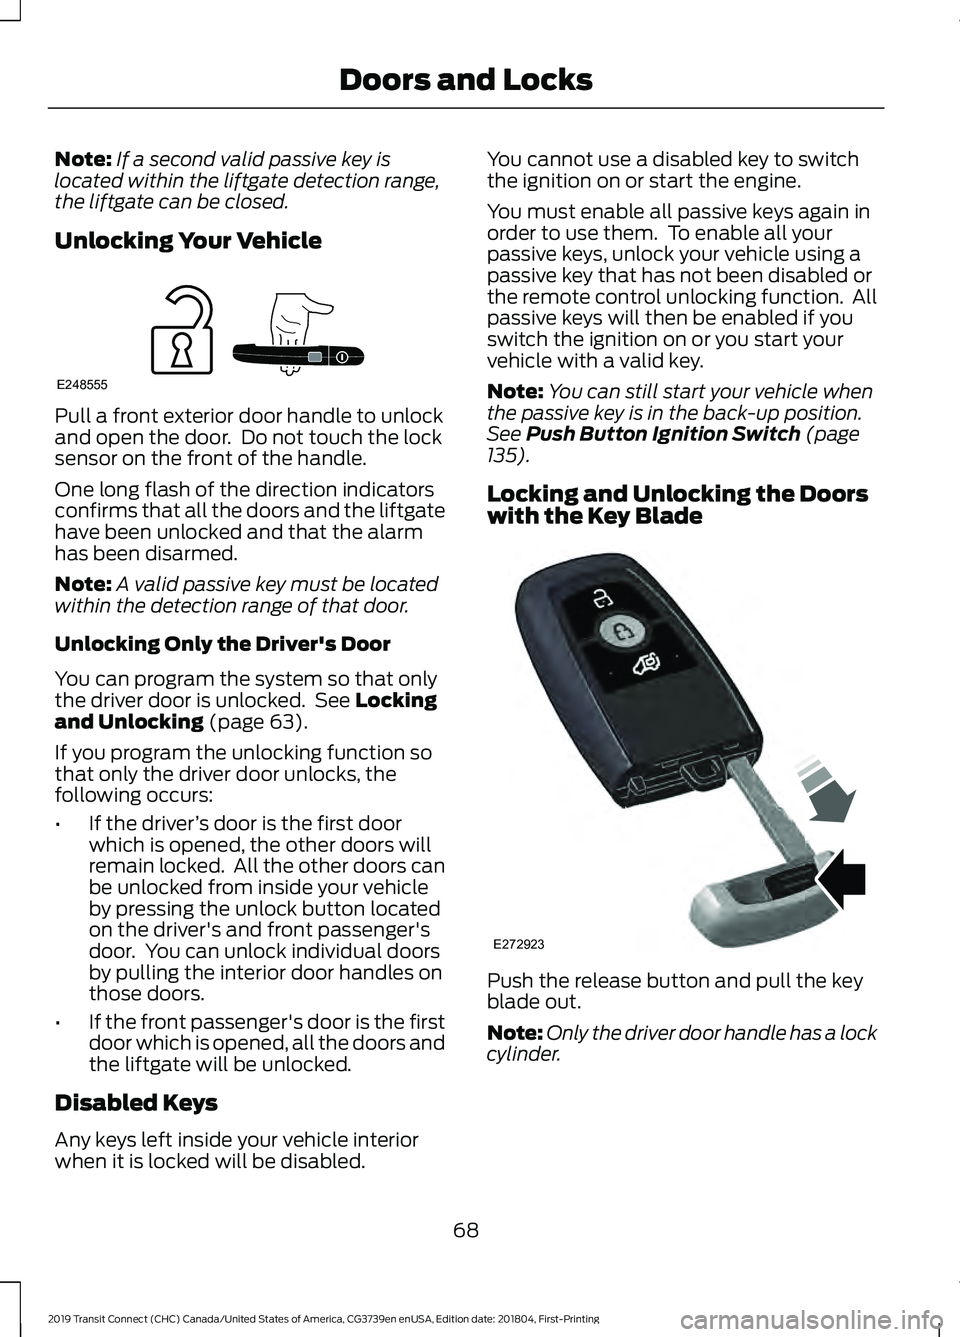
with the Key Blade Push the release button and pull the key
blade out.
Note:
Only the driver door handle has a lock
cylinder.
68
2019 Transit Connect (CHC) Canada/United States of America, CG3739en enUSA, Edition date: 201804, First-Printing Doors and LocksE248555 E272923
Page 73 of 493
MANUAL LIFTGATE
WARNING: It is extremely dangerous
to ride in a cargo area, inside or outside of
a vehicle. In a crash, people riding in these
areas are more likely to be seriously injured
or killed. Do not allow people to ride in any
area of your vehicle that is not equipped
with seats and seatbelts. Make sure
everyone in your vehicle is in a seat and
properly using a seatbelt. Failure to follow
this warning could result in serious
personal injury or death. WARNING: Make sure to close and
latch the liftgate to prevent drawing
exhaust fumes into your vehicle. This will
also prevent passengers and cargo from
falling out. If you must drive with the
liftgate open, keep the vents or windows
open so outside air comes into your vehicle.
Failure to follow this warning could result
in serious personal injury.
Note: Be careful when opening or closing
the liftgate in a garage or other enclosed
area to avoid damaging the liftgate.
Note: Do not hang anything, for example
a bike rack, from the glass or liftgate. This
could damage the liftgate and its
components.
Unlocking the Liftgate Press the button on the remote
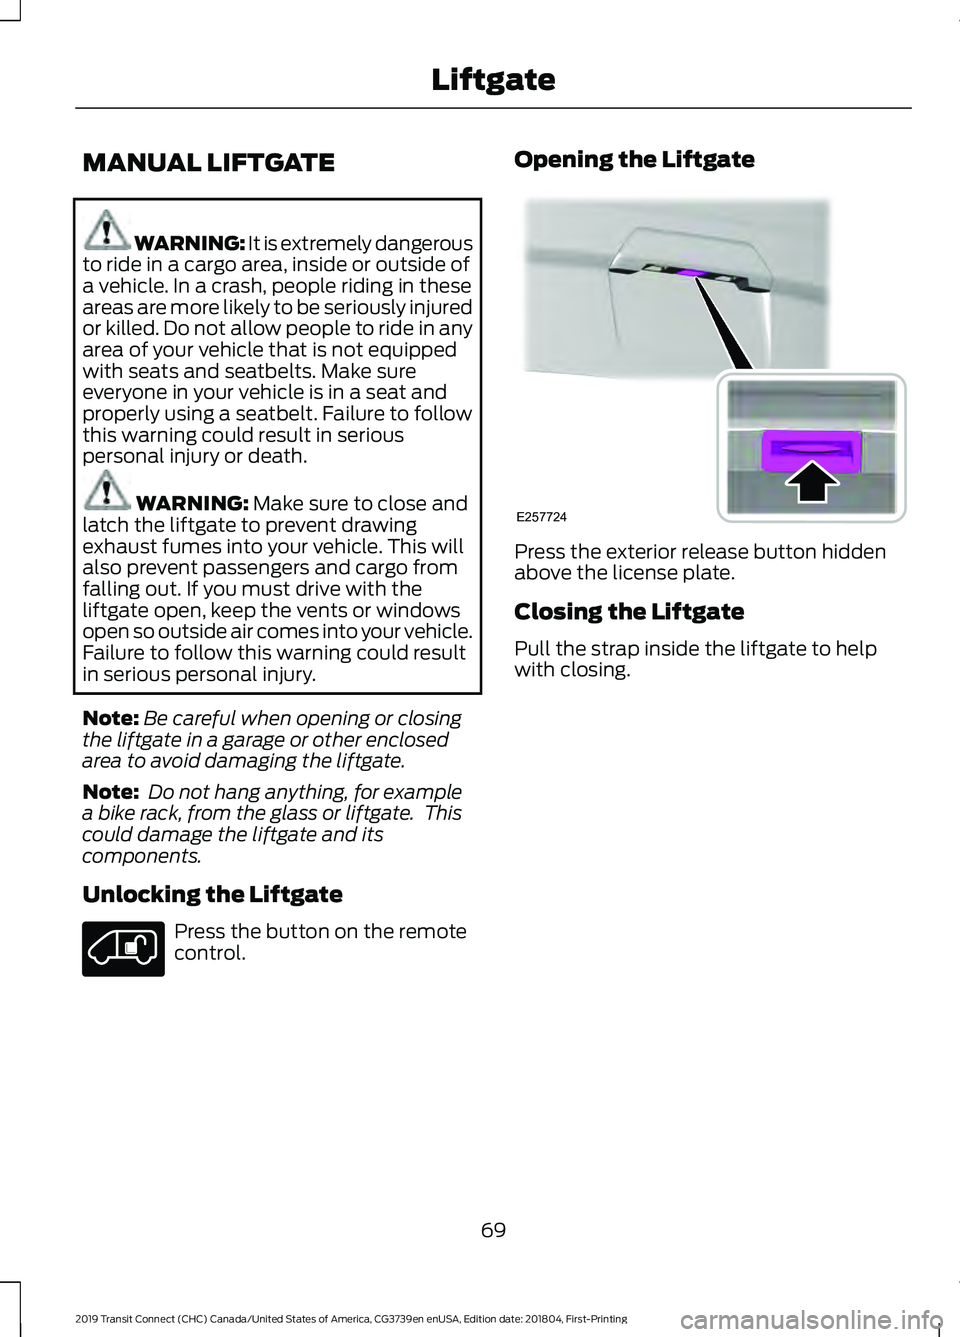
control. Opening the Liftgate
Press the exterior release button hidden
above the license plate.
Closing the Liftgate
Pull the strap inside the liftgate to help
with closing.
69
2019 Transit Connect (CHC) Canada/United States of America, CG3739en enUSA, Edition date: 201804, First-Printing Liftgate E257724
Page 74 of 493
PASSIVE ANTI-THEFT
SYSTEM
Note:
The system is not compatible with
non-Ford aftermarket remote start systems.
Use of these systems may result in vehicle
starting problems and a loss of security
protection.
Note: Metallic objects, electronic devices
or a second programmed key on the same
key chain may cause vehicle starting
problems if they are too close to the key
when starting the engine. Prevent these
objects from touching the programmed key
while starting the engine. Switch the ignition
off, move all objects on the key chain away
from the programmed key and restart the
engine if a problem occurs.
Note: Do not leave a duplicate
programmed key in your vehicle. Always
take your keys and lock all doors when
leaving your vehicle.
SecuriLock®
The system is an engine immobilization
system. It is designed to help prevent the
engine from being started unless a
programmed key for your vehicle is used.
Using an incorrectly programmed key may
prevent the engine from starting. A
message may appear in the information
display.
If you are unable to start the engine with a
programmed key, a malfunction has
happened and a message may appear in
the information display.
Automatic Arming
The engine immobilization system arms
immediately after you switch the ignition
off. Automatic Disarming
Switching the ignition on with a
programmed key disarms the engine
immobilization system.
Replacement Keys
If your keys are lost or stolen and you do
not have a spare programmed key, you will
need to have your vehicle towed to an
authorized dealer. You need to erase the
programmed keys from your vehicle and
program new keys.
Store an extra programmed key away from
your vehicle in a safe place to help prevent
any inconveniences. We recommend that
you contact an authorized dealer to
purchase additional spare or replacement
keys.
Note:
Your vehicle comes with two keys.
Programming a Remote Flip Key
The procedure programs both the vehicle
immobilizer keycode and the remote entry
portion of the remote control to your
vehicle.
To program a new key, you require two
programmed keys and one unprogrammed
key with you in your vehicle.
We recommend that you contact an
authorized dealer to have the key
programmed if you do not have two
programmed keys.
Make sure that you complete the
procedure within 30 seconds.
Stop and wait for at least one minute
before you start again if you miss a step.
Note: You can program a maximum of six
keys to your vehicle.
Read the entire procedure before you
begin.
1. Close all the doors.
70
2019 Transit Connect (CHC) Canada/United States of America, CG3739en enUSA, Edition date: 201804, First-Printing Security
Page 75 of 493
Note:
Keep the doors closed throughout
the procedure.
2. Switch the ignition off.
Note: Do not press the brake pedal or
accelerator pedal throughout the procedure.
3. Insert the first programmed key into the ignition.
4. Switch the ignition on.
5. Wait five seconds.
6. Switch the ignition off and remove the
key from the ignition.
7. Within 10 seconds, insert the second programmed key into the ignition.
8. Switch the ignition on.
9. Wait five seconds.
10. Switch the ignition off and remove the key from the ignition.
11. Within 10 seconds, insert the unprogrammed key into the ignition.
12. Switch the ignition on.
13. Wait five seconds.
14. Switch the ignition off and remove the key from the ignition.
Check that the remote control functions
operate and your vehicle starts with the
new key.
Note: Wait 10 seconds and repeat the
procedure if the remote control functions
do not operate and you cannot start the
engine.
Wait 20 seconds and repeat the procedure
to program an additional key.
Programming a Passive Key
The procedure programs both the vehicle
immobilizer keycode and the remote entry
portion of the remote control to your
vehicle. To program a new key, you require two
programmed keys and one unprogrammed
key with you in your vehicle.
We recommend that you contact an
authorized dealer to have the key
programmed if you do not have two
programmed keys.
Make sure that you complete the
procedure within 30 seconds.
Stop and wait for at least one minute
before you start again if you miss a step.
Note:
You can program a maximum of four
keys to your vehicle.
Read the entire procedure before you
begin.
1. Close all the doors.
Note: Keep the doors closed throughout
the procedure.
2. Switch the ignition off.
Note: Do not press the brake pedal or
accelerator throughout the procedure.
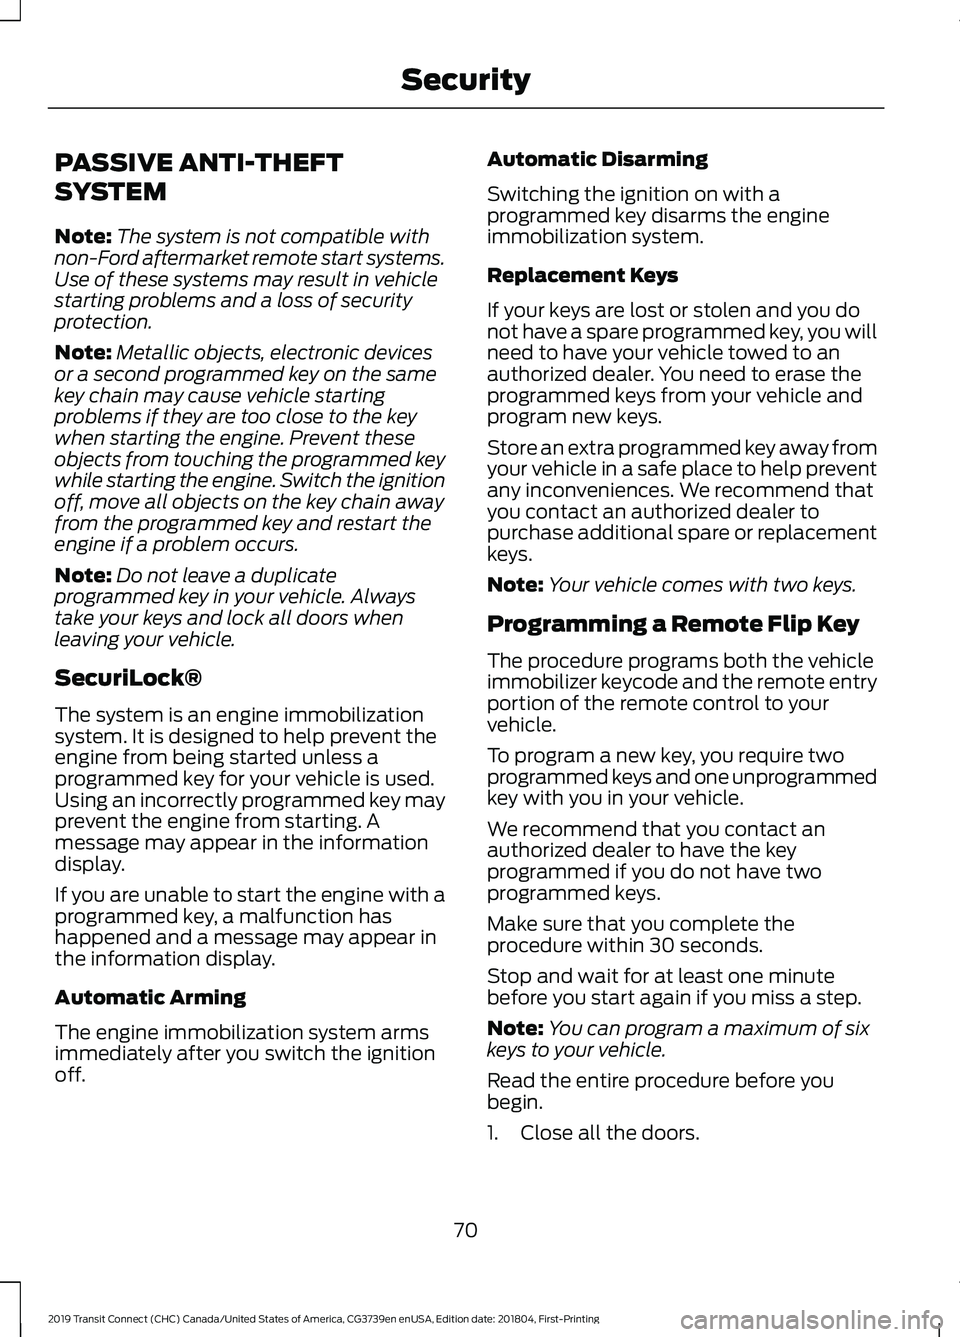
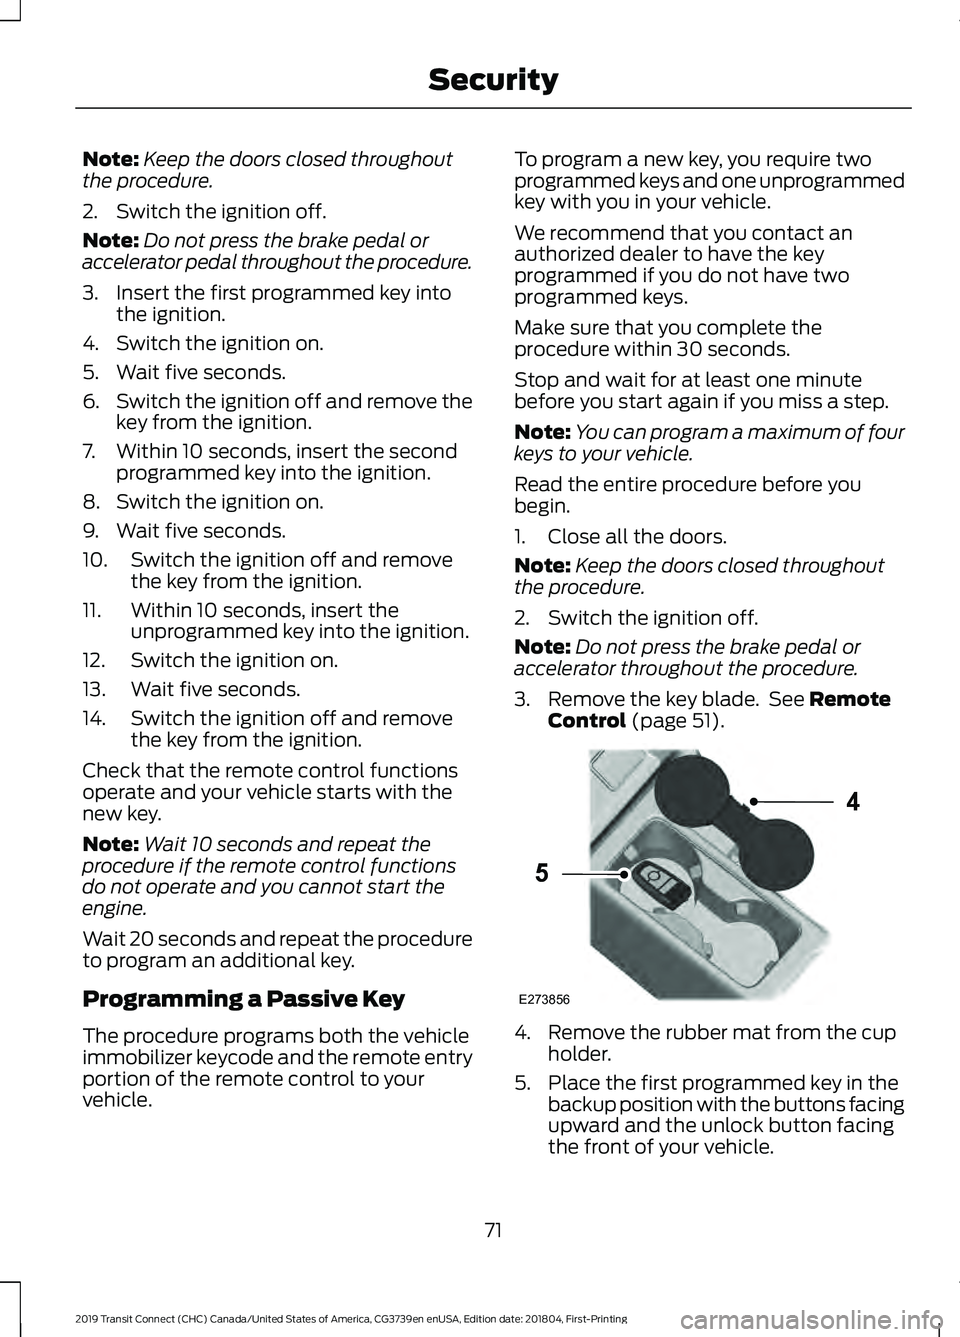
3. Remove the key blade. See Remote
Control (page 51). 4. Remove the rubber mat from the cup
holder.
5. Place the first programmed key in the backup position with the buttons facing
upward and the unlock button facing
the front of your vehicle.
71
2019 Transit Connect (CHC) Canada/United States of America, CG3739en enUSA, Edition date: 201804, First-Printing SecurityE273856
4
5
Page 76 of 493
6. Press the push button ignition switch.
7. Wait five seconds.
8. Press the push button ignition switch.
9. Remove the key.
10. Within 10 seconds, place the second
programmed key in the backup
position.
11. Press the push button ignition switch.
12. Wait five seconds.
13. Press the push button ignition switch.
14. Remove the key.
15. Within 10 seconds, place the unprogrammed key in the backup
position.
16. Press the push button ignition switch.
Check that the remote control function
operate with the new key.
Note: Wait 10 seconds and repeat the
procedure if the key functions do not
operate.
Wait 20 seconds and repeat the procedure
to program an additional key.
ANTI-THEFT ALARM
Alarm System
The perimeter alarm is a deterrent against
unauthorized access to your vehicle
through the doors, luggage compartment
and the hood. It also protects the audio
unit.
Triggering the Alarm
Once armed, the alarm is triggered in any
of the following ways: •
If someone opens a door, luggage
compartment or the hood without a
valid key or remote control.
• If someone removes the audio or
navigation system.
• If you switch the ignition on without a
valid key.
If the alarm is triggered, the horn will sound
for 30 seconds and the hazard warning
flasher will flash for five minutes.
Any further attempts to perform one of the
above will trigger the alarm again.
Full Guard and Reduced Guard
Full Guard
Full guard is the standard setting.
In full guard, the interior sensors are on
when you arm the alarm.
Note: Do not arm the alarm with full guard
if passengers, animals or other moving
objects are inside your vehicle.
Reduced Guard
In reduced guard, the interior sensors are
off when you arm the alarm.
Selecting Full or Reduced Guard
You can select full or reduced guard using
the information display. See General
Information (page 92).
Ask on Exit
If you switch ask on exit on, you can choose
which level of guard you require after you
switch the ignition off.
Arming the Alarm
To arm the alarm, lock your vehicle. See
Doors and Locks
(page 63).
72
2019 Transit Connect (CHC) Canada/United States of America, CG3739en enUSA, Edition date: 201804, First-Printing Security
Page 77 of 493
Disarming the Alarm
Disarm and silence the alarm by unlocking
the doors with the key and switching the
ignition on with a correctly coded key
within 12 seconds, or by unlocking the
doors or the luggage compartment with
the remote control.
73
2019 Transit Connect (CHC) Canada/United States of America, CG3739en enUSA, Edition date: 201804, First-Printing Security
Page 88 of 493
POWER WINDOWS - VEHICLES
WITH: ONE-TOUCH OPEN
DRIVER WINDOW
WARNING: Do not leave children
unattended in your vehicle and do not let
them play with the power windows. Failure
to follow this instruction could result in
personal injury. WARNING: When closing the power
windows, verify they are free of obstruction
and make sure that children and pets are
not in the proximity of the window
openings. Press the control to open the
window. Lift the control to close
the window.
Note: The power windows operate with the
ignition on, and for several minutes after you
switch the ignition off or until you open a
front door.
To reduce wind noise or pulsing noise when
just one window is open, slightly open the
opposite window.
One-Touch Open
(If Equipped)
Fully press the control and release it. Press
again or lift it to stop the window.
GLOBAL OPENING
1. Press and release the unlock button on
the remote control.
2. Press and hold the unlock button on the remote control.
3. Release the button when the windows
start to open.
Press the lock or the unlock button on the
remote control to stop global opening. Note:
You can use global opening for a
short period of time when you unlock your
vehicle using the remote control.
EXTERIOR MIRRORS
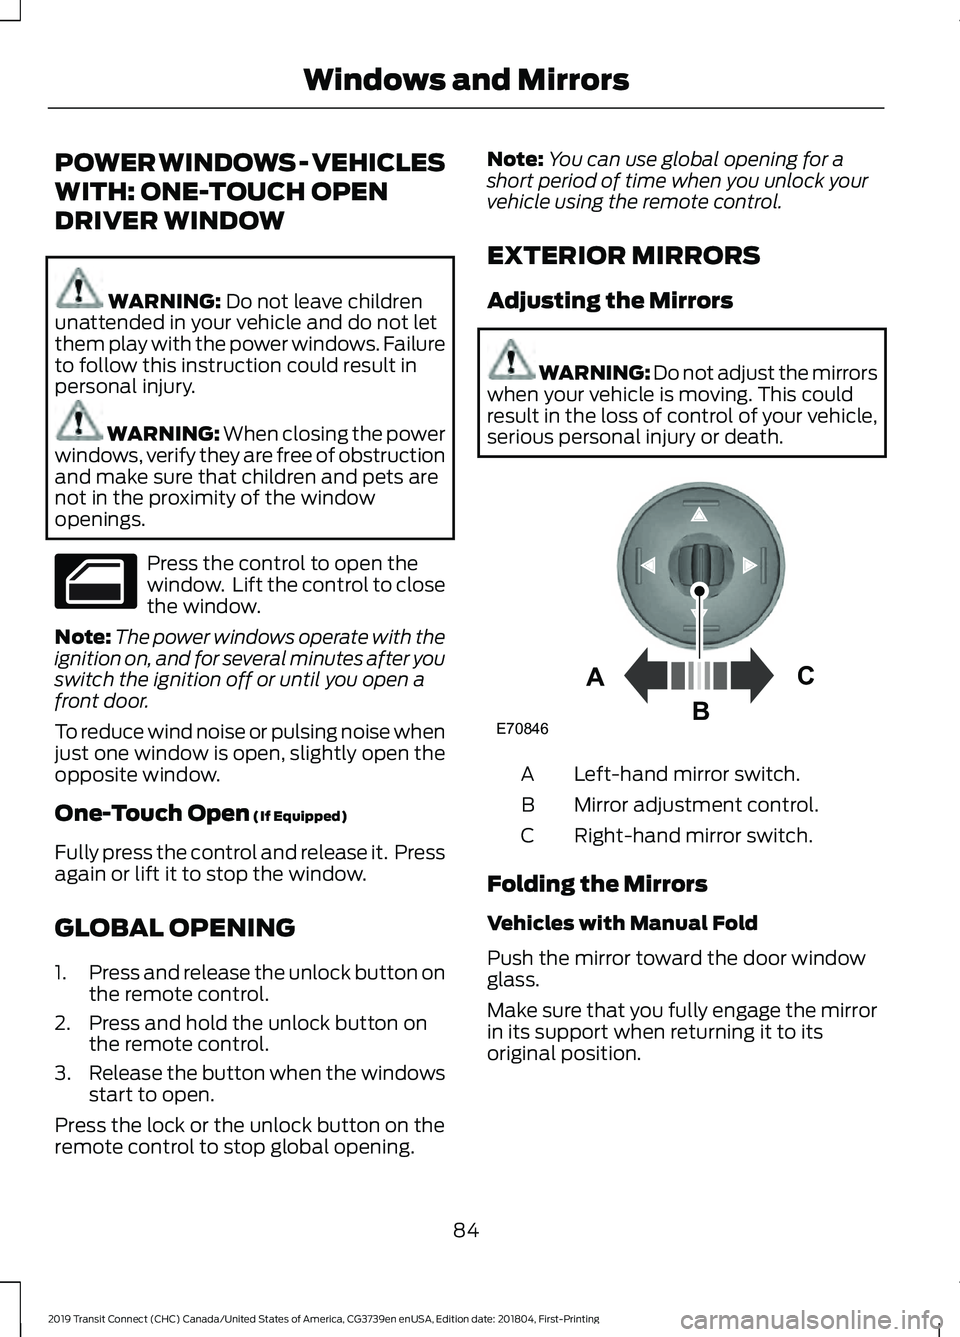
Adjusting the Mirrors WARNING: Do not adjust the mirrors
when your vehicle is moving. This could
result in the loss of control of your vehicle,
serious personal injury or death. Left-hand mirror switch.
A
Mirror adjustment control.
B
Right-hand mirror switch.
C
Folding the Mirrors
Vehicles with Manual Fold
Push the mirror toward the door window
glass.
Make sure that you fully engage the mirror
in its support when returning it to its
original position.
84
2019 Transit Connect (CHC) Canada/United States of America, CG3739en enUSA, Edition date: 201804, First-Printing Windows and Mirrors E70846A
C
B
Page 106 of 493
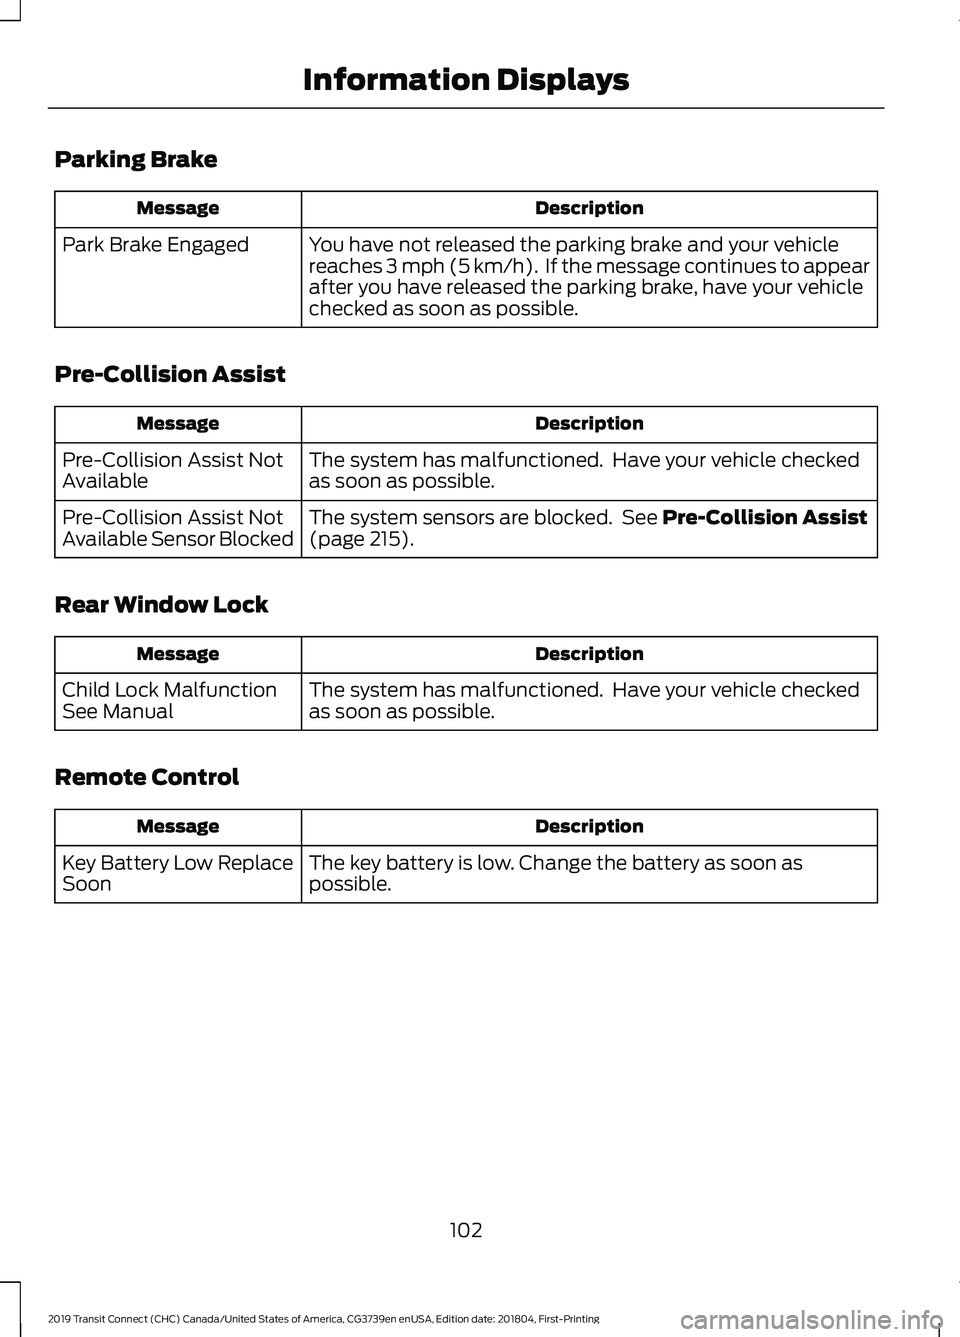
Parking Brake
Description
Message
You have not released the parking brake and your vehicle
reaches 3 mph (5 km/h). If the message continues to appear
after you have released the parking brake, have your vehicle
checked as soon as possible.
Park Brake Engaged
Pre-Collision Assist Description
Message
The system has malfunctioned. Have your vehicle checked
as soon as possible.
Pre-Collision Assist Not
Available
The system sensors are blocked. See
Pre-Collision Assist
(page 215).
Pre-Collision Assist Not
Available Sensor Blocked
Rear Window Lock Description
Message
The system has malfunctioned. Have your vehicle checked
as soon as possible.
Child Lock Malfunction
See Manual
Remote Control Description
Message
The key battery is low. Change the battery as soon as
possible.
Key Battery Low Replace
Soon
102
2019 Transit Connect (CHC) Canada/United States of America, CG3739en enUSA, Edition date: 201804, First-Printing Information Displays
Page 136 of 493
Note:
If you use the socket when the engine
is not running, the battery may run out of
charge.
Note: When you switch the ignition on, you
can use the socket to power 12 volt
appliances with a maximum current rating
of 15 amps.
WIRELESS ACCESSORY
CHARGING WARNING: Wireless charging
devices can affect the operation of
implanted medical devices, including
cardiac pacemakers. If you have any
implanted medical devices, we
recommend that you consult with your
physician.
The system supports one wireless charging
compatible device on the charging area.
Note: Devices without built-in Qi standards
for wireless charging require an additional
Qi receiver or sleeve.
Make sure the charging area is clean before
charging a device.
Do not place items with a magnetic strip,
for example passports, parking tickets or
credit cards near the charging area when
charging a device. This could damage the
magnetic strip.
Do not place metal objects, for example
remote controls, coins or keys on or near
the charging area when charging a device.
Metal objects may heat up and degrade
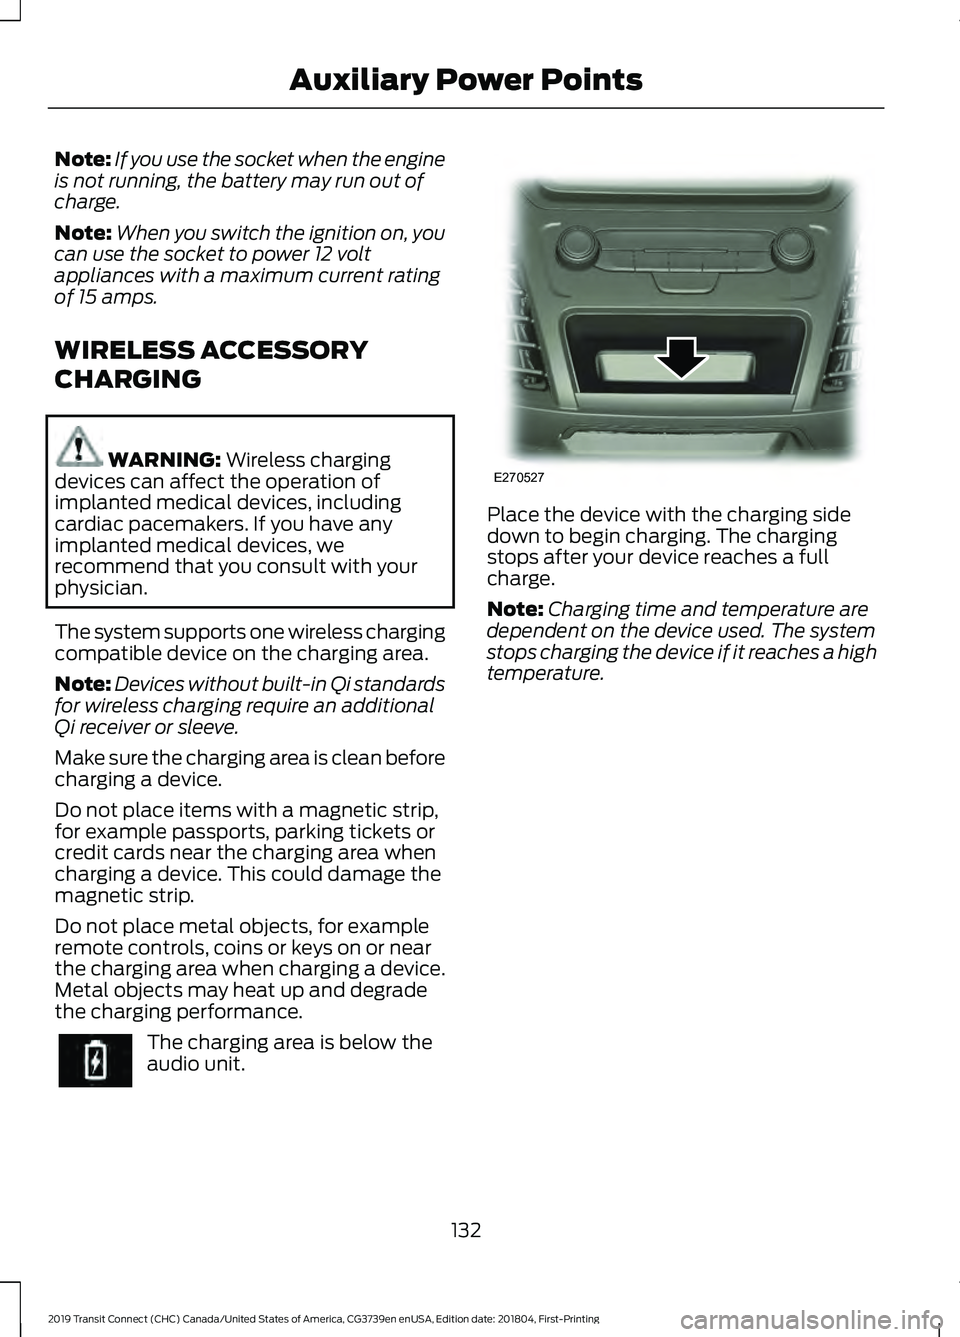
the charging performance. The charging area is below the
audio unit. Place the device with the charging side
down to begin charging. The charging
stops after your device reaches a full
charge.
Note:
Charging time and temperature are
dependent on the device used. The system
stops charging the device if it reaches a high
temperature.
132
2019 Transit Connect (CHC) Canada/United States of America, CG3739en enUSA, Edition date: 201804, First-Printing Auxiliary Power Points E270527