brake fluid GEELY MK 2008 Owner's Guide
[x] Cancel search | Manufacturer: GEELY, Model Year: 2008, Model line: MK, Model: GEELY MK 2008Pages: 416, PDF Size: 25.19 MB
Page 299 of 416

Visually check whether Hydraulic coupler leaksScrew down pipe head as required Abnormal
Check worn condition of brake discReplace brake disc Abnormal
Check brake fluid level switchReplace brake fluid level switch Abnormal
Exhaust checkExhaust again Abnormal
Use fault diagnosis instrument hydraulic con-
trol unit for diagnosis
Check tightness of normally closed valve leakReplace HCU (hydraulic control unit) AbnormalUse fault diagnosis instrument hy-
draulic control unit for diagnostic
check of normally open valveReplace HCU(hydraulic control unit) AbnormalNormal
Normal
Normal
Normal
Normal
Use traditional method of non-ABS
vehicle to check booster and pedal
strokeMK-60 ABS system -ABS System Check5-112Travel of brake pedal is too long 4
[Description] Firstly visually check whether there is external leakage or
mechanical failure. Use exhaust method to check whether
there is air in the system. Use fault diagnosis instrument
hydraulic pressure unit functional testing to check whether
normally closed valve leaks.Possible cause
Brake fluid leaks
There is air in the system
Brake disc is worn severely
Brake fluid level switch
failsA very large force is needed to step on pedal 5
[Description] Use traditional method to check travel of booster and brake pedal.
Fault of normally open valve may be checked using fault diagnosis
instrument hydraulic pressure unit functional testingPossible cause
Booster has problem
Normally closed
valve has problem
Page 304 of 416

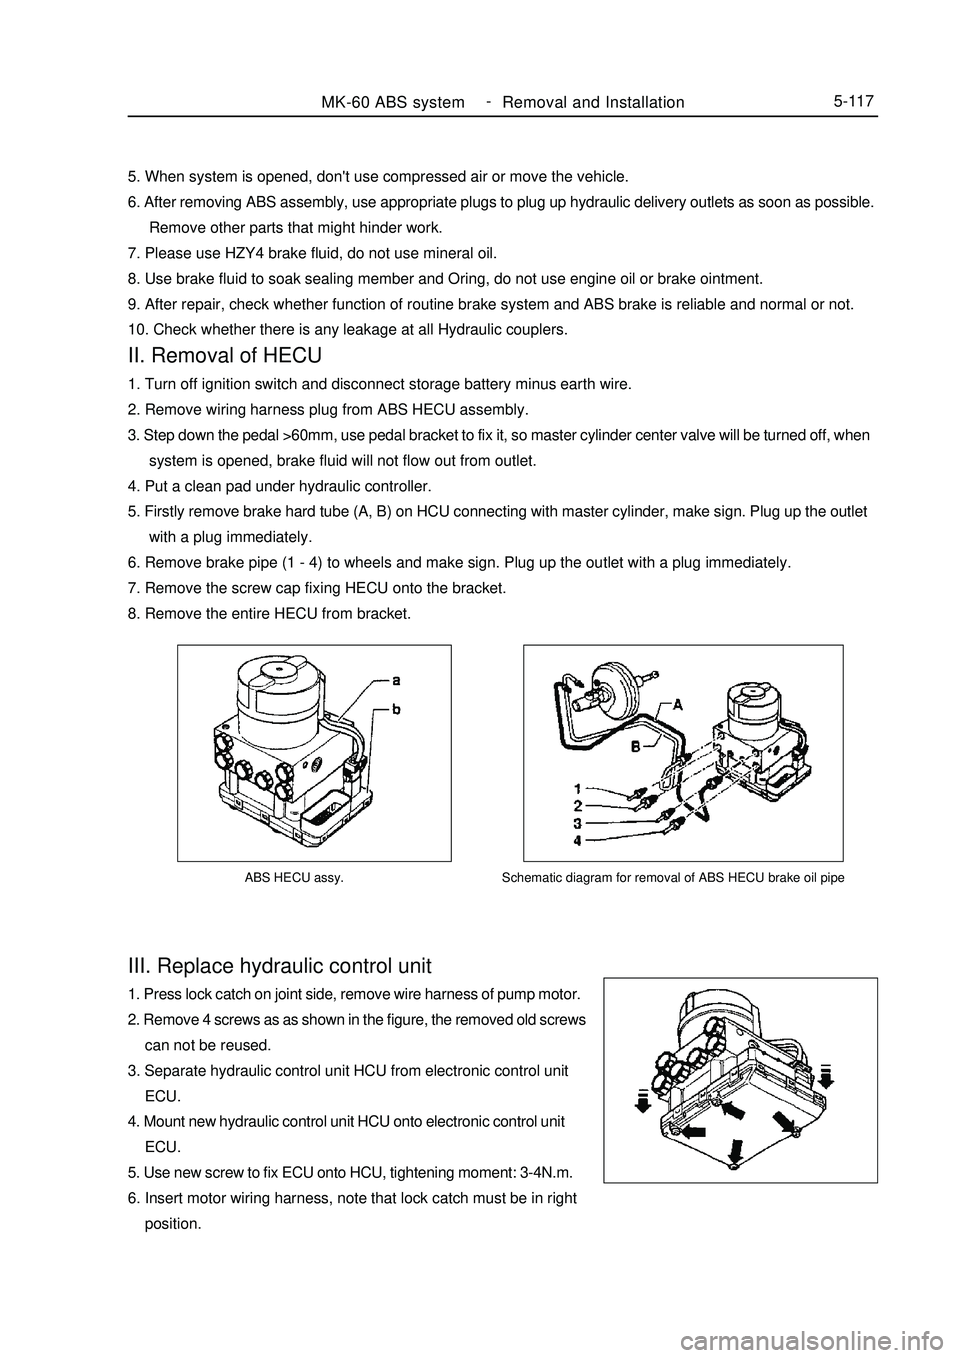
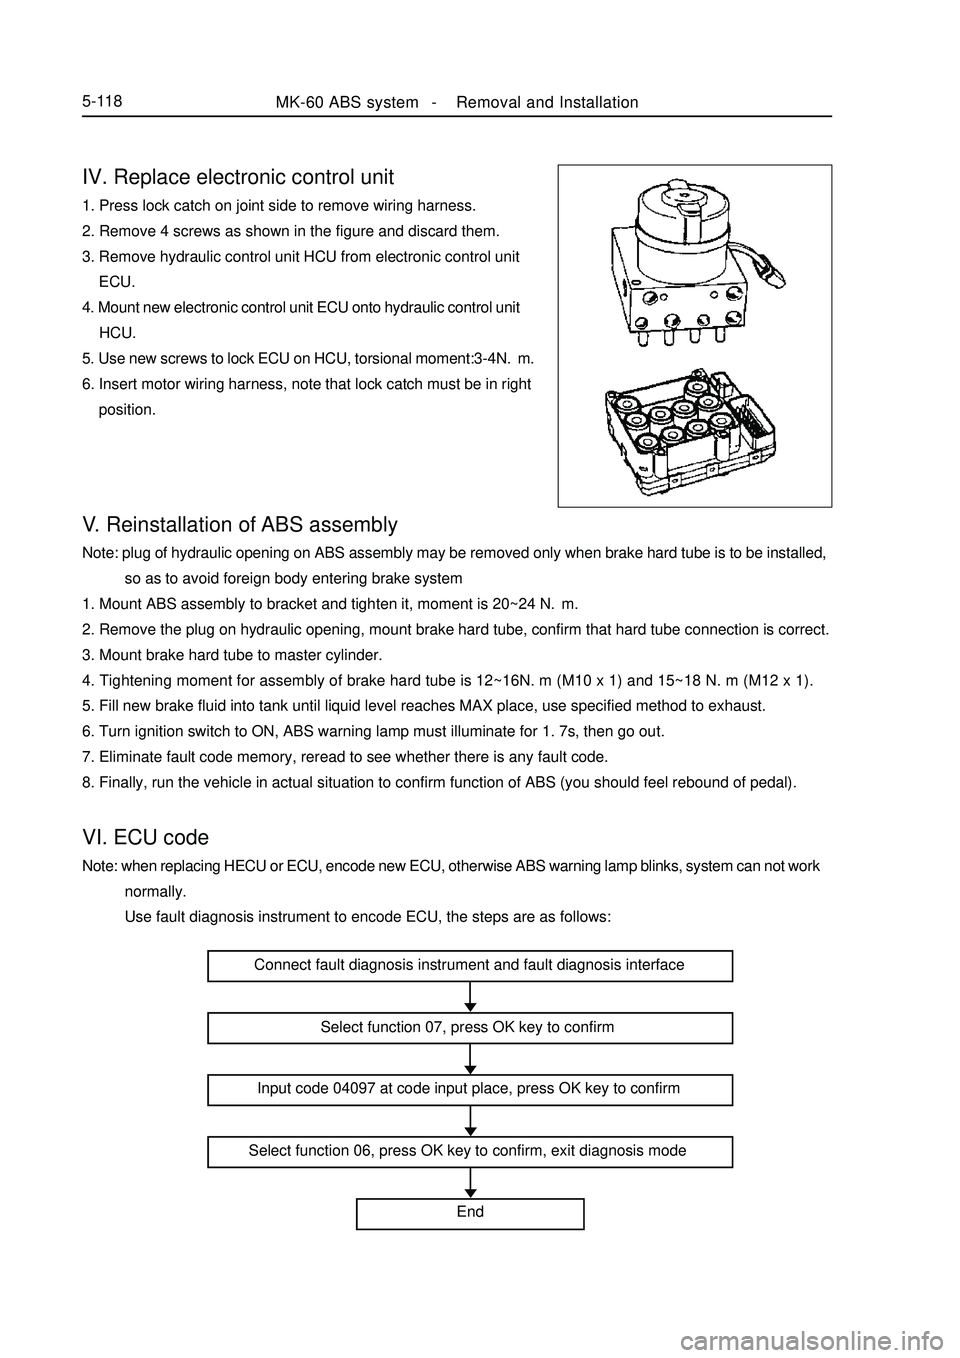
ABS HECU assy.III. Replace hydraulic control unit1. Press lock catch on joint side, remove wire harness of pump motor.
2. Remove 4 screws as as shown in the figure, the removed old screws
can not be reused.
3. Separate hydraulic control unit HCU from electronic control unit
ECU.
4. Mount new hydraulic control unit HCU onto electronic control unit
ECU.
5. Use new screw to fix ECU onto HCU, tightening moment: 3-4N.m.
6. Insert motor wiring harness, note that lock catch must be in right
position.MK-60 ABS system -
Removal and Installation5-117Schematic diagram for removal of ABS HECU brake oil pipe5. When system is opened, don't use compressed air or move the vehicle.
6. After removing ABS assembly, use appropriate plugs to plug up hydraulic delivery outlets as soon as possible.
Remove other parts that might hinder work.
7. Please use HZY4 brake fluid, do not use mineral oil.
8. Use brake fluid to soak sealing member and Oring, do not use engine oil or brake ointment.
9. After repair, check whether function of routine brake system and ABS brake is reliable and normal or not.
10. Check whether there is any leakage at all Hydraulic couplers.II. Removal of HECU1. Turn off ignition switch and disconnect storage battery minus earth wire.
2. Remove wiring harness plug from ABS HECU assembly.
3. Step down the pedal >60mm, use pedal bracket to fix it, so master cylinder center valve will be turned off, when
system is opened, brake fluid will not flow out from outlet.
4. Put a clean pad under hydraulic controller.
5. Firstly remove brake hard tube (A, B) on HCU connecting with master cylinder, make sign. Plug up the outlet
with a plug immediately.
6. Remove brake pipe (1 - 4) to wheels and make sign. Plug up the outlet with a plug immediately.
7. Remove the screw cap fixing HECU onto the bracket.
8. Remove the entire HECU from bracket.
Page 305 of 416

V. Reinstallation of ABS assemblyNote: plug of hydraulic opening on ABS assembly may be removed only when brake hard tube is to be installed,
so as to avoid foreign body entering brake system
1. Mount ABS assembly to bracket and tighten it, moment is 20~24 N.m.
2. Remove the plug on hydraulic opening, mount brake hard tube, confirm that hard tube connection is correct.
3. Mount brake hard tube to master cylinder.
4. Tightening moment for assembly of brake hard tube is 12~16N.m (M10 x 1) and 15~18 N.m (M12 x 1).
5. Fill new brake fluid into tank until liquid level reaches MAX place, use specified method to exhaust.
6. Turn ignition switch to ON, ABS warning lamp must illuminate for 1. 7s, then go out.
7. Eliminate fault code memory, reread to see whether there is any fault code.
8. Finally, run the vehicle in actual situation to confirm function of ABS (you should feel rebound of pedal).VI. ECU codeNote: when replacing HECU or ECU, encode new ECU, otherwise ABS warning lamp blinks, system can not work
normally.
Use fault diagnosis instrument to encode ECU, the steps are as follows:IV. Replace electronic control unit1. Press lock catch on joint side to remove wiring harness.
2. Remove 4 screws as shown in the figure and discard them.
3. Remove hydraulic control unit HCU from electronic control unit
ECU.
4. Mount new electronic control unit ECU onto hydraulic control unit
HCU.
5. Use new screws to lock ECU on HCU, torsional moment:3-4N.m.
6. Insert motor wiring harness, note that lock catch must be in right
position.MK-60 ABS system -Removal and Installation5-118Connect fault diagnosis instrument and fault diagnosis interface
Select function 07, press OK key to confirm
Input code 04097 at code input place, press OK key to confirm
Select function 06, press OK key to confirm, exit diagnosis mode
End
Page 309 of 416

4. Knocking sensor
(1) Knocking sensor is a vibration acceleration sensor. Mounted on engine cylinder body. Sensing element of
the sensor is a piezocrystal. Vibration of engine cylinder body is transferred to piezocrystal via mass block in the
sensor. Since pressure generated by vibration of mass block is applied to piezocrystal, it generates voltage on two
polar planes and turns vibration signal into voltage signal for output.5-122Symptom
Poor accelerationPossible cause
Various liquids, such as engine oil, cooling fluid, brake fluid, water etc
contact the sensor for a long time, which cause corrosion to the sensor. Mounting torque: 20 ± 5 N.M
Repair precautions: sensor must be fitted closely to cylinder body with its metal surface, any type of washer
is not permitted for installation. For wiring of sensor signal cables, note that do not let resonance occur to signal
cables, otherwise they might be broken. Energizing of high voltage between sensor 1 # and 2 # pins must be
avoided, otherwise piezoelectric element might be damaged.
(2) Simple measuring method:
(Remove joint) turn digital multimeter to ohm position, connect two meter pens with sensor 1 #, 2 # pin
respectively, its resistance value at room temperature should exceed 1M ohm. Turn digital multimeter to millivolt
position, use a hand hammer to tap near knocking sensor, now voltage signal output should be available.
5. Oxygen sensor
(1) Its sensing element is a ceramic tube, outside is open to exhaust, inside is open to atmosphere. When
temperature of sensing ceramic tube reaches 350°C, it will have the characteristic of solid state electrolyte. Just
utilizing this characteristic, it converts concentration difference of oxygen into electric potential difference, thus
forms electrical signal output. If mixed gas is a bit concentrated, inside and outside oxyanion concentration
difference of ceramic tube is high, electric potential difference is a bit high.
A large number of oxyanions move from inside to outside, output voltage is high (approximate 900mV); if
mixed gas is a bit thin, inside and outside oxyanion concentration difference of ceramic tube is low, electric
potential difference is low, only a small quantity of oxyanions move from inside to outside, output voltage is low
(approximate 100mV).
Possible cause
1. humid water vapor ingresses inside of sensor, temperature
changes rapidly, probe is broken.
2. oxygen sensor "is poisoned". (Pb, S, Br, Si) Symptom
Poor idle speed, poor speedup, tail gas
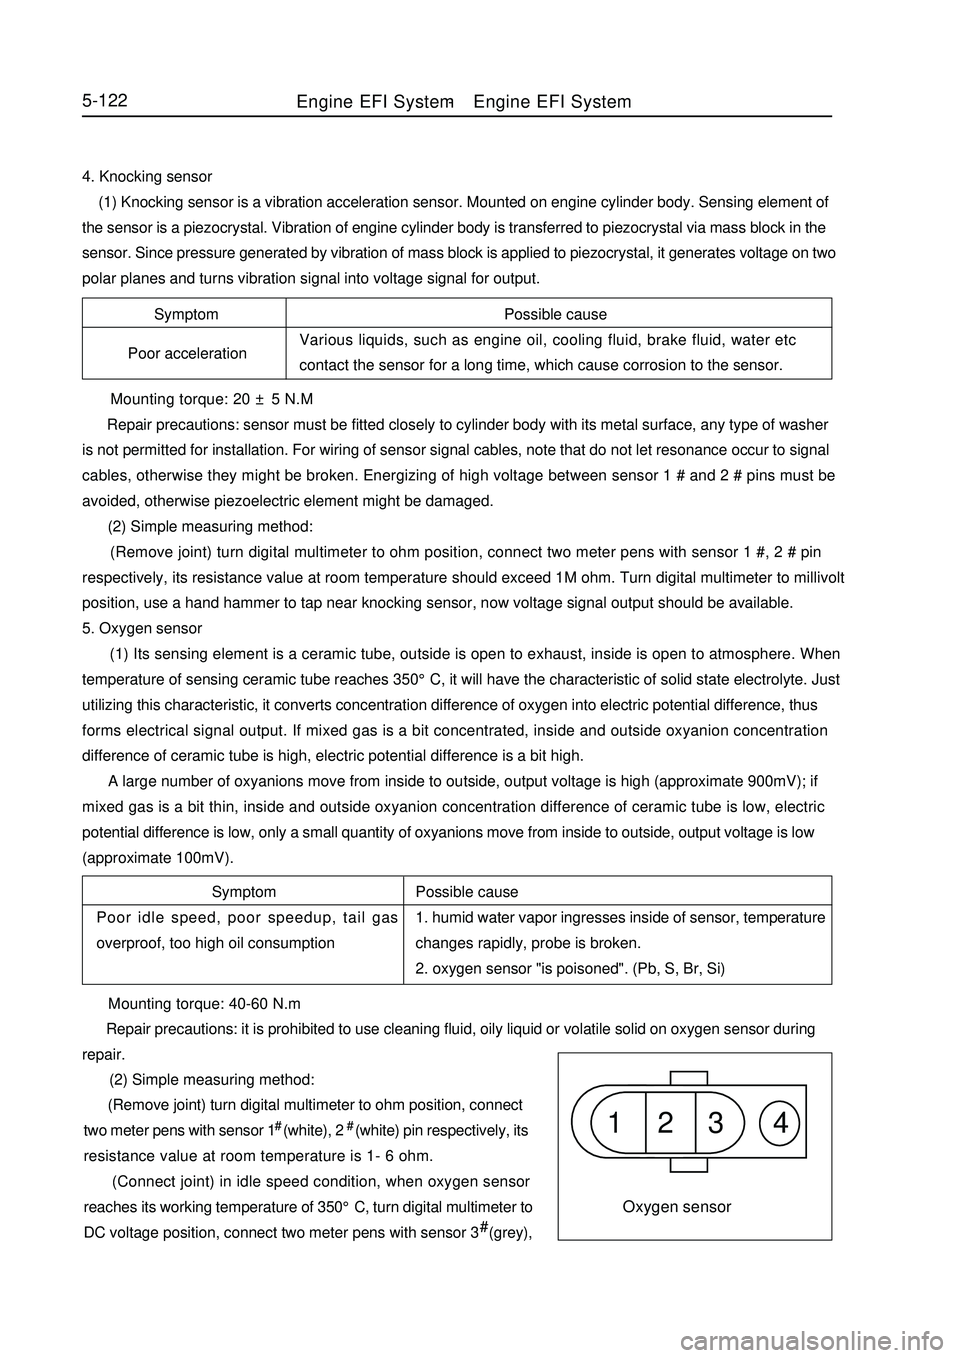
overproof, too high oil consumption1 2 3 4Oxygen sensor Mounting torque: 40-60 N.m
Repair precautions: it is prohibited to use cleaning fluid, oily liquid or volatile solid on oxygen sensor during
repair.
(2) Simple measuring method:
(Remove joint) turn digital multimeter to ohm position, connect
two meter pens with sensor 1# (white), 2# (white) pin respectively, its
resistance value at room temperature is 1- 6 ohm.
(Connect joint) in idle speed condition, when oxygen sensor
reaches its working temperature of 350°C, turn digital multimeter to
DC voltage position, connect two meter pens with sensor 3# (grey),Engine EFI System-Engine EFI System